Adding a color or pattern to a wall is a simple way to change the entire vibe of a room. But, that said, not everyone wants to mess with painting their home, no matter how much they want to change up their space. Whether you’re renting your home or are simply not ready to commit to a few coats of permanent paint, you’ll want to know about some ways to decorate a wall without painting it that still have the power to transform a space. From fabrics to plants to a sprawling gallery wall, there are so many ways to redo your space without risking your security deposit or getting your hands dirty.
Here I’ve rounded up a list of paint alternatives that are easy to install, easy to remove, and completely transformational. When that interior design bug bites, it’s hard to be in a space without obsessing over the possibilities for change. When you know a change is imminent, it’s like you can’t even see the space as it is anymore, it becomes kinetic and restless. So trust me, these alternatives are not subtle! If anything, they’ll offer you more of a change than a few coats of paint. What’s more, these comps come with a complete vibe overhaul. Pick a method and watch your space go through a stunning metamorphism that doesn’t break the bank, or your back.
Traditional wall paper is not only expensive, but it requires a complicated installation. Not to mention, it’s not easy to take off. In fact, in terms of the affect the method has on the wall itself, wallpaper is much more cumbersome than paint. A new wallpaper company called Chasing Paper has created an expansive line of wall coverings that are super affordable and totally non-committal. The quick install and removal will put your landlord at ease, and the endless variety of vibrant colors, patterns, murals and images will instantly transform your room. Good luck picking a just one. Just kidding, you don’t have to.
Holes are easy to fill with caulk, walls are not easy to repaint. If you want to change the look of your room drastically, and you want to be able to admire your walls rather than look past them, you should consider mapping out an epic gallery wall. If you’re overwhelmed by the prospect of curating your own gallery wall and dealing with mounting and framing on your own, you’re in luck there’s a company that can do all of that for you. Artfully Walls is an online print and frame shop that not only curates an extensive selection of art from around the world, but also provides a wall design tool that helps you to map out your gallery wall accurately. All art is printed on museum quality paper and ink and comes framed and ready to transform your space.
Related Articles
Trying to make over a bedroom without using paint may seem limiting, but painting is only one aspect of decorating. Use a combination of style, color and design to create the look you want. If you want to change the color of the walls, there are ways to cover these blank spaces that won’t harm the existing paint.
Pick a Focal Point
Determine the focal point of the bedroom. A focal point is something that will anchor the room and provide a basis for the room makeover. A focal point can be anything that draws attention, such as a fireplace, a bed frame or an antique quilt. Build your room around the focal point by repeating its color, arranging furniture around it or framing it with accessories. For example, if an antique quilt is your focal point, you could repeat its predominant color with throw rugs, wall art or bed linens.
Choose a Style
Select furniture and accessories in a similar style. Whether your style is elegant, country or boudoir, keep the majority of items within the room true to the style. A silky comforter with a geometric border would not fit in a country-style bedroom, but it would look at home in a bedroom with elegant elements. Using a particular style as a basis for decorating makes it easier to select the items for your bedroom makeover and takes much of the guesswork out of the process.
Select Colors
Concentrating on specific colors will help pull together your bedroom makeover. Choose colors from your focal point, if possible. You can use either one main color or a base color combined with specific accent colors. Use the main or base color in large areas such as the bed linens, curtains and carpeting. Use the accent colors with throw pillows, throw rugs and other accent pieces. Carry the colors through to the wall art. To avoid nail holes in the walls of rented bedrooms, use specialty adhesive-backed picture hooks that can be removed without leaving marks.
Cover the Walls
Use removable wallpaper to carry your bedroom style onto the walls. This type of wallpaper is easy to install and does not damage the existing paint. Another wall-covering option is to use liquid starch to glue fabric to the walls. When it is time to move, simply peel off the fabric and wash the dried starch off the walls. You can disguise blank sections of wall by placing a tall plant in front of them or by the strategic arrangement of decorative folding screens.
Agnes Hammar / IKEA
While paint is by far the most common decorating treatment for residential walls, it is not always the hassle-free decorating technique people think it is. Painting a room is messy, smelly, and time-consuming, and the level of hassle jumps a notch if you happen to be painting ceilings and woodwork as well as the wall surfaces.
So why not consider other decorative treatments for your walls? With some creativity, you might even stumble across some decorating methods that are both easier and more attractive than paint.
Below, you’ll find seven real-life examples of homeowners and apartment dwellers who have found clever, innovative ways to dress up walls without spilling a drop of paint or cleaning up a single paintbrush. They’re not only great to look at, but perfect for stylishly hiding unsightly eyesores such as holes, dings, and dents.
Peel-and-Stick Confetti
In this example, blogger Agnes Hammar has found a way to hide nasty stains and nicks on a rental apartment’s wall by using DIY peel and stick “confetti”—self-adhesive stickers that create a collage of different colors and shapes that make the occasional wall flaw look like part of the plan.
Peelable stickers offer the advantage of being easy to remove when it comes time to move on to a new residence or when another innovative decor solution strikes your fancy.
DIY Wall Tapestry
Wall tapestries aren’t just for college kids. While they are great for dressing up a dorm room, they’re also a chic bohemian decor staple that can help warm up cold rooms. This stylish one from The Merry Thought couldn’t be simpler—made from an ordinary canvas drop cloth and permanent ink markers.
How much does this idea cost to create? You can pick up a 9-by-12-foot drop cloth made of machine-washable cotton for about $20. Permanent markers usually cost less than a buck each.
Washi Tape Decor
Here’s an idea perfect for small spaces. it will spruce up boring white walls and your room decor, while also offering a way to cover up small holes created by picture frame hangers. Emily, from Everything Emily Blog, used black washi tape to create a repeated plus pattern.
Washi tape, a decorative masking tape made from Japanese rice paper, is loved by crafters because it comes in hundreds of colors, patterns, and sizes. And, although it’s surprisingly durable, washi tape is also a cinch to remove. For the best results, you’ll want to work on a clean surface, so remove dirt and dust from your wall using a gentle cleaner or clean damp rag. When it’s dry, you’re ready to tape.
How much does this magical tape cost? Prices vary based on style and width. A 30-yard starter pack, which usually includes three 10-yard rolls, starts at around $5.
Post-It Note Masterpiece
Yep, this colorful textured mural of Kanye West was made using Post-It Notes in colors from the Electric Glow Collection. It was created by two roommates, Emily Duda, and Jamie Accashian, using nothing but sticky little pieces of paper.
How much did this project cost? While we’re not sure how many Post-Its were used, but we do know a 14-pad pack costs around $20.
Faux Brick Photo Wall
If you have a massive number of digital photos you want to display, print them all out and DIY this mesmerizing photo wall from IKEA Family Live. The trick to this brick-look is making sure all the photos are printed at the same size and arranged in precise rows.
What are the out-of-pocket costs for a project like this? It all depends on what you pay for printer ink.
Tip: If you have a postcard collection, you can adapt this technique to show them off.
Fabric-Covered Walls
Dressing up walls with fabric can be done in several different ways. In this example, an unsightly wall has been covered with a curtain. Don’t want to mess with a curtain rod? You can staple fabric directly onto the wall.
You can also use fabric and starch to create removable DIY wallpaper. Want to save money when you buy fabric? Flatbed sheets are usually much cheaper than buying material by the yard.
1. Cover up.
Protect the floor, and any furniture you can’t (or don’t want to) move, from paint splatters and spills. For the floor, choose fabric drop cloths instead of plastic ones, as plastic can be slick under your feet or, worse, the ladder.
2. Start with a fresh surface.
Paint won’t adhere as well to a dirty surface (think fingerprints, soot, dust, cobwebs), so use a Swiffer-type mop to dry-dust the walls first. Swab down any extra-grimy parts with a wet sponge or cloth; you may need a ladder to reach up high.
3. Prep the borders.
Remove outlet and light-switch covers, and tape off any areas you don’t want painted — such as moldings, baseboards, or window frames — with blue painter’s masking tape or green Frog Tape (from $6, Amazon.com). The Good Housekeeping Institute tried the latter on a smooth wall and found that it makes a crisp line and doesn’t let paint bleed through.
4. Skip a step.
Typically, painting over a dark wall with a light color (or covering stains) requires a coat of primer and two coats of paint — and at least six hours of drying time. That’s why GHI recommends Benjamin Moore Aura ($55 per gallon, benjaminmoore.com), a self-priming paint (it’s a cost-effective option if you were planning on buying primer). Going from light to light? You can get away with two coats of good-quality regular paint.
5. Start painting.
Now you’re ready for the main event: With an angled brush or a sponge tool, paint a two-inch swath around the edges of woodwork and the ceiling, which should be taped off (see step 3). Then fill in the central unpainted space using a paint tray and a roller (1/4-inch nap for smooth surfaces, 3/8-inch nap for semi-smooth, or 5/8-inch nap for rough — the wrong tool will apply too much or too little paint) in overlapping W- or M-shaped strokes for the best paint distribution.
For easier cleanup later, try a quick-release frame-handle roller, like Shur-Line’s ($8, shurline.com). Other worthy investments: an extension pole, so you can stash away the ladder after the edging step; a paint-can opener; and a pour spout to lessen mess. Let the first coat dry at least a couple of hours, then coat again. (Between coats, cover the tray and brush with plastic wrap touching the paint surface, and refrigerate.)
6. Wrap it up.
Rinse your paintbrush and roller (if you don’t toss it) under a faucet until the water runs clear. Decant the tray’s leftover paint back into the can; seal the can tightly by placing a paper towel over the lid and tapping the lid edges with a hammer. Rinse the tray. Once the brush’s bristles are totally dry, slip the brush back into its original paper wrapper to keep the bristles from fanning out, or try this DIY fix: Fold a thick piece of paper around the bristles; tape to secure.
7. Leave no trace.
Have a moist rag handy to wipe fresh splatters. Scrape off dried drips with a credit card or plastic spatula. Remove masking tape before you call it a night, pulling it off at an angle, to avoid tearing the finish.
Let’s find out several guides how to decorate bedroom walls without paint in the below post. When you move into a new apartment, the owner forbids you to paint the wall. The wall is considered as the biggest part of the bedroom. When you change the color of the bedroom, you can renew the flair and mood. But don’t worry if you do not have any chance to repaint the wall. You can make it look nice by using interesting wall décor.
How To Decorate Bedroom Walls Without Paint: Guide 1 Area Rug
You can add an interesting color in the bedroom by using a new area rug. It can banish the boring look in the space. You can make it stylish with a red tribal area rug. It will remind you with the eclectic bedroom design. If you more money to spend, you can buy colorful rugs in several pieces. Scatter them on the floor. This area rug can add an interest due to the presence of unique color. Pick the area rug which can match other items and accessories in the bedroom.
Bedroom Wall Design
How To Decorate Bedroom Walls Without Paint: Guide 2 Colorful Curtains
The next item to have is the colorful curtain. You can hang it on the window. To bring more color in the plain bedroom wall, you can purchase the larger, wider and bigger curtain. It is recommended for you to use the solid colored or muted colored draperies to decrease the busy feeling in the bedroom.
Bedroom Wall Ideas
How To Decorate Bedroom Walls Without Paint: Guide 3 Wall Art
Bedroom Wall Style
How To Decorate Bedroom Walls Without Paint: Guide 4 Wall Picture
If you want to add bold color on the wall, you can have some decorative wall pictures. Choose the ornate and artistic ones if you want to decorate the traditional or classic bedroom. They can be hung inside the gold frame or dark finished wooden frame.
Bedroom Wall Decor
How To Decorate Bedroom Walls Without Paint: Guide 5 Wall Stencil
If you want the cost effective option to decorate the wall, you can install the wall stencil. You can pick the abstract one for decorating contemporary bedroom or chevron one for unique optical illusion. Look at the previous post on how to arrange bedroom with a queen bed here.
How to Decorate Bedroom Walls Without Paint
Are you interested reading the guides on how to decorate bedroom walls without paint?
*This post may contain some affiliate links for your convenience (which means if you make a purchase after clicking a link I may earn a small commission, but it won’t cost you a penny more)! Click here to read my full disclosure policy.
11 Inspiring Ways to Make Feature Walls without Paint
- Posted on April 29, 2017 May 26, 2018
- by Amanda
Want to make a change in a room in your home without breaking out the paint? Check out these 11 ways to make feature walls without paint in your home. SO many creative ideas!
So you’re ready to make a change in your home, but want to make a greater impact than just an accent color on your wall? Me too! So many people’s first instinct is to just paint a wall, but as I researched planning for my toddler’s bedroom makeover I found so many fun ways to decorate a room and make an impact on a feature wall without using paint. I’m excited to show you these 11 ways to make a feature wall without paint. Let’s get started!
Feature Walls without Paint
1 | Concrete Wall Cladding
This concrete wall in stunning! Wouldn’t it be fun to do this in an office space or man cave?
2 | Wood Block Wall
This wall, and entire office space actually, is gorgeous!! You HAVE to check it out!!
3 | Vinyl Feature Wall
Of course, I had to share Mini Me’s darling reading nook in her bedroom. Her feature wall turned out perfect for a little girl! The concept, however, is so simple and can be used in many different rooms in your home. Get all the details here!
4 | Concrete Geometric Wall
First off, I am in love with this whole living area. This is like my dream home and that wall is the perfect compliment to the room!
5 | Gold Sharpie Wall
The ladies at Classy Clutter always knock it out of the park and this feature wall using sharpie was no exception!
6 | Herringbone Plank Wall
Everything Tasha at Designer Trapped in a Lawyer’s Body does is great! I love how she used an old fence to create this feature wall in her kitchen. Get all the details here!
7 | Sharpie Wall
Again with the sharpie wall….this is just the perfect, simplistic statement. It draws attention to the wall without being too overpowering. LOVE! Mandi at Vintage Revivals kills at everything she gets her hands on.
8 | Washi Tape Frames
This concept is so fun! This would be the perfect way to feature some favorite pictures in a craft room or child’s room without needing to buy fancy frames or painting.
9 | Picture Wall
Of course, you can always make a statement with a picture wall. Hi, Sugarplum has this gorgeous wall in her living room.
Or of course you could do a gallery wall if you don’t just want pictures to make a statement like the one I did in Mini Me’s bedroom. Turned out so cute!
10 | Metallic Silver Paint Pen
This scalloped design using a paint pen is such a creative idea! Lucky for you, she shows you how to do it. Such a neat idea!!
11 | Faux Brick Wall
Faux brick. Ten years ago I swear I saw this all over the place. Not so much anymore, however, I am loving this brick wall and how she distressed it. Great idea to make that wall stand out!
These feature walls are so incredible and I love that you don’t have to paint to make a feature wall. We’re currently in the planning stages of making over our master bedroom and I have some grand plans to make that room look amazing — including a feature wall that I know will be amazing if I can convince my hubby to let me do it. Here’s to hoping! I can’t wait to show you!
But, back to these walls…..
So what do you think of these feature walls without paint?
Share in the comments below.
Want a modern home on a budget?
Subscribe and get this FREE GUIDE to learn the tips, tricks, and my best resources to create a family-friendly modern home on a budget!
Success! Now check your email to confirm your subscription.
Related Articles
Spending a day at the beach is an ideal way to relax, so drawing inspiration from the surf and sand for your decor can help create a calm, restful mood in your bedroom. The right color palette definitely plays a role in a beach-themed room, but that doesn’t mean that you have to pick up a paintbrush. Without painting a single item in your bedroom, you can recreate the feel of your favorite beach by choosing the right accessories and materials.
Bedding
The right bedding can bring the beach theme to life in your bedroom. Opt for an obvious sea-inspired pattern such as sheets covered in sailboats or a comforter with fish, seashells or seahorses. If you prefer a more subtle look, a striped bedspread in blue and white can add a nautical look to the room, particularly if you accent it with red throw pillows. Solid bedding can also help create a beach-inspired look if you choose the right color palette. Go monochromatic with shades of blue or combine blue and green shades to mimic the look of the ocean. You can also mix blue, tan, white and yellow bedding for a soft seashore feel. Even bright colors can work for a tropical beach look. Use bright shades of turquoise, lime, hot pink and tangerine to create an island feel for your bedroom.
Natural Materials
For a beach-inspired bedroom, natural materials are a must. Choose wooden furniture, particularly for large items such as your headboard, dresser or armoire. Hardwood flooring also works well in a bedroom with coastal decor. If you want to incorporate area or throw rugs, opt for natural fibers such as sisal, jute, coir or sea grass to maintain an earthy, casual feel. When it comes to window treatments and throw pillows, use natural fabrics. Hanging cotton sheers on the windows is an ideal option to give your bedroom a bright, airy feel that works well with beach decor. Canvas is another natural fabric to consider for your bedroom since it’s often used for boat sails. Use it for throw pillows and window treatments for authentic, beach-inspired style.
Repurposed Items
Repurposing items that evoke images of the surf and sand for your bedroom decor is a fun way to capture the beach theme. Old boat oars can make whimsical wall decorations. For a truly striking look, line up several oars and mount them to the wall behind your bed to serve as a headboard. A surfing enthusiast can accomplish a similar look with vintage surfboards, or use weathered beach fencing for a more general beach-inspired look. Incorporate other vintage items such as signal flags, life preservers and nautical maps into your wall decor.
Beach Souvenirs
You might normally include some plants or floral displays in your bedroom, but when you’re going for a beach theme, try a different kind of natural display. Create a striking display on your dresser, bookshelf or bedside table with souvenirs from trips to the shore. Fill a large, clear vase with sand and layer seashells and stones that you found in the surf. You can also cover a simple tray with sea glass, shells and starfish for a simple display.
Painting the walls is almost always one of the first things on the list when renovating or decorating an apartment. Still, this doesn’t make it a must. There are plenty of ways in which you can complete the project without using paint. For example:
Hanging wall décor.
One of the alternatives would be to hang things on the walls of your apartment. For example, tapestries and drapes can be an option. Use them to create special visual effects for the walls.
Wall art.
Framed wall art and photos are wonderful for covering the walls of your home. They can enhance the style you’ve chosen for the space and they can be easily replaced if you want a fresh vibe.
Removable wall graphics.
If you’re living in a rented apartment, then there may be restrictions when it comes to painting the walls. You can still add your own touch to the décor using decals and other removable wall graphics. They can be easily replaced or removed leaving the walls in their original state.
Open shelves.
You can also use shelves to change the look of a wall. There are lots of interesting designs and shapes to choose from and some are really eye-catching. A simple shelf design can be the perfect display area for your personal collections.
Folding screens.
Use folding screens to cover up an ugly wall and to change the look of your apartment. You can move them around whenever you want and they can also make nice decorations for the room. In the bedroom, a folding screen can be used as a headboard.
Fabric.
You can cover the walls and even the ceiling with fabric. There are some really interesting techniques and designs you can try. There’s no need to paint a wall when you can hide it behind some lovely fabric.
Make the most of a windowless bedroom with creative and deliberate decorating. Infusing the room with layers of light and reflective surfaces combats a cave-like feel. You can fool the eye (and mind) into forgetting about what’s missing with distracting focal points, or instead simply re-create the look of a window. Circulate and recycle the air in a windowless bedroom to avoid a stuffy, uncomfortable atmosphere.
Compensate with Light
Good lighting design in any room is accomplished with layered lighting–and is critical in a room without a source of incoming natural light. For a pleasant ambient glow against the ceiling, install cove lighting under crown molding wall trim. Use wall sconce fixtures to illuminate windowless walls and provide accent lighting. If the fixtures can’t be hardwired into the wall, hide unsightly cords with plastic cord covers and paint them the same color as the wall. If the room has adequate ceiling space, consider a chandelier or hanging pendant for a statement focal piece. Recessed lights and track lights are good options for directional overhead lights. Include a pair of bedside table lamps, or for a cutting-edge look, install wall-mounted swing-arm lamps over each nightstand.
Sleek and Reflective
Decorators and designers commonly use mirrors to reflect light throughout a room and create a feeling of spaciousness. A large antique standing floor mirror placed in a corner visually opens up the room and makes an interesting conversation piece. Shiny lacquered bedroom furniture, tables and dressers with mirrored tops and chrome picture frames all help distribute light around the room.
Minimalist decorating with sleek, low-profile furniture and a platform-style bed is also conducive to an open feel in the room. Use floating shelves for extra storage and clean, streamlined displays.
Faux Windows
Create the look of a window where there isn’t one by mounting a window frame on the wall. Install LED lights inside the frame for a light source and cover the glass with frosted or colored window film. Install a curtain rod over the frame and hang curtains or drapes to soften the room and accessorize the space with pattern and color.
Another option is to install a virtual window, which consists of an illuminated light box featuring some type of animated scenic outdoor view. You can also find lifelike wall decals designed to look like windows with outdoor views, or commission a decorative painter to paint a trompe l’oeil of a window with a scenic view. A large wall mural of a forest or beach scene keeps the walls from feeling like they’re closing in.
Circulate the Air
Keep the air flowing in a windowless bedroom by installing a ceiling fan. This helps distribute warm or cool air blowing in through air ducts. Set the blades to rotate counterclockwise during the summer to force air downward for a cooling effect. Reverse the direction to clockwise during the winter to create an updraft, which helps push rising warm air back down.
Live houseplants are very beneficial in a room without windows, as they help to actually recycle the air by converting carbon dioxide into oxygen. Plants also bring a sense of the outdoors into the room. According to researcher Kamal Meattle, the three best plants for recycling indoor air are Areca palm, mother-in-law’s tongue and the money tree. However, you may need to provide artificial indoor plant lighting to sustain plants without natural light.
Additional Design Tips
Paint bedroom walls in light, neutral colors or pale shades of blue or green to create a relaxing, tranquil atmosphere in the room. Paint the ceiling a lighter color than the walls to make it appear higher. Keep the room clean, organized and clutter-free to utilize all available space.
Use stone veneer on an accent wall to bring a natural, earthy feeling into the room. Highlight the wall as a focal point with directional overhead lighting. Whenever possible in loft, attic or second-story bedrooms, install a skylight to help bring natural light into the room. Tubular skylights are easier to install in most cases and can sometimes even reach into first-floor rooms.
Published: Mar 30, 2015 · Modified: Feb 14, 2020 by Ashley Phipps · 930 words. · About 5 minutes to read this article. · 71 Comments · This post may contain affiliate links · This blog generates income via ads and sponsored posts · This blog uses cookies · See our privacy policy for more info Filed Under: DIY, Home Decor, Sponsored Post
Painting (or repainting) a room can be tedious work, so today I am sharing my best tips to quickly paint a room. You don’t want to miss this. I have discovered how to paint a room fast!
This post was done with the help of HomeRight (Thanks HomeRight for making this post possible!)
Our house is in desperate need of repainting. With two little kids, no matter how hard we try to keep their little fingers off the walls, somehow, they still manage to get dirty from about four feet down.
Unfortunately, our paint color is no longer made and while the paint company will “match” their paint, it is not the same color. Seriously. How does that even happen!?
Anyway, we are no longer able to do simple touch-ups, we need to paint entire walls and rooms at a time. Which is incredibly frustrating, but it needs to be done.
First, let me give you a little tour of a few things that needed to be touched up in our back entryway. Our baseboards are gross. Especially in this corner by the door. I wipe and scrub but they just are at the point where they need to be repainted.
It is hard to tell, but in the second photo above, there is a large discolored area on our walls. This is where my son decided to color on the walls, with crayon. Sigh.
We (aka my son) cleaned it off as best we could, but it still left a large discolored area on the wall that needed to be painted over. So this past weekend I decided to finally tackle painting this room and it looks so much better!!
Today I am sharing my tips to quickly paint a room fast!
Steps for learning how to paint a room fast:
1. Prep Work done properly is how you get a good paint job done fast. To prepare, I wiped down all the baseboards and walls to get any grease and grime off. I used baby wipes, but a simple washcloth and water will do the trick too! Then I taped off any areas that needed to be taped. I don’t love taping but it is important especially around floors and built-in furniture you don’t plan to remove. We also removed light switch and electrical outlet faceplates and door stoppers. And all wall art and nails came down too.
2. Have the right tools to paint a room fast. I collected a few of my favorite tools from HomeRight. For this project, I grabbed my HomeRight QuickPainter Pad Edge Painter, my HomeRight EZ-Twist Paint Roller Applicator, and my HomeRight Mini PaintStick.Next, I grabbed my paint, and I stirred it well.
3. Paint the edges around walls and doors. Some people like to edge first, some people like to edge last. I personally think edging is more tedious and time-consuming so I like to get it out of the way first! I used the QuickPainter Pad Edge Painter to edge my entire room.
This is a great little tool because you can suck paint up into the handle and dispense it directly onto the pad as needed.
And it has a great little guide that keeps you from getting paint onto the adjoining wall. This worked great for the tops of my walls, the corners, down near the baseboards and in other small spaces in this room.
I found that if I kept enough paint on the pad, to paint a room went very quickly. Just don’t push too hard on the pad or the paint will seep out the sides.
4. Paint the walls in the room quickly too! After I was done edging I grabbed my PaintStick. I love love love the EZ-Twist PaintStick, but for parts of this space, it ended up being a little too long. So I placed my EZ-Twist PaintStick frame onto my Mini PaintStick and the smaller handle on the mini worked perfectly in this space!
I love that the PaintStick holds paint in the handle that dispenses directly through the roller onto the walls! It is a huge time-saver to quickly paint a room.
Since I had already edged the room, I just needed to roll the paint onto the walls fast and I was pretty much done! It really was finished fairly quick at this point!
5. Paint the Trim. After the walls were completely painted, I went back and painted my trim. You can use a paintbrush or the QuickPainter to paint the trim. Before everything was completely dry, I removed all of my painter’s tape. There were a couple of areas where the paint seeped through, but since the paint wasn’t completely dry, this wiped off very easily!
With these tips to quickly paint a room this space only took about 2 hours to prep, tape, edge, and paint, which really is not too long! And the room looks so nice with a fresh coat of paint on the walls and trim!
It is amazing what a coat of paint can really do to transform and beautify a room!
Image: Donna Griffith
Colour
This article is featured on:
These tips and tricks on how to decorate with paint will breathe new life into a dull, tired home.
Update your home’s interior and exterior using a fresh coat of paint to decorate. Bring energy and optimism, create a calming, relaxed atmosphere and renew old furniture using paint colours, finishes and accents.
1 Establish a more intimate space by painting the ceiling a darker colour, creating the illusion of a lower ceiling.
2 Soften an awkwardly angled wall or room by painting it one solid colour.
3 For a modern effect try painting the walls and trim the same colour. Use a flat paint for the walls and a semi-gloss for the trim.
4 Make a tight space seem larger and airier by painting the ceiling a lighter version of the hue painted on the room’s walls or white.
5 Paint your front door a statement colour that stands out from the rest of the house. Try a gorgeous historical blue or a radiant ruby red – not something you see every day.
6 A home’s exterior plays a large part in how the world, or at least neighbours and visitors, see you. Revitalize your home with a fresh coat of paint every three to six years.
7 If you want to invigorate your home’s exterior without painting the entire exterior, freshen up the trim. White or rich neutrals, depending on the house’s exterior colour, can easily update the look of your house.
8 Shutters and porch gables are the perfect place to express a love for colour and decorate with paint.
9 If you really want to set a mood in a room, then use different paint hues to create an energetic or relaxed atmosphere or to warm up or cool down a space.
10 Ash purples, bronzed greens and lacquer reds reflect a feminine classicism, inspired by needlework, appliqués and period furniture, that is back in style.
11 Conjure up images of rural life with wonderfully rustic plum, teal and red clay tones.
12 If you have a lot of dark wood furniture add an exotic, Middle Eastern influence by painting the walls a deep, rich purple or blue.
13 Expressing your individuality in your paint colour choices can result in more unexpected pairings of colour, pattern and design styles.
14 If you’re colour shy, go with all-white walls. The absence of colour is as effective as the presence of colour.
15 Use a variety of neutral shades and have fun mixing several textures in your rooms to keep things interesting.
16 When choosing a bold colour be sure to tie it into the whole scheme of the room.
17 Contemporary paint effects like stencils and colour washes create interest and surprise. Think of these effects as unframed artwork adorning your walls.
18 Use lightly washed stripes to create a sophisticated French country look (especially if you use blue, yellow or white hues). This is a subtle technique that adds texture and sheen to a room.
19 Create a fun mural, like clouds or the night sky, on the ceiling. This is a great way to decorate with paint in a child’s room, nursery or family room.
20 Fresco is a wonderful painting technique that can help hide surface imperfections. It gives a soft, mottled look that adds depth and interest to your walls.
21 Add a splash of colour to neutral walls by selecting zones on a wall or ceiling and painting them a different, often contrasting, colour from the main wall. This technique is known as colour blocking.
22 Feature a wall at one end of a hallway by painting it a contrasting, dramatic colour; that will serve to visually bring it forward.
23 Give chairs, dressers, drawers, tables and desks a new lease on life with a new colour or coat of paint. You’ll be surprised how quickly that old, ugly chair becomes your new favorite accent piece.
24 Get in touch with you inner Pollock by applying dripped and splattered paint to an article of furniture. Make sure the piece is painted a solid colour (preferably white or black) before you start throwing different paint shade onto it.
25 Make the kitchen pop by bringing in a bold colour. Paint the backsplash or the cabinetry a bright colour that you love (and can live with).
Our favourite BEHR® shades for a statement wall:
Moxie MQ3-35, Off Broadway MQ1-35, C’est La Vie MQ4-27.
See more of summer’s hottest design and decor trends.
This post was originally published in September 2016 and updated in September 2019.
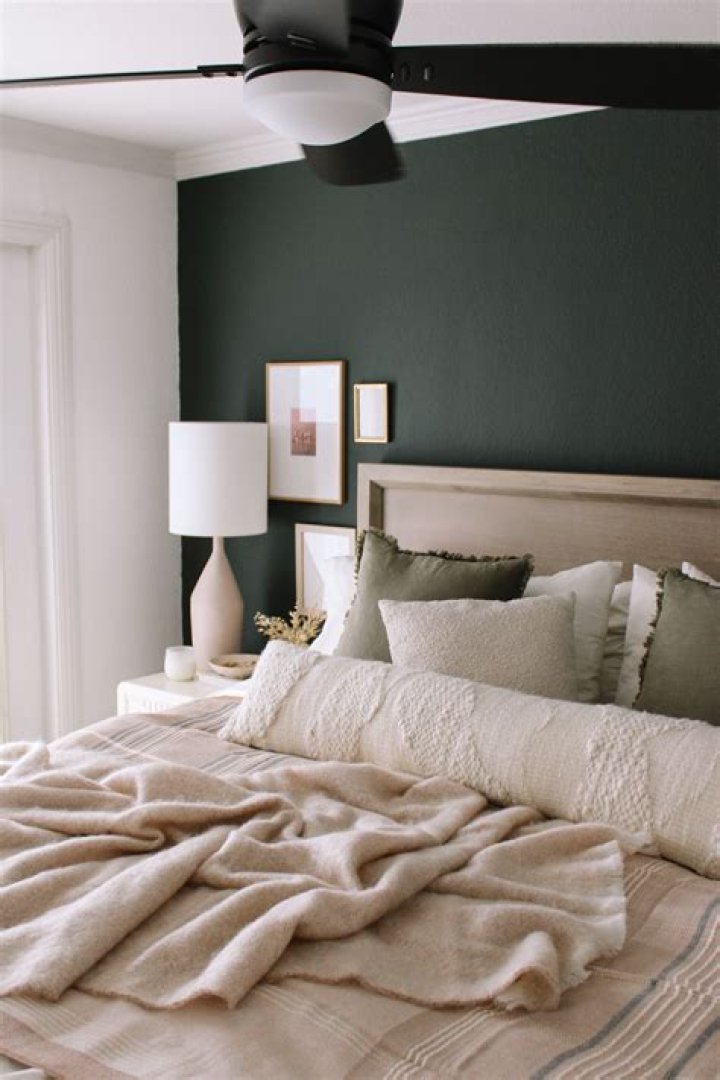
We love the idea of using jewel tones to create warm, cozy spaces that feel luxe but inviting. There’s just something about sapphire, emerald, and garnet that feel rich and layered — everything we’re craving for fall. Here are our favorite ways to incorporate jewel tones into your space:
1. Wall Color for the Win
The easiest way to bring color into your space is always with paint. In this room we used Benjamin Moore’s Salzburg Blue to create a dramatic backdrop and to give our rooms an enveloping feel.
2. Light Fixtures in Bold Colors
Our Parker Table Lamp comes in a deep emerald green which is the perfect finishing touch for a bedroom or corner of your living room. Accents of color throughout the space are a great way to bring in personality without going over board.
3. Dramatic Drapery Panels
Every room needs window treatments, so why not use them to make a statement? Our Dupioni Silk Drapery Panels in Peacock feel rich and so luxurious in the corner of this seating area. They’re the perfect way to add punch to neutral foundation pieces, wouldn’t you agree?
4. Dreaming of Velvets
In the fall we are always vibe-ing on jewel tones, but we love incorporating velvet too! Why not combine them both? Ruby-colored velvet is the perfect way to bring a large swath of color to family room, and in terms of curl up comfort, furniture pieces upholstered in velvet are oh-so inviting.
5. Mix in Metallic
We’d be remiss if we didn’t talk a little bit about metallics while we’re on the subject of jewel tones. Just like your favorite pieces of jewelry, golds and silvers are the perfect complement to saturated sapphire, emerald, and ruby-colored hues. In this bedroom, we used gold sunburst mirrors and mirrors with a gold frame to add glamour to a sapphire velvet headboard, resulting in a luxe but cozy space where we certainly wouldn’t mind catching some z’s.
6. Color Underfoot
We love to decorate with rugs that have lots of color because visually, that heavy color is at the bottom of the room meaning it grounds the space beautifully. We do this all the time when building the rooms for each season. First we pick a rug that we love, then we use the color palette from that rug to guide the rest of the pieces in the space. Before we know it, the rest of the space has come together beautifully — like magic!
7. Art
If buying a piece jewel toned furniture feels a little too risky for you, another approach that might feel safer is choosing artwork that incorporates jewel tone colors. We love this option because artwork is a great way to feature multiple jewel tones in a room. The deep blues, reds, yellows and greens mixed together in our A Sunlit Stroll Art have perfect pops of color and act as great starter piece if you are beginning to experiment with jewel tones.
For more design inspiration shop our Jewel Tone trend page and check out these other posts:
Did you like this post and find it helpful? Rate it below and share your thoughts in the comments!
36 best bedroom ideas how to decorate 57 bedroom decorating ideas how to room without ing anything 60 stylish bedroom design ideas 57 bedroom decorating ideas how to how to decorate a small bedroom.
How to decorate a small bedroom better homes gardens 15 master bedroom decorating ideas and design inspiration 100 bedroom decorating ideas in 2020 designs for beautiful bedrooms 36 best bedroom ideas how to decorate a 22 stylish small bedroom design ideas freshome 15 master bedroom decorating ideas and design inspiration.
Related Posts
Small House Living Ideas
16 best small living room ideas how 30 small living room decorating small living room ideas how to inspiring small house decorating.
Entryway Ideas Ikea
Easy ikea shoe cabinet hack avec clever diy ikea hacks for entryways designers share their ikea décor ideas ikea hack ideas for.
Trending Paint Colors For Bedrooms
Hottest interior paint colors of 2019 interior paint colors so far in 2019 benjamin moore paint color trends 2019 paint colors for.
Monica 8217 S Apartment Number
Woman legend blog american 8300 monica cir plano tx 75025 zillow friends reunion get the look from woman legend blog american friends.
Master Bathtub Ideas
Master bathroom for the home top 60 best master bathroom ideas 45 alcove bathtub ideas photo examples master bathroom for the home.
Dreaming your tiny bedroom had space for more than a bed? Or your guest room was more than a dumping ground? Then read on
Small bedrooms can be tricky to decorate. They often end up as unloved spaces with little personality because we’re worried that too much stuff will “shrink” them visually. Conversely, small spare rooms can end up as dumping grounds for old fitness equipment, packaging or clothes-drying racks.
While a typical master bedroom is usually large enough to accommodate cabinets and chests of drawers, a second or third bedroom may be big enough only for a bed and little else. How can you make the most of every square inch, and ensure that a small bedroom is both stylish and functional? Here are some clever ideas for decorating a small bedroom.
Do copy hotel style. Many boutique hotels have tiny bedrooms, but they are so carefully decorated that guests hardly notice. Copy some of the tricks: A padded headboard, plush throws and multiple pillows offer a similar scaled-down luxury at home.
Try to slot in bedside tables, even if they’re just small shelves, for somewhere to set down a morning cuppa.
Do build around the headboard. In this small bedroom, a built-in unit around the headboard makes great use of the limited space without impinging on other walls, keeping an open feel.
Also, as this blue-and-green scheme demonstrates, adding bright colors to a predominantly white room injects energy and life without closing things in. Stick to one or two hues so that the room doesn’t get too busy.
Decorate a small bedroom with two beds. Even small guest rooms can often accommodate two single beds; consider extra-narrow designs if necessary.
This chic room doesn’t compromise on style, with painted brickwork and a graphic rug adding industrial attitude. Wall lights are a terrific space-saving solution, but if they’re not an option, try reading lights that clip on headboards.
If conventional bedside tables aren’t possible, repurpose something else. Here, two logs do the job.
Make a small bedroom look larger with a feature wall. Painting all four walls the same color can exaggerate the boxy feel of a small square room. Instead, create a focal point by adding a wall of luxe paper, textured paneling or, as here, an interesting paint effect.
Next to the white walls, the darker shades and ombré effect on the back wall lead the eye to it, creating a depth of field. This bedroom may be compact, but it’s far from a featureless box.
Go dual-purpose with big furniture. Multifunctional furniture is your friend in a small bedroom. Here, a bookcase works as a headboard, bedside table and home for books all in one. Stylistically, a piece like this also helps transform a plain white cell into a Zen-like getaway.
Ceiling-mounted spotlights are another smart move in rooms with low ceilings.
Don’t underdecorate. The temptation in a small space can be to pare back. But that can end up looking dull and undesigned. Don’t be scared to decorate a small bedroom with some of the elements you might find in a larger room, including pictures, rugs and decorative lighting. The result is a “proper” room — a cozy retreat to which you’ll enjoy escaping.
Don’t choose closets with fussy handles. In this snug sleep space, the cabinet almost disappears, thanks to its minimal, hardware-free doors. A glossy finish also bounces light around the room.
A bed with a simple frame is another trick for a small room since it appears to take up less space
Combine a small bedroom with a home office. Is it a bed, is it a desk … or perhaps it’s a “besk”? Our homes are getting smaller, so in the future, all bedrooms might look like this one. The smart integrated bureau is a good idea for an older child’s room, providing a place to catch up on social media or do homework, while the pullout bed underneath is just the ticket for sleepovers with friends.
In general, going custom may be the answer to suit your exact needs and dimensions, so talk to a carpenter or builder about the possibilities.
Use mirrors to make small bedrooms look bigger. It’s the oldest trick in the book, but a wall of mirrored closet doors will help a small room feel larger. But ensure that the room is just as chic, simple and tidy as it is here — reflected clutter and “floordrobes” can look twice as bad!
Do copy houseboat style. A lot of inspiration for small-space living can be gained from houseboats. Here, a low unit around the edge of the room provides storage and a bedside table without taking up an entire wall, as a closet would.
Tell us: How did you decorate a small bedroom? Share your ideas and photos in the Comments below.
Wake up those bedroom walls with some dreamy decorating ideas.
You’re giving your bedroom a makeover—what’s the first thing you do? You probably try to figure out how exactly to hang that colossal flat-screen TV directly across from your bed. Stop doing that! It’s time to think outside the (idiot) box. Your space should be a sanctuary—a restful, cozy bedroom where you fall asleep after a long day and wake up fresh as a daisy in order to start a new one, and your bedroom walls deserve more than electronics. Even better, there are so many options of what to do with those walls, so you should apply the same care you used when you chose your bed, nightstands, bedding, lighting, and rug. (We know—some of those decisions took you 18 months. We’re here to help make things move a little quicker!)
Let’s start with your decorating style: If your bedroom walls could talk, what do you want them to say about your aesthetic? Maybe you want to be a gallery wall girl or guy. Consider mixing some your most prized collections with new-old finds from the flea market. Are you known for creating guest rooms so cool that your friends never want to leave? Apply those skills to all the bedrooms. Do you favor rich paint colors or subtle shiplap in other parts of the house? No reason not to introduce them on bedroom walls. No matter what you’re feeling, we’ve got you covered with outstanding bedroom wall decorating ideas ranging from from rustic to romantic and paint to reclaimed barnwood.
Decorating Dilemmas is a weekly column in which our stylists answer your design questions, so you can tackle your home decorating project with complete confidence.
Dear How to Decorate,
We just moved into a new house, and I really need to update the master bedroom. Any advice you give is much appreciated!
I remember when we bought this bedroom set just after we got married in 1999. It was our first major furniture purchase as a new couple. However, it’s 2015, we need to blast out of the past with a fresh look!
I LOVE the coral & mineral color combination that you have on your website. I have a swatch of the Devlin rug, but I’m not sure if it will work or not. I definitely want an area rug.
All of the furniture and drapes will stay, except for the large chair and ottoman and maybe the mirror. I’d like to replace all of the accessories, lamps, and bedding. The piece above the bed will stay. I’d like to have a reading nook in the corner, and a chandelier over the bed.
I like the traditional style of the furniture and the brass pulls. I’ve noticed that brass is making a comeback! However, I also know that brass can look dated if it’s not done right.
I like the wall color, Benjamin Moore’s Northern Cliffs, but I’m not opposed to painting.
Thank you so much for considering my project!
Your Decorating Dilemma reminds us that it’s hard to find a good balance between wanting a refresh and keeping pieces in which you have invested.
We suggest starting by painting the walls a warm, creamy white such as Benjamin Moore’s Seashell (#926) for a crisp and clean feel.
The Clarence Rug is a beautiful option that has the spa, coral, and taupe tones in a Persian blooming pattern that you were looking for in a rug.
Changing out a few of your pieces in the room will make a great style impact. Create a cozy reading nook with the Julia Chair and Griffin Ottoman both upholstered in Suzanne Kasler’s Mineral Linen to replace your oversized chair in the corner. Place a distressed blue green Louis XVI Bench with luxurious linen at the foot of your bed for an added softness and textural interest.
Consider trading out your matching mirror above your dresser with an Aubrey Leaner turned horizontal. The warm antique silver color is a timeless look that will complement your dresser. We do think your room needs additional softness so consider substituting one of your nightstands with a Terrific Trio. This is a simple way to refresh your space while making a big impact. Update your lamps with Suzanne Kasler Gourd Lamps for a classic, beautiful style.
We suggest that you keep the bedding simple with the Amelie Collection in spa, and remember to have it monogrammed! Layer in additional pops of color with Euros in Malabar Coral and a bolster wrapped in Queens Velvet Coral. No doubt, you will want to rush home to your relaxing retreat!
We would love to see pictures when you are finished!
You don’t really want to match all your bedroom furniture — dull, dull, dull. The “great-taste-no-shortcuts” alternative is to harmonize the different pieces so they blend together as if a first-rate eye has selected them over a period of time. That flea market rocker, curbside nightstand, inherited dresser and antique-shop bed will coexist in gorgeous glory when you fiddle around with paint and fabric, and score the perfect accessories to link them.
Something Similar
Assemble a complete bedroom suite from disparate pieces with an eye toward design or material elements that have something in common. If grandma gave you her spool bed and a small vintage wood table in a similar wood tone, you’re halfway there. Hunt for a nightstand in the same style of wood as the table and bed frame, turn the occasional table into a nightstand, and coordinate the two with matching lamps. Any other wood furniture in the room should echo the tones in the bed grouping or be painted to match the walls or trim. If mismatched pieces “feel” as if they belong together, you can get away with random acquisition. That means the style, the finish, the color, the heft and scale of the furniture should be somewhere in the same neighborhood so they harmonize in your bedroom.
Protective Coloration
Wield a mean paintbrush and whip that junk store bedroom into shape. An armoire, dresser, nightstand and wood bed frame become a coordinated, fab shabby chic-style bedroom with some crackle glaze, sandpaper and milk paint. Clean up the wood and remove the hardware. Sand and paint the pieces with a colorful base coat — barn red, dark chocolate or forest green. Cover the dark color with one or two coats of cream or white milk paint, but build in some distress by following the directions to make the paint chip as it dries or add swatches of crackle glaze before the final coat to encourage the crazing that happens to old paint. Both faux techniques will reveal some of the color of the darker coat beneath the light finish. Add a little more visual wear by lightly sanding the edges, bedposts and the areas around handles where the paint would have worn away over the years.
Masquerading as a Match
The dressing table is a spectacular mirrored retro Art Deco pretender. You splurged on a less expensive copy of a clear polycarbonate ghost chair. Your bed is a discreet slab of wood that supports a mattress with a luxurious silver silk-polyester duvet cover. The dresser is a lump of brown veneer from the attic, and the white walls are boring. You’re a DIY weekend away from a knock-out bedroom. Paint the dresser metallic silver and glue mirror panels to the sides and drawer fronts. Replace the clunky wood knobs with faux crystal from the home or hardware store. Paint the bed platform pewter or aluminum — non-metallic — to make it match a bit but mostly disappear. Paper one wall with black and metallic silver Art Deco wallpaper and haunt flea markets and thrift stores for old crystal lamp bases to refurbish for the vanity and nightstands.
Forging Links
A common thread can turn a garage sale of bedroom furniture into a chic retreat. Find an arresting fabric to stretch over the bed as a canopy, cover pillow shams for the bed and chair or bench, and fancy up a lampshade or the cushion on your desk chair. Pull colors from the fabric to shine against neutral walls — white, pale gray, linen, or the merest hint of lilac, powder blue or blush pink is background to your decorative embellishments. A vibrant russet and lemon print might inspire a rust velvet bedspread, pale yellow ceramic bedside lamps, a lemon glass chandelier and russet raw silk roman shades. A subdued toast, cream and pewter print works with bamboo roll-up shades, gray-painted sawhorse desktop supports, a faded tobacco, cream and gray oriental rug and a gray chenille spread on the wrought-iron bed.
Do you quietly enjoy looking at your ceilings? Make the ceiling as the way to impress your guest.
Open, clear and serene atmosphere can be shown by the design of the ceilings itself.
Here is the way to decorate your large wall with vaulted ceilings.
1. Paint the vaulted ceilings with the best colors
Remember the power of colors; you can use it as the first step. Show off your taste by applying the colors in the ceiling.
Do not make the large wall as a blank space, draw attention and paint the ceilings impeccably to accentuate the wall.
If you want to make it elegant, paint it all white. Make the vaulted ceilings as canvas and add monochrome colors in it.
2. Add lighting
The second step to make the design more beautiful is with adding the light. Lighting is one of the most important things when it comes to decor the interior.В Put some impressive lighting features to woo your guest.
Create warm illumination an welcoming sense by adding a pendant lighting close to ceiling. If you like something sparkly, find crystal chandelier and put it there. Make the people memorize how great the pattern it is.
3. Set more features
The third step is to use something chic as features. You can set a window atВ the ceilings. Remember that the vaulted ceiling match with the French window. It is simple yet classic design for your airy room.
If you like Victorian touch, you can go with Cathedral ceilings idea. It creates fantasy, it make the small room becomes larger and the dark room become brighter. Set drape of velvet to make it glamour.
4. Accessorize the high wall
Do not forget the large wall, you cannot leave it empty. Use the wall as a display. Put the best photo or your life-size photo. If you like art, hang the fancy drawing or painting. Do you like the impressionist work? Show your collection.
Add some French impressionist painting like the work of Monet.В Choose the one which go along with the landscape. For example the Water Lilies paint in the 1915, the colors will make your room comes out beautifully.
5. Blend it with the Furniture
The last but not the least step is combining the design together with your furniture. If you like minimalist design, put a TV in the room. Make a valuable time with your family while enjoy the decorated ceilings.
If you want to go classic, pay attention to the stuff like fire place. Set a fireplace under your vaulted ceilings; combine it with stone walls close the ceiling.
Do not doubt to show your ideas when design the ceilings. The vaulted ceiling is the best aspect to emphasize your large wall. Use the wall as well, try different idea and grasp the sensation when accessorize it.В Let the design display yourself, use the charisma of the design of the ceilings and show the people your taste.
Image: memorabledecor.com
This is the easiest way to decorate a bookcase, that anyone can do! It’s also cheap if you have lots of books lying around. And the best part is it goes with pretty much every decor style since it’s just a simple look.
For more decorating ideas, check out my blog.
Step 1: Gather your materials
All you need for this is:
- books (I prefer hardback cover books)
- white wrapping paper (I got mine at the dollar store)
- Scissors
- bookends (I prefer a neutral color)
Step 2: Wrap all your books
We’re going old-school with this! Remember the days of covering your books in school? Do they still do that?!
Just use the wrapping paper to cover each and every book.
Step 3: Put them on your bookcase
For this step, you can either stack your books on top of each other or set them up and use a bookend.
I personally like to invert the books and have the pages stick outward.
I used both antique books and new books, so you can see the page color differences between them. I really like mixing old with new!
Scroll To See More Images
Pink is such a tricky color—it’s beloved by many (hi, millennials), but when you make the choice to start decorating with pin, you run the risk of the room looking like Pepto-Bismol just exploded all over it. With just a little direction, however, pink decor can turn out chic instead of tacky or childlike. Use these 12 tips and tricks as a starting point for pulling off the color in your own home. Dare to think pink, and we promise it’ll pay off.
MORE: 25 Unapologetically Feminine Home Decor Ideas
1. Go for a pink statement coach
You don’t have to have a overly-girly home to pick a pink statement couch for your living room. In fact, sometimes a pink sofa works best when it feels completely unexpected, like in a modern space.
2. Pink accent pillows go a long way
Aren’t ready for a complete pink overhaul? Pink throw pillows offer just the right amount of color, and feel fun and fresh on a living room couch.
3. Pink and leopard is one big yes!
There’s something effortlessly glamorous about pairing up pink and leopard in a home. Try a pink piece of furniture with leopard pillows, a pink chair next to a leopard rug, or even bedding that mixes and matches pink and leopard.
4. Go bold with a pink neon sign
Every celebrity home these days—including the likes of Lauren Conrad and Kourtney Kardashian—seems to feature a modern neon sign. Make it the focal point of your living room, put it above your bed, or hang it in your kitchen—there’s really no wrong way to decorate with these guys.
5. Pink flowers are the ultimate room pick-me up
Pink flowers—especially roses or peonies—make a great accent, particularly in an otherwise neutral space. We particularly love the look of mixing pink and burgundy flowers for the ultimate romantic bouquet.
6. Decorate with cool pink accessories
Don’t be afraid to get creative when decorating with the color pink! Source cool objects in the color—everything from mini lucite figures to pink shoes—placing them on a coffee table, a nightstand, or a mantel.
7. Make pink drapes the focal point of one room
Got a neutral room that you’re looking to punch up? Light pink curtains will do the trick, and then some.
8. Mix and match different shades of pink
You don’t have to stick to just one shade! Experiment mixing pastel pink, fuchsia, and dark pink to come up with a totally unique room.
9. Dare to paint your walls pink
Pink walls can make a statement or they can be super-calming, depending on the shade. To make a dining room or hallway pop, try a deeper hue, while very pale pink looks lovely in a bedroom, an office, or a bathroom.
10. Make your kitchen that much cooler with pink appliances
One of the biggest kitchen decor trends right now? Retro appliances that come in pastel shades like mint green, baby blue, and pastel pink. It doesn’t get much more fun than a pink refrigerator.
11. Make a pink piece of art the focal point of your room
Make a cool piece of pink art the focal point of a room in your home. You don’t even have to buy a piece of artwork to do this—paint a canvas pink, or frame a swatch of pink fabric.
12. Mix and match pink patterns
We love the look of mixing and matching pink patterns with unexpected patterns like black and white leopard, and floral. It shouldn’t work, but it totally does.
MORE: Best Minimalist Bedrooms That’ll Inspire Your Inner Decor Nerd
Originally published February 2015. Updated April 2017.
Aah, moving into a new-build home can be so satisfying. Everything is brand new and clean. The walls are freshly plastered and painted. Everything works as it should and it’s a perfect blank canvas for you to put your stamp on.
That said, decorating a new build also throws up challenges. For example, a lack of traditional features, such as a fireplace or ornate plasterwork. Or a challenging open-plan layout where it’s hard to know what goes where.
Fortunately for all of us, Queen of Decorating Kelly Hoppen was on our screens on Thursday, with lots of tips on how to decorate a new build.
Talking to This Morning’s Eamonn Holmes and Ruth Langsford, she was full advice for three homeowners in need…
Kelly Hoppen on how to decorate a new build
1. Don’t put all your furniture up against the walls
Image credit: Joanna Henderson Styling: Gemma Gear
Kelly’s first caller is Anna, who doesn’t know what to do with her new-build in Lincolnshire ‘The walls are white, and we’ve not really done much in the lounge,’ Anna explains.
‘All your furniture is placed very close to the walls, like you’re almost a bit scared to bring it out,’ says Kelly. ‘To make the room feel much cosier, what you need to do is move your longer sofa away from the wall, and put a console or a shelf behind it and bring the sofa in.’
‘Bring your other sofa in as well, so you are creating seating area.’ Kelly also suggests putting art above the new console table.
2. Don’t put your coffee table too close to the TV
Kelly spots that two of her callers have their coffee tables closer to their TVs than their sofas. Of course, it’s much more helpful to have the table close to your sofa, so you can rest drinks, magazines, books and your remotes on the top.
3. Add a feature wall behind the TV
Image credit: Colin Poole
It can be tempting to stick with your perfectly painted white walls, which will make your room feel fresh and bright. But Kelly believes that’s playing it too safe.
‘Paint the wall behind where the television is, or put some wallpaper up,’ she advises both Kelly and her next caller, Martin.
We can see her logic – so many of us have rather TVs these days, and a dramatic feature wall is going to lessen the impact of the screen on your decor. Like this example made of wood pallets, above.
‘Do something quite dramatic – there are so many amazing wallpapers that you can get, or just paint it a really nice anthracite grey, even,’ Kelly goes on. The latter is a great option if you’re not really into bold colour statements, like Martin.
‘We’re not big fans of colour,’ he replies. ‘I’m a man after your own heart Kelly – I know you like monochrome and so do I.’
If you are creating a feature wall, Kelly also advises keeping it clear of shelves or pictures, for a smarter finish.
4. Use mirrors strategically
New builds often get a bad reputation for having rooms that are smaller than older properties. So Kelly is an advocate of using large mirrors to make a room look bigger. In Anna’s home, she suggests placing the mirror on the wall opposite the French doors that lead onto the garden.
This reflects the garden – and more light – into the space.
How to decorate this dining room’s tray ceiling?
Tray ceilings are a contemporary architectural feature that have ended up in way too many traditional style homes. They try to fill our need for unique detail in our otherwise generic interiors.
Instead of adding detail, however, you end up with yet another bland box-within-a-box to decorate, or worse, a box-within-a-box-within-a-box. If you have a choice during a new-build or remodel, skip the tray ceiling and spend that money on nice crown molding in an otherwise normal room.
But if you have a dining room or master bedroom with a tray ceiling, what do you do with it? Do you:
- Paint it a bold color to draw attention to it?
- Do you paint it a light color to minimize it?
- Do you add moldings to it or not?
If your interior decor is traditional in nature, then by all means, yes, install moldings on your tray ceiling.
Two Approaches to Decorating a Tray Ceiling
- Minimize the ceiling by painting a color that blends with the room and adding simple moldings to the inner and outer perimeters to the tray.
- Draw attention to the tray with bold colors and elaborate trim patterns.
In the latter method, it helps to think of the inner part of the tray in the same way you would an ornate ceiling medallion.
The client ended up painting the tray ceiling moldings I designed and installed in more subtle colors than I had initially envisioned, but it still looks nice. Can you can come up with other color combinations that would work as well or better?
Above If you really want to install a tray ceiling in a new home, then this is the style — beveled rather than stepped — is more appropriate for a traditional style home.
Below I designed and installed a simple molding pattern for the upper and lower perimeters of this master bedroom tray ceiling. The intent was to paint the ceiling in a several light colors, so not to emphasize the tray too much.
That is not how it was ultimately painted, though. Like it or not, at least the tray ceiling really stands out now.
The master bedroom tray ceiling as it appears now.
Just for fun, do a Google image search for “tray ceiling,” and you end up with hundreds of reasons of why I don’t like them.
To be fair, here is a good example of a tray ceiling in a traditional style home. Nice work Sandi.
Do you have an opinion on how to decorate a tray ceiling? Let’s hear what you have to say in the comment section below.
By Jessica on March 12, 2020 in Inspiration
It takes but a few simple steps to spruce up and breathe new life into your home. Read on to see how you can add a new flavor to your home without spending any money! You’d be amazed at the resources you already have sitting around collecting dust. Now it’s time to put them to use.
1. Rearrange your furniture.
Nothing is so simple as rearranging furniture. (For larger pieces you may want to enlist the help of a friend.) You’ll be amazed at how different your space looks by simply moving a couch, a table, dresser or bed. Your room may even end up feeling a good bit larger. It will certainly feel fresher and newer.
2. Make use of those old paint cans
Most likely you have cans of paint sitting in your basement or garage. Gallon-sized tins that could be as much as 1/2 to 3/4 of the way filled. Add some color, pizzaz and depth to your rooms. If you don’t have enough to paint an entire room consider painting an accent wall or even the ceiling. Paint the inside of your closets or book cases. Give old furniture a facelift with a coat of paint.
3. Put old fabric swatches to use
Dig up any fabric swatches that you have and put them to use either individually or collectively by covering pillows and bolsters for your bed or couch. You can create a patchwork pattern or you can frame those swatches that are most interesting and interesting to create fun and colorful wall art.
4. Freshen up the linens
Give curtains, sheets, pillows and bedding a new look by adding ric-rac, pompoms or ribbons to borders. By simply adding these to the borders an ordinary pillow (sheet or bedding) can become more whimsical, sophisticated and elegant. You will be amazed at how such a simple thing can be so transforming!
5. Display your wares
Whether you’re an avid collector or simply have lovely and unique items, it makes no sense to keep them tucked away behind closed cabinet doors and drawers. Bring out the decorative dishes, bowls, pitchers, the muffin tins and rolling pins. Bring out whatever it is that you collect and display them proudly, whether by hanging them or grouping them together on tables, counters and in bookcases. Instead of having various candle holders scattered through your home, bring them together in one location and display them together.
6. Mirror, Mirror on the wall
Add oversized mirrors to your space. Mirrors will open up your space and enhance the room’s natural lighting. Large mirrors need simply lean against a wall or rest on a mantel for a simple and perfect touch. Add one mirror, add several. You can’t go wrong here!
7. Put your unused fireplace to good use
If your fireplace doesn’t get used take advantage of this natural focal point. A fireplace is any room’s greatest asset, so play it up! Paint the inside of your fireplace in a bright or bold color. Place a large plant, stone bust or other artifact inside the empty space. Create a small scene or vignette using art, coffee table books and other collectibles. Group candles of all sizes together and light them to create a warm and lovely setting. Or store extra books or a large wicker basket with extra pillows here. Don’t let this extra space go to waste!
Whether you’re updating or renovating your bedroom, there are some ways you can make it your ultimate calming space.
The bedroom is a place of comfort and refuge, a place to start and end your days. This is usually the most personal space you have at home and it should be a place that inspires you to rest and refresh.
Here are some ways you can decorate your bedroom to make it more relaxing:
1. Create a tempting foundation
Your bed is the main attraction in the bedroom. Instead of choosing a bed based on its convenience in shipment and size, go for something that fits you right. This will set the calming tone in your room. Choose something like a padded bed with neutral or lightly-coloured fabric to give your room a soft and comfy look. If this doesn’t appeal to you, try something with a simple frame or a bed with an open base.
These styles usually take up less space and make the room look airy instead of cramped. You’d also want to indulge yourself in a comfy mattress to seal your comfort package. Choose the best mattress to ensure that you don’t regret your choice.
2. Choose light and natural colours for the walls
Light, natural colours help make a space look peaceful while dark ones make it look cramped. Think about using light blue, beige, light green, or white for your wall colour. If you think this is expensive, think again, you can even paint your walls yourself.
Move the furniture away from the wall, cover it and the floor before you start painting.
3. Establish your personal spot
In your bedroom, the nightstand is a place where you should show your style as it’s your most personal space. Start with a side table or nightstand that best fits your needs. Consider a side table with shelves if you want extra storage for your reading materials. Or you might want one with drawers, or just something to place your late night tea or alarm clock. Place a cute table lamp or hang a painting or your favourite photo to make it look and feel extra personal. This adds soothing elements into your bedroom.
4. Combine light wood tones
Whether it’s your dresser or nightstand, including light wood tones inside your room can help make it look spacious and clean. If your space allows, try a dresser that’s big enough to keep your things while also serving as a displaced surface for small items. The idea is to choose something neutral and stick to a light colour palette for your bedding, furniture and embellishments.
5. Decorate your walls
The bedroom walls are usually difficult to embellish especially if your goal is to create a relaxing atmosphere. But then if you leave the walls empty, it will somehow look and feel incomplete. A good place to start is with a round mirror. Place the mirror above the bed to help reflect light inside the room. This gives it the illusion of being larger than it is.
Another way is to use an open bookshelf instead of a nightstand since it has multiple functions. It can serve as a nightstand without taking up plenty of space and doesn’t feel heavy. A bookshelf also extends vertically so it can fill the wall without overwhelming the room.
6. Add a little colour
Although a completely white bedroom can look very clean and comfy, a planned approach to colours can make the bedroom look as equally attractive. Adding a pop of colour will also break up the monotony of white beddings and white walls.
To do this step, first you need to choose a colour. Because colours affect moods, it’s better to choose cooler hues such as blue, lilac, or light grey to help promote rest and relaxation.
Pick your rug, pillows, accents, and art based on your chosen colour. Doing this will ensure that there is harmony inside the bedroom. You will have one continuous palette and this colour will be your guide in finding things that you decide to bring into the room later.
Sticking to one hue will help reduce visual frenzy and will help create a generally clean look.
7. Improve air circulation
Consider adding a fan into your bedroom to help provide ventilation inside the room, which can help promote better sleep. In choosing a fan, ensure that it makes as little noise as possible.
8. Use a pop of green
You don’t need a green thumb to add one or more plants into your bedroom for a sense of life and peace. Have one large plant in one corner of the room or place a few small plants on your dresser or nightstand. You’ll need to water them once a week. Be sure to open the curtains in the daytime to let the sunshine in to allow your plants to thrive.
9. Declutter and keep the room orderly
Although you can’t see mess when you sleep, some people find it difficult to fall asleep with clutter around them. To reduce clutter inside the bedroom, you’d only need to keep the needed furniture. No mess means no distractions, which can help you recharge at the end of the day.
10 Use blackout window covers
For the body to rejuvenate itself effectively during sleep, it needs to do so without the presence of light. There are many blackout window cover options that allow natural sunlight during daytime while providing privacy.
11. Treat the senses
Have your body and mind relaxed by soothing all your senses. Recreate a relaxing spa experience in the bedroom by adding fresh flowers, using a diffuser for fragrance, and a sound machine for blocking outside noises. You can also light some aromatherapy candles to set that relaxing mood, but don’t forget to blow them out before sleeping.
12. Eliminate technology
This means not bringing the laptop to bed or placing your computer inside the bedroom. Insinuate that relaxing atmosphere you want as soon as you step inside the bedroom and stay away from work as much as possible. The day’s work is over and now that you’ve come inside the bedroom, it’s time for some rest. Don’t bring in exercise equipment and a television, or your phone to bed with you.
Finally
Regardless of what you do during the day, it’s always nice to come inside the relaxing refuge of your bedroom. While there are many decorating themes you can try, it’s better to give the bedroom a peaceful and calming look. Indulge your senses by choosing soft colours for your walls, choosing your decor well, considering ventilation, and adding a relaxing fragrance to your bedroom. Taking technology out of the bedroom will also make your bedroom a place to refresh your mind and body.
| Contemporary Master Bath – By Nancy Hugo Via (CC BY-ND 2.0) |
Beautiful Bathrooms – Horizontal or Vertical Stripes?
Whilst vertical stripes have been a common feature in living rooms, hallways, and kitchens for years, the use of striped bathroom walls has not been popular in bathrooms. Bathrooms are not friendly to wallpaper, because of the humidity and moisture levels, which is why we tend to prefer tiles and paint to decorate our bathrooms – this is almost certainly why stripes have rarely made it into this room.
The use of stripes in a bathroom should not be overlooked however, as they not only provide added pattern and interest to the walls (without being too fussy), they can also create visual illusions.
Vertical stripes are ideal if you want to create the illusion of a taller, more grand looking bathroom. Ideally you would only use this on one wall, or one section of wall in the bathroom – a bathroom should be a restful haven, not somewhere to inflict headaches with the overuse of stripes on every wall.
Horizontal stripes are one of the hottest current trends for decorating, and are ideally suited to small or narrow bathrooms, that you want to make feel wider and more spacious. Again, using it on one, or maybe two walls in the bathroom would be sufficient, and to maintain a more modern, restful feel should be wide stripes, or of varying widths, rather than narrow, or candy stripes.
How to Paint Stripes on Walls – Bathroom Layout
Striped painted bathroom walls are the easiest way to get the look of stripes in the smallest room of the house, you just need:
- Tape Measure
- Spirit Level (preferably large with indicated measurements like a ruler)
- Masking Tape
- Plumb line (for vertical stripes)
- Bathroom paint (regular emulsion paint cannot withstand moisture in a bathroom and will peel off the walls)
| Vertical Stripes – By tanakawho Via (CC BY 2.0) |
For Painting Vertical Stripes
For Painting Horizontal Stripes
For vertical or horizontal striped painted walls, the next step is the same. Mask off each area with masking tape, and paint your stripes. Remove the masking tape whilst the paint is tacky – not when it’s wet as the color can bleed, and not when it’s dry as your paint is likely to flake off.
Other Ways of Using Stripes in the Bathroom – Painting Stripes on Walls
Of course striped bathroom walls don’t have to be just horizontal or vertical. You could also try painting:
- Diagonals into the corner of the room,
- Mask off squares or circles and paint stripes within them.
- Use one small section as a focal point – maybe off to the side of center.
- Freehand and irregular stripes for a more relaxed feel.
If you don’t want to use paint, to create striped walls in the bathroom, you could also:
- Use tiles to create the lines, if you don’t have a steady hand. Either as a few strips, or just as a splash back.
- Add small mirrors, or mirrored tiles to create stripes and the feeling of space – metallics are also a hot decorating trend, so you are incorporating two trends into one.
Whichever way you choose to create striped bathroom walls, just remember to use it in one area, or space the stripes out – you want to create the feeling of a modern sanctuary, not migraine central.
Autumn is here, and that means natural colors become very popular for decorating at home. So for today, I chose terracotta often called baked clay. This color is very charming, especially if you are a fan of the Bohemian style. As the trend of green plants in the room is usually present with terracotta pots, but not just for the pot this time, the hot orange color is quite neutral to be combined with various color schemes.
A pink wall in the living room – 15 Photos of how to decorate living rooms in pink
To display more pop color in the right room, you can put terracotta on the wall. You want to use the color or make it natural, by selecting a brick wall and retaining its original color, want to paint the entire wall or just the half accent wall, or just want to give some color of terracotta to the furniture color. Whatever your wish, today I have gathered terracotta paint design ideas, which is hard to miss, as it creates a warm wood background and a neutral accent that is bold and comfortable.
If you are lucky enough to have exposed brick walls , then you are ready with the terracotta you need. For a simpler style, you can choose decorations with the corresponding colors, such as carpets, wall hangings, cupboards, to minimalist sofas. Here’s a gallery of magical terracotta decorating ideas that can fit your home style, scroll down and get inspired.
i recently re-did my decent sized-bedroom and painted the 3 walls a light gray and the other wall black(too black!). i have red as an accent color with a BRIGHT red shag rug and red drawer/box type things in an entertainment center. the colors are all too much and im seriously regretting picking such bold colors. how can i decorate to make it more girly and less “in your face”? i also have a twin loft bed too so pillows and bedding don’t make much of a difference. im 14 so im kinda on a budget and i cant paint it again. HELP.
3 Answers
For black and grey, I would go with maybe brilliant shades of red or blue. Find some posters or cheap framed pictures that have really bright colors.
portray each wall in a room black does no longer make a room experience smaller – it really is a fantasy. portray one or 2 walls black WILL make the room experience smaller. in case you paint the ceiling black besides, the room will experience a lot higher than it really is. it is a visual trick that hides each and each of the seams the position the walls and ceiling meet. you’ll favor to make useful you’ve passable lights contained in the room. also in case you ever favor to move lower back to a unique colour you’ll favor to apply Kilz primer first. (you may might want to do this with any saturated colour used on walls – no longer basically black.) also chrome, glass, mirrors will all artwork properly in an area like this. keep it contemporary, reasonably provided and upload a pop of colour the following and there and examine a good room!
paint/buy/photograph some images! posters! decorate the walls 😀 . fresh flowers in a vase can create a lovely look too 🙂
by admin · Published March 2, 2020 · Updated March 4, 2020
How to Decorate A Living Room Lovely Bedroom Door Ideas Bachelor Bedroom Ideas Inspirational Plan
– Welcome to the website, in this particular time I am going to show you with regards to How to Decorate A Living Room Lovely Bedroom Door Ideas Bachelor Bedroom Ideas Inspirational Plan
. And today, here is the 1st image.
Why don’t you consider image earlier mentioned? can be which remarkable. if you believe thus, I’l d show you many image once again under:
Small Bedroom Ideas from How to Decorate A Living Room Lovely Bedroom Door Ideas Bachelor Bedroom Ideas Inspirational Plan , source:noordinaryhome.com
Elegant Bedroom Interior Design by Aenzay Interiors from How to Decorate A Living Room Lovely Bedroom Door Ideas Bachelor Bedroom Ideas Inspirational Plan , source:pinterest.com
áááá¤áá á¢áá á áááááá á¡ááá᪠from How to Decorate A Living Room Lovely Bedroom Door Ideas Bachelor Bedroom Ideas Inspirational Plan , source:pinterest.com
Lounge Room Ideas from How to Decorate A Living Room Lovely Bedroom Door Ideas Bachelor Bedroom Ideas Inspirational Plan , source:noordinaryhome.com
Modern Decorations Space Furniture Designs Color Ideas Home from How to Decorate A Living Room Lovely Bedroom Door Ideas Bachelor Bedroom Ideas Inspirational Plan , source:pinterest.pt
So, if you want to acquire all of these incredible graphics regarding (How to Decorate A Living Room Lovely Bedroom Door Ideas Bachelor Bedroom Ideas Inspirational Plan
), click save button to save the shots in your personal computer. These are prepared for obtain, if you’d rather and want to obtain it, simply click save symbol in the web page, and it’ll be directly saved in your laptop computer. Finally if you like to obtain unique and the latest photo related to (How to Decorate A Living Room Lovely Bedroom Door Ideas Bachelor Bedroom Ideas Inspirational Plan
), please follow us on google plus or bookmark this site, we try our best to give you daily update with all new and fresh images. Hope you like staying here. For many updates and latest information about (How to Decorate A Living Room Lovely Bedroom Door Ideas Bachelor Bedroom Ideas Inspirational Plan
) graphics, please kindly follow us on tweets, path, Instagram and google plus, or you mark this page on bookmark area, We attempt to give you update periodically with fresh and new graphics, enjoy your searching, and find the perfect for you.
Thanks for visiting our site, articleabove (How to Decorate A Living Room Lovely Bedroom Door Ideas Bachelor Bedroom Ideas Inspirational Plan
) published by at . At this time we are pleased to declare that we have found an incrediblyinteresting topicto be discussed, that is (How to Decorate A Living Room Lovely Bedroom Door Ideas Bachelor Bedroom Ideas Inspirational Plan
) Many people attempting to find info about(How to Decorate A Living Room Lovely Bedroom Door Ideas Bachelor Bedroom Ideas Inspirational Plan
) and certainly one of these is you, is not it?
Is part of your home sporting those 70’s wood paneled walls? Before you paint the paneling, give these ideas a try first! Keep reading to find out how to make wood paneling look modern – without painting it! You might just be surprised at the outcome!
Not to be Captain Obvious, but I am all for making your home look good, especially considering this is primarily a home decorating blog.
I am all for updating those laminate countertops, hiding those popcorn ceilings, ripping up the wall-to-wall carpeting and other things of that nature.
But sometimes, every once in a while, I prefer to keep those “old” design aesthetics and work with them, instead of against them.
I’m talking about My Jungle Room, folks.
In the Jungle Room, or the den if you want to be so boring as to call it that, we kept the original wood paneling.
I will be the first to say that my initial instinct when I saw this space was to rip all the paneling out. However, budget and seeing a friend’s updated 70’s paneled walls in action helped to change my mind and give it a whirl. Here’s what the space looked like before:
Sexy, no? hehehehe
Now, here’s what I did to make that paneling work and look good.
How to Decorate Wood Paneling Without Painting It
This post contains affiliate links for your shopping convenience. Click here to read my full disclosure policy.
1. Paint the trim
Yes, there is some painting involved, but NOT of the paneling – just the trim around the paneling.
I first saw painted trim paired with paneling at my friend Kellie’s house. She had paneling in much of her den and kitchen and had painted the trim in those areas black. It gave off a really vintage, retro kind of vibe to me and I liked that.
I painted all the trim, the bookshelves, the ledge that runs along one side of the room and the fireplace Limousine Leather by Behr, which is my go-to black paint color. After doing that, the paneling was definitely looking better, but I wasn’t completely sold just yet.
2. Bring in solid colors on furniture.
From that point, I decided that to make the paneling more of a backdrop rather than a focal point, I needed to bring in more solid colors on the furniture.
Luckily, I found this sofa on Craigslist and it worked perfectly. It added more black into the space which helped to pull out the black on the trim even more.
I also brought in these solid navy side tables, which brought more color into the space. Side note: I am planning to paint these red, which I think will look even better in the jungle room.
3. Create multiple focal points.
I know. I’m probably breaking some design rule with this one. That never stopped me before and I certainly didn’t plan on letting it stop me now though. Once more, to make the paneling seem like more of a backdrop, I created two different focal points when you first walked into the room. The first was the fireplace.
By painting the fireplace a solid black, it actually stood out more, rather than blending into the paneling as it did before with the reddish bricks.
I also created another focal point above the sofa.
There, I used the ledge above the sofa to place a vintage brass lamp, the Ocean Avenue art, a family picture and antlers on the wall.
4. Use eye-catching art.
This one is kind of a no-brainer. What’s the best way to distract someone’s eye? Give them something eye-catching to look at.
Of course, you just saw the vignette above where I did this with the Ocean Avenue art above the sofa. I also did it on the fireplace mantel.
On the fireplace, I used a traditional piece of art, this cheetah print, and something a little non-traditional, but that grabbed the eye’s attention – those little red cowboy boots.
Also along the fireplace mantel is a framed record, mine and Grunt Labor’s song, and some DIY text art that also snags the eye with it’s red hue.
5. Layer in texture and pattern.
Not only did this final trick help to make the jungle room a tad more cozier, but it also brought in other elements that worked well with the paneling – texture and pattern.
The biggest way I brought these two things in was with the rug.
Without the rug, the floor would have been quite bland. The pattern and texture of the zebra print rug worked well to bring the eye to the floor.
I also added in more texture with the fur throw (which added to the jungle room vibe as well). The malachite side table brought in more color, which the room needed, as well as pattern.
I also used the snakeskin lamps, green throw pillow and black and cream pouf that you saw in earlier photos above to bring in more texture and pattern.
I realize wood paneling is still something many would prefer to ditch. That’s cool – to each his own. Around here though, we choose to decorate around wood paneling. You’ll find us here flying our freak flag in the jungle room clad with 70’s wood paneling – and loving every minute of it.
Share your tips for how to make wood paneling look good in the comments!
You might just find these posts interesting as well…
The 70’s Landing Pad Home Tour – we embraced the split-level and went 70’s style – with a touch of glam for good measure.
How to Distract from Popcorn Ceilings – six ideas to help hide those popcorn ceilings without the mess of scraping them off!
Want to come back here later? Just pin the image below!
As going to bed is one of the most essential parts of our daily routine, seeing the same bedroom decor can make this routine seem plodding. Changing your room decoration is a good way to stop life being too repetitive and the headboard is often central to your room’s visual style. However, it can be costly to buy a new headboard just because you want a change. With a little artistic flair and creativity you can restore and modify your furniture without breaking the bank. Once you’ve done it, it can look like a whole new room.
Read on as OneHowTo.com explains how to paint your wooden headboard.
- Headboard
- Screwdriver
- Sander
- Dye
- Colourless furniture wax
- Cloth
- Brush
- Table
Remove the headboard from your bed and put it on a table where you can work comfortably. Consider your body posture when working to prevent injury to your back.
If your headboard is covered in fabric, first remove the fabric and staples holding it on. Once you have exposed the wood of the board, you should sand it down well on both sides with a medium grit sandpaper. If your headboard is painted you must also sand it, but you may need a coarser grit to get the job done.
After sanding, use a brush to remove all the dust. You can then start to apply your desired stain to decorate your headboard. Choose the tone you like the most. The more coats you apply, the darker the tone will become.
Leave the stain to dry for a few hours before sanding the headboard again to give it an even finish. This might require a finer grit depending on the finish you desire. If you go too dark, you can also sand the board again and try to get the balance right.
If you want to apply more than one coat of stain, remember to sand the board between coats. After the last coat, you also need to sand it well and then apply a colourless furniture wax. This wax helps to give the stain a nice finish and protects it from damage.
Finally, after leaving the colourless wax to dry for half an hour, polish it by briskly rubbing with a cloth. You’re then ready to reattach the headboard to your bed.
If you would prefer to have a matt finish rather than the glossy wax, you can skip this step. You can also lightly sand either patches of the board or the whole thing. This gives the headboard an ‘upcycled‘ look, but should depend on the style of the rest of your bedroom.
Once you have made these changes and decided to play around with your bedroom decoration, why not check out these articles on How to Decorate Master Bedroom Walls and How to Decorate a Bedroom Feng Shui Style.
If you want to read similar articles to How to Paint Your Wooden Headboard, we recommend you visit our DIY & decorating category.
Wall painting always jumps into our mind whenever we think about home renovation and décor. We start scrolling down our Pinterest board, browse décor websites and visit paint shops to get inspiration for painting our walls. Should I go with simplicity is the best policy, or follow the rule of extravaganza? The minimal color palette will be the best, or bright colors are in trend? And what about experimenting with miss-match antics? These are some of the things that cross your mind while deciding about the color palette for your walls.
But what if I ask you to minus wall painting altogether from your home renovation? Yes, you heard it right! I am asking you to skip painting, but no, I am not asking you to ditch wall décor. This time transform your space with some innovative ways that also doesn’t require you getting drenched in the paint from head to toe, or going through the headache of saving your furniture from getting splashed. Here are some ways that you will simply love:
Pull Some Fabric:
Tapestry décor has come back in the fashion game, and tradition lovers and innovation seekers are loving it equally. And why not? Tapestries decorate the wall with colors, art, and design in one go. Yes, tapestries have come out of the old period movies and are confidently settling on walls of modern homes because they look great. They give artful, traditional, luxurious and vibrant feel to the wall which isn’t possible with simple paint. Try them out to have some royal vibes!
Mural Designs:
The mural is another way that can change the outlook of the whole wall without a tint of paint. Mural comes in so many designs, from scenery and abstract shapes to quirky images, you can choose them as per your taste and vibes you want to pull. The best thing is that murals from Muraledesign are so easy to install and take off. You don’t have to undergo any kind of hassle to get a desirable living space that triggers your aesthetics.


