ABOUT THE AUTHOR
Sharon Perkins
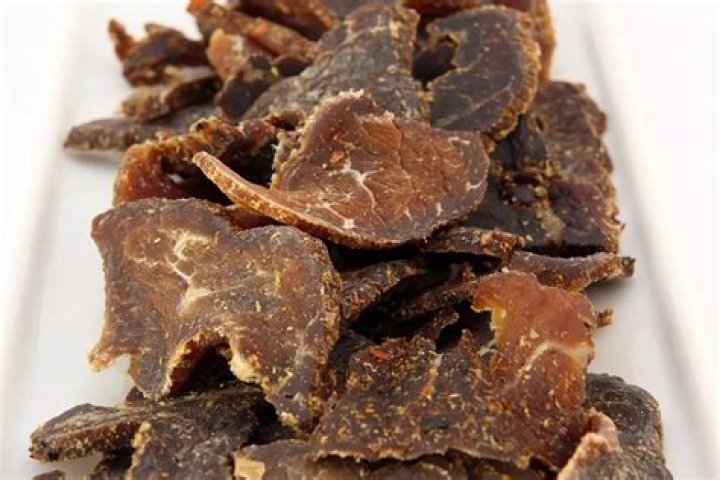
Dehydrated meat is easy to store and take with you if you’re camping or hiking and is also a good way to store meat, because dehydrating reduces the bulk of meat, making it more compact. Dehydrating meat is a first step to preserving it, but dehydrating alone won’t safely preserve meat. You also have to place your dehydrated meat in a safe place, in appropriate containers, for the proper amount of time. Taking the time to store and save dehydrated meat correctly ensures the meat will remain free from bacterial contamination and spoilage.
Dehydrating Meat
Dehydrating, or drying, meat means removing much of the water content. Removing water doesn’t affect the nutrition of the meat, but does increase its shelf life without refrigeration. Because bacteria, mold and yeasts need water to multiply, dehydrating meats makes them less vulnerable to contamination that can spoil them or make them dangerous to eat. Because dehydration alone heats meat only to 140 degrees Fahrenheit, it doesn’t thoroughly cook meat or kill bacteria. Roasting or boiling meat in marinade before dehydrating in the oven or dehydrator heats it to 160 F, making it safer to eat. You can also cook in the oven at 275 F long enough to heat the meat to 160 F.
Containers for Dehydrated Meat
Dehydrated meat does best when saved in airtight lidded containers that are completely free from moisture inside, because moisture encourages bacterial growth. Glass jars or other airtight containers keep moisture out. You can also use vacuum packaging to keep dehydrated meats dry and safe.
Storage Areas
Keep dehydrated meats in a cool, dark area. You can keep dehydrated meat in your kitchen cupboard, as long as the cupboard isn’t too close to the heat of the stove. Keep dehydrated meats in an unrefrigerated area for no more than two weeks, the National Center for Home Food Preservation recommends. After that, place the jars in the freezer or refrigerator for use up to one year after dehydrating.
Safety
Keep the area you work in to dehydrate meat scrupulously clean and wash your hands thoroughly before touching the meat. Dehydrated meats can grow mold if moisture gets into the container. If you see mold, throw the meat out. Treat pork or game meat to kill trichinella, the parasite that causes trichinosis, by freezing a piece of meat cut 6 inches thick or less at 0 F for 30 days. This treatment does not destroy bacteria, however. Only heating to 160 F will destroy bacteria such as Escherichia coli.
Dried meat is light in weight and rich in protein, making it an important staple for hikers, paddlers and other outdoor enthusiasts to take in their food packs. It provides us with energy, play a vital role in metabolism process, help repair body tissues (skin, bones, muscles) and boost the immune system. Meat also is rich in minerals (iron, zinc, magnesium) and vitamins (E, B).
What meat can be dried?
You can dry any raw meat (beef, poultry,game) or canned. However, each type of meat requires different pre-treatment.
How to make beef jerky
Choose a lean cut of meat in excellent condition. Remove skin and bones (for poultry).
Trim the visible fat off and throw out any filmy membrane tissue. It’s very important to trim meat well. Remember that fat doesn’t dry and can later turn rancid.
Cut into thin strips or slices, about 1/4 inch (6mm).
Marinate for 6–12 hours in the refrigerator.
Pre-cook meat by either roasting or steaming them to get an inner temperature 160–165F/71–74C. This step assures that any bacteria present will be destroyed before drying.
Rinse off and spread on dehydrator trays.
Dehydrate at 145F/63C temperature for 4–6 hours until hard and no moisture pockets available. Meat should be dry-leathery or partly brittle when done.
Put into vacuum-sealed containers, glass jars or zip lock bags.
Store in a dry, dark place at room temperature for two months.
How to dehydrate ground beef and turkey
Choose the leanest meat available. Put it in a skillet, break into fine pieces and cook until no pink meat remains.
Transfer meat into a colander to drain the fat. Rinse with hot, boiled water. Season to taste and leave to cool.
Spread cooked ground meat on dehydrator trays, covered with non-stick sheets or parchment paper.
Dehydrate at 145F/63C for 4 to 6 hours until completely dry and brittle. Blot off any fat with paper towel once or twice while drying.
Put into vacuum-sealed containers, glass jars or zip lock bags.
Store in a dry, dark place at room temperature for two months. Vacuum-seal or freeze for a longer shelf life.
Are you a hunter or a fisher? Or maybe you just want a way to preserve meat for longer term storage — other than freezing it.
Well, drying meats is a way of preserving used years and years ago by the Indians and other ancient peoples.
Indians would cut the meat into long strips and hang it up to dry in the wind and sun. They called it charqui (pronounced “sharky”). As English explorers moved into Indian territory, they picked up that name for dried meat, and it gradually changed to “jerky” or “jerked beef”.
Another method used by North American Indian tribes was to pound the dried meat with a rock and gradually mix it with fat, dried fruits, and vegetables. The result of this process was “pemmican”. It provided an ideal food of concentrated energy packed for the trail.
On rainy days, the Indians found their meat strips hanging in the rain instead of the sun and wind. So they moved it into the tepee and hung it over the smoking fire. The result was smoked jerky which had a delicious flavor and possibly prolonged its “shelf life”.
Meats can be dried in much the same way as fruits and vegetables; however, there are a few more precautions to take. Meat is made up of both lean and fat portions, and while the lean keeps well when dried, the fat portion will turn rancid. So to avoid this, only the leanest meats should be used, removing all possible fat before drying.
This discussion is only about fully cooked meats (not jerky), which is a good way to preserve leftover roast turkey or pot roast. Information on how to make your own jerky can be found here.
Here’s how to dehydrate your own beef (or any meat):
- Cook it well (steam, paise, simmer in a small amount of water, or cook in a pressure cooker for 35 minutes)
- Slice it thin, or cut in 1/2 inch cubes, or grind it if you like (it will dehydrate faster when ground up).
- Dehydrator: Spread the cubes sparingly over trays and dry at 140 degrees F (60 degrees C) for about 6 hours (or follow the directions that came with your dehydrator).
- Oven: Spread over trays and dry at 140 degrees F for about 6 hours, then stir cubes/slices and lower temperature to 130 degrees F (55 degrees C) and continue drying until hard. Keep door of oven ajar.
- Sun: Spread cooked cubes in a thin layer over trays and place in a well-ventilated place in full sun. Dry until hard, stiring occasionally. Drying time will depend on the weather and the moisture in the meat, but should be from 2-3 days. Take trays inside at night.
How to rehydrate:
Pour 1 cup of boiling water over 1 cup meat cubes. Soak for 3 to 4 hours, or until water is absorbed. Use in any recipe calling for cooked meat. Or pour boiling water over meat and simmer over low heat for 45-50 minutes.
What is the shelf life of dehydrated meat?
If it is properly prepared and kept in a cool, dry place, very lean beef, venison, poultry, lamb, and fish can have a shelf life of a year or more. Pork does not dry or store well because of the high fat content, but lean ham can be dried and stored for several months.
I personally would vacuum seal dehydrated meat in the appropriate bags, but using oxygen absorbers will also remove the oxygen if the meat is put into a canning bottle.
There are a few tricks when dehydrating meat for backpacking meals that greatly improve its tenderness when you rehydrate it on the trail.
In this section I share my bread crumb technique and cover how to dehydrate ground beef and turkey, sliced ham, shrimp, tuna and imitation crab meat. I continue with how to dehydrate chicken in the next section.
Before we get into how to dehydrate meat, let’s cover a question I often receive about dehydrating meat.
How Long will Dried Meat Keep?
Freezing dried meat will preserve it for several years.
Vacuum sealing the dried meat prior to freezing prevents freezer burn and freezing stops the clock for all biological processes.
For use and storage less than a year, freezing is not required, but is still beneficial before you assemble your meals – provided you take reasonable care in drying and packing it:
- Dry only lean meats and blot off any oil during the drying process. It is the fat in meat that can turn rancid as it reacts over time with oxygen. Heat and light accelerate oxidation, so store in a cupboard away from heat.
- If storing dried meat for up to two weeks in preparation for a trip, you may store it in jars with tight fitting lids. If your trip follows shortly thereafter and is for only a few days or a week, packing the meat in zip-style bags with the other ingredients in the meals is sufficient.
- If use of the dried meat will occur beyond a month, or if you will be hiking or paddling in hot or moist conditions, vacuum seal the meat.
Storage Tips for Month-Long Trips or Longer
If you will be dehydrating meat several weeks in advance and sending food ahead in mail drops or carrying it on a long journey, vacuum seal and freeze the dried meat until ready to assemble into meals.
Photo at Right: Vacuum Sealed Ground Beef & Turkey
Tip: When removing dried food from the freezer, allow it to return to room temperature before opening the container to avoid condensation from forming on the food.
After the meals are assembled, vacuum seal into daily rations.
Note: I have eaten meals preserved this way, which included dehydrated meat, over a year after I packaged them with no problems.
See the section on vacuum sealing food for more information.
Dehydrating Meat: Ground Beef
Backpackers often call dehydrated ground beef “gravel” because it doesn’t rehydrate well. Solve this problem by adding bread crumbs to the meat before cooking it. Bread crumbs allow more liquid to penetrate the dried meat when you rehydrate it, so it turns out tender every time.
If you are sensitve to gluten in breadcrumbs, you can substitute ground oats or millet to prep the ground beef. Learn how in this Trail Bytes article.
Use only lean or extra lean ground beef with fat content in the 7% to 15% range. Ground beef with 15% fat content is often labeled as Ground Round. Ground beef labeled as Chuck or Hamburger will have higher fat content. Grass fed beef is usually in the 7% to 10% range.
Some of the fat in the ground beef gets removed when you cook it. Some fat beads up on the surface of the meat while drying. Blot off the fat from the meat with paper towels after cooking and a couple of times while it dries. Starting with low fat meat and blotting off what you can during cooking and drying will minimize any risk of the meat spoiling after it is dried.
For each pound of beef, sprinkle ВЅ cup of finely ground bread crumbs over the meat. Work the bread crumbs into the raw meat with your fingers. Make bread crumbs by dehydrating bread slices for two to three hours and then grinding the dried bread in a food processor.
Break the meat into small pieces and cook in a frying pan over medium high heat until lightly browned and fully cooked, stirring continuously. Remove from heat and squeeze between paper towels to remove moisture.
Spread small pieces of ground beef on dehydrator trays covered with Excalibur ParaflexxВ® sheets, parchment paper or the fruit leather inserts that go with your dehydrator. Using non-stick sheets keeps small pieces of dried beef from falling through the trays.
Dry at 145В° for approximately six hours. Ground beef will be hard when dry.
Once or twice during the drying process, move the meat around and squeeze with a paper towel to remove oil. Wipe any oil off the non-stick sheets. Break any pieces of meat that are drying slower than the rest in half.
Dehydrating meat separately allows me to include it in a wide variety of recipes which combine it with different starches (potatoes, rice and pasta) and vegetables.
You’ll find the complete collection of recipes which include dehydrated meat in my book, Recipes for Adventure .
You can also dehydrate meat in a complete meal. See Dehydrating Meat in Chili.
People write to me often to say how much they enjoy eating it on the trail.
Click the images above, or these links below, to visit the meat pages:
Chicken | Roast Beef | Turkey
Dehydrate Your Left-Overs!
Dehydrating meat that is pre-cooked and pre-sliced makes this task easy – we have the perfect way for dehydrating meat safely! Are you ready to make lots of great stews and soups!?
Meats are the building block of proteins for the body, and it’s so easy to have your own dehydrated meats on hand.
Fastest and Easiest Way to Dehydrate Meat:
Use Pre-Cooked Meats!
Meats can be preserved by smoke, freeze-dried, or cured by salt. But we’re all about the ‘easy’ here as in ‘easy’-food-dehydrating! For example, when preparing chicken for the family dinner, put some extra chicken in the cooking pot and save it to dehydrate later on!
Or as my brother says:
“I’m saving it for Ron” – “late. R on” . (I can hear you groaning!)
So let’s get some cooked meat dehydrated NOW before inflation hits big time – and meat prices start escalating (even more than they already have . )
Use Stock To Add Flavor
Check out our “re-hydrating” page – and consider using chicken/beef stock when re-hydrating meat! Adds more flavor, that’s for sure!
Dehydrate Your Leftover Meats!
Important: While vegetables re-hydrate very well, I cannot say the same for meats.
You may experience a more chewy texture than you’d like . but it’s better than not having any meat available at all, that is, unless you are a vegetarian.
Feel free to experiment with longer re-hydrating times for less-chewy meat!
What’s The Ideal Temperature
for Dehydrating Meat?
Cooked meats are best dehydrated at 160°F – but please consult your food dehydrator’s owners manual for their specific instructions.
Preparation for Dehydrating Your Cooked Meats
Your meat is already cooked, so that’s one step saved – so no further preparation is necessary for dehydrating meat this way.
The best meats to use are choice cuts – the tender cuts – so they won’t be chewy or tough. The less fat on the meat, the better as it’s the fat in meat that causes the meat to go rancid.
Learn which beef cuts are best for dehydrating at TheMeatSource. This site has tons of great info. on how to cook meats properly!
Dehydrated meats are perfect to use in stews, soups, or in a Beef Stroganoff for example. (Recipe link just below).
Make sure the meat pieces are SMALL so they re-hydrate more evenly.
Vacuum sealed dehydrated cooked meats can last up to 2 to 3 weeks at room temperature.
Store in Refrigerator or Freezer
Until Ready to Use
To maintain the quality of dehydrated meats, please refrigerate or store in the freezer until ready to use. Dehydrated meats will stay fresh for up to six months in the freezer – without freezer burn!
Check out some of our recipes like Beef Stew, Chicken Soups, and much more!
Great Tips From Easy Food Dehydrating Visitors:
One of our site visitors, Paul Bee, wants to add this:
Get Lean Roast Beef, 1/16″ thick!
“Go to the deli counter and get lean roast beef, turkey, or chicken and have them slice it about 1/16 inch thick. When you get home, slice it into strips and dehydrate. I use it for a quick snack or when camping. As mentioned by Susan, freeze it until you are ready to use within the time limit. Vacuum sealing keeps moisture from getting to the jerky.”
– Thanks, Paul, for writing in!
Sarah in Australia wanted us to know this about canned chicken:
Get Low-Fat Canned Chicken
“I do a lot of dehydrating for long hiking trips, and have found that the canned chicken (that looks like canned tuna) in the supermarket (yes sounds gross) is the only chicken I’ve been able to dehydrate that re-hydrates exactly like it was prior. Taste and texture on re-hydration is perfect for chicken, just remember to buy the low fat canned chicken”.
Hi Sarah – that’s really great to know! I actually have been known to use the ‘canned chicken’ in soups and chicken salad! 🙂 And yes, the low-fat stops rancidity when storing “long-term”. Thanks so much for posting!
You Might Like These .
Dehydrating Chicken – Sliced Pre-Cooked Chicken Breast
Dehydrating Chicken – It’s E-A-S-Y when you use pre-cooked, pre-sliced chicken breast! More info right here.
Dehydrating Turkey – Sliced Pre-Cooked Turkey
Dehydrating Turkey – It’s E-A-S-Y when you use pre-cooked, pre-sliced turkey meat! Check it out .
Dehydrating Beef – Sliced Pre-Cooked Roast Beef
Dehydrating Beef – So Simple when you use pre-cooked, pre-sliced roast beef! Check this out .
10 Incredible Health Benefits of Using a Dehydrator
10 Tasty Foods You Can (And Should) Dehydrate
3 Benefits of Dehydrating Food You Need to Start Taking Advantage of
4 Important Advantages of Switching to a Dehydrated Food Diet
November 16, 2018
Have you ever wanted to learn how to dehydrate meat? Maybe you’re sick of paying for expensive beef jerky at the store, or just looking for new recipes to try.
Learning how to dehydrate your own meat is a game changer. You can save money, preserve food, and experience all sorts of new ways to consume some tasty morsels.
However you found this article, you’re in luck, because you’re about to learn how to dehydrate meat in the comfort of your own home. Here are 5 simple steps to dehydrating your own meat.
1. Gather Ingredients
The first step to dehydrating your own meat is to gather all the ingredients you’ll need. Which types of protein will you dehydrate? What will you flavor your meat with?
If, for example, you are dehydrating ground beef, you’ll probably want to also gather particular spices that might not work well for something else.
2. Trim The Fat (And Anything Else)
If you want dehydrated steak or dehydrated turkey that tastes good, you’ll need to trim away all of the fat. Fat can turn rancid and ruin all your hard work.
On some cuts of meat, you may also have to remove skin and bones. You’re basically looking to get your cut of meat down to the leanest version of it you can make. This will make the end result much tastier and easier to rehydrate if you are doing something like backpacking.
3. Marinate
For exceptional flavors, you’ll want to pick a marinade that goes well with your protein choice. For example, dehydrated beef might not take more than just some good meat and a little bit of salt. Like a good steak, you don’t want to overpower the meat with too much flavor.
On the other hand, ground turkey will benefit from flavors like lemon, Worcestershire sauce, paprika, and garlic. You can combine these in a bowl before you dehydrate it to add flavors to your finished product.
4. Set The Temperature, Low And Slow
The temperature on your oven should be set between 140-160 degrees. Most dehydrated meat recipes between 6-8 hours on a cookie sheet for the dehydration process to take place fully.
At least once during the drying process, move your meat around and squeeze it with a paper towel. If there is oil on the surface, this will help to remove it so it dries properly.
Obviously, be aware that the meat needs to be fully dried in order for it to be safe to consume. The last thing you want is anyone to get sick!
5. Store Properly
When it comes to producing a good product, you’ll want to store your finished work in a dry, dark place before you consume it.
Dried meats can actually be frozen for several years and not go bad. For bulk drying, consider this option so you don’t waste any of the finished product!
Ready To Learn How To Dehydrate Meat?
The process of how to dehydrate meat is not that difficult. It only requires you to follow a few steps. With some practice, you can be drying your own food for backpacking trips or just for the enjoyment of trying something new.
Check out some of our eBooks for more kitchen secrets and dehydration tips.
Drying your own food for the trail is a great way to save money, reduce weight of your backpack and enjoy quick, tasty and comforting meals throughout your adventure.
There are two ways to prepare dehydrated backpacking meals :
- when you make the meal, by assembling the powdered and/or dried ingredients or
- by cooking the entire meal first, then dehydrating it.
How to dehydrate whole meals and leftovers
To successfully dehydrate whole meals and leftovers you have to follow some rules:
- Thoroughly cook your food before it’s placed in the dehydrator.
- Always reheat leftovers before drying, to prevent the growth of bacteria.
- Cut or shred your vegetables, fish and meats into smaller pieces. This ensures quicker drying and quicker rehydration when you’re at the campsite.
- Place the food evenly on the dehydrator so it quickly dries the food out.
- Allow the dehydrated food to cool down before you package it.
- Divide and pack meals into single servings.
- Label and date each bag.
- Store bags with dried food in a cool, dry, dark place, preferably in the freezer.
- Do not dry food that contains oils, fats and dairy products. It will likely become rancid quickly.
Rehydration basics
The general rule for food rehydration is to use equal parts water and dried food ( 1 cup of dried meal to 1 cup of water ). You can always add more water later to get the consistency you want. How long it’ll take your food to rehydrate will depend on a number of factors:
- The size of the piece of food. Smaller pieces of food and powders rehydrate almost instantly. Larger pieces may take from 30 minutes to several hours.
- The type of food and whether it was fresh, cooked or canned before drying. Uncooked food takes longer to rehydrate than roasted, canned or blanched food.
- The degree of dryness of the food. Food that was dehydrated until hard will take more time to rehydrate.
- The temperature of liquid being used to rehydrate the food. You can use both cold and hot water for this process. However, rehydration with hot water and further cooking work best for the trail.
Looking for a way to store perishable food for longer than its typical shelf life? You have a few options, including canning, smoking and dehydrating. When it comes to the latter, you have even more choices for dehydrating the food, including specialized appliances or homemade outdoor dehydrating stations that harness the power of the sun.
But if you have a convection oven, there’s no need to go to any great lengths to purchase or build a special food dehydrator. Your dehydrator is already sitting in your kitchen!
Why Dehydrate Food in a Convection Oven?
Still need a little convincing about choosing dehydration as your preferred food storage method? Think about it this way: it’s more versatile than canning or smoking. You can dehydrate anything from fruit to meat, and because the moisture has been removed, the food becomes inhospitable to mold, mildew and bugs. However, despite the loss of moisture, dehydrated food retains its delicious flavor.
Best of all, once the food prep is complete, you just put it in the oven and walk away. No need to sweat over a hot stove as in canning. Plus, dehydrated food doesn’t take up much space in your pantry. It’s a win-win no matter how you look at it.
You also don’t need any materials you don’t already have if you choose to dehydrate food in a convection oven. You just need a sharp knife for food prep, a cooling rack, an oven and a chunk of about 6 to 12 hours where you’ll be around the house and ready to keep an eye on the proceedings.
Is Your Oven a Convection Oven?
The next thing to think about is the type of oven you own. A convection oven is a type of electric oven that has a fan at the back instead of a metal coil at the bottom. The fan helps to circulate hot air, heating food through a process called convection.
Convection ovens are more efficient at lower temperatures than gas and conduction ovens. This makes them ideal for dehydrating because the temperature ranges for dehydrating food are all below 160 degrees Fahrenheit, and the fan helps to circulate the air evenly around the food as it dries.
So, if your oven has an electric plug and has a fan at the back with no coil on the bottom, congratulations: you have a convection oven!
Start With Proper Food Prep
The first thing you need to do is prepare the food. If you want to dehydrate vegetables or fruits, wash them the way you would if you intended to eat them or cook with them right away. That means scrubbing dirt off of root vegetables and rinsing the produce in water, or scrubbing with soap if you like. If you don’t like peels on your fruits and veggies, now is the time to remove them.
If you wouldn’t normally eat the veggie raw, steam it first to improve its taste when it comes out of the dehydrator. Feel free to add some spices to liven things up.
Prepping Meat for Dehydration
To prepare meat for dehydration, you may want to look up a particular recipe. That’s because you’ll want to marinade the meat or create a dry rub for it before you dehydrate it. This way, the flavors are thoroughly blended into the jerky once it’s done. You also want to trim away any and all fat on the meat, because fat does not dehydrate well and can lead to spoiled jerky.
As with any other cooking method, it’s important that meat reaches a certain temperature so that it’s safe to eat. But because you’ll be storing this meat on a pantry shelf, it’s absolutely crucial to kill any pathogens in the meat. You can precook the meat to an internal temperature of 160 degrees Fahrenheit before putting it in the oven for four to six hours to dehydrate. You can also choose to zap the meat at a higher temperature after dehydrating it, or use a meat probe to ensure the internal temperature has reached 160 degrees.
Thin Slices Work Best
Next, it’s time to slice the food into strips that are a 1/2 inch wide or smaller. The thinner you can slice them, the faster they will dehydrate. But perhaps more crucial to the success of this operation is not the exact width you settle on, but consistency in your slicing. This is definitely the time to dig out the mandolin slicer for consistently sized veggie and fruit pieces.
If you don’t have a slicing gadget to help you, just take your time. Same-size pieces will dehydrate at similar rates, which means you won’t have to fiddle with the food by taking thin slices out early and leaving thicker ones in to dry longer.
To make convection oven beef jerky, you can save yourself some frustration by asking the butcher to give you thin slices when you buy the meat.
Set the Correct Temperature on Your Convection Oven
The temperature you set depends on the food you dehydrate. Fruits and vegetables should be set to 120 to 140 degrees Fahrenheit, while meat requires 140 to 160 degrees Fahrenheit.
Some ovens are more efficient than others and may even have a convenient preset like the KitchenAid oven dehydrate mode. But if your oven isn’t great at regulating its own temperature, you may need to crack the oven door if it gets too warm or turn it up a notch if it gets too cool. You can get accurate readings with an oven thermometer.
Time to Dehydrate the Food
Next, arrange the sliced food onto a drying rack or oven dehydrator trays. This ensures that air can get to the bottom of the food for an even drying process. Don’t let the food overlap; it should lay in a single layer.
Put it in the oven and set a timer for six hours, which is the minimum time it will take. Some foods may not dehydrate fully for 12 hours, based on their composition and the thickness of the slices. Keep an eye on the oven thermometer and make adjustments as needed.
You’ll know when the food is done because it will be completely dry to the touch and dry inside if you slice it open. Take the food out of the oven and let it dry for 24 hours before you store it in an airtight container. It should keep on the shelf for quite a while. Some dehydration enthusiasts claim fruits and vegetables will be shelf stable for years, but use your best judgment before consumption.
Should You Get a Dehydrator?
Dehydrating food in a convection oven is certainly convenient for most people, but if you’ve been bitten by the dehydration bug, you may want to invest in a special dehydrator. That’s because using a convection oven actually requires more energy than a dehydrator. You can also maintain more temperature control with a dehydrator if your oven proves finicky.
All in all, a dehydrator may be a good investment if this turns out to be a great way for you to store food long-term. You can get countertop models or much larger versions for bulk dehydrating. Whatever you choose to do, enjoy the process and the delicious end result!
10 Incredible Health Benefits of Using a Dehydrator
10 Tasty Foods You Can (And Should) Dehydrate
3 Benefits of Dehydrating Food You Need to Start Taking Advantage of
4 Important Advantages of Switching to a Dehydrated Food Diet
November 20, 2018
Dehydration as a method of food preservation is nothing new. In fact, the history of dehydrated foods dates back to ancient Egypt. Since at least 12,000 BCE, people have experimented with a variety of food dehydration methods.
Last update on 2020-08-10 / Affiliate links / Images from Amazon Product Advertising API
The first method used to dehydrate food relied on the sun’s heat. In the middle ages, Europeans began constructing buildings designed for food dehydration purposes. Then, a couple of French inventors created a technique that involved heating and compressing foods.
Today, food dehydration is gaining popularity in homes across America. If you’ve never tried it, it might surprise you how simple the process can be with the help of a food dehydrator.
Read on to learn how to use a food dehydrator for yourself!
How to Use a Food Dehydrator
Before you begin, make sure that you clean the counter space and other areas where you will be working with an antibacterial cleanser. Also, wash your hands, as well as the fruits or vegetables that you will be using.
After cleaning your hands, it’s a good idea to wear gloves so that you don’t transfer any oils from your hands to the foods.
1. Cut the Fruits or Vegetables into Thin Slices
Always be sure that the fruit or vegetables are completely dry after rinsing them before you begin. Then, slice the individual pieces, such as apples or potatoes, into thin slices using a knife or mandolin.
2. Spritz Fruits With Lemon Juice
If you are dehydrating fruits that have a tendency to turn brown, such as bananas, you can preserve their color by spritzing them with lemon juice before placing them into the dehydrator.
This technique also works well with carrots.
3. Blanche or Steam Vegetables
You should steam many of the vegetables that you might use for 10 minutes before dehydrating them. This is the case for broccoli, eggplant, and carrots. You will need to blanch other vegetables, such as cauliflower, potatoes, and squash.
There are some veggies, such as zucchini, that won’t require steaming or blanching before beginning the dehydration process.
If necessary, it’s important that you do not skip this step because it ensures that the vegetables maintain their nutritional value and naturally-occurring enzymes.
4. Place Foods on Racks in the Food Dehydrator
Check to see what temperature it takes to dehydrate the specific fruits or vegetables you’re using. Set the temp on the dehydrator accordingly.
Place the slices onto the rack without overlapping, then put the racks in the food dehydrator.
Most foods will need to heat for several hours to remove adequate moisture. The amount of dehydration time necessary will depend on both the environment and the type of food dehydrator you are using.
Upon removal, foods should be at least 95% dehydrated so that they do not spoil during storage. Excess moisture will cause foods to ruin much sooner.
If the temperature is set too high, it can also cause foods to keep moisture within, even if their outer layer appears to be completely dehydrated.
5. Remove the Dehydrated Food & Place in Air-Tight Storage Container
Once the process is complete, remove the foods from the dehydrator and place in an air-tight storage container.
Most fruits and vegetables will keep for months using this simple, effective method.
Want More Food Dehydration Tips?
Once you know how to use a food dehydrator for fruits and vegetables, the possibilities are endless.
But, when you’re ready, you can also use your dehydrator with meats, and to create tasty recipes, such as fruit leather and beef jerky.
Check out our site for more easy food dehydration tips!
Learning how to dehydrate meat, vegetables, and other food can save you money and space. It can also keep you stocked for an emergency.
Want to survive the apocalypse? Then learn methods to dehydrate food so that you’ll be prepared.
Don’t believe the world is coming to an end? Way to stay positive! Seriously, though, even without end times approaching, learning how to dehydrate food is like beaming to another planet and discovering new culinary treats.
Indeed, dehydrating food yourself will open you up to a whole new world of gustatory delight.
What’s the benefit of learning how to dehydrate food?
If you dehydrate food, you can take it anywhere. You don’t need to eat chalkboard-tasting ready-to-eat meals if you’re doing an overnight backpacking trip. Gone are the days when power bars and trail mix are the only sustenance for hikes.
Take dehydrated food to work with you. If you need snacks to keep your energy up during the day, dehydrated food is perfect. You don’t have to worry about dehydrated food spoiling like fresh fruit. In fact, dehydrated food lasts not years, but decades. Think about all the food you might throw away because of spoilage.
If you learn how to dehydrate food, you’ll save money. You won’t have to consume refrigerated food within mere days. Another benefit of dehydrating food is that you don’t lose any nutritional value. The only thing that goes bye-bye is water. However, one best practice with food dehydration is adding a little pure water before you eat it. Many nutrients are water-soluble. The B vitamin complex are water-soluble. Without water, you’re not going to absorb the B vitamins.
In ancient times, people preserved their food by salting and dehydration. Thus, learning how to dehydrate food is not a recent hipster trend. It’s a tens-of-thousands of years-old preservative technique.
Another benefit of food dehydration is the taste. Many people who have “gone dry” swear that dehydrated food tastes better. One example is tomatoes. Unless you’re in Israel, Italy, Greece or elsewhere in the Mediterranean, tomatoes from the supermarket often taste bland. But magically, out of a food dehydrator, they come back to life. When you remove the excess moisture, food suddenly tastes alive.
What foods can you learn how to dehydrate?
These days, you can dehydrate virtually any food. You can even learn how to dehydrate meat. What else can you dehydrate? Pasta, milk, chocolate, crackers … basically, anything.
The most common way to dehydrate food is by using a food dehydrator. This is arguably the easiest method. As with any other product, prices range from low to high.
You don’t need a top-of-the-line machine. But if you do have the budget and plan on dehydrating lots of food, it’s best to go for a high-quality dehydrator.
Want the best-tasting dehydrated snacks? Then dehydrate only one type of food at a time. And make sure to cut all the slices to the same size and thickness.
Not sure what to start with? Most people start by learning how to dehydrate vegetables, nuts and fruit.
Dehydrated food machine
What are the attributes of a good food dehydrator? There’s airflow. You want enough air to dry out those banana slices. (A side not on dehydrating vegetables and fruits: don’t be afraid to dehydrate the pieces that are imperfect, i.e. the bruises. They will taste great once the moisture completely dries.)
Another marker of a good dehydrator is a unit that has a dual heating element and fan. Temperature and airflow are the two most important aspects of a food dehydrator. You also want a dehydrator with several trays. There should also be an adjustable thermostat. If you want to learn how to dehydrate meat to make your own jerky, the temperature will be different than dehydrating apples. In addition, the trays in the dehydrator should be easy to clean.
Moreover, good food dehydrating units distribute heat evenly. And a high-quality unit like this one, the temperature fluctuates up and down to prevent mold and bacteria growth.
How to dehydrate food without a dehydrator
You can use your oven to dehydrate food. When you preheat your oven, the thermostat usually is set to the lowest setting (150 degrees). Leave the temperature at that setting. Once your oven beeps, you can place a baking sheet with your small-piece cuts of fruits and vegetables. It will usually require up to 8 hours for the dehydration process. This website even suggests using your toaster oven. But be sure to leave the toaster oven slightly ajar. This prevents condensation build-up. Only use your toaster oven if you don’t have any other option, though. It’s better to use a conventional oven.
The oldest and most traditional way of dehydrating food: drying in the sun. You might not necessarily want to leave fresh ground beef out in the sun to make jerky. However, tomatoes, peppers and herbs are particularly easy things to dehydrate in the sun. But with herbs, make sure you don’t let them hang dry in direct sunlight. You can use a herb sunscreen of sorts. Paper towels or a cheese cloth will prevent sunburn.
Some people even use a microwave oven to dehydrate food!
Dehydrating food recipes
Want to learn how to dehydrate meat? Want to make a delicious jerky? It’s easy. Simply marinate your meat (preferably grass-fed, organic) for 12-24 hours. Then, put it in the food dehydrator. Bam, it’s as easy as that.
There are dozens of specific food recipes online. If you want the definitive guide for dehydrating food, there’s no better tome than Jennifer MacKenzie’s The Dehydrator Bible.
Just remember to not dehydrate different types of food at the same time. And don’t stack slices of food on top of each other. The exception to the rule is loose, leafy green veggies.
One final important thought about learning how to dehydrate. You’ll need to store all that dried fruit, etc. in jars and airtight plastic baggies. That is, if you want it to last for a long time.
And if you’re riding out the apocalypse, you’ll enjoy dehydrated food for years. Maybe even decades.
Related Posts
All content on this website is for general informational purposes only. It is not intended to be a substitute for professional medical advice, diagnosis or treatment.
None of the information contained in this website should be used to initiate use of dietary supplements, vitamins, herbal and nutritional products or homeopathic medicine, and other described products prior to consulting first with a physician or healthcare provider. The owner of this site and it’s writers disclaim any liability based on information provided in this website.
About Rachel Garduce
Rachel is the contributing content curator for All Natural Ideas. She is dedicated to a life of natural living and holistic practices. Working as a clinical therapist, she enjoys helping others and holding a space for a like minded community.
Dehydrating ” data-ldtx_powertrust=”0″ data-ldtx_trust=”0″ data-ldtx_power=”0″> Dehydrating or drying foods is a perfect way to preserve foods that are more easily stored than canned varieties. This process is easy to integrate into meals or pack for hiking/camping/emergency foods. In this article, you will find a variety of dried and dehydrated recipes. While most recipes call for a dehydrator, there are other options such as the oven or air drying ” data-ldtx_powertrust=”1″ data-ldtx_trust=”1″ data-ldtx_power=”1″> there are other options such as the oven or air drying .
Different Methods to Dehydrate Food
Before I share food dehydrating recipes, let’s talk about how to make dehydrated food. There are several ways you can dehydrate your food.
Make Dehydrated Food in the Oven
Cut your ingredients into thin slices – around ¼ inch each, and add to the oven.
Use a Toaster Oven
Alternatively, you can use a toaster. Set your toaster oven to its lowest temperature, and keep the oven door slightly ajar. During the time your ingredients are in the oven, keep a watchful eye on them. This is the best strategy to ensure you’re left with thoroughly dehydrated food.
Dehydrate Your Food in the Sun
Another option and the most energy efficient is to dry your food on trays in the sun. Slice your ingredients, place on parchment paper and leave out to dry. Depending on the temperature, this process can take several days to dry your ingredients thoroughly. Use a thin material on top of the dehydrated food to keep insects and flies away.
Use a Microwave
Finally, another process to achieve dehydrated food is with a microwave. However, to dry food this way, carefully consider the foods you use, as this process can take longer than using an oven or dehydrator.
How to Dehydrate Fruit
The best dehydrator recipes produce healthy, pleasant-tasting foods which make a great snack. To improve the taste of your dehydrated food and make the process user-friendly, focus on the preparation before dehydrating.
First, rinse your fruit with cold water – not boiling water. Once cleaned, blot the food dry using parchment paper before adding to trays. Ensure the fruit is thoroughly dry before placing in a dehydrator.
Alternatively, soak the fruit in ¼ cup lime juice and 1 cup water. As a general rule of thumb remember that the thinner you cut your fruit, the less liquid you’ll need, and the less time the fruit will take to dehydrate. Cut the fruit into thin slices. Place parchment paper onto the trays and add the fruit on top. In an average food dehydrator, fruit takes around six hours to dehydrate completely.
To confirm that it’s dehydrated correctly, pinch the fruit to see if any moisture squeezes out. If moisture comes out, the fruit isn’t properly dehydrated. It’s essential that you cut your fruit evenly so that the entire batch finishes at the same time.
What Foods Can You Dehydrate?
There’s an abundance of fruits and vegetables you can dehydrate.
First, apples are a great go-to because they dry easily, and you can even achieve an added crunch if you freeze them. Strawberries will also please your taste buds, and make a great snack for in front of the TV, or for children to take to school. Keep in mind that this fruit doesn’t maintain its sweetness once dehydrated. Blackberries make a great snack or addition to your meal as well. You can even add this fruit to your dried cereal for a healthy and delicious start to the day. Try adding some excitement to your taste buds with pineapple. This fruit dries exceptionally well, although pineapples can lose their sweetness once dry. A way to combat this is by adding sugar once the fruit is dry.
Why not take things to another level with homemade jerky? Ensure you begin with a slice of jerky with as little fat on it as possible. Not only does this make the result healthier, but ensures that the homemade jerky properly dehydrates. Play around with a new sauce to create a homemade jerky marinade recipe the whole family will love.
Dehydrating beef and other meat is an option, too. Ensure that the beef is pre-cooked before you begin to quicken the process. You don’t have to buy fresh beef to dehydrate, because you can use any leftover food from your Sunday roast dinner. Slice up the meat and add it to a dehydrator.
Homemade Dog Food With Chicken, Rice, Carrots & Peas
If you’re fed up with all the additives in doggy treats, consider dehydrating your own meat. Dehydrating meat not only kills bacteria, but imparts extra flavor for your pooch, making the treats perfect for training sessions. Even though you can dry meat in your oven, the safest way is to use a dehydrator, according to the United States Department of Agriculture.
Step 1
Wash your hands with soap and water before handling the meat. Wash the knife and cutting board, as well.
Step 2
Rinse meat. Use paper towels to remove excess water. Place the meat on the cutting board.
Step 3
Cut or slice the meat double the size you want it to be once dried. Slice no more than 1/4 inch thick. Trim off excess fat.
Step 4
Place meat on the dehydrator trays. Avoid letting the meat overlap or touch. Leave space between the pieces or slices for even drying.
Step 5
Set the dehydrator temperature for 160 degrees for beef and 165 degrees for poultry. Depending on the size and thickness of the pieces, you need to dehydrate the meat for three to six hours. If the meat cracks when bent, it is done.
Step 6
Once the meat cools, place the pieces in closeable plastic bags or containers. You can store them in the refrigerator or at room temperature. You can also use freezer bags, if you wish to freeze the pieces.
Partially freeze meat for easier slicing and cutting.
If you don’t like the smell of dehydrating meat, such as liver, move the dehydrator to the garage.
More Articles
The dehydrator was first introduced in 1795 in France as an appliance for drying fruits and vegetables. What manufacturers specify as the use of a dehydrator has come a long way since then. While fruits and vegetables are definitely viable candidates for dehydrating, your dehydrator can dry a variety of other foods and even some non-food items as well.
Fruits and Vegetables
Pick fruits and vegetables when ripe and dehydrate at their freshest for the best taste and to retain the most nutrients. While fresh is usually best, fruits and vegetables that are unsuitable for canning such as overripe fruits or bruised fruits or vegetables are also acceptable for dehydrating. Drying the fruits and vegetables at a temperature between 130 and 140 degrees Fahrenheit keeps the food at a low enough temperature to reduce the loss of heat-sensitive vitamins A and C. Vegetables and fruits are sufficiently dried when they are crisp and have no pockets of moisture.
Meat and Fish
How to Keep and Store Watercress
When dehydrating meat for jerky select leaner cuts of meat such as round or flank steak since fat goes rancid quicker. Dry tender cooked meat to reconstitute later and use in stews or pasta dishes. Dried beef spoils in about three weeks when stored at room temperature; keep it in the refrigerator or freezer for storage times of up to six months. Dry lean fish for jerky; the quality of rehydrated fish is not appetizing and thus not recommended. Dry meats and fish on the dehydrator’s highest temperature setting. Since meat and fish do not contain heat-sensitive vitamins, dehydrating does not affect their nutritional value as drastically as it does when drying fruits and vegetables. The higher dehydrating temperatures also help to kill the bacteria and harmful microorganisms that sometimes contaminates meat and fish. Dried fish and meat is tough, but do not dry it to the point that it becomes brittle.
- When dehydrating meat for jerky select leaner cuts of meat such as round or flank steak since fat goes rancid quicker.
- Dried fish and meat is tough, but do not dry it to the point that it becomes brittle.
Flowers and Plants
Dry flowers, herbs and other plants for food use or to use in potpourri or in crafts, including floral arrangements, corsages or as party favors. Harvest herbs and plants while they are fresh and before they start to open. The aromatic oils in plants are heat sensitive so keep the heat down to temperatures between 90 and 100 degrees Fahrenheit when dehydrating them. Plants dry quickly within about one to two hours. When drying flowers with petals or leaves, using a desiccant in the dehydrator preserves the color and structure of the flower better since it absorbs moisture quickly and shortens the drying process.
Here are two of the easiest methods to dehydrate food naturally.
If you think the only way to preserve fruits and veggies is by using a dehydrator, there are other options you can explore. For instance, you can dehydrate food naturally at home with a few simple steps. So if you have no electric dehydrator and you have some fresh produce you want to desiccate, this short guide will show you the step-by-step methods.
Keeping your food fresh is not the only reason you need to use the drying method. When you dehydrate food naturally or with some equpment, you are also prolonging its shelf life. From preparation, dehydration to storing your dehydrated food – here’s everything you need to know to start.
How to Dehydrate Food Naturally
Dried fruits, vegetables, and other foods are easy to prepare, carry, and use. Some of the important factors in successful drying include:
- stable (warm) temperature,
- good air circulation,
- and low humidity.
Dehydrating is easier than canning because after preparing your slices, just allow them to dry through sun or air drying. After that, you can put them in zip-top bags to keep your food fresh and dry until you’re ready to eat or use them in cooking.
You need the right combination of air circulation, low humidity, and warmth in order to naturally dry foods. Low humidity helps diffuse moisture to the air from your food items. Warm temperature or low heat allows moisture to vaporize, while air circulation speeds up drying.
There are several ways to naturally dry your foods. The following are the best and the easiest methods to dehydrate food naturally.
Sun-drying foods
One of the oldest and simplest ways to dehydrate food is sun drying. This has been used for thousands of years and is still relevant up to this day. You just place your sliced fruits or veggies on racks and let the sunlight take moisture from your food.
If you’re in a location where the hot climate is more prevalent, this is the best method to use. However, if the temperature in your area is at least 86 degrees Fahrenheit (25 – 30C)and with 60 percent humidity, then it will still work. Just make sure that sliced fruits, for example, are set to dry for several days.
Air-drying foods
Another ancient method to dehydrate food is air drying, but this is used to preserve food while protecting them from direct heat or sunlight. It only needs you to place your herbs, greens, flowers, and other delicate produce under the shade so they won’t be damaged by the sun.
If you want to save for herbal teas and other culinary mixes, air drying is the best option. Tie a bundle of these greens, for instance, then hang it somewhere with good ventilation to allow the food to dry. Good air circulation will draw the moisture from your garden bounty.
You can dry almost any foods that are still fresh such as fruits, vegetables, meat, fish, nuts, seeds, sprouted grains, herbs, crackers, granolas, and …. Just remember that some foods dehydrate more successfully than others.
Even though drying food naturally seems like the most natural way to dry your food, it is safer and more time saving to use a dehydrator or even an oven. It really depends on the amount of food you want to dehydrate – if the quantity is small, try a dehydrator or oven. If the quantity of food you want to dehydrate is large, then natural methods might be the way to go.
Storing dehydrated food properly
Before you store any dehydrated foods, check for dryness. If the veggies are brittle, that means they are ready for storage. On the other hand, the leather-like feeling when you touch the fruits is a sign that they are also set for storing. Once they are safely dried, allow them to cool (in case of sun-drying) before putting in a jar or container.
Always check your food while giving it time to cool because a longer cooling period may cause moisture to re-enter your food. Lastly, choose an appropriate container to store your dehydrated fruits and veggies. Keep in mind that proper storage will prevent rodents and insects from sneaking your food.
To ensure that your chosen container will keep out moisture and save nutrients, here are some tips to consider:
- Use vapor-proof freezer boxes, metal cans, glass jars, and cartons with tight lids.
- Tighten covers and lids on glass containers to prevent insects and other harmful elements from consuming your dried foods.
- Choose rodent- and insect-proof plastic bags made with pressed seals.
- Always check the containers, plastic bags, or cartons within 10 days to make sure moisture is not present. Immediately remove the food if you spot some wetness to redry again. However, if your food is already moldy, dispose it of properly and sterilize the container if you intend to reuse it.
Depending on your storage methods and conditions, the shelf life of dehydrated foods can reach up to 12 months. To achieve the best quality, you can store your dried foods in a place with a temperature of 60 degrees Fahrenheit. However, it’s not required to store them in a freezer or refrigerator. The only exception is meat jerky which should be stored in low temperatures in order to extend its shelf life.
If you’re looking to save money, reduce waste, create better flavor, achieve nutritional quality, and easily prepare foods at home, dehydrating food naturally is the perfect solution. So, what types of foods are you planning to preserve?
Think using an electric dehydrator is the only way to be able to dehydrate your garden bounty? You’ve got options!
Dehydrating food is a great way to be able to preserve your garden bounty or great find at the produce stand. You simply remove the moisture from your produce or meat to give it a much longer shelf life. This is not the same thing as freeze-drying which is a more mechanical process. This is simply allowing nature or low heat to dry out food.
Dehydrating takes up less space than traditional canning if canning is not something you want to tackle. It’s also much less hands-on than canning, simply prepare your slices, and walk away, then store (through canning jars with silica packets, zip top bags for quick use, dry canning or using a vacuum sealer) to keep your bounty fresh, but dry, until you are ready to use it in your cooking or snacking. Dehydrated foods typically can last up to a year or more, though meat jerky should be consumed within 3 months.
Off-Grid Drying Racks
This method allows you to use natural dehydration to dehydrate your food without artificial heat. Having the mesh on the sides helps keep bugs and unwanted matter away from your food, you’re not reliant on an energy source other than the wind and sun, but you are dependent on perfect weather for it. Non-humid sunny days work best. These are easy (and inexpensive) to build with some scrap wood and window screening. This method is slower, but not being on the grid has it’s benefits, too!
Solar Powered Dehydrator
from rootsimple.com
from waldeneffect.org
Electrical Dehydrator
Electric dehydrators are probably the most convenient in that you can just throw stuff in and walk away. You don’t have to worry about the weather or bugs or making sure all the conditions are prime. But you are dependent on some kind of power to run them. They are also the most reliable means of dehydrating safely.
Oven Drying
Oven drying allows you to have the benefit of heat drying without having to have a dehydrator. You can’t dehydrate as much food, and you do have to keep an eye on it more closely to regulate temperatures and rotate trays. But if buying another appliance isn’t an option for you, dehydrating in the oven works well. In fact, some experts believe that oven dehydrating jerky in the oven is safer than in a dehydrator.
Air Drying
Air Drying has been a traditional method of dehydrating herbs and flowers for thousands of years.The simple act of tying a bundle, and hanging it from a well ventilated space allows the foods to natural dry from air circulation and pulling out the moisture. This doesn’t work well in high humidity climates, but can be worked around. If you prefer, put a loosely tied paper bag around your bundles to keep dust and insects off. This is also a great way to do smaller bundles of herbs when you don’t want to tie your conventional dehydrator up.
Microwave Drying
Yes, really, you can ‘dehydrate’ with a microwave. Layering foods in wax paper and ‘cooking’ them for long periods of time draws the moisture out in a microwave. But you’re looking at a lot of time spent with it checking on the food, etc. And then, if you want it crispy the way most dehydrated food tends to be, you still need to put it in a conventional oven. Is my bias showing here? Yes. But if you have no other options, it is a method that you can master to make the most of your food storage.
YOUR THOUGHTS? What method are you interested in using or what do you already use?
Need some Dehydrator Recipes?
Supplies you might need:
Click the image to Pin to your Dehydrating or Food Storage Pinterest Board.
If you know a thing or two about storing food, you have probably heard of dehydrating food. It is an easy and cost-effective way to store food for future use. The goal of this post is to show you the right way to dehydrate different types of food items. Read on to learn how to dehydrate food.
Food can be dehydrated in several ways, and the best way is to use a food dehydrator. Before we discuss other methods of dehydrating food, we will introduce you to a food dehydrator.
Table of Contents
What is a food dehydrator and How to choose the best?
It is a tool used to dehydrate different types of food items such as fruits, vegetables, fish and meat. It is a small appliance that uses air and heat to remove moisture from food items. When there is no moisture in your food, the food will not spoil because bacteria and other pathogens can not grow in it.
If you dehydrate food properly, the food will retain most of its nutritional properties. Dehydrated food can be stored for months, even years. If you are wondering how to dehydrate food, a food dehydrator can be a solution to the issue. Dehydration is one of the best ways to store food for long periods.
But, as we have already mentioned, using a food dehydrator is not the only way to remove moisture from food. You can do it pretty well even if you do not have this tool. You can dehydrate food in the sun, or you can use your oven. Now we will show you how you can do it using your oven.
Tips for dehydrating food with a dehydrator
Setting the right temperature is the first rule of dehydrating food. The right temperature depends on the type of food as well as the type of dehydrator. Read the dehydrator label and you will find the guidelines and the recommended temperature. When you are done, the food should be 95% dehydrated.
Preparation is the key. Wash the food thoroughly before you put it in the dehydrator. Do not forget to wear gloves when you touch food. Before you put the food in the dehydrator, allow the food to warm up. It is not a good idea to dehydrate different types of food items at a time.
You may need to put the food back in the dehydrator if the food feels spongy, soft or sticky. If the pieces are hard and crunchy, you can be almost sure that there is no moisture left in the food. If you are wondering how to dehydrate food, this is one of the most important things to know.
Do not hurry, if you try to do it quickly, you may end up spoiling the food. Over drying is always better than under drying. If necessary, dry your food for longer.
How to dehydrate fruit in oven
Fruits are plentiful in summer. If you dehydrate some food during this season, you can enjoy them throughout the year. The good news is, a food dehydrator is not necessary to get the job done. You can do it just by using your oven. This is how to dehydrate fruit in oven.
First, you need to prepare your fruit. When choosing fruits and berries, make sure that they are ripe. Use cold water to wash them and remove blemishes. Remove stems from your berries. Then you need to slice the fruits evenly. To learn how to dehydrate food, this is one of the most important things to understand.
Remove the skins from your fruits if necessary. No all fruits need to be treated this way. But if you are going to dehydrate apples, nectarines and peaches, you should remove the skin. You can soak the fruit in water mixed with lemon juice. Keep it soaked for about 10 minutes and then drain it.
Now pay attention to the oven. Preheat it to 130-160 degrees F. For thinly sliced fruits like peaches and apples, the temperature should be lower. You need a bit higher temperature for fruits such as strawberries.
Take a piece of parchment paper and place it onto sheet pans. Fruits should be arranged in a single layer. As the fruits dry, they will tend to curl up. To prevent it, you can use a silicone pan or pizza screen. Once you have placed fruit into your oven, you have to wait.
Dehydrating times of common fruits
Here is a list of general drying times of common fruits:
- Apricots: 12 hours
- Strawberries: 12 hours
- Citrus peel: 8-10 hours
- Cherries: 12 hours
- Grapes: 8-10 hours
- Bananas: 6 hours
- Apples: 6 hours
- Peaches: 6 hours
- Pears: 6 hours
- Plums: 6 hours
When the fruit is completely dehydrated, store it in a plastic or glass container. The container should be left open for about 4-5 days. During this time the fruit will become fully moisture-free.
How to dehydrate meat in the oven
It is very easy to dehydrate meat with a dehydrator, but you can do it even if you do not have a dehydrator. You can get it done with your oven. For those who can not invest in a food dehydrator, it is really good news. Read on to learn how to dehydrate meat in the oven.
You can dehydrate any meat. Select meat before you go into further action. Once you have chosen meat, you have to remove fat from the meat. Use a sharp knife to trim fat. You are advised to avoid purchasing fatty meat in the first place.
You can either save the trimmed fat or not. This is optional. If you have several pounds of left over fat, you can freeze the fat. This fat can be used for many different purposes.
The next step is to freeze meat partially. Keeping the meat in the freezer for just an hour is enough. Partially frozen meat is easier to slice. Slice widths will be consistent, and the slices will be dehydrated easily. The meat should be sliced against the grain.
You may be tempted to slice with the grain, but that is not the best way to slice meat for dehydration. How thick should the slices be? As a rule of thumb, slices should be 1/8 to ¼ inches thick. Thin strips will take less time to dehydrate. Anyone interested in learning how to dehydrate food should know this.
Light marinating is better
Now you have to marinade the meat. You can do it simply by using salt, pepper, vinegar and water. From health perspectives, minimal seasoning is better than heavy seasoning. You can do it for just one hour or leave it overnight.
If you wish, you can line your oven with foil. Remember, this is an optional step. Then you have to remove the grate of the oven and arrange the strips. It is a good idea to do this over a sink.
At first the oven should be set at a low temperature. 140 degrees Fahrenheit is the ideal temperature. Keep in mind that your goal is to dehydrate the food and not to cook it. Food will be dehydrated faster if you let air circulate opening the oven door.
The process of dehydrating meat can take up to 6 hours. The time depends on the temperature of the oven and the thickness of the slices.
We have explained how to dehydrate food with or without a food dehydrator. If you follow the instructions carefully, you will be able to dehydrate different types of foods.
Let’s say you have a lot of dried meat, jerky, properly stored and preserved for your family’s needs and it is now time to pull it out and use it. Are you going to hand your family a hard piece of dried meat and let them chew on it or are you going to use it in a prepared recipe? Chewy jerky is great, for a snack or an occasional meal but, softening the meat by putting liquid back into it and approximating its original texture is what you really want to do with dried meat.
For larger amounts of dried meat:
Place the dried meat in a metal pan or glass bowl.
Pour boiling water over the meat on about a 1:1 ratio. You don’t want to use more water than can be absorbed as you’ll lose nutrients into the soaking liquid. If you do have liquid left over that is not reabsorbed, add it to your meal somewhere else – don’t throw it away.
It takes up to about 4 hours to completely rehydrate dried meat. Your desired texture may be reached before that, so check the meat frequently. If you want complete re-hydration you should consider refrigerating the meat and water after the first 2 hours to keep any bacterial problems to a minimum.
For re-hydrating small portions of dried meat:
Treat the meat jerky much like you would dried mushrooms and soak it in water, wine or broth for about a half hour until the meat absorbs some of the liquid. This should take some of the chewiness out of the meat and make its texture more like it was before it was dehydrated.
For re-hydrating ground meat:
If you have time to re-hydrate with cool water then it needs to sit for about an hour or a hour and a half to properly absorb.
If you use hot water, then it should be finished within 10-15 minutes. Some indication that the hot water can cause the meat to take on a rubbery feel.
Liquids for re-hydration
Liquids to rehydrate meat in: Broth, water, fruit juice, beer, wine or milk – if it is liquid and safe to drink then it’ll probably work to re-hydrate your meat.
After dried meats are reconstituted with fluids you must remember that they must be eaten or refrigerated after a couple of hours. Re-hydrated meats are subject to bacterial contamination and cannot be kept at room temperature for long periods like the dry meat can.
Have you ever reconstituted dried meat to cook with? Do you have tips to share with us? The comment section below is for you!
Comments
Mike r says
Thank you this was very helpful 🙂
Alpha says
Thanks for all the helpful tips. I’m a backpacker/hiker and have used quite a few of the food preservation and non perishable tips you’ve posted on the trail. Very well done!
Jeff says
What is meant by a 1 to 1 ratio?
Catherine Morck says
Like 1 cup water, 1 cup something else. An example is humming bird food for a feeder should be a 1 to 3 ratio. 1 cup sugar to 3 cups water.
Greg says
Hi Jeff,
It simply means the same amount of liquid as Jerky. eg. 1 cup of Jerky to 1 cup of liquid.
Olen says
That’s not particularly clear, since a cup of jerky is going to have a lot of air space in it. One time you might have much more meat than the next time. Better bet would be to literally weigh out 1:1 with a diet scale, etc.
Earnest says
The ratio is good.
“Cups” however is a terrible measurement for the reason you stated.
Use grams
Jason Poulin says
I have been looking for a freeze dryer that is affordable ya wright $2500.00 now I’m looking into a dehydrator and hopefully more affordable for what I want to do. And this site made my mind up. Thank you.
bubba mustafa says
re-hydrate at a 1:1 ratio.
ok is that volume or weight? Volume is hard to measure with the dried item, tons of air gaps.
Justin Allen says
I put sticks through the meat and hang it on old racks like fridge or oven grills. They just sit in the tiled bathroom with the windo open and fans going for 3 days or so till done. You can literally dehidrate as much as you need in yhis manner. Use your food safety concerns to your own detriment .
Kathy Hammonds says
Why would we hang our food in the toilet room?! Please folks don’t do that.
James Mussell says
I smoked pork chops on the Traeger, then cooled them in the fridge. I sliced them into 1/8″ slices and dehydrated them at 65 degrees C for 8.5 hours. They break when bent.
What would be the best way to re-hydrate this meat? I plan to add it to tomato powder and tomato chunks (both dehydrated) and serve with pasta shells.
Jim
Ryan V. Gagliardo says
Could anyone provide a more detailed description of the texture of rehydrated meat? And was there a point made that boiled water could render meat more rubbery vs. letting it soak longer in a cooler liquid? Thanks!
Kevin says
Hi there – thank you for your info!
Do you have any experience with partially de-hydrated meats, and storing in stone-pressed olive oil? I know it a specific question but I’m trying to preserve some of the bioactive compounds in the meat by not fully dehydrating (chewy on the inside). I am wondering if they can be rehydrated as well? I am going to try this soon! Best,
Leave a Reply Cancel reply
I’m Lauren. Just a new mom trying to share her love for essential oils. Follow me on my journey to learning how I use EO’s daily in my home.
Drying meat into long slices of jerky dates back to ancient Egypt. Today you can dry your own meat using a dehydrator — a small electrical appliance for drying foods indoors. Using ground beef allows you to make jerky or other foods that you can munch on for snacks or while hiking. To dehydrate ground beef, you must first cook the meat to a minimum internal temperature to prevent harmful bacteria.
Select lean ground beef with 15 percent fat or less. Too much fat can lead to excessive oil and moisture that will negatively affect the dehydrating process.
Combine 2 lbs. of ground beef with 1 cup of bread crumbs in a large mixing bowl. The bread crumbs provide texture and flavor to the ground beef.
Warm a skillet to medium heat.
Cook the ground beef mixture, breaking the meat into small pieces until the temperature of the meat reaches 160 degrees Fahrenheit.
Remove the ground beef from the skillet and place it on paper towels to remove any excess moisture or liquid.
Spread the ground beef on the dehydrator trays so it dries evenly.
Turn on the dehydrator to 145 degrees and cook for two hours.
Reduce the temperature to 125 degrees and cook for another six hours.
Based in Nebraska, Jeremy Hoefs began writing fitness, nutrition, outdoor and hunting articles in 2006. His articles have been published in “Star City Sports,” “Hunting Fitness Magazine” and RutWear field journals, as well as on the Western Whitetail website. Hoefs graduated with a Bachelor of Science in exercise science from Nebraska Wesleyan University.
Are you ready to transform the way you eat on the trail?
Start dehydrating food and amaze yourself and friends with your culinary creations.
With a food dehydrator and my backpacking recipes, you’ll make the healthiest, most delicious homemade backpacking meals, trail snacks and desserts.
Learn how to dehydrate food including meat, vegetables, fruit, bread and starches like potatoes and rice.
All the food drying techniques I have employed over the years are linked below, including how to make bark, the secret sauce in many of my meals.
Chef Glenn’s Dehydrating Food Topics:
- Choosing a Food Dehydrator
- Dehydrating Meat (Ground Beef, Turkey, Ham, Shrimp, Tuna)
- Dehydrating Chicken
- Dehydrating Vegetables
- Dehydrating Fruit
- How to Make Fruit Leather
- How to Make Tomato Sauce Leather
- How to Make Tomato Powder
- Dehydrating Tofu
- Bark Recipes: The secret sauce in many backpacking recipes and a tasty snack food. Learn how to blend and dehydrate potatoes, sweet potatoes, beans, corn and pumpkin into bark. Homemade dog treats, too.
- Dehydrating Rice and Risotto
- Dehydrating Macaroni (Trail Bytes Back Issue)
- Dehydrating Olives
- How to Make Bread Crumbs
- How to Make Soup with Dried Food
- How to Vacuum Seal Dried Backpacking Food
- How to Cook Dehydrated Meals on the Trail
Recipes for Adventure
Nicely formatted in Print Edition or PDF Download.
Learn how to dehydrate food.
Over 70 backpacking recipes for dried meals.
“Hello Chef Glenn! I want to say thank you! We just returned from a backpacking trip in the Shadow Lake area of the JMT. I use your recipes and dehydrating food system exclusively; it is an elegant and effective system – and the best way to get enough healthy calories when we are working hard and the weather is so cold. My husband has eaten his share of purchased freeze-dried food and goes on and on about the recipes I prepare from your collections. When we were involved in the Boy Scouts, I taught this system to the boys, and my own boys use it as well. Thank you for all the effort and thought you have put into this endeavor – we appreciate it!” -Jenny S.
Introduction to Drying Food Presentation
Below is a Zoom presentation hosted by the Appalachian Mountain Club of NY/NJ. I gave a 30-minute talk about dehydrating food, followed by a 30-minute Q & A session. Note: The Q & A session gets choppy in places due to a slow internet connection.
Why I Dehydrate My Backpacking Food
More veggies, please!
Freeze-dried backpacking meals are always light on veggies and heavy on starches. We need starches for energy, but I want my veggies, too.
Dice vegetables such as tomatoes, peppers, and onions and put them directly into the food dehydrator.
Vegetables such as broccoli and green beans benefit from a few minutes of steaming before dehydrating. With a small amount of home preparation, include healthy portions of colorful, vitamin-rich vegetables in all of your backpacking meals.
Delicious, homemade taste.
Black Bean Bark Stew, Chili Mac, Easy Cheesy Rice & Beans, Ham & Cheese Macaroni
Keep out unwanted ingredients.
Manufacturers of dried meats and fruits douse their products with preservatives, artificial colors, and flavors. Even Quaker Instant Oatmeal slips you fake strawberries and blueberries with the magic of Red 40 and Blue 2.
Flavored rice and noodle products from the grocery store often contain MSG, excessive salt, partially hydrogenated oils, and ingredients that would be easier to pronounce if you had paid attention during chemistry class.
Free yourself from chemically engineered food by dehydrating food from Mother Nature and you’ll feel well nourished and healthy on the trail.
Prepare the right size meals.
No one wants to get hungry on the trail, and no one wants to pack out leftovers. Only you know how much food you need. Cooking a meal with Вј cup dehydrated meat, Вј cup dehydrated vegetables, and ВЅ cup rice or other starch fills me up nicely, but you could easily bump the quantities up to suit your appetite. On a backpacking trip to Savage Gulf, Tennessee, my friend Gary had to pack out his leftover Mountain House Lasagna, but my homemade Mexican Beef & Rice was just the right size for me and muy delicioso!
Save space in the backpack.
Home-dehydrated meals takes up half the space of store-bought freeze-dried meals, so you can carry a week’s supply of backpacking food without hiring a goat.
Dehydrating food saves money.
If you’re in a hurry to get on the trail, you may gladly pay the higher prices of freeze-dried meals, but if you can plan ahead, you’ll save money drying your own meals. Each one of my backpacking recipes cooks up for about two dollars. In contrast, a freeze-dried meal from Mountain House will set you back seven or eight dollars.
Dehydrating Food for Emergencies
The same meals that I dry for backpacking trips, are what I often eat for work lunches, or while travelling. Having this supply of dehydrated meals on hand means my family is always prepared for emergencies. I vacuum seal the meals, so they are safe and delicious to eat whenever we need them.
The Action Guide provides step-by-step instructions for how to dehydrate food, and how to assemble it into thirty-one meals.
Advertisement: 15% off 5-Tray Dehydrators
Use code 5TRAY15. Sale ends Aug. 11, 2020
America’s Best Dehydrator
Buy Direct from Excalibur
Disclosure: BackpackingChef.com participates in the affiliate program offered by Excalibur Dehydrators. If you make a purchase after following the above link, I may receive a commission. Thank you.
Choosing a Food Dehydrator Important Features, Ease of Use, Capacity.
Written by: Alisha Sloan Off-Grid Foods 14 Comments Print This Article
Image source: 500px.com
In the age of the Internet and microwaves, we tend to expect ease and instant gratification to be a perpetual way of life. We can buy a hundred pounds of meat, stick it in the freezer and eat off of it for a year without any special preparations or considerations made.
But what if the time comes when our modern conveniences are no longer available? Who among us could say that in the event of a catastrophe, we would be able to do what is necessary to maintain a hearty stock of food for ourselves and our families? Look ahead to a future in which unpredictable electrical blackouts make refrigeration impossible and the inflated prices of commodities make them unaffordable.
This article provides an introduction to the two easiest, most fool-proof techniques for preserving meat – curing and smoking – just like our ancestors did it. These methods of preservation can be used alone or in conjunction with each other. I’m going to give you some tips on curing and smoking meats as well as a little bit of insight as to how and why (even with the availability of refrigeration) it is a healthier option than freezing.
The process is basically the same for all different varieties of meats, although the recipes may differ slightly.
Cure
The process of curing is simply using the benefits of salt to preserve meat. Before refrigeration was available, curing was just about the only way to save up meat in warm weather months. Without salt, bacteria would grow in and on the meat and quickly cause it to go bad. The basic role of salt in curing is to dehydrate the meat just enough so that bacteria cannot thrive. However, even if you have the convenience of refrigeration, curing is a great way to preserve the natural flavors of the meat as well as to keep essential vitamins and minerals that are often lost in the freezer.
There are two ways to salt-cure meat. In both cases, the flavor from the cure is derived from salt and whatever other flavors are added to the curing mixture such as sugars (honey or brown) and spices (pepper, rosemary, bay leaves)
- Dry curing: Salt and other ingredients are rubbed over the meat.
- Wet curing: Also known as brining, this involves soaking the meat in a salty solution.
One of the most important ingredients to include when preserving meats by curing is sodium nitrate. Sodium nitrate can be found in all kinds of leafy green vegetables and can be added to your salt mixture in the form of celery juice, ground spinach or pink salt (curing salt #1, which is 7 percent sodium nitrate). Sodium nitrate is useful for warding off the development of one of the worst kinds of bacteria found in food — botulism. Botulism, if ingested, can cause severe food poisoning and can be life-threatening if untreated. So we want to do everything we can to make sure that our cured meats are as safe as possible. Sodium nitrate will also make your cured meats turn a nice shade of bright reddish-pink. One thing to be mindful of, however, is that high levels of nitrates (like most anything) are toxic and you need to be careful about the amount that you are adding to your curing mixture. Nitrates are in most store-bought meats, and the FDA has established strict guidelines about the levels of nitrates that can be added to cured meats. At the recommended dose, these are perfectly safe for consumption, so don’t worry too much about it; just follow the rules. (Note: During the curing process, nitrate turns into nitrite.)
Smoking
Image source: TheOrganicsInstitute.com
Smoking is a process of curing meat that involves prolonged exposure to wood smoke (usually hickory, maple, cherry, oak, and other fragrant hardwoods. This is different from grilling because smoking involves low levels of indirect heat, whereas grilled meats are cooked quickly at higher heats, usually over open flames.
Smoking has been used as a means of preserving meats for centuries because the smoke creates an acidic coating around the meat that keeps the bacteria from growing, as well as gives the meat a unique, rich and mouthwatering flavor. Smoking also helps to dehydrate the meat, again changing the environment within the meat so that it is less hospitable for bacteria to thrive in. Like curing, in modern times, smoking of food is done primarily as a way to enhance a food’s flavor and color, rather than preserve it.
There are two types of smoking:
- Hot smoking: Done at temperatures of at least 150 degrees F. The goal is to cook the food at the same time it is being flavored with smoke. It is still cooked much longer than grilled meats, in lower temperatures, but hot enough so that the meat cooks very slowly, making it tender enough to fall right off the bone and melt in your mouth.
- Cold smoking: Processed at less than 100 degrees F. This method isn’t meant to cook the meat at all; it is merely used to flavor and seal the meat with the smoke barrier so that the bacteria cannot cause it to spoil, but it can still be saved to cook at a later time. This is a really good way to flavor meats that have already been cured if you like that smoky flavor. Salamis and sausages are very good when given the added flavor of cold smoking.
Smokers come in all shapes and sizes to fit your individual needs and are fueled by charcoal, electricity, gas, wood, etc., in order to generate smoke. Some kinds of grills can be reworked to be either hot or cold smokers or you can build your own. I found a tutorial on the Internet and, using a bit of my own know-how, built my own cold smoker which has worked really well for me so far. It was a lot cheaper than many of the store-bought versions. In any case, it is important to have some outdoor space to do your smoking.
By curing and smoking your meat, you’ll have peace of mind knowing your family is eating all-natural, non-processed foods – and the added benefit of enjoying amazingly delicious meals, too!
What smoking and curing tips do you have? Tell us in the section below:
Dehydrating is great for food storage, and dehydrated food can be pretty delicious too. Dehydrating is just the method of removing moisture from food. This changes the food’s texture and taste, but more importantly slows growth of microorganisms and drastically increases the storage life. While you can dehydrate almost any food, certain foods have qualities that make them better suited for long term storage. Higher acid content and lower fat content can help a dehydrated food have less potential for spoiling. Dehydrating food can cause the food to lose some nutrients, but up to 90% of them can be retained if you dehydrate food at a lower heat for a longer period. Some common dehydrated snacks you are probably familiar with include beef jerky, banana chips, and trail mix fruit.
If you don’t have one already, you will need a good dehydrator. Some foods can be oven dried or air dried, but having a dehydrator will allow you to dehydrate any food on the list below. Dehydrators come in a wide range of sizes and prices, but the best one to get started is probably just the Nesco FD-75A Snackmaster Pro. Being on the cheaper side will let you try dehydrating without investing too much money, but it still has the capacity and capability to be used to improve your long term food storage.
Whether you are dehydrating fruit s, veggies, or meats you will want to use fresh supplies that are not blemished and that dry well. Dehydrating pairs especially well with gardening, since you can harvest your garden and dehydrate everything you can’t use right away while it is ripe. The same is true for hunting large game, since you will need to freeze or preserve large amounts of meat anyways. You can even take advantage of farmers market or supermarket specials and stock up on supplies when they are on sale.
Best Fruits to Dehydrate
Fruit is great for dehydrating for long term storage or just for a snack on the go. Pick perfectly ripe fruit, wash them thoroughly, and then slice into thin slices. The thinner the slice, the quicker the drying. Some smaller fruits can be dried whole, but require a little bit more time. Apples and pears may turn a brownish color when dried, but they are still safe to eat. If the discoloration really bothers you, you can treat the sliced fruit before you dry it with ascorbic acid for a few minutes to preserve the color.
Best Vegetables to Dehydrate
Vegetables make a great choice for dehydrating but can take a little longer than fruit because they usually have less acid. Just like the fruit, you will want to wash thoroughly and then slice. Some vegetables need to be blanched, which means boiling them and then dropping them into icy water. This slows the enzyme breakdown to a crawl which will help preserve flavor and texture. You can typically dry vegetables for a longer time, reducing their moisture content all the way down to 10%.
Best Meat to Dehydrate
Dehydrating meat is a great way to preserve it to last a long time and provide much needed protein during a disaster. Lean meat is always best, since fat does not dehydrate well and can cause jerky to spoil quickly. Some meats will require some sort of treatment to kill microorganisms before drying, especially if you are using wild game meat. Freezing the meat can make it easier to slice into thinner portions, which can make it easier to dry out. You want to cut slices no larger than ¼” and even that would be pushing the limits. Cut the meat against the grain with a sharp knife for a less chewy but a more tender texture. The best choice for dehydrating meat is using lean beef.
The Final Word
Using a dehydrator is a great way to boost your long term survival food storage. We recommend using a healthy mix of food items, storage methods, and an inventory system to maximize your survival potential. Make sure you use a good airtight storage container to further increase the storage time of your dehydrated foods. Keep exploring, stay prepared, and be safe.
The best way to stay up to date with our articles is to sign up for updates by subscribing to TruePrepper, or by following our Facebook page.
Rusty
I am an engineer by day, but a prepper 24/7. I am an Air Force veteran that developed emergency and disaster plans as an emergency manager and responded to many attacks and accidents as a HAZMAT technician. I have been exposed to deadly chemical agents, responded to biological incidents, and dealt with natural disasters worldwide. Check out my full story here: Rusty’s Story
One thought on “ The Best Food to Dehydrate for Long Term Survival Storage ”
I’ve dehydrated zucchini, I cut it into slices and on some I’ve added seasoning like you would potato chips, I vacuumed sealed them into canning jars, I did this a few years ago and they are still crisp and tasty today
Leave a Reply Cancel reply
Start Prepping
TruePrepper is a free resource supported by our readers. If you buy recommended gear we may recieve an affiliate commission at no cost to you. Learn more on our disclosure page and how you can help us out.
Join TruePrepper
       
Start to Finish:
1 pound of jerky
Beginner Making deer jerky at home is a simple way to preserve large amounts of meat, and for making easy protein-rich snacks. You will need a dehydrator with a temperature control feature and a probe-style instant-read thermometer to safely preserve meat. Lean, intact muscle tissue makes great jerky. Use this method to make jerky from your favorite game meats, or from lean cuts of beef.
- 1 cup Worcestershire sauce
- 1 cup soy sauce
- 2 teaspoons ground pepper
- 1 large onion, diced
- 2 cloves garlic, minced
- 1 teaspoon liquid smoke
- 3 pounds fresh venison
Combine the Worcestershire sauce, soy sauce, pepper, onion, garlic and liquid smoke in a large zip-top bag. Remove the venison from the freezer and slice against the grain into thin strips. Put the strips into the bag with the marinade. Refrigerate for 4 to 6 hours or overnight. Put the venison in the freezer for 30 to 45 minutes or until firm, but not frozen solid, before slicing. This will make the meat easier to cut into thin strips. Preheat the oven to 275 degrees Fahrenheit. Lay the marinated meat in a single layer on a rack set over a baking sheet. Roast until the internal temperature of the meat reaches 160 degrees F. Remove the meat from the oven. Set the dehydrator’s temperature control to 130 to 140 degrees F. Spread the meat in a single layer on the drying racks in the dehydrator. Allow the meat to dry for 5 to 10 hours or until it reaches the consistency you prefer. Homemade jerky is shelf-stable for 1 to 2 months. If you have more jerky than you plan to use in that time frame, you can vacuum-seal individual portions to extend its shelf life, or freeze it for up to 6 months. Get creative with your jerky marinade. This is where the real flavor of your finished product begins. Use these suggestions as a starting point:
- Sweet and salty: Substitute 1/2 cup pure maple syrup for half of the Worcestershire sauce in this recipe. Your jerky will have rich, sweet maple undertones.
- Spicy: Add a chipotle chili (or two) in adobo sauce to the marinade.
- Asian-inspired: Substitute grated ginger for the onion in this recipe, and add 1/4 cup chopped lemongrass to the marinade.
Dehydrating food for long-term storage is the third step to ensuring safe food dehydration. Click here to read about the other steps. In this post I’m going to cover how to dehydrate:
1. Fresh or frozen fruit
2. Fresh or frozen vegetables
Why “cooked” meats, you ask? It’s easy and it’s safer. I’m not talking about jerky-making here as that needs spices. What I’m proposing is to use the Sunday dinner’s leftovers. I’ll continue with the cooked meats shortly.
Dehydrating Fresh or Frozen Fruit
Pardon me for plugging my own website here: Easy Food Dehydrating. In my Fruit section that currently lists the top 14 fruit, you’ll see exactly what each fruit needs (prep wise) and at what temperature to dehydrate them at and for approximately how long. Notice that I use lemon juice to deter oxidation (browning) — a prep step — and I use a glass bowl in which to spray and toss the fruit (and veggies). Here are my top five fruits to get you started:
• Apples – peel and slice – spray with lemon juice – lay on trays – dehydrate between 125 degrees Fahrenheit and 135 degrees for 4-10 hours until pliable
• Bananas – peel and slice lengthwise or in coins – spray with lemon juice – lay on dehydrator trays – dehydrate between 125 degrees and 135 degrees for 6-12 hours until they are leathery
• Grapes (for raisins) – rinse and pat dry – slice in half, cut side facing up on the dehydrator trays – dehydrate between 125 degrees and 135 degrees for 6-10 hours until pliable
• Pears – wash them – peel if desired – remove the core and cut into halves, quarters, or 3/8-inch slices (so long as they’re all roughly the same size for even drying) – spray with lemon juice – arrange on your dehydrator trays – dehydrate between 125 degrees and 135 degrees for 6-16 hours until pliable
• Strawberries – wash and cut off the top, cut into 1/4-inch slices or into halves – arrange on your dehydrator trays – dehydrate between 125 degrees and 135 degrees for 6-15 hours until crisp and leathery
Even though the “owner manuals” state you don’t have to rotate the trays during drying, I do. Those trays closest to the fan are obviously going to dry faster — and it’s better to have them all dry at the same rate!
Don’t forget to use your dehydrator sheets to keep your trays clean. Check out this post for more information on accessories to use when dehydrating sticky fruits.
Regarding using frozen fruit, you do not have to do any prep steps! In the five fruits I mentioned, their prep steps included washing, slicing, and spraying with lemon juice. When using frozen fruit, any big clumps of fruit can be run under (good) tap water for a few seconds to loosen them (while on the dehydrator tray). If the fruit is still in the bag, thump it on the counter-top a few times to loosen clumps — and don’t blame me if the bag bursts — just be careful!
Dehydrating Fresh or Frozen Vegetables
Again, visit Easy Food Dehydrating. In my Vegetable section that currently lists the top 16 veggies, you’ll see exactly what each vegetable needs (prep wise) and at what temperature to dehydrate them at and for approximately how long. Here are my top five veggies:
• Broccoli – cut your broccoli florets into even-sized pieces, rinse – blanch for 2 minutes – lay on trays – dehydrate between 125 degrees and 135 degrees for 6-14 hours until brittle
• Carrots – peel and slice in coins — or dice them – blanch for 3 minutes (see note below) – place on dehydrator trays – dehydrate between 125 degrees and 135 degrees for 6-12 hours until they are leathery
• Garlic (regular or elephant) – peel and slice as evenly as possible (mandolines are great for elephant garlic) – place on the dehydrator trays – dehydrate between 125 degrees and 135 degrees for 6-12 hours until brittle
• Onions – peel – slice into rings, chop into slices, or dice (so long as they’re all roughly the same size for even drying) – arrange on your dehydrator trays – dehydrate between 125 degrees and 135 degrees for 4-12 hours until pliable and please keep your windows open or run your stove’s vent hood to remove odors. Why? Onion odor is poisonous to pets.
• Zucchini – wash and slice into 3/8-inch slices – arrange on your dehydrator trays – dehydrate between 125 degrees and 135 degrees for 5-11 hours until brittle
Note for the carrots: if you don’t want to blanch your carrots, you can simply spray them with lemon juice instead. Much faster!
Don’t forget you can also dehydrate frozen vegetables just like the frozen fruit.
Back to Dehydrating Cooked Meats
To dehydrate cooked meat, it really is simply a case of cutting up leftover chicken, beef, or ham into pieces that are roughly the same size. Consider dehydrating tubs of cooked meats, or if you have time to stand in line at the deli, ask them to slice your chosen cuts of cooked meat about 1/16-inch thick. When you get home, cut into strips and dehydrate at the higher temperature of 160 degrees F.
In the next post, I’ll get into the step that many fans of dehydrating omit. It’s a super-important step, especially for mushrooms! It’s called “conditioning.” Until then, have a super week!
To read all of Susan’s posts, please visit this page on MOTHER EARTH NEWS.
Since December of 2010, Susan Gast has operated Easy Food Dehydrating, a website dedicated to dehydrating fresh fruits and vegetables, and cooked meats. Susan teaches you how to safely store your goodies too—for long-term food storage. Keep your food pantry full—whatever the reason or season!
All MOTHER EARTH NEWS community bloggers have agreed to follow our Blogging Best Practices, and they are responsible for the accuracy of their posts. To learn more about the author of this post, click on the byline link at the top of the page.
Many articles about dehydrating fruits and vegetable suggest using lower temperatures for a longer period. Much of what I’ve read says to dehydrate below 110 F in order to preserve enzymes and keep the food living and raw. We have been pleased with the results never setting the temperature above 105 F. I think you are dehydrating at too high of temperatures to maintain food quality.
Working out how long to dehydrate jerky is something that takes practice. It is a case of finding that sweet spot where there is a nice chew to the jerky without it being too brittle.
Dehydrating jerky is not really a case of saying, this is how many hours to do it for, there are several factors that come into play, however, I have some good tips that will help you decide when your jerky has dried enough so let’s take a look.
Table of Contents
Determining How Long To Dehydrate Jerky
Dehydrating anything, not just jerky, is a process that needs your attention. We can ballpark a length of time that is roughly correct but there needs to be some checking towards the end of dehydrating your jerky to get it just right.
In most cases dehydrating jerky could take anywhere between 5 – 15 hours depending on different variables.
An example to work from is this beef jerky recipe that uses a simple marinade which takes roughly 6 – 10 hours to dry.
Factors Affecting Jerky Drying Times
There are certain variables that will either shorten or lengthen the time it takes to dehydrate any jerky so altering these variables will help you estimate (with practice) a drying time.
Thickness: As with dehydrating anything the thickness of the meat will have an affect on drying time. Simply put, the thicker your jerky the longer it is going to take to dehydrate.
You will want to slice the jerky less the 1/4 inch / 6mm thick but more than 1/8 inch thick / 3mm. Between this range will give good texture without making it overly difficult to thoroughly dry the jerky.
Method Of Dehydration: Depending on whether you dry jerky in a dedicated food dehydrator, oven or even sun drying will have an effect on dehydration time. The quickest and most efficient method is with a dehydrator, sun drying and oven drying will in most cases take longer as there is less airflow.
Marinade & Salt: If you are using a wet marinade then you will need to blot this thoroughly before you start dehydrating the jerky. If you leave a wet marinade on the surface of the meat then this has to dry out before the jerky even begins to dry.
Salt levels also affect the amount of moisture in the meat before drying. Salt draws moisture out of the meat at the same time as helping draw flavour from the marinade or rub into the jerky.
Dehydrator Temperature: The temperature in which you need to dehydrate jerky is important. To make meat safe to eat and kill possible pathogens the jerky needs to be heated, all the way through, to 160°F / 71°C and 165°F / 74°C for poultry.
Once this temperature has been reached internally you can lower the heat in which you dehydrate jerky to around 130°F – 140°F. If you leave the meat dehydrating at a higher temperature it will of course dehydrate quicker but the texture will be more brittle and less pleasing.
How To Check If Your Jerky Is Done – Jerky Doneness Tests
Checking for “doneness” is to all intents and purposes a case of testing and sampling. You’ll need to check the progress of the jerky drying regularly and towards the end of drying especially so.
There are a couple of common methods to check the jerky is dried that work quite well and they are as follows:
The Bend Test
When you reach a point when you think you need to check if your jerky is done the simplest method is the bend test.
To do the bend test take a piece of jerky out of the dehydrator and let is cool for 5 – 10 minutes.
Once cooled bend the jerky at a 90 degree angle, look for any moisture being squeezed out. If there is the jerky needs to dry more
If dried properly the jerky should almost fray where the meat is bent but not snap or crack.
Chew Test
After bending the jerky and being satisfied give the jerky a chew.
The texture should be almost like leather and be chewy without being soft or moist. It should not be brittle or sharp which would indicate it has been overdried.
Once fully dehydrated store the jerky correctly and it should last quite a while.
There’s no denying that jerky is one of the US’ favorite snacks, but there’s also no denying that it’s expensive, and many people see it as a big treat in their weekly grocery shop. This is the main reason that many people are turning to the food dehydrator – this simple appliance allows anyone to make their own jerky for a much lower price than ready-made and packaged options.
If you would like to dehydrate meat yourself then you’ll first need a dehydrator appliance. Take a look at our By Brand pages and By Type pages for information on the best selling models and current ranges. From there, you can decide on what marinades or jerk seasonings to use, and of course which meats to use too. The most popular include turkey, beef, venison and buffalo.
Dehydrating meat safely is of paramount importance, and as you know it’s possible to suffer food poisoning from meats. Luckily, there’s a simple process that kills all dangerous bacteria from meat before drying, so before we tell you how to dehydrate meat, we are going to go through this step. It simply involves cooking the meat at 160 degrees fahrenheit, until it is cooked through and piping hot in the middle. You can check this by putting a knife into the meat for 2 to 3 seconds, removing and checking the temperature with your finger. From there you can dehydrate your meat as follows…
You should consider whether you want to marinade and season your meat before it is dehydrated, and if so then this should be done before the initial cooking to 160 degrees F. If you haven’t done so already, then slice your meat into pieces around half a centimeter thick, 6 cm long and 3 cm wide, and arrange them on your dehydrator tray.
To dehydrate meat, all you need to do next is turn the dehydrator on, and if it has settings, set it to dry for a long period of time. Most jerky tastes best when it’s dried over at least 3 days. To ensure it is safe to eat, you should keep the temperature to at least 120 degrees fahrenheit for the duration.
Once the meat dehydrating is finally dry, you can simply turn the appliance off and serve. It really is this simple to make your own beef jerky at home, and perhaps the best part is that you can choose your own seasonings too.
How long to dehydrate deer jerky? I’ve heard this question during one of my conversations with my hunter folks. It seems that they don’t have an iota of an idea of the preparation time of this type of jerky.
For me, it is an unusual question. It is not because deer (or venison) is an exotic variety of meat. That’s not the reason. In the United States today, the popularity of deer meat is beginning to reach the commercial market. Even a simple household cook like me knows a thing or two about deer recipes.
The reason why I deemed it unusual is that only a few people attempted to make a deer jerky. Therefore, it is not very common to see this kind of query every day. Even if you jot it down to search engines like Google, getting the right answer is still quite a hurdle.
But in this article, I will end such quandary once and for all. In this way, you can prepare any jerky deer recipes without any worries!
How Long to Dehydrate a Deer Jerky
If you are new to jerkies, you should understand that the ideal preparation method of this dish is through drying. It can increase the lifespan of the meat as it removes the liquid and other types of spoil-causing elements that are in the flesh.
There are different factors that could affect the drying time of a deer jerky. Therefore, there is no exact time in which you can tell that the meat is already a jerky. You should take these considerations into account.
Temperature
You can set the temperature of an oven or smoker to your liking. That’s your prerogative, and I don’t have any control over it. However, it would determine the speed of your cooking. Evidently, if you put the drying device at higher temperatures, the dehydration process would be quicker also. Take a look at the example below:
- 160 degrees Fahrenheit – 4 hours
- 150 degrees Fahrenheit – 7 hours
- 140 degrees Fahrenheit – 8 hours
- 130 degrees Fahrenheit – 10 hours
As you can see, the longest drying time of a deer jerky is ten hours. Of course, preparing any food at such length is quite exhausting, right? If you are not up for the waiting game, then you should maximize the temperature of your drying device.
Cut Choice
You should know as well that the meat cut is a huge factor to the speed of the drying process. The time that I mentioned earlier is for meat cuts that are lean and doesn’t contain fat. Well, you might really enjoy eating fatty foods. But for making jerkies, they are not really recommendable.
The more the fat content of meat, the longer it will dry. You cannot expect that the meat will quickly shrink just because you subjected them to intense heat. Cranking up your oven or smoker to extreme temperature could also toast the meat. And that’s not how you prepare a jerky.
Of course, this is not only applicable to deer jerkies. Any jerkies adhere to this unwritten rule. You must not use fat portions of the meat. Otherwise, you will spend a long time in the kitchen. For beef jerkies, you can check this article for a full guide (The Best Cut for Beef Jerky article).
How to Tell if a Deer Jerky is Done
It is quite easy to tell if the meat is already a jerky. Aside from being aware of the recommended drying period, you should also do physical checks. First, you have to be wary about the color. A fully cooked jerky should have a reddish to brownish texture.
Second, touch if the meat is already firm. If it is tender, then it is not yet ready for consumption. Moreover, if the meat cracks if you bend it, then it is already a jerky worthy of being devoured!
How Long Does a Deer Jerky Last
I already mentioned earlier that a deer jerky (and any other types of jerky) has a long lifespan. If you know how to store them properly, they can last for one to three months. If you freeze the delicacy, it would still be good for the next six months.
Fortunately, storing a jerky is easy. You just have to put them inside containers or Ziploc bags. In this way, external detriments that could cause food spoilage won’t get in your way!
Conclusion
Preparing a deer jerky is fun and satisfying. It lets you exercise your patience and creativity while you are inside your kitchen. Moreover, it allows you to experiment with different recipes that could fully enhance the taste of the treat.
There is no exact answer to the question “how long to dehydrate a deer jerky.” As I mentioned earlier, the drying time depends on the temperature that you subject the meat.
Let just me remind you that the choice of meat is an essential factor to the success of your cooking. Furthermore, make sure that you have the right ingredients and drying appliances as well!
Did you like this article? Do you have any deer jerky recipe that you want to share? Let me know about it in the comment section below!


