There was a time when typing was very laborious work. With that conventional numeric keypad, typing was really a very time-consuming task. However, with the advent of Qwerty keyboards and screen touch phones makes typing a super easy and fun job. This feature becomes even more convenient, easy and smooth with ‘Swipe Gesture’ typing. Talking particularly about Android phones, Swipe Gesture typing feature would not let you embarrass due to wrong spells.
In this piece, we are describing you the steps to enable and disable ‘Swipe Gesture’ typing feature. Although we advocate this feature for convenient typing if your fingers are not set for swipe typing, you probably end up with the mess of words on your screen. Also know about Aptoide Apk is the best alternative to Google Play, an Android app store where you’ll be able to find millions of apps and games completely free of charge.
In such a case, you may disable this feature too. Before we move to know the steps to enable or disable swipe gesture typing feature, you must know what we mean by ‘Swipe Gesture’ typing. Well, Swipe Gesture is a keyboard feature added in Android devices to facilitate the users with easy typing. When you enable this feature, you would be able to type at the swipe of your finger.
WPS Connect is an application which aids for getting your entire router’s issue been solved. You can do this by possessing WPS Connect APK. This is an astonishing app that lets you change your router’s password if there are any vulnerabilities in your router.
Say you want to type ‘Hello’ to your friend, with ‘Swipe Gesture’ you can do so simply by swiping your finger from ‘H’ to ‘E’ to ‘L’ to ‘O’. Try it out enabling this feature now.
Step to Enable ‘Swipe Gesture’ Typing on Android
- Open ‘Google Keyboard’ application on your Android device.
- Go to the ‘Settings’ menu of the Google Keyboard App.
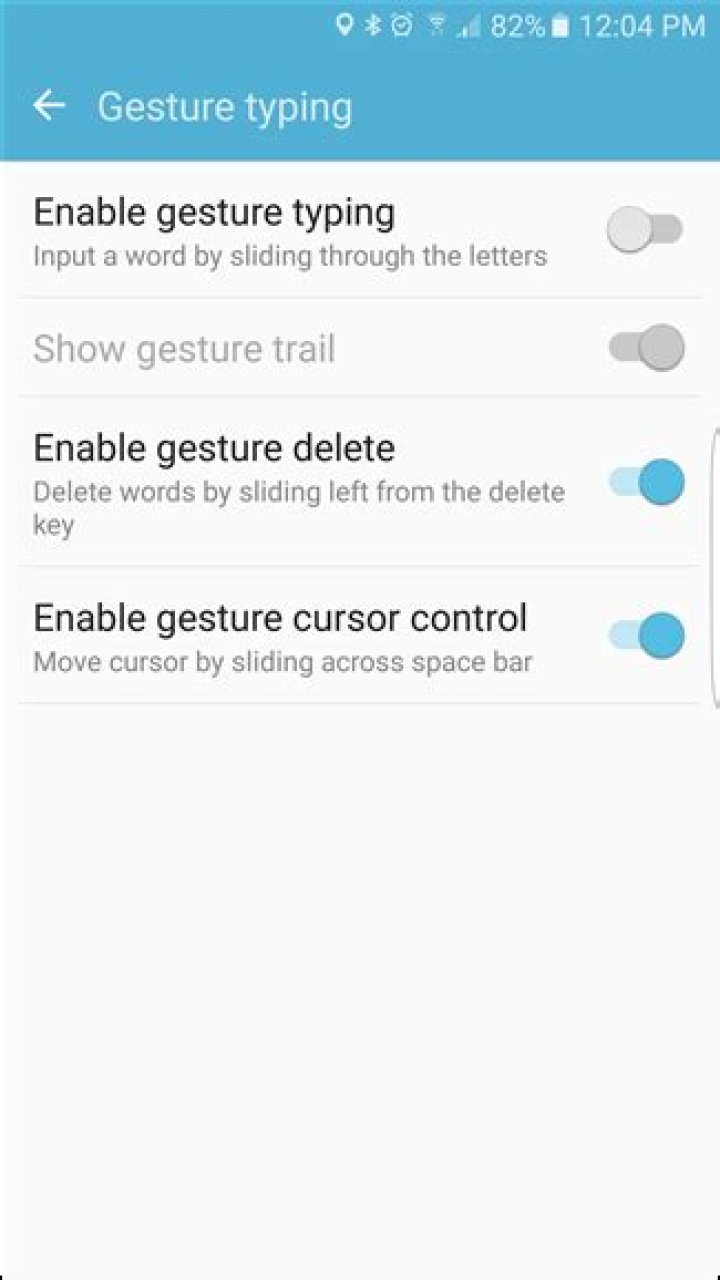
- Tap on the option of ‘Gesture Typing’.
- There you will 4 options viz.,
- Enable gesture typing.
- Show gesture trail.
- Enable gesture delete
- Enable gesture cursor control.
- Slide on the options as per your preference and choice.
- Save the changes you made.
That’s all. You are now ready to type at the lightning fast speed with just the swipe of your finger.
Step to Disable ‘Swipe Gesture’ Typing on Android
To get out of the swipe typing, you may disable this feature of ‘Swipe Gesture’ anytime –
- Open ‘Google Keyboard’ application on your Android device.
- Go to the ‘Settings’ menu of the Google Keyboard App.
- Tap on the option of ‘Gesture Typing’.
- There you will 4 options viz.,
- Enable gesture typing.
- Show gesture trail.
- Enable gesture delete
- Enable gesture cursor control.
- Slide off the 1 st option in order to disable ‘Swipe Gesture’ typing on your Android device.
- Save the changes you made.
Sum Up
With tons of social media apps, we use our phone less for voice communication and more for texting and hence we always wish to type the fastest. There is no doubt that Swipe Gesture typing is a wonderful feature of Google Keyboard which gives you flash-like typing speed and brings convenient typing option. However, swiping is not always well timed.
Sometimes it may result in typing terribly wrong words which may make your task more complex and you find the classic technique of tapping the letters better. In this post, we have explained both options to our readers so that they can enjoy flexible typing. Read our blog for more articles like this.
Okay, hurtige tommelfingerhuller, du ved hvordan dette virker: Du skriver en super vigtig SMS-besked ved breakneck-hastighed, når alle en pludselig opdager tastaturet din Flash-lignende tapping hurtighed som en swipe. Doh! Nu i stedet for at sige “Ja, jeg vil elske at gå i biografen i weekenden!” Du lige faldt en “Travis lobectomy govtfilm denne skrevet!” På din intetanende fling.
(Ja, det er en rigtig besked jeg fik
Den gode nyhed er, at deaktivering af gestusning i Google Keyboard på Android er super nemt, så du kan sige ord, der rent faktisk giver mening fremad.
Dette skal fungere på alle de nyeste versioner af Google Keyboard, men menuerne kan variere lidt afhængigt af hvilken version du kører. I denne vejledning bruger jeg version 5. Lad os gøre det!
Det første du vil gøre, er at starte tastaturet på en eller anden måde – hvis du har tastaturgenvejen aktiveret i app-skuffen, tryk bare på.
Hvis ikke, skal du åbne en boks med tekstindtastning for at starte tastaturet, og tryk derefter langsomt på kommaet (det er en tilbageslag, hvis du bruger Chrome). Når du slipper knappen, vises en dialogboks med to muligheder: Sprog og Google Tastaturindstillinger. Du vil have den sidstnævnte.
Du skal vises i menuen Indstillinger, trykke på indstillingen “Gesture Typing”.
Der er et par forskellige valgmuligheder her, som du kan lege med for at “tilpasse”, hvordan gestus fungerer. Hvis du bare vil deaktivere den helt, skal du slukke for “Aktiver gestusskrivning”, “Aktiver gestusslettelse” og “Aktiver gestusmarkørstyring”.
Ellers kan dudeaktiver Gesture Typing selv og lad “Gesture delete” og / eller “Gesture cursor control” aktiveret. Det er ret pænt.
Når du har fundet din perfekte kombination af indstillinger, er du bare tilbage ude af denne menu. Du er færdig.
Gestusskrivning kan være nyttig (og hurtig!), Men hvis du ikke bruger det, så er der virkelig ingen grund til at holde den aktiveret. Når det er sagt, er “Gesture delete” og “cursor control” mulighederne begge ganske nyttige, når du vender dig til dem. Alvorligt – du bør prøve dem begge, hvis du ikke allerede har det. De er pæne.
Det siges, at en telefon er tabt eller stjålet hvert tredje sekund, hvilket er nøjagtigt roden af hvorfor det mobile data backup-felt bliver mere overfyldt. At holde sig foran konkurrencen er ingen picnic, men WinX MediaTrans gør det nemt! Simpelthen er WinX MediaTrans, udviklet af Digiarty Software, en ny slags mobil filhåndtering til brugere iOS og Android (kommer senere).
Det lader til, at folk bare ikke kan få nok af vejledningerne til at skabe skjulte mapper eller låste mapper i Windows. Jeg har allerede skrevet to guider om, hvordan man gemmer en mappe, en ved at bruge en meget enkel indbygget funktion i Windows og en anden ved at bruge nogle Windows-scripts. I sidstnævnte artikel nævnte jeg også et gratis program, som du kan bruge kaldet Folder Hide til helt at fjerne en mappe fra synlighed. End
Geoffrey Carr
Oke, penyadap jempol yang cepat, Anda tahu cara kerjanya: Anda mengetik pesan teks yang sangat penting dengan kecepatan yang sangat tinggi, ketika tiba-tiba keyboard mendeteksi kecepatan pengetukan seperti Flash sebagai gesekan. Doh! Sekarang alih-alih mengatakan “Ya, saya ingin pergi ke bioskop akhir pekan ini!” Anda baru saja menjatuhkan “film-film anime Travis lobectomy yang ditulis ini!” Pada orang yang tidak Anda curigai.
(Ya, itu adalah pesan nyata yang saya gunakan dengan mengetik isyarat.)
Kabar baiknya adalah bahwa menonaktifkan ketikan isyarat di Google Keyboard pada Android sangat mudah, sehingga Anda dapat mengucapkan kata-kata yang benar-benar masuk akal untuk maju.
Ini harus berfungsi pada semua versi Google Keyboard terbaru, tetapi menu dapat bervariasi sedikit tergantung pada versi yang Anda jalankan. Dalam tutorial ini, saya akan menggunakan versi 5. Ayo lakukan ini!
Hal pertama yang Anda ingin lakukan adalah meluncurkan keyboard dengan satu atau lain cara — jika pintasan keyboard diaktifkan di laci aplikasi, cukup ketuk itu.
Jika tidak, buka kotak apa pun dengan masukan teks untuk meluncurkan keyboard, lalu tekan lama koma (ini adalah backslash jika Anda menggunakan Chrome). Ketika Anda melepaskan tombol, kotak dialog akan muncul dengan dua opsi: Bahasa dan Pengaturan Keyboard Google. Anda menginginkan yang terakhir.
Anda harus muncul di menu Pengaturan, ketuk opsi “Isyarat Ketikan”.
Ada beberapa opsi berbeda di sini yang dapat Anda gunakan untuk menyortir “menyesuaikan” bagaimana gerakan bekerja. Jika Anda hanya ingin menonaktifkannya sepenuhnya, Anda harus menonaktifkan “Aktifkan ketikan isyarat,” “Aktifkan hapus gerakan,” dan “Aktifkan kontrol kursor gerakan”.
Kalau tidak, Anda bisa nonaktifkan Ketikan Isyarat itu sendiri dan tinggalkan “Hapus isyarat” dan / atau “kontrol kursor Gesture” diaktifkan. Itu cukup rapi.
Setelah Anda menemukan kombinasi pengaturan sempurna Anda, cukup mundur dari menu ini. Anda sudah selesai.
Ketikan isyarat dapat berguna (dan cepat!), Tetapi jika Anda tidak menggunakannya, maka tidak ada alasan untuk tetap mengaktifkannya. Yang mengatakan, opsi “Gesture delete” dan “kursor kontrol” keduanya cukup berguna setelah Anda terbiasa dengan mereka. Serius — Anda harus mencoba keduanya jika Anda belum melakukannya. Mereka rapi.
Okay, speedy thumb tappers, you know how this works: you’re typing a super important text message at breakneck speed, when all of a sudden the keyboard detects your Flash-like tapping quickness as a swipe. Doh! Now instead of saying “Yeah, I’d love to go to the movies this weekend!” you just dropped a “Travis lobectomy govt movies this written!” on your unsuspecting fling.
(Yes, that’s a real message I got using gesture typing.)
The good news is that disabling gesture typing in Google Keyboard on Android is super easy, so you can say words that actually make sense moving forward.
This should work on all of the most recent versions of Google Keyboard, but the menus may vary slightly depending on which version you’re running. In this tutorial, I’ll be using version 5. Let’s do this!
The first thing you’ll want to do is launch the keyboard in one way or another—if you have the keyboard shortcut enabled in the app drawer, just tap that.
If not, open any box with text input to launch the keyboard, then long-press the comma (it’s a backslash if you’re using Chrome). When you release the button, a dialog box will pop up with two options: Languages and Google Keyboard Settings. You want the latter.
You should appear at the Settings menu, tap the “Gesture Typing” option.
There are a few different options here that you can toy with to sort of “customize” how gestures work. If you just want to disable it completely, however, you’ll need to turn off the “Enable gesture typing,” “Enable gesture delete,” and “Enable gesture cursor control” options.
Otherwise, you can disable Gesture Typing itself and leave “Gesture delete” and/or “Gesture cursor control” enabled. That’s pretty neat.
Once you’ve found your perfect combination of settings, just back out of this menu. You’re finished.
Gesture typing can be useful (and fast!), but if you don’t use it, then there’s really no reason to keep it enabled. That said, the “Gesture delete” and “cursor control” options are both pretty useful once you get used to them. Seriously—you should try them both out if you haven’t already. They’re neat.
Geoffrey Carr
Okei, kiire pöialtõkesti, sa tead, kuidas see toimib: saate kirjutada väga hämmastava kiirusega tekstisõnumit, kui ootamatult tuvastab klaviatuur oma Flash-tüüpi kiirklahvide kiireks muutumise. Doh! Nüüd, selle asemel, et öelda: “Jah, mul oleks meeldiv minna filmide juurde sel nädalavahetusel!” Läksite lihtsalt oma “pahatahtlikuks” pahaks “Travisi lobektoomia filmitud filmid selle kirja teel!”
(Jah, see on tõeline sõnum, millele ma kasutasin žesti kirjutamist.)
Hea uudis on see, et Androidi Google’i klaviatuuril olevate keelatud žestite tippimine on ülikihtne, nii et võite öelda sõnu, mis tegelikult mõttekad liiguvad edasi.
See peaks töötama kõigi Google’i klaviatuuri kõige uuemate versioonidega, kuid menüüd võivad erineda veidi olenevalt sellest, millist versiooni te kasutate. Selles juhendis kasutan 5. versiooni. Teeme seda!
Esimene asi, mida soovite teha, on klaviatuuri ühel või teisel viisil käivitada – kui rakenduse sahtlis on lubatud klaviatuuri otsetee, puudutage seda lihtsalt.
Kui ei, siis avage klaviatuuri käivitamiseks ükskõik milline tekstisisestusklahv, seejärel pange komaga pikk vaade (kui kasutate Chrome’i). Kui nupp vabastatakse, avaneb dialoogiboks kahe variandi puhul: keeled ja Google’i klaviatuuri seaded. Sa tahad viimast.
Peaksite ilmuma menüüs Seaded, koputage suvandit “Gesture Typing”.
Siin on paar erinevat võimalust, mille abil saate mänguasja luua ja kohandada, kuidas žestid toimivad. Kui soovite selle täielikult täielikult keelata, peate siiski välja lülitama suvandid “Lubage žesti sisestamist”, “Luba žesti kustutamine” ja “Luba žesti kursori juhtimine”.
Muidu sina saab keelake žestuse sisestamine ise ja jätke “Žesti kustutamine” ja / või “Žesti kursori juhtimine” sisse. See on päris puhas.
Kui olete oma seadete täiusliku kombinatsiooni leidnud, siis jälgi sellest menüüst tagasi. Sa oled valmis.
Žesti trükkimine võib olla kasulik (ja kiire!), Kuid kui te seda ei kasuta, siis pole sellel aktiivsel viisil mingit põhjust. Sellest hoolimata on mõlema puhul “žesti kustutamine” ja “kursori juhtimine” mõlemad üsna kasulikud, kui olete nendega harjunud. Tõsiselt – peaksite neid mõlemaid proovima, kui te pole seda juba teinud. Nad on puhas.
U redu, brzi dodiri, znate kako to radi: kucate super važnu tekstualnu poruku s velikom brzinom, kada odjednom tipkovnica otkrije vašu brzinu sličnu Flashu kao swipe. Doh! Sada umjesto govoreći: “Da, volio bih ići u kino ovaj vikend!” Vi samo pao “Travis lobectomy Govt filmove ovo napisao!” Na vašem bezazlen fling.
(Da, to je prava poruka koju sam dobio pomoću tipkanja geste.)
Dobra vijest je da je onemogućavanje tipkanja geste u Google tipkovnici na Androidu vrlo jednostavno, tako da možete reći riječi koje zapravo imaju smisla kretati se naprijed.
To bi trebalo raditi na svim najnovijim verzijama Google tipkovnice, ali izbornici se mogu neznatno razlikovati ovisno o verziji koju koristite. U ovom vodiču koristit ću verziju 5. Učinimo to!
Prva stvar koju ćete htjeti učiniti je da pokrenete tipkovnicu na ovaj ili onaj način – ako je tipkovnička prečica omogućena u ladici aplikacija, samo je dodirnite.
Ako ne, otvorite bilo koji okvir s unosom teksta da biste pokrenuli tipkovnicu, a zatim dugo pritisnite zarez (to je obrnuta kosa crta ako koristite Chrome). Kada otpustite gumb, pojavit će se dijaloški okvir s dvije opcije: Jezici i Postavke tipkovnice Google. Vi želite ovo drugo.
Trebali biste se pojaviti na izborniku Postavke, dodirnite opciju “Gesture Typing”.
Postoji nekoliko različitih opcija koje možete igrati s nekakvim “prilagoditi” kako gestovi rade. Međutim, ako ga želite u potpunosti onemogućiti, morat ćete isključiti opcije “Omogući tipkanje pokretom”, “Omogući brisanje pokreta” i “Omogući kontrolu kretanja pokretom”.
U suprotnom, možete onemogućiti sam gestikuliranje i omogućiti “Gesture delete” i / ili “Gesture cursor control”. To je prilično uredno.
Kada pronađete savršenu kombinaciju postavki, vratite se iz ovog izbornika. Vi ste gotovi.
Tipkanje pokretom može biti korisno (i brzo!), Ali ako ga ne upotrebljavate, zapravo nema razloga da ga zadržite omogućenim. To znači da su opcije “Gesture delete” i “cursor control” prilično korisne kada se naviknete na njih. Ozbiljno – trebali biste ih isprobati oboje ako već niste. Oni su uredni.
Android has a lot of good features, and one among a million of them is the Swype Gesture typing. With this feature enabled, you can easily swipe through the letters of your keyboard, and get done writing a good long text message, or even an email. However, for all of you fast typists out there, you know the struggle when you type so fast that the keyboard application accidentally mistakes it for a swipe gesture, and totally messes up your conversation.
Well, we have a fix. While almost all of the third-party keyboards on Android devices have this option ready for enabling and disabling, we will be demonstrating this using the stock keyboard application, Google Keyboard. In order to disable this annoying feature, we insist you be running on the latest version of Google Keyboard, just to ensure that the layout of settings hasn’t changed all that much. Once you’re set to go, let’s get right into it.
Disable Swype Gesture Typing on Android
- First of all, you need to get into the Google Keyboard’s settings panel. This is accessible as an application from your app drawer, or even as a setting from your Settings application. If you cannot find this application in your app drawer, then navigate to Settings >Languages >Google Keyboard.
- This will pop open the settings panel for Google Keyboard, which is stuffed with all kinds of tweaks and tips to improve your typing experience. Anyways, right now, you need to hop into the menu named ‘Gesture Typing‘.
- Right here, you can further find a million options that you can toy with. We suggest you find the best settings for your gesture typing habits and save them. Although, if you completely want to disable it, then tap on the three options which read ‘Enable gesture typing‘, ‘Enable gesture delete‘, and ‘Enable gesture cursor control‘.
- Save the settings, and restart your Android device if the settings don’t affect the keyboard by default.
Nice! The next time you try to type fast, you will not be annoyed by the constant swipe gestures anymore. If you have any issues whatsoever regarding this article, then definitely make sure you hit us down in the comments section.
There was a time when typing was very laborious work. With that conventional numeric keypad, typing was really a very time-consuming task. However, with the advent of Qwerty keyboards and screen touch phones makes typing a super easy and fun job. This feature becomes even more convenient, easy and smooth with ‘Swipe Gesture’ typing. Talking particularly about Android phones, Swipe Gesture typing feature would not let you embarrass due to wrong spells.
In this piece, we are describing you the steps to enable and disable ‘Swipe Gesture’ typing feature. Although we advocate this feature for convenient typing if your fingers are not set for swipe typing, you probably end up with the mess of words on your screen. Also know about Aptoide Apk is the best alternative to Google Play, an Android app store where you’ll be able to find millions of apps and games completely free of charge.
In such a case, you may disable this feature too. Before we move to know the steps to enable or disable swipe gesture typing feature, you must know what we mean by ‘Swipe Gesture’ typing. Well, Swipe Gesture is a keyboard feature added in Android devices to facilitate the users with easy typing. When you enable this feature, you would be able to type at the swipe of your finger.
WPS Connect is an application which aids for getting your entire router’s issue been solved. You can do this by possessing WPS Connect APK. This is an astonishing app that lets you change your router’s password if there are any vulnerabilities in your router.
Say you want to type ‘Hello’ to your friend, with ‘Swipe Gesture’ you can do so simply by swiping your finger from ‘H’ to ‘E’ to ‘L’ to ‘O’. Try it out enabling this feature now.
Step to Enable ‘Swipe Gesture’ Typing on Android
- Open ‘Google Keyboard’ application on your Android device.
- Go to the ‘Settings’ menu of the Google Keyboard App.
- Tap on the option of ‘Gesture Typing’.
- There you will 4 options viz.,
- Enable gesture typing.
- Show gesture trail.
- Enable gesture delete
- Enable gesture cursor control.
- Slide on the options as per your preference and choice.
- Save the changes you made.
That’s all. You are now ready to type at the lightning fast speed with just the swipe of your finger.
Step to Disable ‘Swipe Gesture’ Typing on Android
To get out of the swipe typing, you may disable this feature of ‘Swipe Gesture’ anytime –
- Open ‘Google Keyboard’ application on your Android device.
- Go to the ‘Settings’ menu of the Google Keyboard App.
- Tap on the option of ‘Gesture Typing’.
- There you will 4 options viz.,
- Enable gesture typing.
- Show gesture trail.
- Enable gesture delete
- Enable gesture cursor control.
- Slide off the 1 st option in order to disable ‘Swipe Gesture’ typing on your Android device.
- Save the changes you made.
Sum Up
With tons of social media apps, we use our phone less for voice communication and more for texting and hence we always wish to type the fastest. There is no doubt that Swipe Gesture typing is a wonderful feature of Google Keyboard which gives you flash-like typing speed and brings convenient typing option. However, swiping is not always well timed.
Sometimes it may result in typing terribly wrong words which may make your task more complex and you find the classic technique of tapping the letters better. In this post, we have explained both options to our readers so that they can enjoy flexible typing. Read our blog for more articles like this.
Geoffrey Carr
Okei, kiire pöialtõkesti, sa tead, kuidas see toimib: saate kirjutada väga hämmastava kiirusega tekstisõnumit, kui ootamatult tuvastab klaviatuur oma Flash-tüüpi kiirklahvide kiireks muutumise. Doh! Nüüd, selle asemel, et öelda: “Jah, mul oleks meeldiv minna filmide juurde sel nädalavahetusel!” Läksite lihtsalt oma “pahatahtlikuks” pahaks “Travisi lobektoomia filmitud filmid selle kirja teel!”
(Jah, see on tõeline sõnum, millele ma kasutasin žesti kirjutamist.)
Hea uudis on see, et Androidi Google’i klaviatuuril olevate keelatud žestite tippimine on ülikihtne, nii et võite öelda sõnu, mis tegelikult mõttekad liiguvad edasi.
See peaks töötama kõigi Google’i klaviatuuri kõige uuemate versioonidega, kuid menüüd võivad erineda veidi olenevalt sellest, millist versiooni te kasutate. Selles juhendis kasutan 5. versiooni. Teeme seda!
Esimene asi, mida soovite teha, on klaviatuuri ühel või teisel viisil käivitada – kui rakenduse sahtlis on lubatud klaviatuuri otsetee, puudutage seda lihtsalt.
Kui ei, siis avage klaviatuuri käivitamiseks ükskõik milline tekstisisestusklahv, seejärel pange komaga pikk vaade (kui kasutate Chrome’i). Kui nupp vabastatakse, avaneb dialoogiboks kahe variandi puhul: keeled ja Google’i klaviatuuri seaded. Sa tahad viimast.
Peaksite ilmuma menüüs Seaded, koputage suvandit “Gesture Typing”.
Siin on paar erinevat võimalust, mille abil saate mänguasja luua ja kohandada, kuidas žestid toimivad. Kui soovite selle täielikult täielikult keelata, peate siiski välja lülitama suvandid “Lubage žesti sisestamist”, “Luba žesti kustutamine” ja “Luba žesti kursori juhtimine”.
Muidu sina saab keelake žestuse sisestamine ise ja jätke “Žesti kustutamine” ja / või “Žesti kursori juhtimine” sisse. See on päris puhas.
Kui olete oma seadete täiusliku kombinatsiooni leidnud, siis jälgi sellest menüüst tagasi. Sa oled valmis.
Žesti trükkimine võib olla kasulik (ja kiire!), Kuid kui te seda ei kasuta, siis pole sellel aktiivsel viisil mingit põhjust. Sellest hoolimata on mõlema puhul “žesti kustutamine” ja “kursori juhtimine” mõlemad üsna kasulikud, kui olete nendega harjunud. Tõsiselt – peaksite neid mõlemaid proovima, kui te pole seda juba teinud. Nad on puhas.
U redu, brzi dodiri, znate kako to radi: kucate super važnu tekstualnu poruku s velikom brzinom, kada odjednom tipkovnica otkrije vašu brzinu sličnu Flashu kao swipe. Doh! Sada umjesto govoreći: “Da, volio bih ići u kino ovaj vikend!” Vi samo pao “Travis lobectomy Govt filmove ovo napisao!” Na vašem bezazlen fling.
(Da, to je prava poruka koju sam dobio pomoću tipkanja geste.)
Dobra vijest je da je onemogućavanje tipkanja geste u Google tipkovnici na Androidu vrlo jednostavno, tako da možete reći riječi koje zapravo imaju smisla kretati se naprijed.
To bi trebalo raditi na svim najnovijim verzijama Google tipkovnice, ali izbornici se mogu neznatno razlikovati ovisno o verziji koju koristite. U ovom vodiču koristit ću verziju 5. Učinimo to!
Prva stvar koju ćete htjeti učiniti je da pokrenete tipkovnicu na ovaj ili onaj način – ako je tipkovnička prečica omogućena u ladici aplikacija, samo je dodirnite.
Ako ne, otvorite bilo koji okvir s unosom teksta da biste pokrenuli tipkovnicu, a zatim dugo pritisnite zarez (to je obrnuta kosa crta ako koristite Chrome). Kada otpustite gumb, pojavit će se dijaloški okvir s dvije opcije: Jezici i Postavke tipkovnice Google. Vi želite ovo drugo.
Trebali biste se pojaviti na izborniku Postavke, dodirnite opciju “Gesture Typing”.
Postoji nekoliko različitih opcija koje možete igrati s nekakvim “prilagoditi” kako gestovi rade. Međutim, ako ga želite u potpunosti onemogućiti, morat ćete isključiti opcije “Omogući tipkanje pokretom”, “Omogući brisanje pokreta” i “Omogući kontrolu kretanja pokretom”.
U suprotnom, možete onemogućiti sam gestikuliranje i omogućiti “Gesture delete” i / ili “Gesture cursor control”. To je prilično uredno.
Kada pronađete savršenu kombinaciju postavki, vratite se iz ovog izbornika. Vi ste gotovi.
Tipkanje pokretom može biti korisno (i brzo!), Ali ako ga ne upotrebljavate, zapravo nema razloga da ga zadržite omogućenim. To znači da su opcije “Gesture delete” i “cursor control” prilično korisne kada se naviknete na njih. Ozbiljno – trebali biste ih isprobati oboje ako već niste. Oni su uredni.


