users want to know how to show or hide non printing characters in MS Word like tab, space, enter, hidden text, optional hyphen.
- Amit Sharma
- January 25, 2021
- Join us: TelegramFacebookTwitter
Hi friends, do you know about the non-printing character? During typing any thesis, letter, email message and many more in any document of MS Word you must use lot of different non printing characters. Most of the users ask this question how to show or hide non printing characters in MS Word.
Many time we need to know how much non printing characters are used in the active document. Lot of person asked what is needed to view these characters. Answer of this question is very simple that you can easily view single or more spacing between the characters.
This feature allows you to easily control the design of your active document and also know how much extra non printing character used by you in active file. You can easily view all non-printing characters like tab, space, enter, hidden text, optional hyphen, object anchors and special characters in the active document of MS Word.
You can easily view all these non-printing characters like tab, space, enter, hidden text, optional hyphen, object anchors and many special characters in the active document of Microsoft Word 2010. Normally these non-printing characters are not seen on the screen during typing or finalization the contents of active file. There are two ways from which you can easily show or hide all of these non-printing characters either from word options window or by clicking on the show or hide button from the ribbon bar of MS Word window. You can show all non-printing characters all the time or any time.
How to show or hide non printing characters
Method 1: From the Word Option
Click on File option in the standard tab, then click on the option button and click on the Display option in the Word option dialog box. Now turn on all given option in “Always show these formatting marks on the screen.”
Method 2: From Show/Hide button
There is another easy and quick method from which you can easily turn on or off all used non-printing characters in the active document from the ribbon bar in Microsoft Word application window. You have to click show or hide button which is located in the Paragraph group of the Home tab or you can also press CTRL + SHIFT + * key combination to show or hide all non-printing characters in active document. When you turn on this option it displays all spaces as a dot (.) period, tab keys (®), paragraph mark or enter key by (¶) signs.
Must Read: How to Turn ON or OFF Track change in MS Word 2013
I hope you like this show or hide non printing characters guide from which you will be able to easily show or hide non printing characters without any extra efforts. If feel any problem in this guide then please use comment box.
Show Non-Printing Characters in Word: Overview
You can easily show non-printing characters in Word documents. In Word, the “Spacebar,” “Tab,” and “Enter” keys all create characters within your document. In this regard, they act like most other keyboard characters keys do. However, unlike most other characters, you cannot normally see these characters. This means that they can sometimes cause problems if they are accidentally selected. For example, accidentally selecting a “Tab” character can cause a problem when copying and pasting text from one location to another in a document.
Sometimes, you may want to show non-printing characters in your Word documents. To show non-printing characters in Word, click the “Home” tab in the Ribbon. Then click the “Show/Hide Non-Printing Characters” button in the “Paragraph” button group. The face of the button looks like the paragraph mark (“¶”).
After you click this button, it then appears highlighted to let you know that the function is turned on. To then hide non-printing characters in Word, click the same “Show/Hide Non-Printing Characters” button again. Doing this then turns the display of the non-printing characters back off.
Show Non-Printing Characters in Word – Instructions: A picture of a document after showing the non-printing characters in Microsoft Word.
Show Non-Printing Characters in Word: Instructions
- To show non-printing characters in Word documents, click the “Home” tab in the Ribbon.
- Then click the “Show/Hide Non-Printing Characters” button within the “Paragraph” button group.
- To hide the display of the non-printing characters in your document, click the “Show/Hide Non-Printing Characters” button again.
Show Non-Printing Characters in Word: Video Lesson
The following video lesson, titled “ Non-Printing Characters ,” shows you how to show non-printing characters in Microsoft Word 2016. This video lesson is from our complete Word tutorial , titled “ Mastering Word Made Easy v.2016-2013 .”
Besides the normal content of your documents in Word, there are also characters that don’t normally display on the screen. In addition, Word uses several special characters for its own purposes, such as characters to indicate the end of a line or a paragraph.
Word refers to these special characters as non-printing characters. Why would you want to display non-printing characters in a document? It’s easier to understand the spacing and layout in your document when these special characters are displayed. For example, you can tell when you have inserted two spaces between words or added an extra carriage return. But there may be times when you want to hide these characters to view your document as it will be printed. We’ll show you to easily show and hide these characters.
NOTE: We used Word 2013 to illustrate this feature.
To display specific non-printing characters, click the “File” tab.
On the backstage screen, click “Options” in the list of items on the left.
On the “Word Options” dialog box, click “Display” in the list of items on the left.
In the “Always show these formatting marks on the screen” section, select the check boxes for the non-printing characters you want to show in your document at all times. The “Show all formatting marks” check box toggles the display of the non-printing characters in the document. This check box does not affect the individual settings in the “Always show these formatting marks on the screen” section.
Click “OK” to save your selections and close the “Word Options” dialog box.
You can also use the button that looks like a backwards “P” (technically called a “pilcrow”) in the “Paragraph” section of the “Home” tab to show and hide non-printing characters.
NOTE: The backwards “P” button performs the same function as the “Show all formatting marks” check box on the “Display” screen of the “Word Options” dialog box. Toggling one affects the other.
Note that any formatting marks you selected on the “Display” screen of the “Word Options” dialog box show no matter what, even when you click the backwards “P” button in the “Paragraph” section of the “Home” tab to turn off non-printing characters.
More stories
Geek Trivia: The British Royal Navy Considered Rations Of What Foodstuff A Military Secret?
Think you know the answer? Click through to see if you’re right!
How to Invite All Friends to Facebook Event Invites, or Block Them
If you’ve ever created a Facebook event, then you know it can be hard to invite more than a few friends at a time. Thankfully there’s a new way to easily invite almost all your friends in two clicks. Don’t want to receive event invites? You can also block them.
How to Add Two Spaces After a Period Automatically in Word 2013
There used to be an old typographical convention that it’s proper to use two spaces after a sentence. This came about because monospaced type has a uniform appearance and two spaces between sentences broke up the text and made it easier to read.
How to Rename iMessage Group Texts on Your iPhone
Everyone’s been in a group message at one point in their life or another. But what can you do if you have a number of them going at once, and don’t know which is supposed to be which?
When I Hit the Appropriate Key During Start-Up, am I Entering BIOS or CMOS?
When you reach the point where you are learning how to configure your computer’s start-up settings, you may find yourself confused about BIOS and CMOS. Which one are you actually accessing to alter those settings? Today’s SuperUser Q&A post has the answer to a curious reader’s question.
Geek Trivia: Which City Is Captured By The Highest Resolution Terrestrial Photograph In The World?
Think you know the answer? Click through to see if you’re right!
How to Pick the Right Monitor for Your PC
You spend all of the time you’re on the PC staring at that monitor—shouldn’t it be a good one? Today, we’ll decode the specs and monitor jargon to help you find the best possible LCD screen for your needs.
5 Ways to Get Windows 7 On Your New PC
Yes, Windows 7 is still available. If you want a new PC and you also want Windows 7, you can probably get it. This is easiest for businesses, but even home users have ways to get Windows 7.
How to Create and Download an Archive of All Your Google Data
When Google announced that you can download an archive of all your search data, the pervading attitude was “cool, finally!” What you may not know is, you can already download other valuable data with a little-known service called Google Takeout.
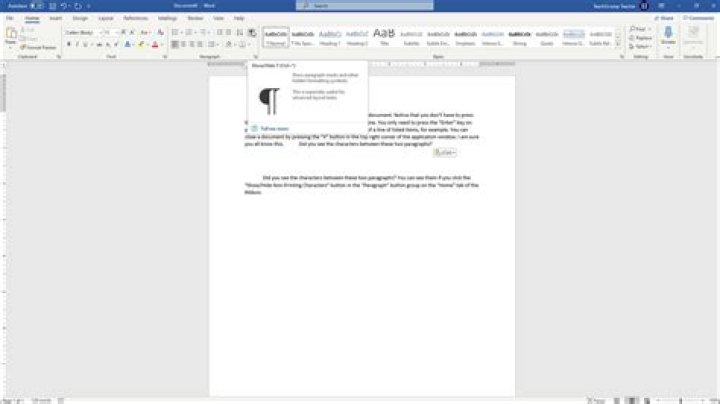
How to Disable ScreenTips in Word 2013
When using the commands on the ribbon in Word, you may have noticed popup boxes that display when you move your mouse over the buttons. These are ScreenTips and can be handy as a reference. However, if they’re distracting to you, they are easily disabled.
Cowirrie make iOS apps. For examples, see our demonstrations page. This blog includes news about Cowirrie apps, travel and questions about data literacy.
They allow your word processor to tell you how your document layout works.
Earlier this year, someone walked past while I was word processing and noticed my screen was full of odd characters.
Usually people who notice this go “Aargh! Hideous!”, but this time the response was “That looks useful”, and it is. The blue symbols are non-printing characters, and they show why your layout is happening. As the name implies, they only appear on your screen, not in print, or when you export to PDF.
In most word processors, non-printing characters are indicated by a ¶ symbol, which is also known as a pilcrow.
Go the the “Home” tab of the ribbon, find the “Paragraph” section and make sure the “¶” button is enabled.
Once enabled, the non-printing characters appear as shown below. An unusual feature is that it places a large black square at the start of lines that have “Keep with next” enabled under “Text flow”. This is a common format for headings, as it guarantees that, if the paragraph immediately following the heading wraps onto the next page, the heading will move with it.
LibreOffice
Find the “Standard” toolbar, and make sure the “¶” button at the right end is enabled. This option may also be found in the “View” menu, under “Nonprinting characters”.
LibreOffice displays the characters much like Word, except that non-breaking spaces (see below) receive a grey background.
Pages
In Pages, non-printing characters are referred to as “Invisibles”. They may be enabled from the “View” drop-down menu on the toolbar, or in the “View” menu in the menu bar.
Invisibles in Pages are always coloured blue.
Spaces are what you type with the space bar .
Non-breaking spaces will “glue” words together so they can’t be separated over a line ending. The way you type them depends on your operating system, not your application. Under Windows, they are typed with ctrl – shift – space ; under Mac OS, they are typed with option – space . If it is important that a name or phrase appear in full without being broken across a line or page, use a non-breaking space. Do not over-use them, or your line endings will be ragged 1 .
Paragraph breaks are what you type with the enter or return key 2 .
Line breaks move to a new line without starting a new paragraph. This will not be visibly different from a paragraph break unless the paragraph formatting includes space before or after, or special first line formatting. They will also wreck the layout of Justified text. Line breaks are entered with shift – enter or shift – return . This makes it easy to accidentally type a line break while intending to enter a paragraph break. Once typed, the only way to know that bad layout was caused by an accidental line break is to make the non-printing characters visible.
Tabs create a measured gap to the next piece of text on the same line. The exact spacing depends on the tabs set up in the paragraph format. Tabs are too complex to be fully discussed here, but once understood they can be used to create elegant layouts that are easy to edit. Type tabs using the tab key.
I always have them enabled, even if I’m writing a simple letter. It takes a little time to adapt, but they help me detect and fix layout problems when I create the problem, before it spreads through a large document.
If you can’t stand typing with the non-printing characters visible, it is still good to enable them when you are formatting a document with complex layout.
This chapter is from the book
This chapter is from the book
This chapter is from the book
Showing/Hiding Non-printing Characters
Non-printing characters indicate where you ended a paragraph, pressed , or pressed (Figure 3.8). You can show or hide non-printing characters as you work on a Word document. Being able to see non-printing characters is especially helpful when you’re trying to locate multiple tab characters where only one should be or when you’re looking for errant punctuation, such as blank paragraphs or extra spaces. See Table 3.2 for a complete list of non-printing characters.
Figure 3.8 When displayed, non-printing characters are a faint gray.
Table 3.2. Non-printing Characters
Symbol
Character
(dot)
Line break (new line, same paragraph)
End of paragraph
To show/hide non-printing characters
- Click the Show/Hide ¶ icon on the Standard toolbar (Figure 3.9).
Figure 3.9 The Show/Hide ¶ icon is the paragraph symbol.
- The Show/Hide ¶ icon is a toggle. Click it once to show non-printing characters and a second time to hide them.
- Showing non-printing characters is particularly useful in the proofing/editing stage—after you’ve finished the writing. (Having non-printing characters visible while creating a document, on the other hand, can be distracting.)
This video shows how useful it can be to display non-printing characters. These symbols mark when there are spaces, paragraph returns, page breaks, and other important layout items that are otherwise invisible on a page.
- Course Overview
- Transcript
- View Offline
– [Instructor] Forgive me for stating the obvious here,…but documents are generally composed of text characters,…like letters and punctuation,…but they also contain lots of invisible characters.…For example, when you hit the space bar,…that space is considered an invisible character.…It’s on the page, but it’s just represented by empty space.…There are times when it can be very valuable…to actually see these individual or nonprinting characters.…To make nonprinting characters visible,…we’ll go to the Home ribbon…and click on this button that sort of…looks like a backwards p.…
And now we have some interesting…new information on the page,…and two of them really stand out.…These tiny little dots between each word,…that represents a space,…when I hit the space bar while typing,…and this symbol here, the one that…looks like the backwards p…is when you create a new paragraph,…or when you hit the return key while typing.…So think about what this does for you.…If you’re not too worried about formatting,…this might not be so useful.…
Author
Released
Skill Level Intermediate
Duration
Views
Related Courses
Cert Prep: Word 2016 Microsoft Office Specialist (77-725)
Office 365 New Features (Microsoft 365)
- Contents
- Notebook
Introduction
1. Application and Document Defaults
2. Adding and Formatting Text
3. Spelling and Proofing Tools
4. Useful Tools
Conclusion
- Mark as unwatched
- Mark all as unwatched
Are you sure you want to mark all the videos in this course as unwatched?
This will not affect your course history, your reports, or your certificates of completion for this course.
Mark all as unwatched Cancel
Take notes with your new membership!
Type in the entry box, then click Enter to save your note.
1:30 Press on any video thumbnail to jump immediately to the timecode shown.
Notes are saved with you account but can also be exported as plain text, MS Word, PDF, Google Doc, or Evernote.
This chapter is from the book
This chapter is from the book
This chapter is from the book
Showing/Hiding Non-printing Characters
Non-printing characters indicate where you ended a paragraph, pressed , or pressed (Figure 3.8). You can show or hide non-printing characters as you work on a Word document. Being able to see non-printing characters is especially helpful when you’re trying to locate multiple tab characters where only one should be or when you’re looking for errant punctuation, such as blank paragraphs or extra spaces. See Table 3.2 for a complete list of non-printing characters.
Figure 3.8 When displayed, non-printing characters are a faint gray.
Table 3.2. Non-printing Characters
Symbol
Character
(dot)
Line break (new line, same paragraph)
End of paragraph
To show/hide non-printing characters
- Click the Show/Hide ¶ icon on the Standard toolbar (Figure 3.9).
Figure 3.9 The Show/Hide ¶ icon is the paragraph symbol.
- The Show/Hide ¶ icon is a toggle. Click it once to show non-printing characters and a second time to hide them.
- Showing non-printing characters is particularly useful in the proofing/editing stage—after you’ve finished the writing. (Having non-printing characters visible while creating a document, on the other hand, can be distracting.)
This chapter is from the book
This chapter is from the book
This chapter is from the book
Showing/Hiding Non-printing Characters
Non-printing characters indicate where you ended a paragraph, pressed , or pressed (Figure 3.8). You can show or hide non-printing characters as you work on a Word document. Being able to see non-printing characters is especially helpful when you’re trying to locate multiple tab characters where only one should be or when you’re looking for errant punctuation, such as blank paragraphs or extra spaces. See Table 3.2 for a complete list of non-printing characters.
Figure 3.8 When displayed, non-printing characters are a faint gray.
Table 3.2. Non-printing Characters
Symbol
Character
(dot)
Line break (new line, same paragraph)
End of paragraph
To show/hide non-printing characters
- Click the Show/Hide ¶ icon on the Standard toolbar (Figure 3.9).
Figure 3.9 The Show/Hide ¶ icon is the paragraph symbol.
- The Show/Hide ¶ icon is a toggle. Click it once to show non-printing characters and a second time to hide them.
- Showing non-printing characters is particularly useful in the proofing/editing stage—after you’ve finished the writing. (Having non-printing characters visible while creating a document, on the other hand, can be distracting.)


