If you are like me, having a hot shower after a long day of hiking is like being in heaven. In our small RV bathroom, the shower heats up and steams the room making it a personal spa while you are in the shower. Waiting until your water tank is full is an important factor to have the best shower. But how long do you need to wait to experience cleanliness while showering? Good question, lets find out the dirty details below.
How long does it take for a RV water heater to heat up? A hot water heater in your RV or Travel Trailer will take 31 minutes to heat up if you have a 6 gallon tank and 51 minutes to heat up if you have a 10 gallon tank. These numbers are based upon heating with propane only. 110v heating or using both can give you much quicker or slower heating times.
Table of Contents
Factors that determine the heat up time
Size of hot water tank
- 6 Gallon
- A 6 gallon water heater is the size that is installed in the majority of travel trailers. As this tank is only 60% of the size of a 10 gallon, it will heat up much faster. Typically my family of 3 can use 6 gallons to shower all of us back to back with some time in between for the hot water tank to heat up.
- 10 Gallon
- Lots of trailers have either an option for a 10 gallon tank or come standard in some nicer travel trailers as well as 5th wheels. 10 gallons is a lot of water that you have to heat and will take more time. It is however, nice to have 40% more water than a 6 gallon tank if you have a larger family or use it for washing clothes or dishes in your RV.
Type of heat
- 110v Electric
- Electric heat will heat up much slower than propane, but if you have access to plugins, this is very reliable and can provide you with good cheap hot water. On a typical RV hot water heater, electric will heat at 6.2 gallons per hour. If you are hooked up to a 2,000 watt generator, it will take about 1 gallon of gas to heat up a 6 gallon water heater. (we had to find this out the hard way when our control board failed on the first day of our 9 day camping trip last year.)
- If you have a 6 gallon water heater, expect your tank to be hot in 58 minutes at a rate of 6.2 gallons per hour. If you have a 10 gallon tank, expect it to be hot in about an hour and a half.
- Propane
- Propane heat is the way to go if you are boondocking as your heater will heat much more efficiently and will heat your water quicker than the 110v element. Propane will heat your water at 11.6 gallons per hour. A propane hot water heater that is 6 gallons will heat the water tank at 11.6 gallons per hour or in 31 minutes. If you have a 10 gallon tank, expect the water to be heated in 51 minutes.
- Both
- Many water heaters come with both options and you can use both at the same time. Using both types of heat can heat your water at a rate of 17.8 gallons per hour. If you have a 6 gallon water heater, expect it to heat at 17.8 gallons per hour and take 20 minutes to heat up. If you have a 10 gallon tank, it can take about 33 minutes to fully heat up.
Outside Temperature
Outside air temperature will have some control on how long your water heater will take to heat up. This may not make it vary a lot, but can either help your or hurt you either way on your timing.
Incoming Water Temperature
The incoming water temperature will also play a role in how long it will take to heat up. If your water is coming from your fresh water tank and the temperature is 70 degrees, it will take a shorter amount of time to heat up than if it is coming from the plumbing in your RV park at 50 degrees. If you are camping in the winter and the water is 35 degrees, this will also take longer to heat up.
Instant Hot Water Heaters
Some trailers have been fitted with the controversial instant hot water heater. Theriotically, these will never run out of hot water and will provide you with an unlimited hot shower, but in practice, these have been found to not fully provide the hot water demanded and many have switched them out for water tank units.
Instant hot water heaters for RV’s typically provide .5 to 1 gallons of hot water per minute, therefore allowing you to take an unlimited shower.
Can you run Gas and Electric elements at the same time?
Yes, in most models, you can run both propane and electric at the same time in order to speed up the process of heating your hot water tank as well as make your hot water tank last for a hotter longer shower.
If you have a low flow shower head as well as not taking the absolutely hottest shower, you may almost virtually have unlimited hot water as depending on you water heater, you may be able to create 23 gallons of hot water per hour. While you use your shower, you are mixing hot water and cold water, therefore if you have both sides on full, you are running about 50-50 so you would only use 1 gallon per minute if you have a 2 gallon per minute shower head.
Should I leave my hot water on?
You can leave your hot water on all the time, but if you are boon docking it is never a good idea to leave it on 24/7 as it will go through propane and battery to keep it heated. If you are on electric, the choice is up to you. I never keep ours on all the time as I try and conserve both electric and propane.
The way a water heater works, cold water enters through a dip tube that runs down to the bottom of the tank and hot water exits from the top of the tank. This results in sediment, rust, and contaminants from the water sinking to the bottom of the tank where it builds up over time.
Allowing the sediments and calcium deposits to build up in the tank may result in loss of heating power, failed components such as clogged pipes or the heating element, and possible health issues for those who use the water. To get the safest and most dependable use from your water heater, cleaning it annually is the best way to go. Here’s how to flush a water heater…
Drain the Water Heater
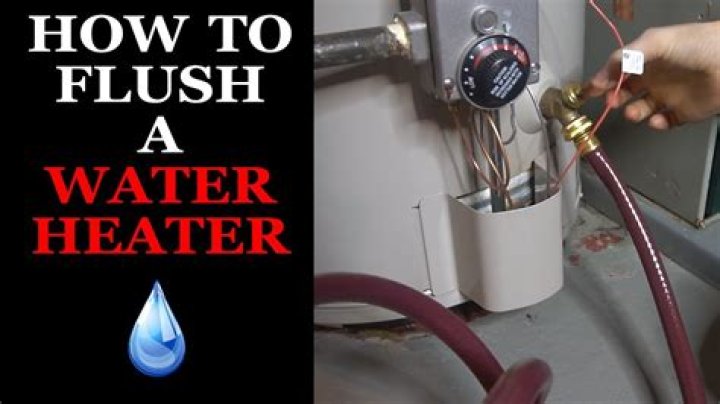
Connect a garden hose to the hose bib near the bottom of the water heater and extend the hose to a floor drain or outside location.
Turn off the power to the water heater or set the gas control valve to the “Vacation” setting. Close the cold water inlet valve which is usually located at the top of the tank. Open the drain valve and turn on the closest hot water faucet to allow air into the tank.
Allow the tank to empty fully before proceeding. Obviously, larger hot water heater sizes will take a bit longer to drain but it shouldn’t take more than a few minutes.
Remove the garden hose from the drain valve. If your water heater has a plastic drain valve, this is a good time to replace it with a more durable brass valve. Using a large adjustable wrench, remove the drain valve and replace with the brass valve.
Cleaning and Flushing the Tank
Your local hardware store will sell a long, narrow brush (like this) that is designed for refrigerator coils but is also excellent for water heater tank cleaning.
Insert the brush into the opening where the drain valve was removed. Carefully use the brush to scrape the bottom of the tank and as much of the interior sides of the tank as you can reach.
If your tank has not been cleaned in a while, this can take a bit of time. The more of the sediments you can break loose, the better your water heater will function.
Screw a short 3/4 inch plumbing nipple into the drain opening. Drain valves are not suitable for tank cleaning because they are easily clogged by the debris that will be flushed out.
Place a bucket directly below the plumbing nipple or connect a garden hose to the other end of the nipple (or let it drain into a properly installed drain pan). Insert the other end of the hose (if using one) into a bucket so you will be able to see the results of your cleaning.
Turn on the cold water inlet valve and allow it to run until the water coming out of the hose clear. Remove the nipple and repeat the process until no more sediments are washed out after scrubbing. There may be rust, calcium deposits or other debris in the bucket.
Note: Many newer water heaters include “self-cleaning” feature. While helpful, you still want to manually flush and clean a water heater but you simply don’t have to do so as often. So instead of an annual cleaning, doing so every 3 years or so should suffice.
Completing the Project
Turn off the hot water faucet. Instead of replacing the drain valve, you can install an inline ball valve on the end of the nipple to make future cleaning easier. You will need to add a second, short nipple to the outlet side of the valve.
Wrap the threads on both ends of the nipple with plumber’s tape and tighten the nipple securely into the tank. Screw on the ball valve and tighten it properly.
Turn on the cold water inlet valve. Turn on the hot water faucet and allow it to flow until all air has escaped the line. When the air has been removed from the tank, restore power or set the gas control valve to the “On” position.
Related Articles
- How to Fix a Popping Noise on Water Heaters
- How to Defrost a Frozen Pipe
- How to Repair a Freeze-proof Faucet?
- How Does a Ryobi 700R Gas/Fuel Primer Bulb Work?
- How to Remove Lime From a Hot Water Tank
Flushing a hot water heater helps rid the tank of mineral deposits that collect during normal operations. The minerals are dissolved in the water, with a high concentration of minerals in hard water. You should flush a hot water heater about twice a year. Other reasons for emptying the appliance are to make repairs or replace the water heater.
Turn the water heater’s gas valve to either the “Off” or “Pilot” position. The pilot light remains burning when the valve is in the latter position, but all gas flow stops when in the former position.
Allow the tank to cool for about two hours. The water inside the heater appliance is typically around 120 degrees Fahrenheit. Allowing the water to cool saves injury and it allows you to use the water on plants or on the lawn as you drain the system.
Rotate the valve for the cold water supply, stopping water from entering the tank. Some units have a handle that acts as a quick release, while others have a spigot you must turn. The top of the hot water heater is labeled “Cold” to help you identify the correct pipe.
Attach a garden hose to the spigot at the bottom of the tank. Stretch the hose to the outside.
Open the drain valve at the bottom of the hot water heater tank. Allow the tank to drain completely, flushing out flakes of mineral deposits along with the cooled water. Open a hot water tap close to the water heater, which helps provide some back pressure that assists in the draining process.
Reopen the cold water supply valve. This allows fresh water to rush into the tank and back out through the drain valve, further flushing the tank. Keep both valves open for about five to 10 minutes.
Shut the drain valve and disconnect the garden hose. Keep the hot water tap open while the tank refills. Trapped air escapes through the tap, so you may hear sputtering and pops as water displaces air in the tank.
Close the tap once a steady stream of water flows through it.
Turn the gas valve back to “On.” Relight the pilot light if necessary.
- On a gas water heater, turn the gas valve to the off position. On an electric water heater, turn the electric off to the heater.
- Shut the cold water off to the water heater.
- Open a hot water faucet.
- Connect a hose to the drain valve on the heater and run to a drain.
- Open the drain valve and allow the tank to completely drain.
- Turn back on the cold water into the water heater.
- Allow the water to run through the water heater and out of the drain valve. Do this for approximately five (5) or ten (10) minutes.
- Close the drain valve and allow the tank to refill, keeping the hot water faucet open. When water comes out of the faucet, the tank is full.
Homeowner Tools
- Find a Contractor
- Warranty Center
- Product Rebates
- Product Documentation
- Energy Efficiency
- Contact Us
Professional Tools
- For the Pro ®
- RightSpec ® Tools
- Technical Training
- Warranty Center
- List Your Business
- Specs, Manuals, Parts
- Rep Locator
Products
- Commercial Line
- United States
- Canada
- International
- Specs, Manuals, Parts
- Innovations
Quick Links
- Find a Contractor
- Warranty Center
- List Your Business
- For The Pro ®
- RepConnect ®
- Contact Us
Homeowner Tools
Homeowner Tools
- Find a Contractor
- Warranty Center
- Product Rebates
- Product Documentation
- Energy Efficiency
- Contact Us
Professional Tools
Professional Tools
- For the Pro ®
- RightSpec ® Tools
- Technical Training
- Warranty Center
- List Your Business
- Specs, Manuals, Parts
- Rep Locator
Products
Products
- Commercial Line
- United States
- Canada
- International
- Specs, Manuals, Parts
- Innovations
Quick Links
Quick Links
- Find a Contractor
- Warranty Center
- List Your Business
- For The Pro ®
- RepConnect ®
- Contact Us
- Disclaimers
- About Us
- Contact Us
- Privacy Policy
- Careers
Search Results
Video Disclaimer
All information contained in the videos are intended to be for guidance only. Any action you take on the information on the Bradford White Water Heaters YouTube or Vimeo channels are strictly at your own risk.
Bradford White Water Heaters may at any time and at its sole discretion change or replace the information available on the Bradford White Water Heaters YouTube channel and in the videos contained therein.
Table of Contents
Water heater manufacturers recommend flushing out the water heater as part of a regular water heater maintenance program. Homeowners who follow these recommendations can not only ensure their water heater’s dependability but also but also save on operating costs.
Sediment Build-up and Flushing Your Water Heater
Sediment build up is caused by the sand, minerals, and other grit from the waters source, whether it is a private well or a municipal water company. Mineral deposits and sediment are a normal part of any water system in most areas, but heavy concentrations of these deposits can accumulate after the city or county has flushed their lines.
Over time these particles can build up in a homes water heater. The build up of sediment can cause corrosion of the tank and reduce the efficiency of the water heater and eventually failure of the appliance. A regular water heater maintenance program that includes flushing the water heater can increase the lifespan of a water heater by several years.
How often should I flush my hot water heater?
Once a year. Most manufacturers suggest flushing at least once a year
What happens if you don’t flush your water heater?
Unless flushed regularly, your heater can corrode faster. Often, sediment can block or block the pressure and relief valve (which helps prevent your water heater from exploding).
Steps for Flushing a Water Heater
Below are step by step instructions for flushing out a water heater and typically all that is needed is a garden hose. Please read all steps before starting this procedure. If uncertain of any procedures or if uncomfortable with performing any of these tasks, call a local plumbing contractor for assistance.
- If the water heater is gas, set the gas valve to “Pilot” to prevent the burners from coming on while performing the flush. If the water heater is electric, turn off the power to the water heater at the circuit breaker box.
- Connect a garden hose to the drain valve at the bottom of the tank. Extend the hose out side and away from the structure. Do not open drain yet.
- Close the shut off valve on the cold inlet to the water heater. If you do not have a shut off valve located at your heater or if it does not work, shut off the water at the main line coming into the home or directly at the water meter.
- Carefully open the temperature and pressure relief valve at the top of the tank by lifting the lever and keeping it in the open position.
- Open the drain valve at the bottom of the heater allowing the water to flow out through the garden hose.
- If the sediment begins to clog the drain valve, try closing the temperature and pressure relief valve, then turn on the cold inlet valve to “power flush” the sediment out.In some cases the sediment hardens into large chunks that can block the drain valve. If so, then wait until everything cools down, remove the garden hose from the drain valve, remove the valve if necessary, and use a long screw driver to break up the clog. This is a very wet and messy procedure. Have a shop vac handy or call a plumbing pro!
- When the garden hose runs clear and the water heater has been drained, the job is done.
- Close the drain valve at the bottom of the tank and remove the garden hose.
- Close the pressure relief valve at the top of the tank if it is still open, and turn the cold inlet valve back on.
- Open the hot water faucet closest to the water heater and allow it to run until all of the air is out of the lines.
- Some discoloration in the water after flushing the water heater is normal. This is only sediment in the lines that has been dislodged and has traveled through to the fixtures in the home and will clear up in 24 hours with normal use.
- Turn the electric back on to the water heater or re-light the pilot. Water should be hot in approximately 30-60 minutes.
Water Heater Maintenance Tips and Warnings
For individuals undertaking this task themselves should take special note of the items below:
- Caution should be used when draining the water heater. Water coming from the heater can be extremely hot and can scald quickly. Keep children and pets away from the draining water.
- If your heater is electric be sure to turn off the circuit breaker to the water heater before attempting to drain. If this step is skipped when flushing an electric water heater and the water level drops below the heating elements, the thermostat will turn the elements damaging them. The unit will not function properly and the parts will need to be replaced.
- If the water is brown or rust in color this could be an early warning signal. Rusty water indicates that the water heater has started to deteriorate internally. This deterioration will eventually caused the water heater to leak. Replacing a water heater in this condition should be top priority.
- Refer to the owner’s manual for the recommended schedule, as each water heater and will depend on the quality of water in the area. Water heaters located in areas where high mineral content is standard will have to be flushed more often than a unit that connected to a water filtration system.
Combined with a regular water heater maintenance plan, flushing out the water heater periodically cleans this build up of sediment, extending the life of the water heater and lowering the energy required to run it.
If the phrase “how to flush a water heater” has you wondering what the heck that is, you’re not alone. Although most homes have a water heater to warm up their showers, laundry, and other household tasks, many do not realize that this heater must be regularly flushed of debris. So how is this done?
“Flushing out the water heater drains sediment that collects in the bottom of the heater over time,” explains Don Glovan, a franchise consultant with Mr. Rooter Plumbing in Hendersonville, NC. “This maintenance step increases efficiency, prevents corrosion, and lengthens the appliance’s life.”
If you call up your local plumber to flush your water heater, you’re likely to be charged anywhere from $100 to $300. Not ready to part with all that cash? You’re in luck: This is a DIY task that most homeowners can manage, and a full flush needs to be done only once a year.
Related Articles
- 6 Kitchen Renovations That Really Pay Off
- 12 Money-Saving Secrets Appliance Stores Don’t Want You to Know
- 10 Money-Saving Tricks Furniture Stores Don’t Want You to Know
How to flush a water heater: Tools you’ll need
The main tools for this job are pliers, a small adjustable crescent wrench, and a garden hose—items most homeowners already have. It’s also helpful to have a transfer pump, which can be found at your local hardware or home improvement store.
Step 1: Turn off the utilities
Turn off the gas or oil that heats the water.
The first step in flushing a water heater is turning off the utilities that run to it, says Fred Webster, owner of MillTown Plumbing in Chelmsford, MA.
If you have a gas-powered water heater, you’ll need to turn the gas valve on your water heater to the off position. If you have one that’s electric, turn off the electricity. This may require turning it off right at the circuit breaker in your home.
Step 2: Shut off the cold water
The water supply typically has a knob like this.
Next, shut off the cold water that is leading into the heater. This valve is typically located near the top of your water heater.
Step 3: Turn on the hot water faucet
The hot water should run from a faucet throughout the process.
Turn on a hot water faucet in your home, ideally one nearest where your water heater is located. You’ll leave this on throughout the flushing process in order to prevent a vacuum from forming. When the heater is fully flushed, you’ll notice that water stops running out of the faucet, but leave it open!
Step 4: Give the water a place to go
A regular garden hose is part of the flushing process.
Connect a garden hose to the drain valve on your water heater, which is typically located on the side near the bottom. Run that hose to a drain, such as a sink. If you notice any leaking around the hose attachment, grab the pliers, and use them to tighten the hose to the valve.
You can also try a couple of buckets rather than a hose, but depending on the size of your tank, you could be facing 40 gallons of water or more that must be flushed out. You’ll need to make sure there’s somewhere for that water to go, and a bucket or two might not be enough.
If you don’t have a nearby drain to handle the flow of water, Webster says, you may need a transfer pump to help pump water to a suitable drainage location. Pumping the water outside is a popular option, but be sure to lay down a screen or catch the sediment that comes out along with the water.
Step 5: Open the drain valve
Sediment from the tank is natural, so don’t be freaked out when you see this gunk coming out.
Once your water has a place to go, open the drain valve, allowing the tank to completely drain. Be careful, the water may be hot! Also, don’t be alarmed by debris. This, after all, is why you’re flushing the heater in the first place.
Once the sediment stops coming out (typically in five to 10 minutes), this means your water heater is fully flushed out. At that point, you can close the drain valve, allowing the tank to refill.
You will want to leave your hot water faucet open during this entire process. The water will have stopped running out of the faucet when your heater was emptied—after all, there’s no water in the heater to come out—but once the tank has refilled, the water will again pump through your pipes, and feed the faucet. When water comes out of that faucet, you’ll know the tank is full.
A few words word of warning
Although this is a DIY-friendly project, Webster warns all homeowners to follow their manufacturer’s instructions when flushing a water heater. You should be able to find these near the temperature and pressure relief valve located on the side of the tank.
If you have an older system that has never been flushed, it may also be wise to call in a pro to handle the job, says Carlos Pineda, a professional plumber with ClipCall.
“If a water heater has never been flushed from date of installation and it has been three to five years, sometimes flushing the water heater will do more damage than good,” Pineda warns.
A pro can inspect your water heater to tell you if it’s good to flush. After that, the process should be done annually to keep your water heater in good shape.
When it comes to household chores, flushing your water heater may not be on the top of your list. But flushing your water heater regularly will help it to run more efficiently and will help to prolong its life. When a water heater isn’t flushed regularly, it allows for mineral sediment buildup to occur which can lead to rust in your water heater. Here’s how to flush your water heater.
First Things First
You’ll need to start by turning off your tank’s water supply. Simply turn off the water line that feeds the water into the tank. This prevents any additional water from filling the tank and will also allow the existing water to cool. Depending on whether you have a gas or electric heater, you will then need to turn off the gas supply or switch-off the breaker located on your electrical panel. This will prevent any fire hazards by cutting off the heating element. It’s also a good idea to turn your water heaters thermometer to the “off” position.
Connect Up To The Drain Valve
You will then need to attach a garden hose onto the drain valve at the bottom of the water heater. Be aware that some models may have a protective cover over the drain valve which you will need to remove. You can either run the hose directly into a drain, a large bucket or even onto your driveway where it can drain safely.
Drain Your Water Heater
The next step is to open the drain valve and allow the water to drain. The water will be hot so be careful not to burn yourself. You may notice that the water begins to run out slowly towards the end. This can be a sign that there is a sediment build-up that needs to be flushed out of the tank. You can do this by turning on the cold-water inlet that leads into your hot water tank. The cold-water inflow will loosen any sediment and drain it out of the water heater.
It’s a good idea to repeat this process until you’ve managed to flush out all of the sediment. You want to make sure that the water in the tank is clear and not a brownish color. If your water heater is particularly dirty, you may require a long narrow brush to help loosen and remove any remaining sediment. If you’re unsure, call a professional plumbing and electric company to flush out and maintain your water heater. Water heater maintenance is important to prolong the lifespan of your heater.
Finishing Things Up
Once your water heater has been flushed out it’s time to turn off the drain valve and then disconnect the drain hose. Remember to close the pressure relief valve. You can then turn on the cold-water inlet and allow the tank to fill. Once the tank is full, it’s time to open the pressure relief valve to remove any excess air from the tank.
If you have a gas heater, you’ll need to turn the gas supply back on and relight the pilot light. For an electric heater, simply flip the breaker back up on your electrical panel. It’s important to also set the thermostat correctly to set the optimal temperature for your water heater. Finally, give your water heater about 20 minutes to warm up and then turn on a faucet to confirm that hot water is coming out.
Flushing out your water heater can be a daunting task. Art Plumbing, AC & Electric offers a wide range of water heater maintenance and installation services. Trust the professional’s when it comes to flushing out your water heater.
Water heater maintenance and flushing a water heater aren’t things the typical homeowner spends much time considering. However, without periodic routine maintenance, you may find yourself experiencing a gradual but annoying shortening of your available hot water supply. A poorly maintained heater uses more energy with less return. You’ll see that in your monthly energy bill. Water heaters are pricey. Periodic water heater maintenance goes a long way toward keeping its performance at peak throughout the full warranty period and beyond.
What Gets Flushed From My Water Heater?
Natural minerals in your water supply, typically magnesium and calcium, fall out of solution when heated and build up at the bottom of your water heater. If you’ve got a soft water plumbing system, your heater may not build up sediment as quickly, but you will need to check the heater anode at least once a year. Soft water corrodes anodes much faster because of the salt that replaces the hard water elements. Without soft water treatment, you will only need to check the anode every six years.
And about that anode: it’s there to prevent water tank corrosion that would occur on the inside. Without it, the tank could rapidly develop a significant leak at the bottom and require a complete replacement. Tank corrosion and corrosion from old water supply lines also contribute to the sediment that settles to the bottom of your hot water tank.
Why It’s a Good Idea to Call Benjamin Franklin Plumbing
While there are several maintenance operations that you can perform yourself, we recommend calling us to inspect and maintain a hot water heater.
- Water heaters are high-pressure installations that combine gas, electric, heat, and water. They must be approached with caution and know-how.
- A Benjamin Franklin Plumbing technician will not only flush your water heater but also perform a multi-point inspection of the entire unit and show you how to get the most efficiency and longevity out of your heater.
- Many times, a decline in hot water supply is due to more than just the need for a flush. Having Benjamin Franklin Plumbing on-site saves you repeat visits. Everything necessary to bringing your heater up to speed gets done in one visit.
- If your heater can give you more years of service, we will tell you. If it needs to be replaced, we’ll show you why. We will also show you many choices for a new heater that is perfect for your home and living conditions – all at discount prices.
Flushing Your Hot Water Heater
A periodic flush ensures the sediment build-up doesn’t calcify and become impossible to remove. How often to flush? That depends on how hard your water is. A flush every six months is about average, but if your water supply has a very high mineral content, flush every other month.
- Check your heater’s operating manual before you do anything else. Directions are often also posted on the side of the tank. Familiarize yourself with the components of the heater before you begin. Wear protective gloves and safety glasses, as you will be dealing with hot water and metal parts. If you have no instructions, find the manual for your specific model online.
- Turn off the gas to the heater per your heater’s instructions. You may be able to turn the setting knob to “pilot” or a vacation setting. If your heater is electric, turn it off at the circuit breaker panel.
- Turn off the cold water supply to your heater. This is typically found at the top of the tank.
- Turn on at least one hot water faucet. The more faucets you turn on, the faster the tank should drain. Keep these turned on throughout the flushing process.
- Put a bucket under the drainage pipe connected to your pressure relief valve and open the valve. The water coming out will be hot, so be very careful. This will help the flow of the flush. If nothing happens when you open the valve, it must be replaced. You are far better off calling us to flush your hot water heater, as the process performed incorrectly is very dangerous.
- Connect a hose to the drainage spigot at the bottom of the tank. Make sure the hose is long enough to carry the rusty water to a safe place well beyond the foundation walls and away from plants and pathways.
- Turn on the spigot and let the water drain until it is clear.
- If you have a lot of sediment, the water might not run clear before the tank is empty. In that case, turn on the cold water spigot that leads into the tank and let it run until the water from the hose is clear.
- Turn off the drainage spigot and remove the hose.
- Close any faucets you had running and close the pressure relief valve.
- Turn on the cold water spigot to your heater.
- When the tank is full, let off the excess air by opening the pressure relief valve. Alternatively, you can leave the hot water faucets open until clear water starts coming out. The idea is to get trapped air out of the system.
- Turn the gas dial back to its standard operating setting. If electric, turn the circuit breaker back on.
- Write the date of the flush and the date of the next scheduled flush so you can keep track of timing.
What About a Tankless Water Heater?
Tankless heaters can also accumulate sediment from the water supply but require a different approach to flush. Most manufacturers recommend an annual flush if your mineral content is moderate and twice as often if your water is very hard.
Flushing the tankless heater requires some electrical knowledge and access to a portable pump. Benjamin Franklin Plumbing provides this service and can flush your tank quickly and professionally. If you feel up to it, you can take the DIY approach and buy a tankless water heater flush kit at a hardware store at about $200.
The Nasty Reason You Should Be Flushing Your Water Heater Annually
Did you know that sediment and sludge collect and hide at the bottom of your water heater tank?
Look at the nasty sludge coming out of this water heater! Photo source
You see, water has lots of dissolved minerals in it that are perfectly safe for you to drink. But they can settle at the bottom of your water heater and create a nasty sludge.
Image source: Bradford White
And this sludge is more than just nasty. It also causes some inconvenient and expensive problems for you.
Problems caused by sediment in your water heater
The layer of sediment on the bottom of your water heater can result in:
Less hot water
Have you noticed that your hot water is not as hot as it used to be? It could be caused by a layer of sediment on the bottom of the water heater.
You see, the sediment forms an insulating layer that makes it more difficult for your water heater to heat your water. And that can lead to…
Higher energy bills
Since your water heater can’t heat the water as well, it will run longer and rack up your energy bills. And running more often can lead to…
Burst/leaking water heater
Your water heater has a special inner lining to prevent the tank from rusting. But when your water heater is running constantly (because of the layer of sediment on the bottom), the tank overheats and cracks the protective lining.
So now your water heater is more susceptible to rust, which can cause the tank to leak or burst. And that leads to…
Water damage
When water heaters burst, that’s 60 to 80 gallons of water all over your home. That’s some serious water damage. In fact, water heater failures cost an average of $4,444 per incident after the deductible was paid, according to Insurance Institute for Business & Home Safety (IBHS).
The solution: Flush out your water heater annually
The best way to avoid these problems is to flush out your water heater every year.
And it’s relatively simple to do. Basically, you open up the drain at the bottom of the water heater and run fresh, clean water through it to clear out any buildup of sediment.
But using a professional has it’s advantages. Most quality plumbers will also check the rest of your water heater to make sure that the whole thing is running in tip-top shape.
So if you don’t feel confident about doing it yourself or don’t have the time, contact a professional for help.
Mr. Plumber can help with all of your metro Atlanta water heater repair, service and replacement needs. Contact us online to ask us a plumbing question or set up an appointment.
Extend your water heater’s life span by draining the tank annually to remove any sediment that may have built up.
Related To:
Most water heaters employ a large, insulated holding tank to ensure there’s plenty of hot water on hand at all times for different purposes throughout the home. Over time, naturally occurring minerals in the water, as well as sand and grit flushed from municipal water lines, can settle in the bottom of the tank. This sediment buildup can potentially reduce the efficiency and capacity of your water heater. It can also plug the drain and interfere with ongoing maintenance, leading to early failure. Draining a water heater to remove sediments is an easy DIY that takes very little time and just a few basic tools.
Hot-Water Heater
Over time, naturally occurring minerals in water, as well as sand and grit flushed from municipal water lines, can settle in the bottom of your home water heater tank. Sediment buildup can potentially reduce the efficiency and capacity of your water heater.
Photo by: Sherri James
Over time, naturally occurring minerals in water, as well as sand and grit flushed from municipal water lines, can settle in the bottom of your home water heater tank. Sediment buildup can potentially reduce the efficiency and capacity of your water heater.
Sediment can interfere with burner efficiency in a gas water heater and can cause cracking and popping noises during heating cycles. Depending on your water source and the mineral content, both gas and electric water heaters should be flushed of sediment every one to two years to ensure optimal performance.
Dave Moody, a plumbing pro with Service Experts, suggests, “You may need to drain your water heater more frequently if your water source is a well or if your municipal water has higher-than-normal sediment content.”
Mineral deposits build up quickly in hot water heaters, This reduces both the efficiency and the life of the hot water heater.
A water heater should be flushed at least once every six months, or every three months in areas with high mineral concentration in the water supply.
Tools & Materials Needed
Steps To Flush a Hot Water Heater
- Connect a garden hose to the drain valve.
- Run the other end of the hose either to a drain or to the outside the home. A drain can be a floor drain in a laundry room, a nearby bath or shower, or a laundry tub. If the hot water heater is located in a garage or near an outside door, the hose can be run outside. If run outside, do not flush the hot water onto grass or plants. Just let the water run down the driveway.
- If you have a gas water heater, make a note of the temperature setting, then turn the gas valve setting to Pilot. Don’t turn it off or you may have to re-light the pilot flame. If you have an electric hot water heater, shut off the power to the unit.
- Open the drain valve all the way and let it run for about two minutes. The valve on your unit may use either a screw or a knob.
- After two minutes has elapsed, close the water supply valve. This is usually located on a pipe above the hot water heater.
- Go to the closest sink and turn the hot water on. Shutting off the water supply in conjunction with turning on the hot water at a nearby sink allows the hot water heater to drain.
- After the water heater has drained, turn the water supply valve back on. Allow the water heater to flush with fresh water for another two minutes.
- Close the drain valve. Let the water heater refill itself. You should hear the water running as the tank fills.
- Go to the sink faucet and wait until all the air has been purged from the water lines. You will hear gurgling sounds and the flow of water will be intermittent while the air is being purged. When all the air has been purged and the water flow is steady, shut of the sink faucet.
- For a gas heater, turn the gas valve setting to On. If you changed the temperature setting, adjust it to the original setting. For an electric heater, turn on the power.
- Disconnect the garden hose.


