Install Python, run an IDE, and start coding right from your Microsoft Windows desktop.
Subscribe now
Get the highlights in your inbox every week.
So you want to learn to program? One of the most common languages to start with is Python, popular for its unique blend of object-oriented structure and simple syntax. Python is also an interpreted language, meaning you don’t need to learn how to compile code into machine language: Python does that for you, allowing you to test your programs sometimes instantly and, in a way, while you write your code.
Just because Python is easy to learn doesn’t mean you should underestimate its potential power. Python is used by movie studios, financial institutions, IT houses, video game studios, makers, hobbyists, artists, teachers, and many others.
On the other hand, Python is also a serious programming language, and learning it takes dedication and practice. Then again, you don’t have to commit to anything just yet. You can install and try Python on nearly any computing platform, so if you’re on Windows, this article is for you.
If you want to try Python on a completely open source operating system, you can install Linux and then try Python.
Get Python
Python is available from its website, Python.org. Once there, hover your mouse over the Downloads menu, then over the Windows option, and then click the button to download the latest release.
win-python-install.jpg
Alternatively, you can click the Downloads menu button and select a specific version from the downloads page.
Install Python
Once the package is downloaded, open it to start the installer.
It is safe to accept the default install location, and it’s vital to add Python to PATH. If you don’t add Python to your PATH, then Python applications won’t know where to find Python (which they require in order to run). This is not selected by default, so activate it at the bottom of the install window before continuing!
win-python-path.jpg
Before Windows allows you to install an application from a publisher other than Microsoft, you must give your approval. Click the Yes button when prompted by the User Account Control system.
win-python-publisher.jpg
Wait patiently for Windows to distribute the files from the Python package into the appropriate locations, and when it’s finished, you’re done installing Python.
Install an IDE
To write programs in Python, all you really need is a text editor, but it’s convenient to have an integrated development environment (IDE). An IDE integrates a text editor with some friendly and helpful Python features. IDLE 3 and Pycharm (Community Edition) are two great open source options to consider.
IDLE 3
Python comes with an IDE called IDLE. You can write code in any text editor, but using an IDE provides you with keyword highlighting to help detect typos, a Run button to test code quickly and easily, and other code-specific features that a plain text editor like Notepad++ normally doesn’t have.
To start IDLE, click the Start (or Window) menu and type python for matches. You may find a few matches, since Python provides more than one interface, so make sure you launch IDLE.
idle3.png
If you don’t see Python in the Start menu, reinstall Python. Be sure to select Add Python to PATH in the install wizard. Refer to the Python docs for detailed instructions.
PyCharm IDE
If you already have some coding experience and IDLE seems too simple for you, try PyCharm (Community Edition), an open source IDE for Python. It has keyword highlighting to help detect typos, quotation and parenthesis completion to avoid syntax errors, line numbers (helpful when debugging), indentation markers, and a Run button to test code quickly and easily.
To install it, visit the PyCharm IDE website, download the installer, and run it. The process is the same as with Python: start the installer, allow Windows to install a non-Microsoft application, and wait for the installer to finish.
Once PyCharm is installed, double-click the PyCharm icon on your desktop or select it from the Start menu.
Tell Python what to do
Keywords tell Python what you want it to do. In IDLE, go to the File menu and create a new file. In PyCharm, click the New Project button.
In your new, empty file, type this into IDLE or PyCharm:
- If you are using IDLE, go to the Run menu and select the Run Module option.
- If you are using PyCharm, click the Run button in the top right corner of the window.
In this tutorial, learn how to download and install Python on Windows 10. Follow the step-by-step process to install Python on your computer. Install on automated location or on to a specified location of Windows OS.
How to Download Python for Windows 10
To install python, you have to download the latest version of python from the Python official website. This gives the latest version of Python to download on your Windows operating system.
See the screen below giving you a button with text “Download Python 3.7.0“. Click this button to download the latest version of Python on your Windows.
This tutorial gives you download and set up the Python process for your Windows OS. The version of Windows can be any including Windows 7, Windows 10 and all other versions of Windows.
How to Install Python on Windows After Download
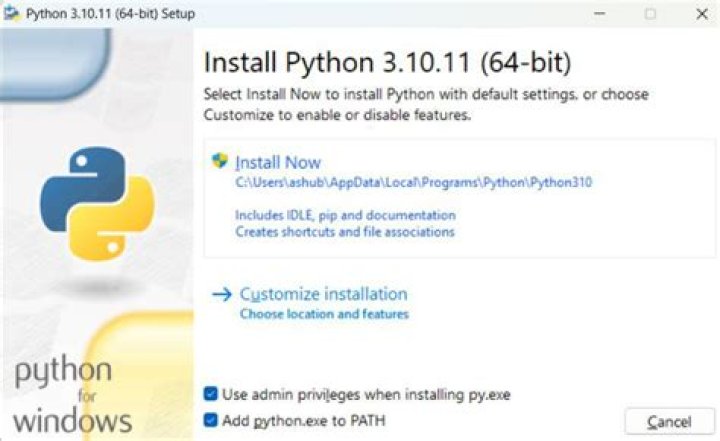
After you download the latest version of Python, you have to double click Python setup installer. This gives the below-given image screen to start the process with the two options given below.
- Install Now
- Customize Installation
Let’s see the install now process first
Method1:- Install Python on Windows Using “Install Now”
This process installs the Python on windows automated location. You can check the installation location in the image given below. The location automatic generated for fast process of installation.
Note: If you want to install the Python on the specified location, please follow the second method.
The “Install Now” link is given as in the screen below. This gives you the automated installation location as given in the link.
But before you click the link, you have to click the checkbox. The checkbox set the PATH for Python on your windows on installation. To add the PATH, you just need to click the checkbox given in the image. The check box contains the text “Add Python 3.7 to PATH” above with of
Now, click the “Install Now” link given in the above image. This starts the installation process of Python.
You can check the installation progress as given in the screen above. This installs all the libraries of Python on to your local system.
After the progress is completed, you will see a setup successful message. The successful message screen is as given below.
Click the close button to complete the process and open Python.
Method2:- Install Python on Windows Using “Customize Installation”
To install the Python on a specified location of the computer system. follow the steps given below.
Step1: First click the checkbox with the text “Add Python 3.7 to PATH“. This adds the Path of Python on your computer system.
After that, You have to select the link option with the text “Customize Installation“. This starts the installation process of Python on to a specified location.
Step2: In this step, the screen is as shown in the image below. You don’t need to click any checkbox here. Just click the “Next” button here.
Step3:
In this step, you have to browse and select the location where you want Python.
The above image installs the Python software in Python folder of C drive. Click the “Install” button to start the installation progress.
The installation progress shows the addition of all Python files and libraries.
After the progress is completed. You will get a successful message of Python installation.
You may also like to read.
Hope you like this tutorial of how to download and install Python on Windows 10. If you have any query regarding the tutorial, please comment below.
Also tell me, which software you have install for Python development on Windows.
Related Posts
One reply on “How to Download and Install Python on Windows 10”
Hello and thank you for the help! However, I would like to ask one question. Would there be any trouble had I not clicked on “add Python…to path”? So far, it seems to function just fine, but I wonder if I might encounter problems as I work with a more complex code. If so, what would be the best approach to fix this? Do I need to reinstall the program? Thank you in advance!
PyCharm is a cross-platform editor developed by JetBrains. Pycharm provides all the tools you need for productive Python development.
Below are the detailed steps for installing Python and PyCharm
Installing Python
Step 1) To download and install Python visit the official website of Python and choose your version. We have chosen Python version 3.6.3
Step 2) Once the download is complete, run the exe for install Python. Now click on Install Now.
Step 3) You can see Python installing at this point.
Step 4) When it finishes, you can see a screen that says the Setup was successful. Now click on “Close”.
Installing Pycharm
Step 1) To download PyCharm visit the website and Click the “DOWNLOAD” link under the Community Section.
Step 2) Once the download is complete, run the exe for install PyCharm. The setup wizard should have started. Click “Next”.
Step 3) On the next screen, Change the installation path if required. Click “Next”.
Step 4) On the next screen, you can create a desktop shortcut if you want and click on “Next”.
Step 5) Choose the start menu folder. Keep selected JetBrains and click on “Install”.
Step 6) Wait for the installation to finish.
Step 7) Once installation finished, you should receive a message screen that PyCharm is installed. If you want to go ahead and run it, click the “Run PyCharm Community Edition” box first and click “Finish”.
Step 8) After you click on “Finish,” the Following screen will appear.
Download and install 32-bit and 64-bit python 3.6.4 for windows.
The objective of this tutorial is to help you set up python 3.6 on windows OS.If you are using Ubuntu, you might want to check this other tutorial Install Python 3.6 on Ubuntu.
At the time of this writing, the latest stable version of python is 3.6, released on December 23rd, 2016. (Update: The latest stable version is 3.7.1 which you can download and install by following the steps here.) This tutorial will assist you in the download and install of python 3.6 on windows. It is for both 32-bit and 64-bit versions of python 3.6. This installation process will automatically install IDLE, pip, and documentation as well and will also create shortcuts and file associations so that you don’t have to set up environment variables after the completion of installation.
Before starting, check if python is already installed on your computer. To do so, open command prompt and type “python” in it. If python is not already installed on your machine, you will see something like:
To download the setup file for python 3.6, go to python’s official website and click on Python 3.6.4 under Downloads in the menu bar.
Or, you can directly click on the link below to download the setup file.
Once downloaded, locate the setup file under the name python-3.6.4.exe in the downloads folder and run it. You will see something like:
Click on Run, you will see something like:
By default, the Add Python 3.6 to PATH option is unchecked, make sure it is checked then click on Install Now. If the setup is successful, you should see a window as below:
Let’s check if python 3.6 is successfully installed now. Open the command prompt and type “python” on it. If you haven’t closed the command prompt from earlier, you will need to close and reopen it. You will see something like:
Check that the python interpreter is working properly through command prompt:
You can also search for IDLE and run python commands via. it.
Python 3.6 on windows 64-bit version installation
To install the 64-bit version for python 3.6 on windows, go to python’s official website and click on Windows under Downloads in the menu bar. You will see something like:
Click on Download Windows X86-64 executable installer.
Or, you can directly click on the link below to download the setup file.
Once downloaded, locate the setup file under the name python-3.6.4-amd64.exe in the downloads folder and run it. Rest of the steps is similar to that of the 32-bit version installation.
I hope this tutorial helped you install Python 3.6 on Windows.
Python is an excellent general purpose language that can be used for batch processing and other tasks on your server.
To install Python on Windows Server operating system, you just need to run the installer and use the simplest configuration.
Steps to Install Python on Windows Server Operating System
Download the installer (full as opposed to the web sintaller) and save it to your temp folder.
Right-click on the file and select Run as administrator.
You’ll see a User Account Control popup window with a question, “Do you want to allow the following program to make changes to this computer?” Just click on Yes.
Check the Add Python 3.7 to PATH checkbox at the bottom of the window (or whatever the latest version you’re installing).
If you don’t care where the program is installed, you can just clik on the Install Now, there’s nothing wrong with the setup and Python will run and this is generally fine for desktop installation.
For server installation, you should be more mindful with the program location better location rather than the default installation under a specific user folder who ran the installer. So it’s better to choose Customize installation.
In Optional Features screen, make sure you at least check the following: pip, py launcher, and for all users. Click Next.
On the next screen, Advanced Options, make sure you check Install for all users which then will change the value of Customize install location, just accept the default installation in C:Program Files unless you have a reason to install it somewhere else. Click Install.
Once you see Setup was successful just click the Close button.
Make sure that C:Program FilesPython37 and C:Program FilesPython37Scripts are in the Path of your System variables.
If you’re able to click on Edit button, you can see all the path entries in each line which is easier to read and edit. In this case, the button is greyed out due to the group policy.
As a final check, you can open Programs and Features and check if Python and Python Launcher are shown.
That’s all there is to have your server running Python scripts.
Python Tutorial
Installing and using Python on Windows 10 is very simple. The installation procedure involves just three steps:
- Download the binaries
- Run the Executable installer
- Add Python to PATH environmental variables
To install Python, you need to download the official Python executable installer. Next, you need to run this installer and complete the installation steps. Finally, you can configure the PATH variable to use python from the command line.
You can choose the version of Python you wish to install. It is recommended to install the latest version of Python, which is 3.7.3 at the time of writing this article.
Table of Contents
Step 1: Download the Python Installer binaries
- Open the official Python website in your web browser. Navigate to the Downloads tab for Windows.
- Choose the latest Python 3 release. In our example, we choose the latest Python 3.7.3 version.
- Click on the link to download Windows x86 executable installer if you are using a 32-bit installer. In case your Windows installation is a 64-bit system, then download Windows x86-64 executable installer.
Step 2: Run the Executable Installer
- Once the installer is downloaded, run the Python installer.
- Check the Install launcher for all users check box. Further, you may check the Add Python 3.7 to path check box to include the interpreter in the execution path.
Select Customize installation.
Choose the optional features by checking the following check boxes:
- Documentation
- pip
- tcl/tk and IDLE (to install tkinter and IDLE)
- Python test suite (to install the standard library test suite of Python)
- Install the global launcher for `.py` files. This makes it easier to start Python
- Install for all users.
Click Next.
This takes you to Advanced Options available while installing Python. Here, select the Install for all users and Add Python to environment variables check boxes.
Optionally, you can select the Associate files with Python, Create shortcuts for installed applications and other advanced options. Make note of the python installation directory displayed in this step. You would need it for the next step.
After selecting the Advanced options, click Install to start installation.
Once the installation is over, you will see a Python Setup Successful window.
Step 3: Add Python to environmental variables
The last (optional) step in the installation process is to add Python Path to the System Environment variables. This step is done to access Python through the command line. In case you have added Python to environment variables while setting the Advanced options during the installation procedure, you can avoid this step. Else, this step is done manually as follows.
In the Start menu, search for “advanced system settings”. Select “View advanced system settings”. In the “System Properties” window, click on the “Advanced” tab and then click on the “Environment Variables” button.
Locate the Python installation directory on your system. If you followed the steps exactly as above, python will be installed in below locations:
- C:Program Files (x86)Python37-32: for 32-bit installation
- C:Program FilesPython37-32: for 64-bit installation
The folder name may be different from “Python37-32” if you installed a different version. Look for a folder whose name starts with Python.
Append the following entries to PATH variable as shown below:
Step 4: Verify the Python Installation
You have now successfully installed Python 3.7.3 on Windows 10. You can verify if the Python installation is successful either through the command line or through the IDLE app that gets installed along with the installation.
Search for the command prompt and type “python”. You can see that Python 3.7.3 is successfully installed.
An alternate way to reach python is to search for “Python” in the start menu and clicking on IDLE (Python 3.7 64-bit). You can start coding in Python using the Integrated Development Environment(IDLE).
Hurray! You are ready to start developing Python applications in your Windows 10 system.
Requests is an elegant and simple HTTP library for Python, built for human beings. One of the most famous libraries for python used by developers al over the world. This article revolves around how one can install requests library of python in Windows/ Linux/ macOS, etc.
Installation
Windows
For installing requests in windows, one would require Python (preferably latest version), so if you don’t have python installed, head to – How to download and install Python Latest Version on Windows. Now open command prompt from the windows and run following command –
Booom. Done Now, requests library is downloaded successfully.
Linux
For installing requests in linux, one would require Python (preferably latest version) and pip latest version, so if you don’t have python installed, head to – How to download and install Python Latest Version on Linux. To install pip in linux – How to install PIP in Linux?. Now run,
macOS
For installing requests in mac, one would require Python (preferably latest version) and pip latest version, so if you don’t have python installed, head to – How to download and install Python Latest Version on mac. To install pip mac Os. Run,
Now to install requests,
Alternative common method
THe last method for installation of requests on any operating system is to grab the base files and install requests manually and Requests is actively developed on GitHub, where the code is always available. For code – visit here.
You can either clone the public repository:
Or, download the tarball:
Once you have a copy of the source, you can embed it in your own Python package, or install it into your site-packages easily:
For documentation of requests library – visit here
Attention geek! Strengthen your foundations with the Python Programming Foundation Course and learn the basics.
To begin with, your interview preparations Enhance your Data Structures concepts with the Python DS Course.
First, follow the installation instructions for Chocolatey. It’s a community system packager manager for Windows 7+. (It’s very much like Homebrew on OS X.)
Once done, installing Python 3 is very simple, because Chocolatey pushes Python 3 as the default.
Once you’ve run this command, you should be able to launch Python directly from to the console. (Chocolatey is fantastic and automatically adds Python to your path.)
Setuptools + Pip
The two most crucial third-party Python packages are setuptools and pip, which let you download, install and uninstall any compliant Python software product with a single command. It also enables you to add this network installation capability to your own Python software with very little work.
All supported versions of Python 3 include pip, so just make sure it’s up to date:
Pipenv & Virtual Environments
The next step is to install Pipenv, so you can install dependencies and manage virtual environments.
A Virtual Environment is a tool to keep the dependencies required by different projects in separate places, by creating virtual Python environments for them. It solves the “Project X depends on version 1.x but, Project Y needs 4.x” dilemma, and keeps your global site-packages directory clean and manageable.
For example, you can work on a project which requires Django 2.0 while also maintaining a project which requires Django 1.8.
This page is a remixed version of another guide, which is available under the same license.
This opinionated guide exists to provide both novice and expert Python developers a best practice handbook to the installation, configuration, and usage of Python on a daily basis.
O’Reilly Book
This guide is now available in tangible book form!
All proceeds are being directly donated to the DjangoGirls organization.
Python 3.9 released on Oct 5th, 2020. With that, the need of its usage is scaling high these days. In this article, we will see how to install Python 3.9.0 on Windows 10 OS. With that, to avoid any hassles in future, we will also let you know how to verify the installation.
Download Python 3.9
Now, keep the mouse cursor on the Downloads menu. The current version of Python i.e. Python 3.9,0 can now be seen,
On clicking, the Download begins,
After the download completes, click on the arrow, and select Open to begin installing,
Installing Python 3.9
Installation steps initiated. Select the checkbox “Add Python 3.9 to PATH“. After that, click Customize Installation as shown below:
Now, you will reach the section Optional Features. This by default checks the “pip” package installer, test suite, py launcher, etc.
Keep the default and click “Next“:
The Advanced Options section would be visible now. Select Install for all users. On selecting it will set the following installation path on it own. You can change the installation path by clicking Browse. If you want to keep the default path, click Install,
Installation of all the components begins,
After few seconds, the installation completes as shown below.
Click Close,
Verify Python 3.9 Installation
Now, verify whether we have successfully installed Python 3.9 or not. Go to START -> type CMD, right-click Open as Administrator.
The Command Prompt opens as shown below,
Now, on typing the following command python –version on CMD, the following is visible, that means Python successfully installed on our Windows 10 OS:
Video Tutorial
Here’s the YouTube video for the steps we saw above to install Python on Windows 10 and the sample Python program in the end:
If you liked the tutorial, spread the word and share the link and our website Studyopedia with others.


