How do you lock elements (pictures, text boxes, shapes, etc.)? In reading through this forum, I have seen reference to an anchor icon. Where is this? I have checked the “Lock Anchor” box in the advanced layout –> position window, but the item still moves. What am I missing? I have looked through all the Word training and can’t find the answer to keeping individual items from moving.
I am designing a master document for a client. They need to be able to insert their own title, date, etc. over the masthead header, and their own copy into the main body of the document. I do not want them to be able to move the elements, just to be able to insert their own copy. I would like to have placeholder text to guide them, ex.: Title, Subtitle, Date, Heading, etc. and to have Greeked text in the body that is formatted in the correct font and size, but that they can replace with their own text.
I have tried Header/Footer, but these can still be moved around. I have also tried Master Pages, but have had problems with that as well. I did see a great post about setting up a master page with a different first and second page—that was very helpful.
Different question: For a new document, when do you a Publishing Layout vs. a Print Layout and why?
Just found the easiest answer. Insert the photo into the header, select any text wrapping style for your picture other than “in line”. Then drag your picture wherever you want it in the document and click out of the header. Done.
Details
- Click “View” tab and go down to “Header and Footer”
- Once you have the header and footer section open in your document, insert your picture into the header.
- Single click to select your picture. Then go to the “Format” tab and select “Picture”.
- The Format Picture box will pop up. Select the “layout” tab.
- Drag your photo to wherever you want it to appear locked within the document.
- Click anywhere outside the header to go back to normal editing mode.
- Your picture should be “locked” within the document. You can always click back into the header to reposition.
69 people found this reply helpful
Was this reply helpful?
Sorry this didn’t help.
Great! Thanks for your feedback.
How satisfied are you with this reply?
Thanks for your feedback, it helps us improve the site.
How satisfied are you with this reply?
Thanks for your feedback.
One clarification to Daniel’s reply: Graphic objects in a Word document are either:
- In Line with Text as though they were a character in a paragraph, or
- Floating due to having some form of Text Wrap applied in order to be positioned more freely.
The clarification is that Floating objects are always Anchored to a paragraph. Their position can be controlled in a variety of ways using the settings in the Layout> Advanced options, but they remain anchored to a paragraph.
If you intend to use graphic objects in Word documents you might do well to read through the information provided on this web site. Follow the links at the bottom of the page that refer to Floating graphics & the Draw Layer:
IMHO, it is merely a veneer added to Word for the purpose of appealing to a wider range of users. Its primary purpose is to make it easier for those who don’t know how the program works to do things Word really is not designed for & was never intended to do [i.e., Desktop Publishing / Page Layout]. As Daniel points out, its very nature negates many of the principle strengths of the program & creates a document structure by transparently invoking features which many users simply do not understand, often have no awareness of, and/or do not want to deal with. [I don’t mean to sound condescending, so please don’t take it that way :-)]
Although you can switch views in a Pub file I’d strongly suggest that you not do so unless you are very familiar with how the program works. Also, once a document has been saved in Pub Layout View it will always open in that view from that point on. (I believe there is a VBA alternative available.) However, only Word 2008 & 2011 have Pub Layout View. If the file is opened in any other version it may not display as intended.
In a nutshell, Pub is a nice convenience for limited purposes if the document is to be printed locally or generated as a PDF. For cross-platform, multiple editors or professional page layout it might be wise to consider other options 🙂
AI: Artificial Intelligence or Automated Idiocy.
Please mark Yes/No as to whether a Reply answers your question.
Related Articles
- How to Make Word Documents Fillable but Not Editable
- How to Add an Animated GIF in PowerPoint 2007
- How to Change the Footnote on PowerPoint
- Removing Check Boxes in Word
- How to Open a VRM File
- How to Alphabetize Last Names in Excel
Word provides tools and features that allow you to create custom documents. One type of document you can design is a fillable form, which lets you add content controls — such as text controls, which are text boxes in which other users can enter text. After you create a form, you can lock it so that anyone who works with the document cannot change or delete the text boxes or other controls, although they can still type into them.
Step 1
Display the Developer tab of the ribbon if it is not already visible. Select the “File” tab and click “Options.” Select “Customize Ribbon.” Select the “Developer” check box in the Main Tabs list under Customize the Ribbon and click “OK.”
Step 2
Add a text control. Place the cursor where you want the text box to appear. Select the “Developer” tab and click “Design Mode” in the Controls group. Click “Rich Text Content Control” to allow users to format the text or type an entire paragraph or select “Plain Text Content Control” to limit the text they can add.
Step 3
Set the text box properties. Click on the control to select it. Click the “Developer” tab and click on “Properties” in the Controls group to open the Content Control Properties dialog. Choose the options you want to apply and click “OK.”
Step 4
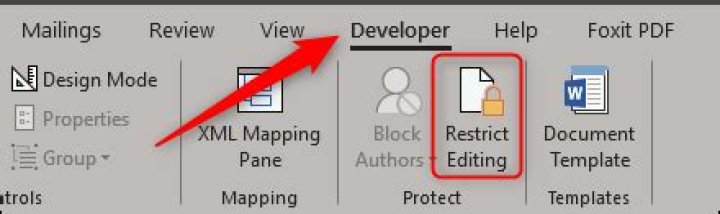
Lock the form. Press “Ctrl-A” to select the entire document or click “Select” in the Editing group of the Home tab and click “Select All.” Click on the “Developer” tab and click “Restrict Editing” in the “Protect” group.
Step 5
Select “Allow Only This Type of Editing in the Document” in the Editing Restrictions section and choose “Filling in Forms” in the drop-down list. Click the “Yes, Start Enforcing Protection” button and save the document.
Locking text boxes is a great way to protect specific content in your document from changing, either accidentally or intentionally. Here’s how to lock your text boxes in Word.
Locking Text Boxes in Word
Let’s say you’re working on a document that other people on the same network have access to and you want to lock your text boxes, so they don’t get edited by mistake.
To make this work, we’re going to need to use the tools provided in the Developer tab. The developer tab is hidden by default, so go ahead and enable the tab to appear on the Ribbon if you haven’t already.
Once you have the Developer tab enabled, go ahead and open up your document that has the text boxes you want to lock and switch to the “Developer” tab. Here, select “Restrict Editing” in the “Protect” section.
Note: The Restrict Editing option is also available on the Review tab, but only appears if you have enabled Developer tab.
A Restrict Editing pane appears on the right where you can restrict editing permissions for all, or certain parts, of the document. Here, check the box next to “Allow only this type of editing in the document” in the “Editing restrictions” section, then keep “No changes (Read only)” selected in the drop-down menu in the same section.
Next, you need to select all of the content in your document except for the text boxes you want to lock. The easiest way to do this is to hit Ctrl+A to select everything in the document and then hold the Ctrl key while clicking each checkbox, in turn, to remove them from the selection.
Once you’ve selected the content, check the box next to “Everyone” under “Exceptions.” This makes it so that everyone is still able to edit the selected content.
Finally, select “Yes, Start Enforcing Protection” at the bottom of the “Restrict Editing” pane.
Once selected, you’ll be prompted to enter a password for additional protection. Type a password and then click “OK.”
You’ll notice all the content except for the text boxes is now highlighted, meaning your text boxes can no longer be edited while the highlighted content can.
To remove the protection restrictions on the document, click “Stop Protection” at the bottom of the “Restrict Editing” pane.
If you’re collaborating on a document with several other people, there is always a chance that the content you wanted to remain untouched gets edited. Protect yourself from human error by protecting specific parts of a Word document from editing.
Protecting Specific Content in a Word Document
So you’re getting ready to send out your Word doc, but you want to make sure that certain parts of the document remain untouched. Instead of leaving this up to trust, you can take advantage of a feature that allows making specific parts of your content read-only, rendering them un-editable.
First, go ahead and open the Word document to be protected and head over to the “Review” tab.
Next, click the “Restrict Editing” button.
The “Restrict Editing” pane will appear on the right side of Word. Here, tick the “Allow only this type of editing in the document” checkbox.
Once ticked, you’ll notice the drop-down menu underneath becomes selectable. Make sure “No changes (Read only)” is selected from the menu. You’ll also notice a new “Exceptions” option, but we’ll come back to that later.
Now, you’ll need to select the parts of the document for which you do want editing allowed. Whatever parts you don’t select will end up as read-only. Go ahead and select the text by clicking and dragging your mouse across the text. If you have specific content in two separate sections that you’d like to keep open for editing, hold the Ctrl key while you click and drag to add them to your selection.
Once the text is selected, head back over to the “Restrict Editing” pane and tick the “Everyone” checkbox under the “Exceptions” section. This allows everyone that receives the document to edit the content you selected. If you’re on a company network and would like only to allow specific people to be able to edit the content, select “More users” and enter the users’ names (note that this requires access to a central, network user directory).
Finally, under the “Start enforcement” section, click “Yes, Start Enforcing Protection.”
The “Start Enforcing Protection” window will appear, warning you that the document isn’t encrypted and therefore susceptible to malicious users. You’ll be prompted to enter a password. Go ahead and do so, then select “OK.” If you selected specific people for whom to allow editing, you’d select the “User authentication” option instead.
Word now highlights, as well as brackets, the selected text. This is an identifier for users that those are the editable sections.
In the right-hand pane, you’ll also notice a new option that lets you hop from editable section to editable section. All you need to do is click “Find Next Region I Can Edit.”
The “Show All Regions I Can Edit” option points out the editable sections, as the name implies. If you’d like to remove the highlights from the text, uncheck the box next to “Highlight the regions I can edit.”
To remove the protection restrictions on the document, click “Stop Protection” at the bottom of the “Restrict Editing” pane.
Now you can safely send out the document for collaboration without the worry of having certain parts edited that should otherwise remain untouched.
Related
- How to Expand Groups in a Protected Worksheet in Excel 2007
- How to Communicate Back & Forth in Google Docs
- How to Transfer a PDF to Word and Make It Fillable
- How to Unprotect PDF
- How to Block Someone From Commenting on Facebook
Locking text boxes in a Word document lets you prevent others from tampering with or making inadvertent changes to these text-entry controls. By doing so, you promote error-free performance of any Visual Basic for Applications programs that rely on the text boxes. Locking text boxes also prevents changes that could make a document visually unfit for presentation. A simple way of locking text boxes is to use the Restrict Editing command, which allows you to single out text boxes for restricted editing.
Click the “File” tab and then click “Options.” Click “Customize Ribbon” in the left pane, select the “Developer” check box to indicate you want to show the Developer tab and then click “OK.” This tab has a button whose appearance makes it easy to verify the locked state of text boxes.
Open a Word document that has text boxes. Click the “Review” tab, then click the “Restrict Editing” button in the Protect group. Word displays a pane allowing you to manage editing permissions for specific parts of the document, including text boxes.
Under Editing Restrictions, select the “Allow Only This Type of Editing in the Document” check box. This confirms that you want to restrict access to at least some parts of the document. Click the drop-down list under Editing Restrictions to display a list of editing types to restrict and select “No Changes.”
Select all parts of the document except for the text boxes that you want to lock. Select the “Everyone” check box under Editing Restrictions in the Restrict Formatting and Editing pane to indicate that anyone can edit the selected areas.
Select just the text boxes. Select the check boxes under Editing Restrictions for those users whom you do not want to lock out of the text boxes. If you want to lock the text boxes for everyone, leave all user check boxes unchecked.
Click the “Yes, Start Enforcing Protection” button under Start Enforcement. Click the “Password” option in the dialog box that appears to specify a simple password protection scheme for the document. Type a password in the two text boxes provided. Click “OK” to lock the text boxes.
Click the “Developer” tab, then observe the Design Mode button in the Controls group. The button is disabled, indicating you can’t click it to enter design mode, which is the mode for editing text boxes. This indicates you successfully locked the text boxes.
Darrin Koltow wrote about computer software until graphics programs reawakened his lifelong passion of becoming a master designer and draftsman. He has now committed to acquiring the training for a position designing characters, creatures and environments for video games, movies and other entertainment media.
Related
- How to Gray Out a Check Box in Access
- How to Protect Adobe Acrobat Files From Being Edited or Copied
- How to Change the Cell Font on a Fillable Acrobat PDF
- How to Send a Form From a Website to a Fax
- How to Add a Scrollbar in Excel
After creating a fillable form in Microsoft Word, you may want to lock it down to prevent users from accidentally editing content outside the fillable areas. Microsoft Word provides a function called Restrict Editing that lets you either lock down the form in its entirety or allow users to access only the fillable areas within the form.
Lock Down Form
Open the form that you need to lock down, and press “Ctrl-A” to select all content within the form. Click the “Developer” tab, and then click “Restrict Editing” on the Protect group; if you cannot see the “Developer” tab, click “File | Options | Customize Ribbon | Developer | OK.”
On the Restrict Editing pane that shows up, check “Allow Only This Type of Editing,” then click the pull-down menu under Editing Restrictions. Select “Filling in Forms” to prevent users from editing the content outside the fillable areas, or select “No changes (Read Only)” to lock down the entire form, including the ability to fill in anything. Click “Yes, Start Enforcing Protection,” then enter a password into both the “New Password” and “Reenter Password” boxes. Click “OK.”
Disclaimer
Information in this article applies to Microsoft Word 2013. It may vary slightly or significantly with other versions.
This article describes the most common methods for creating ruling lines or blank lines in a Microsoft Word document. These are useful if you are creating a form that will be printed and filled out with pen or pencil.
The following six methods are described in this article:
Paragraph Border method
Table Border method
Blank Space method
Tab Leader method
Compatibility Options method
Summary
To create lines in a Microsoft Word document, you may use any of the following methods:
Paragraph Border Method
To place a line (border) under each line that has a paragraph mark (¶), follow these steps.
NOTE: To show paragraph marks in your Word document, click Options on the Tools menu. On the View tab, click to select the Paragraph marks check box, and then click OK.
Select all the paragraphs to be underlined.
On the Format menu, click Borders and shading.
Click the Borders tab.
Under Style, click the line style you want to use for the border.
Under Preview, click on the diagram to select the center and bottom borders.
Click OK. Each line with a hard return will now have a border beneath it.
NOTE: Multiple blank paragraphs formatted in this way can be placed in text boxes and positioned underneath the normal text area to form lines that are not affected when you type text; lines created by using the Draw method are also not affected when you type text.
Table Border Method
To place a border on the bottom of the table cell, follow these steps. There will be a line under any text typed in the table cell. When text wraps to a second line, there will still be only a single border at the bottom of the cell.
Place the insertion point on a blank line where you want the underlined text to appear.
On the Table menu, point to Insert, and then click Table.
In the Number of columns box, type 1, in the Number of rows box, type 1, and then click OK.
NOTE: A one-column, one-row table now appears at the insertion point. You can specify the number of columns and rows you need.
On the Table menu, point to Select, and then click Table.
NOTE: You can also select just a particular cell, column, or row of your table to apply the bottom border to.
On the Format menu, click Borders and Shading, and then click the Borders tab.
On the Borders tab, under Setting, click None.
Under Style, click the line style you want to use for the border.
Under Preview, click on the diagram to select the bottom border, and then click OK.
Blank Space Method
To underline one space at a time, follow these steps. Word does not normally underline blank spaces. The following instructions explain how to create non-breaking spaces that Word will underline.
Place the insertion point where you want the ruling line (underlining).
On the Format menu, click Font. In the Underline style box, select the line style you want, and then click OK.
For every blank space you want to underline, press CTRL+SHIFT+SPACEBAR.
Tab Leader Method
Place the insertion point on the line where you want the underlining.
On the Format menu, click Tabs.
In the Tabs dialog box, click Clear All.
Under Tab stop position, type a number that corresponds to the number of inches you want the line to extend from the left margin. (For example, 6.0 inches goes from margin to margin in a document with 1.25-inch left and right margins.)
Under Alignment, click Right, and then under Leader, click 4 (the underline).
Click Set, and then click OK.
Press the TAB key. A line extends from the insertion point to the tab created in step 4.
Press ENTER to move to a blank line, and then press the TAB key again. Repeat this step as needed.
NOTE: Multiple blank paragraphs formatted in this way can be placed in text boxes and positioned underneath the normal text area to form lines that are not affected by typing text; lines created using the Draw method are also not affected by typing text.
Draw Method
Click the Drawing toolbar button on the Standard toolbar, or point to Toolbars on the View menu, and then click Drawing.
Click Line on the Drawing toolbar.
Place the pointer where you want the line to start. The mouse pointer is a crosshair (+).
Click and hold the mouse button, and drag the line to the length you want.
Holding down the SHIFT key while drawing a line produces straight horizontal or vertical lines.
Holding down the ALT key while drawing a line prevents the line from snapping to the grid and allows exact line placement. To turn off the snap-to-grid feature, click Draw on the Drawing toolbar, and then click Grid. Click to clear the Snap objects to grid check box, and then click OK.
Repeat steps 1 through 4 to add as many ruling lines as you want.
Compatibility Options Method
NOTE: Using this method will create an underlined character each time you press a key. Pressing the SPACEBAR will create an underlined space.
On the Tools menu, click Options.
Click the Compatibility tab.
Under Options, click to select the Draw underline on trailing spaces check box, and then click OK.
On the Format menu, click Font.
On the Font tab, click the underline style you want in the Underline style box, and then click OK.
More Information
For more information about using text boxes, click Microsoft Word Help on the Help menu, type text boxes in the Office Assistant or the Answer Wizard, and then click Search to view the topic.
Written by: Greg Lindberg
Written on: July 14, 2020
In the Microsoft Office Word application you can create many types of text-based documents as well as add graphics to create posters and flyers. When you add a text box to your document you may want to protect the content from being deleted or edited if other people have access to the document.
In order to lock your text boxes you will need to make sure you have the text formatted that way you want and then lock the position of the text box using the Lock anchor option.
Open the Microsoft Word document that contains the text boxes that you want to lock. Right-click on the text box you want to lock and then click on the “Format TexBox” option.
- In the Microsoft Office Word application you can create many types of text-based documents as well as add graphics to create posters and flyers.
- Right-click on the text box you want to lock and then click on the “Format TexBox” option.
Click on the “Layout” tab and then click on the “Advanced” button. Select the “Alignment” option below the “Vertical” heading and then select the “Bottom” option from the drop-down menu.
Select the “Margin” option from the drop-down menu next to the “relative to” field. Click on the box next to the “Move object with text” field so that it’s deselected.
- Select the “Margin” option from the drop-down menu next to the “relative to” field.
- Click on the box next to the “Move object with text” field so that it’s deselected.
Click on the box next to the “Lock anchor” field so that it’s selected. Click on the “OK” button.
Move your cursor about the text box. Click on the “Insert” option from the top toolbar menu and then click on the “Break” option if you’re using Word 2003. Click on the “Page Layout” tab and click on the “Breaks” icon for Word 2007.
Select the “Continuous Break” option. Click on the “Tools” option and then click on the “Protect Document” option for Word 2003. Click on the “Review” tab and click on the “Protect Document” icon for Word 2007.
Click on the “Select sections” option and then select the section of your document where your text box is located. Click on the “OK” option and then click on the “Yes, Start Enforcing Protection” button.


