Some of us don’t have a big yard in which to grow our warm season gardens and some of us have no yard at all. There are alternatives, though. These days many containers are used to grow flowers, herbs, and even vegetables. These containers include gutter garden ideas. Research does not indicate who originated the idea of growing shallow rooted plants in a prepared gutter, but it is a worthwhile undertaking.
What is a Gutter Garden?
If you’ve not seen them, in person or online, you may be asking what is a gutter garden? It’s a rain gutter designed to hold your choice of plants and decorate a wall, fence, porch railing, or other area. Use your creativity to put a gutter garden in some of your free space. If you need inspiration, take a look here. Consider these uses for gutter gardens:
- Hanging for vertical appeal: Thread thin wire through a gutter and use it to hang after planting. You may use more than one gutter piece in the hanging arrangement.
- Hide an unpleasant view: Use a series of hanging gutters to hide your trash cans or the neighbor’s old car parked in the backyard.
- Growing herbs near kitchen: Oregano, tarragon and thyme are among the shallow rooted herbs that are great for this and all within easy access for use.
- Repelling aphids: Plant nasturtiums into smaller pieces of gutter along with chives, dill, or lemon balm. Move them as needed to areas where aphids are attacking new growth. The fragrance of the herbs repels aphids and other pests, while flowers of nasturtiums act as a trap for the pests.
- Seasonal color: Plant pansies in spring and fall or alyssum, creeping phlox, petunias in summer.
- Create a succulent garden on a wall: Hang old gutters on a wall and fill with your favorite succulent plants for added appeal.
How to Make a Gutter Garden
Choose gutters with open space. Old gutters that have not rusted may be appropriate for the project. Some sources say they’ve purchased them new and inexpensively. You’ll need end caps and possibly glue to keep caps in place. You’ll also want screws if you’re attaching them to a fence or wall.
Cut them into appropriate lengths, wearing safety glasses. Drill holes for wire if your garden will hang and add drainage holes, unless the gutter garden will be at an angle where it can drain.
Paint gutters for a more colorful display. Hang on a stand, if desired.
What to Plant in Gutter Gardens
The best garden gutter plants are those with spreading roots instead of those that continue to grow downward. Succulent plants generally have spreading roots and grow perfectly in shallow containers, such as a portion of gutter. Besides the plants already mentioned, you can try:
Gutter Gardens & How to Make Your Own
courtesy of Houzz.com
The first time I saw a picture of a gutter garden, I was hooked and had to have one for myself. It was so neat and organized-looking, and it shouted “Low Maintenance”, which is right up my alley.
The picture on the left shows the gutter garden I built, but there are lots of different styles and materials you can use. Some people make hanging gutter gardens that are not attached to a wall. I’ve seen others that run back and forth diagonally to create an easy watering system. Of course some people also have plants growing out of their rain gutters that have gotten clogged with debris (ok, that’s a joke).
There are so many benefits to gutter gardens – but even if you don’t care about those, they’re cool to have anyway.
1. They are Cheap and Easy to Make
You can pick up basic materials at your local home improvement store very inexpensively. If you can glue, drill and put dirt in a container, this job is calling your name.
2. You Don’t Need a Large Yard
Gutter gardens are vertical, so they take up virtually no floor space. This means you can live in a very urban area and grow as many plants as your wall space can accommodate.
3. They Keep Plants Safe from Lots of Pests
If you’re worried about gopher, raccoons, dogs or other plant predators attacking your plants, fear no more! Gutter gardens high off the ground can keep your plants alive and happy.
4. You’ll Suddenly Have Lots of Friends
Once people see your awesome gutter gardens, they will be amazed, ask you where you got them, then find out you made them yourself and then think you’re super cool. Well, maybe.
If you are looking for a more industrial look or simple design, a gutter garden may be just your style. You can plant a bunch of different plants or herbs in a single gutter, and watering and drainage can be extremely easy if you hang your gutters at a slight angle.
I’ve seen gutter gardens that are 12 feet long that extend alongside of a house. You can also cut gutters to a shorter length and “stack” them one above the other, letting the top drain into the gutters below it.
A nice benefit to growing plants in gutters is that you can place them high enough where pets and other critters can’t get to them. This is especially important if you are growing edibles.
Materials Needed:
All you need to do is go to your local home improvement store and get yourself some rain gutter with end caps and supports. You can attach these to a wall or a fence or build a frame (see video below) to attach the gutters together and then hang them.
Materials are very inexpensive, plastic being cheaper than steel. They are also both very durable so they will last you a long time.
Tip: Something to keep in mind when planting in a warm, sunny location is the color of your gutter. Darker gutters will heat up the soil more and may dry out plants faster than a bright white gutter that will reflect light and heat. Since gutters can’t hold as much dirt as a typical pot, this can can have a bigger impact on your plants.
Note: I actually used steel gutters in the photo above, since I liked the industrial look – and the location is mostly shaded so heat wasn’t an issue.
As I mentioned about, gutters don’t provide lots of space for soil, so it’s best to grow smaller-sized plants or ones that don’t need a lot of space for their roots. This can also help with the weight of the structure if you plan to hang it on a fence where you may be concerned with weighing it down too much.
Herbs are awesome for this reason, but lettuces are also popular. Annuals could work quite well, especially if you are creating a gutter garden as a work of art in your backyard.
I didn’t want my gutter garden to stress my fence out. The gutters and other material are light, but the dirt combined with water can get heavy. Therefore, I did a few things to keep the garden as light as possible:
1. I planted smaller herbs. They don’t grow big, and they need less dirt.
2. I used styrofoam in the base of the planter instead of pebbles. You may not need either if you are using plastic gutters.
3. I used a narrower taller gutter instead of a wider gutter that would likely need more dirt to cover the plants’ roots.
4. Using an existing support beam (or adding one of your own) can help distribute the weight of the garden more evenly.
Some Things I Learned:
Since gutters can hold many different plants together, it’s important to avoid using fast and spreading growers, like mint (no offense, Mint!), that will overtake your other plants. That is, of course, unless the entire gutter is mint.
Instead of having water simply drip out of the base of the planter, I glued a 3/4 drip line to the base and directed the extra water to a nearby planter holding another plant. No wasted water and no messy dripping. Gorilla Glue worked for me, although you may need to re-glue it occasionally if the tube gets jostled frequently.
Making an Herb Gutter Garden…
growing herbs in gutter gardens care great because they are generally smaller and lightweight. My garden contains spearmint, orange mint, lemon balm, parsley, cilantro and basil. Here is a list of other herbs that you can usually find at your local nursery or garden center. You can also start your garden from seeds.
– Thyme
– Oregano
– Chives
– Stevia
– Marjoram
– Sage
– Tarragon
– Rosemary and Lavender (although these can get big if not trimmed regularly)
Hanging Gutter Garden Is Perfect For Your Plants | The WHOot
Easy Gardening For Beginners
Do you admire other peoples gardens but think which you could never have one? Many humans love to have a look at their neighbors adorable gardens within the spring and summer or chat with their pals as their associates work in their gardens and they suppose how pleasant itd be to have a lovable lawn of their very own, but assume that they could in no way create a garden. Its not as difficult as you might suppose to create a stunning garden complete of healthy, thriving flora. It takes a few patience, some realize how, and some planning, however you could create a beautiful garden in your yard.
The biggest cause that humans think they can not create their very own stunning gardens is due to the fact they suppose that gardening requires a awesome deal of time and effort and a large amount of knowledge about flora.
Its proper that creating a high-quality garden does take a few attempt, but its smooth to find out the records you need to recognize so as to choose the exceptional vegetation to your particular place of the united states and for the soil that you have.
You will find that when you lay the muse to your garden properly it might not take a whole lot time or attempt to maintain it going. And the effort and time you do spend on the lawn you may probably enjoy!
You will never run out of herbs again! Always have a fresh stash on standby with this brilliant Hanging Gutter Garden. It’s perfect for all your herbs and plants and so easy.
If you love to grow herbs and flowers, do we have a project for you! Who would have thought that you could create a vertical hanging garden using Rain Gutters?
What we love about this project is the versatility. We have featured a number of different ways to display including free standing. Check them all out now and Pin your favorites.
You can even run it across a wall or fence. It’s practical and moveable and will come in so handy. It’s such a great idea when you need more sun or shade or to add some color to your space. We love the above version from Dutramaquinas.
We have included a video that will show you how to recreate your own at home. Click Play above to watch now and continue scrolling for all the handpicked projects we have selected for you ^
Here’s another great way of using your Hanging Herb Planter, we love the addition of the herb pots and the rope is a nice rustic touch. It’s another great job from A Girl and Her Glue Gun and you can get the instructions here
Chain looks great too as shown by this version from Apexext
Don’t you love this Hanging Gutter Garden? This is another very attractive version and it would take the focus off a wall or fence.
This one is from Her Tool Belt and you can get the tutorial here
Here’s another way to display your gutter garden. Simply add a chalkboard background and use metal rather than plastic gutters. What a great look from Hative
Looking for a cute way to water your plants? Everyone loves this Elephant Watering Can and we couldn’t resist sharing. It’s a great gift too. Get yours here
via Dutramaquinas
You could also make a hanging strawberry gutter garden or you may like to try the PVC vertical version included below.
via Home Depot
You can paint your gutter garden and use rope too if you like. This version from Home Depot looks very cheery and they have a full tutorial on their site here
As an Amazon Associate we earn from qualifying purchases.
Privacy policy · Cookie policy.
Grow fresh fruits and veggies at home even if you don’t have a yard for planting. Hang this adorable bucket by your front door, on your balcony or even in the kitchen for fresh produce practically on demand.
Related To:
Photo by: David Killebrew
Difficulty: Easy
Cost: Approximately $50
Photo by: David Killebrew
Materials and Tools
- galvanized bucket
- strawberry or tomato plants
- 1/4 in’ wire mesh
- gardening fabric
- wire cutters
- rope
- jigsaw
- potting soil
- chalkboard paint (optional)
Photo By: David Killebrew
Photo By: David Killebrew
Photo By: David Killebrew
Photo By: David Killebrew
Start by cutting a hole in the bottom of a bucket. We used a jigsaw with a blade specifically designed for cutting metal, but you can also complete this task using wire cutters. Whichever tool you use, start by creating a hole with a hammer and nail about 1-1/2″ – 2″ from the edge of the bucket and then use it as a starting point to make your cut.
Original_David-Killebrew_Hanging-Garden_34.jpg
Photo By: David Killebrew
Photo By: David Killebrew
Photo By: David Killebrew
Photo By: David Killebrew
Trace a circle on the wire mesh the same size as the bucket’s circumference. Use the wire cutters to cut it to size. Then cut circles where you plan to plant the strawberries so that you can slide the plants into the mesh. Make sure to remove any sharp parts from the mesh that could damage the plants.
Cut a very large circle from the mesh and slits to fit around plants. Add a slit to the edge of the fabric as well.
The Knowledge You Need To Survive
Categories
Log in:
Subscribe to this blog
Recent Posts
Companion Blog
Looking back…
DISCLAIMER
How to Make a Hanging Gutter Garden
Posted by nwnikkie on June 9, 2011
Why Bother with a Gutter Garden?
Many apartment dwellers are confined to balconies, or small patios, and a collection of containers can start to look like clutter and cost a lot of money up front. Gutter gardens are a great way to take advantage of the vertical spaces around your home to grow flowers, edibles and create a stylish space divider or privacy screen without spending too much money.
Oh, and the slug issue – that’s just it, there is none! Not to say this design is pest free. You’ll still have to deal with flying pests, but you can easily wrap some row cover material around the gutters to allow sunlight in, but keep the flying buggers away from your spinach.
Other gutter garden designs have suggested anchoring them on the side of your house. Although this is not a bad option, I’d rather not drills holes into my siding or worry about water sitting between the gutters and my siding. If you rent, I doubt your landlord would be into you screwing a bunch of holes in the siding either.
How to Make a Modern Gutter Garden
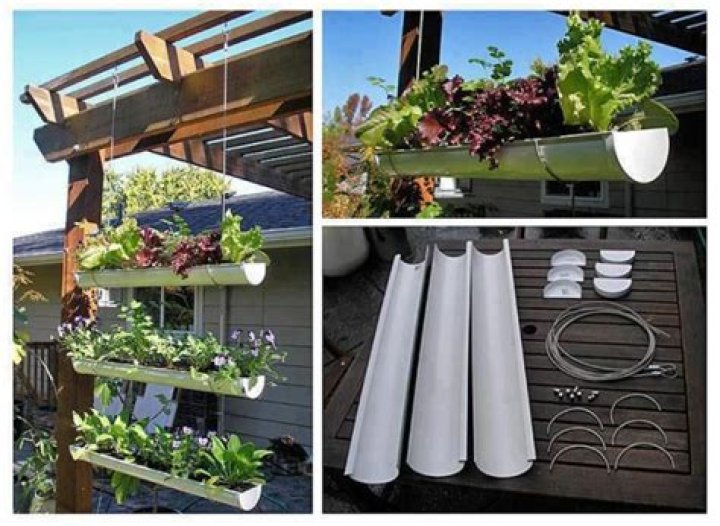
Most if not ALL of these materials can be purchased at your local hardware store.
Materials
1 – 8’ PVC white rain gutter cut into 3 32” sections
6 – PVC white gutter end caps
2 – 1/8″diameter steel cables cut to desired length
6 – Cross Clamps
6 – 1/8″ diameter steel rods
2 – Galvanized eye hooks
Potting soil and Plants
Tools
Cordless Drill with drill bit set
Hand saw or hack saw
T-square or straight edge
Let’s get started already…
- Determine the center of your gutters and draw a reference line (otherwise your gutter won’t hang right).
- Mark and drill the holes for the steel cable rods. Find a drill bit the same diameter as the cable to minimize the wiggle room.
- Space drill holes a few sizes larger to make sure you get good drainage (plant roots hate sitting in water for long periods of time).
Once you have all your gutter holes drilled, you’re ready to hang this bad boy. Be patient…we’ll be planting very soon.
- Locate a spot that gets at least 4 hours of sun. I placed mine on the cross beams of a pergola I built a couple of years ago.
- Drill pilot holes (a hole slightly smaller in diameter than the screw diameter) to make screwing in the eye hook a lot easier. Make sure the holes are the same distance as the steel cable so they hang straight down.
- Slide the gutters through the holes and secure them with the cross clamps at your desired heights. You’ll notice I placed mesh tape (normally used for drywall joints), left over from another project, over the drainage holes to keep the soil from seeping. However, I think the holes are small enough, this step is not necessary. I did it out of habit.
- Secure the gutter with the cross clamps and half circle steel rods
Now you’re ready to fill it with organic potting soil and plant them with your choice of shallow rooted plants. I found watering to be easier with a narrow spout watering can like this Aqua Genie Watering Can. Hoses will blast your soil all over the place and rain-style spouts will water your plants and not the soil (note: water your soil NOT your plants).
Plant Picks for Gutter Gardens
Shallow rooted edibles and annual flowers should grow easily in a gutter garden, making this project perfect for small space gardens, like balconies, or just to add visual interest to an otherwise boring patio. Scroll down to see how the plants filled in a month after planting.
Here’s a list of edibles to experiment with in your new gutter garden:
- Arugula, spinach, Swiss chard, kale and all kinds of lettuces
- Annual herbs – cilantro, parsley, chives
- Strawberries – buy bare roots to save money and make planting easier
- Root Veggies – beets, radishes and maybe shallow carrot varieties like Tonda di parigi
- Annual Flowers – marigolds, nasturtiums, pansies and violas
The gardening season is opened and I bet that everyone is striving to plant and grow something fresh somewhere outdoors. If you want to plant something but don’t have enough space for that, there are some creative space-saving gardening solutions like vertical planters or hanging gardens. Today I’d like to share some hanging ideas for those of you who lack space.
Creating hanging gardens both indoors and outdoors is pretty simple. Choose a pot that you will use: it may be a usual pot, a piece of gutter, a PVC pipe, an old kitchen colander, a piece of a bottle, a bucket or anything else. Here everything depends on the style of garden you want, on the things you have at hand and the plants you’ll grow. Then decide how you want to secure it all: on poles, on chains or ropes, or just hang somewhere using hooks. Now mark the planters somehow if these are veggies or herbs, to differentiate them when needed. You may do that with chalkboard marks, or just spray paint the pots with different colors.
a blacony herb garden on vertical poles is a very comfortable solution
a hanging canvas shoe organizer repurposed into a vertical herb garden
a hanging garden on chains of salvaged materials
collect aluminum cans, add an interesting color graphic, and hang along an exterior wall or porch beam
colorful buckets hanging on a ladder
elevated hanging garden of wooden beams and buckets
galvanized buckets and cans hung on a porch for a simple herb garden
hang an over-the-door shoe holder on a fence and tuck herbs into the compartments for a fun twist on the vertical planter
Now go and hang the whole construction where you want: in your patio, balcony, garden or even on the porch and enjoy your plants. So easily!
hanging garden on the wall using galvanizd planters from West Elm
hanging gutter garden for your outdoor space is a simple DIY idea
hanging succulent garden created with a bird cage
herb garden on wooden planks can be adapted to your window size and needs
outdoor garden on metal wire is a win-win idea
put old kitchen colanders to good use and transform them into pretty hanging baskets for plants
PVC pipe succulents garden is suitable both for indoors and outdoors
unique alternative to hanging baskes is such a rustic installation
upside-downcycle herb planter made of plastic bottles with marks
Home and Garden Tips from around the World
7 Easy Ways To Motivate Yourself To Clean Today
It’s easy to put off cleaning. You’re tired, it can wait, or maybe it’s someone else’s turn. But then things pile up and … [Read More. ] about 7 Easy Ways To Motivate Yourself To Clean Today
How To Make An Awesome Grout Cleaner
Tile grouts that are dark and dirty can look really horrible and old, so it is a good idea to clean them every few … [Read More. ] about How To Make An Awesome Grout Cleaner
10 Cleaning Secrets To Steal From Hotel Maids
Wouldn’t you love to clean faster and better with less effort? (Wouldn’t we all love that?) How about learning from … [Read More. ] about 10 Cleaning Secrets To Steal From Hotel Maids
41+ Camping Hacks That Are Borderline Genius
“Lifehacks” are tricks that make your life easier, simpler, and more efficient. Camping hacks? You guessed it. Vanessa … [Read More. ] about 41+ Camping Hacks That Are Borderline Genius
60 Amazing Tips for Food and the Kitchen Your Mother May Have Forgotten to Tell You
No matter how experienced we may feel in the kitchen, there is always room for more tips and tricks to make our lives … [Read More. ] about 60 Amazing Tips for Food and the Kitchen Your Mother May Have Forgotten to Tell You
11 Simple And Natural Ways To Get Rid Of Mice
Mice are major pests and they seem to just pop up from time to time. They get into your food and can leave major messes … [Read More. ] about 11 Simple And Natural Ways To Get Rid Of Mice
How To Make 46 Awesome Freezer Meals in 4 hours For Just $95
“Freezer Meals” are suddenly all the rage, and with good reason. There is something deeply appealing about the thought … [Read More. ] about How To Make 46 Awesome Freezer Meals in 4 hours For Just $95
35 Things Every Homeowner Must Know to Save Money and Prevent Big Screw-Ups
The first and most important tip is to educate yourself concerning common and easy to fix household kerfuffles. Doing so … [Read More. ] about 35 Things Every Homeowner Must Know to Save Money and Prevent Big Screw-Ups
Materials
- 1 – 8′ PVC white rain gutter cut into 3 32″ sections
- 6 – PVC white gutter end caps
- 2 – 1/8″diameter steel cables cut to desired length
- 6 – Feeney Cross Clamps (see image below)
- 6 – 1/8″ diameter Feeney steel rods
- 2 – Galvanized eye hooks
- Potting soil and Plants
Tools
- Cordless Drill with drill bit set
- Hand saw or hack saw
- T-square or straight edge
- Tape measure
- Permanent marker
- Level
- Eye protection
How to make it
1. Determine the center of your gutters and draw a reference line (otherwise your gutter won’t hang right).
2. Mark and drill the holes for the steel cable rods. Find a drill bit the same diameter as the cable to minimize the wiggle room.
3. Space drill holes a few sizes larger to make sure you get good drainage (plant roots hate sitting in water for long periods of time).
4. Locate a spot that gets at least 4 hours of sun. I placed mine on the cross beams of a pergola I built a couple of years ago.
5. Drill pilot holes (a hole slightly smaller in diameter than the screw diameter) to make screwing in the eye hook a lot easier. Make sure the holes are the same distance as the steel cable so they hang straight down.
6. Slide the gutters through the holes and secure them with the cross clamps at your desired heights. You’ll notice I placed mesh tape (normally used for drywall joints), left over from another project, over the drainage holes to keep the soil from seeping. However, I think the holes are small enough, this step is not necessary. I did it out of habit.
7. Secure the gutter with the cross clamps and half circle steel rods.
Now you’re ready to fill it with organic potting soil and plant them with your choice of shallow rooted plants.
About Us
TNT trucking and services has been in business for 14 + years Servicing the Kelowna and Okanagan area. Started by Nick Nixon and family the company has grown to a fleet of trucks and equipment TNT able to handle all your contracting and trucking jobs, with our wide array of services and equipment to suite your needs from big to small we can handle it all.
This DIY hanging gutter garden will save you lots of garden space!
DIY Garden Yard Art
When growing your own lawn yard art, recycled and up cycled materials can be the right location to start. If you want a creative manner to show off your potted plant life or plant life, locate an old wooden chair. Paint it the use of bright colorations that compliment the flowers, and you-ve an eye catching potted plant display.
For a whimsical touch, drag out that vintage wood wagon that has been sitting within the garage collecting rust. You can add some paint if you definitely have to, but the true beauty lies in its vintage look. Find a gap in your lawn and add a number of the potted flowers you want to make sure all of us notices, and you-ve got an instantaneous exhibit for those beautiful flora you labored so hard on.
The exceptional part of recycled yard art is the capacity to create a unique space that is all your personal. If you want to create a theme based lawn, look around and locate matters that suit your theme. You can use sculptures of cats mixed with cattails for a feline inspired haven, or you could use vintage farm system for a down on the farm feel. Just area your decorations where you want and add flowers and shrubs round them to create thrilling focal pieces.
When I consider gardening I do think Filth, weeds,bugs and chilly, soiled fingers. I also consider excellent, flavorful, refreshing and pesticide free food and that is The main reason I tolerate all of that other “stuff”.
Would you have an interest in finding rid with the Dust, weeds,bugs as well as cold dirty fingers and however get terrific backyard make. Imagine if you could possibly expand all this indoors with Nearly no work? Does this audio like a thing you need to do? Then you should Assume Hydroponics.
A way of increasing vegetation equally for household and professional use without the need of applying soil is hydroponics. The desire in dwelling hydroponics is often a latest phenomenon and is particularly rising in leaps and bounds and with Excellent purpose. Hydroponic plants are often far more healthful, mature earlier, and use much less Area.They can be developed year round.
For anyone who is seriously interested in rising clean, flavorful, balanced food items and herbs in your own home yr spherical I would advise you can get one of the numerous portable hydroponics programs. Get one that promises to get each of the Guidelines you require. If you do not have a sizable window to supply sufficient light weight for developing plants, have a process with an appropriate light source
For those who are interested in developing your own system you will be able to locate heaps of information on the varied types of program to create. Do not Permit the thought of constructing your own private scare you. It is really fairly uncomplicated.
Do that to obtain an attractive lettuce crop: Get you an affordable plastic tote from any hardware store. Ensure it is darkish coloured. (mild hues permit surplus inexperienced algae development) You will want 2″ thick styrofoam slightly smaller sized compared to the tote. This really should be meticulously formed, shell out distinct consideration to the corners. It’s to move up and down freely In the tote. (It’s going to float on the liquid beneath). Lower it so that you never permit any more light weight than needed beneath it. Cut 2″ holes inside the styrofoam raft to accommodate your plants progress. they must be seven” eight” apart.
Up coming you will need an air pump, an air stone along with a length of plastic tubing within the pet retail outlet. Place the air stone in the bottom on the tote and carefully put the tubing down the corner In order not to interfere with your styrofoam raft. Use a bead of silicone and push the tubing into it and Enable dry for a few hours. The air stone infuses the solution with oxygen. Lower foam rubber discs the identical measurement given that the holes in your raft. Minimize these about 2/3rds of how across. These will hold your seedlings while in the raft. That is actually all You can find to the construction.
Fifteen Gardening Recommendations On How To Get A Great Backyard Garden Devoid Of Too Much Time Expended On Gardening
Listed below are fifteen approaches to get a beautiful back garden While using the least probable work, so you can spend the summertime in which you belong inside of a deck chair. one. Pick out vegetation weeds despise Ground hugging crops are ideal for this as they The natural way suppress them.
Pest Handle – Mole Crickets Within Your Garden And Garden And The Way To Manage Them
An insect that causes substantial harm to backyard garden vegetation and particularly to lawns could be the mole cricket. (Gryllotalpa gryllotalpa) Unlike most insects that feed off vegetation, it is the adult from the species instead of the caterpillar that is the most important offender. The mole cricket is unusually huge, reaching some 5cm in size. It is usually exceptionally fearsome in physical appearance. However it’s your plants that need to have to fret not you or your family!
Landscaping With Rocks – How You Can Use Rocks Thoroughly Within Your Landscape Style
Landscaping with rocks can incorporate a certain attract the design of one’s landscape. And that’s why stones, boulders and rocks are Just about the most frequent accent used by Qualified landscaping artists inside their design and style.
Do you admire the hanging gardens of Babylon which is one of the seven wonders of the ancient world? Maybe we cannot replicate the same put you still could make your “small” gutter garden! Designing and growing your herb garden is fun and exciting. You can choose from the simple rectangular patio design to a quarter-circle… No matter how basic your DIY ability, it’s easy to create a great feature vegetal wall.
Table of Contents
Metal gutters recycled into planters, perfect on the side of a woodshed
Grow your own “gutter” strawberries, could be made on the side of a shed!
Colored gutter garden
Tier Polka-Dot Hanging Gutter Planter
Rustic vintage gutter recycled into a flower planter
This would make a good centerpiece for an outdoor table setting.
A natural gutter garden made with bamboos
Gutters repurposed for herbs in the kitchen
Strawberry gutter garden
Lettuces and mixed herb gutter garden
Cost-saving PVC gutter garden
Planter plugged in gutters
A Gutter garden made on a side of a garden shed or retreat made from pallets. Awesome idea!
Spice up your dinners with fresh herbs! Build a simple stand to make a hanging gutter planter and fresh herb garden.
Steel cable or chain design for this gutter vertical garden
Privacy gutter garden
How to make a rain gutter garden in 4 steps
Make a DIY hanging gutter planter for under $20
Vertical gardens are a fun way to inject some refreshing foliage into any space
This A-frame is growing strawberries. It holds up to nine to 10-foot gutters
Gutter garden on a colored wood fence
How useful was this post?
Click on a star to rate it!
Average rating 4.7 / 5. Vote count: 49
No votes so far! Be the first to rate this post.
As you found this post useful.
Follow us on social media!
We are sorry that this post was not useful for you!
Let us improve this post!
Tell us how we can improve this post?
Best Sellers
About us
A website for your green inspiration! Discover great pictures of garden projects from all around the world but also some nice DIY (cinder block and wooden benches. ), landscaping ideas (landscaping rocks. ), and outdoor patio furniture. You will also find guides, tutorials, and tips about gas grills, fencing ideas, hot tub, outdoor kitchen, daybed, fire pit, lounge chairs, patio covers, lawn mower, brush cutter, DIY pool, outdoor projectors and many more! At 1001Gardens, it’s all about gardenings. Do not hesitate to contribute by sending us your garden pictures!
What can you make out of inexpensive rain gutters and a few standard pieces of hardware? Some of the coolest industrial-looking hanging planters your yard has ever seen.
As a design consultant on the OWN show “Home Made Simple,” designer Kenneth Wingard is all about creating simple home décor pieces on a budget. For one of his latest home makeovers, he tackles a sparse outdoor space in desperate need of some character. Vertically hanging planters are just what the space needs.
First Wingard measures the rain gutters and cuts them into three-foot sections using tin snips, which he says are “basically super-powered scissors.”
Next, Wingard prepares to drill holes in the rain gutters where he wants a chain to hang from. “We’re going to just make those at 12 inches,” he says, marking the sides of the gutters with a pencil. “All we’re going to do is just drill a little hole.”
A simple s-hook will be inserted into those holes and will loop into a 20-inch chain that will hang the planter from the ceiling.
Then it’s time to add the hardware to the bottom of the rain gutter so that the additional planters can hang below it. “We’ve got an eyehook with a bolt and we’re going to put [on it] a big washer, a small washer and a nut,” Wingard explains.
To close off each end of the rain gutters, Wingard snaps on rain gutter caps, which can be found at any hardware store. Soon enough, the planters are ready to hang.
Wingard adds the plants as the finishing touch, but says flowers aren’t the only things you can grow. “You could do a spring mix and you could come out here to get your salad,” he suggests. “Or you could also do an herb garden.”
by Melissa Francis · Published February 6, 2013 · Updated March 13, 2018
This step by step tutorial of How to Make a Hanging Gutter Garden DIY Project is a great way to grow strawberries, herbs and lettuce in a vertical space. Gutter gardens are a great way to take advantage of the vertical spaces around your home to grow flowers, edibles and create a stylish space divider or privacy screen without spending too much money. I´m planning to make one for myself this summer.Goods Home Design shows how it is done.
Related posts:
- Next story Delightfully Dehydrated Garland
- Previous story Composting Toilet DIY
Search Our Site
Categories
Subscribe via email
Use of images: TheHomesteadSurvival.Com, shares and actively promotes websites containing the best related articles and tutorials.
To help promote the source website’s article, we sometimes use images from the original article.
When images are used in this manner, permission is always requested from the website owner.
If you have any issues regarding this please don’t hesitate and contact us.
Copyright © 2020 The Homestead Survival by BIGPOSTING. All Rights Reserved.
Hanging gutter garden.
You can try find out more about
Hanging gutter garden.
JUST USE THIS FORM FOR SEARCH
Most Viewed Story
200+ Free Dress Patterns
jels — Kelly Osbourne before and after losing 69lbs
A soft spring sweater for baby
How to build a horse barn on a budget
1 year anniversary gifts for him ideas
Knot Chart
Fake Stone Wall Urestone Panels
Styrofoam ceiling tiles – awesome ceiling design ideas
Gender Reveal Fizzies
THE PAVING SYSTEM THAT WORKS JUST LIKE A CARPET OF STONES.
gingerbread felt ornaments
Little Ganesha statue Some
DIY canvas to make beautiful decor in your house
19 fitness Videos for weight loss ideas
Behind you, all your memories. Before you, all your dreams. Around you, all who love you. Within you, all you need. Today and always, wishing you always the gifts that last
Secret Room Ideas
Unique Bookshelf for Under $13. These crates are at Hobby Lobby!
Get up to 4 Free Quotes!
Creating your own gutter garden is a great way to re-purpose worn out gutters to create a beautiful garden within a limited amount of space. Gutter gardens have been growing in popularity as city dwellers search for new ways to bring plants into their backyard. The best news is that this DIY project won’t cost you a ton of money and it’s a great way to take advantage of vertical spaces by securing your gutters vertically on a trellis or fence.
Whether you choose to fill your gutters with flowers, or edibles like strawberries and herbs, a gutter garden is sure to be a great addition to your patio, deck or backyard. Let’s get started!
Materials You’ll Need:
- Gutters cut into equal sections
- Gutter end caps (both right and left end caps!)
- PVC glue
- Mounting brackets and screws
- Handsaw
- Electric drill and drill bit, screw
- Potting soil, flowers, and edibles of your choice.
Steps to Take:
- Clean out your gutters and clear them of any grime, dirt and flaking shingles. If you think that your gutters were painted with lead paint, do not use them as a planter for any edibles.
- Cut your gutters into equal sections using a handsaw.
- Glue your end caps on the right and left sides of your gutter.
- Drill a series of small holes down the length of the gutter. This will allow water to drain.
- Repaint the gutters. If you prefer the weathered look, feel free to skip this step. We think that adding a fresh coat of paint adds character to your project. If you are painting your gutter, apply a plastic primer beforehand. This will help the paint stick to the PVC gutter. You may need to give your gutters two coats of paint in order to really seal the deal.
- Select a suitable hanging spot (see below).
- Wherever you choose to put your gutter garden, make sure there is ample sunlight!
- Mark space for your brackets. We suggest using two brackets per channel. If you are arranging your gutters vertically, leave at least a foot between each row to allow your gardens to grow and to ensure that there is ample sunlight hitting your flowers or edibles.
- Fasten the gutter garden to your selected area with mounting brackets and screws.
For a suitable hanging spot, consider:
- Mounting the gutter garden to the side of your deck.
- Hanging gutters vertically on a fence or trellis.
- Using your gutter garden as a window planter.
- Attaching the gutters to the side of your home.
The Finishing Touches on Your Gutter Garden
Fill your gutters with potting mix just below the lip. We suggest filling your gutter with the lightest soil you can find. If you are concerned about moisture retention, add a bit of peat moss too.
Consider adding plants that give a burst of color to your backyard. If you can grow it in a 4” pot, you are most likely able to plant it in your gutter garden since it’s a shallow area. Here are some plants to consider:
- Lettuce, salad greens and spinach
- Radish and other small root vegetables
- Strawberries and other small fruit
- A variety of cacti
- Herbs like mint, thyme, parsley and chives
- Marigolds, violas and pansies
Your new gutter garden is sure to add charm to an otherwise uninteresting area! Thanks to their elevated existence, rabbits, bugs and other pests will stay out of your garden. And, remember to water your gutter garden regularly at the soil level!
Avoiding Unwanted Gardens in Your Gutters
Repurposing your gutters with a small garden is a great idea when your gutters are unattached from your home. But, if you have looked at your gutters lately, you may have noticed that they have been sprouting roots, due to neglect. You may not realize it, but your clogged gutter problem can cause serious and costly foundation and structural damage to your home.
Get up to 4 Free Quotes!
Your gutters have one purpose and one purpose only: to divert rainwater away from your home. When your gutters become filled with unwanted debris like leaves, twigs and shingle grit, the flow of water will be interrupted, and water can spill over your gutters, damaging your soffit and fascia board. This will also cause water to pool around the base of your home, seeping into your foundation, causing cracks, mildew or mold.
For these reasons, it’s important to regularly maintain your gutters by properly cleaning them about three times a year. When cleaning your gutters, be sure to have someone at the base of your ladder that can keep it steady to prevent any accidents. As an alternative, consider hiring a professional gutter cleaner to complete the job for you.
Gutter cleaning is a temporary solution to a permanent problem. If you are looking for a more permanent solution to your clogged gutter problem, a gutter protection system, like LeafFilter, may be a viable option for you. Gutter guards keep debris out of your gutters, allowing water to flow freely and divert properly away from your home. However, not all gutter guards are created equal and you should conduct your own research before making the investment.
Conclusion
Remember to keep the garden out of your rain gutter with proper maintenance and enjoy your new garden with your reclaimed gutters in your backyard!
If you’re interested in using the gutter of your home as a planter, here you’ll find some neat Rain Gutter Garden Ideas that you can make yourself.
When you look at a rain gutter, what is your first thought?
It’s probably not that it would make a fantastic planter, right? But they do! There’s an incredible amount of projects that are easy to complete and don’t require a lot of materials that will help you turn a simple rain gutter into a project to be proud of!
You could paint your gutters and attach them to a fence, create a hanging tiered planter that is easily moved, or you could even attach multiple gutters to your deck or porch railings to create a unique and easy-to-care-for garden that’s easy on your knees. We even tracked down an indoor project you can create for your indoor kitchen herb garden, and included more decorative planter options as well.
From more simple displays to utterly unique products designed not only as planters, but as rain harvesting barrels, you’re sure to find both awesome products for those interested in sustainability, and great DIY projects for the whole family!
1. Vertical Wall Planter
Attaching simple white rain gutters to a wooden pallet is a great way to make a sturdy vertical wall garden, and it’s great for raising lettuce, as shown in the image below!
2. Over-The-Railing Planter
Attaching a few over-the-rail hooks to a regular old gutter turns it into a pretty railing box, perfect for plants with shallow roots.
3. Painted Rain Gutters as Fence Decoration
Some gutters are more ornate, and can be painted with metallics or pale colors to create a vertical stacked garden on your fence or shed.
W ould you like to see a garden that needs no watering, no digging, no fertilizing, no weeding and produces fresh, organic food on auto-pilot, year after year? One that can yield up to 8 times more produce than traditional gardens, to feed you and your family in times of crisis with some of the healthiest, tastiest, most nutritious food you could possibly eat… and it can fit right in your back yard.Watch the video below!
4. Rain Gutters as Deck Planters
Try attaching rain gutters to both sides of your deck railing. You’ll get a pop of color you normally wouldn’t on an elevated or enclosed deck.
5. Hydroponic Rain Gutter Garden
Who said plants need soil to thrive? This squirrelly drainage pipe allows a garden to exist even on the side of your home!
6. Strawberry Planter
Elevated rain gutters make for great DIY strawberry planters. Just make sure to secure the gutters well, so you don’t end up losing your crop!
7. Hanging Gutter Garden
If you’ve a pergola in your garden already, you can easily add this DIY hanging rain gutter planter to your landscaping. It doesn’t take up a lot of space, and it has the potential to add a enormous pop of color!
8.Lettuces and mixed herb gutter garden
This milky substance inside this plant doesn’t contain any opiates, but it’s acting directly on the central nervous system (CNS) to lessen the feeling of pain.
Many people have used it as a replacement for addictive prescription pain medicine.Wild Lettuce is un-scheduled by the FDA, meaning it is legal to forage, to grow, and own without prescription or license… just like the Native Americans used it to heal their pain.
Check the video below for more information about this miracle plant!
9. Rain Gutter Indoor Herb Garden
We’ve seen a lot of outdoor gutter ideas, but what about an indoor planter? Try spray painting sections of gutter in chrome and attaching them to a thick chalkboard to make a beautiful, personalized indoor herb garden that won’t take up any countertop space!
10. CISTA Rain Water Harvesting System
This amazing modern rain water harvesting system that can collect up to 100 gallons at a time. An ivy is planted at the bottom, which gradually grows up and throughout the entire metal structure. This beautiful alternative to a traditional rain gutter is both environmentally friendly and a gorgeous planter.
11. Succulents Table Planter
A rain gutter can also be used to create a wonderful outdoor centerpiece complete with succulents and candles. You’ll want to add handles so you can take it inside during inclement weather.
12. Cost-saving PVC gutter garden
13. A Gutter garden made on a side of a garden shed or retreat made from pallets. Awesome idea!
April 11, 2016 by Bethany Sy
It seems like this spring there’s a fun trend of MAKING EVERYTHING A PLANTER. And frankly, I love it.
Rusty tool box? Why not marigolds!
Old retainer box? Pop a succulent in!
Grungy toilet you found in the ditch on the wrong side of the tracks? PEONIES!
But seriously. I do really love the idea of repurposing things, so today’s project is right up our alley! When Home Depot invited us in on their Hanging Gutter Planter collaboration, we were super excited! And we have the perfect place for such an installation. I give you, our not-so-welcoming front porch.
I know! It’s sparse! But perfect for dancing.
In our defense, we literally never use this door. But it is what everyone sees from the road. So it’s been my spring-time resolution to make it a little more lively. We hit up the Home Depot and gathered our supplies: (this post contains affiliate links)
We started by slicing and dicing our gutters into (4) 58” lengths (to fit perfectly at the north end of our porch) using our Ridgid Miter Saw. Then we drilled holes 10” in from each end using a 3/4” Forstner bit for the rope to go through.
Next, we cut some little strips of wood to use as spacers for the gutters. Without these, the gutters were pretty unstable and wobbly because of how long they are. Such a simple thing makes such a huge structural difference!
In an effort to help keep the gutters upright while hung on the rope, we drilled a hole in some of the spacers so the rope would go straight through the gutter and the wood to hold things steady… even in the living-up-on-a-hill-in-rural-Iowa wind.
I decided I also wanted to affix some wood trim to the front for some simple decorative detail. I love the crisp look of white and unfinished wood together. We routed a notch so that the strips of wood would be an L-shape over the top corner. We put it on the flat side of the gutter because… we just liked how it looked there, mkay?
The way we attached them to the gutter is by using a 1/4” Forstner bit to pre-drill some screw holes from the inside out of the gutter lip. We used 4 screws on each gutter.
Since this bad boy is going to hang on the north edge of our front porch, we needed to figure out how to attach it… both to the top overhang, and the bottom concrete slab (cause we don’t need the girls swinging on that thing like a chandelier). So we dangled a weighted string, marked our spots, and drilled into the concrete with a masonry drill bit.
We did the same on the top (only with just a regular drill bit)
Next up? String ‘em up onto the rope!
Nick tied halyard hitch knots at the bottom, strung them up and around and back down to finish off with another knot. Then just level everything out, evenly spaced, and tighten those hose clamps!
Then we loaded them up with flowers!
I love this cheerful little corner of our front porch now! And the boost in curb appeal doesn’t hurt either. The grass reed shade thingy really helps cut down on the wind coming from the north, so it will be a lot more pleasant sitting out here with a glass of wine after the chicklets are in bed.
Be sure to check out the unique twist that each of my blogging friends up on their Hanging Gutter Planter for lots more inspiration! It’s so fun seeing different options with the same exact concept!
ABOUT THE AUTHOR
Shawn McClain
A gutter collects water that would normally fall off a structure’s roof and pool on the ground, and diverts that water away from the structure. Gutters are normally installed on houses to protect the foundation from water damage but they can attach to any structure that has a roof, including a garden shed. Installing a gutter, even on something as small as a garden shed, will take up most of a day, so plan accordingly.
Things You’ll Need
Gutter end caps
1/4-inch sheet metal screws
Step 1
Position one end of your chalk string about 1 inch below the top of the fascia board on the lower edge of your shed’s roof. If the roof falls in two or more directions, pick a side to start with.
Step 2
Move to the other end of the roof and position the other end of the chalk string 1/2 inch lower for every 10 feet of shed length. Pull back on the chalk string and let it go to create a properly-sloped chalk line for the top of your gutter to follow.
Step 3
Cut a piece of gutter material with your hacksaw that’s equal to the length of the side of the garden shed. Place end caps over the ends of the gutter and crimp them in place using your crimper. Some gutter models may have end caps that you screw into place using sheet metal screws.
Step 4
Place the gutter upside down in front of you. Place a downspout connector on the bottom of the gutter, a few inches from the end that will be at the lower side of the line you made on the fascia board. Trace the outline of the downspout connector with a pen or pencil.
Step 5
Drill a hole in the gutter, somewhere inside the outline you just drew. Take your tin snips and cut along the outline, using the drilled hole to get started.
Step 6
Turn the gutter over. Place a line of silicone sealant under the lip of the downspout connector, then press the connector into the opening in the gutter.
Step 7
Place brackets into the gutter. Have one bracket on each end, and the rest about 18 inches apart. Most brackets will snap under the gutter’s front lip; the back edge will then slide over the rear of the gutter.
Step 8
Climb your ladder and hold the gutter up so the top runs along the chalk line you snapped. Drill the long gutter screws through the brackets and into the fascia board.
Step 9
Attach a downspout shoe to one end of your downspout pipe, using two sheet metal screws. Cut the other end with your hacksaw so the downspout will reach from the downspout connector on your gutter to the ground. Attach the downspout to the downspout connector using two sheet metal screws.
Step 10
Repeat the procedure for the other side of the shed, unless the entire roof is only angled in one direction.
If your roof hangs over the side of the garden shed so there are no fascia boards to drill into, simply drill a large piece of wood into the shed wall at the necessary height and use that piece of wood as a fascia board.
Some gutter and bracket sets are designed to have the gutter rest on top of the brackets. In that case, attach the brackets to the fascia boards, then rest the gutter on top.
For years my daughter and I have wanted to have a little vegetable garden. And while we have plenty of space to make a vegetable garden, many of these spaces are not easy to get to. This was a problem. I knew that if we couldn’t get to our garden easily, it would languish and go unloved. But if we could just get a garden space on our deck, we could access it easily and also be able to enjoy its beauty. So, thanks to Pinterest, we got an idea — we could install a rain gutter garden from the outside edge of our deck rail and plant our veggies there!
Our deck rain gutter garden turned out to be an inexpensive and easy one-day project. We got everything we needed from our local Menards and were planting by the end of the day.
Ready to make your own DIY Rain Gutter Garden? Let me show you how!! This post contains some affiliate links for your convenience (which means if you make a purchase after clicking a link I will earn a small commission but it won’t cost you a penny more)! Read my full disclosure policy.
Rain DIY Gutter Garden Materials
- Aluminum rain gutters (we used two 10-foot-long K-style gutters for our deck)
- Rain gutter seamer for joining two long gutters (we used one)
- Rain gutter caps (to seal the ends of the gutter)
- 6″ Aluminum Gutter Hangers (this is what attaches to your deck to hold the gutter in place — we used one every two feet for a total of 9)
- 1-1/4″ exterior screws
- Handheld drill and drill bit (here’s the one we use and love)
- Handheld jigsaw if you need to trim your gutters down to size
First, measure the length of your deck and determine how long you want your gutter garden to be. Our deck is 22 feet long, and we wanted our gutter garden to be 18 feet long.
If your gutter garden is going to be longer than 16 feet, which we did, you’ll need to join two or more gutters. Get the gutter seamers to do this. We trimmed one of our 10-foot-long gutters down to 8 feet with a handheld jigsaw, then attached it with the seamer. It was simple to do.
Next, we added the gutter caps at either end of gutter so dirt and water wouldn’t just spill out.
Then Greg attached the gutter to the outside edge of our deck rail with the gutter hangers. We put it on the outside so it wouldn’t take up valuable space on the deck itself.
Once the gutter garden was attached, we drilled holes for water drainage about every 8″ along the gutter.
And that was it! Our garden was ready for planting.
We created our deck gutter garden this last year, so I can tell you what worked and what didn’t work for us. Our gutter garden is west-facing and gets about six hours of sun a day. We planted lettuce, green beans, green and yellow peppers, and a slew of herbs. The lettuce seemed the happiest in the gutter garden, followed closely by the herbs and the peppers. The green beans didn’t much like it—I think they needed more room for their roots than they could get in the gutter. This year we’re going to focus on lettuce, onions, and herbs. I may also add in some flowers for color!
Rain Gutter Planters – Gardening
I just saw a picture, in a well known magazine, of old gutters attached to the side of a shed. It had several types of shallow root plants like radishes, several types of lettuce/greens etc. This is on my agenda this spring. What a great ‘raised bed’ idea!
HOW TO MAKE A HANGING GUTTER GARDEN
During my after-holiday-get-organized mode, I discovered all these past garden projects I had taken pictures of, but never posted them on the blog. Remember that “living wall” I bragged about? Well, it’s a dead wall now, but there is much to be learned, so I’ll post about it soon. I’ll start my 2011 DIY project post with my new hanging gutter garden that will be featured in the upcoming book Garden Up!by Susan Morrison and Rebecca Sweet.
Why Bother with a Gutter Garden?
For me, I have plenty of space to grow all the edibles I want, however, many apartment dwellers are confined to balconies, or small patios, and a collection of containers can start to look cluttery and cost a lot of money up front. Gutter gardens are a great way to take advantage of the vertical spaces around your home to grow flowers, edibles and create a stylish space divider or privacy screen without spending too much money.
Oh, and the slug issue – that’s just it, there is none! Not to say this design is pest free. You’ll still have to deal with flying pests, but you can easily wrap some row cover material around the gutters to allow sunlight in, but keep the flying buggers away from your spinach. Note to self: this is great blog idea – more to come on this issue.
Other gutter garden designs have suggested anchoring them on the side of your house. Although this is not a bad option, I’d rather not drills holes into my siding or worry about water sitting between the gutters and my siding. If you rent, I doubt your landlord would be into you screwing a bunch of holes in the siding either.
HOW TO MAKE A MODERN GUTTER GARDEN
Before we start the DIY process of making the hanging gutter garden, I should clarify that I made this gutter garden with a few materials from Feeney, an architectural products company right in my backyard. Most of these materials can be purchased at your local hardware store, with the exception of Feeney’s super sleek cross clamps. You can buy less attractive hardware attachments at a hardware store.
| Materials | Tools |
|---|---|
| 1 – 8′ PVC white rain gutter cut into 3 32″ sections | Cordless Drill with drill bit set |
| 6 – PVC white gutter end caps | Hand saw or hack saw |
| 2 – 1/8″diameter steel cables cut to desired length | T-square or straight edge |
| 6 – Feeney Cross Clamps (see image below) | Tape measure |
| 6 – 1/8″ diameter Feeney steel rods | Permanent marker |
| 2 – Galvanized eye hooks | Level |
| Potting soil and Plants | Eye protection |
Close up of Feeney’s super sleek cross clamps.
Let’s get started already…
- Determine the center of your gutters and draw a reference line (otherwise your gutter won’t hang right).
- Mark and drill the holes for the steel cable rods. Find a drill bit the same diameter as the cable to minimize the wiggle room.
- Space drill holes a few sizes larger to make sure you get good drainage (plant roots hate sitting in water for long periods of time).
Once you have all your gutter holes drilled, you’re ready to hang this bad boy. Be patient…we’ll be planting very soon.
- Locate a spot that gets at least 4 hours of sun. I placed mine on the cross beams of a pergola I built a couple of years ago.
- Drill pilot holes (a hole slightly smaller in diameter than the screw diameter) to make screwing in the eye hook a lot easier. Make sure the holes are the same distance as the steel cable so they hang straight down.
- Slide the gutters through the holes and secure them with the cross clamps at your desired heights. You’ll notice I placed mesh tape (normally used for drywall joints), left over from another project, over the drainage holes to keep the soil from seeping. However, I think the holes are small enough, this step is not necessary. I did it out of habit.
- Secure the gutter with the cross clamps and half circle steel rods (Note: I bent the steel rods around my Nalgene bottle. It just happened to be the perfect diameter of the gutters).
Now you’re ready to fill it with organic potting soil and plant them with your choice of shallow rooted plants. I found watering to be easier with a narrow spout watering can like this Aqua Genie Watering Can. Hoses will blast your soil all over the place and rain-style spouts will water your plants and not the soil (note: water your soil NOT your plants).
PLANT PICKS FOR GUTTER GARDENS
Shallow rooted edibles and annual flowers should grow easily in a gutter garden, making this project perfect for small space gardens, like balconies, or just to add visual interest to an otherwise boring patio. Scroll down to see how the plants filled in a month after planting.
Here’s a list of edibles to experiment with in your new gutter garden:
- Arugula, spinach, swiss chard, kale and all kinds of lettuces
- Annual herbs – cilantro, parsley, chives
- Strawberries – buy bare roots to save money and make planting easier
- Root Veggies – beets, radishes and maybe shallow carrot varieties like Tonda di parigi
- Annual Flowers – marigolds, nasturtiums, pansies and violas
I saw an awesome DIY hanging gutter garden on Pintrest. It looked really cool, but the parts and manual labor (using needle nose pliers to form metal…) seem time consuming and expensive.
Anyhow, we realized we could just do it the Fred and Jess way (the cheap yet creative way)!
Here’s how we did it:
You will need:
4 pieces of nylon rope (this comes for under $4 for 48 feet at Home Depot) cut to 8 feet each or however long you want your garden to hang.
1 gutter cut into 3 even parts – mine is plastic and was about $9
6 cutter caps- like $.40 each- I encourage you to get the nice ones
2 hooks to hang this baby from
You will also need something to cut the gutter and rope – we used a dremel and a drill with a bit that is just wider that your rope.
Now do it:
1. Cut your gutter into three even pieces and snap on the end caps
2. Drill holes in the bottom of all three gutters so water can drain out – we made 12 holes 2 inches apart
3. Drill two holes at each end and on each side of your gutters about an inch apart
4. Drill pilot holes and then screw your hooks into a beam that this thing can hang from
5. Having cut your ropes (leaving extra length on each one), make a loop knot at the end of each and hang two from each hook.
6. Thread your rope through the side holes of your first gutter and when it looks level, tie a knot in each rope securing the gutter.
7. Thread the next gutter while leaving about two feet between your previous gutter. Tie knots again and repeat for your last one.
That’s it… I put rope from my last gutter to my middle one as a lattice for the peas I am growing… Just an extra quick step. I think I will grow basil or other shallow rooted plants in the top two.
Here’s my final product:
I also took the time today to plant 20 (yeah I know it is a little overboard…) cherry tomato plants!
Things You’ll Need
Rain chain, about 7-feet-long
Half wine barrel with no holes
Mosquito ring (to prevent breeding in the water)
Large clay pots
How to Make a Rain Chain Water Feature. A water feature is an excellent focal point for any type of garden. One that incorporates the Japanese-inspired rain chain, which is considered a “kinetic sculpture,” is both attractive and functional. A rain chain water feature is a short and easy project that provides a beautiful and aesthetic impact to your garden. Here’s how.
Step 1
Decide where to build your rain chain water feature. Rain chains originated in Japan where they hang chains from the roof to direct rainwater into jugs used to store their water supply. The rain chain would, therefore, replace a downspout and allow the water to flow in the open. The water feature would ideally be under an overhang that’s not too near the wall of the house.
Step 2
Install the rain chain by removing an existing downspout or creating a hole through the gutter system. The rain chain usually comes with an attachment (a V-shaped piece of thick wire) that allows you to hang it from the hole of the gutter.
Step 3
Position the half wine barrel under the rain chain and fill it with water. The barrel will catch the water from the rain chain and disperse it into the garden as it overflows.
Step 4
Add water plants in the barrel as desired. Prop the water plants by inverting clay pots inside the barrel. Weigh the plants down with rocks or pebbles.
Step 5
Add the mosquito ring, the purpose of which is to eliminate larvae in the water before they mature into adult mosquitoes.
Step 6
If desired, anchor the rain chain by tying the end of the chain to a rock inside the barrel.
Step 7
Wait for rain and marvel at the column of water flowing through the rain chain and the quaint jingling sound it makes.
Purchase a rain chain from a landscaping or gutter supply store. Rain chains can also be acquired online. Different designs are available. Half wine barrels made of fiberglass (or resin) are available at home improvement and garden stores. Real half barrels are available from wineries and specialty stores. Water plants (or pond plants) are available at garden stores. You can leave them in the pots they were sold in or repot them into bigger, heavier clay pots. Examples of water plants are Lotus, Water Lily, Papyrus, Pickerel Weed and Powdery Thalia.
Sure, they are designed to keep rain runoff away from your house, but gutters can be used in so many other creative and useful ways.
Spring is a great time of year to clean the accumulated debris from your gutters—and perhaps even replace gutters that have seen better days. So, what can you do with old gutters or the remants from a new installation? Put them to practical and creative DIY use, of course! Here are five smart rain gutter projects that may surprise you.
1. BOOKSHELVES FOR THE NURSERY
Photo: Angela Whelan-Obermueller
Whether you are designing a new nursery or carving out a quiet space for your toddler’s story time, rain gutter shelving is ideal for over-sized books. Be sure to mount gutters securely to the wall and at a height that your kids can reach easily.
2. INSET TABLE CADDY
Photo: Christina Gillette
There’s no need to bring the cooler to the table when it’s already built in. This rain gutter ice caddy was made by removing most of the center slat of a picnic table and replacing it with a gutter of the same dimensions. Check out the great step-by-step at Redesign Revolution.
3. VERTICAL GARDEN
Gutters with end caps can be used to make suspended planters inside or outside of the home. Simply cut the gutters to size, drill holes on both ends, and thread chain or tension wire through to create a hanging gutter garden. If you’re suspending the planter outdoors, locate it near a sprinkler or hose for easy maintenance.
4. FEEDING TROUGH ON THE FLY
Photo: Mark Tighe
Farm animals are typically fed from a trough, and what is a gutter but a roof-mounted trough? Brought down to earth, a gutter’s perfect for this chicken buffet. Just cut a length of gutter to size and mount it on leftover wood. Be sure to get the height right so the chickens don’t have to jump for their breakfast.
5. RIBBON ORGANIZER
One of the biggest challenges for crafters is figuring out where to stash all the supplies and materials. This gutter-turned-ribbon dispenser is a clever solution. Attach a length of gutter to the inside of a cupboard or above a worktable to keep ribbons organized and readily available.
Video Playback Not Supported
Recommended For You
This Flexible Pipe is Perfect for Do-It-Yourselfers
This Primer Has No VOCs to Worry About
The Best Cordless Vacuum for Pet Hair
This Backpack Leaf Blower Has Everything But Gas
Ecobee’s Smart Thermostat is Actually Easy to Set
Sagging gutters are often the result of gutter spikes pulling loose from the fascia board they’re nailed into. Rather than hammering gutter spikes back in; replace them with gutter screws, which provide additional holding power.
To replace gutter spikes with gutter screws:
- Remove Gutter Spike: Grasp the head of the spike with locking pliers, then twist and pull the spike out. Be careful not to damage or dent the gutter when pulling out the spike.
- Insert Gutter Screw: Slide gutter screw into the existing hole in the front of the gutter and through the gutter ferrule.
- Tighten Gutter Screw: Use a cordless drill to screw the gutter screw through a new hole in the back of the gutter and into the fascia board. Be careful not to damage the gutter by over tightening the screw.
Watch this video to find out more.
Further Information
- How to Replace Gutter Spikes with Gutter Screws (video)
- How to Clean Gutters and Downspouts (video)
- How to Unclog and Clean Downspouts on Gutters (video)
- The Trouble with Gutters (article)
VIDEO TRANSCRIPT
Sagging gutters are unsightly and can lead to leaks. Often the spike that secures them to the fascia board has simply worked loose. The best solution is to replace it with a gutter screw. The screw is inserted through the gutter and ferrule and then driven into the fascia board, deep enough to support the gutter but not too deep to collapse it.
Recommended For You
This Flexible Pipe is Perfect for Do-It-Yourselfers
This Primer Has No VOCs to Worry About
The Best Cordless Vacuum for Pet Hair
This Backpack Leaf Blower Has Everything But Gas
Ecobee’s Smart Thermostat is Actually Easy to Set
3 COMMENTS
Please help us Danny! All I did was paint the front metal door at our beach condo and ever since (it’s been about a month), the door sticks so bad you have to use your shoulder to open it. It’s mainly sticking to the weather stripping but I let the paint dry for 24 hrs after painting and it continues to stick each time it’s closed. Any suggestions?
My gutters leak at corners. I inspected them and they are clean however, they are not tight. The only thing holding them are nails. I purchased hidden screw gutter hangers. I didn’t notice the gutters have no lip on the inside. How can I fix my problem?
ABOUT THE AUTHOR
Scarlett Gauthier
Gutter systems are commonly installed on homes and help keep water from entering the home. Water that comes from the roof is caught in the gutters and channeled away from the home out into the desired area. If a gutter is clogged or filthy, it will not function properly and cause damage to the home. In this case, a gutter guard is installed to prevent clogged gutters. You can make your own gutter guard, which is more cost effective than purchasing one, to protect your gutters from clogging.
Things You’ll Need
1/4-inch wire mesh
Washers and nuts
Step 1
Measure the length and width of each gutter section with a measuring tape and mark the measurements on a notepad with a pencil. Gutters are generally uniform in width along the entire system.
Step 2
Add 2 inches to the length and width measurements to obtain the final measurement result.
Step 3
Cut wire mesh sections, using a hacksaw, that are between 1 and 2 feet in length and add up to total the measurements above. Cut enough sections to cover the entire length of the gutters. The smaller sections will make attaching the gutter guards easier.
Step 4
Secure one edge of the mesh to the exterior edge of the gutter with self-drilling screws. Place a washer on the screw and insert the screw through the mesh and gutter with a drill. Secure the screw with a nut.
Step 5
Attach the other edge of the wire mesh to the roof with nails and washers. Place a washer on the nail and hammer the nail into the roof of the house to secure the mesh. Overlap the ends of pieces in each mesh section by 1 or 2 inches for extra security.
Position the ladder close to the sections you are working with to ensure that you are no more than an arm’s length away from the gutter.
I’m so excited to be back and sharing my version of the The Home Depot Do-It-Herself Workshop Hanging Gutter Planter. This project was so much fun! If you missed the BIG announcement last week, myself and three other bloggers were picked by our host Sandra at The Rustic Life to participate in The Home Depot Virtual DIY Workshops.
This is one talented group of Do-It-Herselfers:
Want to learn how to make your own Hanging Gutter Planter? Mark your calendar, bring your best friends and attend the Do-It-Herself Workshop at your local Home Depot store.
The Home Depot #DIHWorkshop
Thursday April 21, 2016
06:30 PM – 08:00 PM
The Home Depot provides FREE Workshops at all of their locations for do-it-yourselfers of all ages and experience levels. There are three types of workshops: Do-It-Yourself (DIY), Do-It-Herself (DIH) and Kids. Workshops are where customers can learn how to build decor projects, how to make easy home repairs and how to operate tools through demonstrations and step-by-step instructions. I just recently took a Do-It-Yourself Workshop on installing a tile backsplash and couldn’t believe everything I learned. Visit to learn more.
This little project was so fun and the best part is it is completely customizable to your space.
Here’s what I used:
(all from The Home Depot)
– 1 vinyl 10 ft gutter (cut into three 30 inch sections)
– 3 sets of gutter end caps
– Rustoleum Hammered spray paint
To customize my planters, I used the spray paint for a galvanized look. And I must say this might be my new favorite spray paint, it achieves that metal look perfectly. I also used natural sisal rope for a more rustic look.
Once my gutters were hung, planting my favorite flowers was a breeze. I’m sure you all know I’m not a big fan of color and like to keep things neutral at our house, so all white was perfect.
The hooks are great for hanging my little watering can that matches my “galvanized” gutters perfectly! Don’t forget to drill extra holes in the bottom of each gutter for drainage. I love this planter so much, I want to make more and hang them in multiple rows along our fence. It’s a simple touch that adds a lot of character to an outdoor space!
Don’t forget to check out your local Home Depot for more workshops and register for the upcoming Do-It-Herself Workshop!
Wanna see even more versions of this fun Hanging Gutter Planter?
Click on the links below to see each customization:
I acknowledge that The Home Depot is partnering with me to participate in this program. As a part of the program, I am receiving compensation in the form of products and services, for the purpose of promoting The Home Depot. All opinions above are my own and my experience with the product and brand.
Vertical gardens provide elegant outdoor decor, however, large planters can weigh a lot. On the other hand, pocket planters give you a simple, lightweight solution for growing plants on a wall. (And, a low-cost kit makes installation easy!)
There are a few ways to lighten the load of a vertical garden besides making a smaller garden (the obvious =)).
First are the plants themselves.
Second, a soil that is less dense can add less weight to the garden.
Third, the container itself contributes pounds, and when made of lighter weight material, this can make a big difference in overall weight.
1. Plants for a Lightweight Vertical Garden
First, let’s talk plants. Smaller plants of course will weight less. Also, plants that don’t grow lots of roots will require less soil. Herb gardens can be perfect for creating a lightweight garden. Other factors to think about are the lifetime of a plant and its growth rate. Annuals can be replaced each year with new, small plants.
Varieties that grow slowly, like succulents, will of course stay small and add less weight to your container. Succulents are also nice because some don’t require a lot of water, which also adds pounds.
2. Soil for Vertical Planters
Obviously, using less soil will lighten the load of the garden. Therefore, it’s a good idea to consider planters that are shallow or have small sections. smaller plans that require less soil will also help.
You can also buy or “make” lighter weight soil, The first option is to buy lightweight potting soil at your local nursery or home improvement store. The second option is to make your own by mixing perlite, peat moss and/or vermiculite in with your regular potting soil. In addition to weighing less, these mixtures also help with aerating the soil, improving drainage and preventing the soil from compacting.
3. The Container that Hangs Vertically
Planters made of lighter materials (ie plastic vs wood) can significantly reduce your garden’s weight. However, these planters can sometime be less sturdy and durable, so you want to be careful.
A new type of planter that has recently come out incorporates recycled nylon felt with a plastic backing – creating a 3 foot by 2 foot container that weighs less than 2 pounds. Seriously!
Not only is it lightweight, it’s highly durable and recycled. At this weight, you can build a simple frame out of wood to enclose your garden – or none at all. As you can see by the photo – the plants look great even without a frame.
Another cool feature about this planter design is that little soil is required. The felt allows proper drainage and lets plants breathe, so they stay healthy.
Gutter gardens can also work, because they provide a shallow planting area. Plastic gutters are lightweight, yet are made of heavy duty material to stand up to storms, rain water, etc..
How to Water Your Plants When You Go Away
This Top-Rated Display Shelf Will Show Off Your Plants Beautifully—and It’s on Sale
Lion Poo for Sale? Dung Being Sold to Ward Off Unwanted Pests from Gardens
9 Habits of People Who Always Have a Clean Home
We Tried Dozens of Eyebrow Tools—These Are the 6 Best
The Top 10 Air Purifiers for a Cleaner, More Breathable Home
16 Things to Know About HGTV ‘Home Town’ Stars Ben & Erin Napier
10 Tricks to Help Your Home Decor Last Forever (Besides Plastic Couch Covers)
Could mushrooms be the key to replacing plastic?
This Sweet Plant Has Red- and White-Striped Flowers Just Like a Candy Cane
Gadget opens doors with your foot instead of your hand
Grow your own armchair out of grass
Do you have a bunch of bored, out-of-shape chickens on your hands? Then this could be the DIY solution you’ve been looking for. Chicken owners have been making their own hanging cabbages to place in their chicken coops or runs, which are designed to stimulate chickens’ natural foraging instincts and help them get a workout by offering a challenging feeding source. They’re especially useful during the winter when your chickens are all cooped up, so to speak.
© Courtesy of City Girl Farming Keep Chickens Entertained With Hanging Cabbage
It’s actually super easy to make your own hanging cabbage; you just need to gather up a cabbage, a drill, and a piece of rope, according to a tutorial from the blog City Girl Farming, which calls the set-up a “low tech chicken gym.”
Additionally, a forum on BackyardChickens.com has some alternative DIY ideas, including using an apple corer, a metal coat hanger, and a landscape nail.
This DIY comes with an important warning, though: You may want to supervise your chickens when they’re using a hanging cabbage, as some commenters have reported that they’ve seen chickens eat twine used to hang cabbages, or become tangled in the rope. One commenter on BackyardChickens.com wrote:
“I went to a chicken chat at the local grange & the avian vet shared a story about a chicken w/ a dislocated wing. The owner left the chicken unsupervised & found the bird tangled in the string & hanging by a wing, unable to touch the ground (possibly all day). Unfortunately by the time they got the poor thing to the vet, it died on the table. I’m not saying don’t do it, just be nearby & keep an eye on them.”
Or, if you want to avoid using rope or are simply not into the DIY route, you can buy a treat ball, like this one from Precision Pet, available on Amazon.
Just fill with cabbage and clip to the top of the coop—the bell even provides some extra entertainment for your chickens!
If you’re just getting started on your journey as a chicken lady, check out our list of chicken coops you can buy, gifts for chicken lovers, and guide to the best chicken breeds.
Gallery: This 6-Sided Grater Will Slice, Shred, And Zest Literally Any Hunk Of Cheese (Delish)
If you’re thinking about installing and hanging gutters yourself, be careful. There are plenty of mistakes to be made. Improperly installed gutters can damage your house or even put your safety at risk in the wrong situation. Here are the five most common gutter mistakes, and how to avoid them:
MISTAKE #1 – Choosing the Wrong Type of Gutter
There are a wide variety of gutter materials, sizes, styles, and gauges. Each has its benefits and drawbacks, but choosing the wrong one can be a nightmare. Choose the most durable material you can afford, and talk with your contractor or hardware store about roof shingle size and what width of gutter is right for your house. Standard residential homes typically use K style aluminum gutters, 5 or 6 inches wide from side to side, but if you live in a particularly rainy climate or looking for a different style gutter, other choices are available like ½ round aluminum gutter . The gauge of a gutter is equally important, standard is 26 gauge but we recommend that you go with 32 gauge to be safe, particularly in regions that have extreme weather events (snow/ice, heavy rains, etc.)
MISTAKE #2 – Incorrectly Calculating the Pitch
Gutters may look perfectly even, but it’s a carefully crafted illusion. Gutters actually have a slight pitch that allows water to flow towards the downspouts, generally one to two inches of decline for every forty feet of length. It’s very gradual and not noticeable, but it helps sweep away debris and keeps your gutters clean, and allows water to flow to the downspouts without overwhelming them, thus backing up the system. As you mount your gutters, check with a level to make sure they’re at the proper pitch.
MISTAKE #3 – Improperly Spacing Mounting or Hanger System
All gutters are attached to your house by mounting system or different types of hangers (inside, outside, or strap), and the hangers need to be carefully spaced close together (3 feet or less) to give the gutter proper support. Without the correct support, the rain gutters will sag. Water will collect in the lower places, tugging at your gutter system, until eventually the whole system will be ripped off your home. If using hangers, space according to instructions, or a bit closer if need be, and your gutters will stay where they belong, sending water to where it belongs.
MISTAKE #4 – Improperly Locating the Gutter
Water runs down your roof, goes off the edge, so the gutter goes on the edge, right? Simple. And like so many things that seem simple, it’s actually wrong.
When choosing gutters, consider the material, as well as the size and width needed.
Your gutter needs to be a few inches under the edge of your roof. Why? Physics. If you put a paper towel on a drop of water, the water will be sucked into the fibers (a phenomenon called capillary action). Your roof does the same thing. Water will drip off the very edge of your roof, but also be pulled back up on the underside, and drip out a few inches underneath your roof’s edge as well. A permanent solution you should consider is installing drip edge. Drip edge gets installed under the first course of shingles and promotes water to run freely from roof edge down into gutter. Without it, water may run down behind your gutter, down fascia board and siding, leading to potential damage.
Clogged gutters can result in runoff water, which can damage your home and landscaping. Gutter guards can prevent clogs and save you money. Download our free gutter guide
MISTAKE #5 – Using Too Many Seams vs. Seamless Solution
Finally, gutters will need to be welded or soldered together in order to be attached. But plan ahead in your construction to use as few welds as possible. Over time, the material in gutters, especially at the seams, is subjected to extreme temperature, force, and, of course, water. This puts a strain on any connections you solder or weld, and will eventually break the gutter if they’re not checked and touched up occasionally. The seams are the weak point in any gutter system, so treat them accordingly.
Seamless gutters or continuous rain gutters are another option available from contractors in some areas, so we highly recommend you consider having them installed on your home to avoid all the potential problems that welded together gutters can cause overtime.
As you can see, this can be tricky business. Don’t go at it alone. Contact us today, a gutter installer who’ll do the job right!
Having fresh plants in the house is very refreshing. The plants looks beautiful and they don’t require a lot of maintenance. The only inconvenient they could present is the fact that they take up. But if you consider using hanging planters then this problem can easily disappear. You can make your own planters. Here’s how:
Make a tiered hanging planter using some scrap wood, terracotta pots, rope and a metal ring. You’ll use the wood to make squares around the pots. Drill holes in the four corners of each wood square. Then hang them using rope.
This project is extremely simple. All you need is a white bowl, a single embroidery hoop and permanent adhesive glue. Put the glue on the bottom of the bowl, where it meets the hoop, press down and let it dry overnight. Add a plant and that’s all.
Here’s another rather simple project. For this one you need cotton rope, embroidery floss in various colors, a metal ring and a closed hook. Cut the rope and thread it through the ring so you have 8 pieces of rope hanging down. Tie it with floss close to the ring. Then tie two lengths of rope together and repeat three more times. Tie the ends together.
For this project you’ll need 4 strips of fabric or ribbon and a metal ring. Fold the strips in half and stick the middle part through the ring. Separate them in four sets of two and knot each of the sets together. Then take one strip from the first set and one from the second and knot them together. Repeat with the remaining strips. Then make another layer. At the end, make a big knot.
These tiny planters are very cute and also very fun to make. The materials needed are polymer clay, colored string, a skewer, plants, a baking tray, a rolling pin and baking paper. Make sure the clay is soft then roll it out. Cut a cone shape, roll it and connect the sides. Poke a hole through each side and bake it.
If you still have some doilies hidden somewhere, you can finally use them. You’ll also need embroidery floss in various colors. Use the embroidery floss to make colorful rope and attach it to the doilies in four points.
You can also make a shelf on which to display your potted plants. Take a piece of wood, measure the pot and cut a circle of the same size. This way the pot will fit through the hole in the wood. Then make some straps using fabric or leather and hang the planter somewhere.
Although a little messy at first, this is a very lovely project once you complete it. The supplies needed are dry moss, potting soil, clay mud, moss, twine or ribbon and a succulent plant. Wash off any soil around the roots and mix together the clay and the potting soil. Add water to the dry moss and wrap it around the roots. Then take the clay mixture and pat it down the root ball. Wrap around the green moss and then wrap the twine or string around it.
Here’s a lovely ceramic planter which works great both indoors and outdoors. It’s cube-shaped and the exterior is painted in two colors. You can choose any color combination you want. You could make something similar using concrete but you’d have to be careful with the tiny holes for the rope.
A wine bottle can be repurposed as a hanging planter. You’ll first have to cut off the bottom of the bottle and this is the most difficult part. Then take some twine or cord, tie it tightly around the bottle’s neck and then separate the twine pieces in two sets of two and knot them.


