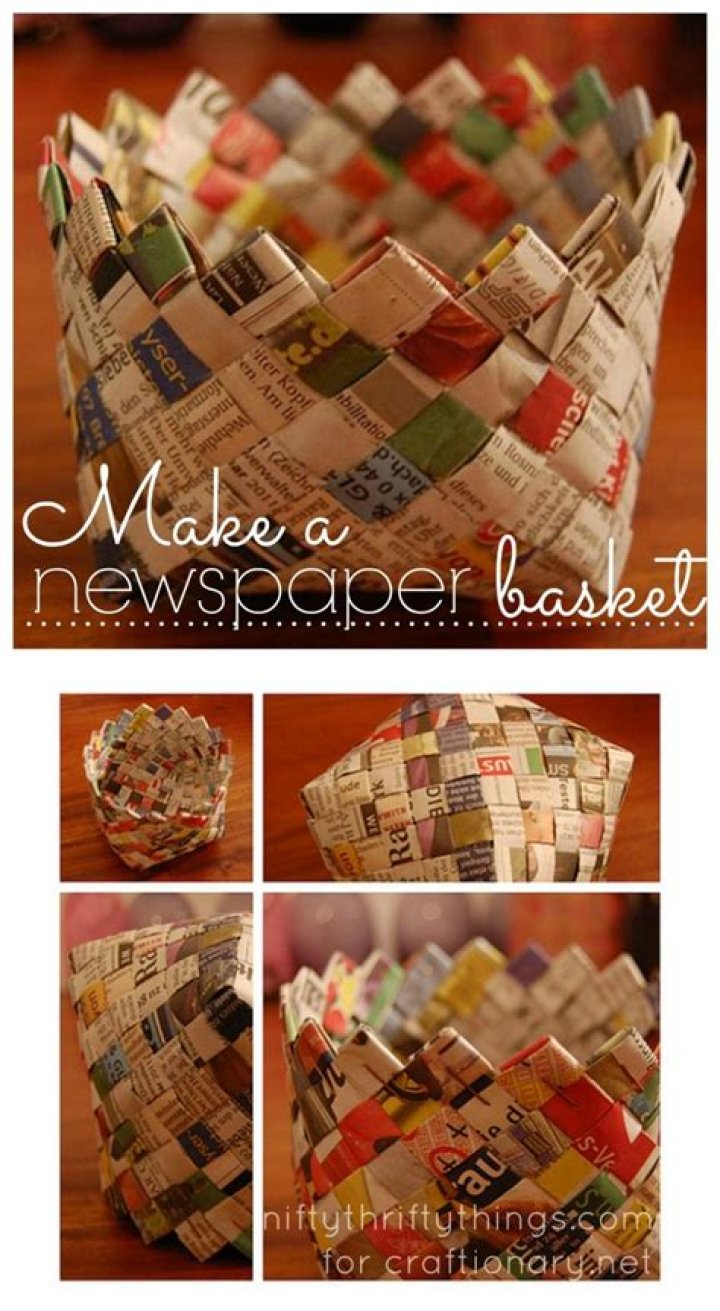
Last night, I was searching the web for some inexpensive baskets to stuff with homemade goodies for Christmas gifts this year, but I couldn’t find anything cheap enough! (I should have been keeping an eye out for them at yard sales throughout the year!)
My search then shifted to how to make a basket out of recycled materials. I was excited when I came across THIS SITE, and discovered a great way to make a newspaper basket! And since I have access to stacks of newspapers, I knew this was definitely for me.
I decided not to do my own tutorial, as Crafty Stylish has already done a fantastic job of it! I’ll just add my own comments as to what I did.
Materials:
- Newspaper
- Stapler
- Optional: Ribbon and glue; Spray Sealant (I used Acrylic Sealant)
I found that I didn’t even need scissors, except to do some trimming around the top edge at the very end. I simply tore the newspaper right down the seem to separate the pages. I used 28 of these half sheets for my project.
Then, you fold each section of the paper into half long-ways, then fold in half again, then one more time. You should have a long folded paper about an inch or so in width. Do not cut the strips (my mistake!), you’ll need the thick strips to have a sturdy basket.
Then follow the directions in the tutorial on weaving them. Definitely use the stapler to keep your strips in place. The base of my basket was 8 strips by 6 strips. That was a good size for me. The sides are tricky to do, I had to staple a lot around the edge to keep the strips tight.
What I did once I had the sides done, was take two more strips of newspaper, folded them one more time, and stapled them over the top edge.
I sprayed the basket with an Acrylic Sealant to keep the ink from bleeding. I also decorated it with ribbon, simply hot glued around the rim, and threaded through the basket near the top, and tied in a bow. You can also cut a cereal box to put in the bottom of the basket for more strength. There’s no limit to the embellishments you can add… get creative!! I think I’ll add some little paper snowflakes too.
In all it took me about 2 1/2 hrs to make. Seeing as I have more time than money, it’s worth it for me! The first one always takes longer, and isn’t exactly perfect looking, but I’m sure I’ll get better at it as I go.
I’m excited about how cute these newspaper baskets will look once filled with homebaked goodies! What do you think?
A city girl learning to homestead on an acre of land in the country. Wife and homeschooling mother of four. Enjoying life, and everything that has to do with self sufficient living.
What could be more incredible that a handmade basket to be used around the home for a thousand and one purposes? Well, how about an amazing woven basket that’s actually made of nothing more than old recycled newspapers?
We’re all about making the best of waste products – especially things like newspapers were millions are tossed in the trash every day. By using this wonderfully simple technique (see the guide and illustrations) you’ll soon be able to transform those old newspapers into the most wonderfully creative craft projects the likes of which could bring wonderful new convenience and decorative touches to your home!
Recycle Newspapers Into Laundry Baskets?
This is an age-old technique that isn’t used nearly as much as it deserves to be these days. All you have to do is take your old newspaper sheets and roll them into tight tubes as you can see in the illustrations. After this, it’s simply a case of using these tubes to weave the basket of your choosing in exactly the same way as you might do with wicker or plastic. You can paint the tubes in any color you desire, make a basket of any shape or size you wish and you’ll find yourself able to create dozens of amazing baskets with just a few standard newspapers! It really is one of the best ways we’ve ever come across of giving something that would otherwise go in the trash and amazing second life as something else!
It’s also unbelievably addictive – once you’ve put your first basket together, you’ll find yourself making more and more all the time!
This post may contain affiliate links which may give us a commission at no additional cost to you. As an Amazon Associate we earn from qualifying purchases.
The joy of hunting for Easter eggs never gets old! This year my kids and I decided to make our own Easter baskets. I normally buy baskets, but they can be expensive and I am trying to buy less, and make more this year. So, we sat down to craft. A newspaper basket is a fun spring craft to help you get ready for Easter and recycle your newspapers! You could also leave the handle off your newspaper Easter basket, and have a basket for small toys.
Newspaper Basket For Easter
Newspaper Easter Basket Materials:
- Newspaper
- Glue (any kind will do)
- Scissors
- Paint (optional)
The beauty of these baskets is that people will have NO idea that they are made from newspaper. Because you are folding and weaving them a couple times they are actually very sturdy! My kids ran around holding them the entire day, and they were in perfect condition after.
How To Make An Newspaper Easter Basket
Your first step is to cut the folded edge off of your newspaper, and make sure your sheets aren’t connected. Then you are ready to make your newspaper strips. Take your first piece of paper and fold it in half length wise; then fold it in half again. Your strips will be roughly a little over an inch wide.
I like to glue my strips so the flaps stay down. This also adds some reinforcement for each strip.
You will need a total of 8 strips to make the woven base, 8 strips for the square parts, and then 1 strip for the handle! Your first step is to take 8 strips and weave them like the pattern in the below picture.
Try to make the sides as even as possible. Apply glue, as needed, to keep the strips in place.
Next, take two strips and glue them together at the ends. Roughly measure the square base of the woven basket and glue the strip in to a square that is that same size. Create 3 squares, cutting off the excess.
Tip: If you want to make a bigger basket, simply add more strips to the woven base. Adjust your square size to fit the larger width of the basket.
Take the strips from the woven base and weave them up around the square, alternating in and out. Repeat this pattern with the other 3 squares. Adjust the strips so they are tightly pieced together. Once you have them in place, apply glue to keep it all from moving. You do not need to glue every part, the top and a few sections in the middle should do.
You can fold the top strips inside and glue them or cut them flush with the edge of the basket. Adhere glue to any piece you want to keep down. After that you can attach one newspaper strip as the handle!
I used spray paint to make my baskets a single color. You could use craft paint or spray paint. Another idea is to paint the strips before you weave. There’s no wrong way to do this project.
Kids can paint them or decorate them with stickers. You can also use the comic book section and create a fun comic themed basket to store toys!
Your DIY newspaper Easter basket is ready for the big egg hunt!
Check out all of our fun Easter crafts and recipes here, including great tips for your Easter egg hunt!
Leggi questo post in: Italiano
a year ago i saw this post on pane, amore e creatività on how to make a basket out of woven folded newspaper pages. i really liked the idea so i gave it a go. it came out relatively nice although, despite the gazillions of staples i used to keep it together, i couldn’t manage to weave the sides tightly and it came out a bit funny. i put it in my daughter’s room anyway to keep some of her toys in (any parent knows that you can never have enough containers for toys!). at first it worked ok (as you can see in the second photo), but after a few months, the sides started warping, getting less and less rigid, and now this basket is pretty useless.
nearly a year later, i saw a similar project in the book craftcycle (which i wrote about in my last post), but made with cereal boxes. what a great idea! this paper is more rigid and full of colors! and of course we always have tons of them hanging around. however, as is often the case, i had to make a few changes to the instructions. so i decided to rewrite the tutorial here, complete with pictures taken on a floor in dire need of a cleaning!
1. to make a box like this one (about 18 x 18 cm, 10 cm high) which i ended up using for some old audio cassettes, you’ll need 3 cereal boxes. if you have a paper cutter, it will be a lot easier and faster.
2. first, cut open the boxes along the side and cut off the very top and bottom flaps.
3. the book said to cut the strips 3 mm (1/8”) wide, which to me seems absolutely insane (not to mention that the strips in the book’s photos are definitely wider), so i decided to cut them 2 cm wide. do this with all three boxes.
4. attach the ends of two strips to make one long strip. the book suggested using a glue gun, but for me that was a total disaster (which you can see if you look at the inside bottom of my finished basket). then i tried with other regular glue, but it was still not working out. then i thought of double-sided tape, which ended up being perfect for this project. it sticks on right away, you don’t have to hold the strips together until they dry and it doesn’t create bulk between the strips. do this to make 18 long strips made of 2 strips each and another 6 long strips made of 3 strips each. (sorry about the crummy picture, but there wasn’t any natural light left by the time i took it.)
5. start laying out 9 of the strips made of 2 strips, alternating the colors so it looks more mixed. then start weaving with the other 9 strips of 2 strips. at first put some double-sided tape between the strips to keep them in place. and try to hide the overlapped parts inside the basket so you won’t be able to see them.
6. when you’re done weaving the base, turn it upside down and fold the strips up on all 4 sides. then start weaving the sides of the basket with the strips made of 3 shorter strips. at the corners make sure you fold the strips and use the double-sided tape to keep everything from shifting around.
7. use 5 of the really long strips for the sides, then trim the strips sticking out the top to just 2 cm. (sorry, i didn’t take pictures of this part because it was dark out and i was tired!) fold them towards the inside of the basket and stick them down with double-stick tape. then use the last long strip to go around the inside of the basket, sticking it down with the tape, so that it covers the ends of the other strips. (as you can see in the picture below)
8. finally, protect the paper (and make it a bit more rigid) by coating it lightly with a bit of diluted craft glue with a paintbrush. the book suggests using modge podge, but i don’t even know if that exists in italy. regular glue diluted just a bit worked just fine for me.
and there you have it! my basket isn’t exactly perfect, mostly because of the problems i had with the glue gun, but using the double-sided tape it comes out much better. you can obviously make bigger or smaller baskets by making longer or shorter strips (joining more or fewer shorter strips). or you could make a little box with a cover. have fun!
Recycled magazine baskets are fun, charming and just right for catching small items like napkins, keys or craft supplies. Make as many as you have magazines.
Recycled Magazine Baskets
While traditional baskets are woven out of reeds or strips of wood and bark, the same techniques can be used to weave recycled paper. While the finished size of the basket is dictated by the size of the paper, you can have lots of fun with color by pairing up magazine pages in similar shades and patterns. Try repurposing some of your old magazines into fun and useful baskets.
Materials
- Approximately 10 magazine pages per basket
- Scissors
- Glue Dots
Instructions
- Cut the magazine pages lengthwise into 2.5 inch strips.
- Place a strip in front of you horizontally and fold the top edge towards you, so the cut edge touches the center of the strip.
- Fold the other cut edge up to meet the first, so both cut edges come together in the center of the strip.
- Fold the strip in half so the cut edges are in the center.
- Use a Glue Dot to secure the strip and keep it from unfolding.
- Lay five strips side by side on the table in front of you.
- Pick up a loose strip and weave it under and over the strips on the table. Repeat with four more strips.
- Push the strips close together to form a tight weave and use Glue Dots on the corners and end strips to help hold them in place.
- Bend the ends of the outer strips up at a 90 degree angle.
- Begin weaving loose strips through the outer strips to form the sides of the basket. Secure with Glue Dots.
- Trim the tops of the strips down when you reach the top with weaving so the top of the basket is level.
- Fold over the remaining strips on the top of the basket to form a finished edge. Secure with Glue Dots.
| M. Sosebee, University of Texas-Arlington |
Basketballs used in NBA games have long had a leather cover. The new balls, however, are covered with a special kind of plastic. Spalding, the company that makes the new balls, insists that thorough tests during development showed that the synthetic covering performs better than leather does.
Sign Up For the Latest from Science News for Students
Weekly updates for inquiring minds of every age, delivered to your inbox
Experiments by scientists in Texas, however, seem to show otherwise. The researchers suggest that the plastic balls are less bouncy, more likely to bounce off course, and more slippery when moistened with sweat. These early experimental results suggest that this change in ball design could have a big effect on the quality of game play.
To compare friction, or the ball’s ability to stick to surfaces (such as hands), the scientists took measurements as they slid both old and new balls against sheets of silicon. Silicon is similar to the palms of our hands in its degree of stickiness.
When dry, the old leather balls slid more easily than did the new plastic balls. When moistened with just one drop of a sweat-like liquid, however, the plastic balls became a lot more slippery than when they were dry.
Leather balls actually became stickier with sweat. And they absorbed moisture about eight times more quickly than the plastic balls did.
“When the balls are dry, the synthetic ball is easier to grip, and when they’re wet, the leather one is much easier to grip,” says physicist James L. Horwitz of the University of Texas-Arlington.
To keep professional players from dropping the ball, it may be necessary to change and clean balls throughout a game.
Some scientists are urging the NBA to reconsider the switch until scientists finish further testing.
John J. Fontanella, a former college basketball player and now a physicist at the United States Naval Academy in Annapolis, Md., belongs to that group. “The NBA,” he says, “should stick with the leather basketball for another year.”
Update: In December, in response to player complaints, the NBA decided to return to the original leather ball, starting on Jan. 1, 2007.—E. Sohn
Weiss, Peter. 2006. Dribble quibble: Experiments find that new basketball gets slick. Science News 170(Nov. 4):292-293. Available at .
To learn more about the new basketball, go to (National Basketball Association).
To see the results of the experiments at the University of Texas-Arlington, go to (Mark Cuban).
Science project idea: What factors affect how high a basketball bounces? What factors affect its coefficient of friction? How much does the age or material of a ball affect its performance? In what ways?
Power Words
(for more about Power Words, click here)
friction The resistance that one surface or object encounters when moving over or through another material (such as a fluid or a gas). Friction generally causes a heating, which can damage a surface of some material as it rubs against another.
physicist A scientist who studies the nature and properties of matter and energy.
plastic Any of a series of materials that are easily deformable; or synthetic materials that have been made from polymers (long strings of some building-block molecule) that tend to be lightweight, inexpensive and resistant to degradation.
silicon A nonmetal, semiconducting element used in making electronic circuits. Pure silicon exists in a shiny, dark-gray crystalline form and as a shapeless powder.
synthetic An adjective that describes something that did not arise naturally, but was instead created by people. Many synthetic materials have been developed to stand in for natural materials, such as synthetic rubber, synthetic diamond or a synthetic hormone. Some may even have a chemical makeup and structure identical to the original.
technology The application of scientific knowledge for practical purposes, especially in industry — or the devices, processes and systems that result from those efforts.
What you will make:
Give your Valentine something sweet! Make this woven paper heart basket and fill it with candy. You will weave together red and white or pink and white paper to make this basket. In Norway, these cute little baskets are used to decorate Christmas trees.
The weaving can be a bit tricky, so carefully read the instructions for weaving and study the illustrations. This project is not recommended for children under 10 years old.
Here’s what you need:
- Computer paper: red and white, or pink and white
- Ribbon (optional)
- Scissors
- Glue or tape
This project is rated AVERAGE to do.
How to Make Woven Paper Heart Valentine Baskets
Read all of the steps before starting.
Choose the size of Valentine basket you want to make and download the pattern. There are patterns for 5¼” (13 cm) and 4″ (10 cm) Valentine baskets. Print the pattern once on white paper, and then again on red or pink paper. Or, select a colored pattern and print it on white paper. Another option is to print a black & white pattern on white paper and color it with crayons or markers.
All of Aunt Annie’s project patterns are designed to be printed on standard letter-size paper (8.5″x11″ or A4). When printing from Adobe Reader, you may need to select Auto-Rotate and Center or Choose paper source by PDF page size to ensure the best fit.
Step 2: Cut
Cut out the long, oval-shaped pattern pieces. Each Valentine basket requires two pattern pieces: one red (or pink) and one white.
Step 3: Fold
Fold each pattern piece in half end-to-end. Be sure that the three center lines are on the outside.
Step 4: Cut on Lines
Hold the folded pattern piece firmly and cut on each of the three lines. Repeat for each pattern piece. If you printed on colored paper, refold the pattern piece the opposite way so that the printed lines are on the inside.
The weaving can be tricky, so read the instructions carefully and refer to the illustration.
Hold the folded red pattern piece in your left hand and the white one in your right hand. Weave the first loop of the white piece inside the first loop of the red piece. Weave it over the second loop of the red piece, inside the third red loop, and over the fourth.
Weave the second loop of the white piece over the first loop of the red piece. Weave it inside the second red loop, over the third, and inside the fourth.
Weave the third white loop like the first and the fourth like the second. When you are done, the basket will look like the illustration and you will be able to open it up.
Tip: For the patterns with little hearts, hold the pattern piece with hearts in your left hand and the plain pattern piece in your right hand. Then follow the weaving instructions substituting the heart piece for red and plain piece for white. You should see little hearts going down the center of your basket.
Step 6: Add a Handle and Finish
Cut a handle for your basket from a scrap of paper, or use ribbon. Make the handle about 1/2″ to 3/4″ wide (1 to 1.5 cm) by 4″ to 6″ long (10 – 12 cm). Fold the handle in half, and glue or tape it inside the basket.
That’s it! Now fill the basket with candy and give it to your Valentine!
This paper basket craft can be adapted and decorated for almost any occasion and made by any age of child (with help as appropriate).
Using our scrapbook papers and printer card you can create a wonderful, colourful selection of baskets – or use heavier coloured or glossy card for a different effect.
They are perfect for Christmas, filled with goodies or Christmas decorations. At Halloween you could fill them up with treats for any spooky visitors to your house. Of course at Easter they are perfect filled with shredded paper and Easter eggs. Imagine how pretty they could look at Valentine’s Day covered in hearts and filled with little chocolates! How about filling them with Indian sweets and treats at Diwali?
Help the children make one for each place setting at Thanksgiving or any family occasion and use them to hold a napkin, a place name, some flowers, chocolates or other bits and pieces.
How about having a craft party? Each child decorates their own basket and then uses it to take home their “going away” treats.
These baskets are easiest made using our grid paper and card which can be fed through your printer so we start with instructions on how to do it that way – Method 1. Your children can decorate the second side of the card themselves or you can choose one of our many scrapbook paper designs.
You can alternatively print out our grid paper onto normal printer paper or card and glue it to another material – perhaps wrapping paper (gift wrap) or even fabric. See Method 2 below.
Finally, we give instructions for using heavier non-printable materials such as pre-printed or glossy card in Method 3. You will need to use this method if it is essential that the inside of your basket
1. Start by choosing a suitable design for basket from our selection of scrapbook papers, and print it out onto printer card. Designs which have no obvious “way up” are best.
2. Put the card back into the printer and print out our small grid paper onto the second side. Every printer varies so you may have to fiddle around a little to work out how to do this!
3. Trim the edges so that you have complete squares on your grid and the pattern on the other side covers the grid totally. Save any off-cuts of pattern to make the handle.
4. Count in 7 boxes from each edge and draw a pencil line from edge to edge along as shown below. (Vary the dimensions of your box by changing the size of the grid and the number of boxes that you count in from, but always come in the same amount on each edge).
5. Fold each edge along the lines in turn, creasing well. If you card is stiff it is easier to first score along the lines (place a ruler along the lines and then “draw” along it with a blunt biro, the edge of a blunt knife or a pair of scissors. You aren’t trying to cut the line, just make it easier to crease).
6. Now cut carefully along the short edges as shown in the photo below.
7. Turn your basket over and apply glue to the four corner squares (marked with a sticker in the photo below).
8. Turn the box over again and fold the corner squares in to form the box/basket shape.
9. Use a further strip of card, ribbon or similar to form a handle, and fill your basket as appropriate for the occasion!
1. Print the small grid paper onto paper or card as appropriate for whatever material you are using to make your basket. If you are using a fairly heavy card or wrapping paper, you will be able to print it onto normal paper. If you are using a thin wrapping paper or a fabric, print onto card to provide stiffness for your basket.
2. Glue the grid paper carefully to your chosen material making sure that you use a light covering of glue all over the grid paper and paying particular attention to the edge. Allow to dry.
3. Trim the edges of the grid paper as in 3. above and proceed as in Method 1.
This method is slightly more difficult than the grid method above as a certain amount of measuring and drawing with right angles is required! It does allow you, however, to use stiffer cards in larger sizes, and you won’t have the grid paper showing on the inside of the basket.
1. Use any rectangular piece of card and decide how tall you want the edges of your basket to be.
2. Measure in this amount from all sides and mark with a pencil and ruler as shown above.
3. Score along these lines and crease each edge in. Rub out the pencil marks if you wish.
4. Proceed as in Method 1.
Note: If you are making a large number of baskets or if you are working with very young children, it can be helpful to make a square card template to the appropriate measurements for your border. Show the children how to place the template in each corner of their rectangle and draw around it. Use these guidelines to crease and cut the rectangle.
Ideas for decorating your baskets
Use ribbons, buttons and bows.
Use sequins, glitter, “jewels” and stickers.
Older children could decorate their card using fonts in all shapes and sizes. How about writing the name of the recipient of the basket over and over again?
Cut out old photos.
Use crafty bits and pieces like pompoms, card toppers or pipe-cleaners.
Use colour themes – red and pink for Valentine’s Day, green for St Patrick’s Day, purple and silver for Diwali, and so on. Cut out extra shapes as appropriate.
Use craft foam shapes, felt, old scrabble tiles and jigsaw pieces – whatever you can find!
Use cotton wool and glitter for a snowy look.
We are sure you will come up with many more ideas!
News articles are designed to relate the news. The article is written to inform readers. It is factual, meant to present information in a quick, digestible form. The following elements of writing a newspaper article are important, so heed them well.
Research and Fact Gathering
Perhaps the #1 rule of writing a newspaper article is that you are factual. You do not want to make assumptions or fabricate information. Before you can write your article, you must have as many of the facts as you can gather. Here are some facts that you will need to find out:
- What? The specific event that took place. Who? The people involved. Where? Places. When? Date and time. Why? Reasons for the event taking place. How? Connecting the facts.
You will also need to gather as much detail as you can. This will involve:
- Interviewing people connected to the story. Gathering quotes from people (be exact…never paraphrase what they said). Cite names, unless they specifically request to remain anonymous. Resolving conflicting facts from individuals. Researching public information (always cite your sources, so write them down).
Once you have all your facts, you can begin to write your article.
The Headline or Title
For a news article, this is where you have most of your creativity. The headline must grab the attention of the reader. It needs to be catchy, emotion evoking, or creates curiosity. Be creative with it. In many instances, you will spend more time trying to come up with the perfect headline than you will in the actual writing.
The Article Body
The main news article itself is written from bottom down. In other words, the most important information comes first and each paragraph gives less and less details. Whereas a novel, for example, starts you out with little information and you must read to the end to get all of it.
In news article writing, however, you want to provide the key information right up front. You start with the 6 questions you should have already answered in your research:
- What?Who?Where?When?Why?How?
Your first two paragraphs need to answer all these questions. For example:
The Varsity football team beat Smith High School last Saturday, 21 to 7, in a rematch that vindicated Coach John’s prediction of a win during Friday’s pep-rally. Our first home win this season at our very own Jane Doe Field was a morale booster to the entire student body. Quarterback, Joe Baker completed 18 out of 24 passes to cement the win.
This was only a simple example, but almost all the questions are actually answered in the first two sentences. From here you can add more inconsequential details, such as receiving yards, rushing yards, and so forth. You will at some point include quotes from people such as the coach, the quarterback, a receiver, a fan in the stands, and perhaps the principal. Although for quotes, you don’t want to include too many, but having two or three is important. By the time you get to the end of the article, you are simply expanding upon what the reader already knows from the first two paragraphs you wrote.
Don’t make your paragraphs long—two to three sentences each. Your word count will need to stay around the 500 word count or less, generally speaking.
SEE WHAT OTHER SCHOOLS ARE DOING
Below are just a few examples of what other schools are doing with their newspapers. Take a look and become inspired and find ideas.
Snappy ledes tell who, what, where, when, why, and how
Tom Merton / Getty Images
- M.S., Journalism, Columbia University
- B.A., Journalism, University of Wisconsin-Madison
What is a lede? A lede is the first paragraph of any news story. Many would say that it’s also the most important part, as it introduces what is to come. A good lede must accomplish three specific things:
- Give readers the main points of the story
- Get readers interested in reading the story
- Accomplish both of these in as few words as possible
Typically, editors want ledes to be no longer than 35 to 40 words. Why so short? Well, readers want their news delivered quickly, and a short lede does just that.
What Goes in a Lede?
For news stories, journalists use the inverted pyramid format, which means starting with the “five W’s and H:” who, what, where, when, why, and how.
- Who: Who is the story about?
- What: What happened in the story?
- Where: Where did the event you’re writing about occur?
- When: When did it occur?
- Why: Why did this happen?
- How: How did this happen?
Lede Examples
Now that you understand the basics of a lede, see them in action with these examples.
Lede Example 1
Let’s say you’re writing a story about a man who was injured when he fell off a ladder. Here are your “five W’s and H:”
- Who: the man
- What: He fell off a ladder while painting.
- Where: at his house
- When: yesterday
- Why: The ladder was rickety.
- How: The rickety ladder broke.
So your lede might go something like this:
“A man was injured yesterday after falling from a rickety ladder which collapsed as he was painting his home.”
This sums up the main points of the story in just 19 words, which is all you need for a good lede.
Lede Example 2
Now you’re writing a story about a house fire in which three people suffered smoke inhalation. Here are your “five W’s and H:”
- Who: three people
- What: They suffered smoke inhalation in a house fire and were hospitalized.
- Where: at their house
- When: yesterday
- Why: A man fell asleep while smoking in bed.
- How: The cigarette ignited the man’s mattress.
Here’s how this lede might go:
“Three people were hospitalized for smoke inhalation yesterday from a house fire. Officials say the fire was ignited when a man in the home fell asleep while smoking in bed.”
This lede clocks in at 30 words. It’s a little longer than the last one, but still short and to the point.
Lede Example 3
Here’s something a bit more complicated—this is a story about a hostage situation. Here are your “five W’s and H:”
- Who: six people, one gunman
- What: The gunman held six people hostage in a restaurant for two hours before surrendering to police.
- Where: Billy Bob’s Barbecue Joint
- When: last night
- Why: The gunman tried robbing the restaurant but police arrived before he could escape.
- How: He ordered the six people into the kitchen.
Here’s how this lede might go:
“A failed robbery of Billy Bob’s Barbeque last evening resulted in six being held hostage as police surrounded the building. The suspect surrendered without incident following a two-hour standoff.”
This lede is 29 words, which is impressive for a story that has a bit more complexity to it.
ABOUT THE AUTHOR
Kathryn Hatter
Whether for Easter, May Day or just for amusement, making your own basket out of construction paper is an easy and enjoyable project. Children will delight not only in the process itself, but in using it to carry and keep their precious belongings. Organize a fun crafting afternoon and help your children make their own colorful construction paper baskets with just a few safe and simple materials.
Things You’ll Need
Construction paper (12 inches by 18 inches)
Step 1
Cut 27 strips of construction paper that are each 3/4 inch by 12 inches.
Step 2
Cut 10 strips of paper that are 3/4 inch by 6 inches.
Step 3
Arrange seven of the 12-inch-long strips side by side on a flat surface. Anchor the strips to the work surface by taping the tops of them down.
Step 4
Weave another long strip under and over the foundational seven strips. Arrange the woven strip so that there is an equal amount of strip on both sides of the weaving.
Step 5
Weave six other long strips in the same fashion. When you are finished with this step, you should have a plus-shaped paper weaving.
Step 6
Weave four short strips on one side of the woven shape. To secure this weaving, place glue on both short ends of these strips after you have woven them. Allow the glue to dry completely.
Step 7
Continue weaving the other short strips on the other three sides of the plus-shaped paper weaving.
Step 8
Fold the remaining four short strips in half length-wise to make 3/8-inch-wide strips. Unfold each strip and dab glue on the inside of these strips. Fold the strips over each of the four long strip edges to finish these edges. Allow the glue to dry completely.
Step 9
Fold up each of the four edges that you finished in Step 8 to create the sides of the basket. Crease these folds.
Step 10
Glue the loose edges at the newly formed corners to secure the corners to create the basket. Allow the glue to dry completely.
Step 11
Match up the long strips that are left by placing them on top of each other. Glue these strips together and allow the glue to dry completely.
Step 12
Glue the strips to two opposite inner sides of the basket as a handle.
Journalists need their newspaper articles to be clear and well written. Others may have occasion to write a newspaper article as well, perhaps for submission to a publication about an upcoming event. No matter the author, a well-written article is more likely to be published. Use these tips to write a solid newspaper article.
Write a strong lead. The first paragraph of the article is also called the lead. This paragraph, often one sentence but perhaps two sentences, in most cases will summarize the main purpose of the article, which addresses the basic questions of “who, what, when, where, how and why.” Other types of introductions are sometimes used, such as leads that ask questions or leads that give an example of a situation to be explored in the article.
Write the newspaper article in the inverted pyramid format. This means the most important, most vital facts should be mentioned first, with the less important facts mentioned later in the article. The first few paragraphs must be more important than the next few, which in turn will be more important than the section beneath them, etc.
Where necessary, support all claims and arguments that need attribution. If you’re making an assertion in the article about someone’s actions or guilt in a criminal context, for example, this must be attributed to someone. If information in an article cannot be attributed to a reliable, appropriate source, it’s not suitable for publication.
Go back and give your article a thorough re-read. Work that must be done quickly, such as on deadline, can lead to typographical errors that can be as embarrassing as they are simple, such as the difference one letter can make between the words “public” and “pubic.” Errors also can occur if you have moved parts of the article around.
Related To:
Baskets are something that mysteriously accumulate in my home. I think between flower arrangements and gifts of fruit, they just pile up in my hall closet, waiting for their time to shine again. If you can relate, take a look at these cool crafts and ideas for baskets and get inspired to use yours for something beyond bananas, pears and apples.
Old Basket = New Light Fixture
CI-Mali-Azima_basket-pendant-light_s3x4
Photo by: Mali Azima
This idea from Brian Patrick Flynn is perfect for deeper baskets that already resemble lampshades. The rope adds a touch of coastal-cool to this nautical light fixture.
Old Baskets = New Wall Art
Wall Decor With Woven Baskets
Shallow woven baskets (like ones found at basketsofafrica.com) in a mix of sizes and colors can make for a super-graphic wall display. To hang the baskets, hammer a nail with a small head near the center of each so the edges of the baskets overlap. Start with one big basket and work your way out.
If you’ve got quite the basket collection at this point, turn it into an eclectic 3D wall art installation. This example from HGTV Magazine is the ideal mix of varying colors and sizes.
Use as pot holder – Works in a pinch to keep from getting burned.
Use as table cloth padding.
Use as a light reflector when taking photographs.
Finger/Hand Strengthener – One trick used by baseball pitchers and mountain climbers to strengthen their fingers and forearms is to lay a single sheet of newspaper on a flat surface and then lay their hand palm down in the center. Using only that hand, begin crumpling the newspaper and see how small a ball you can crumple it into. This is a great inexpensive rehab technique for those who’ve suffered hand injuries or strokes.
Contributed by Kelley Mitchell, [email protected], who gives credit to dad for this idea.
Newspaper Games – Contributed by Charlene, [email protected]
- Do a scavenger hunt/word search.
- Roll flat paper into cones and use them to try and catch rolled up newspaper balls.
- Make lots of newspaper balls and draw a circle on the ground. See how far away they can be and still get the balls into the circle.
- If it’s windy outside, see how far pieces of newspaper will blow, do flat ones blow easier than folded or crumpled ones? Just be sure and clean up.
- Experiment to see how many times you can fold a full sheet of newspaper. Who’s is smallest?
- See how many times you can fold a full sheet of newspaper and still be able to tear it in half.
Use to decorate crafts – Painted, fringed newspaper is great for all kinds of crafts, especially kids crafts.
* Christmas Wreath Instructions
Use for papier mache – Instructions here
Workspace cover – Cover your craft area with newspaper – the all-purpose work table protector!
Glass cleaner – After you wash your windows or mirrors with soap and water or regular glass cleaner, polish the glass with a piece of crumpled newspaper for a streak-free shine.
Kitty litter liner – Use several sheets folded up to line the bottom of your kitty litter box.
Recycle it by making new paper – Instructions here.
Odor remover – Stuff wads of newspaper into your shoes or boots overnight to remove odors. Got an old plastic container that smells bad? Crumple up some newspaper and stuff it in the container. Seal it and leave it overnight to remove the stink. Also works in trunks, luggage or boxes that have that old musty smell.
Garden mulch – Spread newspaper flat or shredded around the base of plants or between rows of plants. Water thoroughly. Will discourage weed growth.
Make paper hats
Fire starter – roll and twist a few sheets of newspaper and use for kindling to help start your fire.
Garbage can liner – use several sheets of folded newspaper to line the bottom of your kitchen garbage can. It’ll help absorb liquids and odors.
Filler – as a quick and easy (and cheap!) filler for puppet heads, doll heads and bodies, packing for gifts and packages and so on, crumpled up newspaper can’t be beat.
Shape Keeper – stuff newspaper into your shoes or boots or purses when storing. Helps them keep their shape.
Dress Patterns – newspaper works for making your own clothing patterns. Butcher paper would be better, but newspaper will do in a pinch.
A basketball court has symmetry; one half of the court is a mirror image of the other. The entire basketball court (see Figure 1) is 94 feet by 50 feet. On each half-court, painted lines show the free throw lane and circle, as well as the three-point arc, whose distance from the basket varies based on the level of hoops being played.
Indoor basketball courts are almost always made of hardwood. Outdoor courts are most commonly composed of asphalt.
The borders of the court have their own commonsense names:
- Along the length of the court, the borders are the sidelines.
- Along the ends, the borders are the endlines, or baselines.
- Separating both halves of the court is a midcourt line.
- In the very center of the midcourt line is the center circle (12 feet in diameter), where the center toss takes place to begin the game.
The free throw lane and free throw line
The free throw lane is the hub of the action in each half-court. This rectangle is 12 feet wide — 16 feet at the men’s pro level. Its length, as measured from the basket to the free throw line, is 15 feet at all levels. An offensive player may not stand inside the lane for more than three seconds unless he or one of his teammates is shooting the ball. After a shot is taken, the count starts over again. A defensive player may remain inside the lane for as long as he desires.
A player fouled by another player sometimes receives free throws, also known as foul shots. She takes these shots (they aren’t really “throws”) from the free throw line at the end of the lane — 15 feet from the basket. The shots are “free” because a defender does not guard the shooter while she’s shooting. When a player shoots a free throw, her feet may not cross the free throw line until the ball hits the rim, or else the shot is nullified.
The remaining players line up alongside the free throw lane (or behind the shooter) and cannot interfere with the shot. They line up in order, on either side of the lane, of defense-offense-defense-offense. (Up to four players may stand on one side of the lane.) If a player opts not to take a spot (say, for example, the second defensive spot), then a player from the opposing team is permitted to step into that spot. The fans behind the basket usually scream, jump up and down, and wave their hands to try to distract an opposing team’s shooter during free throws.
The three-point arc
The three-point arc is the other important marked feature of the court. The arc extends around the basket in a near semicircle, and its distance from the basket differs according to the level of play. Even at one level, the distance can change as rules committees grapple with the best distance for the good of the sport. The NBA has changed the three-point distance on two different occasions since first adopting the trey, as the three-point shot is called, in the 1979-1980 season. The three-point distance was moved back to its original 23′ 9″ for the 1997-1998 season. The college distance is 19′ 9″, while the international distance is 20′ 6″.
Any shot made from beyond this arc — even a desperation half-court shot at the buzzer — is worth three points. A three-point shooter must have both feet behind the arc as he launches this shot, but either foot is allowed to land on the other side of the arc.
The backcourt and frontcourt
Thinking of the entire court as two half-courts, divide it into frontcourt and backcourt. The frontcourt is the half of the court where the offense’s basket is located. The backcourt is the other half. Thus one team’s backcourt is the other team’s frontcourt.
At the root of every great garden is a great compost pile.
Compost is an amazing organic powerhouse of nutrients. Nutrients that help to keep soil loose, workable, and most importantly, completely energized.
We use it absolutely everywhere we can in our garden, and in our flower beds, containers and hanging baskets as well.
In our vegetable garden and flower plantings, we add a a shovel-full of compost to every single planting hole. And once planted, we use more as a 2″ thick mulch around the base of every single plant.
It’s also a main and powerful ingredient in our homemade planter and hanging basket soil mix. See : How To Make Perfect Homemade Potting Soil
Not only does compost help to build incredible soil tilth and structure over time, it also acts as a perfect slow-release fertilizer, gently providing a low-dose of nutrients to your plant’s root systems all season long.
And, perhaps best of all, it makes an incredible all-purpose liquid fertilizer when soaked in water. –
Compost tea, made simply by steeping fresh compost in water, is the perfect solution to providing plants with a liquid fertilizing boost. See : How To Make Compost Tea.
So enough about how great it is! Let’s take a look now at the secrets to make your own incredible pile this year.
How To Make Great Compost For A Great Garden – The Simple Secrets!
Using The Right Mix Of Materials
To get the most from a compost pile, it takes a proper balance of Brown (Carbon) and Green (Nitrogen) materials. It can all sound intimidating, but it’s actually quite simple.
Brown materials consist of leaves, straw, wood shavings, dead grass, small twigs, etc.
Greens on the other hand are materials like vegetable peels, coffee grounds, green grass and plant clippings.
Greens can also be animal by-products such as chicken and rabbit manures. They are the “fuel” that gets the pile cooking!
So what should the ratio of browns to greens be?
A great rule of thumb is for every 4 parts of brown materials, add in 1 part green. And it doesn’t have to be all at the same time either.
If you add in 4 buckets of shredded leaves, then a bucket of vegetable peels or fresh green grass needs to go in to balance it out.
And don’t fret about being exact or putting materials in at the same time. Add materials as you get them, and just stay as close to the ratios as you can to make the pile work at maximum efficiency.
What Not To Put In Your Compost Pile
It’s also important to know what not to put in your pile.
Meat is a big no-no. It attracts rats, mice, raccoons and other unwanted animals, and can lead to foul smelling piles.
In addition – refrain from using dog or cat manure as it can contaminate your pile.
Making Your Pile The Right Size
If a pile is too small, the materials never “heat up” enough to decompose quickly.
And if it is too big, it becomes difficult to turn and mix. As you will see in the next tip, that turning and mixing is a big part of a successful pile.
So what is the best size? For best results, a pile or compost bin between 3′ x 3′ x 3′high, to 5′ x 5′ x 3′ high works best. It allows for a pile big enough to have thermal heat, but not so big that it’s hard to turn.
There are some good options available for purchase, but you can also make a bin from nearly any material.
Old wooden stakes, chicken wire, fencing boards and even blocks or brick work well. Product Link : The GeoBin Compost Bin $34.99
Chopping The Compost Ingredients!
One of the biggest keys to a fast-working compost pile is to chop the ingredients before tossing them in.
As a rule, the smaller the item going in, the quicker it decomposes.
There is no need to buy expensive shredders or grinders. A simple run-over with the lawnmower can shred leaves or straw.
The same goes for those kitchen scraps. A few more chops with a knife will help break ingredients down twice as fast.
Turn The Pile Often
Like all living creatures, the organisms that help to break down a compost pile need oxygen.
Turning the pile frequently (with a spade or pitchfork) helps to add oxygen to the center core.
In addition, the brown and green materials become mixed more thoroughly as well, helping to speed decomposition even faster.
Turning a pile at least once a week will speed up the decomposition process greatly. Ideally, a pile should be turned every few days for maximum efficiency.
Keep The Pile Moist
Last, but certainly not least, it is vital to keep the pile moist.
In addition to oxygen, compost needs water to keep it cooking. A good compost pile should feel like a slightly damp sponge.
And remember, at the end of the day, everything will compost eventually.
So get that pile going, and start turning all of that “waste” into black gold for your garden!
Happy Composting, and Happy Gardening! Jim and Mary.
If you don’t remember, we spent a few weeks in Paris a few years ago and I came back with my head absolutely in the clouds. As a matter of fact, of my very favorite Parisian-y things to do was to pack a picnic and go eat in the park (preferably under the Eiffel Tower, duh), which led to one of my favorite pictures of all time. So when we came back, I figured out how to make a picnic basket for a perfect Parisian-type picnic so we could pretend we were back there again. In case you dream of the same thing, we’re sharing our little tutorial here for you.
The key to this project is that you don’t actually have to make the basket, you just find a really great pre-existing one and outfit it for picnicking. And that means that you can find a basket that’s perfect for your needs, whether it’s larger, smaller, or any shape and color you can imagine. As you’re planning how to make a picnic basket, consider your needs and the types of items you’d like to be able to store inside your basket. It also helps to thing about how you’ll be transporting it (bike, car, walking, and so on). That should help you narrow down the size and shape of the perfect basket.
How to Make a Picnic Basket
Materials
- basket with hinged lid
- E6000 (or your favorite mega-strong glue)
- colorful elastic ribbon
- large button
- scissors
- upholstery thread
Make Time: 1 Hour (Plus Drying Time)
Start by figuring out what utensils you’d like to attach to the inside of your basket. I wanted to make space for a couple of sets of silverware, and a couple of champagne glasses. (Speaking of which, here’s a tutorial to make your own gold polka dot champagne flutes!)
Then, measure out the elastic so that it’s long enough to wrap around your glasses but keep them very snug. Snip off the right amount of elastic. Spread E-6000 on both ends and press the ends firmly into the underside of the basket lid.
Repeat the process for the other items you’d like to attach to the lid. For utensils, make a small loop of elastic by cutting about 2 inches and glueing the ends together. Then glue the loop to the lid in the same way you did for the glasses.
Use thick upholstery thread to weave through the front of the basket and through the hole of your button. Next, make a few passes with the needle to ensure that the connection is strong. Finally, double knot and snip the ends.
Glue a loop of elastic to the underside of the lid of your basket, long enough to reach around the button and hold the lid taut.
Allow all of your glue to dry for at least 24 hours, or until it’s completely cured. If you’d like to add places to hold plates or larger items to the lid or sides of your basket, do so in the same manner that you added the elastic for the glasses. Plates hold well if you glue the elastic on in an “X” shape, because then they stay secure if your basket gets jostled around.
And that’s all! Fill it with fun treats (champagne required) and get yourself on some picnics! xoxo
Willow and Basket Making
Willow , for example is an ideal material that can easily be bent and woven to form very strong baskets. It is harvested in the winter when the sap is down, and is used with the bark still on, and then left to dry.
However, not all willow is good for basket weaving as sometimes it is very brittle and can snap as you are working with it. If you harvest your own willow you can test to see if it is any good by bending it and testing its give. If it doesn’t and snaps then don’t use it and look for willow that is more pliable.
Willow can also be used without its bark. It can be first soaked in water until the summer when it is then used after the bark has been stripped.
For those of you who like your baskets to have that golden brown appearance the willow used here is boiled first, and then stripped before used.
Cane and Basket Making
Willow is, of course, not the only material used for making baskets. One can also use imported materials like cane which often comes from Indonesia. Unlike willow, which is thicker at one end than the other, cane is uniform in diameter from one end to the other. This makes using cane easier for basketry and is the best material for beginners to use when first starting off with their basket making.
Basket Making and Storing Cane
If you are not going to use your cane immediately, store it stacked, not in coils as it makes it very difficult to work with it later on. Also make sure that you store it in under cool, dark and dry conditions.
Basket Making and Dyeing Cane
Cane is a very porous material and as a result it is very suitable for dyeing a variety of cheerful and interesting colors. The most successful way to do this is to use fabric dye.
Basic Basket Making Tools
You do not need expensive tools to start making baskets. Nor will you need a lot of tools to do the job. You will need an awl for making holes for inserting the willow, cane or reed, along with a good, sharp pair of secateurs for cutting. You will use a pair of nose-pliers to pinch the reed where you want to bend it at right-angles when making borders. If you don’t squeeze it well, when you try and bend it, it will split and break. You will need a tape measure of ruler to measure your work. Finally, if you are working with willow you will need a rapping iron that looks similar to a chisel, but it is blunt and used for tapping down the willow weave into position.
Basic Basket Making
The easiest baskets to make are those that involve using flat reed for the stakes and round reed for weaving.
Take 13 pieces of 3/4 inch flat cane cut at 30 inches, and mark the centers of the flat can on the wrong side.
Now, form the bottom of the basket by inter-weaving the flat cane lengths in an under, over pattern with 7 pieces being laid on one direction and 6 pieces laid in the other, making sure that the wrong side is facing up. As you are weaving the 6 pieces, make sure that you insert your wooden handle in the middle of these, so that there are three lengths either side. The handle size ideally should be an 8″x12″ D shaped handle with a flat base.
Adjust the weaved pieces on the base to fit 8″x8″. Mark these with a pencil so that you know where the boundaries are. Now take a number 2 round reed and weave it in and around the whole base twice to keep it in place. Treat the handle as part of the stakes and hide the twining’s ends in between the inter-woven stakes.
Making sure that the stakes are very damp, gently bring them up into an upright position. Now, using a start-and-stop weave, and using 2 pieces of 1/2 inch round reed cut at 11 inches in length, keep the stakes in an upright position. All weaving now should be showing the right side.
For those of you who are unfamiliar with the term start-and-stop-weave this is when you stagger the start of each row from the start of the last row. Finish the row by overlapping the same weave to the third stave after the start. Overlap the finish of each weave on the outside of the start.
An example of start-and-stop weaving in basket making
Using 24 pieces of flat-oval reed cut at 38 inches in length, now continue weaving in and out and building your basket. If you have a handle that tapers at the sides, you will have to keep the weaving very tight as you use less and less of the cane lengths as you build your basket. Just make sure that you do this after the first 2 rows, otherwise you will end up with a skew basket!
You may have to start shaving a little off the sides of the stakes as you build past 15 rows so that you go from a 3/4″ stake down to a 1/2″ stake. You can do this with a pair of secateurs, adjusting the width of the stakes accordingly.
To make your basket more interesting you can add a different color now, 3 rows of brown or blue look good using 1/4 inch flat-oval reed using the same reed color twice. And then add another 3 rows of natural 1/4 inch flat-oval reed as below the dyed area.
Now it is time to tidy up and put on the rim. Cut the stakes so that they are still long enough to fold over and tuck down into the several layers of weave so that they hold themselves in place. This prevents the last row of weave from unraveling and also allows a secure edge to lash the rim to.
A common rim is made by encircling the last wall weave with two reeds or splits, each placed on either side, with the stakes in the middle. This is then lashed and fastened to the basket.
This is done by taking 8 inches of 5 mm binder cane making sure that is damp and supple and lash the rim to the basket. When you come to the handles go around them in a cross-stitch X pattern to strengthen this area. Remember to do this both sides and make sure that the shiny sides are facing upwards.
Did you find this page helpful?
Sharing is a way of saying, “Thanks!”
Follow Us and Keep Up to Date
You can Add your Own Comments and Pages on Basket Making Here!
We have lots of pages where you can contribute to this website, as you can see from our links below. We love hearing from our readers whether you are homesteading at the moment, thinking about homesteading, urban homesteading or just aspiring to country living one day. Wherever you are, we hope you will be one of those we hear from on a regular basis. Look around our homesteading today website. If you have any comments or questions, please feel free to contact us.
Leave a Comment
Do you have anything that you would like to add after reading this page? We would love to hear your thoughts. If you can add additional information to what has been written here you will be adding value to the website! No need to have any special skills – just type and submit. We will do the rest!
Easter baskets are the traditional Easter gift from parent or grandparent to child. Store-bought versions of these baskets are usually overpriced wicker handled baskets stuffed with “Easter grass” filler and some small toys and sugary sweets. By making your own baskets at home, you can save money and create a truly personal gift without all the messy filler.
Basket Ideas
The first step in making your own Easter basket is finding a suitable basket. Start by thinking out of the box – or the basket! While a wicker or woven basket is fine, there’s no reason to limit yourself. What about a bathroom caddy, filled with hair products, little clips and a new lip gloss? How about a sand pail, filled with outside toys like bubbles, a sand shovel and sidewalk chalk?
Let your imagination run wild. From a printed gift bag to a ceramic planter to a plastic mixing bowl, anything can serve as your “basket”. You can also make your own Easter baskets.
The woven basket is a simple and child-friendly craft. Save the plastic mesh-like containers used to store strawberries or mushrooms at the grocery store. Wash and dry thoroughly. Then, using different colored ribbons or narrowly cut strips of paper, weave them in and out of the holes in the basket. Attach each end by tucking it in and applying a drop of glue (a hot glue gun works great for this).
Even simpler is the square paper basket. Cut a perfect square about 10″x10″ out of a piece of poster board or construction paper. Reserve the remaining section to make the handle. Fold over each corner to form an edge, and staple together. Once all four corners are stapled, cut a one-inch strip out of the matching paper and affix with a stapler on either side of the basket. If your kids feel like decorating, give them the square (before folding and stapling) along with crayons, markers, stickers, glitter and glue. Their creation is sure to be dazzling and much more appealing that a generic store-bough basket.
Since you are making your own baskets, there is no need to stick to the same, boring chocolate candies and little plastic toys. Think about your child (or the basket recipient) and tailor your basket to his or her interests.
Is your son really into horses? Go the dollar store and pick up some horse stickers, a horse-themed coloring book and box of new crayons, a horse stuffed animal and a DVD about horses. If you can’t find horse-friendly chocolate, try including some candied apples and baby carrots – favorite horse treats!
What if your daughter has just started ballet? Include a new pair of ballet slippers and some sweet ballet clips for her hair. Maybe make her a tutu, an quick and easy craft with a spool of toile and a hot glue gun. Wrap it all up in a new pink backpack – aka “basket” – that she can use to carry her ballet wear to class.
Looking for additional Easter Craft ideas? Visit our Holiday Arts and Crafts website for holiday ideas.
Want to learn how to crochet a basket? Iuliana, from the Creative Team, is here to teach us how! These adorable little baskets make fantastic Mother’s Day gifts! Enjoy! -Linda
How to Crochet a Basket
May is a busy month at our house, and between my birthday, mother’s day, my daughter’s birthday and half my friends’ birthdays, I have my hands full especially when it comes to gift giving. Today, I am sharing a simple tutorial on How to Crochet a Basket, which makes for a quick last minute and economical gift! (Mother’s Day gift anyone? Talk about last minute!)
Crochet Spa Basket Tutorial
Supplies:
cotton worsted weight yarn (i used Lily Sugar n’ Cream)
5.5 mm hook
needle for weaving in ends
Abbreviations:
CH- chain
ST- stich
SL ST- slip stitch
SC- single crochet
DC- double crochet
Step 1: Make a magic loop (learn how to make a magic loop here or at Hip2Thrift). CH 3, 12 DC in the loop, join with Sl ST at the top of the CH 3.
Step 2- CH 3, DC in the same stitch as the CH3, 2 DC in each stitch around. Join with Sl ST to the top of the CH 3
Step 3: CH 3, DC in the same stitch as the CH3, *2 DC in next st, 1 DC, 2 DC*, all around. Join with Sl ST to the top of the CH 3
.Step 4- CH 3, DC in the same stitch as the CH3, *2 DC in next st, 1 DC in the next 2 stitches, 2 DC*, all around. Join with Sl ST to the top of the CH 3.
You are basically making a flat circle. Keep adding 1DCs in between 2DCs, depending on how big you want the basket bottom to be. I stopped at the previous row. Make sure that your circle is flat.
Step 5- CH 1, SC into the back loop of next stitch and all around. SL ST to the beginning CH1.
This step creates a ledge and makes for a good transition to the next rows that will all be going up, creating the walls of the basket.
Step 6 – regular SC all around. Join with a SL ST. You can make it as tall as you want here.
You can make it taller and fold it over for an awesome cuff and more sturdy look.
Step 7- Weave in ends with your upholstery needle.
Optional: Depending on how loose or tight you crochet, you can spray the basket with a starch spray and iron.
I love how easy these baskets are to make! If you use thicker yarn, or even t-shirt yarn, you can these up in no time. You can use two colors for an awesome color block look. These baskets are versatile and can be used to hold spa essentials, make-up, or as storage anywhere in the house. Give it away as a gift filled with awesome spa goodies, or keep it for yourself. I have a couple that I use whenever I have guests and I fill them with washcloths, small size toiletries, and even some treats.
Now that you know how to crochet a basket, go make some baskets now!


