How to Make Microwave Heating Bags
Things You’ll Need
- 1 1/2 yards of fabric
- 6 squares of cardboard, 4 inches by 4 inches
- 17 strips of cardboard, 3 3/4 inches by 11 inches
- Needle and thread
- Sewing machine
Carrying bottles of wine to holiday celebrations or family dinners can be done easily in bags that are insulated with cardboard. You don’t have to worry about the bottles hitting each other and breaking, causing a real mess. Party hosts will also appreciate a safely delivered supply of dinner wine. Most stores simply place your purchases in bags or in a cardboard box. Having your own carry bag will be a real convenience.
They can also be used as gift containers. Include cheeses and gourmet snacks in some of the open bags rather than six bottles of wine.
Cut 12 squares of fabric that are 4 1/2 inches tall and 4 1/2 inches wide. Place two squares together with the wrong sides out. Sew a seam 1/4 inch from the edge on three sides on each set. Turn them right side out. Insert one 4-inch square of cardboard inside each square. Sew the open end closed.
Cut 24 pieces of fabric that are 12 1/2 inches tall and 4 1/2 inches wide. Use 4 pieces for each bag. Sew the four pieces together on the long sides. This creates the top part of each bag. Do the same for the other five bags.
Sew one 4-inch square to one end of each bag. Complete all six bags in the same manner.
Hand sew three bags together so you have one row of three bags. Match the edges of one bag to the next bag and sew the vertical side seams leaving the tops open. Create another row of three bags. Sew these to the first three bags, creating a large bag with six open compartments. Hand sew the edges of the bags together so that you have a rectangle of bags that is three bags across and two bags down.
Cut 17 strips of cardboard that are 3 3/4 inches wide and 11 inches long. Insert one strip into the top openings of the sides of the bags. Then fold in a hem in the top edges of each bag and sew them closed.
Cut one strip of fabric that is 38 inches long and 5 inches wide. Fold the strip in half with the wrong side of the fabric facing out. Match the edges together and sew a seam along the entire long side. Turn the strip right side out. Press this tube so the seam is in the center of the underside. This creates the handle for the bag.
Fold in 1/4 inch of each end of the strap. Sew each end to the bottom edge of the bag. Place one end on the left at the center where the bags connect. Place the other end on the right at the bottom. Bring the strap up along each side at the center seams and hand sew it to the bag. Add extra stitches at the top edge to reinforce the handle.
About the Author
Gracie Sprouse has been writing professionally since 1976. Her areas of expertise are in antiques, crafts, real estate, income taxes and small businesses. Her education consists of an Associate of Applied Science with a business and accounting major from Piedmont Virginia Community College.
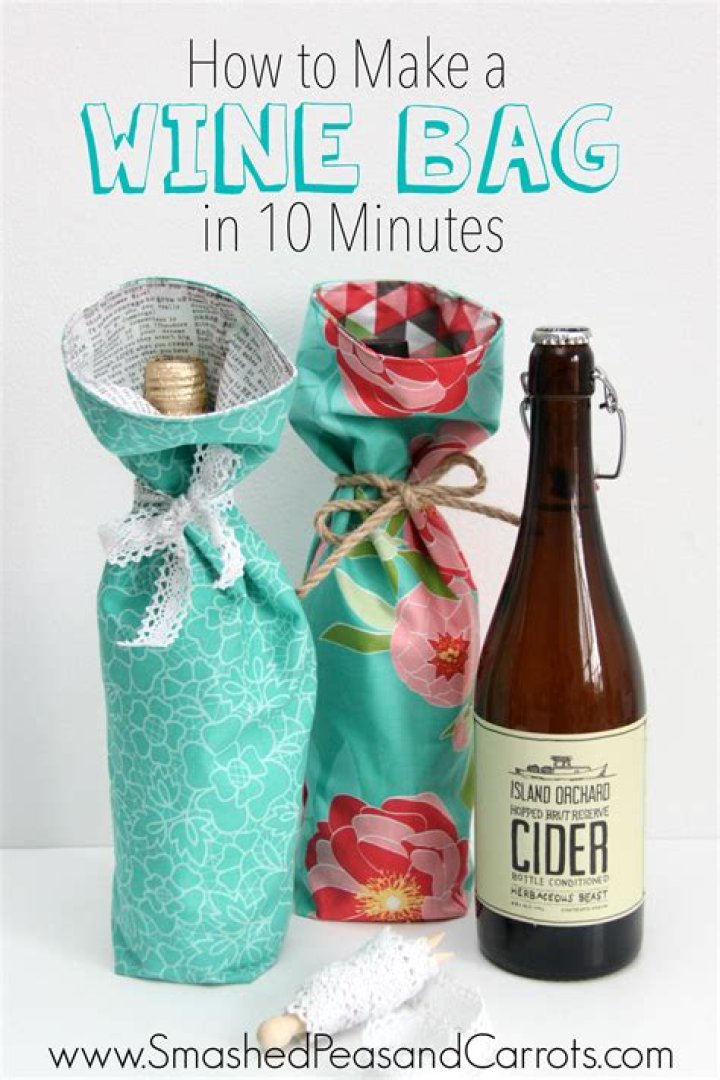
Today I thought I’d bring home another super easy yet fun to make tutorial I did as part of the Riley Blake Project Design Team! Today I will be teaching you how to make a fabulous Wine Bag, and it will only take you 10 minutes…10 MINUTES. So fast you could crank out quite a few in less than an hour and have an array of pretty packaged hostess gifts to bring to all of your holiday parties.
In this tutorial I will be using Riley Blake’s beautiful Cottage Garden fabrics, they are so so pretty, aren’t they!
All you need is the following to make one bag:
10 Minute Wine Bag Tutorial
one 12 x 16 inch piece of fabric
one 12 x 16 inch piece of coordinating fabric
12-15 inch piece of lace, trim, ribbon, jute or twine for the tie
First, fold each piece of fabric right sides together the long ways so that each piece measures 6 x 16 inches. Then sew down the long raw edge and the bottom raw (making an L-shape) using a 1/2 inch seam allowance.
Next, pinch the two corners you just made (one at a time) and fold them over the seam at at the bottom of the bag (like the picture above on the right). Measure 1.5 inches from the tip of the corner and sew horizontally across the corner. Do this on both corners.
The bottom of you both fabric pieces should look like the picture above on the left. Take a pair of scissors and clip both corners off making sure not to cut through the seam you sewed together earlier.
Now flip the fabric that will be the outside of your wine bag so that it is right side out. Leave the inner fabric so that it is still wrong sides out.
Place the inner fabric bag inside the outer fabric bag making sure the seams match up (like the picture above on the left). Then fold each raw edge inward about 1/2 inch and pin together. I did this starting at the seam so that I knew they would be matched up as I pinned around the circle.
Then just top stitch the raw edges together using a 1/4 seam allowance.
Ta-Da. You now have yourself a darling little wine bag! Just insert your wine bottle, champagne, or sparkling apple juice inside and tie the top closed with a piece of lace, trim, ribbon, or twine and you are ready to head to all your holiday parties this season! I hope you get a chance to make a few for the holidays. There is nothing better than gifting something pretty.
Add a special handmade touch when gifting bottles of wine with these cute fabric wine bottle bags. These reusable bags stitch up in minutes, and can be made with scraps that are likely in your stash right now.
How to make a wine bag
Step 1: Cut out the fabric
Cut four pieces of fabric 18″ x 7″. They can be all the same fabric, or a variety of fabrics. This method will end up with a bag that is completely reversible, so you could use solids on one side and print or holiday theme fabric on the other. Any fabric will do – even upholstery fabric or denim. Have fun with the mixture of fabrics.
Step 2: Sew fabric bags
Here we are using a 1/4″ seam allowance to create a generous sized bag. If your fabrics are smaller, then you can create a shorter bag. Just measure some wine bottles — to reach the neck of the bottle is typically about 10″. The bag below the drawstring needs to be about 1.5″ longer than that as we will be creating a box shape at the bottom and cutting off some length.
Mark an opening 1″ wide about 12″ up from the bottom and break the stitching at that point, as that is where the drawstring will go. Backstitch at those openings so the seam is secure. Sew both bags as shown.
Step 3: Stitch and trim corners to make bag shape
Pin the side seam and bottom seam together to make a triangle and mark a horizontal line 1.5″ from the point. Stitch across this line. This will create a box shape at the bottom of the bag. Repeat for the other side and then also on both corners of second fabric bag.
Trim the excess part off as shown to reduce bulk and create a flat bottom surface. I find if you leave the bulk in the bottom of the bag, then a wine bottle won’t have a flat surface to rest on and may tip over when you put it down.
Step 4: Press top edges
Press the top edges of both fabric bags over toward the wrong side, about 1/2″. Insert one bag into the other, wrong sides together and line up the seams and drawstring openings.
Step 5: Pin and stitch channel for drawstring
To mark the channel for stitching, pin the two bags together along the mid-point of where the channel will be. Then stitch 1/2″ either side of the row of pins, eliminating the need for any markings.
Here the stitching line is indicated by the blue lines in the image. Note how the stitching is at either end of the drawstring opening – be sure not to stitch it closed. If your sewing machine has a removable extension table you can remove it so you can slip the bag over the surface to sew. If not, you can put the pins on the inside of the bag and stitch around the inside, as that is easier than trying to fold the fabric away to stitch. It also helps to roll the top edge down a bit to shorten the distance from the channel to your presser foot.
Step 6: Sew top edge
Sew the top edges of the bag together. This is a spot where you can easily add embellishment like ribbon, ricrac or other trims.
Step 7: Insert the drawstring into the channel
Cut two pieces of ribbon, each about 24″ long. Use a big safety pin to thread the ribbon all the way around the bag. Starting at the opposite side, repeat with the second ribbon. Tie off the ends and now when you pull the ribbon, it gathers the bag around the neck of the wine bottle.
Sew up a few of these wine bottle bags and you will be ready to be a gracious guest at the next festive gathering.
You might also enjoy our roundup of 11 free gift bag patterns to sew and our post on how to wrap gifts with fabric.
Introduction: Wine Bags
Make a wine bag for a gift or make a set for a blind wine tasting.
I made the set pictured here as a gift for my husband. He likes to organize blind tastings to test folks knowledge of wine and let people identify their preferences without being swayed by the price tag or label. We used to use the paper bags the wine came in but this is a much more elegant and reusable solution.
This instructable has a lot of steps but only because I was trying to be clear. If you have a sewing machine that you know how to use, you’ll be fine.
Happy sewing (and drinking)
Step 1: Gather Supplies
You will need:
Materials needed per bag
2 pieces of fabric at least 13×14 inches and 8×14 inches plus scraps
12 inches of string or twine
1 button (optional)
a small piece of fusible webbing approx 4 inches square (Wonder Under is a brand name) available at fabric stores and found with the interfacing
coordinating thread
nice bottle of wine for a gift (optional)
another bottle of wine to drink while sewing for inspiration (optional)
Tools
sewing machine
scissors
iron
a rotary cutter and ruler are nice but not required
Step 2: Cut Fabric Squares
From the primary fabric (yellow in this example) cut a rectangle 14×13 inches. From the accent fabric (turquoise here) cut a rectangle 8×14 inches.
Note about fabrics: I used a cotton quilting fabric for the main and a silky polyester (from a discarded pair of pajama pants) for the accent. You can use recycled clothes or scrap fabric but the main fabric should have some body (be a little stiff). Don’t choose something too heavy (like corduroy) because the bottom of your wine bag may get uneven and make the bottle tip over.
Note about cutting: I love using a rotary cutter but you could mark your lines with a ruler and use scissors
Step 3: Sew Rectangles
Putting the right sides of the fabric facing one another, sew the two rectangles together along the 14 inch long edge. I used a 1/4 inch seam throughout but you don’t have to be too picky.
Step 4: Sew Into Tube
Fold the rectangle in half as shown and sew along the bottom (primary fabric end) and along the long edge. Leave the top (accent fabric end) open.
Step 5: A Note About Sewing Corners
Maybe you already know this, but a nice trick when you’re sewing a corner (like you did in step 4) is to plant the needle into the fabric, lift the presser foot, and pivot the fabric. Do this when you are one seam allowance away from the edge. Hope this makes sense with the photo.
Step 6: Open Bottom of Bag and Mark for Sewing
To make the bottom of the bag, open it and fold it as shown. When flat, mark stitch lines with a pen.
The stitch lines should be perpendicular to the stitch line going across the bottom of the bag and should be at a point where it will be 3.25 inches long. See how the ruler shows 3.25 inches? Mark, pin and stitch along your mark.
Step 7: Trim Excess Off Bottom
Trim off the corners of the bottom of the bag
Step 8: The Finished Bottom
Turn your bag right side out and this is what the bottom of your bag should look like. Basically a square.
Step 9: Fold and Attach Accent
Now that your bag is right side out, fold the accent in to the interior leaving 2.5 inches showing on the outside and about 5 inches folded inside. Pin and then stitch around at the seam where the accent and primary meet. This will secure the accent fabric in place.
Step 10: Attach Your String
There are two ways to do this. In this example, I had the string from the pajama bottoms so I cut it to about 12 inches and attached it to the back of the bag (the side with the seam) at the point where the primary and accent fabrics meet.
Alternatively, in the set I made as a gift, I sewed a large button to the front of the bag and tied to the button a 12 inch piece of waxed hemp twine.
You can make the ribbon tie into a bow, or, for the hemp, wrap it a few times around the bottle and then a few times around the button to secure.
Step 11: Use Your Fusible Webbing
If you are doing a single gift bag (rather than a numbered set) you’re done. Way to go. Although you may want to consider doing this step but instead of numbers adding the initials of the recipient or some other image.
Anyway, for the wine tasting set, you need the numbers so participants can make notes about the wine without knowing its identity. I made six bags but I suppose that would depend how many friends you have!
Your fusible webbing has a papery side and a rough side. Fuse a square of the webbing (rough side down) to the back of your scrap of accent fabric. Follow the instructions on the package for specifics.
Step 12: Cut Out Numbers
I printed numbers on the computer. (font=Impact size=250 point)
Pin your number templates to the fused accent fabric and cut out.
Once you’ve cut them out, remove the paper backing on the fusible web.
Step 13: Attach Your Numbers
Use the iron to press your number onto the front of your bag a few inches down from the accent fabric.
Sharing is caring!
A few weeks ago, I made some pretty customized wine gift bags for Thanksgiving and Christmas. I mentioned that I purchased the wine bags at Michaels, but they were since discontinued. Today I’m going to share the simplest tutorial with you for how to make your very own diy wine bags. Literally, if you can sew a straight line, you can make these bags.
I started with my favorite crafting fabric, a drop cloth. I have a huge piece that I’ve been slowly whittling away at for a while. It’s what I made my Home Alone movie quote pillow from, and several other projects. To make the wine bag, I cut two pieces of the drop cloth at 6 1/2″ wide and 16″ long. I cut the pieces so that the finished edge of the drop cloth would be on both pieces. This will be the top of the wine bag. It saves a little work to already have a finished edge.
I placed the right sides of the drop cloth together and sewed a 1/4″ seam around three edges, leaving the top open. I turned it right side out and I had my simple bag. I didn’t take pictures of the previous steps, because it literally took me 2 minutes to put the whole thing together and I thought it sort of spoke for itself:)
I had some Silhouette red heat transfer material left over and I used that to iron on this pretty deer silhouette. I added a little bit of some leftover faux pine sprigs and a few twigs and tied them to the bag with jute twine. It makes it a bit more festive and I love it!
I’m planning to make several more of these bags as hostess gifts for upcoming Christmas parties. I also need to make another Thanksgiving bag, thanks to our super sweet and obedient (insert sarcasm) four legged child who decided one day last week to grab the bag and wine bottle off of the bar cabinet, thus shattering the bottle and ruining the bag. She’s lucky she’s cute.
There’s still time if you want to make one for your Thanksgiving dinner hosts too! These are such great and simple gift ideas for people and the bags are so simple to make. You can probably knock out several bags in just a few minutes. Then customize them with whatever vinyl designs you like!
DISCLOSURE: This post contains affiliate links. If you purchase something from one of these links, I will receive a small commission at no extra cost to you.
Unwind at the end of the day with a glass of wine and friendly conversation. With this simple wine tote you can easily take your wine to a neighbor’s boat or house. We designed this padded tote to conveniently carry two bottles of wine (or liquor if that’s your preference) to wherever sundowners are being had. We’re going to share the full step-by-step tutorial with you so you can make your own simple wine tote.
We made our wine tote using Oly*Fun™ Multi-Purpose fabric, but any Bag Fabric will work for this DIY. Go to the Mega Menu on the Sailrite ® website, find the “Hobby Fabric” section and click on “Bag Fabric.” Cordura ® or Nylon would make great fabrics for this wine tote.
For the padding in our tote, we added 1/4-inch Fabric-Backed Sew Foam. The backing on this foam allows you to sew through it, which makes it really great for padding in projects like this.
One craft pack of Oly*Fun and one yard of Sew Foam will make two wine totes. Let’s break down the step-by-step process for making this wine tote.
Wine Tote Materials List:
- One Craft Pack of Oly*Fun Fabric OR 2 yards Bag Fabric
- 1 yard Fabric Backed 1/4″ Sew Foam #121506
- Lightweight thread, V-30 or V-46
How to Make a Wine Tote
1. Unroll and unfold your Oly*Fun so that you have two layers of fabric on top of each other.
2. To create the bottom of the bag, take a wine bottle and set it on your fabric. Trace half of the shape of the bottle onto your fabric. Measure over 11 inches and trace half the bottle again. Connect the lines.
3. Add 1/2 inch all the way around the shape outlined. Cut out both layers of fabric together at the 1/2-inch line.
4. Cut a piece of foam to match the bottom fabric. Then, layer the three bottom pieces so the foam is in between the two pieces of fabric.
5. Take the assembly to the sewing machine and sew around the perimeter 1/4 inches away from the raw edge.
6. Fold the base in half and mark the center with pins or chalk.
7. Using a soft tape measure, follow your stitches and measure the perimeter of the bottom piece. Use this measurement to pattern the width of your side panels.
8. Cut two pieces of fabric for the side panels using the perimeter of the base as your width (ours was 27 inches) and a length of 10 inches.
9. Next, cut a 3 x 20-inch piece of fabric for the handle of your tote.
10. Cut a piece of Sew Foam that is 1 inch smaller in each direction than you side pieces of fabric. Our foam dimensions were 26 x 9 inches.
11. Lay the foam between the two body pieces of fabric so that the foam lines up flush with the fabric at one long edge. This edge will be the bottom. Pin the assembly together.
12. Find and mark the center of the body piece. Then find and mark the halfway point between the center line and the short edge of the fabric on each side of the center.
13. Take the body piece to the sewing machine and stitch down each marked line as well as across the bottom of the piece, 1/4 inch away from the raw edge.
14. Fold the body piece in half widthwise and pin the open end together. This should make your piece a circle. Then sew a row of stitches down the pinned side.
15. Turn the top, unsewn edge of the body piece down towards the wrong side of the fabric 1 inch and pin in place. Do this all the way around the top. When pinning, be sure the side seam is lying flat before you fold the top over. This will help the seam lie nicely inside your bag.
16. Stitch the top fold in place with one row of stitches 1/4 inch away from the raw edge. Just above the first row, sew a second row of stitches.
17. Now it’s time to attach the base. Line up the center of the base with the two center seam lines on the body. Pin the base to the body with the right sides together. To fit the body around the curve of the base, you can snip relief notches in the seam allowance of the side piece.
18. Sew a 1/2-inch seam allowance around the base of the bag.
19. Turn the bag right side out.
20. Next, make the handle. Take your handle piece of fabric, fold it in half lengthwise, and crease the fold.
21. Open the fabric back up and fold each side in to meet the crease in the center of the fabric. Fold the entire piece in half again lengthwise and pin.
22. Sew a row of stitches down each long side of the handle piece.
23. Pin the end of the handle in place on the front, inner side of the bag. The front is the side opposite the splayed outer seam with the visible topstitching. Sew the handle in place to secure. Sew in line with the topstitching on the bag for a clean look.
24. Lay the back seam against the front seam. Tuck the base of the bag up in between the seams and pin it all together.
25. Sew from the base of the bag to the top and stitching in the ditch (directly on top of the back seam).
26. On the back of the bag, place a pin 2-1/4 inches away from the center seam. Pin the free side of the handle just on the other side of that pin.
27. Fold the two sides of the bag together so the handle you just pinned is in the center of the bag.
28. Where the handle and the sides all come together, sew two rows of stitches to secure.
Now you can load up your bag with wine and head out to the party!
This is a sponsored post written by me on behalf of Santa Margherita Wines. All opinions are 100% mine.
As much as I love entertaining, it’s nice to be invited to someone else’s home for dinner every now and then. We all need a break, right? Even though I may get by with not cooking dinner for one evening, I never like to show up empty handed. A bottle of good wine makes a perfect gift for a dinner host. Today I’m sharing how you can take it up a notch by making a homemade gift bag. Let me show you how to make an easy sew wine gift bag in just a few simple steps.
Materials needed for this project:
- 2 pieces of coordinating fabrics
- scissors and cutting mat
- matching thread
- 12 in piece of matching ribbon, twine or other trim
- sewing machine
- straight pins
How to make a wine gift bag:
Start out by measuring and cutting your fabric. You want both pieces of fabric to measure 12 in x 16 in.
Fold over both pieces of fabric with the wrong side out so that each piece measures 6 in x 16 in.
Sew the fabric together along the long side and one short side of the fabric, leaving one end open.
Now it’s time to sew a box corner for the bottom of the bag. You will do this for both pieces of fabric. Grab the two bottom corners and fold the fabric so that the bottom seam now goes right down the middle. This will form a triangle on each end (see picture below). Sew a straight line across the triangle 1 inch from the tip.
Snip off the triangles carefully with a pair of scissors.
Turn the fabric you want to be on the outside of your wine gift bag so that it is right side out. Now slip the other piece of fabric inside with the right sides still facing.
Fold both fabrics down so that the raw edges meet 1/2 inch and line them up. You can line them up evenly or choose to have the outer fabric overlap slightly like I did. Secure into place with pins.
Sew the edges together and you’re all done.
All that’s left to do is slip a nice bottle of wine into the bag and secure it with a ribbon.
Santa Margherita Wines are a perfect choice for your gift. My lucky hostess is receiving this classic bottle of Pinot Grigio from Santa Margherita Wines. It pairs well with cheeses, rice, seafood, pasta and more. You can’t go wrong with this flavorful wine! For more information about this and their other wines, you can visit the Santa Margherita Wine’s Website.
I hope you’ve enjoyed this simple tutorial on how to make an easy sew wine gift bag. It’s the perfect gift for your dinner host, friend or neighbor. Who will you give your wine gift bag to?
Related Posts
Will you be attending a New Year’s Party this year? I’ve never liked going out…
Do you want to give someone a gift card, but you don’t want it to…
Today marks the first day of a new series on the blog called Frugal Gifts…
Leave a Reply Cancel reply
looking for something?
Oh, hi there!
Hi! I’m Christie. Jesus follower, wife, pet lover, avid crafter and DIY addict. I believe in spending time doing whatever brings sunshine into your life. Welcome to my blog where you will find inspirational tips for DIY projects, crafts, recipes, organizing, household tips and much more. Let’s create some sunshine for your life! Read More…
Popular Recipes
Cranberry & Raisin Monkey Bread
Fresh Broccoli Salad
Become a VIP insider today
Sign up to receive my latest posts, inspirational emails and get access to our FREE PRINTABLE library, exclusive for newsletter subscribers!
Or, how I fought the piping, and the piping won.
But, you know, sometimes things just don’t work out. I broke three needles and knocked over my box of carefully organized quilting blocks, so they all got mixed up. That knocked out my power strip and turned off my lights and sewing machine. I knocked my thread/scrap bin onto the floor, which had the broken needles tossed into it.
And I had to undo part of my original bag, redo it and then eventually throw it in the trash. But not before I tried to convince myself that I could finish the project and photograph it from just the right angles as to trick you, dear readers, into thinking I had had success. But, alas, such trickery and dishonesty was not for me. I started over, sans piping.
Supplies
(Click fabrics for direct links for purchase at Warehouse Fabrics Inc.)
Lining fabric: 1/2 yard
Interfacing: 1/2 yard (I used Peltex, which is really, really stiff and thick. It makes sewing tough, but it makes a nice, stiff bag. If you don’t want to go through the trouble, feel free to use a regular, stiff interfacing like Craft Fuse. You could also use thin batting for body. REGARDLESS, for the handle, use Craft Fuse or something thinner. It will be too thick to fold otherwise.)
Ribbon: 1 yard
This pattern is simple enough that I could give you dimensions and you could measure it out yourself, but I scanned it in so you could print it from a pdf file. Problem is, one piece is longer than a piece of computer paper, so I had to lop it off and put part of it next to the pattern piece. Attach those two pieces by simply taping them together. NOTE: I did not leave you any overlap, so just tape it end to end.
There are three pattern pieces:
Wine Bag Side: 11-3/4″ x 3-3/4″ (cut 4 fabric, 4 lining, 4 interfacing)
Wine Bag Strap: 3-1/2″ x 10-1/2″ (cut 1 fabric, 1 interfacing)
Wine Bag Bottom: 3-3/4″ x 3-3/4″ (cut 1 fabric, 1 lining, 2 interfacing)
The process
(click for bigger images)
Cut out your pattern pieces and fabric (download pattern pieces above).
It’s small and has lots of corners, so it’s kind of a pain, but go slow and you can do it.
HOW TO MAKE A WINE BOX BAG
Courtesy of Talley and Jim Powell of the Trawler DAWN TO DUSK
(Trawler Cruisers We Met At The Dowry Creek Marina Near Belhaven, NC On Our Way Back From The Bahamas, May 2012)
There have been many discussions about our wine box bags which made their M.T.O.A. debut at the Cambridge Rendezvous. All these comments seem to end with either “Can I buy that one?” or, “You should make a bunch of those and sell them!” I have been answering most of those remarks with either “no”, or “no.”
It was in a conversation this past fall with some fellow Turtles at one of Mary’s famous “Dowry Creek Marina Happy Hours” I said I might make a couple of the bags for friends as gifts, but I was going to put the basic instructions and patterns in an article for the M.T.O.A. magazine, and then everyone could make their own.
My remark was met with great enthusiasm and encouragement.
SO, HERE IT IS.
This is a discussion on the virtues and values of a well fitted wine box bag, and how the bag is analogous to, and parallels life cruising down the ICW.
The first point in our conversation comes from the mentor assigned to us at the Cambridge 2011 Northern Rendezvous, Bob Smith. He was talking about his wonderful Ford Lehman engines when he said, “Don’t make it difficult!” The same holds true for life, and “the Bag.”
THIS IS SIMPLE.
The most complicated part of all this is the material selection. The material should be a reflection of your inner soul, a statement of how you perceive yourself, and how you wish others to perceive you. If you’re soft, smooth, and sensuous, you could use silk or satin. If you want to project a more rough and tumble image, you could use burlap or canvas. Just as your selection of the trawler you cruise the ICW speaks volumes about you and your style, so does “the Bag,” except “the Bag” costs a little less.
While perusing the materials available at a local yardage store, my First Mate/Admiral saw some upholstery material with turtles all over it. In her lovely and simplistic way she said, “That’s it.” So ended the most complicated part. This isn’t shopping. It’s buying. Buy something and get over it. All you’re doing is putting a masquerade on a cheap box of wine.
The second thing to consider is what brand of box wine you usually knock back. All boxes are not all made the same. Black Box is not the same size as a Bota Box, and neither compare to the manly Peter Vella box we’ve all come to know and love.
NEXT IS SIZING “THE BAG”.
It is important at this juncture to understand that it is easier to properly fit the bag to the box if the box is empty. Your next step should now be clear to you. Empty the contents of the box.
I would like to point out that the first properly fitting wine box bag, through a process of trial and error, took approximately 4Ѕ days to complete due to the emptying of the box(s) being bagged. The involvement of that much alcohol and the ensuing and inevitable confusion to a point of diminishing returns significantly delayed the conclusion of the project. Finally, and after about 4 yards of junk muslin wound up being thrown out the starboard portal, eureka, I solved the conundrum. Turn it inside out first! I got up off the floor and proceeded, thusly:
MY NEW 12 STEP PROGRAM
1. Turn the material inside out, folded over at the edge closest to you.
2. Measure two sides of the box
3. Cut the material to be about an inch wider than the width of two sides of the box.
4. Sew up the two sides, leaving about 3/8 inch hem.
5. Put the box in what now looks like a bag .
6. Push the box all the way into the bag, and fold over the ears at the bottom
7. Mark the ears, remove the bag from the box, and sew the ears shut.
8. Turn the bag right side out, and put the box all the way into the bag.
9. Check for fit.
10. Measure the height of the bag, add about 3/8 inch for the hem.
11. Cut the bag top, fold it over inside the bag, and sew the hem.
12. Add rope handles, closing flap, and etcetera, as per the reflection of your inner soul.
IN CONCLUSION:
Here, as in life and cruising, it is far easier to box a bag, than to bag a box.
Fernandina Beach is less than six months away. The sooner you start, the more time you’ll have to complete your winter project for the dismay and display to your fellow Turtles. And possibly a competition? Judged perhaps by George Kay? Maybe a pin to the winner?
Remember your project will be delayed by the initial 4 Ѕ days as described earlier in this article. There seems to be no valid way around it.
Anyone needing detail clarification, or perhaps assistance in empting boxes, may contact me at nh2o4uATgmail.com. (replace AT with @).
Jim & Talley Powell
Aboard “Dawn to Dusk”, currently lying New Bern Grand Marina, Slip B-32
. (Ed. Note: Again our thanks to Jim and Talley Powell for sharing this ‘project’ with us! Fair winds, etc.)
Posted 7/8/2012
Visits Since 7/8/2012
Don’t show up empty-handed to holiday parties this year! Grab a bottle of wine or champagne as a host/hostess gift and toss it in one of these easy-to-sew fabric gift bags. These gift bags can be made from fabric scraps left over from other projects and will add a festive flair to your bottle. We’ll show you step-by-step how to make these gift bags for yourself.
We used fabric that was leftover from other projects to make our gift bag. You could really have a lot of fun mixing and matching the fabrics and the ribbons for different personalities and seasons. This project is a great way to impress your friends and doesn’t take anymore time than going to the store and buying a gift bag!
Wine Bottle Gift Bag Materials:
How to Make Wine Bottle Gift Bags
1. Cut your fabric so it measures 33 x 8 inches. I used a rotary cutter, acrylic ruler and cutting mat to make sure my cuts were straight and square.
2. Fold over a small single hem on each short side of your fabric. Pin the hem in place.
3. Take your fabric to your sewing machine and sew a straight stitch down each hem to secure it in place.
4. Fold your fabric piece in half so that the hemmed edges are together and the right sides of the fabric are facing.
5. Sew down each long side of the fabric.
6. Turn your bag right side out, making sure to poke out the corners.
7. Place your bottle of wine or champagne in the bag.
8. Then tie a decorative bow around the neck of the bottle to secure the bag. Fluff the top fabric so it looks nice. Now it’s ready to gift!
You can find great fabrics for this and other projects right here at Sailrite ® .
Related To:
Have you heard of a “re-giftable wine bag” before? Neither had we, so we made it up. By “we” I mean the friends who brought a bottle of wine to me one night when I had invited them to dinner. The wine was nice, but the bag they put it in was gorgeous. It was a heavy damask type of material in soft but shimmery silver with beautiful figures on it.
As I “oohed” and “aahed” over it, they explained that it had been given to them by a friend whom they had invited to dinner and who presented them with a bottle of wine in that particular bag. They were re-using it with the stipulation that I in turn pass it along to someone. So I did. We added the idea of making a small book with empty pages that was inserted in the pocket we put on the bag. This way a record could be kept of who gave wine to whom, on what occasion and the date.
Materials and Tools:
1/2 yard fabric, 43- to 45-inches wide
1 yard wired silk ribbon
chipboard or mat board
paper for book pages
white thread
sewing needle
scissors
Steps:
1. Cut or tear a 9-inch wide strip of the fabric crossways.
2. Cut a 3-3/4-by-4-inch piece of the fabric to use for a pocket on the side of the bag.
3. Ravel all four sides of the pocket fabric about 1/4 inch. Ravel the two sides of the strip of bag fabric about 1/4 inch, too.
4. Fold the bag fabric in half crosswise. The fold will be the bottom of the bag. Position the pocket fabric in the middle of the fabric from side to side and about 2 inches up from the fold. If you are in doubt about the placement of the pocket, open up the strip of fabric and place the bottle along the middle fold. Pull the fabric up around the bottle and determine where you want to place the pocket.
5. After positioning the pocket stitch around the three sides (both sides and across the bottom) to secure to the bag.
6. Refold fabric strip in half. Fold the length of ribbon in half. Insert the folded end of the ribbon in between the fabric about 11 inches up from the folded (bottom) edge. Stitch up both sides just inside of the raveled area of the bag, catching the silk ribbon in the stitching as you go.
7. Fold the top 2 or 3 inches of the fabric down inside the bag. This should be the selvedge, so no hemming will be required.
8. To make the little book: Cut a piece of the silk about 4-by-6 inches. Cut three pieces of the mat board or chipboard. Cut two 2-by-3-inch pieces for the cover and one 1/4-by-3-inch piece as the spine. Position them on the silk piece in sequence: cover, spine, cover; leave a tiny space between the pieces.
9. Fold the extending corners and edges back over the board and glue to hold. Cut two more pieces of fabric slightly smaller than 2-by-3 inches and glue to the inside covers to hide the raw edges of the folded over silk.
10. Cut several 3-by-5-inch pieces of paper, fold in half crossways, and stitch along the fold of the paper to the spine of the book cover.
11. On our book we added a glass bead between each stitch so they lined up on the spine on the outside of the book.
12. Place the wine bottle in the holder, tie the ribbon in a bow with lengthy streamers, and insert the little book for keeping track of who, what, where and when in the holder.
Other Holders
Another bag that we made in the same way had an entirely different and more casual look. The fabric was a heavy cotton that featured bunches of purple grapes on a black background with a glass of wine here and there. Though the fabric was heavier than the silk and did not ravel as easily, we made the bag in the same way and pulled the threads by hand.
A third bag was made of heavy burgundy velvet. In this case we used the standard way of folding the fabric with right sides together, stitching up the sides, and then turning the bag right side out.
When your insulated cooling needs require size, but not bulk, a cooler bag is the answer. A large-sized cooler bag made from aluminized Mylar sheets and quilted fabric can be sewn in about an hour. According to Eljen Technology, aluminized Mylar is, “thin polyester film coated on both sides with aluminum metal.” The simple cooler bag utilizes a lunch sack design, making it easy to fill, roll and securely close with hook and loop strips. A cooler bag takes up less space in cars, boats, or other recreational vehicles and can be folded flat and stored when emptied of contents.
Fold the aluminized Mylar sheets/blankets in half horizontally and cut two 30-inch wide by 30-inch long squares from each sheet/blanket. You will have four Mylar squares. You can buy aluminized Mylar sheets/blankets online, at camping stores or at many discount stores in the sporting goods department.
Place an aluminized Mylar square to a flat surface. Place another aluminized Mylar square on top of the first aluminized Mylar square. Place a quilted fabric square on top of the Mylar square. Pin through one edge, joining the squares.
Sew through one edge of the layered squares using the sewing machine using a 1-inch seam allowance and a straight stitch. Remove the pins. Repeat for the other two Mylar squares and one quilted fabric square.
Turn the layered squares “right side out” so the quilted fabric is between the two aluminized Mylar sheets. The quilted fabric is retained between the layers of aluminized mylar providing further insulation for the cooling bag. Aluminized mylar on the outside and inside of the cooler bag reflect heat away from, and coldness to the cooler bag’s contents. The quilting layer also provides padding and stabilization for the thin sheets of aluminized mylar material. Repeat for the other joined squares.
Align the sewn edges of the layered squares together. These are the top edges of the cooler bag’s opening. Pin the two unsewn sides and bottom together. You have formed a bag. Don’t pin the previously sewn edges.
Start in the left top corner of the bag, and sew, using a straight stitch and 1-inch seam allowance, vertically down the side, horizontally across the bottom and up, vertically along the right side of the bag. Remove pins.
Turn the cooler bag right side out by reaching inside the bag, grasping the bottom seam and pulling it through the bag’s opening. Place bag flat on a table.
Use the tape measure to measure 8-inches down from the front, top edge of the cooler bag’s opening. Place a strip of self-adhesive Velcro, horizontally, across the bag. Press firmly to ensure a good bond between the adhesive and the cooler bag.
Turn the bag over so the non-velcro side is facing you. Measure 2-inches down, vertically, from the cooler bag’s opening top edge. Place a strip of Velcro, horizontally, across the bag. Rub the Velcro to make sure the adhesive bonds with the bag.
Fill the insulated cooler bag with desired contents, then grasp both bag sides together, roll down, as you would a lunch sack, and secure the Velcro.
This post brought to you by Duck Brand provided by ShurTech Brands, LLC. All opinions are 100% mine.
Easy Wine Bottle Gift Bags – homemade paper bag bottle wrap with #duckthehalls | A bottle of wine or liquor is one of our favorite last minute gifts for holiday parties. It’s an easy last minute ‘no-brainer’ especially during this busy time of year.
There are so many different options to dress up the bottle – though if you are pressed for time here’s a simple solution requiring just a few brown paper lunch bags and some festive Duck Brand® tape.
Material Needed:
- Brown Paper Lunch Bags (3 per bottle)
- Duck Tape®
- Ribbon
Tools Needed: Scissors, Hole Punch
Step One: Double two of the brown paper lunch bags. This will become the bottom of the gift bag.
Step Two: Cut the bottom off the third bag – as shown above.
Step Three: Place the bottle of wine/liquor into the doubled bag.
Step Four: Pull the cut bag on top and adjust so the top of the bottle is about an inch or so below the top of bag.
Step Five: Remove the bottle and begin taping the two bags together with Duck Tape®. It is easier to use two pieces of tape, one for the front of the bag and one for the back – as shown above and below.
Step Six: Add the speciality tape. For these particular bags two solid color bands of black Duck Tape® were used as a base to highlight a band of the speciality tape.
Duck Glitter® Crafting Tape in Silver (shown above) was used, as well as the Snowman and Penguin Printed Duck Tape® (shown below).
Step Seven: Using a paper hole punch, punch holes on each side of the bag.
Step Eight: Fold the top of the bag down – twice, for a finished look.
Step Nine: Line the top of the bag with more Duck Tape®. Just a strip will do – right at the top.
Step Ten: Finish with some ribbon – looped around the bag and through the punched holes.
Then just tuck in your bottle.
Each bag takes less than 5 minutes – plus they can be made as tall as needed – which is perfect for those wine or liquor bottles that will be tucked inside.
The Duck the Halls Holiday Designs make these gift bags festively fun for the season – though with the wide variety of everyday Duck Tape® prints these easy and inexpensive gift bags can be made and used year round.
Give the gift of wine. with a creative and heartfelt twist.
How to make a teacher’s wine bag 00:26:18
A simple and fun way to thank your child’s teacher for all their hard work.
- 11 Nov 2019
- 11 months
- /display/
We are reaching the end of another productive year of work and play (otherwise known as learning). Your kid’s teacher has been there and done the amazing –managing the needs of twenty plus thriving young minds – and now you would like to reward them with something special, like this handmade ‘apple’ wine bottle bag.
What you need:
- 50cm apple print woven fabric
- 15cm light green woven fabric
- 10cm elastic, 8mm width
- Scrap felt: red, green
- Ruler
- Fabric marker or pencil
- Scissors: paper, fabric, pinking shears
- Hot glue gun
Note: If you are sewing machine savvy, you may choose to sew the bag where the instructions say to use a glue gun.
Activity
Print out the pattern templates here. Cut out the pocket, apple and leaf pattern pieces. Referencing the technical drawing, rule the rectangular lines of the bag on to apple print fabric – 34cm width by 40cm length.
Cut the templates. Image: supplied.
Trace remaining patterns onto fabric. Cut out all the fabric pieces – bag, pocket, apple and leaf. For a bit of pretty, use pinking shears to cut out the pocketpiece, and the top side of the bag piece.
Glue apple and leaf to the middle of the pocket piece. With a pencil, mark the location of the pocket on the bag piece, referencing the technical drawing. Glue the sides and bottom of the pocket onto the bag piece, over the markings.
Fold elastic in half and glue the ends together. Glue the folded ends of the elastic and press to the side edge of the bag piece, 5cm down from the top edge.
Glue down the side edge of the bag piece. Fold the bag piece in half, and press the sides together.
Mark the bottom of the bag piece in two places, dividing the open bottom edge: 5cm-8cm-5cm. Glue the bottom edge of the bag piece closed between the two markings.
Fold the remainder lower holes so that the bottom of the bag makes a ‘I’ shape. Glue these ends closed. Turn the bag through.
Slide a bottle of wine into the bag. Pull the elastic over the bottle and around the upper edge of the bag. Pop a thank you card into the pocket, and you’re done!
Don’t forget the wine! Image: supplied.
Recently, I flew to Dallas for a wine event to teach a workshop of how to make wax canvas wine bags and everyone’s reaction was so positive, I thought I’d turn it into a DIY hostess gift for the blog.
I love gifting wine for parties, etc – especially around the holidays. Who couldn’t use another bottle or two? And this DIY idea makes the gift feel a bit more special and (dare I say) more thoughtful since it incorporates a handmade element.
Aside from gifting these totes with wine, I was thinking it would be fun to craft these at your party and then let the guests take them home as favors, if you’re feeling ambitious. Just throwing it out there! Either way, you can click through for the full tutorial…
And just in case you’re not big on the leather handles idea, you can skip those last couple of steps and instead, tie on some handmade pom poms or even just rolling the canvas down a couple of times and then tying on a monogrammed gift tag, for something more casual. Between the three options, you have a handful of options to include every personality on your hostess hit list. 🙂
Here’s how to make your now canvas wine totes….
Materials:
- medium to heavy weight canvas (available by the year at art supply stores)
- sewing machine and thread
- fabric dye (I like Rit – I used royal blue and black)
- embroidery floss and needle for hand stitching
- 3/4 inch wide leather strips (mine are from Amazon)
Instructions:
1. Start by measuring a piece of canvas for your wine bag, based on the desired size. A good starting point is 28.5 inches long and 7 inches wide (you can measure the width of a wine bottle you have on hand to see if you want to make yours wider or more narrow than mine). And cut with sharp fabric scissors.
2. Once cut, fold the canvas, as shown in photo, and pin vertically, again as shown. I only needed roughly 4 pins because the weight of the canvas was heavy enough to stay in place.
3. Next, at the bottom (folded) end, start by sewing a backstitch to secure the thread, and then sew a straight line all the way to the open end. Be sure not to sew too close to the edge – you’ll probably want to sew your line about a 1/4 inch from the edge. Add another backstitch when you reach the end of the canvas, then cut the thread.
4. Repeat step 3, on the opposite side. Then remove straight pins and cut excess salvage, if needed.
5. While the bag is still inside out, reach inside, find the corners with your fingers and pinch them together. Then use your other hand to secure the two points and create something of a flat triangle, as shown.
6. Measure from the tip to 1.5 inches down, make a mark, and then make a horizontal line across as your guide. Flip over and do the same on the other side. And then pin one of the triangles, so it doesn’t come undone (but don’t pin them together – they’re separate).
7. Start with the triangle that’s not pinned down, sew a straight line across the guide that you made in step 6. Being sure to backstitch at each end. Repeat this process for the other triangle that was pinned. Remove pin and sew line, being sure to backstitch at each end.
8. Using a needle and thread, sew the two triangle corners together. This will keep the bottom flat on the bag and make it even more secure.
9. Line up the seams, then roll back the fabric at the top of the bag 1/2 – 1 inch. Pin down just one section to give you a better idea of where the measurement needs to be and then the roll rest down. Follow that as a guide and adjust as necessary. And then sew and backstitch once again.
11. Turn tote right side out. Next up is dyeing the bag. I do a lot of dyeing projects around here, so I won’t explain the process again…but here’s the step by step tutorial for dyeing if you need a refresher.
12. Once dyed, washed, and dried, you can stop here and add pom poms or a gift tag. OR keep going and add leather straps…. Start by cutting two lengths of leather strap, 8-9 inches long each. Then punch four holes on each side, in the form of a square. See photo for reference.
13. String a needle with embroidery thread and attach the handles to the tote, making sure to run the thread through each hole several times, for security. Cut and double knot string to keep from unraveling.
Note: Before adding the leather straps, I actually hand waxed the dyed canvas as well, which helps with making them water-resistnat and a bit more rugged. This process is very easy and I plan to share exactly how to do it in an upcoming post, but decided not to include in this tutorial because it was already pretty lengthy. 🙂 Let me know if you have any questions though!
Photography Amelia Tatnall Lawrence
Sewing Elizabeth Scoper
Styling Brittni Mehlhoff
Hope you liked this DIY idea! Curious to know… What’s the best hostess gift you’ve ever given or received?
Box wine is an economical alternative to traditional bottled wine. A wine box is a cardboard box with a plastic spigot that is attached on the inside to a plastic or foil bag that holds the wine. Box wines are typically less expensive than bottles of wine, are recyclable, easy to carry, and has a longer opened shelf life. You can reuse wine boxes by detaching the inside bags and washing them before refilling them with wine.
Open the empty box of wine. There should be an empty bag that hold wine inside of the box. Grasp the spigot on the outside of the box and the bag’s opening on the inside of the box. Twist the spigot until it detaches from the bag. Remove the bag from the box.
Squeeze 1 tsp. of liquid soap into the neck of the bag. Add the hot water, then jostle the bag to mix the soap. Reattach the spigot, then turn it to drain the water from the bag. The soapy water will clean the spigot as it exits the bag. Rinse the bag and spigot with water until all of the soap is removed. Let the parts dry.
Use the funnel to refill the bag with fresh wine, leaving some space at the top. Keep the bag upright as you maneuver it back into the box, lining the mouth up with the spigot hole. Hold the bag tightly as you push and twist the spigot back into the hole and the mouth of the bag.
Posted by Deirdre Quirk on Dec 27th 2017
Wouldn’t this stylish wine-bottle bag make a perfect hostess gift? The instructions for this bag come from Hack That Tote! by Mary Abreu. Starting with one basic tote bag pattern, Mary shows you how to adapt it in infinite ways.
Inside the Hack
This Wine-Bottle Bag is made by removing the handles and adjusting the proportions of the Basic Tote Bag. Buttonholes and a double row of stitches through both layers of the bag create a casing for ribbon to add that gift-giving touch.
FINISHED BAG: 4 ̋ wide × 13¼ ̋ high × 4½ ̋ deep
Materials
Yardage is based on 42 ̋ width of fabric unless stated otherwise.
FABRIC: 2 fat quarters
WOVEN FUSIBLE INTERFACING: ½ yard, 20 ̋ wide
RIBBON: ½ yard, 1 ̋ wide bag
Cutting
Cut 2 rectangles 9 ̋ × 16 ̋.
Cut 1 square 2¼ ̋ × 2¼ ̋ from each bottom corner.
Cut 2 rectangles 9 ̋ × 16 ̋.
Cut 1 square 2¼ ̋ × 2¼ ̋ from each bottom corner.
Cut 4 rectangles 9 ̋ × 16 ̋.
Cut 1 square 2¼ ̋ × 2¼ ̋ from each bottom corner.
Construction
All seam allowances are ¼ ̋ unless otherwise noted.
1. Follow the manufacturer’s instructions to fuse the woven fusible interfacing to the wrong sides of the exterior and lining pieces of the bag.
2. Follow the instructions in your sewing machine manual to sew 2 buttonholes ¾ ̋ long on the right side of 1 exterior bag piece, 3 ̋ in from each side and 3 ̋ down from the top edge. Cut open the buttonholes and apply a small amount of seam sealant (optional) to inhibit fabric fraying. FIG. A
A. Sew buttonholes to 1 exterior piece.
3. Match the exterior pieces, right sides together. Pin the sides and bottom edges. Sew. Press open the seams. FIG. B
B. Match exterior bag pieces, right sides together.
4. Create the bottom corners of the bag by matching a side seam to the bottom seam, right sides together. Pin and sew in a straight line. Repeat with the opposite corner. FIG. C
C. Match side seam and bottom seam, right sides together, to form bag corners.
5. Repeat Steps 3 and 4 with the lining pieces, leaving a 3 ̋ gap in the center of the bag bottom for turning.
6. Insert the exterior into the lining, right sides together. Match the top edges of the bag. Pin and sew. FIG. D
D. Place exterior into lining, right sides together.
7. Turn the bag right side out through the gap left in the lining. Tuck the lining into the exterior and press.
8. Machine stitch or slipstitch the gap in the lining closed.
9. Topstitch 1/8″ from the top edge of the bag all the way around.
10. To make the casing, stitch all the way around the bag 2 5/8″ from the top edge. Make a parallel line of stitches 3 7/8″ from the top edge of the bag (1¼ ̋ away from the previous line of stitches). FIG. E
E. Stitch parallel rows around top of bag.
11. Use a bodkin or attach a safety pin to the end of the ribbon and feed the ribbon through the buttonholes and the casing. Tie the ribbon ends into a bow.
Making bags from old jeans – This is one DIY project that appeals to those of us who hoard old jeans. There so many old jeans in my cupboard belonging to all four of us in our family- some torn in all the wrong places, some not fitting anymore in girth, some too short, some not fashionable enough. All of them waiting for some easy recycling ideas – to be made into new and beautiful denim bags.
When I thought about recycling my jeans into bags I dug into Pinterest and when I came up my head literally buzzed with so many ideas. But there is only so much time. So I decided to make only three from those ideas with two from my pile of jeans and at the end of it, there is still fabric enough to make many more jean bags. Another day another project.
One advantage of a jean bag is that you do not have to care about your perfect stitching skills – the rugged look of the jeans fabric take care of all that. Then the seam stitching on the jeans is an added charm. You also get a readymade top edge if we use the hem or the waistband as the upper edge. You do not have to worry about interfacing as denim fabric is thick enough.
How to make jeans bag at home
1 A sling bag from old denim
- 1 A sling bag from old denim
- 2 Old jeans bag with another fabric
- 3 A simple Jean bag
Take your jeans and keep it folded with the zipper opening of the pant on one side. Mark a rectangle shape from the top edge – it will be slightly diagonal extending to the crotch level.
Keep it together right sides to the inside and stitch the sides and the bottom edges. When stitching with a home sewing machine start stitching from the belt side (thicker area) and go down – the stitching will be easier otherwise the presser foot will refuse to ride up the thicker level.
For the Strap cut out the seam of the legs of both the legs very close to the stitching
After determining that the length is alright Join together keeping one edge on top of the other and making an x stitch.
The size of the bag will depend on the size of the jeans. As I made it with kids’ old jeans this is not a big bag – just enough to carry small books and your favourite DVD. Add velcro strips to the inside of the top edge if you want closure there
Update: The seam handles do fray a lot – so if you do not like the thread-standing-on-end look, use fray check on the sides of the strap, as soon as you have cut it out. You have the option of using other easy handles like ribbon, webbing etc. Check out this post on the 18 different types of bag handles you can use
2 Old jeans bag with another fabric
You can combine upholstery material or interfaced dressmaking materials with denim from old jeans to make your bag more interesting.
Cut out the leg portion of the jeans for this and cut it open on one side seam
Join the other fabric to the cut open edge ( the hem will be the upper edge of your bag)
Make straps from the upholstery fabric – just cut out the length you want and width you want and turn under the side edges to the inside and top stitch on either side.
You can also do some embroidery or applique on the denim at this point to match the fabric.
Cut out small hexagonal shaped denim tab pieces to cover the strap stitching. Stitch in place
If you wish to add a lining to this bag, make a smaller lining bag of the same shape, with some extra for the top edge; finish the band and hem its upper edge; You can add snaps or velcro as opening to the lining bag at this point
Keep the lining bag to the inside of the finished bag and then hand stitch the lining bag top edge to the main bag hem.
A similar bag made with jeans leg.
3 A simple Jean bag
To use the front portion of the jeans as it is, is a simple plan for the bag. You just need to stitch the bottom edge to make this bag. But there is a problem – the front crotch seam is curved. You will have to open it up and straighten it – but that is easy – the same way that you would do it for a jean skirt project. Infact this was a jean skirt first before it got to be a bag.
Cut out the jeans straight on the crotch level. Open up the curved seam on the front with your seam ripper.
Reposition it straight and stitch it
Side seams are already stitched for this bag but on the bottom edge you may wish to make a curved shape. Join the bottom edge and add a strap. You got your bag.
How to Sew a Lined Tote Bag FREE Sewing Pattern
by Kristin Omdahl
This FABULOUS bag is easy to make. Learn step by step how to make it in this photo tutorial. Use it for a knitting or crochet project bag, taking to the market, on a picnic, travel, or even use it as your purse! Makes a wonderful gift, too.
What you will need:
1/2 yard cotton fabric (outer bag)
1/2 yard complementary cotton fabric (lining)
1/2 yard fusible interfacing (medium weight)
44″ canvas strap webbing, cut into two 22″ pieces
Sewing machine and normal sewing supplies
Finished size: 12″ tall x 19″ wide at top, base is 12″ wide x 6″ deep
Instructions:
1. Cut Fabrics
Cut two 20″ x 15″ rectangles of outer fabric, inner fabric and interfacing. Cut webbing into two 22″ pieces.
2. Snip corners. On the long side of all 6 rectangles (2 outer fabric, 2 lining fabric and 2 interfacing), cut a 3″ x 3″ corner from only the bottom corners.
3. Press interfacing to wrong side of outer fabric rectangles.
4. With wrong sides together, sew the sides and bottom together of outer fabric. Leave the top and two sipped corners unsewn. Repeat for lining fabric pieces. Press seams.
5. Sew corners. Pinch together the gaps in the snipped corners, lining up the side and bottom seams in the center. Sew 1/2″ seam. This step creates a flat bottom. Repeat for lining fabrics.
6. Flip liner right-side out and place inside outer fabric so that right sides are facing each other. Tuck the straps between the inner and outer fabrics. You want two edges of one strap facing the front and two edges of the other strap facing the back of the bag. You also want them centered and mirroring each other. Begin each strap approx. 4″ from side seam. Pin all pieces together, and make sure you line up the side seams well.
7. Beginning at a side seam, sew 1/2″ seam around perimeter of bag, leaving a 4″ opening from the starting point. Make sure you caught all 4 straps, while leaving enough room to turn the entire bag out through the opening.
8. Pull both fabrics and both straps through the opening. Turn the bag right-side out and tuck the lining into the bag. Press top seam with iron, and turn the opening’s hem inward to match the rest of the seam.
9. Top stitch around the entire bag’s opening to finish the edge, making sure to close the opening. This also reinforces the canvas straps.
The problem with boxed wine is that it comes in a cardboard box. These boxes are great for shipping, production, and the environment, but you’ll never see a waiter present boxed wine at a table or old boxes used as decor. The boxes are unattractive, and that’s too bad because in my opinion some of the wine is very good and significantly cheaper.
So what are you going to do? Well, if you know Jocie, or ever read her articles on The Better Half, presentation is important to her, so much so that she usually pours the wine into a carafe. Instead, I decided to make a classy, boxed wine holder that she can display proudly. Even better, I made it from pallet wood.
Bota Box is our favorite brand of boxed wine. That’s what we usually buy so this boxed wine holder is sized for Bota Box wines.
Step 1: Get Your Pallet Wood
Jocie had already harvested the pallet wood, and you can see a great video showing how she does it at that link. I snagged a few boards, picked up some Bota Box wine and headed to the OPC shop. If you’re following along with this project, make sure you start with the right pallet, and by that, I mean heat-treated (not chemically treated), clean, etc. The last thing you want are pesticides mingling with your wine. We recommend sealing the wood too, and I’ll get to that later in the article.
Step 2: Square the Boards
One thing about pallet wood is that most of the boards are not necessarily straight, square or even the same thickness. To make it easier to work, I squared up the boards on my table saw.
Step 3: Cut Braces
I used some scrap wood to make thin strips that’ll be used as braces for the pallet boards.
Step 4: Build Sides
I started assembling the boxed wine holder by building the sides. Bota Boxes measure about 6-3/4″ wide x 3-3/8″ deep x 9-1/4″ tall so I cut a series of boards 10-1/2″ long. Using another pallet board, I scribed a line at the top and bottom for attaching braces.
I glued the braces and clamped everything together for about 30 minutes.
After the glue was dry (enough), I ran the sides through my table saw so that they both measured 10-1/2″ tall x 8-1/4″.
Step 5: Make the Top and Bottom
The top and bottom are single boards, and the only difference is that the bottom is a 1/2″ shorter than the top. This allows the back to slide off, and I’ll give more details on that in a moment. In the picture below, you can see how the top and bottom boards are flush with the sides and snug up against the braces. My top measured 7-3/4″ x 3-3/4″. The bottom measured 8-1/4″ x 3-3/4″.
Step 6: Build the Back Panel
To move boxed wine in and out, I decided on a tongue and groove backside that could slide off. This is more difficult that incorporating a hinge, and it requires some careful measuring. However, I thought it would look nicer.
To make the back, I started by cutting a board to 4-1/4″ x 10″.
I used a dado stack on my table saw to cut a 1/4″ tongue on both sides of the board. Now the visible face of the board measures 3-3/4″ wide. I also drilled a 1″ hole (spade bit) to make it easier to slide the back panel. This hole lines up with the knock-out on the Bota Box and can be used for carrying the boxed wine holder around.
Next, I cut a 1/4″ groove into the sides, and I trimmed the braces with a chisel.
Step 7: Make the Front
I made the front much like the sides – cut to size with two braces glued across the boards. The face of my wine box holder measures 4-3/4″ x 10-1/2″. I also cut a hole for the spout with a jigsaw.
Step 8: Glue it Together
I used wood glue to join all the pieces together.
Step 9: Sand Smooth
I grabbed an orbital sander and sanded away the rough surface of the pallet wood. Sanding also ensures that all the joints are perfectly flush, and it cleans up the wood nicely.
Step 10: Apply Stain
I let Jocie take over at this point, and she applied a few coats of wood stain.
Step 11: Stencil Graphic
To give our box wine holder some more character, Jocie whipped up a fleur-de-lis stencil on her Silhouette. She debated doing numbers like our friend’s Jacque at Matt over at The DIY Village stenciled on their bar stools, but opted for the fleur-de-lis in hopes for a more classic look.
She painted the stencil, and something we realized is that the wood absorbed a lot of paint. Jocie had to perform some touch-ups, and she suggests that readers seal the wood before stenciling.
Step 12: Seal It
Jocie applied some soft wax to the exterior of the boxed wine holder, and she sprayed a sealer on the inside. This will ensure the wood isn’t stained by any spilled wine. Also, it’s reassuring to know that the pallet wood won’t ever come in contact with wine glasses.
Finished
I think this rustic-chic, boxed wine holder looks phenomenal. I’m really proud how it turned out, and you can be sure we’ll be showing this off instead of hiding the boxed wine in the pantry.


