Lori Kaufman is a technology expert with 25 years of experience. She’s been a senior technical writer, worked as a programmer, and has even run her own multi-location business. Read more.
Do you pin a lot of programs to your Windows 7 Taskbar and run a lot of programs at once? Between pinned programs and other programs running, your Taskbar can get crowded. There are a few ways you can reclaim the space on your Taskbar.
Make the Taskbar Icons Smaller
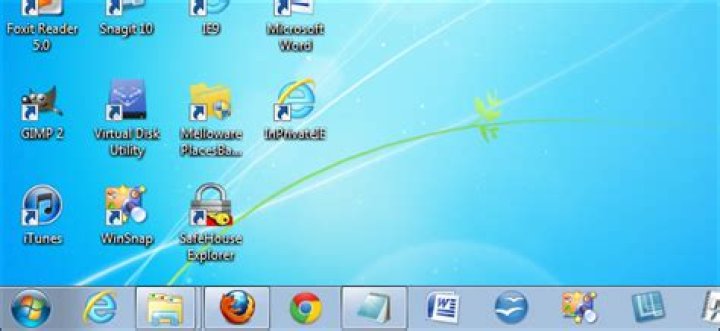
You can decrease the size of the icons on the Taskbar, so they’ll take up less space. The image above shows the Taskbar with the default, full size icons. To make the icons smaller, right-click on an empty space on the Taskbar and select Properties.
The Taskbar and Start Menu Properties dialog box displays. On the Taskbar tab, in the Taskbar appearance box, select the Use small icons check box so there is a check mark in the box. Click OK.
All the icons, except the Start button, are reduced in size, and the Taskbar itself is slightly shorter in height.
Increase the Number of Rows on the Taskbar
If you really have a lot of icons on the Taskbar, you can make the Taskbar display two rows. To do this, unlock the Taskbar by right-clicking on an empty space on it and selecting Lock the taskbar so there is no check mark next to the option.
Put your mouse cursor on the top edge of the Taskbar. The cursor should change to a double-ended arrow, as shown below.
Drag the double-ended arrow up until you get two rows on the Taskbar. It will look similar to the following image, although we don’t have enough icons on the Taskbar to fill a second row.
If you want to keep the two rows, right-click on the Taskbar again and select Lock the taskbar so there IS a check mark next to the option.
NOTE: You can put the Taskbar back down to one row by dragging the double-ended arrow down until you see one row. Then, lock the taskbar again.
NOTE: If you like filling up the Taskbar with icons, this tip will be useful for you. However, you’ll notice that it does take up more room on your screen.
Minimize Applications to the System Tray Instead
When you minimize a program, it puts an icon on the Taskbar by default. However, you can use third-party programs to minimize programs to the system tray, leaving your Taskbar less crowded. We’ve written about three different tools that allow you to do this:
Use Launchers to Keep the Taskbar Clear
You can also use launchers to keep your Taskbar clear, and maybe your Desktop, too. One method does not require any third-party software. You can use the Windows Quick Launch bar as an application launcher.
For more ideas about how to customize your Taskbar and Start menu, see our tips and tricks article.
Lori Kaufman is a technology expert with 25 years of experience. She’s been a senior technical writer, worked as a programmer, and has even run her own multi-location business. Read more.
The Quick Launch bar was introduced in Windows XP, and sat on the far left side of the Taskbar next to the Start button. It provided a quick and easy way to access programs and your desktop.
In Windows 7, the Quick Launch bar was removed from the Taskbar, but it’s still available in Windows 7, 8, and 10 if you know how to add it back. Why would you want the Quick Launch bar back when you can pin programs to the Taskbar? The Quick Launch bar also contains the Show Desktop feature, which is a more obvious place than that small rectangle on the far right side of the Taskbar (especially in Windows 8 and 10). Maybe you prefer to use a more old-school, ungrouped taskbar with shortcuts on the side. In any case, we’ll show you how to add the Quick Launch bar to the Taskbar in Windows 10, but this will also work in Windows 7 and 8.
To add the Quick Launch bar back to the Taskbar, right-click on an open area of the Taskbar, and go to Toolbars > New Toolbar.
Copy and paste the following path into the box at the top of the On the New Toolbar – Choose a folder dialog box and press Enter.
Then, click the “Select Folder” button.
You’ll see the Quick Launch toolbar on the Taskbar, but it’s on the right. The original Quick Launch bar was on the left next to the Start button, so we’ll move it to the left side of the Taskbar.
To move the Quick Launch bar, you’ll first need to unlock the Taskbar. To do this, right-click on an empty part of the Taskbar and select “Lock the taskbar” from the popup menu. When the Taskbar is unlocked, there is no check mark next to the option.
Click and drag the two vertical dotted lines on the left side of the Quick Launch bar to the left side of the Taskbar. You’ll find you can’t drag past the Windows Store, File Explorer, and Edge icons. But, if you want to get the Quick Launch bar right next to the Start button, we can solve that.
While the Taskbar is still unlocked, you’ll see two vertical dotted lines to the left of the Windows Store, File Explorer, and Edge icons. Click and drag those lines to the right of the Quick Launch bar. Now, the only icons between the Quick Launch bar and the Start button are the Cortana or Search icon and the Task View button. If you want the Quick Launch bar right next to the Start button, you can hide the Cortana icon and the Task View button.
The original Quick Launch bar had an icon and no text. There is no icon on this version of the Quick Launch bar, just the title “Quick Launch”, but you can hide the title if you want. To do that, right-click on the vertical dotted lines and select “Show title” to uncheck the option.
When the “Quick Launch” title is hidden, at least the first item on the Quick Launch menu displays on the Taskbar. You can move the vertical dotted lines to change the width of the Quick Launch bar on the Taskbar and show more than one item from the menu on the Taskbar. If you want to hide the Quick Launch title and show some items from the menu on the Taskbar, you might also want to remove the text from the items, so they will take up less space. To remove the text from the menu items, right-click again on the vertical dotted lines and select “Show Text” to uncheck the option.
Below is an example of the Quick Launch bar with no title and no text on the one item showing on the Taskbar.
Once you’ve set up the Quick Launch bar the way you want, lock the Taskbar again by right-clicking on any empty space on the Taskbar and selecting “Lock the taskbar” from the popup menu. When the Taskbar is locked, there is a check mark next to the “Lock the taskbar” option on the menu.
We decided to keep the “Quick Launch” title, and only have the Quick Launch bar be wide enough to show the title on the Taskbar. And, we hid the Cortana button and the Task View button, so the Quick Launch bar is right next to the Start button. Click the double-arrow button to access the Quick Launch menu.
If you decide you don’t want the Quick Launch bar on the Taskbar anymore, simply right-click on any empty space on the Taskbar and go to Toolbars > Quick Launch. The Quick Launch bar is removed from the Taskbar.
Note that when you remove the Quick Launch bar from the Taskbar, it’s also removed from the Toolbars submenu. If you want to add the Quick Launch bar to the Taskbar again, you will have to follow the steps in this article again.
If your Windows 11 Taskbar is getting a bit crowded, there are several things you can do to make more room. Here are some tweaks you can do to make more space available on the Taskbar.
The Windows 11 taskbar can become crowded with icons. Thankfully, it’s an easy process to customize it to remove unnecessary icons, hide certains apps, or to hide the taskbar entirely.
If you want to make more space available on the Windows 11 taskbar, here’s what you’ll need to do.
How to Hide the Search Icon and Other Built-in Items on the Taskbar
Granted—the Search icon doesn’t take up that much room on the taskbar. However, it’s redundant, as you can already search using the search tool in the Start menu. Why leave the extra icon to take up valuable screen real estate?
To hide the search icon and other built-in taskbar items, right-click on the taskbar and select Taskbar settings.
You can quickly access the Search box on the Start menu by pressing Windows key + Q.
The Task view button accesses the Virtual Desktops feature. You can still access this feature without the button on the taskbar by pressing Windows key + Tab. You can also press Windows key + Ctrl + D to create a new virtual desktop directly.
How to Unpin Programs from Taskbar
If you’ve pinned many programs to the taskbar, you may want to unpin some of the programs you don’t use as much. You can always use the Search box to find a program you want to open.
To unpin a program from the taskbar, right-click on the program’s icon and select Unpin from taskbar. This will hide it from view immediately.
How to Hide the Taskbar Corner Icons
To the right of your taskbar, near the clock and Action Center, you’ll see additional systems icons. These include the pen menu, touch keyboard, and virtual touchpad.
If you don’t want to see these icons, you can hide them.
To hide these icons, right-click on the taskbar and select Taskbar settings. In the Taskbar corner icons section, click the slider to set the icons to Off.
How to Hide the Taskbar Corner Overflow Icons
The Notification area or system tray icons are now called Taskbar Corner Overflow icons. These are icons for programs that run services in the background and usually sit in the system tray.
Some programs put their icons on the taskbar, however, instead of placing them in the system tray by default. You can move these icons back into the system tray to save room on the taskbar, however.
To move program icons back into the system tray, right-click on the taskbar and select Taskbar settings. Next, click Taskbar corner overflow to expand that section.
To move an app back to the system tray, click the slider button for that app to turn it Off. You won’t see that app on the taskbar anymore.
How to Hide the Taskbar
If you’re strapped for space on your screen in general, you can automatically hide the taskbar when you’re not using it.
The taskbar becomes a very thin strip at the bottom of the screen. Move your mouse over this strip to show the taskbar again.
Customizing Windows 11
The steps above should help you to free up space on your taskbar for other things. There are other ways you can customize your taskbar, however, including moving it to the top of your screen.
New to Windows 11? Don’t forget to create a USB recovery drive for emergencies, especially if you need to perform a clean installation in the future.
Windows 10 has new features that appear on the Taskbar, but you might want to clean it up a bit. Here’s some tweaks you can do to make space available.
Windows 10 has new features that appear on the Taskbar, but you might want to clean it up a bit. Here are some tweaks you can do so your taskbar is cleaner.
Note: This article has been updated to show how to remove icons from the system tray.
Shrink the Search Box or Hide it
By default, the Search box on Windows 10 takes up a lot of space on the Taskbar. But the cool thing is you can make it smaller, just putting a button there, or remove it completely.
To do that, right-click an empty area on the Taskbar and then go to Search. There you can switch it to show a search icon or click Hidden to get rid of it entirely.
Personally, I shrink it down to just a button, as shown below, but you can also hide it completely.
If you don’t plan on using it (with your mouse anyway), you can completely hide it. You can still access it by using the keyboard shortcut Windows Key + Q.
Hide Task View Button
If you have no desire to use the new Virtual Desktops feature in Windows 10, you can hide the Task View icon. Right-click the Taskbar and uncheck the “Show Task View button.”
If you use Virtual Desktops but still want to free up some space, use the keyboard shortcut Windows Key + Tab to launch the feature and Windows Key + Ctrl + D to create new virtual desktops.
Unpin Items from Taskbar or Add a Toolbar
Of course, the most obvious way to clear up space on the Taskbar is to unpin items you don’t use often or if you launch them from inside the Start menu.
Another interesting thing you can do is use the Desktop toolbar. It actually adds an item to the Taskbar, but it can allow you to unpin virtually everything from the Taskbar.
This isn’t anything new; it’s been a feature of Windows for quite a while. But to add it, right-click the Taskbar and go to Toolbars > Desktop.
It allows you to access everything on your desktop and includes sub-menus.
For instance, if you enable God Mode and have the folder on your desktop, you can find everything in the folder, as shown below.
Hide Icons in the System Tray
You can also remove items from the system tray on the right, where the clock and Action Center are located. The more you install desktop programs, especially utilities, the more you’ll find icons over there. Some of them allow you to hide them simply by giving them a right-click and selecting a hide or remove option.
But you can also hide them using Windows 10 settings. Go to Settings > System > Notifications & Actions.
Then click the link Select which icons appear on the taskbar. From there, you can turn icons on or off to hide them. Turn off “Always show all icons in the notification area” (or keep it on if you don’t want to see anything), then individual select what you want to hide or turn on to see.
Did I miss anything? Leave a comment below and let us know your tips for saving space on the Windows 10 Taskbar.
By Shubham Agarwal published 12 December 21
Not a fan of the Windows 11 Start menu and taskbar? Here’s how to tweak its look
Windows 11 refreshes the Start menu and taskbar with a new look, and while it looks more modern, it’s important to know how to customize the Start menu and taskbar for future use. The centered position is simpler and less overwhelming, especially for first-time Windows users. But if you’ve been a Windows PC owner for ages and were content with how things worked before, you can easily customize the Windows 11 Start menu and taskbar.
Thanks to built-in personalization options and third-party apps, it’s possible to change the new Windows 11 Start menu and taskbar’s appearance just the way you prefer. Whether you’d like to restore Start back to its original corner or hide new taskbar additions, such as the widgets shortcut, we’ve got you covered in this Windows 11 guide.
Edit the taskbar’s alignment and shortcuts
The Windows 11 taskbar aligns your open and pinned apps’ icons in the center and features a handful of new shortcuts, including one for Microsoft Teams. But if you have no use for these additions, you can switch back to the Windows 10 design from the settings.
Right-click the taskbar and select Taskbar settings. From the Taskbar items section, you can pick which buttons should be the dock. Similarly, you have the option to choose the shortcuts that are available from the corner overflow menu.
Under Taskbar behaviours, you can move back your icons to the left corner and edit whether apps on the taskbar should display unread count badges.
Resize the Windows 11 taskbar
Unlike macOS, Windows 11 doesn’t let you resize the dock, and you’re limited to the size that the software deems appropriate for your screen’s resolution. That might leave you with a taskbar that’s either too small or large to your liking. Fortunately, a simple registry hack allows you to get past this limitation and modify the Windows 11 taskbar size.
Hit the Windows and R keys together, punch in regedit, and press enter.
Navigate to “HKEY_CURRENT_USER > Software > Microsoft > Windows > CurrentVersion > Explorer > Advanced” from the list of folders on the left.
Right-click Advanced in the left pane and select New > DWORD (32-bit) Value. Name the new entry TaskbarSi.
The TaskbarSi item’s value determines your taskbar’s size. You have three sizes to choose from: 0 for small, 1 for medium, and 2 for large. Double-click TaskbarSi and punch in one of these numbers to shrink or enlarge the Windows 11 dock. Reboot your computer to apply the new changes.
Please note that since this is not an official method, some of your dock’s icons may appear pixelated on the largest size mode because they’re not optimized for it.
Theme the Windows 11 Start menu and taskbar
By default, the Start menu and taskbar backgrounds on Windows 11 are either light or dark, depending on your system preferences. If that’s too dull for you, Windows 11 lets you extend your system’s theme and colors to the taskbar.
Go to Settings > Personalization > Colors and toggle on Show accent color on Start and taskbar. The Start menu and taskbar’s backdrops will now feature your PC theme’s dominant color.
Edit the Windows 11 Start menu’s content
Apart from your installed programs, Windows 11’s Start menu offers quick access to the apps you open the most and the ones you recently downloaded. Given the Start menu’s limited space, this could, however, make it more crowded than necessary and difficult for you to find your pinned apps.
To edit what the Start menu shows, head over to Settings > Personalization > Start. Toggle off the sections you don’t need and leave the rest as is.
In addition, you can unpin the apps you don’t actively require for a cleaner Start. Simply right-click an app’s icon in Start and hit the Unpin from taskbar option to do that.
Get the classic Start menu back with Start11
Microsoft only lets you personalize Windows 11’s Start menu and taskbar to an extent. For more customization tools, you’ll have to turn to a third-party app called Start11.
With Start11, you can swap the Windows 11 Start menu for a bunch of classic looks, including the one from Windows 7. It also enables you to adjust the Start menu’s layout precisely, fine-tune its transparency as well as colors, add shortcuts to settings you access the most, relocate it to the corner or the top, and more.
Start11 also brings back some taskbar functionality Windows 11 has removed. You can, for instance, add the context menu, which previously you could access by right-clicking the taskbar. Plus, with Start11, you can easily adjust the taskbar’s size without diving into the registry.
Start11 is currently in beta and requires a one-time $4.99 fee.
Shubham Agarwal is a freelance technology journalist from Ahmedabad, India. His work has previously appeared in Business Insider, Fast Company, HuffPost, and more. You can reach out to him on Twitter (opens in new tab) .
Pen menu could be a handy function for those who use a touch-screen PC running Windows 11 and a stylus. Well, how to easily active Pen menu on Windows 11? You can add the Pen menu icon to Windows 11 taskbar, and then click this icon to use Pen menu. For the tutorial, please scroll down.
The Pen menu on Windows 11 taskbar makes it easy for you to access your favorite apps such as Sticky Notes, Snip & Sketch, etc. Well, how to make the Pen menu icon available on Windows 11 taskbar. For that, here is a tutorial from the MiniTool Partition Wizard website.
Add Pen Menu Icon To Windows 11 Taskbar
How to add Pen menu icon to Windows 11 taskbar? It can be easily completed through Windows Settings, and the whole process is below:
Step 1: Open the Settings menu on Windows 11. Here are two ways:
- Press Windows + I at the same time.
- Click the Windows icon on the taskbar and then choose the Settings option from the pop-up menu.
Step 2: Choose the Personalization option from the left side of the Settings window.
Step 3: Click the Taskbar option on the right side of the window.
Step 4: Scroll down to the Taskbar corner icons area and then click it to expand it.
Step 5: Switch the toggle bar related to Pen menu to the On state like the following screenshot shows.
Now the Pen menu has been enabled in Windows 11, and it will appear on the right side of the taskbar of Windows 11 when you plug the Stylus pen into your computer. When you click the Pen menu on Windows 11, a small pop-up menu will open, from which you can easily launch many apps like Microsoft Whiteboard, Snip & Sketch, etc.
If you do not want to remove Pen menu on Windows 11 taskbar, you just need to repeat the above steps in step 5, change the state of the toggle bar for Pen menu to Off.
How to add Pen menu to Windows 11 taskbar? I believe that you have a clear answer to the question after reading the above content and have managed to do that.
Well, do you know how to easily manage disks and partitions on Windows 11? Keep reading!
Bonus: How to Easily Manage Disks and Partitions on Windows 11
To easily manage the Windows 11 disks and partitions, you need a professional partition management tool, and here MiniTool Partition Wizard is highly recommended.
MiniTool Partition Wizard is an all-in-one tool with a clean user interface. As the following screenshot shows, the tool has basic functions that help you create/delete/extend/format/wipe partitions and other advanced functions such as data recovery, partition recovery, disk benchmark, OS migration, and so on.
If you have difficulties in managing disks and partitions using the Windows tool like Disk Management or Diskpart, it is worth trying MiniTool Partition Wizard.
If you run into issues when using MiniTool Partition Wizard, you can contact [email protected] , and you will get a reply as soon as possible.
About The Author
Vicky is a website editor who has been writing tech articles since she was graduated from university. Most of her articles talk about Windows PC and hard disk issues. Some of her articles also touch on YouTube usage and issues.
During her spare time, she likes to spend time reading, watching videos, and sitting on her Yoga mat to relax.
Sociologists say that multitasking has shortened our attention spans and made us more easily distracted than ever. The problem is especially noticeable on modern PCs, where it’s possible to open dozens of windows at once. The challenge for Windows users is how to keep track of all those windows without losing focus.
In this week’s Windows 7 screencast, I offer a closer look at the new taskbar, which represents a striking departure in form and function from its predecessors. Its design is clearly intended to make it easier to manage large numbers of programs and open windows.
The biggest change, as I demonstrate here, is the ability to “pin” a button to the taskbar. That eliminates the need for a separate Quick Launch bar, because you can pin your favorite programs to the taskbar so that they can be launched with a single click. You can also move buttons (pinned or not) into preferred positions on the taskbar by dragging left and right. The thumbnail previews available as part of the Aero interface get a major upgrade too. As you move the mouse pointer over each thumbnail, a feature called Aero Peek gives the corresponding window temporary focus and lets you see it in its actual size and position instead of having to squint at a small snapshot. Another noteworthy Windows 7 feature that I show off in this demo is the Jump List, a shortcut menu that provides ready access to common tasks, favorite files and folders, and recently opened documents.
Some critics have accused Microsoft of stealing the design of the Windows 7 taskbar from features in OS X Leopard, specifically, the Dock and Exposé. But anyone who uses either system for any length of time can spot the differences and can also chart the separate evolutionary paths for each one. (Ironically, Apple could easily be accused of borrowing from the Windows 7 taskbar for some of the improvements in the Snow Leopard version of Exposé.)
In this screencast, I mention in passing one of my favorite aspects of the new taskbar: Each of the first ten buttons has a corresponding keyboard shortcut, consisting of the Windows logo key plus a number (1 through 9 for the first nine shortcuts, and 0 for the tenth). By default, Windows Explorer is in the second position on the taskbar, so pressing the Windows logo key + 2 opens Explorer. If you already have multiple windows open for one of these top ten buttons, pressing the shortcut cycles through all available windows quickly.
If you have trouble adjusting to the new taskbar layout, several customization options are available. The most noteworthy option adds labels and combines open windows under a single button, giving a look that is comfortingly similar to the XP/Vista taskbar.
This is the second of four Windows 7 demos I’ve done in this series. Look for a new screencast next week at this time.
More coverage of Windows 7:
You might be wondering where the network connection icon in your notifications tray went to. When this happens, you usually have an internet connection but cannot see the Wi-Fi signal bar, the ethernet icon, or the connection status icon. In some other cases, you cannot access the internet and there’s no icon to access the Network and Sharing Center.
This can be caused by several reasons: it’s either the network connection status icon is missing, the network service isn’t running, or an issue from Windows Explorer. In most cases, the missing icon can be brought back by enabling it in the notification tray settings. If that doesn’t work for you, you can try the other methods provided in this guide.
Method 1: Enabling the Networking Icon to Appear in the Notifications Area
Windows 7:
- Right-click on the taskbar and select ‘Properties’
- On the Taskbar tab, click on ‘Customize’ under the ‘Notification Area’ segment.
- Click on ‘Turn system icons on or off’
Also, make sure under Icons and Behaviours, ‘Network’ matches with ‘Show icon and notifications’
- Locate ‘Network’ under the System Icons and select On from the drop-down menu of Behaviours
- Click OK to exit.
Windows 8 / 8.1 / 10:
- Right-click on the taskbar and select Settings
- Scroll down to the Notification area section and select ‘Turn system icons on or off’’
- Look for Network and toggle the switch next to it on.
Method 2: Restarting the Network Services
- Press the Windows + R, type ‘services.msc’ and then hit Enter.
- Look for the following services
- Make sure these services are started by right-clicking on the service name and then clicking Start.
Method 3: Restarting Windows Explorer
- Launch the Windows Task Manager by using the keyboard combinations Ctrl + Shift + Esc or right-clicking on the taskbar and then selecting ‘Task Manager’
- In the ‘Processes or Details’ tab, find ‘Explorer’
- Right-click Windows Explorer or explorer.exe and then select Restart. In Windows 7 select End Process.
- Click on File >Create New Task/New Task
- Type explorer.exe in the field and then press enter.
Method 4: Resetting the Icon Cache
- Right-click on an empty space on your desktop and choose Display Properties
- Depending on the layout of your Display properties, find the Color Quality from 32 to 16 bit
- Click Apply, change it back to 32 bit, and then restart your computer.
Method 5: Using the Registry
Proceed with this step only if you’ve tried the earlier methods or you’re conversant with the Windows registry.
- Press the Windows + R, type ‘regedit’ to open the registry editor, and then hit Enter.
- Navigate to the following registry key
- Under this key, locate the Config entry, right-click on delete it. Don’t panic if you didn’t see this entry, it’s perfectly fine.
- Restart your computer. The config entry will automatically be reconstructed during a reboot.
If you don’t see Config, ignore this method because it is for those who have their settings customized manually or by a third party program.
Method 6: Forcefully Restarting Explorer.exe and Changing Registry
If none of the above methods work, as a last resort, we can try deleting some registry keys and force restarting Explorer.exe from the command prompt.
- Press Windows + R, type ‘command’ in the dialogue box, right-click on the result and select ‘Run as administrator‘.
- Now, execute the following commands one by one:
- Now try accessing the network icon and see if the issue is resolved.
The latest Start11 beta fixes many of the taskbar frustrations Windows 11 users experience.
Windows 11 introduced several notable taskbar changes, but a number of features from Windows 10 didn’t make the cut much to the frustration of some users. However, there is a solution if you’re willing to spend $6.
Microsoft’s new take on the taskbar doesn’t include the ability to move or resize it, adjust the size of the icons or ungroup them, and multi-monitor features are more limited. The latest beta version of Stardock’s Start11 (Opens in a new window) aims to remove all those frustrations by “re-building the taskbar from the ground up.”
Start11 launched last August and is compatible with both Windows 10 and Windows 11, but beta v1.2 (Opens in a new window) focuses specifically on Windows 11 features. As Brad Sams, VP and General Manager of Stardock Software explains, “The new taskbar features are designed to deliver functionality from previous versions of Windows but make them look and feel native to Windows 11.”
Once installed, you’ll be able to ungroup items on the taskbar, as well as left or center-align the Start button while keeping app icons centered if you wish. Mutli-monitor support has also been enhanced, allowing primary and secondary grouping for more control over what appears where.
There’s a range of style options (Windows 7, Modern, Windows 10, or Windows 11) and the ability to combine taskbar buttons always, sometimes, or never. Add to that color, blur, transparency, and corner settings, as well as enhanced search capabilities, custom shortcut links, icon grid spacing, and the ability to add folders and pages to Start menu layouts.
Last updated: January 5, 2017
You may be wondering how to move the taskbar to the bottom of the screen if you have turned on your computer and found that it is currently located at the top of the screen, or one of the sides. Different people prefer different taskbar locations, and Windows 7 makes it possible to move the taskbar location by following a few short steps.
There are some parts of Windows 7 that we take for granted. But when something about them changes, it can have a very detrimental effect on how we use and view our computer. But, generally speaking, any change you make in Windows 7 can be undone; it is simply a matter of figuring out where the menu is that contains the option you want. So while you may get frustrated trying to return a taskbar that has been moved to the top or side of the screen, rest assured that it is actually a relatively simple process. Our guide below will show you how to move the taskbar to the bottom of the screen.
Restore the Taskbar Back to the Bottom of the Screen in Windows 7
More often than not, a change like this is made to your computer screen by another user. Because of the importance of the taskbar when it comes to navigating around your computer, not having it located in a comfortable or familiar position can drastically reduce your efficiency, and just generally make your computing experience worse. Fortunately it is a simple process to move your taskbar back to the more comfortable location at the bottom of the screen.
Step 1: Right-click the taskbar at its current location on the screen, then click Properties.
Step 2: Click the Taskbar location on screen drop-down menu at the center of the window, then click the Bottom option.
Step 3: Click the Apply button at the bottom of the window, then click the OK button.
Summary – How to move the taskbar to the bottom
- Right-click the taskbar, then select Properties.
- Click the dropdown menu to the right of Taskbar location on screen, then select the Bottom option.
- Click the Apply button.
- Click the OK button.
If you’re interested in some more interesting things you can do with your Windows 7 taskbar, then you should check out this article about hiding the taskbar. It provides a great way to leave you with the best form of Windows navigation, while still maximizing your screen real estate.
If you’re looking for a gift for the holidays or a birthday, you should look into the Kindle Fire HD. It is a great, affordable tablet with some impressive specs and features.
Matthew Burleigh has been writing tech tutorials since 2008. His writing has appeared on dozens of different websites and been read over 50 million times.
After receiving his Bachelor’s and Master’s degrees in Computer Science he spent several years working in IT management for small businesses. However, he now works full time writing content online and creating websites.
His main writing topics include iPhones, Microsoft Office, Google Apps, Android, and Photoshop, but he has also written about many other tech topics as well.
The “language bar missing from taskbar” issue is a common problem on all Windows versions. In most cases the language bar has disappeared from taskbar after a Windows update or after upgrading Windows to a newer version.
This time the language bar has disappeared after upgrading a Windows 8.1 based computer to Windows 10. To resolve this problem at first, I double checked that the language bar is already enabled from the language options in control panel (Method-1) and then I proceeded to apply a registry hack and the issue was resolved (Method-2).
In this tutorial you ‘ll find detailed instruction on how to fix the “language bar missing from taskbar” issue on Windows 10, 8.1, 8, 7 & Vista.
How to fix: Language Bar has Disappeared on Windows 10/8/7/Vista.
Method 1. Enable Language Bar from Control Panel.
First, ensure that the Language Bar is enabled.* To do that:
* Notice: Keep in mind that the language bar isn’t displayed if you haven’t installed more than than one input languages on your system.
1. Navigate to Windows Control Panel.
- In Windows 7 or Vista :
- Click Start >Control Panel.
- In Windows 10 or 8, 8.1 :
- Right click on Start menu and select Control Panel.
2. Change the View by: to Small icons.
3. Select Region and Language. *
* In Windows 10 , select Language and continue here.
4A. Windows 7 & Vista : Select the Keyboard and Languages tab and click Change keyboards.
- Then select the Language Bar tab and make sure that the “Docked in the taskbar” option is checked.
- Click OK to exit. If the language bar is still missing then proceed to Method-2.
4B. Windows 10 , 8.1 & 8
- Click Advanced settings.
- Check the “Use the desktop language bar when it’s available” checkbox and then click Options.
- Make sure that the “Docked in the taskbar” option is checked and then click OK. If the language is still missing then proceed to Method-2.
Method 2. Enable Language bar by using Registry.
Important: For preventive purposes, always create a restore point before modifying the registry. If after registry modification, something goes wrong then restore your system to this restore point.
- To create a restore point:
a. Type Create a restore point at the search box and then click on the result.
b. Then click the Create button, to immediately create a restore point.
To Enable the Language bar through Registry:
1. Open Windows Registry Editor. To do that:
1. Press the Windows + R keys to load the Run dialog box.
2. Type regedit and press Enter.
2. At the left pane, navigate to this key:
3. Right click at an empty space at the right pane and select New > String Value.
4. Give at the new value the name: CTFMON.
5. Double click at the newly created value and at the value data box, type:
- C:\Windows\System32\ctfmon.exe
6. Click OK and then close Registry Editor.
7. Restart you computer and you ‘re done!
That’s it! Let me know if this guide has helped you by leaving your comment about your experience. Please like and share this guide to help others.
Microsoft has confirmed that the new taskbar is a mandatory feature, there …
Kurt Mackey – Oct 31, 2008 1:15 am UTC
reader comments
Share this story
- Share on Facebook
- Share on Twitter
- Share on Reddit
While we haven’t yet gotten our hands on a Windows 7 build with the new taskbar, we did talk to Microsoft’s Steven Sinofsky about the various UI changes and what we can expect at release time.
It’s not a surprise that the most disruptive Windows UI change in 15 years comes under the watch of the man largely responsible for the Office ribbon. The ribbon was a jarring change for many users, yet there was no option to turn it off, which made sense to most of us here at Ars. Many people vehemently disagreed with this decision, and we expect to be hearing from them again on the new taskbar. Sinofsky told us that there will be no ability to enable the old taskbar since, in Microsoft’s opinion, the new taskbar’s leap in usability negates the need for a “less-able” option. While there’s not quite as much ingrained taskbar knowledge as there may have been for the various Office toolbars and menus, we expect that this change will be the source of lots of contention.
The Office change seems to have given Microsoft some insight into how its customers will react to disruptive changes, and made the company a little bolder with Windows itself. Ribbon users generally took between 48 hours and 25 days to see productivity gains, and Microsoft is quick to point out how much time many Office users actually spend in front of Excel. The implication is that an aggressive taskbar change won’t be quite as hard to adapt to as the Office ribbon may have been for many users.
Sinofsky’s comments about historical Windows UI changes were informative. “I think that Windows has had this history of being, sort of, risk averse on change. And frankly, I feel like we just kind of move stuff around a little and never really fundamentally alter it,” Sinofsky told Ars. “So people talk about how XP had compatibility mode. it kind of just turned it gray. I mean, it really didn’t do all that much to make it that much different”.
Over the course of this discussion, we also heard something interesting about the taskbar’s jump list feature. “The reason [the jump list feature] is really cool is because it gives a chance to developers to stop annoying customers,” Sinofsky said.
Current and previous versions of Windows don’t really have a good mechanism for the sort of unobtrusive interaction that jump lists could provide. To highlight the problems this causes, Sinofsky pointed out that even Windows Live messenger has a window for listing buddies, a notification icon with a basic context menu, and it’s still a window that can be minimized “with bizarre balloon messages if you close it, reminding you that it’s still running.” With jump lists, developers can just make the window, minimize it, and do everything in one place, leaving the notification area for. notifications only.
Other Windows 7 UI tidbits
Many of our readers have asked us about multimonitor support for the new Window docking abilities. We asked about that, and it sounds like window docking will behave in a relatively predictable way with multiple-monitor setups. If you watch the video of a single-monitor configuration, you’ll notice that dragging a window to one of the side edges of the screen “docks” it, while dragging it to the top edge maximizes it. In a multimonitor configuration, the screen will be treated as one giant space, with one specific exception. The outer side edges will result in a “docked” Window that fills the screen it’s on, while the top edge will maximize a window to the current screen. We would have liked to have seen two regions per screen for docking purposes, but they don’t seem to have included that.
There are quite a few big UI changes in Windows 7 that are dependent on developers taking advantage of them. Microsoft is going to have to lead the way here, since it’s the largest Windows software developer (in addition to, you know, building Windows). Vista had a number of neat features that Microsoft software never took much advantage of; there were no first-party Office sidebar gadgets, for instance. We asked Sinofsky if this would be different for Windows 7, and he basically said that the entire company follows Office, for better or worse, so it will depend on what the Office people do. They have apparently been included in the design process for some of these changes, which may mean that there’s some hope in this area.
We’re pretty excited to get our hands on the Beta build of Windows 7 that’s supposed to be out in January. Microsoft confirmed that the UI changes they demonstrated will be available in that build, so it will give us a good chance to put them through their paces and show them in action.
No matter what kind of Windows computer you have — a desktop, laptop, or tablet — it has at least one hard drive that stores your programs, settings, and data.
It doesn’t matter whether that drive is a traditional spinning platter or a more modern solid-state drive ( SSD ); either way, Windows gives you two easy ways to check your storage, and you can use whichever method is more convenient for you.
Here’s how to do both.
Check out the products mentioned in this article:
Windows 10 (From $139.99 at Best Buy)
Acer Chromebook 15 (From $179.99 at Walmart)
How to check your Windows storage space using File Explorer
This is a fast and easy way to see how much storage space you have left, and only takes a few clicks.
1. Open any folder to launch the File Explorer.
2. In the navigation pane on the left side of the folder, click “This PC.” You can also simply type “This PC” in the text box at the top of the folder.
3. You should see all your hard drives displayed, with the available storage space displayed under each drive.
How to check your Windows storage using Settings
This is an alternate way to see how much storage space Windows has. It has the advantage of providing additional information.
1. Click the Start button and then click the Settings icon, which looks like a gear.
2. Click “System,” and then, in the pane on the left, click “Storage.”
3. You should see details about your primary hard drive, called “C:.” Here, Windows will show you the remaining storage space, as well as how your drive is currently being used. If you click any category, you’ll see additional options for managing this storage space.
4. To see the storage space remaining on any other drives on your PC, scroll down and click “View storage usage on other drives.”
5. You can click other drives to see a similar breakdown by category.
Cory Gunther has been writing about phones, Android, cars, and technology in general for over a decade. He’s a staff writer for Review Geek covering roundups, EVs, and news. He’s previously written for GottaBeMobile, SlashGear, AndroidCentral, and InputMag, and he’s written over 9,000 articles. Read more.
@xguntherc
Apr 8, 2022, 2:28 pm EDT | 2 min read
Ever since the first preview build arrived, users have asked Microsoft to make it an option to move the Windows 11 taskbar location to the left or right side of the screen. Unfortunately, it doesn’t look like that’s happening anytime soon.
As you probably know, the Windows 11 taskbar is locked to the bottom center of the screen. And while you can move the icons to the left bottom edge like Windows 10, that’s about it. There are several valid arguments for why your Windows taskbar should be on the left, but Microsoft doesn’t see it that way.
In a recent Reddit AMA (ask me anything), Microsoft’s Windows 11 team took several questions about the new operating system. As expected, a question about the taskbar location quickly came up. If you were hoping for good news, sorry to burst your bubble. We didn’t get any.
When asked about the option to change the Windows 11 taskbar location (at the 9:50 minute mark), Tali Roth, head of Windows Core experience at Microsoft, gave us a short answer that Windows fans won’t like.
“When we built Windows 11, we rebuilt the taskbar from scratch. That meant we had to pick and choose which things we’d put in first and which features we would include.” As Roth explains the process, she confirms the team is essentially working on pain points and adjustments to help a larger group of users.
“The goal was to be really data-driven about what to include, what to put off for later, or what not to include.”
It sounds like being able to move the taskbar isn’t a huge request or didn’t have enough attention to warrant a change. Instead, Roth quickly pivots to some of the recent adjustments the team has made, like the collapsed and expanded taskbar for smaller touchscreen devices or tablets.
As the conversation continues, Tali Roth then explains that “when it comes to actually being able to move the taskbar to different locations on the screen, there are a number of challenges with that. When you think about having the taskbar on the right, or the left, all of a sudden the reflow and the work all of the apps have to do to have a wonderful experience is just huge.”
Then, circling back to her earlier point about making “data-driven decisions,” the subset of users that want to move the taskbar is minimal compared to other folks asking for different features. That said, it does sound like moving the taskbar is one of those things Microsoft will continue to look at and keep listening to feedback, but at the moment, they don’t have a plan to build the side taskbar.
While Microsoft doesn’t plan to make this an option anytime soon, there is a registry hack that lets you move the Windows 11 taskbar to the left, right or even the top of the screen, but it’s sort of broken, so don’t expect a perfect experience.
Why available shrink space is smaller than the free space? How to shrink volume more than the given available shrink space.
By Dervish / Last Updated March 7, 2022
Shrink volume with Disk Management
There are many solutions to shrink volume less than free space. Many users prefer to use Windows built-in utility Disk Management. To open Disk Management, you can go to Control Panel > System and Security, or type in “diskmgmt.msc” in the search box and press Enter.
To shrink volume with Disk Management
1. Right-click on the volume you want to shrink and choose “Shrink Volume”.
2. The program will query volume for available shrink space, and then the next pop-out window will show you the amount of space available to shrink. You just enter the amount of space to shrink and click Shrink.
Generally, Disk Management will shrink the partition or volume to the amount you entered successfully. But if, unfortunately, the size of available shrink space is less than free space on this volume or the operation fails with not enough space available error, then you may try to use Diskpart.
Shrink volume with Diskpart
To open Diskpart.exe utility, you can type “diskpart” in the Run box and press Enter, or run “diskpart” command in a regular command prompt. You can refer to the following commands for shrinking a volume:
DISKPART> list disk
DISKPART> select disk [disk number]
DISKPART> list partition
DISKPART> select partition [partition number]
DISKPART> shrink desired=[size in MB]
For example, to shrink partition 2 on disk 1, type the following commands:
select partition 2
If you do not specify any parameters for the desired size for shrinking, it will shrink the selected partition by the maximum amount of space. Possibly, you may get the error saying that the specified shrink size is too big and will cause the volume to be smaller than the minimum volume size. The reason why shrink size is much less than the free space is that it can only shrink the partition size down to where the first unmovable/locked file located, as the Disk Management warning states. You may defragment the volume to increase available shrink space a bit. Also turning off System Restore points temporarily might be helpful. If you still cannot shrink a partition by your desired size, you need to use the third party partition manager freeware.
Shrink volume with AOMEI Partition Assistant
As a free disk and partition management program, AOMEI Partition Assistant Standard lifts all the restrictions that Disk Management has. It allows you to shrink a partition by nearly the whole free space, regardless of the location of unmovable files. If you are troubled to find a way to shrink partition further, AOMEI Partition Assistant can easily relieve you. Free download, install and open the partition manager program.
To shrink a partition or volume with AOMEI Partition Assistant:
Step 1. Right-click the partition you want to shrink and choose “Resize Partition”.
Step 2. In the next screen, drag the end of the partition leftwards or type in a specific partition size you desire, and then click OK.
Step 3. The program enables you to preview the partition layout before applying any changes to your hard disk. If everything is fine, click Apply to execute the operations.
That’s it. To shrink volume less than free space with AOMEI Partition Assistant is easy. If you want to create a new partition or extend partition with the unallocated space, you can use this freeware to accomplish it, too. Besides, AOMEI Partition Assistant Professional is capable of many things, such as convert dynamic disk to basic, convert system disk between GPT and MBR, allocate free space, Windows 10/8 to Go creator, etc. For server users, you can try AOMEI Partition Assistant Server.
Are you using Windows 11? Do you want to know how to find disk space on Windows 11? If the disk space is full, you may also want to free up the drive. In this post, MiniTool Partition Wizard shows you how to do that.
How to Find Disk Space on Windows 11
Windows 11 has been announced but now you can’t get it still, unless you sign up for Windows Insider Program. The official Windows 11 upgrade is scheduled to begin late in 2021 and continue into 2022.
Some people have signed for Windows Insider Program and upgraded to Windows 11. Then, how to find disc space on Windows 11? You can use the following methods:
Way 1. Use File Explorer
- Click the File Explorer (the folder icon) on the Taskbar.
- Click This PC on the left side of the panel. You can check how many disks are there and the used space and the total space of a disk.
Way 2. Use Disk Management
- Press Windows key + R to open Run
- In the Run box, type “msc” and press Enter. You can open the Disk Management. In this tool, you can see whether there are hidden disks and unallocated space.
Way 3. Use Windows Settings
- Press Windows key + I to open Settings
- Navigate to System >Storage. You will see what is taking space on the drive.
If the disk space is not enough and you want to delete some files, you can also complete this operation there, for example:
- Click Apps & features section, you are able to uninstall programs here.
- Click Temporary files section, you are able to delete temporary files and some other cached files here.
How to Free up Disk Space Windows 11
After checking disk space on Windows, if you find the disk is full, you may want to free up disk space. Then, you can try emptying the recycle bin, deleting personal files, or deleting files in Windows Settings > Storage tab.
But Windows 11 offers you another tool to free up disk space. Here is the guide:
- Open File Explorer and click This PC.
- Right-click the disk where the space is full, and then choose Properties.
- Click Disk Cleanup.
- Check files you want to delete and click the OK
If you want to delete more files, please click Clean up system files. It will allow you to delete files including system backup files and so on.
After reading through the above contents, you may find that the ways on how to find disc space on Windows 11 and on how to free up disk space on Windows are similar to the ways on how to find disk space and free up disk space on Windows 10.
You’re right. Windows 10 and Windows 11 are the same in this aspect. Therefore, if you want to know more methods on how to free up disk space on Windows 11, you can refer to this post: What’s Taking Up Space on Your Hard Drive & How to Free up Space.
About The Author
Author Linda has been working as an editor at MiniTool for 1 year. As a fresh man in IT field, she is curious about computer knowledge and learns it crazily. Maybe due to this point, her articles are simple and easy to understand. Even people who do not understand computer can gain something.
By the way, her special focuses are data recovery, partition management, disk clone, and OS migration.


