AutoArchive helps manage the space in your mailbox or on the e-mail server that you are using by automatically moving items to an archive location. Depending on the options, AutoArchive completes one or both of the following actions:
Moves items from their original location, generally one of your active folders, to an archive folder.
Where do my items go?
The archive file is a type of Outlook Data File (.pst). The first time AutoArchive runs, the archive file is automatically created in: C:\Users\YourUserName\Documents\Outlook Files\archive.pst
I can’t find the folders listed in this article
Some of the folders might be hidden folders. For more information about viewing hidden folders in Windows, see Show hidden files.
Permanently deletes items that have passed their aging periods.
If you choose to have items deleted, they are not archived. If you choose to have items archived, they cannot be deleted by an AutoArchive. Once items are archived, they can only be deleted manually.
If you have multiple Exchange accounts in your Outlook profile and configure AutoArchive for one account, all other Exchange accounts will have the same settings applied automatically.
For more information about the AutoArchive feature, see Archive older items automatically.
Aging periods of Outlook items
Any Outlook item that has exceeded its aging period is included in the next AutoArchive, unless the item has been specifically marked to be excluded. The default aging period for each Outlook folder is as follows:
Inbox and Drafts
Sent Items and Deleted Items
Note: Folders that you create that contain the same type of items as the Inbox, Calendar, Tasks, Notes, or Journal have the same default, six-month aging period. For example, a mail folder that you create for status reports received from a co-worker or a contact folder you create for personal contacts.
Determine the age of an item
When the aging period starts
The received date/time or when you last changed and saved the message, whichever is later. Marking a message as read or unread is an example of a message change.
Calendar meeting, event, or appointment
The date when you last changed and saved the item, whichever is later. Recurring items are not AutoArchived. Regardless of last save date only calendar items that have already happened will be archived.
The completion date or when you last changed and saved the task. Tasks that are not marked complete are not AutoArchived. Tasks assigned to other people are archived only if marked complete.
When you last changed and saved the note.
The date the Journal entry was created or when you last changed and saved the entry.
Contacts are not archived by default. However, you can manually archive them.
AutoArchive settings and options
See the following descriptions for the settings and options that you can apply when customizing AutoArchive.
Run AutoArchive every n days Choose how often AutoArchive runs. Archiving many items at the same time might slow your computer’s performance. Therefore, it is better to use AutoArchive more frequently to reduce the number of items processed.
To turn off the AutoArchive feature, clear the Run AutoArchive every n days check box.
Prompt before AutoArchive runs Choose whether you want a reminder message to appear before AutoArchive processes your Outlook items. When prompts appear, you can click No on the reminder message to cancel that AutoArchive session.
Delete expired items (e-mail folders only) This option is off by default. Select this check box to delete messages after their aging period has passed.
Archive or delete old items Choose this option if you want to set or change the settings that follow. If this check box is cleared, AutoArchive runs using default settings.
Show archive folder in folder list Select this check box to have the Archive folder listed with your other working folders in the Navigation Pane. If you do not use this option, you can still open your archive folder — click the File tab, then on the Open tab, click Open Outlook Data File.
Clean out items older than Specify the age at which you want items to be archived, in days, weeks, or months. You can configure a period of one day up to a maximum of 60 months.
Move old items to Select this check box to archive old items instead of automatically delete them. The default folder appears in the box. To use a different folder, enter the folder location in the box or click Browse. Selecting this option clears selection of the Permanently delete items option.
Permanently delete items This option deletes any expired items. They are not moved and no archive copy is kept. Selecting this option clears selection of the Move old items to option.
Apply these settings to all folders now This option applies the AutoArchive settings, including your changes, to all folders. To specify unique settings for one or more folders, do not choose this option. Instead, right-click the folder, click Properties and then go to the AutoArchive tab to change settings for each folder that you want to change.
Items in your mailbox might be subject to your organization’s retention policies or messaging records management, and may be subject to FRCP regulations.
Your mailbox grows as you create and receive email and associated attachments.
To keep your Outlook 2010 organized and to help it run faster, set up the AutoArchive feature. AutoArchive allows you to manage space in your mailbox or on the email server by moving old items that are important, to the archives – a recommended practice. You can archive manually, or you can setup the feature that would do it on the regular scheduled basis.
How to Enable and Configure Auto Archive
In Outlook 2010 Auto Archive is not enabled by default. To turn it on, here is what you need to do:
- Click the File tab to open the Backstage view, and then click Options on the navigation bar to your left.
Info > Options” src=” alt=”Go To File > Info > Options” width=”727″ height=”580″ /> Go To File > Info > Options
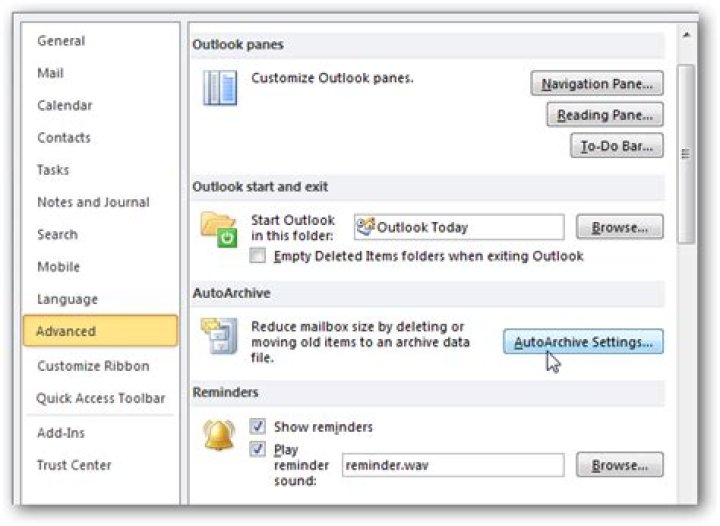
On the Advanced tab, under AutoArchive, click AutoArchive Settings.
AutoArchive > AutoArchive Settings” src=” alt=”Go to Advanced > AutoArchive > AutoArchive Settings” width=”724″ height=”608″ /> Go to Advanced > AutoArchive > AutoArchive Settings
Choose the Run AutoArchive every x days to the number you need. The default setting is 14 days, but you can use the number of day you feel is reasonable for you and your business.Please, note: if you select thePermanently delete old itemsoption, emails will not be archived.
Run AutoArchive – click OK
Since the beginning of Outlook, Microsoft has always included the Archive and AutoArchive feature and Outlook 2010 is no exception. The AutoArchive feature automatically moves or deletes older email from your Primary Mailbox into an Archive Data File stored on your local hard drive. These files are called .PST files. In the past when Outlook .PST files had a 2 GIG limit, the Archive feature was much more important as it archived older email out of your Primary .PST file and into an Archive.pst file. That being said, even though .PST files in Outlook 2010 have a 20 Gig limit; it’s still a good idea to let it manage your older email to keep your .PST files small and system performance up!
Explain again What the AutoArchive feature does, please!
AutoArchive reduces mailbox size by deleting or moving old items to an archive data file or .PST. The process works pretty much the same whether you’re using Microsoft Exchange at work or IMAP or POP from on a home or small business setup. It’s essentially just like taking a few stacks of paper off your desk and placing them in an organized quick-access file cabinet or .PST file as mentioned above. This process is different from exporting in two ways. Exporting will allow you to move the emails into multiple different external formats, whereas Archiving only lets you move older email to a .pst file or delete the email entirely. Archiving also allows easier access to old email since there is a tab in the Outlook navigation pane for them. Of course, you can also set up AutoArchive to delete your old mail as well.
How To Enable Default AutoArchive For ALL Outlook 2010 Folders
1. In Microsoft Outlook, Click the File menu and Select Options.
Options in Outlook 2010″ width=”182″ height=”410″ border=”0″ />
2. In the Options menu Click the Advanced tab and then Click the AutoArchive Settings button.
Autoarchive settings in Outlook 2010″ width=”632″ height=”485″ border=”0″ />
3. Click the checkbox for Run AutoArchive every [14] Days. From here you can further customize the AutoArchive settings for Outlook 2010 however by default once enabled AutoArchive will MOVE (not delete) all mail older than six months into an Archive.pst file. I suggest you keep the Prompt before AutoArchive runs checked so that you’ll be alerted whenever an archive happens. You would be surprised how often people ask me about missing email! Normally it’s just AutoArchive function. Once you have the settings where you like them, Click Apply these settings to all folders now.
If you followed the above steps, AutoArchive enables for all of your Outlook emails. If there is a folder you wanted to exclude from AutoArchive, or if you only want it to apply to a few folders we can do that too. Outlook 2010 allows you to customize the AutoArchive settings for each folder, here’s how.
Change AutoArchive Settings For Single Outlook 2010 folders
4. In Outlook look in the left side navigation pane. From there Right-Click any folder and Select Properties to set its AutoArchive policy.
5. In Inbox Properties window that appears, Click the AutoArchive tab. Here you can customize the AutoArchive settings for this folder, or even disable AutoArchive for it entirely.
Alright, now we know how to AutoArchive individual folders! But what if you don’t want to use AutoArchive at all? If you aren’t a fan of the automatic feature, you can still make use of Archiving by using the manual process.
How-To Manually Archive Items
6. In Outlook Click the File > Info menu tab and then Select Cleanup Tools > Archive.
7. In the Archive dialog that appears Select which Folders you want to Archive. This process is nearly the same as AutoArchive except it’s a one time deal. Something different is that you can even override the “Do not AutoArchive” property if you’ve applied that to some folders, but that is optional.
Where Are Outlook Archived Items Located?
8. In Outlook you can access archived items from the Archive folder in the left-side email navigation pane.
9. You can also access archives from the Outlook .pst file where they store. You can get there by Clicking the File > Open menu tab and Selecting Open Outlook Data File.
10. By default the Outlook archive .pst file location is:
%UserProfile%DocumentsOutlook Files
If you haven’t used Archiving in Outlook before, give it a try! It’s sure to help keep things clean and move old, unused email items out of your Primary Mailbox/.PST file. It’s also a nice way to keep .PST file size under control which always helps with System Performance!
If you want to keep Outlook 2010 clean and run faster, one method is to set up the AutoArchive feature. Today we show you how to configure and manage the feature in Outlook 2010.
Using AutoArchive allows you to manage space in your mailbox or on the email server by moving older items to another location on your hard drive.
Enable and Configure Auto Archive
In Outlook 2010 Auto Archive is not enabled by default. To turn it on, click on the File tab to access Backstage View, then click on Options.
The Outlook Options window opens then click on Advanced then the AutoArchive Settings button.
The AutoArchive window opens and you’ll notice everything is grayed out. Check the box next to Run AutoArchive every…
Note: If you select the Permanently delete old items option, mails will not be archived.
Now you can choose the settings for how you want to manage the AutoArchive feature. Select how often you want it to run, prompt before the feature runs, where to move items, and other actions you want to happen during the process. After you’ve made your selections click OK.
Manually Configure Individual Folders
For more control over individual folders that are archived, right-click on the folder and click on Properties.
Click on the AutoArchive tab and choose the settings you want to change for that folder. For instance you might not want to archive a certain folder or move archived data to a specific folder.
If you want to manually archive and backup an item, click on the File tab, Cleanup Tools, then Archive.
Click the radio button next to Archive this folder and all subfolders. Select the folder you want to archive. In this example we want to archive this folder to a specific location of its own.
The .pst files are saved in your documents folder and if you need to access them at a later time you can.
After you’ve setup AutoArchive you can find items in the archived files. In the Navigation Pane expand the Archives folder in the list. You can then view and access your messages.
You can also access them by clicking the File tab \ Open then Open Outlook Data File.
Then you can browse to the archived file you want to open.
Archiving old emails is a good way to help keep a nice clean mailbox, help speed up your Outlook experience, and save space on the email server. The other nice thing is you can configure your email archives and specific folders to meet your email needs.
HowComputer – Q & A – Question & Answer
- Join
- Login
How to Manage AutoArchive in Outlook 2010
If you want to keep Outlook 2010 clean and run faster, one method is to set up the AutoArchive feature. Today we show you how to configure and manage the feature in Outlook 2010.
Using AutoArchive allows you to manage space in your mailbox or on the email server by moving older items to another location on your hard drive.
Enable and Configure Auto Archive
In Outlook 2010 Auto Archive is not enabled by default. To turn it on, click on the File tab to access Backstage View, then click on Options.
The Outlook Options window opens then click on Advanced then the AutoArchive Settings button.
The AutoArchive window opens and you’ll notice everything is grayed out. Check the box next to Run AutoArchive every…
Note: If you select the Permanently delete old items option, mails will not be archived.
Now you can choose the settings for how you want to manage the AutoArchive feature. Select how often you want it to run, prompt before the feature runs, where to move items, and other actions you want to happen during the process. After you’ve made your selections click OK.
Manually Configure Individual Folders
For more control over individual folders that are archived, right-click on the folder and click on Properties.
Click on the AutoArchive tab and choose the settings you want to change for that folder. For instance you might not want to archive a certain folder or move archived data to a specific folder.
If you want to manually archive and backup an item, click on the File tab, Cleanup Tools, then Archive.
Click the radio button next to Archive this folder and all subfolders . Select the folder you want to archive. In this example we want to archive this folder to a specific location of its own.
The .pst files are saved in your documents folder and if you need to access them at a later time you can.
After you’ve setup AutoArchive you can find items in the archived files. In the Navigation Pane expand the Archives folder in the list. You can then view and access your messages.
You can also access them by clicking the File tab \ Open then Open Outlook Data File.
Then you can browse to the archived file you want to open.
Archiving old emails is a good way to help keep a nice clean mailbox, help speed up your Outlook experience, and save space on the email server. The other nice thing is you can configure your email archives and specific folders to meet your email needs.
Your Outlook mailbox is only so big, and it’s a good bet that you won’t stop getting email anytime soon. To keep it from filling up, you can move old items you want to keep to an archive, a separate Outlook Data File (.pst) that you can open from Outlook any time you need it.
Note: The Archive command and feature doesn’t appear for any account in your Outlook profile if you include an Exchange Server account and your organization uses Microsoft Exchange Server Online Archive. Your network administrator can also disable this feature.
By default, Outlook uses AutoArchive to archive items at a regular interval. To learn more, see Archive older items automatically.
You can also archive items manually whenever you want. That way, you can control which items to archive, where to store them, and how old an item needs to be before it can be archived.
Do one of the following:
In Outlook 2013: Click File > Info > Cleanup Tools > Archive.
In Outlook 2016: Click File > Info > Tools > Clean up old items
Tip: Archive and AutoArchive might not be available if your mail profile connects to an Exchange Server. It’s also possible that your organization has a mail retention policy that overrides AutoArchive. Check with your system administrator for more information.
Click the Archive this folder and all subfolders option, and choose the folder you want to archive.
Under Archive items older than, enter a date.
You can create multiple .pst files if you want to archive some folders using different settings. For example, you may want to keep items in your Sent folder longer than items in your Inbox folder.
Check the Include items with “Do not AutoArchive” checked box to archive individual items that are excluded from automatic archiving. This option doesn’t remove that exclusion from these items, but instead ignores the Do not AutoArchive setting for this archive only.
Turn off AutoArchive
To archive only when you want, turn off AutoArchive.
Click File > Options > Advanced.
Under AutoArchive, click AutoArchive Settings.
Uncheck the Run AutoArchive every n days box.
Support for Office 2010 ended on October 13, 2020
Upgrade to Microsoft 365 to work anywhere from any device and continue to receive support.
By default, older Outlook items archived automatically on a regular interval. To learn more about AutoArchive, see Use AutoArchive to back up or delete items.
You can also manually back up and archive items, in addition to AutoArchive or as a replacement. Manual archiving provides flexibility, and allows you to specify exactly which folders are included in the archive, and which archive Outlook Data File (.pst) is used.
To manually archive Outlook items, do the following:
Click the File tab
Click Cleanup Tools.
Click the Archive this folder and all subfolders option, and then click the folder that you want to archive. Any subfolder of the folder you select is included in this manual archive.
Under Archive items older than, enter a date.
If you do not want to use the default file or location, under Archive file, click Browse to specify a new file or location. Browse to find the file that you want, or enter the file name, then click OK. The destination file location appears in the Archive file box.
Select the Include items with “Do not AutoArchive” checked check box to include any items that might be individually marked to be excluded from automatic archiving. This option does not remove that exclusion from these items, but instead ignores the Do not AutoArchive check box for this archive only.
Turn off AutoArchive
If you want to archive only manually, you must turn off AutoArchive. Do the following:
Click the File tab.
On the Advanced tab, under AutoArchive, click AutoArchive Settings.
Clear the Run AutoArchive every n days check box.
AutoArchive, which is turned on by default, automatically moves old items to an archive location at scheduled intervals. However, you can manually back up and archive items to a location that you specify.
Note: The Microsoft Office Outlook 2007 AutoArchive settings are customizable. Rather than backing up or archiving your items manually, you may find that AutoArchive can meet your needs. For more information, see Using AutoArchive to back up or delete items.
On the File menu, click Archive.
Select the Archive this folder and all subfolders option, and then specify a date under Archive items older than.
Under Archive file, click Browse to specify a new file or location if you do not want to use the default file or location.
Select the Include items with “Do not AutoArchive” checked check box if you want to override a previous setting to not automatically archive specific items. If you choose to manually archive these items during this procedure, the items will again be subject to the Do not AutoArchive setting unless you manually override that setting again in the future.
Note: Outlook automatically creates another archive file for items in the folder and location specified.
Email can fill your Outlook Inbox quickly – new messages, replies, and forwards. Before you know it, you could have thousands of messages. Keep your Outlook inbox and its folders under control by moving older items you want to keep to an archive. Use AutoArchive to do this automatically.
You can change how often AutoArchive runs, where it stores archived items, and how long Outlook keeps items before archiving them.
Click File > Options > Advanced.
Under AutoArchive, click AutoArchive Settings.
Click the Run AutoArchive every n days box and specify how often to run AutoArchive.
Choose any other options you want, such as having Outlook delete old items instead of archiving them.
Tip: Archive and AutoArchive might not be available if your mail profile connects to an Exchange Server. It’s also possible that your organization has a mail retention policy that overrides AutoArchive. Check with your system administrator for more information.
For more information about AutoArchive settings, see AutoArchive settings explained.
Change the AutoArchive settings for an individual folder
In the Navigation Pane’s folder list, right-click the folder you want to change, and click Properties.
On the AutoArchive tab, choose the options you want.
The first time that you run Outlook, AutoArchive is on by default and runs every 14 days. You can change how often AutoArchive runs, specify the Outlook data file (.pst) used to store archived items, and choose when items in your Outlook folders are subject to being archived.
Select Tools > Options and then select the Other tab.
Select the Run AutoArchive every n days check box, and then specify how often to run AutoArchive.
Select the options that you want.
Run AutoArchive every Choose how often you want AutoArchive to run. Archiving many items at the same time might slow down your computer’s performance. Therefore, it is good to choose a period of time that shortens the AutoArchive process. Consider how many items that you typically receive during a given time and adjust the timeframe accordingly. Prompt before AutoArchive runs Choose this option if you want Outlook to display a reminder message before AutoArchive processes your Outlook items. When you see the message, you can click No to cancel that AutoArchive session.
Delete expired items (e-mail folders only) This option is not selected by default. You can choose to have e-mail messages deleted when their aging period has expired. The default period for your Draft and Inbox items is six months, and three months for your Sent Items, but you can change these periods using the Clean out items older than option.
Archive or delete old items You must choose this option if you want AutoArchive to delete some or all items when they expire. This option activates other options that enable you to decide which items are archived and which are deleted when they reach the end of the aging period. Then choose additional settings to apply to both archiving and deletion.
Note: In the AutoArchive dialog box, “folders” refers to your main Outlook feature areas, such as the Calendar folder and Task folder, and individual e-mail folders. This is because your Calendar and Task items are stored in their respective Calendar and Task folders.
Show archive folder in folder list Choose to have the Archive folder listed with your other working folders in the Navigation Pane. In the main Archive folder, you can open the subfolders and view your archived items. When viewing your archived items, you can verify that the correct items were archived, and you can also drag any items that you need back to a working folder.
Clean out items older than Choose the default setting for when you want your items archived, in days, weeks, or months. You can set a period of one day up to a period of 60 months. “Clean” means to archive — store — items. It does not mean “delete” unless you have specified that setting for the folders elsewhere.
Move old items to The default setting for this location is different for computers that are running the Microsoft Windows Vista and Windows XP operating systems.
Windows Vista: C:\Users\user\AppData\Local\Microsoft\Outlook\Archive.pst.
Windows XP: C:\Documents and Settings\user \Local Settings\Application Data\Microsoft\Outlook\Archive.pst.
If you want to set another destination for the archived items, you can browse to and set a different location. Items will be moved to this location after their aging period.
Note: Items archived in a custom location will not be deleted unless you open the folders and delete them manually.
Permanently delete items This option immediately deletes the expired items instead of moving them to the default location, another folder that you have designated, or the Deleted Items folder.
Apply these settings to all folders now This option applies the AutoArchive settings, including your changes, to all of your folders. To specify different settings for one or more folders, do not choose this option. Instead, use the instructions shown below the button that explain how to specify settings for individual folders. These instructions are also included in the following section, “Change the AutoArchive settings for an individual folder.” Changes made to specific folders apply only to those folders.
Retention Policy Information In your organization, a system administrator might set retention policies that determine when and how your mailbox items are AutoArchived. You can view the policies here, but you can’t change them without the appropriate permissions.
Change the AutoArchive settings for an individual folder
In the folder list in the Navigation Pane, right-click the folder you want to change, and then click Properties on the shortcut menu.
Click the AutoArchive tab.
Select the options that you want.
Note: For more information on the settings, please see Step 4 in the section above, “Review or change the default AutoArchive settings.”
Question
I have set my autoarchive as standard. run it every 14 days. and some subfolders are to be run every 7 days.
I have problems with my folders are now full and also I have problems that my Outlook is VERY laggy when autoarchive runs.
i wonder how i can manually trigger this autoarchive so I have more control of when it is runned.
Answers
- Marked as answer by HAL07 Thursday, December 17, 2009 9:01 AM
All replies
- Marked as answer by HAL07 Thursday, December 17, 2009 9:01 AM
This is what you want:
Then press the AutoArchive button.
- Proposed as answer by Another random dude Wednesday, February 3, 2010 6:29 PM
whenever you make a suggestion and have it set as an answer. PLEASE EXPLAIN WHY IT SHOULD BE CONSIDERED AN ANSWER!
iam seeing this way too often. some dude posts a link and then it gets marked as an answer by somebody else. UNLESS the thread members agree that this is the appropriate solution, DO NOT mark it as an answer! just delete the thread if not because its a waste of time for us IT people trying to solve problems.
Replies (7)
You need to modify the auto archive settings so ‘apply these settings to all folders’
Or rt click any folder>Properties>Auto Archive tab
NB Archive works on the modified date of any mail
Was this reply helpful?
Sorry this didn’t help.
Great! Thanks for your feedback.
How satisfied are you with this reply?
Thanks for your feedback, it helps us improve the site.
How satisfied are you with this reply?
Thanks for your feedback.
Was this reply helpful?
Sorry this didn’t help.
Great! Thanks for your feedback.
How satisfied are you with this reply?
Thanks for your feedback, it helps us improve the site.
How satisfied are you with this reply?
Thanks for your feedback.
Was this reply helpful?
Sorry this didn’t help.
Great! Thanks for your feedback.
How satisfied are you with this reply?
Thanks for your feedback, it helps us improve the site.
How satisfied are you with this reply?
Thanks for your feedback.
You need to modify the auto archive settings so ‘apply these settings to all folders’
Or rt click any folder>Properties>Auto Archive tab
NB Archive works on the modified date of any mail
My auto-archive ran again today with slightly better results. It cleared 420 emails worth 0.16GB off the server, as this account is set up as IMAP in Outlook. Now my account has gone back to an orange alert instead of red alert. I need it down to yellow or green.
The improved results were based on the fact that over the last 14 days I manually set the archive option to run on certain folders which I knew had the oldest mail.
The option to ‘apply these settings to all folders’ did not work, although I selected it on more than one occasion. How can I get all the folders automatically included? I have
- 46 Folders
- 29 Sub-Folders
- Sent
- Trash
- Deleted
- Drafts
- Junk
- Search
- Spam
and won’t like to continue setting up manually. The archive folder tree is now listing 9 folders and 3 sub-folders, plus some of the default ones.
- Home
- Products
- Classic Menu for Office 2007
- Classic Menu for Office 2007 Applications
- —————————————————————————
- Classic Menu for Office
- Classic Menu for Office Enterprise
- Classic Menu for Office Home and Business
- Classic Menu for Office Applications
- Compare Classic Menu Suites
- —————————————————————————
- Ribbon Customizer for Office 2007
- Download
- Classic Menu for Office 2007
- Classic Menu for Office 2007 Applications
- —————————————————————————
- Classic Menu for Office
- Classic Menu for Office Enterprise
- Classic Menu for Office Home and Business
- Classic Menu for Office Applications
- —————————————————————————
- Ribbon Customizer for Office 2007
- Purchase
- Classic Menu for Office 2007
- Classic Menu for Office 2007 Applications
- —————————————————————————
- Classic Menu for Office
- Classic Menu for Office Enterprise
- Classic Menu for Office Home and Business
- Classic Menu for Office Applications
- —————————————————————————
- Ribbon Customizer for Office 2007
- Support
- FAQs
- Search
- Support
- About Us
- Documents
- News and Updates
- Languages
- English
- Français
- Deutsch
- Español
- Italiano
- Português
- Nederlands
- 日本語
- 繁體中文
- 简体中文
Where is AutoArchive in Microsoft Outlook 2010 and 2013?
- It is much easier to find AutoArchive in Outlook 2010/2013/2016/2019 if you are using Classic Menu for Office
- If you have not Classic Menu for Office (Method: More steps to find AutoArchive)
It seems a bit difficult to find the AutoArchive button in Microsoft Outlook 2010 and 2013, if you want to manage the space of mailbox. How to find AutoArchive in the ribbon of Outlook 2010 and 2013? Provided below will give you various methods to find AutoArchive whether Classic Menu software installed or not.
How to Bring Back Classic Menus and Toolbars to Office 2007, 2010, 2013, 2016 and 365?
Just download Classic Menu for Office 2007 or Classic Menu for Office
Kutools for Outlook: 20+ Powerful New Features for Outlook.
Office Tab: Tabbed Editing and Browsing in Office, Just Like Chrome, Firefox, IE 8/9/10.
If you are using Classic Menu for Office.
With classic menu style interface, on Menus tab, click Folder menu and it will bring up the Folder drop-down menu, from which you can easily see AutoArchive Settings at the bottom.
Click AutoArchive Settings, there appears AutoArchive window, where you can make the setting of AutoArchive. Note that the Outlook data will be autoarchived into the archive.pst file.
If you are not using Classic Menu for Office.
In Microsoft Outlook 2010 and 2013, there are several ways to find the AutoArchive command in the new ribbon as below:
Method A:
- Click the File tab.
- Click Options.
- Selce Advanced in Outlook Options window.
- Under AutoArchive, click AutoArchive Settings. There will appear AutoArchive window like fingure 2, Select the Run AutoArchive every n days check box, and then specify how often to run AutoArchive.
Method B:
- Click the Folder tab.
- AutoArchive Settings in the Properties group at the rightmost corner.
- Click the AutoArchive Settings.
- Inbox Properties window appears.
- Click the AutoArchive tab.
Method 3:
- Click the File tab.
- Click Info.
- Click Cleanup Tools.
- Click Mailbox Cleanup from the drop-download menu.
- Click AutoArchive button if you want to quickly move old items to the archive files on the computer.
What is Classic Menu for Office/Outlook
Brings the familiar classic menus and toolbars back to Microsoft Office 2007, 2010, 2013, 2016, 2019 and 365, helps users get through the transition from Office 2003 (or 2002, 2000) to Office 2007, 2010 or 2013, and saves your money and energy on training if you are upgrading your Office.
Classic Menu for Office
It includes Classic Menu for Word, Excel, PowerPoint, Access, Outlook, OneNote, Publisher, InfoPath, Visio and Project 2010, 2013, 2016, 2019 and 365.
Classic Menu for Office 2007
It includes Classic Menu for Word, Excel, PowerPoint, Access and Outlook 2007.


