Chris Hoffman is Editor-in-Chief of How-To Geek. He’s written about technology for over a decade and was a PCWorld columnist for two years. Chris has written for The New York Times and Reader’s Digest, been interviewed as a technology expert on TV stations like Miami’s NBC 6, and had his work covered by news outlets like the BBC. Since 2011, Chris has written over 2,000 articles that have been read nearly one billion times—and that’s just here at How-To Geek. Read more.
Ubuntu 14.04 LTS will “form the basis of the first commercially available Ubuntu tablets,” according to Canonical. We installed Ubuntu Touch 14.04 on our own hardware to see what those tablets will be like.
We don’t recommend installing this yourself, as it’s still not a polished, complete experience. We’re using “Ubuntu Touch” as shorthand here — apparently this project’s new name is “Ubuntu For Devices.”
The Welcome Screen
Ubuntu’s touch interface is all about edge swipes and hidden interface elements — it has a lot in common with Windows 8, actually.
You’ll see the welcome screen when you boot up or unlock a Ubuntu tablet or phone. If you have new emails, text messages, or other information, it will appear on this screen along with the time and date. If you don’t, you’ll just see a message saying “No data sources available.”
The Dash
Swipe in from the right edge of the welcome screen to access the Dash, or home screen. This is actually very similar to the Dash on Ubuntu’s Unity desktop. This isn’t a surprise — Canonical wants the desktop and touch versions of Ubuntu to use the same code. In the future, the desktop and touch versions of Ubuntu will use the same version of Unity and Unity will adjust its interface depending on what type of device you’re using.
Here you’ll find apps you have installed and apps available to install. Tap an installed app to launch it or tap an available app to view more details and install it.
Tap the My apps or Available headings to view a complete list of apps you have installed or apps you can install. Tap the Search box at the top of the screen to start searching — this is how you’d search for new apps to install. As you’d expect, a touch keyboard appears when you tap in the Search field or any other text field.
The launcher isn’t just for apps. Tap the Apps heading at the top of the screen and you’ll see hidden text appear — Music, Video, and Scopes. This hidden navigation is used throughout Ubuntu’s different apps and can be easy to miss at first. Swipe to the left or right to move between these screens.
These screens are also similar to the different panels in Unity on the desktop. The Scopes section allows you to view different search scopes you have installed. These are used to search different sources when you start a search from the Dash.
Search from the Music or Videos scopes to search for local media files on your device or media files online. For example, searching in the Music scope will show you music results from Grooveshark by default.
Navigating Ubuntu Touch
Swipe in from the left edge anywhere on the system to open the launcher, a bar with shortcuts to apps. This launcher is very similar to the launcher on the left of Ubuntu’s Unity desktop — that’s the whole idea, after all.
Once you’ve opened an app, you can leave the app by swiping in from the left. The launcher will appear — keep moving your finger towards the right edge of the screen. This will swipe the current app off the screen, taking you back to the Dash.
Once back on the Dash, you’ll see your open apps represented as thumbnails under Recent. Tap a thumbnail here to go back to a running app. To remove an app from here, long-press it and tap the X button that appears.
Swipe in from the right edge in any app to quickly switch between recent apps. Swipe in from the right edge and hold your finger down to reveal an application switcher that shows all your recent apps and lets you choose between them.
Swipe down from the top of the screen to access the indicator panel. Here you can connect to Wi-Fi networks, view upcoming events, control GPS and Bluetooth hardware, adjust sound settings, see incoming messages, and more. This panel is for quick access to hardware settings and notifications, just like the indicators on Ubuntu’s Unity desktop.
The Apps
System settings not included in the pull-down panel are available in the System Settings app. To access it, tap My apps on the Dash and tap System Settings, search for the System Settings app, or open the launcher bar and tap the settings icon.
The settings here a bit limited compared to other operating systems, but many of the important options are available here. You can add Evernote, Ubuntu One, Twitter, Facebook, and Google accounts from here. A free Ubuntu One account is mandatory for downloading and updating apps. A Google account can be used to sync contacts and calendar events.
Some apps on Ubuntu are native apps, while many are web apps. For example, the Twitter, Gmail, Amazon, Facebook, and eBay apps included by default are all web apps that open each service’s mobile website as an app.
Other applications, such as the Weather, Calendar, Dialer, Calculator, and Notes apps are native applications. Theoretically, both types of apps will be able to scale to different screen resolutions. Ubuntu Touch and Ubuntu desktop may one day share the same apps, which will adapt to different display sizes and input methods.
Like Windows 8 apps, Ubuntu apps hide interface elements by default, providing you with a full-screen view of the content. Swipe up from the bottom of an app’s screen to view its interface elements. For example, swiping up from the bottom of the Web Browser app reveals Back, Forward, and Refresh buttons, along with an address bar and Activity button so you can view current and recent web pages.
Swipe up even more from the bottom and you’ll see a button hovering in the middle of the app. Tap the button and you’ll see many more settings. This is an overflow area for application options and functions that can’t fit on the navigation bar.
The Terminal app has a few surprising Easter eggs in this panel, including a “Hack into the NSA” option. Tap it and the following text will appear in the terminal:
That’s not very nice, now tracing your location . . . . . . . . . . . .Trace failed
You got away this time, but don’t try again.
We’d expect to see such Easter eggs disappear before Ubuntu Touch actually ships on real devices.
Ubuntu Touch has come a long way, but it’s still not something you want to use today. For example, it doesn’t even have a built-in email client — you’ll have to use your email service’s mobile website. Few apps are available, and many of the ones that are are just mobile websites. It’s not a polished operating system intended for normal users yet — it’s more of a preview for developers and device manufacturers.
If you really want to try it yourself, you can install it on a Wi-Fi Nexus 7 (2013), Nexus 10, or Nexus 4 device. Follow Ubuntu’s installation instructions here.
Chris Hoffman is Editor-in-Chief of How-To Geek. He’s written about technology for over a decade and was a PCWorld columnist for two years. Chris has written for The New York Times and Reader’s Digest, been interviewed as a technology expert on TV stations like Miami’s NBC 6, and had his work covered by news outlets like the BBC. Since 2011, Chris has written over 2,000 articles that have been read nearly one billion times—and that’s just here at How-To Geek. Read more.
Ubuntu’s Unity desktop is a change of pace, whether you’re coming from Windows or another Linux distribution with a more traditional interface. Unity has its own way of doing things, including powerful keyboard shortcuts.
If you’re not using Ubuntu, you can play with Unity in your browser using the Ubuntu online tour website. This guide is targeted at new Unity users, but even experienced Ubuntu users might discover a few new tricks.
The Launcher
The launcher at the left side of the screen is where you’ll launch frequently used applications and switch between running applications.
Click an application icon to launch or switch to it. If the application has multiple open windows, Ubuntu will show you the windows and allow you to switch between them.
To quickly open a new window, even if the application is already running, middle-click its icon.
Right-click an application icon to access its quick list. For example, right-clicking the file manager icon will display a list of bookmarked folders you can open.
Other applications you launch will also appear on the launcher while they’re running. To permanently attach another application to the launcher, right-click its launcher icon and select Lock to Launcher.
Select the Unlock from Launcher option to remove any icon from the launcher.
You can rearrange the applications on your launcher by dragging and dropping the application icons.
The Dash
Open the Dash by clicking the Ubuntu icon at the top left corner of the screen. You can also press the Super key to open the launcher (the Super key is also known as the Windows key).
The home area in the Dash displays your recently used applications and files.
You can search for applications by typing at the Dash. This search feature searches more than just application names – for example, searching for “theme” will reveal the Appearance application.
Ubuntu includes many applications that aren’t attached to the launcher by default. To browse your installed applications, click the Applications lens at the bottom of the Dash and scroll through the applications.
Other lenses are also available at the bottom of the Dash. Click them to browse for and search files and folders, music, and videos.
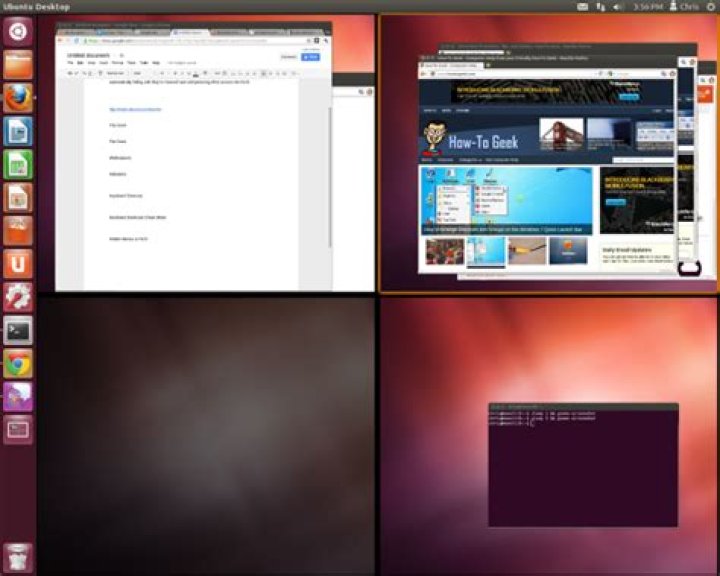
Workspaces
Ubuntu includes multiple workspaces. Each workspace is its own desktop, allowing you to group application windows.
To view your workspaces, click the Workspace Switcher icon on the launcher.
You’ll see an overview of your workspaces and the windows open on each one. You can switch between workspaces from here.
Drag and drop windows on the workspace switcher to rearrange your workspaces.
Use the Ctrl-Alt-Arrow Key keyboard shortcuts to switch workspaces. This is probably the quickest, most efficient way to switch workspaces.
Use the Ctrl-Alt-Shift-Arrow Key keyboard shortcuts to move windows between workspaces. This key combination switches between workspaces, but brings the currently focused window with you.
Indicator Menus
Many important functions are located in the indicator menus, located at the top right corner of your screen. Whether you want to switch users, shut down your computer, control the volume level, or change network settings, you’ll find an option in one of the indicator menus.
The mail icon is the messaging indicator, which groups new message notifications for email, instant messaging, and social networking applications into one icon. The icon glows blue when you have a new message.
Switching Between Applications
The trusty Alt-Tab keyboard shortcut switches between applications in Unity, too. When you Alt-Tab, it only switches between windows on your current workspace.
The Alt-Tab switcher groups applications with multiple windows into a single icon. The three arrows to the left of the Firefox icon indicate that we have three Firefox windows open.
If you Alt-Tab and pause with the Firefox icon selected, you’ll be able to switch between the open Firefox windows. You can also skip to this screen with the Alt-` keyboard shortcut. (The ` is the key above the Tab key.)
Hidden Global Menus
Unity uses a global menu – application menus aren’t located in the application’s windows, they’re located on the top panel. This may be somewhat confusing at first, because you can’t see the application’s menu until you mouse over the top panel.
Each window’s title bar also merges into the top panel when you maximize the window. This includes the window manager controls. When an application window is maximized, its close, minimize, and restore buttons are located at the left side of the top panel, above the Dash icon.
The HUD
The HUD is a new, alternative way of accessing application menus. Instead of clicking the menu, press the Alt key and start typing a menu item’s name. You can search for and activate menu options without touching the mouse.
Keyboard Shortcuts Cheat Sheet
Unity has a lot of keyboard shortcuts, but you don’t need to remember them. Press and hold the Super (Windows) key and you’ll see a keyboard shortcuts cheat sheet.
When you press and hold the Super key, you’ll also see numbers over the application icons on the launcher. Use these numbers in combination with the Super key to switch to or launch applications.
For example, if the Firefox icon is in second place, we can press Super-2 to launch or switch to Firefox.
Chris Hoffman is Editor-in-Chief of How-To Geek. He’s written about technology for over a decade and was a PCWorld columnist for two years. Chris has written for The New York Times and Reader’s Digest, been interviewed as a technology expert on TV stations like Miami’s NBC 6, and had his work covered by news outlets like the BBC. Since 2011, Chris has written over 2,000 articles that have been read nearly one billion times—and that’s just here at How-To Geek. Read more.
Linux newbies have probably heard a lot about Ubuntu, but it isn’t the only Linux distribution. In fact, Ubuntu’s standard Unity desktop is still controversial among long-time Linux users today.
Many Linux users prefer a more traditional desktop interface, and Linux Mint offers that. As Ubuntu focuses more on Ubuntu for phones, Linux Mint may be an even clearer choice in the future.
No, Ubuntu isn’t terrible. Some people prefer Ubuntu’s Unity desktop and love it. But you’ll probably have an easier time getting to grips with Linux Mint instead of Ubuntu.
The Issues With Ubuntu
Let’s take a quick look at Ubuntu’s Unity desktop first. New users (and even experienced Linux users) will have many issues with it:
- The standard File/Edit/View menu is completely separated from each window and appears on the top bar, like a Mac. This is unusual for Windows users. Worse yet, the File/Edit/View menu is actually hidden until you move your mouse up to the bar, and then it appears. This is just unnecessarily confusing.
- The window management buttons (close, minimize, and maximize) appear at the top-left side of each window instead of the top-right side. This is more like Mac OS X than Windows. There used to be a hidden option to move these buttons back to the right side, but it no longer works.
- The Unity desktop features a sort of dock, known as a launcher, that displays shortcuts to your applications and to running applications. You can’t get a more traditional taskbar, if you prefer that, as you can on Windows. The launcher also always appears at the left side of the screen. You can’t move it to another edge of the screen, as you can on Windows and Mac.
- The application launcher is rather confusing. Rather than being an easy pop-up menu with a list of useful shortcuts, it’s a full-screen search interface by default. To actually view a list of installed applications, you have to click the Ubuntu shortcut and select the little Applications view icon at the bottom of the screen. You then need to click “See more results” next to your installed applications and you’ll get a full, alphabetized list of applications without any categories or other useful information. The so-called “dash” interface works best if you use it for search, and you’ll see Amazon search results if you do that. Other options you might expect to find in a “Start menu”-style menu appear in the indicator menus at the top-right corner of the screen.
Let’s be honest, it can be easy for a new user to become confused by this interface. Even seasoned Linux users — rather, especially seasoned Linux users who cut their teeth on earlier desktops — may not find this interface to be the most comfortable.
Why Linux Mint is More Comfortable (and Awesome)
Linux Mint offers two primary flavors. One has the Cinnamon desktop, a more modern desktop environment, while another offers the MATE desktop, which is a “fork” of the older GNOME 2 desktop previously used by Ubuntu and other Linux distributions.
We tend to prefer Cinnamon, as it includes more of the latest technologies. But that doesn’t mean it’s as quirky as Ubuntu’s Unity. The Cinnamon desktop includes a pop-up menu for launching applications and managing settings that works like you’d expect it to. It has a familiar taskbar, which can be moved to other edges of your screen. Its window management buttons are in the place Windows users will expect them. Its File/Edit/View menus work normally and are part of each window. If you’ve used Windows — or if you last used Linux a while ago and prefer more traditional desktop environments — Cinnamon is a great option.
MATE isn’t that bad either. It’s a more traditional desktop environment — right down to the underlying code — and Mint configures it to look and work a lot like Cinnamon does. Yes, there’s a simple applications menu, a taskbar, and everything!
This is just the desktop interface stuff, though. Mint has some other advantages, having “questionable stuff” like multimedia codec support and the Flash browser plug-in installed by default. This was Linux Mint’s original reason for existence. If you’re a hardcore open-source geek, this is no good. However, if you’re the average Linux user, you’ll probably want to install this stuff anyway.
But Ubuntu has made this easier, too, and all it takes is a single click in the Ubuntu installer to install this extra stuff.
Linux Mint is Basically Ubuntu, Too
There’s a lot of software in Ubuntu’s software repositories, and many applications (like Valve’s Steam for Linux) officially target Ubuntu as their supported Linux distribution. That’s one reason to prefer Ubuntu.
But Linux Mint is actually extremely close to Ubuntu. It uses Ubuntu’s software repositories, so you have access to all the software provided by Ubuntu. It even uses the updates Ubuntu provides, although Ubuntu’s developers and Mint’s developers have clashed over Linux Mint’s more conservative approach to potentially dangerous updates.
You can also try other official Ubuntu derivatives with different desktops, of course. The Xubuntu desktop with Xfce is probably the most traditional one. But, for many users, the Cinnamon desktop walks a nice line between being modern-but-traditional. Despite being older, the MATE desktop based on GNOME 2 may be more comfortable and capable than the Xfce desktop to many people.
Linux Mint is also focused on just providing a polished desktop interface, while Canonical is chasing the unification of desktop and smartphone with the latest releases. That may pay off in the long term, but it hasn’t yet.
This isn’t the last word, of course. Feel free to try Ubuntu, especially if you’re not the biggest fan of Mint. Or try other Linux distributions! But don’t just download Ubuntu and bounce off of the Linux desktop because Ubuntu’s Unity desktop doesn’t work for you. It doesn’t work for a lot of Linux users.
Account Information
Share with Your Friends
10 things you need to know about Ubuntu Unity 8
10 things you need to know about Ubuntu Unity 8
Ubuntu Unity 8 is finally on the horizon–but what will this next phase in the life of Unity bring you? Here are a few bits of information that might help ease your mind and get you up to speed.
Ubuntu Unity’s next phase has been in the works for a long time. Originally announced in 2013, the next iteration of Unity has stalled out more times than not. Why? Two main reasons: Mir and Convergence. The Ubuntu developers have been hard at work for years to bring their sleek take on Convergence to the Linux desktop, with the help of a brand new X Windows server.
Users have been able to get a glimpse of this new technology for some time… and most often they come away surprised. Ubuntu Unity 8 is not Unity 7. In fact, there are things you might want to know about Unity 8 before it arrives. How many things? Let’s start with 10.
Open source: Must-read coverage
- The future of Linux: Fedora project leader Matthew Miller weighs in
- Why your open-source project definitely should not be the next Kubernetes
- Master Linux and Docker before the next Linux adoption boom
- Checklist: Essential support sites for Linux admins
1: Unity 8 vs. Unity Touch
If you’ve experienced the Ubuntu Phone interface (Ubuntu Touch), do not think that’s what you’ll be seeing with Unity 8. Yes, Canonical’s goal is to pull off convergence, but that doesn’t mean the interfaces will be the same. The code base will be similar, but the interfaces will be different–although they will share fundamental similarities, such as a Launcher and Scopes. This is actually a good thing, as Unity Touch would make for a rather disappointing desktop interface. What’s important to know about Unity on the desktop and Unity on the phone is that when you plug your phone into a monitor, it will switch to “desktop mode” (a mode better suited to desktops). Beyond Convergence (and the phone), Unity 8 will actually look similiar to the Unity you’ve used for years.
SEE: Unity 8 suffers another delay (and how to solve this issue)
2: Snappy Packages
These two words have been bandied about quite a bit. For developers this is simply a way to make updating packages easier. If you’re an end user, you’ll see little in the way of difference, outside of the fact that dependencies will be a thing of the past. That’s an important (and massive) step for Ubuntu (and Linux in general). Snappy Packages should offer more ease of use and an even more secure platform.
3: The release
As I mentioned, Unity 8 began in 2013–and it has been teased almost yearly. As of this moment, the next iteration of Unity is to be released with 16.10. That, of course, is not set in stone. In fact, after viewing enough of the preview release, I can’t see how Canonical could manage to get Unity 8/Mir ready for public consumption by October 2016. If I were to guess what would be a more realistic release candidate, I’d say Ubuntu 17.04 (which will release April 2017).
4: Notification area
Unity 8 will contain a notification area that will be instantly familiar. In fact, there is little difference between the Unity 7 and Unity 8 notification area. From this feature you’ll be able to see notifications, control volume, connect to networks, interact with your calendar, and much more. The biggest difference will be in how you get to each setting within the Notification drop-down. Instead of visible icons for each, you’ll “swipe” right or left to reach the different sections. It’s a much more modern approach to notifications–yet with similar functionality that won’t throw users for a loop.
5: Desktop effects
One of the things I’ve experienced first hand is that the desktop effects on Unity 8 work more flawlessly than on Unity–which is a feat, considering there are actually more effects in 8. Fading windows and tooltips, windows sliding in and out, moving/switching applications… everything is more elegant and seamless than it has ever been on Ubuntu Unity. This should mean that lesser-powered machines will run with a bit more pep than with Unity 7. What’s really amazing is that the developers have managed to finally nail smooth window resizing–something that has plagued Linux desktops for a long time.
6: Touchscreen friendliness
Unity 8 has been designed to work well with both standard interfaces (mouse) and a touch interface, or a combination of the two. It has been clear for a long time that Canonical was gearing up for the onslaught of modern interfaces, and Unity 8 proves that. If you’re a fan of touchscreens, Unity 8 might well be the ideal interface to meet your needs.
7: A decent app switcher
One small but significant touch to Unity is the new app switcher. Instead of cycling through all your windows, you’ll be greeted by a more mobile-like app switcher. Hit the hotkey combination and an overlay will appear that allows you to select which window you want to bring back to focus. Hover your mouse over the various entries and a tooltip will appear telling you what the window is. It’s a small addition, but it’ll make switching applications more efficient as well as elegant.
8: Dash no more
This is one difference that might actually lose users. One big change from Unity 7 is that the Dash has been replaced by the Scopes app. When you click on what would have launched the Unity Dash, the Scopes window appears, where you can find what you need. Personally, I find this change to be less than ideal, as the Scopes app has yet to show any signs that it’s an improvement over Dash. It works and works well. But it doesn’t seem to fit with the clean and unified theme Unity 8 has going. Technically, it’s still the Dash–it’s just been separated from the Launcher and the Panel. One improvement, however, is that the Ubuntu Store is now part of the Scopes app, so you can install apps without having to launch a separate tool.
9: Command line
Never fear, the command line is still there. This isn’t something Canonical would dare strip away from Ubuntu. Gaining access to the command line is as simple as ever. In fact, the terminal window for Unity 8 hasn’t changed much at all from Unity 7. So worry not, command-line junkies, your Ubuntu terminal awaits!
10: Prematurity
I’ve alluded to this a few times here, but all the Ubuntu Unity 8 previews available clearly indicate that Unity 8/Mir is not ready for public consumption. Every daily build I’ve tried has been an exercise in frustration. Yes, I get where they are going with the next iteration of Unity (and it has incredible possibility). But what we’ve seen so far has been less than ready. What is interesting is that the desktop mode on the Ubuntu Phone is in better shape than Unity 8. But 8/Mir will eventually be ready for consumers. And when it is, I suspect it will impress.
Your take
Ubuntu fans have had their patience seriously tested with the teasing of Unity 8’s release. My guess is it will happen within the next year–and I think we’ll all agree it was worth the wait.
What do you think? Have you been impressed with Canonical’s work on Unity 8 so far?
Account Information
Share with Your Friends
Ubuntu Unity 22.04 is a Linux desktop distribution that’s as productive as it is elegant
Ubuntu Unity 22.04 is a Linux desktop distribution that’s as productive as it is elegant
Ubuntu Unity 22.04 is out, and it’s better than ever. This throwback to the glory days of Canonical’s in-house desktop might easily usurp your daily driver as your Linux distribution of choice.
Image: Ubuntu Unity
I have a confession to make. Back when Canonical created its own desktop called Unity, I felt it was, hands down, the best desktop environment on the market. Not only was it beautifully designed, but it was also one of the most efficient and productive UIs available. With the Head-Up Display, powerful search, and highly configurable dashboard, I was able to work with a level of efficiency I had yet to experience.
Open source: Must-read coverage
- The future of Linux: Fedora project leader Matthew Miller weighs in
- Why your open-source project definitely should not be the next Kubernetes
- Master Linux and Docker before the next Linux adoption boom
- Checklist: Essential support sites for Linux admins
But then Canonical did the unthinkable and jettisoned that desktop (and all the work the developers put into it) and returned to GNOME. Ever since, I’ve felt Canonical made a big mistake by scrapping Unity. Fortunately, since this is open-source, a fork of the Unity Desktop was given birth in the form of a complete distribution (called Ubuntu Unity) and is still in active development. Although it’s not quite the same Unity as was found back in its Canonical heyday (no HUD connected to application menus), it’s still a fantastic desktop.
Let’s take a look at what Ubuntu Unity 22.04 has in store for you.
First, you can download the ISO for Ubuntu Unity from the official download page. I highly recommend deploying this as a virtual machine at first. If the distribution serves your needs, you can then install it on bare metal and enjoy the Unity desktop as your daily driver.
My first impressions of Ubuntu Unity 22.04
Upon installing and logging into Ubuntu Unity for the first time, my immediate impression is that of nostalgia. Other than the color scheme and the wallpaper, this looks exactly like the Ubuntu Desktop of old that I loved so much (Figure A).
Figure A
The default Ubuntu Unity desktop immediately hearkens back to the good ol’ days of Ubuntu.
This impression really hits home the second you click the menu button at the top left corner. Once the Dash is open (Figure B), you’ll see what looks almost exactly like Unity when it was enjoying its heyday.
Figure B
The Unity Dash is open and ready to make your life a bit more productive.
One thing I appreciated about the Unity Dash is that it allowed me to get very granular with my searching. You could enable/disable different categories and sources for your searches. If you only want to search for applications, make sure Applications is the only option selected under Categories. If you want to search for only Files & Folders … ditto.
That’s not to say everything works perfectly. Just like back with the original Unity, sometimes the search simply won’t find files on your system. If I recall (back in the day) the problem with this issue had to do with Zeitgeist and whether you’d actually opened a file. Here’s an illustration:
- Open a terminal window and issue the command touch
/Documents/TechRepublic.
The search results will come up with nothing. However, do the following:
- Open LibreOffice.
- Open the TechRepublic file.
- Add some text to the file.
- Save the file in the ODT format.
- Close the file.
Now, when you search for the TechRepublic file in the Dash, it’ll appear in the results (Figure C).
Figure C
Our file is there to quickly open from the Dash.
This was just one aspect of why Unity was such an efficient desktop. Of course, it’s not like other desktops don’t include such features, but Unity just always did it better (and looked better doing it). Fortunately, Ubuntu Unity nailed this feature.
The missing piece
The one feature of Ubuntu Unity that I loved was the HUD (Head-Up Display). Effectively, what this did was integrate application menus into the Dash such that you could (while an app was open) hit the Super key (aka the “Windows” key) and then search the app menus. For example, you have LibreOffice open, and you want to center a line of text. Instead of selecting the text, and then clicking Format | Align | Center, you could select the text, hit the Super key, type Center, and hit Enter and the text would be centered. This makes it quite efficient, especially when an application had a large menu system that made it challenging to find what you needed.
Unfortunately, not every application took advantage of this feature, and it looks like Ubuntu Unity has not integrated the HUD with application menus. That’s a shame because it was the absolute best feature in the original Unity.
Even so, Ubuntu Unity has included the global menu feature, which means application menus are found in the top bar and not in the actual app window (in a similar fashion to how macOS handles global menus).
App switch
One of the things the developers have done is switch out a few of the default GNOME apps for those that better fit the Unity UI. That list includes the following:
- Document Viewer–switched with Atril
- Text Editor–switched with Pluma
- Video Player–switched with VLC
- Image Viewer–switched with EOM
- System Monitor–switched with MATE System Monitor
Other than that, the OS includes (out of the box) the likes of:
- LibreOffice 7.3.2.2
- Firefox 99.0.1
- Eye of Mate
- Document Scanner
- Disk Usage Analyzer
- Remmina Remote Desktop Client
- Thunderbird
- Unity Tweak Tool
And, of course, you can always install from thousands of applications using the included GNOME Software.
Who Ubuntu Unity is for?
Anyone who enjoyed what Canonical was doing with the Ubuntu desktop, before it jumped ship back to GNOME, will vastly appreciate what the developers behind this distribution are doing. If you like a desktop that very much creates an efficient and elegant workflow, this might become your go-to Linux distribution.
This might be an unpopular opinion, but I believe Ubuntu Unity is one of the most beautiful Linux desktops on the market. If the developers could only bring back the full HUD, I could see myself replacing Pop!_OS as my distribution of choice.
Subscribe to TechRepublic’s How To Make Tech Work on YouTube for all the latest tech advice for business pros from Jack Wallen.
Open Source Weekly Newsletter
You don’t want to miss our tips, tutorials, and commentary on the Linux OS and open source applications.
Máy tính để bàn Unity của Ubuntu là một sự thay đổi về tốc độ, cho dù bạn đến từ Windows hoặc một bản phân phối Linux khác với giao diện truyền thống hơn. Unity có cách làm việc riêng, bao gồm các phím tắt mạnh mẽ.
Nếu bạn không sử dụng Ubuntu, bạn có thể chơi với Unity trong trình duyệt của mình bằng trang web du lịch trực tuyến Ubuntu. Hướng dẫn này được nhắm mục tiêu vào người dùng Unity mới, nhưng ngay cả người dùng Ubuntu có kinh nghiệm cũng có thể phát hiện ra một số thủ thuật mới.
Trình khởi chạy
Trình khởi chạy ở bên trái màn hình là nơi bạn sẽ khởi chạy các ứng dụng được sử dụng thường xuyên và chuyển đổi giữa các ứng dụng đang chạy.
Nhấp vào biểu tượng ứng dụng để khởi chạy hoặc chuyển sang nó. Nếu ứng dụng có nhiều cửa sổ đang mở, Ubuntu sẽ hiển thị cho bạn các cửa sổ và cho phép bạn chuyển đổi giữa chúng.
Để nhanh chóng mở một cửa sổ mới, ngay cả khi ứng dụng đang chạy, hãy nhấp vào giữa biểu tượng của nó.
Nhấp chuột phải vào biểu tượng ứng dụng để truy cập danh sách nhanh của nó. Ví dụ: nhấp chuột phải vào biểu tượng trình quản lý tệp sẽ hiển thị danh sách các thư mục được đánh dấu mà bạn có thể mở.
Các ứng dụng khác bạn khởi chạy cũng sẽ xuất hiện trên trình khởi chạy trong khi chúng đang chạy. Để đính kèm vĩnh viễn một ứng dụng khác vào trình khởi chạy, nhấp chuột phải vào biểu tượng trình khởi chạy của nó và chọn Khóa để khởi chạy.
Chọn tùy chọn Mở khóa từ Trình khởi chạy để xóa bất kỳ biểu tượng nào khỏi trình khởi chạy.
Bạn có thể sắp xếp lại các ứng dụng trên trình khởi chạy của mình bằng cách kéo và thả các biểu tượng ứng dụng.
Dấu gạch ngang
Mở Dash bằng cách nhấp vào biểu tượng Ubuntu ở góc trên cùng bên trái của màn hình. Bạn cũng có thể nhấn phím Super để mở launcher (phím Super còn được gọi là phím Windows).
Vùng nhà trong Dash hiển thị các ứng dụng và tệp được sử dụng gần đây của bạn.
Bạn có thể tìm kiếm các ứng dụng bằng cách gõ vào Dash. Tính năng tìm kiếm này tìm kiếm nhiều hơn chỉ là tên ứng dụng – ví dụ: tìm kiếm chủ đề trong danh sách trực tuyến sẽ tiết lộ ứng dụng Giao diện.
Ubuntu bao gồm nhiều ứng dụng không được đính kèm với trình khởi chạy theo mặc định. Để duyệt các ứng dụng đã cài đặt của bạn, nhấp vào ống kính Ứng dụng ở cuối Dash và cuộn qua các ứng dụng.
Các ống kính khác cũng có sẵn ở dưới cùng của Dash. Nhấp vào chúng để duyệt và tìm kiếm các tập tin và thư mục, nhạc và video.
Không gian làm việc
Ubuntu bao gồm nhiều không gian làm việc. Mỗi không gian làm việc là một máy tính để bàn riêng, cho phép bạn nhóm các cửa sổ ứng dụng.
Để xem các không gian làm việc của bạn, hãy nhấp vào biểu tượng Workspace Switcher trên trình khởi chạy.
Bạn sẽ thấy tổng quan về không gian làm việc của bạn và các cửa sổ mở trên mỗi không gian. Bạn có thể chuyển đổi giữa các không gian làm việc từ đây.
Kéo và thả các cửa sổ trên trình chuyển đổi không gian làm việc để sắp xếp lại các không gian làm việc của bạn.
Sử dụng phím tắt bàn phím Ctrl-Alt-Arrow để chuyển đổi không gian làm việc. Đây có lẽ là cách nhanh nhất, hiệu quả nhất để chuyển đổi không gian làm việc.
Sử dụng phím tắt bàn phím Ctrl-Alt-Shift-Arrow để di chuyển các cửa sổ giữa các không gian làm việc. Tổ hợp phím này chuyển đổi giữa các không gian làm việc, nhưng mang theo cửa sổ hiện đang tập trung.
Menu chỉ số
Nhiều chức năng quan trọng được đặt trong các menu chỉ báo, nằm ở góc trên cùng bên phải màn hình của bạn. Cho dù bạn muốn chuyển đổi người dùng, tắt máy tính, kiểm soát mức âm lượng hoặc thay đổi cài đặt mạng, bạn sẽ tìm thấy một tùy chọn trong một trong các menu chỉ báo.
Biểu tượng thư là chỉ báo nhắn tin, nhóm các thông báo tin nhắn mới cho email, nhắn tin tức thời và các ứng dụng mạng xã hội thành một biểu tượng. Biểu tượng phát sáng màu xanh khi bạn có tin nhắn mới.
Chuyển đổi giữa các ứng dụng
Phím tắt Alt-Tab đáng tin cậy cũng chuyển đổi giữa các ứng dụng trong Unity. Khi bạn Alt-Tab, nó chỉ chuyển giữa các cửa sổ trên không gian làm việc hiện tại của bạn.
Trình chuyển đổi Alt-Tab nhóm các ứng dụng có nhiều cửa sổ thành một biểu tượng. Ba mũi tên bên trái của biểu tượng Firefox cho biết chúng tôi có ba cửa sổ Firefox đang mở.
Nếu bạn chọn Alt-Tab và tạm dừng với biểu tượng Firefox đã chọn, bạn sẽ có thể chuyển đổi giữa các cửa sổ Firefox đang mở. Bạn cũng có thể bỏ qua màn hình này bằng phím tắt Alt- ‘. (‘Là phím phía trên phím Tab.)
Menu toàn cầu ẩn
Unity sử dụng menu chung – các menu ứng dụng không nằm trong cửa sổ của ứng dụng, chúng nằm ở bảng trên cùng. Điều này có thể hơi khó hiểu lúc đầu, vì bạn không thể thấy menu của ứng dụng cho đến khi bạn di chuột qua bảng trên cùng.
Thanh tiêu đề của mỗi cửa sổ cũng hợp nhất vào bảng trên cùng khi bạn tối đa hóa cửa sổ. Điều này bao gồm các điều khiển quản lý cửa sổ. Khi cửa sổ ứng dụng được tối đa hóa, các nút đóng, thu nhỏ và khôi phục của nó được đặt ở phía bên trái của bảng trên cùng, phía trên biểu tượng Dash.
HUD là một cách mới, thay thế để truy cập các menu ứng dụng. Thay vì nhấp vào menu, nhấn phím Alt và bắt đầu nhập tên của mục menu. Bạn có thể tìm kiếm và kích hoạt các tùy chọn menu mà không cần chạm vào chuột.
Phím tắt Cheat Sheet
Unity có rất nhiều phím tắt, nhưng bạn không cần phải nhớ chúng. Bấm và giữ phím Siêu (Windows) và bạn sẽ thấy một phím tắt bàn phím.
Khi bạn nhấn và giữ phím Super, bạn cũng sẽ thấy các số trên các biểu tượng ứng dụng trên trình khởi chạy. Sử dụng các số này kết hợp với phím Super để chuyển sang hoặc khởi chạy ứng dụng.
Ví dụ: nếu biểu tượng Firefox ở vị trí thứ hai, chúng ta có thể nhấn Super-2 để khởi chạy hoặc chuyển sang Firefox.
Chris Hoffman is Editor-in-Chief of How-To Geek. He’s written about technology for over a decade and was a PCWorld columnist for two years. Chris has written for The New York Times and Reader’s Digest, been interviewed as a technology expert on TV stations like Miami’s NBC 6, and had his work covered by news outlets like the BBC. Since 2011, Chris has written over 2,000 articles that have been read nearly one billion times—and that’s just here at How-To Geek. Read more.
In 2005, Linus Torvalds said, “I don’t use GNOME, because in striving to be simple, it has long since reached the point where it simply doesn’t do what I need it to do.” GNOME’s developers have continued removing options.
Ubuntu uses many of GNOME’s settings dialogs, so it’s losing these options along the way. For example, disabling Caps Lock used to take a few clicks — on Ubuntu 14.04, it now requires terminal commands.
GNOME Tweak Tool
GNOME Tweak Tool is available for every Linux distribution with GNOME 3 and GNOME Shell, including Ubuntu. It also works with Ubuntu’s Unity desktop environment because so many components are shared with GNOME. It’s available in Ubuntu’s Software Center as “Tweak Tool.” On other Linux distributions, it may be called something like “GNOME Tweak Tool” or even “Advanced Settings.”
GNOME Tweak Tool is packed with useful settings, many of which used to be exposed in GNOME. You can change the individual window borders, GTK+ (widget), icons, and cursor theme. You can choose fonts for every interface element. You can manage startup applications now that GNOME and Ubuntu no longer offer easy access to the Startup Applications tool.
The Typing section offers some critical options for customizing how your keyboard works. You can choose to disable the Caps Lock key or have it act as another key. You can re-enable Ctrl+Alt+Backspace to kill the X server. You can swap the positions of your Alt, Win, and Ctrl keys if you prefer another layout. You can change what happens when you double-click, middle-click, and right-click on a window’s title bar.
The tool is packed with other options, but all of them relate to GNOME.
Unity Tweak Tool
Unity Tweak Tool is designed only for Ubuntu, which uses the Unity desktop by default. Unity Tweak Tool doesn’t just change Unity desktop settings, though — it also changes other settings. It’s available in the Ubuntu Software Center.
This tool looks right at home alongside Ubuntu’s System Settings. The options in the Unity section allow you to customize Unity itself — you can have the launcher automatically hide to declutter your screen. You can choose to disable those web app integration prompts when browsing the web.
The options in the Appearance section allow you to customize your theme, icons, cursor, and fonts in different ways. In the past, you could do this from the standard GNOME configuration tools — now you can only choose a single theme option and you can’t tweak the individual components without a third-party tool. You can also choose to place the window buttons on the right side of the window’s title bar instead of on the left if you prefer a more traditional, Windows-like title bar.
If you’re a fan of desktop icons, you can choose to display icons for your home folder, network folder, trash, and connected devices on the Unity desktop. The tool is packed with other options, but most of them relate to Ubuntu’s Unity desktop.
Ubuntu Tweak
Ubuntu Tweak is another popular tool for tweaking Ubuntu. It’s not available in the Ubuntu Software Center on Ubuntu 14.04. Instead, you’ll need to open a Terminal window and run the following commands to add the PPA and install the package:
sudo add-apt-repository ppa:tualatrix/ppa
sudo apt-get update
sudo apt-get install ubuntu-tweak
Once you have, you’ll find a variety of options for customizing Ubuntu, including some options not present in other tools. For example, you can customize the look of Ubuntu’s login screen, edit the “Quicklists” that appear when you right-click icons on the Unity desktop’s launcher, and add scripts that appear when you right-click files in the Nautilus file manager. Ubuntu Tweak also integrates a “Janitor” tool that will remove unnecessary files like your cache of downloaded software packages to free up space.
If you ever used Tweak UI with Windows XP, these tools are similar — they provide useful options that aren’t included in the operating system by default. But, while Windows added such options to the Control Panel and moved away from Tweak UI, GNOME’s developers have been removing more and more options.
Will Unity allow making custom launcher icons from .desktop files or via menu editing system? (Right now the launcher doesn’t give the option to “keep in launcher” on all programs.
For some programs I use, I have to make custom launchers or .desktop files.
For instance, daily blender builds are generally just folders with an executable.
In basic Gnome or KDE, I can make a new menu entry with the menu editing system. Then, I can also add it to Docky either from the menu or by dragging a .desktop file to it. Unity launcher doesn’t support drag and drop, so thats not a bug or anything, but when I open a .desktop file, it has unpredictable results. Most time it will not have “keep in launcher”. Sometime it will have a pinnable item without the .desktop ‘s icon, and if I pin the item to the launcher, it will not call upon the program again after closing it. I’ve also gotten it to just work with a .desktop file for celtx .
16 Answers 16
Updated: 2015-Dec
For Ubuntu 15.10 or 14.04 LTS (11.10 or later, with Unity (3D))
NOTE: This can replace the function of an existing icon, or (once created) can be searched for (from Dash icon) to add to current button-bar.
First make your OWN copy of any of the .desktop files you want to modify. It is MUCH safer, and then you can always delete and start over.
Example: Mozilla Firefox, firefox.desktop
(do this once, or after deleting any failed attempt)
Then carefully change any wording, or add additional options.
Note: The ampersand ‘&’ releases the command line immediately.
My own ‘firefox.desktop‘ file:
My own ‘libreoffice-startcenter.desktop‘ file:
A multi-tool icon ‘toolbox.desktop‘ file:
Here are some of my earlier efforts.
/.local/share/applications to dash sidebar. Open ‘Nautilus/Files’; View > Show Hidden Files; navigate from ‘.local’ > ‘.local/share’ > ”.local/share/applications’; drag .desktop file ..
For 11.04 and earlier:
Unity does support custom launchers from .desktop files. To create custom launcher from a .desktop file you need to create a *.desktop file for your program.
The .desktop file should look something like this:
In your file manager open your home folder and navigate to: (You may need to press ctrl+h to show hidden files to see the .gconf directory.)
you’ll see a bunch of folders starting with ” app- “. you need to create a folder for your program. Use the same name.desktop you used in /usr/share/applications . Go into 1 of the folders for something that is already on the dock & copy the xml file and paste that into your new folder. Open it with your text editor and change the name of the *.desktop to your name .desktop .
Open gconf-editor (you can open gconf by running the command gconf-editor in the Terminal) & go to:
Double click the list on the right & add your name.desktop .
Log out & back in and you should see your launcher. (thank you kerry_s on the Ubuntu Forums for helping with this answer)
I’d like to know how I would build Unity from source code in the current development release. Please cover the following topics:
- Which packages are needed to compile Unity?
- Where would I get the current source code?
- What are the steps to actually configure and compile Unity?
- Is it possible to safely run the latest version alongside the version from the repositories?
6 Answers 6
Building Unity from Source
In this guide you will build a separated version of Unity trunk (locally installed to your home directory), so you don’t need to worry about corrupting the version from the Ubuntu repositories and you also won’t need to get root permissions throughout the whole process (except for installing the build dependencies).
0. Installing build dependencies
You’ll need to run this once to install all necessary build dependencies:
If you have source code repositories (aka deb-src ) enabled, you can instead use:
1. Preparing the environment
Replace SOURCE and PREFIX with the directories you’d like the source and build files to go. In this example I put both in my home directory:
2. Building Nux
You will probably need to grab the latest version of Nux to get Unity trunk to compile:
Tip: Most modern desktops and laptops have several cores. You can greatly speed up the compilation by taking advantage of this. The make command has build-in support for this which you can activate using the -jN switch where N is the number of jobs to run in parallel. A good rule of thumb is to run 2 times the number of cores on your processor. Thus, on a normal dual core computer you should run make -j4 to minimize the compilation time.
3. Building Unity
Now grab the latest Unity code and build it:
That’s it, log out and back in again and you should be running the latest Unity. Alternatively, you can run
4. Updating
Make sure to prepare the environment like described in step 1, then simply enter both top-level directories nux and unity , run bzr pull , rebuild, and reinstall.
I suggest removing and recreating the build directory in the unity directory, to make sure no old files are messing with your build.
5. Removing Unity
Remove the three directories $SOURCE , $PREFIX and
You can download an Ubuntu image here. Make sure to save it to a memorable location on your PC! For this tutorial, we will use the Ubuntu 20.04 LTS release.
On Mac OS or Windows you can download VirtualBox from the downloads page here.
This page also includes instructions to download VirtualBox for Linux. However, on Ubuntu, you can find VirtualBox by simply searching for it in the Ubuntu Software app.
Once you have completed the installation, go ahead and run VirtualBox.
2. Create a new virtual machine
Click New to create a new virtual machine. Fill in the appropriate details:
- Name: If you include the word Ubuntu in your name the Type and Version will auto-update.
- Machine Folder: This is where your virtual machines will be stored so you can resume working on them whenever you like.
- Type: Linux
- Version: Ubuntu (64-bit)
On the next screen, you will be able to select the amount of RAM from your main PC that the virtual machine will access. Be sure to remain inside the green bar to ensure you can continue to work outside of the VM whilst it’s running!
Note: If you select Expert Mode, you will be given the option to set all of these parameters in one go. Useful for future setups!
It’s fine to use the default settings for now.
After that, you can select how much of your hard disk your VM will use.
The type of hard disk depends on whether you use VirtualBox with other VM software. For now, we can leave this as a VDI.
Then you can choose whether the hard disk is dynamically allocated (up to the limit we will set on the next screen), filling up as the VM requires it. Otherwise, we can tell it to allocate the full amount of memory right from the start. This will improve performance but may take up unnecessary space. We’ll leave it as dynamically allocated for this tutorial.
Finally you can set the maximum amount of memory your VM can access.
After this click Create to initialize the machine!
3. Install your image
Click Start to launch the virtual machine. You will be prompted to select the start-up disk. Use the file icon to open the Optical disc selector and click Add to find your .iso file
Choose the disc image you want to use, then click Start on the start-up disc window.
Note: If you close this window before selecting an image you can still do so from the Devices menu at the top of the VM window. Select Devices > Optical Drives > Choose/Create a disc image…
Ubuntu desktop should now boot and display the installation menu.
After this point you can follow the normal installation flow for Ubuntu Desktop.
But there’s one more thing to talk about before we move on!
4. Changing the window resolution
You’ll notice that by default VirtualBox only displays at 800×600 resolution. But if you right click the Window in monitor icon at the bottom of the screen and select Virtual Screen 1, there are many more options available, but greyed out.
To resolve this we need to change some settings. Close the window and select Power off the machine.
Return to the manager window and select Settings.
Then navigate to the Display tab.
Change the Graphics Controller setting to VBoxSVGA and click OK (ignore the warning).
Now restart your virtual machine.
Once Ubuntu has started, you should now be able to select all of the available resolutions from the virtual monitor menu, or simply resize the window to adjust the display.
That’s the end of the primary tutorial. Congratulations, you now have Ubuntu running on a virtual machine!
What follows are some more advanced options if you’d like to explore VirtualBox further.
5. Installing Guest Additions
Guest Additions is an extra piece of software that unlocks some more advanced features of VirtualBox. This includes better integration between your virtual machine and the host machine, as well as improved video support that enables the display resolution options when using VMSVGA.
To install Guest Additions, you need to complete your installation of Ubuntu in your virtual machine and boot to the desktop.
From there, select Devices > Insert Guest Additions CD.
This will prompt you to download the Guest Additions disk image file.
Click Download.
Then click Insert.
The disc will appear inside your virtual desktop and you will be prompted to run the software.
Enter your password to install it.
Once this is complete, you will need to restart your virtual machine for the new features to take effect.
Close the machine, but before you start it up again, return to the Settings menu and change the Graphics Controller back to VMSVGA and Enable 3D Acceleration. This will improve the performance of your virtual machine by taking advantage of your PC’s 3D hardware and allow you to resize your desktop resolution!
Another feature this unlocks is the shared clipboard, which you can activate in Devices > Shared Clipboard. This will allow you to copy and paste between your virtual and host machines, useful when you want to copy outputs from one device to the other.
6. Explore Virtual Box
As you can probably tell, there are tonnes of further configuration options available in VirtualBox and we’ve only scratched the surface.
VirtualBox allows you to create and configure multiple virtual machines, so don’t be afraid to create new instances of Ubuntu to try out different system and storage configurations to fine tune your performance.
Why not try following the tutorial above with one of the Ubuntu flavours!
7. Tell us your thoughts!
Thank you for following this tutorial, we’d love to hear how you got on.
Give us feedback in the Ubuntu Discourse if you have any issues.
To help us improve our tutorials, we’d love to hear more about you:


