Last Updated: August 24, 2020 References Approved
This article was co-authored by Ben Barkan. Ben Barkan is a Garden and Landscape Designer and the Owner and Founder of HomeHarvest LLC, an edible landscapes and construction business based in Boston, Massachusetts. Ben has over 12 years of experience working with organic gardening and specializes in designing and building beautiful landscapes with custom construction and creative plant integration. He is a Certified Permaculture Designer, is licensed Construction Supervisor in Massachusetts, and is a Licensed Home Improvement Contractor. He holds an associates degree in Sustainable Agriculture from the University of Massachusetts Amherst.
There are 16 references cited in this article, which can be found at the bottom of the page.
wikiHow marks an article as reader-approved once it receives enough positive feedback. In this case, several readers have written to tell us that this article was helpful to them, earning it our reader-approved status.
This article has been viewed 208,519 times.
Using pebbles in a garden brings different colors and textures to the garden. Pebbles can fill up otherwise empty space, leaving a visual impression that’s more interesting than simple dirt, soil or mulch. Pebbles can serve other purposes, such as creating a decorative border, landscaped path, and keeping weeds at bay. [1] X Expert Source
Ben Barkan. Garden & Landscape Designer Expert Interview. 2 June 2020. In order to best pebble a garden, it’s important to clear a space for pebbles, choose the pebbles, and put the pebbles into the garden space.
u00a9 2020 wikiHow, Inc. All rights reserved. wikiHow, Inc. is the copyright holder of this image under U.S. and international copyright laws. This image is not licensed under the Creative Commons license applied to text content and some other images posted to the wikiHow website. This image may not be used by other entities without the express written consent of wikiHow, Inc.
n
Ben Barkan. Garden & Landscape Designer Expert Interview. 2 June 2020. This should be placed over the dirt or other base material that will be covered with pebbles. The weed mat covers the cleared area for the pebble garden and makes sure little will grow underneath the weed mat. [7] X Research source
- The base covering that will be covered by the weed mat can be soil, sand, grass, pavement or other natural material.
- The weed mat will limit the growth of weeds coming up through the pebbles. It will also keep the soil or other base material from mixing with the pebbles.
- Weed mats can be purchased in a garden or landscaping store. They are made from a variety of materials including plastic.
- Get a weed mat that’s safe for the environment and will only affect the area you want it to for your pebble garden. A biodegradable weed mat will guarantee your weed mat only affects your garden area and will decompose after you’re finished using it in your pebble garden. [8] X Research source
Written by: Tom Ross
Written on: July 14, 2020
Denis Tabler/Hemera/Getty Images
Pebble gardens are popular all over the world, but are especially beautiful in Italy where vast areas are intricately landscaped in pleasing patterns and geometric designs with polished pebbles of different sizes and colours.
Meandering paths, shallow streams of sparkling water and an array of flowering plants and trees grace the peaceful surroundings. The DIY garden designer can add a wrought-iron bench, a pergola or a trellis with a bounty of colourful flowers. A pebble garden is a low-maintenance garden after installation.
Place the pebble garden in an area that has enough space to incorporate the desired pebble designs as well as garden furniture or structures such as trellises, fountains or a pergola. The location should be out of the normal traffic pattern and have some room nearby to expand into if desired.
Wall in the pebble garden with sleepers tightly placed end to end that are sunk 5 cm (2 inches) into the ground. This is necessary to contain the pebbles within the garden and help maintain the designs.
- Pebble gardens are popular all over the world, but are especially beautiful in Italy where vast areas are intricately landscaped in pleasing patterns and geometric designs with polished pebbles of different sizes and colours.
- Place the pebble garden in an area that has enough space to incorporate the desired pebble designs as well as garden furniture or structures such as trellises, fountains or a pergola.
Till the soil in the garden with the tiller if the soil is hardened and resists draining. Good drainage for the garden is very important. Lay down weed barrier cloth.
Fill the garden with 2.5 cm (1 inch) of sand from wall to wall, using a shovel, and add 5 cm (2 inches) of pea gravel.
Place plastic garden border strips to fill in a circular area measuring 1.8 by 1.8 metres (6 by 6 feet) in one corner of the garden that offers some privacy while providing a good view of the garden itself. Use coloured pebbles of the same size that stand out dramatically from the pea gravel to fill the area in to a depth of 2.5 cm (1 inch). Place a bench made of stone or wrought iron in the centre of the circle. Install a barbecue pit or bird fountain near the bench.
- Till the soil in the garden with the tiller if the soil is hardened and resists draining.
- Place plastic garden border strips to fill in a circular area measuring 1.8 by 1.8 metres (6 by 6 feet) in one corner of the garden that offers some privacy while providing a good view of the garden itself.
Lay down a 60 cm (2 feet) wide path that meanders through the garden from the entry point to the bench. Line the path with plastic garden border strips and fill it in with coloured pebbles of the same size to a depth of 5 cm (2 inches). Line the path with solar lights or larger stones of the same type and colour.
Install an arched trellis with flowering plants at the entry to the path.
Add plants in highly visible areas to provide colour. Dig through the gravel and plant succulents, rose bushes or even small trees in the garden, then spread the gravel over the root system.
Create several pleasing designs to fit specific areas within the garden and fill them in with different colours and sizes of pebbles to a depth of 2.5 cm (1 inch).
If you’re looking for an easy and most amazing way to transform your garden then use garden Pebbles!
Are you looking for a quick option to transform your garden and make it beautiful and attractive for visitors? If yes, then garden pebbles are the best options that you can opt for. One of the most important things about these is that regardless of what you do, your garden will always look remarkably beautiful and pleasant.
In the market, you can find varied, affordable and colorful garden pebbles. And there are many eye-catching and creative ways out there to use them. The best part is that these are very easy to maintain. For taking it to a whole new level and to increase the appeal of your garden and landscaping, you can opt for river rocks.
Why You Should Use Garden Pebbles
These are pleasant to look at and add a wide range of natural colors to the garden, thus, making your garden look more natural. It helps to maintain the original look and enhances the beauty of your garden. Some of the more notable benefits are:
- These pebbles or stones are durable and can withstand almost any level of natural temperature. They are also effective for areas around the stove or fireplace as these are natural stones and resistant to most natural elements.
- You can also use them for mulching and if you have a container garden pebbles can make your container plants look better.
- The surfaces of the garden pebbles are flush and these are very safe to walk on. These stones offer more traction and as a result, slipping is out of the question with these stones in place.
- These stones can be used on dry surfaces such as on a plain landscape and also wet surfaces like a garden floor, swimming pool and portions of your deck.
Useful Advice on Grouting Pebbles
- When you prepare the grout for placing the garden pebbles make sure that you avoid putting too much of water because adding a lot of water can result in a weak grout that can flake in later stages.
- In order to appreciate the beauty of these naturally attractive stones, you need to remove the excess grout with the help of a wet sponge. This is important because in order to make the setting beautiful you want to show as much stone as possible.
- In order to maintain the beauty of these natural stones, you need to make sure to apply sealant every 2-3 years so that the beauty can be prolonged.
Installing or using garden pebbles in your property all by yourself is a fun and creative activity. However, you need to make sure that you follow a proper procedure that will help to get everything done in the right way. If you are not good with working on grout and don’t have many creative ideas then it is best to call the professionals to help you in this regard.
Get Affordable Rates
There are a lot of things that you can buy to get your garden pebbles installed and there are many sellers available in the market. However, you need to make sure that you only buy from affordable sellers and get the best deals in this regard. Since there are multitudes of sellers in the market there is a lot of competition; and as a result, you can get attractive garden pebbles at the most affordable rates.
So, make sure that you compare all your options and then decide on the one that is most suitable for your needs. Get the help of the internet to understand the various possibilities that you have with these stones.
Pin It!
Author Bio:
I am Melissa Hamler, an experienced and professional blogger. I love to write a blog on various topics like home improvement, garden, business, health etc. You can follow me on Facebook or Twitter for more updates.
By: Nicole Vulcan
21 September, 2017
Using a ground cover around your plants is more than an aesthetic choice. Sure, it gives your garden a finished look, but also helps the soil retain moisture. Pebbles make a fine ground cover for your garden, but because they’re so small, you’ll need to take steps to ensure the pebbles stay in place. While it’s best to do this before you plant any plants in the garden, you can also add a layer of pebble mulch to an existing garden.
Benefits and Drawbacks
If you’re using pebbles as a ground cover around your plants, they pebbles act as a mulch cover for the garden. Mulch helps to retain moisture in the soil because it provides a barrier that reduces the rate of evaporation. According to Common Ground Garden Program, which is run by Los Angeles County Master Gardeners, a mulch layer can reduce evaporation by up to 70 percent. While this helps, pebbles don’t add nutrients to the soil like organic mulches do. You’re also more likely to have to buy pebbles, unless you have a gravelly soil and time to sift it for stones.
Create a Side Barrier
Wherever you’re using pebbles in your garden, you’ll need to first dig out the area for them, and put up some kind of barrier. Because they’re so small, pebbles can easily get kicked around, or blow around if something isn’t acting as a wall to hold them in. Ideally, the pebble ground cover should be between 2 and 3 inches deep. With the area dug, smooth the bottom and the walls with the flat side of a shovel, hoe or trowel.
- If you’re using pebbles as a ground cover around your plants, they pebbles act as a mulch cover for the garden.
- Wherever you’re using pebbles in your garden, you’ll need to first dig out the area for them, and put up some kind of barrier.
Making Room for Plants
If you have existing plants in the garden, be careful not to disturb their roots. Instead of using a shovel around the plants, use a trowel and dig slowly and carefully, removing just 1 inch of soil around them. Loosen the soil throughout the area where you don’t have existing plants.
Landscaping Fabric and Edging
To keep weeds from growing under or between the pebbles — and to keep the pebbles from working their way into the soil — lay down a layer of landscaping fabric along the bottom and sides of the bed. If you have existing plants cut the landscaping fabric around the plants. Don’t use landscaping plastic, as that will create a moisture barrier that won’t allow water to penetrate and reach your plants’ roots. Use landscaping staples to hold the landscaping fabric in place. Set edging along the “walls” of your garden, with a lip of the edging rising above the height of your pebbles, to keep the pebbles in place. With all of that in place, spread the pebbles over the bed, sprinkling a thinner, 1-inch layer around the plants and a thicker 2- to 3-inch layer over open garden areas.
There are all kinds of creative solutions to landscape problems. Dry areas or spaces with natural dips in the topography benefit from gravel gardens. What is a gravel garden? These spaces are not only covered with gravel mulch but also host a variety of plants or even a pond. There is a wide range of gravel garden plants that combine hardiness with tolerance to diverse moisture levels. Some tips on how to make a gravel garden will have you on your way to enjoying a unique landscape filled with texture and color.
What is a Gravel Garden?
This type of garden concept is characterized by gravel mulch, but may also include trees, shrubs, ground covers, flowers, larger rocks and differently textured hardscape details.
The best types of gravel garden plants are perennials, ornamental grasses and herbs. The effect provides a Mediterranean style garden that is perfect for plants such as:
Some bulbs such as alliums and crocus will break through the gravel mulch and naturalize in clumps. Xeriscape plants work well in gravel gardens. These might include:
There are many ideas for a landscape gravel garden and suitable plants abound. Lay out a plan before you start and choose gravel garden plants that will thrive in your lighting, moisture and temperature situation.
Can a Garden Be Planted on Top of Gravel?
The curious gardener might ask, “Can a garden be planted on top of gravel?” It seems like it should not work due to the infertility of stone. The key is good soil preparation below the gravel surface.
Dig soil to a depth of at least five inches and incorporate rotted organic material or compost. Ensure good drainage by working in fine sand, unless your soil is already porous. The soil needs the extra nutrients and good drainage to prevent soggy roots and infertile conditions.
Gravel mulch on top acts as a natural moisture conservator, but the stone will get hot in sunny areas and some water will evaporate. Consider this when choosing gravel garden plants.
Install perennials and herbs in clumps to maximize their visual appeal. Put vertical specimen plants as focal points in the center or just off center. Low growing plants work well to outline a natural looking path through the gravel garden.
Ideas for a Landscape Gravel Garden
You can design any shape or size of gravel garden. The area should fit naturally into the rest of your landscape and take advantage of any discrepancies in the yard, such as large rock formations, dips and valleys or already rocky spaces.
If you want to encourage a natural pond, use a butyl liner in a depression held down at the edges by rocks, then spread gravel over that and fill with water. Plant water plants at the edges to conceal any plastic liner that may show.
Flatter areas with gravel benefit from occasional raking to remove plant debris and keep them looking clean and sharp. Be creative and bold with your gravel garden. It should reflect your personality and gardening zone.
The yard is a great place for enjoying the beautiful sunny days. If you are looking for some ideas to beautify your backyard, then you should definitely take a look at these impressive garden edging ideas with pebbles and rocks. These days, this natural material in becoming more and more popular garden decoration. And the most important part is that you can find it in almost any color you want. I prefer decorating with river rocks, but however, the black and white pebbles are also interesting for landscaping.
The truth is that no newly made garden bed is complete without some interesting edging. You can make magnificent edge out of wood, concrete, plastic, brick, metal or stones and distinguish your garden from the rest of your yard. If you thought that this is a difficult task, than you should see the pictures that I rounded up for you and get inspired. Installing landscape edging is a very easy process that anyone can achieve without any help and that can make a great impact on the aesthetics on your outdoor living space.
So, let’s take a look at these ideas and draw some inspiration. You may find them interesting and attractive for your space, who knows. Enjoy and have fun!
image via
image via
image via casepractice.ro
image via casepractice.ro
image via
image via
image via
image via
image via thegardeningcook.com
image via theinspiredroom.net
Pebbles and rocks are easy to maintain and as you can already see you can use them in a variety of ways to create fantastic garden edging. All of the ideas here are very attractive and beautiful and can make your yard more inviting and stunning for your guests.
Many home owners used number of recycled materials like dinner plates, pipes and bottles for garden edging, but I think that the stones are the best because of their natural beauty, the contrast and the texture they add to the backyard space.
Big stones can be the perfect edging for both veggie and flower garden. However, you will need strength in carrying and placing them in your garden. The best option is to ask your friend to help you. To achieve a ‘wall’ effect, you should find stones in the same size. While the big stones can be difficult for placing, the pebbles can be found in variety of colors and can add texture to your yard.
image via serenityinthegarden.blogspot.com
These garden edge ideas will complete the look of your garden landscape, while giving plants their own space to grow. When making the edge, be careful not to overdo. I truly hope that you have found these edge ideas with stones and pebbles stunning and you will use them in your yard. I would love to know which idea is your favorite, so please share your comments with me! Thank you for reading! Enjoy in the rest of your day and don’t forget to stay up to date with the content of Top Dreamer!
Easy Garden Accents
Jacki Cammidge is a participant in the Amazon Services LLC Associates Program, an affiliate advertising program designed to provide a means for sites to earn advertising fees by advertising and linking to amazon.com. Other links on this site may lead to other affiliates that I’m involved with, at no extra cost to you.
When all you have are rocks, pebbles and stones, find a way to use them for garden art. I have lots of small flattish rocks that are formed by the action of frost on the bigger rocks, flaking off small pieces which then become weathered and worn.
These are only about four or five inches tall – you can make them out of rugged rustic rocks like these, or smooth flat pebbles from a shoreline.
Each will give you a unique feature for your garden.
These are simple to make – first, collect your pebbles or stones, and make sure they’re dry and dust free.
I used a wire brush to clean them, but you could just leave them where they’ll be washed by rain.
Figure out which rocks go best with the base, which is much larger to prevent the finished stack from toppling over.
I aimed for a pyramid shape but I’ve seen these where they start small, and have a bulge in the middle. Smooth pebbles used this way make great rock stacks.
I used Permatex 80050 Clear RTV Silicone Adhesive Sealant, 3 oz. to glue the rocks together, to test it out.
It claims to be suitable for outside use, and is also quite thick, which is necessary if the stones are rough surfaced. It’s held up well under my winters, which are cold and snowy.
For now, these will stay on the table until they’re cured – the glue says that full curing of the silicone adhesive will take 24 hours.
Next time I go to the river, I’ll be looking for some smooth pebbles and make some more with those. Meanwhile, these will accent planters or garden beds or line a walkway.
Related Articles
After laying out multiple landscaping areas in your yard, you may want to create a way to walk among the gardens without crushing your plants. Instead of relying on the cold, geometric look of concrete paving stones, turn to the natural look of a winding pebble path. You can choose the shade of your pebbles to complement your plants or pick a distinctive contrasting color for visual appeal. The most difficult part of this project is the heavy lifting; call some friends to help and you’ll finish in a weekend.
Lay a string on your lawn to define the path you want your walkway to take. Lay another string 3 feet away that mimics the curves and direction of the first string. This is the outline for your pebble walkway.
Remove the grass and soil between the two strings all along the length of your walkway. Dig down 4 inches along the entire length, creating a trench. Shovel the grass and dirt into a wheelbarrow to make it easier to remove.
Smooth the bottom of the trench with a rake. Use a hand tamper to compact the soil in the bottom of the trench. Measure the depth of the trench every few feet, and add more soil when needed to keep the depth a uniform 4 inches.
Fill the trench with a 2 1/2-inch layer of crushed stone and stone dust. Rake the stones to keep the surface of the stone layer level. Spray the surface of the stones lightly with a hose. Compact the stone layer with the hand tamper.
Cover the compacted stone layer with landscape fabric. Place the fabric shiny side up, and cut and fold it to fit the curves with a slight overhang on the edges.
Place plastic or metal edging on both sides of the length of the trench. Position the edging with the sides right up against the sides of the trench. Lay a block of wood on top of the edging and tap it down into the soil and rocks. The spikes in the bottom of the edging will punch through the landscape fabric, holding it in place. Push on the edging until the top edge is about 1/2 inch above the surrounding ground.
Pour a layer of pebbles over the landscape fabric until the surface of the pebbles is about 1/2 inch below the top of the edging. Smooth the surface of the pebble layer with the back of the rake to make it level.
Posted on December 15th, 2015 by Artisan Stone
Pebbles are a great way to add visual and textural interest to your garden or outdoor area. By incorporating pebbles into your landscape design, you can make your garden or outdoor space appear stylish and luxurious. You can use pebbles to fill an empty area and give it character, as well as bring a natural feel to the place.
Pebbles come in varying shapes, sizes and colours, and can therefore complement any type of landscape design. Here are 10 amazing ways you can use pebbles for your landscaping project.
1. Drainage
Pebbles are a great way to decorate drains or grates whilst retaining drainage. You can cover grates on a spillover or strip drains in paved areas to add contrast and texture without affecting drainage and water-flow.
2. Ground cover
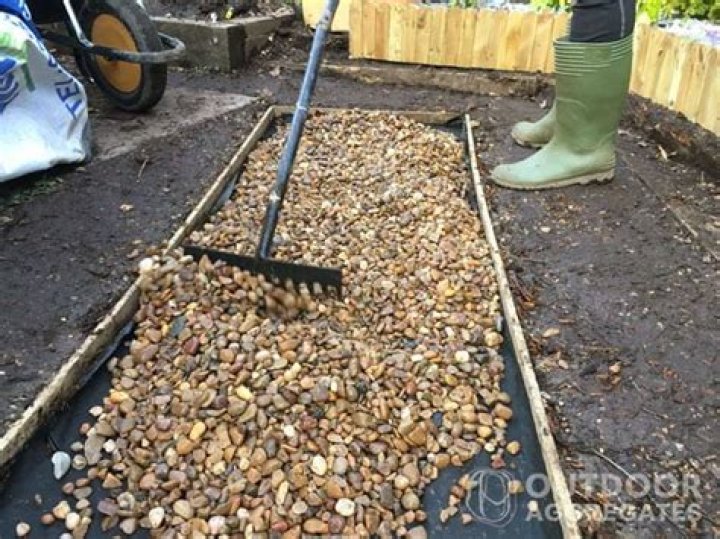
Whether you have a neglected and uneven corner, an eroding pathway, or an unkempt and unwanted lawn, pebbles offer good even coverage and add a great colour feature to these areas. Pebbles can also be placed over a weed mat for an instant facelift. It’s best to use 20-30mm pebbles with 50-70mm depth of coverage if there will be foot traffic.
3. Tree base
If you have a tree in your yard or garden, you can use pebbles to make the base more visually appealing. Use the pebbles to even out the ground around the tree, surround the tree with bricks or large rocks, and then fill the space up to the tree trunk with pebbles.
4. Multi-textured walkway or pathway
Pebbles can be used to fill in and define a walkway or pathway and are great for use with stepping stones. Choose a pebble that compliments your steppers for continuity or a colour that contrasts with the walkway or pathway in order to highlight the area. Pebbles can also be mixed with other stones along the path to create more texture and movement.
5. Outdoor living space
You can also use pebbles to create an outdoor living space by creating a ground cover using pebbles and pairing with benches, tables and lounges. This can be a good way to achieve desired hard/soft ratios if paving is non-compliant.
6. Garden mulch
Pebbles can be used as mulch in garden beds, where they can protect the soil from erosion, sunlight and weeds. What’s more, pebble mulch can last a lifetime! Pebble mulch is generally best suited for native and arid gardens where composted organics aren’t as high in demand.
7. Aquascaping
Pebbles are a great way to create an underwater landscape, you can use different sizes to create ground cover, hills and boulders. Using different colours can also add interest or define spaces to highlight plants or features.
8. Zen rock garden
A Zen rock garden usually contains moss islands, an evocative boulder or two, and raked pebbles. You can create dimension and visual interest by utilising darker colours, such as having a lower border of flat rectangular stones set around smooth pebbles. The garden can be protected from children or pets with a raised terrace.
9. Yard art
Create an eye-catching, magical landscape by forming patterns or shapes in an area of your lawn and outlining them with pebbles. You can make a chequerboard effect, a miniature maze, or big circles on the grass by using pebbles to define or fill them. You can also make footprints or flowers using pebbles of different shapes, sizes and colours and the kids will have a great time helping out.
10. Pot plants
Decorative Pebbles are the perfect finishing touch for pots, jars or troughs. You can use pebbles to cover soil on the surface of pot plants to add texture and colour. As a bonus they also stop inquisitive household pets from digging up soil.
8 acres of severely eroded, barren land in the West of Auroville, along the Kootroad, have been successfully regenerated since 1994, without external inputs – no soil or organic matter from outside – and no hired labour. Pebble Garden has today a vibrant indigenous forest with returning wildlife, a productive bio-diverse garden and a fledgling fruit tree area.
A garden area of a quarter acre is devoted to Seed Conservation. It was created by an intensive process of soil building, using select pioneer species to create biomass in-situ in raised beds, and today supports a plant collection of more than 100 endangered traditional vegetable varieties from all over India – root crops, herbs, perennial and wild food crops, medicinal plants and flowers. These varieties are ideal for home use and home gardens. ‘A Garden for Everyone’ is an outreach initiative to share these hardy plant varieties, which have performed well on this wasteland, with home gardeners and subsistence farmers throughout India. They are shared within known organic farmers ’ collectives via organic fairs, seed melas and through personal contacts and references. A place of continuous learning, Pebble Garden also has a charcoal/wood vinegar production plant, and conducts research on in terra preta.
A guided tour is offered every Friday at 4 pm.
For more info, see various articles on the internet.
It is in the silence of a peaceful mind that one can best commune with Nature.
Decorative pebbles – 3 great uses in the garden
More and more regularly we are seeing Decorative Pebbles and Gravels being used as a ground cover in garden beds as mulch, pathways, driveways and areas around the house where a something just a bit more “pretty” then bark or mulch is required. With the ever expanding and wide range of Decorative Pebble options available on the market it’s no wonder, you can now choose almost any colour of the rainbow!
Locally sourced pebbles can be a great budget option for your landscape design, with many naturally smooth river pebbles available in a variety of colours from all over the East coast of Australia. But for a real premium look, check out the range of decorative pebbles from Kashmiri Pebbles. They are supplied by the 20kg bad (or for larger areas, 1 Tonne bags can be sourced by special order) and come in a huge range of colours and finishes.
Using Decorative Pebbles as a garden mulch
The most common use of Decorative Pebbles is as a mulch in garden beds. Pebble mulch is a great option for a number of garden types and although initial install costs might be slightly higher than traditional tree mulch, long term maintenance costs will be greatly reduced. Why? Well tree bark and mulch, being organic in nature will inevitably break down and require replenishment. Expect to be replacing your mulch every 6-12 months and bark every 12-18 months. Decorative pebbles on the other hand can last a lifetime! Be aware however, that bark and mulch play a number of key roles in the garden. The first is quite simply soil protection from things like erosion, sunlight and weed germination a role pebble mulch can easily fill. The second is to break down and “feed” the garden bed adding organic compost from the rotting timbers. Unfortunately this is one role pebble can not fill, so you will need to ensure that you feed your plants and gardens in other ways such as through the regular application of liquid and slow release fertilisers. Pebble mulch is best suited for native and arid gardens where composted organics are not as high in demand.
Kashmiri Ivory Pebble next to pavers
Using Decorative Pebbles as a ground cover
A great way to spruce up an otherwise dreary area is to add colour! And much like paint and carpet, Decorative Pebbles can do just that for your garden. If you have a neglected corner, an eroding pathway, or an unkept and unwanted lawn, decorative pebbles might be your best option. We recommend at least a 50mm layer of pebble is used in order to get good even coverage and weed control matting is a must in these areas. In most cases with the use of weed mat (and a little bit of weed killer), the pebbles can go down straight over the existing surface for an instant facelift.
Pebbles no bigger than 20-30mm are recommended if there will be foot traffic and obviously the smaller the pebble the “softer” it will be under foot, but too small and you’ll leave footprints! For driveways a 20mm gravel (crushed rock) works best, as the angular edges lock in a minimise movement under tyres.
Using Decorative Pebbles as a garden and pot features
One of the easiest ways to smarten up your deck, patio or backyard is with large potted plants. Sometimes planting into ground is just not possible whether you’re renter or you have limited space. Our range of small to large feature pots are perfect for just that, and they can be finished off beautifully with a bag or two of Kashmiri decorative pebbles. With all the colours imaginable, you will have no trouble matching your pebble choice to your house, pot or garden colour scheme. Not only will the pebbles add a great colour feature they will also help protect your planting investment by preventing the potting medium from drying out so fast in the heat.
So if you’re looking for decorative pebbles for your garden project, drop in and see our full range this week! We have the biggest range of bulk decorative pebbles and gravels in Brisbane plus the largest stock holding of Kashmiri Pebbles in Australia!


