Matt Klein has nearly two decades of technical writing experience. He’s covered Windows, Android, macOS, Microsoft Office, and everything in between. He’s even written a book, The How-To Geek Guide to Windows 8. Read more.
The app system in iMessage is really cool, letting you paste content directly into messages that once required several additional steps. If you’re choosy about which apps appear in iMessage, though, you can prevent iMessage from automatically adding them.
While there’s a lot more to iMessage apps than preventing their installation, here’s the gist: many iPhone apps, such as Giphy or IMDB, will install a small iMessage plugin when you install the app. This plugin will let you search for and instantly paste GIFs into your messages or movie information, and so on.
Many other apps do this as well, including Pandora, Dropbox, Apple Music, and more. Nevertheless, having all those apps in iMessage can quickly prove unwieldy, and you may want to prevent them from automatically being added in the first place.
To turn off automatic app additions, first tap the App Store icon in iMessage, and then tap the four dots in the lower left corner.
Next, tap “Store” on the resulting pane that slides up from the bottom.
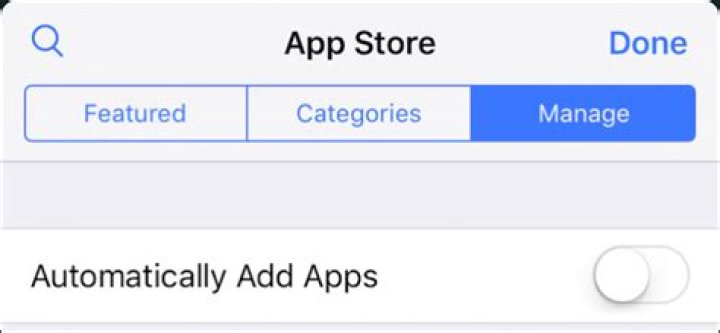
When the App Store opens, tap on the “Manage” tab and then tap off the switch next to “Automatically Add Apps”.
While you’re at it, if you have a bunch of apps already added, you can turn off any that you don’t want or think you will use. That way when you do use apps, you won’t have to swipe through them to get to your favorites.
Just remember that since apps are no longer automatically added, you may miss out unless you routinely check the Manage tab and turn on any new ones.
Matt Klein has nearly two decades of technical writing experience. He’s covered Windows, Android, macOS, Microsoft Office, and everything in between. He’s even written a book, The How-To Geek Guide to Windows 8. Read more.
The app system in iMessage is really cool, letting you paste content directly into messages that once required several additional steps. If you’re choosy about which apps appear in iMessage, though, you can prevent iMessage from automatically adding them.
While there’s a lot more to iMessage apps than preventing their installation, here’s the gist: many iPhone apps, such as Giphy or IMDB, will install a small iMessage plugin when you install the app. This plugin will let you search for and instantly paste GIFs into your messages or movie information, and so on.
Many other apps do this as well, including Pandora, Dropbox, Apple Music, and more. Nevertheless, having all those apps in iMessage can quickly prove unwieldy, and you may want to prevent them from automatically being added in the first place.
To turn off automatic app additions, first tap the App Store icon in iMessage, and then tap the four dots in the lower left corner.
Next, tap “Store” on the resulting pane that slides up from the bottom.
When the App Store opens, tap on the “Manage” tab and then tap off the switch next to “Automatically Add Apps”.
While you’re at it, if you have a bunch of apps already added, you can turn off any that you don’t want or think you will use. That way when you do use apps, you won’t have to swipe through them to get to your favorites.
Just remember that since apps are no longer automatically added, you may miss out unless you routinely check the Manage tab and turn on any new ones.
Sådan installeres, styres og bruges iMessage Apps
Mange andre apps gør det også , herunder Pandora, Dropbox, Apple Music og meget mere. Ikke desto mindre kan få alle disse apps i iMessage hurtigt vise sig uhåndterlige, og du vil muligvis forhindre dem i at blive tilføjet automatisk. For at deaktivere automatiske appudvidelser skal du først trykke på ikonet App Store i iMessage og derefter tryk på de fire prikker i nederste venstre hjørne.
Klik derefter på “Butik” på den resulterende rude, der glider ned fra bunden.
Når App Store åbnes, skal du trykke på fanen “Administrer” og derefter trykke på knappen ved siden af ”Automatisk Tilføj Apps”.
Mens du har det, hvis du har en masse apps allerede tilføjet, kan du slukke for noget, som du ikke vil have eller tror, du vil bruge. På den måde når du bruger apps, behøver du ikke at sveipe igennem dem for at komme til dine favoritter.
Husk bare, at siden apps ikke længere automatisk tilføjes, kan du gå glip af, medmindre du rutinemæssigt kontrollerer fanen Administrer og drej på eventuelle nye.
Du ser det hver gang du logger ind på din Mac: dit profilbillede. Hvis du er som de fleste, har du valgt det igen, når du opretter din bærbare computer, men hvordan ændrer du det nu? Det er enkelt. Gå til Systemindstillinger, og klik derefter på “Brugere og grupper.” Du vil se en liste over brugere til venstre; den aktuelle bruger vil blive valgt.
Netgears Arlo Pro trådløse sikkerhedskameraer kan vare mellem 3 og 6 måneder på en enkelt opladning, men der er mange faktorer der kan påvirke batteriets levetid. Sådan spænder du det ud så meget som muligt. Før vi dykker dybt ind i de forskellige tricks, du kan gøre for at spare på batterilevetiden, skal du huske på, at du kan holde dine Arlo Pro-kameraer tilsluttet til magten 24/7.
Don’t want to see photos shared with you in Messages to show up in Photos app in iOS 15 and iPadOS 15? You can turn this feature off right now.
Unwanted Photos Showing up from Messages in Photos App After Updating to iOS 15 / iPadOS 15? You Can Change this Instantly
Everyone is starting to get acquainted with iOS 15 and iPadOS 15, and we’re sure many of you are waking up to strange changes in the software which just weren’t there before. For example, whenever someone shares a photo with you in Messages, it will appear in your Photos app automatically, just like that. For a lot of people, that is a game-changer feature as it rids you from saving photos manually. But for some, it can be a bit uncomfortable. Just imagine, a photo which you don’t want in your Photos app just pops right up for no good reason. Thankfully, you can turn this feature off and we will show you how.
Tutorial
Step 1. Launch the Settings app on your iPhone or iPad.
Step 2. Scroll down and tap on Messages.
Step 3. Scroll down a little more and you will see an option called Shared with You. Tap on it to open.
Step 4. Here you will see a bunch of toggles. Just turn off the Photos one as shown in the screenshot below.
Whenever someone shares anything with you in Messages, it will never ever appear in the Photos app on its own. You have to manually save it just like how we used to do it before yesterday.
Personally, I’ll just leave this feature turned on. I just don’t like going through so many photos and saving them one at a time. I just want them to appear like magic in my Photos app. If you’re not on the same boat as me, that’s perfectly fine.
Looking to install the update instead? Check out the following:
Programų sistema “iMessage” yra tikrai kieta, leidžianti įklijuoti turinį tiesiai į pranešimus, kai reikėjo kelių papildomų žingsnių. Nepaisant to, kad jūs pasirinkote, kokios programos rodomos iMessage, galite užkirsti kelią iMessage automatiškai juos pridėti.
Nors iMessage programoms yra daug daugiau nei jų diegimo prevencijos, čia pateikiama daugybė iPhone programų, tokių kaip Giphy arba IMDB, įdiegsite mažą iMessage įskiepį, kai įdiekite programą. Šis įskiepis leis jums ieškoti ir iš karto įklijuoti GIF į jūsų pranešimus ar filmo informaciją ir tt
SUSIJUSIOS: Kaip įdiegti, valdyti ir naudoti iMessage programas
Daugelis kitų programų tai daro. , įskaitant “Pandora”, “Dropbox”, “Apple Music” ir kt. Nepaisant to, visų šių programų iMessage gali greitai pasirodyti nepatogus ir galbūt norėsite, kad jie nebūtų automatiškai pridedami.
Norėdami išjungti automatines programos papildymus, pirmiausia palieskite “App Store” piktogramą iMessage ir tada bakstelėkite keturis taškus apatiniame kairiajame kampe.
Tada palieskite “Store”, esantį gaunančioje srityje, kuri skaidosi iš apačios.
Kai atidarys “App Store”, palieskite skirtuką “Tvarkyti” ir tada palieskite šalia “Automatiškai pridėti programas”.
Kol jūs esate, jei jau turite daugybę jau pridėtų programų, galite išjungti bet kokį, kurio nenorite, arba manote, kad naudositės. Tokiu būdu, kai naudojate programas, jums nereikės jų perbraukti, kad patektumėte į savo mėgstamiausius.
Tiesiog atminkite, kad nuo to laiko, kai programos nebebus automatiškai pridedamos, galite praleisti progą, nebent jūs reguliariai patikrinsite skirtuką “Tvarkyti” ir pasukite apie bet kokius naujus.
Lėktuvo režimas išjungia įrenginio korinį radiją, “Wi-Fi” ir “Bluetooth” – visas belaidžio perdavimo funkcijas. Tačiau daugelis lėktuvų dabar siūlo “Wi-Fi” skrydžio metu, o mobiliojo ryšio prieiga gali greitai ateiti į lėktuvus, taigi, jei tai palieka lėktuvo režimą? Net jei jūs niekada skraidysite, lėktuvo režimas suteikia greitą būdą išjungti daugelį jūsų prietaiso akumuliatoriaus išleidimo radijo imtuvai.
“Apple Photos” sistemoje “macOS” galima išmokyti atpažinti veidus, kad galėtumėte ieškoti šeimos narių ir draugų visose nuotraukose, kuriose jie rodomi. Mokymas yra lengvas, tačiau tai gali užtrukti šiek tiek laiko, jei bibliotekoje yra daug nuotraukų. Jei norite apmokyti nuotraukas, kad atpažintų veidus, pirmiausia atidarykite programą ir spustelėkite langelį “Žmonės” ranka pusė.
In this tutorial, we show you how to stop a sent iMessage before it’s delivered to the person or group. Our goal is to cancel or interrupt the outgoing message from reaching Apple servers. Because once it’s sent, there is no way to unsend it.
How to cancel an iMessage once it starts sending
I’ve had plenty of situations where an iMessage I intended for a specific person ended up going to someone else because I wasn’t paying enough attention. Once this happens, you become motivated to learn how to stop an iMessage dead in its tracks before it gets to the wrong person ever again in the future.
The first thing to realize is when you send a message to a person using iMessage; there’s no getting it back once it hits Apple’s servers. This is the reason you have to intercept the message before Apple’s servers receive it. This also means you have to act fast before the blue progress bar reaches the right side of the screen after sending the message.
The trick here is to kill the Internet connection as quickly as possible before the message is sent successfully. And because iPhones have both Wi-Fi and cellular data capabilities available for getting data in and out, your best bet is to get Airplane Mode enabled as quickly as possible after sending the message.
The only downside to this method is you’re taking a chance at it because it can require more time to perform these steps than it may take for the iMessage to send with today’s high-speed Internet connections.
On iPhone and iPad
Here’s how to stop an iMessage from being sent after you have hit the send button:
1) While the iMessage is still sending, immediately open Control Center. To do this on iPhone with Face ID, swipe down from the top right corner of the screen. On iPhone with a Home button, swipe up from the bottom of the screen.
2) Quickly tap the Airplane icon.
3) Dismiss the message telling you how Airplane Mode needs to be turned off to send messages.
4) A red “Not Delivered” indicator should appear.
5) Delete the message from the conversation by holding the text bubble and choosing More > trash icon > Delete Message.
6) Turn off Airplane mode to re-enable Wi-Fi and cellular data.
If you see the red “Not Delivered” indicator, then you’ve just saved yourself a whole lot of embarrassment because this means your Internet connection failed when you toggled Airplane mode and that your iMessage was unable to reach Apple’s servers. Even better is that your iOS device will not try to resend the message automatically, but you would have to do so manually, so just delete the message instead, and you’re golden.
In case you don’t see the “Not Delivered” indicator, that means the message is sent. You can’t do anything to unsend it.
Tip for Jailbroken iOS device
Jailbroken devices have another advantage: Activator. With Activator installed from Cydia, you can assign any gesture to enable Airplane Mode. That’s what we did for this tutorial since we’ve only seldom been able to accomplish this task with the former method of trying to beat the clock to open the Control Center.
Activator gestures can be far more time-efficient than stock iOS gestures. So for this instance, we opted to assign a three-finger tap gesture to toggle Airplane Mode on or off.
After that, while an iMessage is sending, invoke your Activator gesture to enable Airplane mode before the blue progress bar reaches the right side of the screen. After that, you will see a red “Not Delivered” indicator below the message. Now, delete it, and you have successfully stopped the message midway.
Another tweak that can help ensure you don’t miss the mark is SendDelay. It will give you more time before the progress bar hits the right side of your screen. The delay will provide you with enough time to react, and hence you’ll have better luck at turning on Airplane Mode in a timely fashion.
Has this method worked for you if you’ve ever been in a similar situation? Share in the comments below.
iMessage stopped midway
This is how you can successfully intercept an iMessage before it reaches Apple’s servers and remove it from your conversation. After this, you can rest assured that the person you accidentally fired the message off to won’t receive it.
Third-party apps like WhatsApp and Telegram already have the option to unsend a message within a time frame. Until Apple rolls out this handy feature into Messages, the above trick is the only course of action you can take to prevent a sent message from getting delivered to someone.
Related iMessage tutorials:
Source: Christine Romero-Chan / iMore
If you’re like me, then Messages is probably one of your most used apps on your current iPhone or iPad. After all, Messages is the central hub to communicate with your family, friends, coworkers, and even other acquaintences from phone calls and emails. And Messages not only works with other Apple users, but it also incorporates SMS, so it really is a one-stop shop when it comes to messaging on your iPhone.
But you know how it goes — while it’s fun to send your significant partner a million photos of your kid or pet, or a ton of memes and links, things can get lost in the shuffle if you want to pull something up again. And not only that, but the more things you send and receive besides text, the more space all of those attachments take up. So if you want to keep your best iPhone in tip-top shape, you’ll want to keep all of those links and attachments in the Messages app in check with iOS 15.
Here’s how to view and manage links and attachments in iMessage for iPhone and iPad.
How to view all attachments in a conversation thread in Messages
- Launch Messages on your iPhone or iPad.
- Tap on a conversation that you want to view the attachments for.
Tap on the contact pictures at the top of the conversation.
Tap an attachment to view it.
How to manage attachments in a conversation thread in Messages
If you’ve sent and received a lot of pictures, videos, links, or other attachments over time, then that stuff adds up and takes up precious space. You will want to manage (basically delete) your attachments in Messages on a regular basis to keep it clutter-free and reclaim space for more apps or taking more photos and videos.
- Launch Messages on your iPhone or iPad.
- Tap on a conversation that you want to manage attachments for.
Tap on the contact pictures at the top of the conversation thread.
Tap Delete.
You’ll need to repeat this process for each conversation thread that you want to clean up.
Send and receive it all in Messages, and manage it too
As you can see, it’s pretty easy to view and manage all of your links and attachments in Messages on your favorite iPhone and iPad, such as the iPhone 13 Pro. It’s a good way to view everything in one place without having to endlessly scroll through your conversations, and cleaning it out every now and then helps you reclaim valuable space.
Updated May 2022: Updated for the latest version of iOS 15 and iPadOS 15.
Tune in on Tuesday to check out some third-party games on Nintendo Switch!
Ready for the next big announcement from Nintendo? Here’s what you need to know!
M2 benchmarked against other Apple silicon, reminds us M1 Ultra is top dog
While all of the talk right now is about Apple’s new M2 chips, it’s easy to forget that the best Apple silicon money can buy right now is the M1 Ultra — but this latest round of benchmarks soon reminds us all.
How much longer can the Nintendo Switch go on?
Our favorite consoles will forever live in our hearts, but that doesn’t mean they have to live forever on store shelves. When will Nintendo move on from the Switch?
Charge up on the go with the best MagSafe car charging mounts
MagSafe charger plus MagSafe car mount? Yes, please! Whether you prefer a vent or dash mount, we’ve got the best options for you.
How can I disable Teams Meeting being automatically added to any Outlook meeting invite?
Outlook now automatically adds a Teams Meeting link to any meeting I schedule using Outlook – I would like to permanently disable this for my Outlook as my team only uses Zoom for meetings. There does not seem to be any documentation about this and I have been unable to find anything in preferences that changes it permanently.
I find it disturbing that MS just went ahead and started assuming that I would use MS Teams for all of my meetings. Believe it or not, people still have face-to-face meetings and use other online meeting software products. This feature turning on by default caused a lot of confusion. The solution below completely disables MS Teams in Outlook. I would still like it as an option, but don’t assume that every meeting I schedule will use MS Teams. It’s a big overstep.
I couldnt agree more. This is very poor product management.
Outlook now automatically adds a Teams Meeting link to any meeting I schedule using Outlook
How did you schedule meeting in Outlook client? Do you mean if you schedule “Any meeting” in Outlook, it will add Teams meeting link?
Based on my knowledge, if you don’t want to schedule Teams meeting in Outlook client, you could try to disable it by following these steps:
In Outlook, choose File and then Options.
Select the Add-ins tab of Outlook Options dialog box.
Confirm that Microsoft Teams Meeting Add-in for Microsoft Office is listed in the Active Application Add-ins list
If the Teams Meeting Add-in is listed in the Active Application Add-ins list, select Disabled Items in Manage and then select Go…
Set the checkbox next to Microsoft Teams Meeting Add-in for Microsoft Office.
Choose OK on all dialog boxes and restart Outlook.
It has been a while, how is everything going?
If you have any update about this issue, please feel free to post back.
First thing I tried before coming here was disabling the add-in but Teams re-enables it automatically the next time you launch a Teams meeting.
Didn’t this sort of anti-competitive behavior already cost Microsoft a boat load of money 20 years ago? Its exactly what is in their DNA.
Chris Hoffman is Editor-in-Chief of How-To Geek. He’s written about technology for over a decade and was a PCWorld columnist for two years. Chris has written for The New York Times and Reader’s Digest, been interviewed as a technology expert on TV stations like Miami’s NBC 6, and had his work covered by news outlets like the BBC. Since 2011, Chris has written over 2,000 articles that have been read nearly one billion times—and that’s just here at How-To Geek. Read more.
Your iPhone lets you copy data to your clipboard and paste it into other apps. However, an app can read (“paste”) from your clipboard in the background. A feature added in iOS 14 and iPadOS 14 notifies you when an app reads your clipboard.
What is the iPhone Clipboard?
The clipboard is the temporary location where copied data—text, images, or anything else—is stored when you “Copy” it. For example, if you select some text on this web page and tap “Copy,” the text you selected will be copied to your clipboard.
If you switch to another app and then “Paste” your copied text, you’ll see a message that the app you’re using “pasted from Safari.” When your iPhone or iPad says an app pasted from another app, that means it pasted the contents of the clipboard. It can’t read just anything from the other app—only what’s been copied to the clipboard.
Apps Can Paste Without Your Permission
Here’s why this message was added: Apps can “paste” from the clipboard—in other words, access the contents of the clipboard—without you actually tapping a “Paste” button and giving explicit permission.
Note that apps can only paste when you’re using them actively—in other words, when they’re on screen. For example, let’s say you copy some text in Safari and switch to the Facebook app. While you’re using the Facebook app, it can read the text you copied from Safari. If you switch to the Twitter app and have Twitter open on your screen instead, the Facebook app can’t monitor your clipboard because you aren’t using it.
Prior to iOS 14 and iPadOS 14, there was no way to tell when an app was pasting in the background. With this message, you’ll now see a notification telling you when an app is reading the contents of your clipboard.
Why Pasting is a Privacy Concern
If you’re copying private data to your clipboard, you probably aren’t aware that the apps you’re using can read from it. For example, if you copy a password or credit card number and switch to a social media app, that social media app could read the contents of your clipboard and upload your sensitive data to their server.
It doesn’t have to be that nefarious, either. Some ad networks used in apps may just monitor the clipboard to see what you’re pasting and use that information to target advertisements at you, for example.
The message tells you when apps are pasting so you can make an informed decision about what to do. If you use an app and you notice it’s often “pasting” for no reason, you might want to stop using that app—or, if you need the app but really don’t trust it, you could just be extra careful that you don’t have any sensitive data in your clipboard when you use the app.
App developers don’t want their users to be concerned about apps that mysteriously paste data in the background, so many apps that automatically pasted data are being updated to remove the automatic pastes.
For example, when the message was added in an early developer version of iOS 14, people noticed that TikTok was constantly reading the contents of the clipboard as people typed. TikTok claimed it never stored the data and released an update to stop reading the clipboard.
Can You Stop Apps From Pasting?
If you’re using an app that keeps pasting for no apparent reason, you might want to revoke its pasting permission. Unfortunately, as of iOS 14 and iPadOS 14, there is no way to stop an app from pasting. You won’t find any options for this under Settings > Privacy.
If you want an app to stop pasting, all you can do is uninstall or stop using the offending app.
Can You Hide the Paste Banner?
You might want to get rid of the banner message that appears when you past something—after all, it pops up when you tap the “Paste” option yourself.
However, there’s no way to disable the paste notification and stop it from appearing—not as of the release of iOS 14 and iPadOS 14, anyway. When an app pastes data for any reason, you’ll see the message.
One good piece of news: iOS 14 and iPadOS 14 offer a new feature for apps that can reduce unintended pastes. Let’s say an app wants to automatically paste web addresses in your clipboard, but it doesn’t care about other data. Now, the app’s developer can update the app so that it asks the system “Is there a web address in the clipboard?” If there isn’t, the app doesn’t do anything and no messages appear. If there is, the app can paste the URL and you’ll see a paste notification.
Geoffrey_Carr
Системата на приложението в iMessage е наистина готина и ви позволява да поставите съдържанието директно в съобщения, които веднъж изискват няколко допълнителни стъпки. Ако обаче сте избрани за това, кои приложения се показват в iMessage, можете да предотвратите автоматично добавянето им от iMessage.
Докато има много повече приложения за iMessage, отколкото за предотвратяване на инсталирането им, ето ги: много iPhone приложения, като например Giphy или IMDB, ще инсталират малка приставка iMessage, когато инсталирате приложението. Този плъгин ви позволява да търсите и незабавно да поставяте GIF във вашите съобщения или информация за филми и т.н.
Много други приложения правят това, както и, включително Пандора, Dropbox, Apple Music и др. Въпреки това, тъй като всички тези приложения в iMessage могат бързо да се окажат трудни и може да искате да ги предотвратите автоматично да се добавят на първо място.
За да изключите автоматичното добавяне на приложения, първо докоснете иконата на App Store в iMessage и след това докоснете четирите точки в долния ляв ъгъл.
След това докоснете “Съхранение” на получения панел, който се плъзга нагоре отдолу.
Когато се отвори App Store, докоснете раздела “Управление” и след това го изключете до “Автоматично добавяне на приложения”.
Докато сте в него, ако имате вече добавени куп приложения, можете да изключите всички, които не искате или смятате, че ще използвате. По този начин, когато използвате приложенията, няма да се наложи да ги прекарате, за да стигнете до любимите си.
Само не забравяйте, че тъй като приложенията вече не се добавят автоматично, може да пропуснете, освен ако рутинно не проверявате раздела Управление и не включвате нови.
Geoffrey_Carr
IMessage-sovellusjärjestelmä on todella viileä, joten voit liittää sisällön suoraan viesteihin, jotka vaativat useita lisävaiheita. Jos kuitenkin valitset, mitkä sovellukset näkyvät iMessagessa, voit estää iMessagea lisäämästä niitä automaattisesti.
Vaikka iMessage-sovelluksissa on paljon enemmän kuin estää niiden asennus, tässä on tärkeä asia: monet iPhone-sovellukset, kuten Giphy tai IMDB, asentavat pienen iMessage-laajennuksen sovelluksen asentamiseen. Tämän plugin avulla voit etsiä ja liittää GIF-tiedostoja viesteihin tai elokuvatietoihin ja niin edelleen.
Monet muut sovellukset tekevät myös tämän, mukaan lukien Pandora, Dropbox, Apple Music ja paljon muuta. Siitä huolimatta, että kaikki iMessage-sovellukset voivat nopeasti osoittautua hankaliksi, ja haluat ehkä estää niitä automaattisesti lisäämästä ensin.
Jos haluat poistaa automaattiset sovellusten lisäykset, napauta ensin App Store -kuvake iMessageissa ja napauta sitten neljää pistettä vasemmassa alakulmassa.
Seuraavaksi napauta “Tallenna” tuloksena olevasta ruudusta, joka liukuu alareunasta.
Kun App Store avautuu, napauta “Hallinnoi” -välilehteä ja napauta sitten “Lisää sovelluksia automaattisesti” vieressä oleva valitsin.
Kun olet siinä, jos sinulla on jo joukko sovelluksia, voit sammuttaa minkä tahansa, jota et halua tai luulet käyttää. Näin, kun käytät sovelluksia, sinun ei tarvitse pyyhkiä niitä läpi päästäksesi suosikkeihisi.
Muista vain, että koska sovelluksia ei enää lisätä automaattisesti, voit jättää huomaamatta, ellet hallinnoi rutiininomaisesti Hallitse-välilehteä ja ota käyttöön uusia.
Toggle Dark Mode
I f you own two or more iOS devices that are connected to the same Apple ID, then you must’ve noticed that when you download an app on one device, it gets downloaded automatically on the other device as well. This is because of a feature in iOS called Automatic Downloads.
The Automatic Downloads feature is capable of downloading apps, music, and books automatically across all your devices that are using the same Apple ID. It also has a feature to automatically update apps in the background so that you always have the latest version of apps installed.
While this feature could be very useful, it has a couple of drawbacks as well. The major issue is that it could consume a lot of mobile data if large apps are downloaded automatically without your knowledge. If you have a mobile data plan that comes with a limited bandwidth, then having Automatic Downloads enabled can be problematic.
Fortunately, Apple does allow users to disable Automatic Downloads when on Cellular Data or turn off this feature completely. In this article, we’ll show you how it can be done.
How to Turn Off Automatic Downloads on iPhone or iPad
Open the Settings app on your device.
Tap on your name at the top of the Settings app. This takes you to your Apple ID settings.
Next, tap on iTunes & App Store.
Here you can decide how you want Automatic Downloads to function. Under the section labeled ‘Automatic Downloads’, you can choose the type of downloads that should be allowed. By default, it is enabled for Music, Apps, Books, and Updates. The Updates option allows you to have all your apps updated automatically whenever there is a new version available.
If you wish to have Automatic Downloads enabled, but turn it off when on Cellular Data, then toggle off the option that says Use Cellular Data. In this way, automatic downloads will function only when you are connected to a Wi-Fi network.
If you wish to disable this feature altogether, then turn off all the toggles under ‘Automatic Downloads’, or selectively choose the type of downloads that should be disabled.
That’s all you need to do to disable Automatic Downloads. I generally keep App Updates enabled so that all of my installed apps are updated automatically and are always on the latest version. If you plan to enable this, make sure to turn off the Use Cellular Data option so that you don’t waste your mobile data on a limited plan.
Your iPhone’s audio messages may get you in trouble if they haven’t done so already. It’s way too easy for your iPhone to start recording without your knowledge, only to send a friend or family member a conversation you’re having about them. (Awkward.) Luckily, protecting yourself takes only the flick of a switch.
Here’s how the feature is supposed to work:
In a conversation thread inside the Messages app, when you hold your iPhone up to your ear, it’ll start recording audio automatically. When you pull your iPhone away, it stops recording and gives you the option of sending the audio message.
No problem, right?
Unfortunately, your iPhone can be easily tricked and might think you’re holding it up to your ear when really just tucked into your arm or shoulder. Now, that conversation you’re having about Mike gets recorded and accidentally sent to Mike himself. (Yikes.)
If you want to protect yourself from a potentially awkward situation, head to Settings –> Messages, then scroll down to Audio Messages. Here, just disable the toggle next to “Raise to Listen,” the feature in question. Doing so won’t disable audio messages as a whole, so you can still send them via the sound wave icon that appears in the text box.
Disabling the “Raise to Listen” option prevents your iPhone from recording automatically, but it also prevents you from raising your iPhone to listen to incoming audio messages as well, so keep that in mind. Instead, you’ll simply need to manually play them back with a tap.
Keep Your Connection Secure Without a Monthly Bill. Get a lifetime subscription to VPN Unlimited for all your devices with a one-time purchase from the new Gadget Hacks Shop, and watch Hulu or Netflix without regional restrictions, increase security when browsing on public networks, and more.
Systém aplikací v aplikaci iMessage je opravdu skvělý, takže můžete vložit obsah přímo do zpráv, které vyžadují několik dalších kroků. Pokud jste vybíraví, které aplikace se zobrazují v aplikaci iMessage, můžete iMessage zabránit v tom, aby je automaticky přidával.
I když je aplikace iMessage mnohem více než zabránění jejich instalaci, je zde podstavec: mnoho iPhone aplikací, jako je Giphy nebo IMDB, nainstaluje malý plugin iMessage při instalaci aplikace. Tento plugin vám umožní vyhledávat a okamžitě vkládat GIF do vašich zpráv nebo informací o filmu a podobně.
SOUVISEJÍCÍ: Jak nainstalovat, spravovat a používat iMessage Apps
Mnoho dalších aplikací to také , včetně Pandory, Dropbox, Apple Music a další. Přesto, že všechny tyto aplikace v aplikaci iMessage se mohou rychle ukázat jako nekomplikované a možná budete chtít zabránit jejich automatickému přidání.
Chcete-li vypnout automatické přidávání aplikací, nejprve klepněte na ikonu App Store v aplikaci iMessage a pak klepnutím na čtyři tečky v levém dolním rohu
Poklepejte na “Uložit” na výsledném podokně, který se posouvá ze spodu.
Po otevření aplikace App Store klepněte na kartu “Spravovat” přepínač vedle položky “Automaticky přidávat aplikace”.
Když jste na tom, pokud máte již přidané množství aplikací, můžete vypnout všechny, které nechcete nebo si myslíte, že budete používat. Takže když používáte aplikace, nebudete je muset přetáhnout k oblíbeným.
Jen si pamatujte, že jelikož aplikace již nejsou automaticky přidávány, můžete si nechat ujít, pokud nerozpoznáte kartu Spravovat a nepracujete na všech nových.
Když máte hosty, kteří chtějí používat Wi-Fi, chcete jim to dát . ale možná nebudete chtít přístup k ostatním zařízením v síti. Google WiFi je opravdu jednoduché vytvořit “hostskou síť”, která jim umožňuje přístup k internetu, ale zabraňuje jim přístup k místním síťovým souborům nebo jiným síťovým zařízením.
Nic není stejně nepříjemné jako přijímání nevyžádaných pošty, zvláště když nevíte, že je to poprvé spam. Nicméně díky bezplatné aplikaci můžete zjistit, jak je možné detekovat nevyžádané pošty dříve, než je odpovíte a jednoduše je zablokujete. SOUVISEJÍCÍ: Jak blokovat volání z určitého čísla na iPhone iOS umožňuje můžete natolik zabránit určitým číslům, aby vás volali, ale iOS nemůže detekovat nevyžádané volání (a automaticky je zablokovat) bez aplikace třetí strany.
If your job revolves around prospective clients and customers, you may frequently receive iMessages from unknown numbers. Although this isn’t necessarily a bad thing, being bombarded with messages from strangers can create disarray in your inbox if you’re not careful. Luckily, Apple makes it easier to organize your conversations by allowing you to filter unknown numbers in the Messages app.
Using the iMessage filter in iOS 10 and higher, you can create two separate inboxes, or “lists,” in the Messages app. The first list is for saved contacts and all SMS texts, while the new list is strictly for iMessages from people not in your contacts list. If an unknown number sends you an iMessage, you won’t receive a notification for it, making conversations a little less chaotic on your iPhone. Plus, all links will be disabled in unknown iMessages until you add the sender to your contacts list.
Step 1: Enable the iMessage Filter
To enable the filter, go into your Settings app, tap on “Messages,” and toggle on “Filter Unknown Senders” under the Message Filtering section. Once enabled, you can go straight into the Messages app to view the feature in action.
Step 2: Manage iMessages from Unknown Senders
In Messages, even if you currently have no iMessages from unknowns, you’ll see two lists for your conversations: “Contacts & SMS” and “Unknown Senders.”
If you receive iMessages from an unknown phone number or email address, they automatically sort into the “Unknown Senders” list. When you tap on an unknown iMessage, if it looks like spam, you can tap “Report Junk” at the bottom to send it to Apple. Doing so also deletes the iMessage automatically.
One of the best parts about this filter is that links inside unknown iMessages won’t open when you tap on them. To get the hyperlink to work, you have to add the sender to your list of contacts. After doing so, messages from that sender will move automatically to the other list where links do work.
Unfortunately, unknown SMS texts (the green ones) still appear with all of your contacts in the “Contact & SMS” list, which is a bummer. It’s possible that Apple can split them off into the “Unknown Senders” list too, so we’re not sure why it hasn’t.
Also, as stated before, you won’t receive any notification when it comes in. However, a number indicating how many unread unknown messages appears in the “Unknown Senders” tab. And if you have badges enabled, numbers will appear over the Messages icon on your home screen for unread iMessages from unknown senders. If notifications are essential to you and necessary for your work or other venture, you might not want this feature enabled.
This article was produced during Gadget Hacks’ special coverage on texting, instant messaging, calling, and audio/video chatting with your smartphone. Check out the whole Chat series.
Keep Your Connection Secure Without a Monthly Bill. Get a lifetime subscription to VPN Unlimited for all your devices with a one-time purchase from the new Gadget Hacks Shop, and watch Hulu or Netflix without regional restrictions, increase security when browsing on public networks, and more.
· Updated 20 May 2022 ·
– Here’s everything you need to know
(Pocket-lint) – Apple launched iCloud support for iMessages, known as Messages in iCloud, in May 2018. Prior to the support, it wasn’t possible to use iCloud for text messages.
Following the update however – which was iOS 11.4 – the Messages in iCloud feature enables you to treat your iMessages as you would treat photos. Messages sync across all devices when turned on so you can keep up to date with all your Messages, no matter what Apple device you are using.
Here’s what you need to know about Messages in iCloud and how to switch the feature on or off.
What is Messages in iCloud?
It’s worth noting that “Messages” also means iMessage, which is Apple’s app that iOS device owners and Mac owners can use to send and receive texts, photos, videos, Animoji, Memoji and more. iCloud, meanwhile, is built into every Apple device so you can keep your photos, files, notes, and more, safe, up to date, and available wherever you are.
The Messages in iCloud feature syncs your messages across all your Apple devices. When turned on, your entire message history stays up to date across all of your Apple devices signed into your Apple ID. If you delete a message, attachment or conversation on one of your devices, it will delete from all of your devices.
Previous to the Messages in iCloud feature launching, any messages you sent or received on your iPhone would sync to your Mac and iPad. However, if you set up a new device, you would not see any of your old messages or conversations on that device. Of course, there were workarounds. You could restore your new iPhone from an old backup in order to carry over to your new iPhone for example, but it wasn’t as streamlined as it is now.
Each of your devices also backed up its entire Message library, which wasted iCloud storage space. The Messages in iCloud feature sees messages stored in a central spot however, and sent to any device you connect to now or in the future. If you need to free up iCloud storage space, you can just turn the Messages in iCloud feature off.
How does Messages in iCloud work?
Messages in iCloud essentially boils down to making your messages sync better across all your devices (old or new), allowing you to keep on top of them from any device you are using.
If you choose to turn the Messages in iCloud feature on, all your messages will appear on a new device when you sign into it with the same Apple ID account and you get the same view everywhere you use iMessage. As mentioned, when you delete messages and conversations from one device, they are instantly removed from all your devices.
If you delete a message, you can’t get it back. If you don’t want to keep your conversations up to date across all your devices, you can turn the Messages in iCloud feature off. If you turn it off on iPhone or iPad, your message history is included in a separate iCloud backup.
How to turn on Messages in iCloud
To enable Message in iCloud, make sure you have set up iCloud and are signed in with the same Apple ID across all your devices. You will also beed to be using two-factor authentification with your Apple ID and have turned on iCloud Keychain.
iPhone, iPad and iPod Touch users
To turn Messages in iCloud on your iPhone, iPad or iPod Touch, follow these steps:
- Go to Settings
- Tap on [your name] at the top
- Tap iCloud
- Turn on Messages
Mac users
To turn on Messages in iCloud on your Mac, follow these steps:
- Open Messages on your Mac
- Select the Messages menu in the top left corner
- Tap on Preferences from the menu
- Click iMessage
- Select the box next to Enable Messages in iCloud
How to turn off Messages in iCloud
If you turn off Messages in iCloud on an iPhone, iPad or iPod touch, your message history will be included in a separate iCloud backup, as we mentioned above.
You can choose to turn Messages in iCloud off for just one device, or for all your devices. Any device where Messages in iCloud remains on will continue to store what you send and receive from that device in iCloud.
iPhone, iPad and iPod users
To turn Messages in iCloud off on your iPhone, iPad or iPod touch, follow the steps below:
- Go to Settings
- Tap on [your name] at the top
- Tap iCloud
- Toggle off Messages
Mac users
To turn Messages in iCloud off on your Mac, follow the steps below:
- Open Messages on your Mac
- Select the Messages menu in the top left corner
- Tap on Preferences from the menu
- Click iMessage
- Unselect the box next to Enable Messages in iCloud
Thread Tools
- Show Printable Version
- Email this Page…
- Subscribe to this Thread…
Search Thread
Display
- Linear Mode
- Switch to Hybrid Mode
- Switch to Threaded Mode
How to prevent default installations on C-drive?
Certain programs do not give you the option for custom installation, forcing them onto C-drive, hence C-drive space shrinking. And SSD’s don’t have an abundance of space, not in my budget.
So, is there a way to override such an installation on C, to have only elements essential to OS on C?
It’s pretty easy to change the default installation path via the registry.
1. Launch Registry Editor.
2. Navigate to HKEY_LOCAL_MACHINE\SOFTWARE\Microsoft\Windows\Curr entVersion
3. You’ll see a value named ProgramFilesDir.
4. Double click it and change it to the location you want.
Note: For 64 bit users, you’ll see ProgramFilesDir and ProgramFilesDir x86. Change both of them.
Adding this to “must do” list for new installation.
imMortal Kombatant Array Myk SilentShadow PC Specs
| Myk SilentShadow PC Specs | |
| Motherboard | ASUS Rampage IV Formula |
| Processor | Intel i7 3930K |
| Memory (part number) | 8GB Corsair XMS3 1600 |
| Graphics Card #1 | ASUS Radeon 7970 3GD5 |
| Sound Card | ROG Xonar Phoebus |
| Monitor | Samsung SyncMaster SA300 |
| Storage #1 | Corsair Neutron 128GB |
| Storage #2 | Seagate 2TB |
| CPU Cooler | Corsair A50 Pro Air Cooler |
| Case | BitFenix Merc Alpha |
| Power Supply | Thermaltake Litepower 700W |
| Keyboard | Alienware TactX Keyboard |
| Mouse | Tesoro Gandiva H1L |
| OS | Win7 Ultimate x64 |
Join Date Jan 2012 Reputation 266 Posts 5,241
You can do as Chino suggested, or you can go the much easier route – provided the software allows it, is do a “custom” install, which should allow you to pick where you want your software installed. I have yet to find any software that doesn’t let me choose where I install my crap lol
Thatґs just the thing, Myk, some programs donґt present me with the custom option.
from my experience, you should avoid those programs
Iґll try to filter what I can on my next rig, but with the relatively easy fix provided by Chino, I hope I wonґt have to leave out any “must-haves”. I donґt suppose the registry tweak presents any danger to my system (stability issues, programs wonґt work etc.)?!
It’s pretty easy to change the default installation path via the registry.
1. Launch Registry Editor.
2. Navigate to HKEY_LOCAL_MACHINE\SOFTWARE\Microsoft\Windows\Curr entVersion
3. You’ll see a value named ProgramFilesDir.
4. Double click it and change it to the location you want.
Note: For 64 bit users, you’ll see ProgramFilesDir and ProgramFilesDir x86. Change both of them.
Tks!! So easy and so useful. As everything should be!
If they do install on C: you can do this to move them *banned website*
Also if like me you like to keep the SSD with as little installs. I use steam mover to push on and off the SSD to the HDD.
This also works for other programs and super easy to use
Last edited by xeromist; 02-13-2013 at 11:05 AM .
Are you getting a ton of spam text messages? How annoying is it to be interrupted with a notification on your iPhone, only for it to be yet another junk message? Here’s a secret: you can make these go away using a feature already in iOS. It’s just a little hidden.
Here’s how you do it.
1. Open Settings
Scroll down and down and down until you find Messages. Tap it.
2. Scroll until you find “Filter Unknown Messages”
This is the magic. Turn it on. You’ll have to scroll almost three pages to find this thing, but it’s worth it.
3. That’s it
Now, if you go into your messages app, you’ll see tabs at the top of the screen. On the left will be “Contacts & SMS” which will contain messages from known contacts in your address book. On the right will be the new “Unknown Senders” tab.
When you get a message from a sender not in your address book, you won’t get a notification. Instead, it will be dropped into this tab.
Warning: Once “Filter Unknown Senders” is enabled, it becomes very important to add all legitimate senders to your address book. Any message from a number not in your contacts will wind up in the Unknown Senders tab. If you’re expecting a text from someone you know, be sure to enter them into your address book. Otherwise, you’ll have to scan this list to see if there’s anything new you need to pay attention to.
Related warning: Gig workers from services like Door Dash, Uber Eats, and InstaCart often use rotating custom text message numbers to reach out to customers during the shopping or pickup process. If you’re expecting a delivery from one of these services, be sure to check your Unknown Senders tab during the delivery window.
This need for added diligence in certain cases is probably why the feature is turned off by default. For new iOS users with an empty contacts app, all messages will necessarily be from contacts not in the address book. That said, this is such a huge benefit it’s worth a little extra diligence to add contacts you want to be able to get text notifications from.
Let us know whether you’re excited about this new feature. How many spam messages are you getting these days? Share in the comments section below.
Apple’s iMessage is one of the main reasons to use an iPhone, and there’s a lot you can do in chats without being overly complicated. But there’s one issue that continues to drive people nuts, and that’s the blue typing bubble indicator with the moving ellipsis (•••). Can you stop it? Not officially, but there are workarounds.
Aside from the message bubbles being blue instead of green, the typing bubble is one of the most iMessage-esque features there is, something some users would never think of hiding. But to other users, it’s just annoying, and it’s easy to see why.
Why You Should Have the Option to Hide It
When you’re in an iMessage conversation, and you see the typing bubbles appear, you may wait until they send their message before you say anything else. Since the typing indicator appears for up to 60 seconds, no matter if they continue or stop typing, it could feel like a long wait, and then it just “poof” — disappears.
Yes, they could still be typing, and you could wait and wait with built-up anticipation, but you might not ever see what they were typing, making the conversation thread one of the most frustrating aspects of your day. The typing ellipsis (•••) might disappear soon after typing if they delete everything and return to the chats list, to mention one example, but that could still lead you to believe something’s coming your way.
If you don’t want others feeling like that, making sure you’re not putting that typing alert in your conversation is the way to go. Plus, omitting it will take the pressure off of having to respond right away, and you can act like you didn’t see their messages until later when you’re ready to send your response.
There is no on/off switch for the typing indicator like there is for “Send Read Receipts,” but there are a few simple workarounds.
Option 1: Disable iMessage Temporarily
First, you could go to Settings –> Messages, then disable “iMessage,” but that could mess iMessage up if there are any bugs. If you have the guts and want to experiment with that, go ahead. After you disable iMessage, go type your message out, then re-enable iMessage when done. Then, you can send your message whenever you’re ready.
Option 2: Enable Airplane Mode Temporarily
Another way to prevent Apple’s servers from knowing that you’re typing is to cut off your communications. From Control Center, you could disable Cellular Data and Wi-Fi, but it’s much easier just to hit the Airplane Mode button, which kills both radios.
Then, you can type in the iMessage thread without worrying that you’re giving yourself away. Once you start typing, you can go back to Control Center and disable Airplane Mode, then go back to the message and continue typing, and the ellipsis bubble will still not appear on the other end.
This works because the Messages app only sends off the typing signal to the recipient after the first character, so if there are already characters in the box from when offline, it won’t send them the indicator.
Option 3: Start a New Thread
One sneaky way to prevent the typing bubble from showing your activity is to leave the current thread you’re in, tap the compose button from the Messages list to start a new iMessage, and start typing your message. Since iOS doesn’t know who you’re sending the message to yet, it won’t show any typing indicators to anyone. When ready, add the contact, and send.
However, the one thing that isn’t convenient about this is that it won’t save as a draft in the iMessage thread, so you either have to send it right away or abandon it.
Option 4: Delete the Thread & Start Over
This method is only a good option if you don’t mind erasing everything in the current thread. That means texts, photos, videos, links, locations, documents, and other data will be gone unless you save them first.
To get rid of the thread, from the main Messages list, long-press the thread, hit “Delete,” then “Delete” again. Alternatively, left-swipe on the chat from the list, hit the trash can button, then tap “Delete.”
Next, tap the compose button to start a new iMessage, add the contact, and start typing. Since it’s a new thread on your end, they won’t receive any typing alerts on their end, whether from their Messages list or in the thread itself. So you can add the contact before or after you start typing — it doesn’t matter here as it does in Option 3 above.
Option 5: Use Siri to Type Your Message
You could also call Siri right from the iMessage thread you’re in and dictate to it what you want to type. Long-press the Side or Home button, or say “Hey Siri,” then say, “Type message,” and say your message. When done, Siri will ask who you want to send it to; say the contact’s name. Then say something like “Yes,” “OK,” or “Send” when asked if you’re ready to send it.
You could also start it off by saying, “Send message to [contact’s name],” then state your message before having Siri send it. Either way works. However, as with the previous two options, it won’t let you save it as a draft in the iMessage thread, so you either have to send it before Siri closes or forget about it.
Messages send with Siri will say “Send with Siri” on the recipient’s end, FYI.
Are There Any Other Ways?
Not that I’ve seen yet, but let me know if I missed one. Dictation (the mic button in Messages) won’t prevent the typing bubble from showing on the recipient’s end, nor will using Voice Control or a third-party keyboard. But there may still be other ways to hide the typing bubble from people you’re iMessaging with; we just have to find them first.
Keep Your Connection Secure Without a Monthly Bill. Get a lifetime subscription to VPN Unlimited for all your devices with a one-time purchase from the new Gadget Hacks Shop, and watch Hulu or Netflix without regional restrictions, increase security when browsing on public networks, and more.


