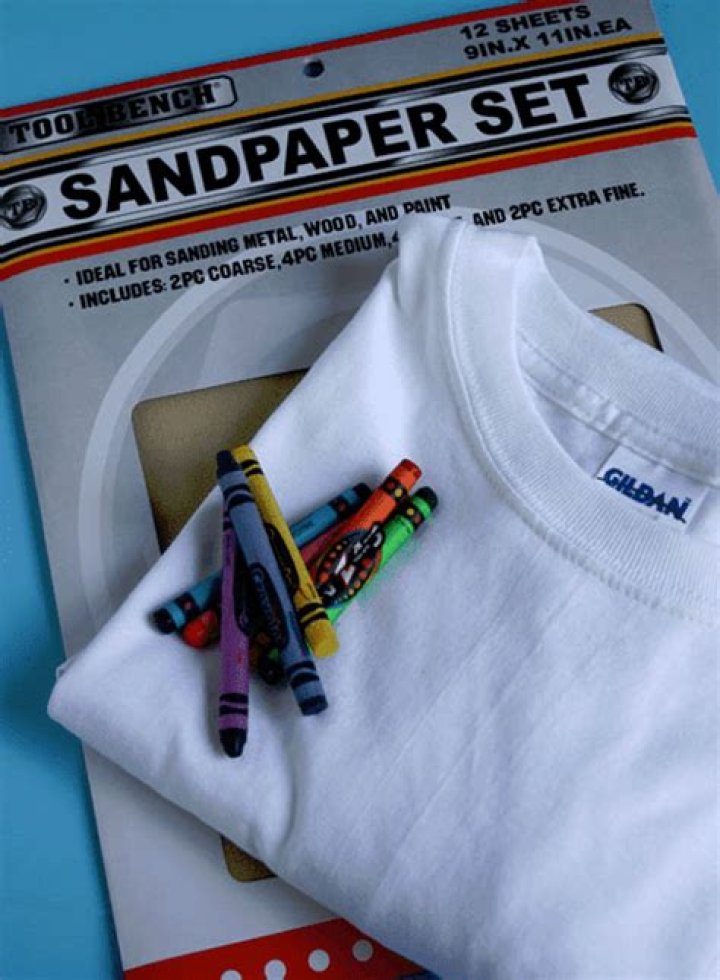
My kids love wearable art. Making it is fun and telling everyone they made it themselves is even better! This DIY t shirt printing method is especially do-able because it doesn’t require any specialty fabric paints or markers, just plain old crayons.
Using sandpaper to print your own t shirt….
Did you guys know it’s possible to heat set plain old crayons to be permanent on cotton fabric? You can! It’s easy and uses up old crayons instead of investing in more supplies that you only use for one project! Grab an old shirt and get ready for DIY t shirt printing..
While you could color straight on to the fabric we’re going to color on sandpaper and then transfer that image to the fabric for this DIY t shirt printing process. If you have ever watched a child try to color on fabric I will tell you it’s not easy. Fabric is stretchy and squishy. Unless you stretch it it’s almost impossible for a little one to color back and forth without the fabric wadding up in a really frustrating way.
Sandpaper doesn’t do that. The scratchy texture adds a nice sensory element to coloring and a textural element to the final print. We used a fine grade of sandpaper. The rougher the sandpaper the more texture will show in the final print. Either will work; use what you have!
Choosing a successful design for your DIY t shirt printing design…
Printing an image reverses it, like a mirror image. This can be a tough concept for kids to get. I discourage words or letters for that reason. (Although my kids were certain they could write their words in mirror image that doesn’t seem like the best idea for new writers!)
Sandpaper is not a precise art. It’s rough which doesn’t allow for sharp, clear lines. (That’s why this is a great project for using up old crayons. Save the new box for another day!)
Choosing a subject that’s large, graphic, and easy will allow for success!
Adding color to your DIY t shirt printing process…
Lay that color down heavy! I like to think of this as a bit of exercise for little fingers. Crayon shouldn’t be fine lines but big, heavy blocks of color. You’re trying to deposit the crayon wax onto the sandpaper, lots of it. All of our Crayola crayons worked for this. These Metallic FX crayons were especially soft and easy to deposit on the sandpaper. But again, use what you have.
We cut our images out when they were done being colored. There were lots of little crayon “bits” floating around. Cutting them out avoided ironing those specks onto our t-shirts.
Print your own t shirt….
Now to transfer the image from sandpaper to t shirt. Turn your t-shirt inside out. Place a piece of cardboard inside the t-shirt and preheat your iron to high.
You want to place your colored sandpaper inside the t-shirt (which is inside out,) crayon side touching the front of the t-shirt. This means your iron will be ironing the wrong side of the t-shirt and directly under that will be the colored sandpaper. Make sense?
Updated: I’ve had some questions on this part! Make sure the crayoned sandpaper is touching the front of the shirt when it is ironed. Where it is touching is where the design will be!
Now cover all those layers with a layer of parchment paper to protect your iron. We ironed all of our individual pieces at once but our designs didn’t need to be too precise. You could do it one piece at a time.
Apply iron moving it very slowly with a little pressure. Feel free to peek and make sure you’re happy with the amount of color transfer before peeling your layers apart.
Turn t-shirt right side out and iron again; still protecting your iron with a layer of parchment paper. Keep your iron on high heat to ensure you’re heat setting your fabric printing.
Setting your DIY t shirt printing project…
One more step to fully heat set your craton fabric printing; the dryer. Throw your t-shirt into the dryer on high heat for a half hour or so. Alone. Do it with just your printed t-shirt just in case any waxy pigment is still coming off!
I also washed and dried this tee by itself the first time. I couldn’t tell that any crayons-y wax came off at all- just being safe!
Wear and enjoy…
This would be super fun and easy to do with a group for a birthday party or Scouts. You could print your own t shirt, pillowcases, bandanas, anything cotton! I’d love to know how your hand printed t shirts turns out!
If you love the sensory elements of this sandpaper printmaking project but don’t have fabric available check out this post on how to do a similar monoprint on paper!
Introduction: Crayon Colored Shirt
I’ve been wanting to make a colorful shirt like this for some time. But, I didn’t want to buy any special materials. So, I looked around the house and found a few simple things that I could use to make this colorful t-shirt and came across freezer paper and some crayons.
Step 1: Materials
- You will need:
- Crayons
- White Cotton Shirt
- Iron
- Freezer Paper
- Paper Towels
- Craft knife
If you want to use a printer:
- Tape
- Printer Paper
- If you want to make this bear shirt, I have included the PDF
Attachments
Step 2: Print or Draw Design
For this shirt, I printed my design onto the freezer paper. You don’t have to print your design. You can draw something using a black marker and cut it out instead; it can something as simple as a heart.
For Printing: Since the freezer paper is thin, it probably won’t go through the printer as it is. It will need to be taped to a piece of printer paper to give it more stability. Get a piece of freezer paper and cut it to be the size of your printer paper. Lay the freezer paper on top of the printer paper, plastic side down. Use long pieces of tape to tape the freezer paper and printer paper together at the edges. Print the outline of whatever design you will be coloring onto the paper.
Step 3: Cut and Iron
With a craft knife, cut the white spaces out, leaving the black lines being careful not to cut them.
When you’re done cutting, get your shirt and place the freezer paper onto it, plastic side down. With your iron on the cotton setting (no steam), run it over the freezer paper for a few seconds until the freezer paper has adhered to the shirt.
Step 4: Color
Start coloring in each section with crayon. It is easier to color when the shirt is warm. If you’re having trouble, warm the shirt with the iron but make sure to put something in between the shirt and iron, like a paper towel, so that the iron doesn’t get dirty.
After you color, to remove excess crayon, take a paper towel and place it in top of the shirt. Iron it, then peel it away. Do this once or twice or until the paper towel comes back clean.
You will have to color each section at least twice in order to get full coverage.
Step 5: Finishing Touches
When you’re finished coloring, peel the freezer paper off. Take a clean paper towel, place it over the entire image and iron one more time. To launder, use cold water and hang dry. If the color fades, just color it in again.
The method I used creates a design without lines. But, if you want lines, you can create a transfer instead. To do this, draw or print you design on the paper side of the freezer paper. Then, flip the freezer paper over so that the plastic side is facing you. You should be able to see your design through the paper. Take a black crayon and trace the design onto the plastic side of the freezer paper. Then, iron the freezer paper, plastic/crayon side down onto your shirt. Peel the paper off and the outline should have transferred. If it doesn’t transfer well, try running the iron over the paper a second time. Have fun coloring in your design!
For our last family game night we decided to do a craft. A really fun and practical one.
Each of us had to draw a picture of what we thought of each other and then we used a technique to print the image onto the shirt and actually stick to it (even after you wash it).
There are many techniques for printed t-shirts. We are not experts at this what’s so ever, but we feel like this printed t-shirt technique was pretty easy to do with kids fully involved in this craft.
DIY Printed T-shirt
You will need:
- sand paper
- crayons (the good kind ones)
- paper towel
- iron
- t-shirts (as low as $2.95 a piece)
- cardboard
Instructions:
1. Draw a design on the sand paper.
Some tips:
- make sure the picture has bright colors
- keep in mind that the picture will be reverse once printed on t-shirt
- go over the designs with crayons few times to make sure there is enough color to be printed on the shirt later. I went over my kids’ designs few times.
- help your kids with the design by setting a theme. We decided to draw each other: my son drew a picture for dad’s t-shirt, I drew for my daughter’s and my daughter’s drew for mine. It was fun.
2. Grab a t-shirt and lay it on the flat service. Put a piece of cardboard inside the t-shirt.
3. Place the design that you draw on sand paper face down on the t-shirt on the spot where you want your design to be.
4. Put a piece of paper towel on top of the sand paper and place hot iron (set on cotton setting).
5. Count till 40 and gently remove iron, paper towel and sand paper.
6. To keep crayon “stick” to the t-shirt put it in the dryer for 15-20 minutes or use hair dryer.
Wear it, wash it and be proud of it! You have a custom made t-shirt by your kid!! How awesome is this.
Here is a short video of our DIY printed t-shirts.
This DIY printed t-shirt craft/activity is perfect for family reunions, day care or class craft projects, because the cost is so low and the process is so easy and fun!
I hope you give it a try. It’s so much fun!
Transfer crayon drawings onto t shirt.
Go through your crayons and find colors you like. Darker more vibrant colors are going to transfer better.
I found these wax pastels in the attic. They didn’t fade as much when I washed my t shirt. If you already have them you can use them but I wouldn’t spend $ on them for this because they’re expensive.
Wash and dry your shirt. I got mine at the goodwill for $1. It’s good to do this in case it shrinks.
This is the sandpaper I got. It came with 3 sheets. The finer the grit the more detail will be preserved. If you want more of a speckled look, go with a grittier sandpaper.
Draw your design on your sandpaper. I chose a Totoro. You can draw anything you want just keep it kind of simple. Some of the detail will be lost because of the texture of the sandpaper.
When coloring your picture, make sure you really press hard on your crayon. The more color the better the transfer.
If you’re going to put words in your design just remember to write backwards.
Put something (that won’t melt) inside your shirt. I used my big drawing board but a wooden cutting board or a towel works really well too. If you have an ironing board use that.
If you don’t have an iron, there’s usually some at goodwill. I got this little travel one for $3. Set your iron to the cotton temperature setting. Make sure there’s no water in it.
I ironed the front of my shirt before I put the sandpaper down just to get all the wrinkles out.
I tried this step with a towel on top and the heat wasn’t getting through so I put paper over the sandpaper and it worked.
Now just iron. You can carefully lift a corner to check progress just don’t shift your paper or else it’ll look weird. It’s probably a good idea to apply a good amount of pressure too.
Peel back your paper and ta-dah.
Now cover your design with some clean paper and iron over it again to set it into the fabric. This is what makes it permanent.
The drawing stays on the sandpaper really well so if you want to make multiple shirts with the same design, you can reuse your drawing and just trace over and fill in color for each shirt.
Your shirt should probably get washed by itself the first couple times just so you don’t go ruining any other clothes. This project is fun and kids would like it too.
Thanks for looking. Hope you have fun with this project too. 😺
What you’ll need
Download the practice files and open design-a-tshirt.ai with the latest version of Illustrator. Follow along to create a stylized boom box design with heart-shaped speakers.
Set up your project
Open the design-a-tshirt.ai sample file provided with this tutorial. Alternatively, launch Illustrator and click the Create new button or press Control+N (Windows) or Command+N (macOS). Select the Print tab, click the Letter preset, and then click Create. This opens a new document with the correct color mode and resolution for printing.
Draw some basic shapes
Press M to select the Rectangle tool in the Tools panel. Drag rectangles of various sizes to create the boom box design. You can change the dimensions of any rectangle by dragging one of the corner handles. To reposition any rectangle on the artboard, simply click the dot in the center of the rectangle and drag it to a new location.
Tip: As you drag the rectangles, look for magenta Smart Guides that help you align the shapes.
Now you’ll draw the speaker. Press and hold the Rectangle tool icon in the Tools panel to select the Ellipse tool. As you drag, look for magenta crosshairs that indicate a perfect circle. Or press Shift while dragging to constrain your shape to a circle. Drag its center point to position the circle on the left side of the boom box.
Combine paths to create new shapes
Select the Curvature tool and click to create four points on a different part of the artboard. This creates the left side of the heart shape. Press Escape after clicking the fourth point to finish drawing the path.
Press V to switch to the Selection tool, and then click on the path. Press Alt (Win) or Option (macOS) and drag the path to duplicate it. You can press Shift while dragging the duplicate path to keep the paths in alignment.
Choose Object > Transform > Reflect. Select Vertical to flip the path. Click OK.
Tip: Alternatively, you can simply click the Flip along horizontal axis icon in the Path section of the Properties panel to achieve the same result.
Press V to switch to the Selection tool. Press Shift and drag the right side of the heart so the two paths overlap. Press Shift and click the other half of the heart to select both paths.
Press and hold the Shaper tool in the Tools panel to select the Join tool. Drag the Join tool over the areas where the two paths meet to join them together. Learn more about joining and trimming paths.
Resize, duplicate, and position shapes
Click an edge of the heart-shaped path with the Selection tool. Press Shift and drag a corner of the bounding box to resize it, and then drag the heart inside the round speaker. Press Shift and click the circle to select both shapes. Press Alt (Win) or Option (macOS) and drag both shapes to duplicate the left speaker. Additionally, press Shift to keep both speakers aligned.
Next you’ll create a bold headline below your boom box. Type T or select the Type tool in the Tools panel. Draw a text frame below the boom box. Replace the default text with your own, and then triple-click to highlight your text. Click the Properties panel tab to view it. (Choose Window > Properties.) In the Character section of this panel, you can change the font, weight, size — even adjust the amount of space between the letters. See Set a beautiful title to learn how to set an eye-catching headline.
Creative Cloud members can choose from the vast library of high-quality typefaces in Adobe Typekit. Watch Tap into a library of available fonts to learn how to browse, sync, and access hundreds of high-quality fonts from Typekit — right inside Illustrator.
Tip: You can scale and reposition your headline just like you resized the heart in Step 4.
Adjust the colors
Press V to switch to the Selection tool, and then drag a box around the boom box to select it. Try changing the colors and the stroke (border) width.
Under Appearance in the Properties panel, select a larger stroke width from the menu.
To apply a custom color to the shapes, select a shape and click the Fill or Stroke icon in the Properties panel. Choose a new color from the Swatches panel.
Tip: Try setting the stroke or fill color to None to create interesting effects.
Customize and experiment
Now draw the antenna on the boom box. Using the Line Segment tool, click and drag a straight line as shown. Press Shift to draw perfectly horizontal or vertical lines. Use the other skills you’ve just learned to embellish your design.
Experiment with other design techniques. Use Adobe Capture to capture a shape with your mobile device and add a textured background.
Introduction: How to Print on Cotton Fabric Using an Inkjet Printer
What you are about to read worked for me and I have endeavoured to create a guide of exactly what I did to create some quality cloth prints on an inkjet printer.
Please do not attempt to do what I did unless you are confident you have the knowledge and experience to follow the steps without ruining your iron, worktop, printer or marriage!! There are plenty of people who have the correct experience to guide you through a project like this and I am sure if you ask for their help they will be glad to help you.
My son started School (reception) in January and the School has asked us to keep a pair of wellington boots in a bag at the School.
I remembered when we were at primary School (yes there were Schools then lol!) most of us had a cloth bag that we kept our P.E. kit in. So I thought I would make something for my son Mark that would do the job and also be original.
Some time ago I found some great ice hockey emblems in jpg format on the internet some were original but some were produced by artists as projects and did not seem to be copyright protected.
Here are some examples you will need to copy and paste the url into your browser:
Some of the above examples are most likely copyright protected.
Step 1: Sourcing Some Fabric
I did have some t-shirt transfers somewhere but we recently moved and after an hour or two searching around my home last night I decided fate was saying a different approach was required.
I did a few searches on the internet and discovered that some people succeeded in stiffening fabric enough so that it would feed directly into an inkjet printer.
Mostly this was done using freezer paper (did not have any of that either) but a few people had used spray starch and although I had no cans of starch I did have some cornflour
I found a pair of my old white boxer shorts and although they were still bright white the elastic had seen better days so they were going to end up as painting and decorating rags soon anyway
I cut the elasticated hem off the top with scissors and then looked for a clear run without seams the piece of cotton I ended up with was a bit larger than an A3 sheet of paper.
Step 2: Stiffening the Cloth.
The cotton fabric was quite light weight and I did not think it would stiffen up enough to feed through the printer.
I used an ordinary little box of cheap cornflour to make up the starch. For this piece of cloth I decided about a cupful of water should saturate it enough and I added a heaped tea spoon of the cornflour to the water and gave it a good stir.
I laid the cloth on my kitchen work top and using a stiff paintbrush I gave the dry cloth a liberal coating of the mixture I had already ironed it flat and once I had finished it was soaked all the way through.
(I would not recommend doing what I did next as I think you will get a better result by lightly stretching the fabric over a frame and leaving it to dry)
I then ironed the fabric using my household electric iron with the steam setting off until it was completely dry. As it was so wet this did take some time and I got a few stains on the fabric as I think the iron needs an internal clean.
I also found that the fabric rucked up and creased a few times and also there was an excess of starch that had dried on the surface and I had to brush off every now and again , so next time I will be patient and leave the fabric to dry over a stretcher. A large tray could work well for the stretcher so long as it has a good size lip and depth, I would use clothes pegs or similar to hold the fabric in place whilst it is stretched across the tray.
Step 3: Cutting to Size
I have an hp officejet 6110 all in one printer it has a front loading tray that accepts A4 paper at its largest setting so I needed to trim my fabric down to A4 size which was the print size I had set up in my photo editing software. I had laid out all my motives and name tag so that they fitted the print area of an A4 sheet within my photo editing software.
The fabric had become reasonably stiff but at this stage I was not sure if it was stiff enough for the printer to pull it through its process.
I used a guillotine to cut the cloth to A4 size and just placed a piece of A4 paper (use a different colour paper if you have it) over the top of the fabric to ensure I cut to the right size. I noticed that the cloth cut better using a scissor/slicing like action rather than a straight single slice as it seemed to get jammed part way.
I ended up with two A4 size sheets of cloth ready for the printer,
At this stage I had no idea if the printer would print onto the heavily starched cloth or even draw it through the feeder.
Step 4: Printing and Fixing
I tested the printer first to ensure all the ink colours were printing ok as I did not want to spoil the fabric with a misprint!
I set the printer up on best quality print with the paper setting to normal and clicked the mouse to print. The printer picked the paper up and started to print phew ok so far (thank god! I have not got the time to fiddle around with this project for much longer) the print came out really well there was a small dark smudge on some of the waste area of the print probably due to a dirty cartridge but all in all very good.
Now when I did my research I came across the fact that inkjet ink when printed on cloth will run if it gets wet if you do not use a fixative and there was no way I was going to spend more time and money buying anything from a craft shop or ink suppliers. One person I found on the internet suggested spraying the cloth print with a thin coat of clear polyurethane varnish as this should fix the ink.
I knew I had a can of that so I cut all the motives out and laid them on some newspaper and sprayed them, only one coat but a good thick one. I left them to dry for half an hour or so until they were nearly touch dry then I took them to the kitchen work surface laid some greaseproof paper over them and gave them a good iron so they have had some varnish and heat now!
Step 5:
I set up my sewing machine with white cotton, I had cut up an old black t-shirt to use as the bag the t-shirt had a good hem at the bottom which I used as the top hem for the bag.
Before I stitched the bag together I stitched all the motives in place (you have it do it in this order or its hard work if you are using a sewing machine) make sure the cloth is not inside out or your motives will end up inside the bag!!
Once all the motives were in place I stitched the bag up leaving the stitching a little short of the top hem as that needed to be open so that the rope tie could be threaded through it.
All done I tied a length of string to the rope at one end and the other end of the string I tied to a pair of hobby tweezers and then threaded the string through the top hem , once done I pulled the rope gently through.
I secured the rope at the bottom corner of the bag using a simple knot which I had passed through a key ring . The keyring was secured to the bag by stitching a piece of black velcro loop to the bottom corner of the bag velcro is tough material so it should last.
and thats it, I still do not know if the ink will run when the bag gets wet but my guess is it will not as the varnish should have fixed it, I know it works on paper so it should work on cloth.
Be the First to Share
Did you make this project? Share it with us!
How to Iron Without Using Transfer Paper
Applying original T-shirt designs or drawings to a regular cotton shirt used to mean learning how to use a screen printing kit. Anyone who has ever worked with one of those kits knows how tricky and costly screen printing can be. With the dawn of high-tech scanners, personal drawings and designs can be captured and transferred directly onto cotton shirts without the mess and hassle of screen printing and with just a few technological and household tools.
Place the drawing you want to transfer face down on the bed of the scanner. Scan the drawing, and open the scanned image of the drawing with a photo editing program on the computer. Make sure that the scan of the drawing is clear and free of smudges or blurred edges that could appear on the shirt unintentionally.
Reverse the image of the drawing in the photo editing software so that it is a mirror image of the original. This step ensures the drawing appears on the finished cotton shirt just like the original drawing and not backwards.
Print the reversed image on high quality transfer paper. Follow any specific manufacturer’s printing instructions for the transfer paper you use.
Heat up the iron on a medium-high setting. Cut out the drawing from the transfer paper if there is excess paper around the image you are applying.
Place the cotton shirt right side out on the ironing board. Place the front of the printed drawing face down on the cotton shirt in the area you want the drawing to appear. Place a towel over the transfer paper.
Press the iron over the entire image firmly. This step should take around a minute, give or take, but follow any manufacturer’s instructions for the transfer paper. Too much heat can damage the image and too little will not allow the image to adhere properly.
Remove the iron and allow the image to cool slightly. Test for any loose edges on the transfer paper. Apply the iron again to any areas that need extra heat to adhere properly to the shirt.
Things You’ll Need
- High resolution scanner
- Computer with photo editing software
- Printer
- Transfer paper
- Scissors
- Ironing board
- Iron
- Clean cotton shirt
- Thin, clean cotton towel
Wash any garments which contain transfer images inside out to maintain the quality of the image.
Tell me if I’m reading your mind …
The Crystal Ball by John William Waterhouse via Wikimedia Commons
You have had a longstanding fascination with screen-printing.
No giggling. I know I hit the nail on someone’s head.
Ouch—that’s not exactly what I meant.
But, seriously, who among us hasn’t dreamed of making her own t-shirts, replete with favorite sayings and dreamy designs?
And yet, if you’re anything like me, you just haven’t found the time (or spare pocket change) to invest in one more new venture.
Well, I’m here to tell you that there is a super-easy way to print darling, DIY, vintage-style tees using stuff you probably already have around the house.
The technique is “sandpaper printing,” and while it may sound a little juvenile when I tell you that crayons are involved, hear me out. (We can call the crayons “colored wax sticks” if it makes you feel better—never mind that kids go crazy over this project, too.)
Sandpaper Printing
- Crayons
- Cotton t-shirt (lighter colors work best)
- Clothes iron
- Sandpaper (coarser textured paper will yield a more “pebbled” effect)
- Stencils, if desired
- Piece of cardboard slightly bigger than sandpaper
- Old towel
1. Lightly sketch a design in pencil on the sandpaper. If you’re including words, be sure to write the words AND their letters backwards because the printed image will be a mirror-image of your design (stencils come in very handy here).
2. Use crayons to color your design, using a heavy hand to lay down a thick layer of wax.
3. Place your t-shirt on an ironing board or other flat surface, and slip a piece of cardboard inside it to prevent the design from bleeding onto the other side of the shirt.
4. Position the sandpaper design-side-down on the t-shirt.
5. Lay an old towel over the sandpaper to protect your iron.
6. On high cotton setting, iron the sandpaper for about 45 seconds.
7. Carefully lift a corner of the sandpaper to see if the image has transferred well. If it looks a little light, continue ironing for another 30 seconds. The image will be “gritty,” but that’s part of the vintage appeal.
8. Gently remove the parchment and sandpaper to reveal your design.
9. To launder, wash on cold and tumble dry on low.
Here’s a cute video showing the process:
Making your own graphic t-shirts is so much fun, and a very inexpensive way to individualize your kids’ wardrobes. We are thrilled to bring you our brand new t-shirt transfer designs, created just for HowDoesShe by the talented Honeyhawk Design.
See all of our unique designs here!
Easy T-Shirt Transfer Tutorial
Here’s what you’ll need:
- Ink-jet printer
- Fabric transfer sheets: You can find them at Walmart, craft stores, or here (you can even buy stretchable kind that are more pliable with cotton t-shirts.)
- White or light-colored t-shirts/onesies
- An iron
*Note: don’t use ribbed tank-tops , unless you want to try the stretchable fabric transfer sheets.
These are already designed as reverse (mirror) images, so they are completely print-ready! No need to fuss with confusing settings! (Thanks Honeyhawk!)
Follow the instructions on your transfer sheets for the proper way to load the transfer paper into your printer. Usually, the shiny side with printed instructions will face upward.
Our images are already reverse (mirror) images, meaning they will read backwards when printed, but when applied to your t-shirt, they will read correctly.
*Note: If you want to make onesies, or smaller prints of these designs, you’ll have to reduce the scale % when you go to print them. See instructions below.
Cut around the outline of the design, leaving a narrow 1/4″ margin. Like so:
Have your iron set to the highest cotton temperature and preheat for at least 5 minutes. No steam or water! You’ll need a very dry heat. Prepare a clean, dry, waist-high area (I used my granite countertop). You’ll be applying a lot of pressure to your shirts with the iron so you’ll need a surface that’s not too high.
Set your cut-out transfer image on an ironed t-shirt, design side down. You’ll want to make sure it’s placed exactly where you want it.
You’re going to be putting some muscle into this, because the more pressure you apply, the better your transfer will stick to the shirt. First take your hot iron and make slow 20-second passes over the entire area of the transfer, giving it an initial stick to the t-shirt.
Next, make continual passes across the entire transfer, applying firm, downward body pressure as you go. Cover the entire image completely and push hard! Especially focus on the corners.
You must seal the corners as firmly as you can to avoid peeling of the transfer sheet after washing!
Follow these general Ironing Time Guidelines:
Full page= 3-4 minutes
1/2 page=2 minutes
1/4 page=90 seconds
When in doubt…iron longer and harder! Really seal that image on there!
Remove the tee from the hot surface and let it cool down completely. Don’t get impatient. Once it is entirely cooled down, begin carefully peeling the paper backing at the corner of the transfer. If you sealed the image correctly, the backing should pull nicely away, leaving the image sealed tightly on the t-shirt. If the image begins lifting, that means you didn’t apply enough heat or pressure. Re-iron the image, focusing mostly on the corners and edges.
See how cute! I’ve gone a little overboard, making tees and onesies for everyone.
They are so great to throw on my baby and head out where I have gotten so many comments from on these graphic onesies! Old ladies especially love ’em…or maybe it’s all these chunky rolls;).
If you’re making onesies or smaller t-shirts, you’ll need to scale down the image to fit your particular shirt. You also may want to print first on regular paper to test the size before you waste a transfer sheet.
1. Click “Print” on the image you’d like to print. Your settings will pop up like this:
Notice the “Scale” is set to 68%. This is for a child and adult-sized shirt.
2. Select “Scale” and decrease the percentage to the size of your choice. I used a 40% scale for size 12 month onesies.
This is the size it will be on a 12 month onesie.
The cutie on the left is a baby-sized image, the handsome fella on the right is a regular sized image, no adjustments needed (4T t-shirt).
These are seriously the cutest to make for baby gifts, brother/sister look-a-like tees, for cousins, BFFs or family reunions. Too cute!
Get the graphics HERE and then make some of your own!
With Downloadable Templates
This tutorial is so easy, you can do it one handed. (Leaving one hand open for a nice double IPA.)
If you’re launching an online store, it can get freakin’ expensive. You have to handle inventory, in-person and online, take care of marketing, and create new & exciting design. On top of ALL that, you have to set up a photo shoots to get quality pictures of your line.
Well, no more. This tutorial will help you to take your sweet design and put it on a model, without a model or photographer even needing to be there.
Saving money on models and photographers = More beer money!
Follow this step-by-step tutorial and you will save time, money for booking models & photographers, and be able to validate shirt designs before having a to printed up a shit-ton of them.
Step 1. Choose Your Model
Sexy models are like any good craft beer. We all love to have them around, but they can get quite expensive.
Luckily, Design By Humans offer a free downloadable kit containing different male and female models. The kit offers blank shirts worn by models in 16 different colors. It doesn’t get much better than this. Here’s a direct link to download the full kit.
Step 2: Create A Photoshop File
Create (Command + N) or (File > New) a new file .
Step 3: Place Your Model Into Your New File
For the sake of this tutorial, I’m going to assume you are using the DBH model templates discussed in Step 1.
On your computer, find where you downloaded the models templates named dbh_all.zip. Unzip it! I’m going to use the male model wearing a white shirt.
Place ( File > Place) the model into your file.
Step 4: Place Your Artwork/Design Into Your File
Inside your file, create a folder on top of the layer containing the model and name it artwork.
Place (File > Place) your design inside the artwork folder. Size (Command + T) or (Edit > Free Transform) and position the design on your model’s shirt.
Step 5: Create A Vector Mask Around Edges of Shirt
This step is to hide the parts of your design that doesn’t fit on the shirt. For example, if you had a repeated pattern design this would make sure the design stops shirt the shirt does.
Change your layer selection to your model’s layer. Using the Quick Select Tool (w), outline the models shirt. Then click the artwork folder and apply a Layer Mask (Layer > Layer Mask > Reveal Selection) of the selection.
Step 6: Add Realistic Shirt Wrinkles to Artwork
This step is what really makes the shirt look real.
Outline (Command + Click on Layer Mask) or (Use Selection Tool Again)the shirt again and Copy the selection to a new layer (Command + J) and name it “Wrinkle Layer” . Move the Wrinkle Layer above the artwork folder. Open Levels (Image > Adjustments > Levels) or (Command + L) and manipulate the levels until the shirt’s highlights/lowlights are exaggerated.
Change the B lending Mode of Wrinkle Layer from Normal to Multiply
Create a Clipping Mask (Layer > Create Clipping Mask) or (Option + G) of the Wrinkle Layer.
That’s It… Now, Add A Bunch Of Designs!
You are now ready to add any design you want.
About
Say it with your shirt!
So one day I was browsing around, Polyvore.com , and I saw this shirt, And It cost $50, I love it so much I decided to make it and share my technique, with you. My version caused around $10 *Note* This has nothing to do with twilight fanaticism. lol Nothing against you, I just really like True Blood a lot more. Hope to see a lot of responses and versions. Have a lovely day! ^__^
- Vampires
- True Blood
Downloads
- Superstar_M54.ttf7.94 KB [ Download ]
- Superstar_M54.ttf7.94 KB [ Download ]
- Missing file
- Key West Witch favorited How To: Stencil Letters On A Shirt 06 Sep 14:43
- Karen M. added How To: Stencil Letters On A Shirt to stencils 07 Oct 20:20
- Peron e. favorited How To: Stencil Letters On A Shirt 13 Jul 06:53
- Cremon d. favorited How To: Stencil Letters On A Shirt 13 Jul 06:12
- Elroker G. favorited How To: Stencil Letters On A Shirt 05 Jul 09:48
- laurie b. added How To: Stencil Letters On A Shirt to Fabric Paint T-shirt Ideas 13 Sep 05:33
- Libby O. favorited How To: Stencil Letters On A Shirt 18 May 04:24
- amanda.shillito favorited How To: Stencil Letters On A Shirt ♥ 15 Dec 20:00
- Millie H. favorited How To: Stencil Letters On A Shirt ♥ 27 Aug 16:46
- Danielle H. added How To: Stencil Letters On A Shirt ♥ to To-make list 09 Jun 04:34
You Will Need
First, choose a font that you really like. If you want the font that I have on my shirt, you can downloaded here.
By clicking of the file Superstar_M54.ttf.
Open a document on Microsoft Word, change your page from “Portrait” to “Landscape” and write your message. For example: “Fang are Fantastic” on font 200. this might make you print it all on several pages.
Get your cutting mat, Xacto knife and letter you have already printed, on your 80 lb paper.
Start cutting the letter carefully.
Take your T-shit, and inset it on the cutting mat, make sure its straight with no bumps. You should work on no clutter zone 🙂
After you have cutter all the letters, put the on the place of desire. Tape them down secure in place.
Now get you Tulip® Slick, Fabric Paint. You can do this with other times of paint, like acrylic paint, shirt ink. This one I got @ Walmart for $3.95, and I really love the results.
Start filling up the letters one by one, careful not to squeeze so hard, and hold down the papers, to avoid the paint bleeding to the other side. I filled up the outline cause its easier.
After you have them all outline, start carefully filling them, the less paint you use less “cakeky” is going to look.
Let it dry over night. The paint dries really fast.
If you do wanted exactly like on the picture,all you have to do is take your fabric scissors and start cutting it this way.
When is cut, stretch the fabric a little, to you desire, this will take off the ruff edges look.


