- Home
- >
- Audition
- >
- Learn Series Part 12> How to record with multiple .
Copy link to clipboard
This is a part of the ongoing Learn series with Mike Russell which will help you get started with Adobe Audition. We’ve some interesting articles & videos coming up weekly where we will talk about the tools, workflow & some really cool effects. Let us know how you use Audition & what you want to learn about Adobe Audition. We’re here to help.
In this video, you will learn how to assign different mics to different channels or to different tracks and record simultaneously with these multiple inputs.
0:17 – Starting a new audio file
0:33 – Use XLR instead of USB for best performance
1:01 – Using a mixer or audio interface with Adobe Audition
1:20 – How to plug multiple mics into an audio interface
1:32 – Assigning audio channels in Adobe Audition
1:57 – Demo of one mic on the left channel and another mic on the right
2:11 – Using multitrack to record two or more mics
2:28 – Assigning microphones to tracks in multitrack
2:48 – Recording multiple mics in multitrack
3:14 – Software to record multiple USB microphones at the same time
Learn more about
Hope it helps in understanding the different ways in which you can set up the Audio Input and record from them simultaneously. Refer to this page to explore the other videos of this series. Let us know if you have any questions.
By Sarah | Follow | Last Updated April 01, 2021
Summary :
It’s a common situation that users have more than one audio output device connected to the computer. Luckily, Windows allows them to choose which sound output to use when there are multiple audio outputs detected on Windows 10. This post from MiniTool teaches people how to play sound on two or more audio output devices simultaneously.
An audio output refers to the device which can play sound and drive signals into another device’s audio input. Common audio output devices include headphones, speakers, sound cards, etc. If there is only one audio device connected to Windows 10, computer will detect and configure the device so that you can play audios through it by default after connection.
Set Your Multiple Audio Outputs to Play Sound on Windows 10 Simultaneously
What if there are two or more audio devices connected to the same PC? By default, Windows will ask you to choose which device to use when playing sound.
Attention:
Worried about data loss on Windows 10? Please go to download the professional recovery software before disk problems occurs and data get lost (click here to see how to recover deleted files on Windows 10).
How to Output Audio/Sound to Multiple Devices on Windows 10
Can you play sound on two or more audio output devices on PC? Is it easy to configure multiple audio outputs Windows 10 manually? Luckily, the answer is yes. Windows contains a Stereo Mix option for dual audio output. How to output audio to multiple devices on Windows 10? There are 3 methods:
- Enable Stereo Mix.
- Choose output devices for individual apps.
- Use third-party tools designed for using multiple output devices.
How to use two audio devices simultaneously with Windows 10? Below are 3 solutions to set up and use Windows 10 multiple audio output at the same time.
Method 1: Enable Stereo Mix
How to output audio to two or multiple devices? You should follow this guide to enable and setup multiple audio outputs Windows 10: select Sounds from sound volume’s context menu -> choose a primary audio playback device -> enable Stereo Mix -> set as default -> select a secondary audio playback device -> apply changes.
- Right click on the sound volume icon in the system tray located in the lower right corner.
- Select Sounds from the pop-up menu to open the Sound window.
- Go to the Playback tab instead of the Sounds tab selected by default.
- Choose a primary speakers audio playback device and then click on the Set Default button.
- Now, go to the Recording tab next to Playback.
- Right click on any blank space here.
- Select Show Disabled Devices from the pop-up menu.
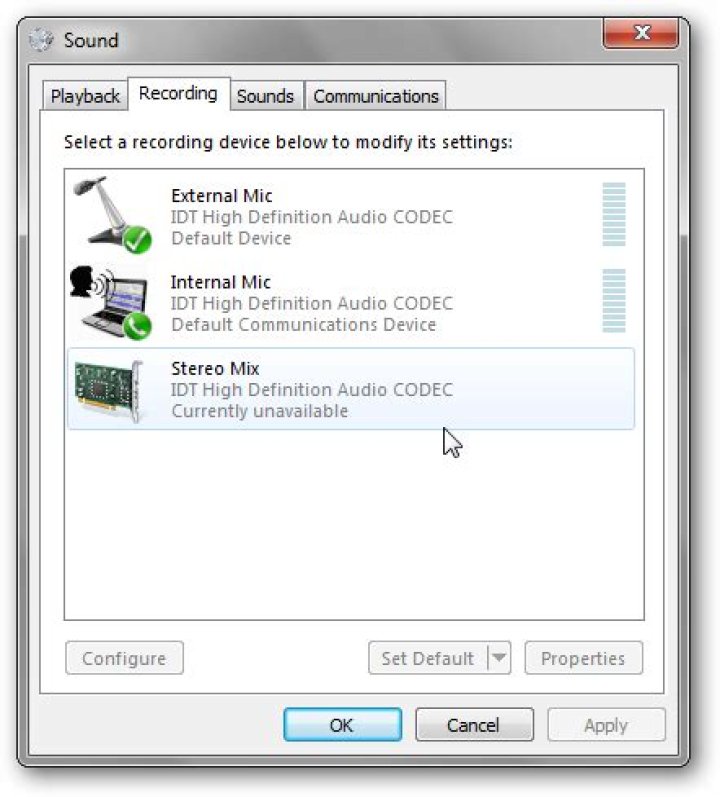
- Now, you’ll be able to see a recording device named Stereo Mix (or Wave Out Mix, Mono Mix, etc.).
- Please right click on Stereo Mix and select Enable from the context menu.
- Right click on it again when it’s enabled and select Set as Default Device.
- Right click on it once again and select Properties (or double click on it directly to open the Properties window).
- Go to the Listen tab at the top.
- Check Listen to this device.
- Click on the down arrow to open the drop-down menu of Playback through this device.
- Select a secondary audio playback device from the menu.
- Click Apply and OK in the Properties window.
- Click Apply and OK in the Sound window.
- Restart your Windows 10 computer.
Method 2: Choose Output Devices to Play Audio from Individual Apps
Configure steps to use multiple audio outputs Windows 10 when opening a specific app:
- Right click on the sound volume icon in the system tray at bottom right.
- Select Open Sound Settings from the pop-up menu.
- Navigate to the Advanced sound options (or Other sound options) section in the right pane.
- Click App volume and devices preferences under it.
- Browse the apps list in the opening Settings window. Then, click on the down arrow under Output to select a playback device from the drop-down menu.
- Close the Windows and restart your PC. (Windows will save the output audio device you choose so that it will play audio for you the next time when you open the certain app.)
Method 3: Use Third-party Tool
Is there other ways to use multiple audio outputs Windows 10? Yes, there are many third-party tools designed for using two audio outputs Windows 10 (or even more). Voicemeeter is one of the free software to help you configure multiple playback devices Windows 10.
ABOUT THE AUTHOR
Position: Columnist
Sarah is working as editor at MiniTool since she was graduated from university, having rich writing experiences. Love to help other people out from computer problems, disk issues, and data loss dilemma and specialize in these things. She said it’s a wonderful thing to see people solving their problems on PC, mobile photos, and other devices; it’s a sense of accomplishment. Sarah likes to make friends in life and she’s a huge music fan.
Recording into your computer’s in-built microphone is easy, but what if you want to record audio as it’s playing from the device itself? Anything that’s coming out of a browser, YouTube, Skype, Spotify, video call interviews, livestreams, conference calls, video games, or any other program can be captured. This is useful for making your own content such as vlogs, documentaries, video tutorials, radio shows and podcasts.
Depending on what source you’re capturing, and what system you’re running, the solutions can vary, but we’ve done the research and rounded up the best solutions in this article…
PC/Mac: OBS Studio
THE BEST SOLUTION FOR: Windows users, podcast/vlog makers.
ADVANTAGES: Free; Simple to set up; Quick; Configurable; Screen record with audio; Multitrack
DISADVANTAGES: Screen video recording mandatory; No editing functionality; No audio-only export – needs a separate step to isolate the audio only
OBS Studio is a free piece of software that is designed for broadcasting and recording livestreams. However, thanks to OBS’s flexible configuration and routing settings, it can be used to record audio on Mac and Windows from multiple sources simultaneously, including system audio, web browsers, and in-built and external microphones.В
As OBS is designed for streaming, all output files will be in MP4 video format, meaning you will need additional software to separate the audio from the video. This is an easy task in most NLEs, and you can even do it online using tools like audio-extractor.net.
A beneficial feature of OBS is that it allows the recording of different sources to individual tracks, meaning that later on you will be able to have separate controls for each source’s volume (mics, system audio). This is enabled in the audio settings. For a full guide, head to OBS’s website. If you use this feature, OBS will still create a single output file, when you import this file into a DAW or video editor, it will contain up to 6 stereo audio tracks – or 12 mono.В
Mac Only: Screenflow
THE BEST SOLUTION FOR: Mac users quickly recording system/onscreen audio.
ADVANTAGES: Free download; Record audio/video very simply; Edit separate tracks
DISADVANTAGES: Exports video with a watermarked вЂDemo Mode’, but offers full AIFF and AAC audio export, as well as editing features, when in demo mode
Screenflow is an application that enables you to record screen video and audio at the same time on Mac. It sells for $129 but there is a free trial option which has no limitations other than watermarking exported videos. It can record from multiple video and audio sources simultaneously (onscreen, webcam, mics, even iPhone), and has editing functionality, with a familiar multitrack interface. Ideal for recording from Facetime or other online sound sources.
You will find the options for source selection when starting a new recording. When the recording is finished, the files are loaded into the editor to be exported.В
Learn how to record with multiple usb mics simultaneously! In this step-by-step guide you will learn how to record two mics at once in Audacity. Plus discover how to record each USB Microphone on separate tracks in multi-track DAW software like Reaper.
This is a step-by-step guide for Windows PC. (Got a Mac? Click here for sister post). You will learn how to record multiple mics using Voicemeeter (Audacity) and ASIO4ALL (Reaper). If you own a mac then you should refer to our sister post on how to Record 2 USB Mics At Once For Mac.
Not sure which USB mic to buy? Check out our ultimate guide to the best USB microphones. We have tested all the most popular USB mics, and our guide includes uncompressed audio recordings plus video reviews.
In our step-by-step video tutorial we used a Shure MV5 Digital Microphone and an Audio Technica AT2020USB+ USB Condenser Mic. However the instructions will work with any USB Microphones correctly installed on your Windows PC.
- Download and Install ASIO4ALL Drivers
- Set Up The ASIO Drivers in your DAW
- Enable Multiple USB Mic Inputs in the ASIO Configuration
- Arm Separate Tracks To Record Different USB Mics Simultaneously
- Record USB Mics on Multiple Tracks At the Same Time
How to Record Multiple Tracks At Once in Audacity & Reaper – Video Tutorial
Our complete video tutorial on how to record two USB mics at once on a Windows PC is below. Then if you need more detailed information, scroll down for our step-by-step guide.
Record 2 USB Mics on 1 PC – Video Tutorial
How to Use Two Microphones at the Same Time in Audacity
We will begin with the simplest way to record 2 USB mics. As a stereo mix in Audacity.
Install Voicemeeter
Grab yourself a copy of the Voicemeeter Utility from the VB-Audio Software site. The software is completely free to use, but they do have a donateware model. If you use Voicemeeter and like it, do consider a donation! This is an awesome utility. Let’s keep it updated by paying a small amount!
Check Audio Device Settings
Navigate to the Control Panel in Windows to make sure your USB mics are correctly installed. Navigate to Hardware and Sound -> Manage Audio Devices.
Advanced Properties of USB Microphones – Set the Sample Rate
Click on each mic in turn, and click the Properties button. You can then make sure the level is correct by clicking the level tab. Then click the advanced tab and check the sampling rate. All the mics should have the same sample rate.
Voicemeeter Setup
Open up Voicemeeter. Select your USB Microphones under the Hardware Inputs. Make sure you click B for each mic you wish to record. This sends the mic signal to the virtual output.
You can also click A if you wish to hear the mic in your headphones or speakers.
Select your hardware outputs at the same time.
Now make sure you leave Voicemeeter running! Do NOT shut it down. Go back to the Control Panel and choose Voicemeeter as the default device for recording and playback.
How To Set Up Audacity with Voicemeeter Correctly
The screenshot above details how to select Voicemeeter as the recording and playback device in Audacity. It is very quick and easy, as the devices are available in drop-down lists on the main screen.
You can also choose whether to record a Mono or Stereo track.
Press Record and You Will Record 2 Mics At Once in Audacity
Now all you need to do is press the record button. Audacity will record the combined input of the USB microphones on one track. Either stereo or mono – that will depend on your choice.
When you are satisfied with your recordings, you can export the audio ready to share with the world!
How To Record More Than One USB Microphone On Separate Tracks in Reaper – or Any DAW
You can easily record multiple USB Mics in any DAW or ASIO software on Windows. In the following worked example we used Reaper to record. But you could use the same principles to record in any multitrack recording software.
Download and Install ASIO4ALL Drivers
Step 1 is to download and install the ASIO4ALL drivers. This is a FREE utility. We recommend that you install ASIO4ALL anyway to record in the most efficient way with your USB Microphone.
You will need to restart your PC after installation.
Set Up The ASIO Drivers in your DAW
Whichever multi-track ASIO recording software you use, you will need to set up the ASIO drivers. In Reaper you navigate to Options-> Preferences and then click on Device. Select ASIO from the Audio system, the ASIO4ALL from the ASIO Driver dropdown list.
Enable Multiple USB Mic Inputs in the ASIO Configuration
In Reaper you click the ASIO Configuration button, then ‘Pin’ all the USB Mics you wish to record with. Then make sure your first input is the very first USB Mic, and the last input is the last USB mic you wish to use (see image below)
Select the first and last inputs within Reaper
Arm Separate Tracks To Record Different USB Mics Simultaneously
To record multiple mics simultaneously in Reaper, on separate tracks, double-click to create new tracks. On each track, click the record button to arm the track to record. Then choose the audio input from the drop-down list. You can choose a different input for each track.
Record USB Mics on Multiple Tracks At the Same Time
Follow the steps above. Now all you need do is press the main record button on the transport bar. You will record multiple tracks at once – each with a different input.
Home Recording Studio Setup – Further Reading
Now that you have mastered recording two USB mics at the same time on Windows, you may be ready to learn more recording tips and tricks.
Found this helpful? Please share it .
[This content may contain affiliate links. For more information, read our disclosure policy here.]
By Sarah | Follow | Last Updated April 01, 2021
Summary :
It’s a common situation that users have more than one audio output device connected to the computer. Luckily, Windows allows them to choose which sound output to use when there are multiple audio outputs detected on Windows 10. This post from MiniTool teaches people how to play sound on two or more audio output devices simultaneously.
An audio output refers to the device which can play sound and drive signals into another device’s audio input. Common audio output devices include headphones, speakers, sound cards, etc. If there is only one audio device connected to Windows 10, computer will detect and configure the device so that you can play audios through it by default after connection.
Set Your Multiple Audio Outputs to Play Sound on Windows 10 Simultaneously
What if there are two or more audio devices connected to the same PC? By default, Windows will ask you to choose which device to use when playing sound.
Attention:
Worried about data loss on Windows 10? Please go to download the professional recovery software before disk problems occurs and data get lost (click here to see how to recover deleted files on Windows 10).
How to Output Audio/Sound to Multiple Devices on Windows 10
Can you play sound on two or more audio output devices on PC? Is it easy to configure multiple audio outputs Windows 10 manually? Luckily, the answer is yes. Windows contains a Stereo Mix option for dual audio output. How to output audio to multiple devices on Windows 10? There are 3 methods:
- Enable Stereo Mix.
- Choose output devices for individual apps.
- Use third-party tools designed for using multiple output devices.
How to use two audio devices simultaneously with Windows 10? Below are 3 solutions to set up and use Windows 10 multiple audio output at the same time.
Method 1: Enable Stereo Mix
How to output audio to two or multiple devices? You should follow this guide to enable and setup multiple audio outputs Windows 10: select Sounds from sound volume’s context menu -> choose a primary audio playback device -> enable Stereo Mix -> set as default -> select a secondary audio playback device -> apply changes.
- Right click on the sound volume icon in the system tray located in the lower right corner.
- Select Sounds from the pop-up menu to open the Sound window.
- Go to the Playback tab instead of the Sounds tab selected by default.
- Choose a primary speakers audio playback device and then click on the Set Default button.
- Now, go to the Recording tab next to Playback.
- Right click on any blank space here.
- Select Show Disabled Devices from the pop-up menu.
- Now, you’ll be able to see a recording device named Stereo Mix (or Wave Out Mix, Mono Mix, etc.).
- Please right click on Stereo Mix and select Enable from the context menu.
- Right click on it again when it’s enabled and select Set as Default Device.
- Right click on it once again and select Properties (or double click on it directly to open the Properties window).
- Go to the Listen tab at the top.
- Check Listen to this device.
- Click on the down arrow to open the drop-down menu of Playback through this device.
- Select a secondary audio playback device from the menu.
- Click Apply and OK in the Properties window.
- Click Apply and OK in the Sound window.
- Restart your Windows 10 computer.
Method 2: Choose Output Devices to Play Audio from Individual Apps
Configure steps to use multiple audio outputs Windows 10 when opening a specific app:
- Right click on the sound volume icon in the system tray at bottom right.
- Select Open Sound Settings from the pop-up menu.
- Navigate to the Advanced sound options (or Other sound options) section in the right pane.
- Click App volume and devices preferences under it.
- Browse the apps list in the opening Settings window. Then, click on the down arrow under Output to select a playback device from the drop-down menu.
- Close the Windows and restart your PC. (Windows will save the output audio device you choose so that it will play audio for you the next time when you open the certain app.)
Method 3: Use Third-party Tool
Is there other ways to use multiple audio outputs Windows 10? Yes, there are many third-party tools designed for using two audio outputs Windows 10 (or even more). Voicemeeter is one of the free software to help you configure multiple playback devices Windows 10.
ABOUT THE AUTHOR
Position: Columnist
Sarah is working as editor at MiniTool since she was graduated from university, having rich writing experiences. Love to help other people out from computer problems, disk issues, and data loss dilemma and specialize in these things. She said it’s a wonderful thing to see people solving their problems on PC, mobile photos, and other devices; it’s a sense of accomplishment. Sarah likes to make friends in life and she’s a huge music fan.
Одновременная запись на нескольких звуковых дорожках позволяет записать звук сразу нескольких инструментов, например, назначив каждому инструменту отдельную дорожку. Для записи на несколько аудиодорожек кнопка «Включить запись» должна отображаться на каждой дорожке. Кнопка «Включить запись» готовит несколько аудиодорожек к одновременному получению аудиоданных.
Примечание. Включение звука для дорожки также позволяет выполнять мониторинг входа.
Запись одновременно на несколько аудиодорожек
В GarageBand для компьютера Mac настройте инструмент или микрофон в качестве источника ввода для каждой дорожки, на которую Вы хотите выполнить запись.
Выберите «Дорожка» > «Настроить заголовок дорожки». Можно также нажать правую кнопку мыши на любом заголовке дорожки или нажать Option-T. В диалоговом окне «Настроить заголовок дорожки» выберите «Включить запись».
Если функция «Включить запись» уже выбрана, этот шаг можно пропустить.
Нажмите кнопку «Включить запись» в заголовке каждой дорожки, на которую Вы хотите выполнить запись.
Переместите указатель воспроизведения в ту точку в линейке ритма, где должна начаться запись.
Установите метроном и включите его, чтобы слышать ритм во время записи.
Нажмите кнопку записи в панели управления (или нажмите R) для начала записи.
Начните петь или играть на музыкальном инструменте.
На каждой включенной для записи дорожке появляется новый аудиорегион.
Нажмите кнопку остановки в панели управления (или нажмите пробел) для остановки записи.
Introduction: Cheap USB Simultaneous Multitrack Recording
want to record simultaneous tracks without an expensive pa system or beastly sound card? i did. i’ll show you how with some cheap usb soundcards.
i got tired of having to record one track and then another and then another when i could really do it all in one take, with much better results. i had a couple computers sitting around in various states of disrepair, so i gutted the sound card from one and put it in another. then using my recording software (cool edit pro at the time) i mapped the soundcards to different tracks and viola, it worked. i hit up ebay and found some usb soundcards for about $3 each and bought about 8 of them. using a usb hub, i plugged in 4 of them and attached a couple of different things and i was surprised when it worked much better than i anticipated.
dislcaimer: it would seem these cards are limited to 16-bit recording. that being said, as you can tell from the videos, it still sounds pretty good. while i wouldn’t try and start my own recording studio with this technology, for hobbyists, budding musicians, bands strapped for cash putting a demo together, i think this is a much better option than recording single tracks and having to overlay them. thank you all for your interest, keep the comments coming, and i’d love to hear what you can make with this.
Step 1: Get USB Soundcards
first you’ll need some usb soundcards. these are pretty cheap, i think i paid $2.99 each and i got mine from ebay –> usb sound card
i might as well tell you what you will need.
materials
——————–
1. a computer
2. usb sound cards
3. usb hub
4. audio recording software that supports multiple tracks (see below)
5. 3.5mm microphones or other audio out from devices
some software options are cool edit pro (used in this example), garage band, and i think audacity can do this too.
as for the input, you’re receiving end is gonna be a 3.5mm jack, but there are all kinds of conversion cables and jacks to help you out. as soon as i got this working, i had grand plans of putting 6 or 8 of the usb soundcards and a hub inside a nice enclosure with some breakout cables which would extend the input jack to the exterior without having to do anything to the soundcards, and terminate it with the 1/4inch jack since i mostly use those for guitar and some of my mics. i never got around to it, but feel free to trick out your setup with a nice wooden box (i initially wanted to use a cigar box). don’t forget to add a bunch of pretty lights. i still have a lot of ideas.
as far as i can tell, this system is completely modular, the number of tracks is limited only to the number of usb soundcards and usb ports you have. the most i’ve ever run at a time is six (i gave a couple away), but i don’t see why it wouldn’t work with more unless limited by your software or processing power.
Step 2: Hook It All Up
once you have your usb soundcards, you can plug ’em in. i recommend using a usb hub to make things easier and use more tracks, but if you only wanted to record two tracks and you have two free usb ports, it’s not a necessity.
Step 3: Set Up Your Software
long story short, i started this instructable a long time ago. i initially did a bunch of searching for ways to set this up using audacity and garage band but can’t remember what i found.
audacity
————————
all you audacity users let me know how and i will include it here with credit
cool edit pro
————————
this is the software we’ll be using today. there are countless tutorials on how to use it, (here’s a youtube video) so i won’t be going that in-depth other than the usb config. i will assume you know the basics. now then.
start a new project.
goto options –> device properties
make sure your devices are listed and in use by changing the order
once you’ve got it all set, go back to the session view (with all the tracks) and change the recording inputs for the tracks you want by clicking the Rec button (see pic). to figure out which input is which (because the devices are named the same) the fastest way is to assign them all to different tracks and just hit record (make sure each track is set to record) and test them out.
Step 4: Record Some Music
press record and do some music making!
i came up with this a while ago and since have got some more audio equipment, however last summer on my way up to rothbury with my sister we stopped over in tennessee at my grandpa’s house and he wanted me to help him with some recording. with only a backpack full of wires and mics and my laptop, we went over to the house of ernest ferguson (IBMA Pioneer of Bluegrass) and recorded a whole cd’s worth of music. below is one song from that session.
that track was recorded with a singstar mic for the ps2, a rockband usb mic for xbox 360, cable converter for the guitar and a lapel mic stuck inside the mandolin. all my other mics require phantom power and because i was going to a hippie convention i really didn’t want to drag a bunch of quality gear with me. i think it turned out pretty good, and Ernie played pretty great for being 92 years old, and Gene did great as well at 84. i’m gonna put it on itunes for them so be real excited and support folk musicians.
hope you enjoy, this should help bring multitrack recording to the masses, or at least to high school students or something. if you record something with this, give us a link in the comments so everybody can check it out!
the video i made at the beginning was recorded with my phone, so sorry for the quality. if there’s enough response, i can do it better and in hd. if you guys have any tips for other audio softwares leave it in the comments. at $3 a track, you can have a pretty decent multitrack recording setup for under $20 as opposed to what, $500? thanks for reading! and if you found this useful, don’t forget to rate!
Find answers to questions about Cakewalk products.
- Support Home
- Knowledge Base
- FAQ
- My Account
- Contact
If you have an audio interface with more two or more inputs you may want to record those inputs at the same time in SONAR. This is very easy to do, here’s how.
In this example we will record four tracks at the same time but this technique will work on as many tracks as you would like to record. The techniques used here will work on SONAR 8 or higher and SONAR Home Studio 7.
The first step is to insert the audio tracks that you would like to record to. If you are going to do this more than once you might want to make a Track template out of these steps so you do not have to repeat them every time.
You can right click in a blank area of the Track View and select Insert Multiple Tracks or you can select Multiple Tracks from the insert menu.
Fig 1: Select Insert | Multiple tracks
Now select the number of tracks you wish to insert. In this example we want to record to four tracks so we will input 4 as the desired number.
Fig 2: Input the number of tracks you would like to insert.
Now press OK and the audio tracks will be inserted into your project. If you started with a blank file the project will now look like the picture below.
Fig 3: A project with 4 tracks inserted.
Now select the correct inputs for each of the tracks. To keep thinks simple set track 1 to input 1 on your audio interface, track 2 to input 2 and so on.
Now arm your tracks by pressing the R button on each track. Press record and you are all set.
Fig 4: All tracks are armed and their inputs are set to the correct input on the audio interface
Recording webcam, mic, and PC screens simultaneously are what people usually do for games, presentations, zoom, and other instructional purposes. With the help of such a setup, you can easily record anything on your computer, including games, live stream chat, etc. It also supports audio input. While there are many tools to help you record webcam, mic audio, and PC screen simultaneously, many people still don’t know how to do it.
Today, we have decided to give a detailed guide on recording webcam and PC screens simultaneously without any issues. So, whether you are a beginner or an expert, you can easily follow this guide.
Can The Webcam Mic Audio System Audio and PC Screen Be Recorded Simultaneously?
If you use a desktop PC or a laptop with a webcam device, you will be able to capture a real-time webcam view with a recording program. A webcam with a built-in microphone or external headset microphone allows you to record both video and sound. However, simultaneously recording your webcam, audio, and PC screen simultaneously, a free recording tool is required.
Wondershare DemoCreator is a video creation and editing tool that allows you to record webcams and desktop screens in real-time. You should record webcam in Wondershare DemoCreator for presentation recording, training courses, game recording, and video tutorials.
Wondershare DemoCreator gives you an innovative interface and multiple features to easily create and edit all videos. Show with the help of its screen recording feature, you can capture real-time videos and edit them like a pro.
Now let’s see how you can record webcam and PC screen with DemoCreator while simultaneously recording mic audio.
How to Record Webcam Mic Audio and PC Screen Simultaneously in Democreator?
Follow this simple guide to learn how to record webcam mic audio and PC screen simultaneously in DemoCreator.
Step 1: Download and Install the Wondershare Democreator Program
Step 2: Well-Connected Mic and Webcam with Your PC
Before you can record your audio and screen, make sure your webcam is connected to the desktop, and your microphone is plugged in. If you are using a laptop, then turn on the built-in webcam and external microphone. Make sure that your mic and webcam are working correctly.
Step 3: Launch The Democreator Program and Choose “Capture”
Now go to the DemoCreator desktop app and click on the “Capture” option.
Step 4: Complete Your Setting Preferences
Set your recording preferences, such as the recording area and recording device. If you want to record the webcam, mic audio, and PC screen simultaneously, you have to keep all the tools turned on.
Step 5: Start Capturing
Then click on the red icon to start capturing. Once the recording is finished, the recorded files will immediately show at the demo creative video editor window.
Through the steps mentioned above, you can learn how to record system audio and mic audio simultaneously along with screen and webcam, with Wondershare DemoCreator. Isn’t it easy to use?!
What Can This Function Do?
The advanced function of recording webcam, audio, and monitor screen simultaneously is super useful. This app makes it easy to create tutorials, presentations, courses, vlogs, and other instructional videos. You can include your video and record your screen to show steps while explaining each step through the audio input.
This setup is best suited for gaming tutorials, business presentations, and for team collaboration in Sales, Marketing, or HR recording. Such videos make it easy to share important information in detail and reduce lengthy conversation threads, loads of texts, and recurring emails.
With social media on the rise, Wondershare DemoCreator is also a great resource for content creators and influencers to make interactive and engaging videos for their followers.
Conclusion
Not a decade ago, simultaneously recording webcam, audio, and monitor screens seemed like an impossibility. But thanks to technology and digital advancement, now some apps have made such impossibilities into reality. Now with the help of a single app, you can easily record your webcam, microphone audio, and PC screen simultaneously. The best part is that you do not have to be a computer expert to do this as Wondershare DemoCreator is suitable for beginners!


