In Windows 10, the newly installed applications will be listed as a Recently added section in the Start Menu. It shows up at the top left of the Start Menu. This feature displays the most recent three installed applications, but users can view more by clicking on the Expand button under it. This is a great feature that allows you to quickly launch the recently installed programs. However, if you don’t want other users to see the recently installed applications, you can remove this section. In this article, we will show you methods through which you can remove the specific applications or completely remove the list from Start Menu.
Context menu of Start Menu
Removing Recently Added List from Start Menu
There are several methods that you can use to remove the recently added list from Start Menu. Some will let you only remove specific applications from the list and others will completely remove the list from Start Menu. Depending on the situation, you can use the one that is better for you. You can also disable the enable/disable option of this list from the Settings app by using the Group Policy Editor. However, the Group Policy Editor isn’t available in all versions of Windows, so we are also including the Registry Editor method.
Method 1: Using the Remove from the List Option
This method is for removing a specific recently added application from the Start Menu. The feature can be found by right-clicking on any of the applications in the recently added list. However, this will not stop the applications from listing under this section in the future.
- Open the Start Menu by clicking on the Start icon or simply pressing the Windows key.
- Now right-click on any of the recently added applications, choose the More option, and then click on the Remove from the list option.
Using remove from the list option
- This will remove that specific application from the list. You can remove multiple by following the same steps.
Method 2: Using the Windows Settings App
There is a setting for enabling and disabling the recently added list from your start menu. The setting can easily be found in your Windows Settings app. You can change the toggle option to Off for this setting to disable the list from the Start Menu. You can also enable it back by simply changing the toggle option back to On.
- Press the Windows + I key combination on your keyboard to open the Windows Settings app. Click on the Personalization category in the Settings window.
Opening personalization in the Settings app
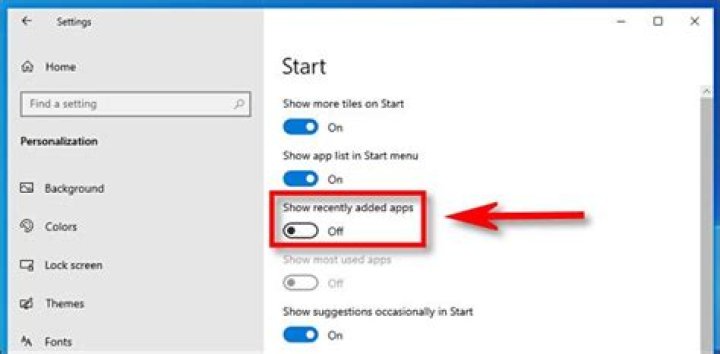
- In the left pane, click on the Start, and now turn Off the toggle for “Show recently added apps“.
Disabling the recently added list
- This will disable the list of the recently added applications from the Start Menu.
Method 3: Using the Local Group Policy Editor
Another method for disabling the recently added list is by using the policy setting in the Local Group Policy Editor. This will completely disable the list and users will be unable to enable it from the Settings app. The changes may not take effect soon, but a restart will apply the changes to your system. Follow the below steps to try it out:
- Press the Windows + R keys together to open a Run dialog. Now type “gpedit.msc” in it and press the Enter key to open the Local Group Policy Editor. If prompted by UAC (User Account Control), then click on the Yes button.
Opening the Local Group Policy Editor
- In the Local Group Policy Editor window, navigate to the following path:
Navigating to the policy setting
- Double-click on the setting named “Remove “Recently added” list from Start Menu” and it will open up in another window. Now change the toggle option from Not Configured to Enabled.
Opening the policy setting
- Finally, click on the Apply/Ok button to save the changes. This will remove the recently added list from the Start Menu.
Note: Sometimes the changes will not take effect immediately and you need to restart your computer for it to see the changes. - To enable it back, you need to change the toggle option back to Not Configured or Disabled in step 3.
Method 4: Using the Registry Editor
The alternative method for the Local Group Policy Editor is the Registry Editor method. It does the same work as the policy setting in the Group Policy Editor. If you used the Local Group Policy Editor method, then it will automatically update the key and value for this setting in the Registry Editor. However, if you are directly using this method, then you need to create the missing value for the setting to work. You can also create a backup of your registry before following the below guide to make it work:
- Press the Windows + R keys together to open a Run dialog on your system. Now type “regedit” and press the Enter key to open the Registry Editor. Also, click on the Yes button if prompted by UAC (User Account Control).
Opening the Registry Editor
- In the Registry Editor window, navigate to this key path:
- In the Explorer key, right-click on the right pane and choose New > DWORD (32-bit) Value. Save this value by naming it as “HideRecentlyAddedApps“.
Creating a new value
- Double-click on the newly created value and change the value data to 1.
Changing value data to enable the setting
- After all the changes, make sure to restart your computer to apply the changes.
- To enable the recently added list back to Start Menu, you need to change the value data of the value to 0 or simply remove the value from the Registry Editor.
Microsoft puts the Recently Added header on the Start Menu by default. Here’s a look at how to remove it if you want.
By default, Windows will show a list of recently added apps to the top of the Start menu. It displays some of the apps you have most recently installed on your system. But some people might not like to see that when they open the Start menu. Here’s how to remove that section.
Remove Recently Added Apps
When you launch the Start menu you will see a “Recently Added” section at the top of the apps list. It displays the names and icons of apps you installed recently.
To hide the Recently added section you need to open Windows Settings. You can get there by clicking the Gear icon in the Start menu or use the keyboard shortcut Windows key + I.
Once you have Settings open click on Personalization.
In the Personalization section click on “Start” from the column on the left sidebar.
Now in the Start section of Settings turn the “Show recently added apps” switch to the Off position.
That’s all there is to it now the next time you open the Start menu the Recently added apps section at the top will be gone.
You will no longer have the reminder of recent apps you have installed at the top. But you can still find them in the All Apps list or by searching for them using the search box in the Start menu. And if you know which letter an app you are looking for starts with you can click one of the letters on the start menu and then search for the app by the letter it starts with. For more on that read our article on how to find apps by the first letter from the Start menu in Windows 10.
This is a good way to get rid of some of the unnecessary items that Windows decides to put on your Start menu that you don’t need or want. If you want to turn it on again for any reason just go back into Settings and turn on the “Show recently added apps” switch again.
This blog post explains how you can remove recently added apps from start menu in Windows 10. The Recently added list on your Start menu shows the list of recently installed applications. In case you do not want to show users about the recent installed applications list. In this post, you will learn to prevent the Start Menu from displaying a list of recently installed applications.
By default In Windows 10 Start menu, you will see recently added applications at the top of the app list that is recently installed.
How to Remove Recently Added Apps from Start Menu in Windows 10
Remove Recently Added Apps From Start Menu In Windows Settings
- In Windows 10 device, Select the Start button, and then select Settings. Click Personalization.
How to Remove Recently Added Apps list from Start Menu in Windows 10
- In Personalization, click on Start. Click the switch Show Recently Added Apps to turn it Off.
How to Remove Recently Added Apps from Start Menu in Windows 10
Remove Recently Added Apps from Start Menu Using Group Policy
To remove recently added apps list from start menu, follow the steps below
You must be logged in as an Administrator on the computer.
- In Windows 10 device, click Start type gpedit.msc in search to run the Local Group Policy Editor.
- Navigate to Computer Configuration >Administrative Templates >Start Menu and Taskbar. Double click on the Remove “Recently added” list from Start Menu policy to edit it.
How to Remove Recently Added Apps from Start Menu in Windows 10
- Select Enabled, click Apply and OK.
If this policy is enabled, the Start Menu will no longer display the “Recently added” list.
Remove Recently Added Apps from Start Menu Using Registry
To add or import a registry value follow these steps:
- Open Notepad, Copy and paste the registry value below into the text editor.
- It will look like in the following syntax, when you see the file.
How to Remove Recently Added Apps from Start Menu in Windows 10
- In the File menu, Select Save As and click Browse to your preferred folder or location. In the File name box provide the appropriate name “FileName.reg” with .reg extension and Choose Save as type “All” from drop-down list. Click Save.
- The registry file will appear on your saved location. To start the execution, Double click or Right click and select Merge option on the saved .reg file content to merge into the local registry.
How to Remove Recently Added Apps from Start Menu in Windows 10
- A warning box with the following messages prompted, Click Yes to continue.
How to Remove Recently Added Apps from Start Menu in Windows 10
- Once Information in path of .reg file has been successfully entered into the registry below prompt will be appear. Click OK.
How to Remove Recently Added Apps from Start Menu in Windows 10
End User Experience
Once you complete the steps, the list of recently installed applications will no longer appear in the Start menu.
How to Remove Recently Added Apps from Start Menu in Windows 10
In Windows 10, with default settings, when you install a new Windows app or traditional desktop program, it appears in the Recently added list of Start menu. The Recently added group shows up at the top left of the Start menu.
The feature displays the last three installed apps but you can view more apps by clicking on the Expand arrow that shows up at the end of the list. The feature allows you to quickly launch the last installed app.
Although there is nothing wrong with this feature, many users find it not so useful as one can always use the search box on the taskbar to quickly launch the recently installed app. If you don’t use the feature, you can turn it off under Start menu settings.
In this guide, we will show how to configure Windows 10 to stop displaying recently installed apps in the Start menu.
Remove newly added apps from Recently Added group in Windows 10 Start
If you are looking to remove the Recently Added group (instead of apps) from the Start, refer the directions mentioned in Method 2 (scroll down to see).
Step 1: Right-click on an app entry in the Recently Added group, click More and then click Remove from this list option.
Remove Recently Added Group from Start menu
Step 1: The first step is to open the Settings app by clicking the Settings icon on the left side of the Start menu. Alternatively, if you prefer using keyboard shortcuts, use Windows + I hotkey to launch the Settings app.
Step 2: Navigate to Personalization > Start page.
Step 4: Here, turn off the option labeled Show recently added apps toggle switch.
Benj Edwards is an Associate Editor for How-To Geek. For over 15 years, he has written about technology and tech history for sites such as The Atlantic, Fast Company, PCMag, PCWorld, Macworld, Ars Technica, and Wired. In 2005, he created Vintage Computing and Gaming, a blog devoted to tech history. He also created The Culture of Tech podcast and regularly contributes to the Retronauts retrogaming podcast. Read more.
By default, when you open your Windows 10 Start menu, you’ll see recently added apps at the top of the app list. This section shows some of the apps you have installed most recently. If you’d like to remove that, it’s easy to change. Here’s how.
Here’s what a typical “Recently Added” section looks like at the top of the Start menu app list. It’s a small area that shows the names and icons of recently installed apps.
If you’d like to hide the “Recently Added” section, we’ll need to visit Windows Settings. Open Settings by clicking the “Start” Menu and selecting the “Gear” icon (or by pressing Windows+I).
In Settings, click “Personalization.”
In Personalization, click the “Start” option in the sidebar.
In the Start menu settings, find the switch labeled “Show Recently Added Apps.” Click the switch to turn it “Off.”
The next time you open the Start menu, the recently added apps section at the top will be gone. You will no longer be reminded of all the apps you’ve installed recently, but you can, of course, find them in the All Apps list or by using the search box in the Start menu.
From the personalization options in the Settings app, you can remove the Recently Added section in the Windows 10 Start menu. Here is how.
Whenever you install a program or add something to the Start menu folder, that application or file shortcut will appear in the Recently Added list. By default, the Recently Added section will appear at the top of the Start menu. i.e, above the general app list. For example, if you install the Chrome browser, the Google Chrome application will appear in the Recently Added list along with the general application list. Generally, the recently added list will not be more than four or five items long. Since most of us need to open the newly installed applications right away, the Recently Added list is quite useful. It eliminates the need to search for newly installed applications or their deep buried shortcuts.
Though the Recently Added list is pretty useful in a lot of situations if you want to better organize the Start menu, you can completely remove the Recently Added section or list from the Start menu.
Without further ado, let me show the steps to fully remove the Recently Added list from the Windows 10 Start menu.
Steps to Remove Recently Added List from Start Menu
You can disable the Recently Added list from the Start menu personalization page in the Settings app. Just turn off the “Show recently added apps” and you are done. Here’re the exact and detailed steps on where to find the option in the Settings app.
- First, open the Start menu.You can do that by pressing the Start key on the keyboard.
- Click on the Settings icon appearing to the left side of the Start menu.
- Click on the “Personalization” option in the Settings app.
- Now, select “Start menu” tab from the left panel.
- On the right page, turn off “Show recently added apps” option.
- Close the Settings app.
That is all. As soon as you turn off the option, the Recently Added list will be removed from the Start menu. From now on, you will no longer see the newly installed application shortcuts at the top of the Start menu’s app list. However, you can still access the install applications by searching for them in the Start menu or by going through the application list in the Start menu.
If you are still seeing the Recent Apps list, the changes might not be applied to the Start menu. In those cases, either restart explorer or restart the system to apply the changes. To restart the system, right-click on the Start menu and select the “Shut down → Restart” option.
If you ever want to enable the Recently Added list, simply follow the same steps but turn on the “Show recently added apps” option in step 5. Once you do that, the list should appear in the Start menu immediately.
That is all. I hope that helps. If you are stuck or need some help, comment below and I will try to help as much as possible.
By default, when you open the Windows 10 Start menu, you’ll see recently added apps at the top of the app list. This section shows some of the applications that you have most recently installed. If you want to remove that, it’s easy to change. That’s how.
This is what a typical “Recently Added” section looks like at the top of the Start menu app list. It’s a small area that displays the names and icons of recently installed apps.
If you want to hide the “Recently Added” section, we will need to visit Windows Settings. Open Settings by clicking the “Start” menu and selecting the “Gear” icon (or pressing Windows + I).
In Settings, click “Personalization”.
Under Personalization, click the “Start” option in the sidebar.
In the Start menu settings, look for the switch labeled “Show recently added apps.” Click the switch to turn it off.
The next time you open the Start menu, the recently added apps section at the top will disappear. You will no longer be reminded of all the apps you have recently installed, but you can, of course, find them in the All apps list or by using the search box in the Start menu.
In this post, you will learn how to remove recently added apps from the Start menu using Intune. The recently added list on your Start menu shows the list of recently installed applications.
In case you do not want to show users about the recent installed applications list. The policy allows IT Admins to configure Start by hiding recently added apps.
By default In Windows 10 Start menu, you will see recently added applications at the top of the app list that is recently installed. Let’s check the steps to prevent the Start Menu from displaying a list of recently installed applications.
How to Remove Recently Added Apps from Start Menu using Intune
Let’s follow the below steps to remove recently added apps from the start menu using Intune –
- Sign in to the Microsoft Endpoint Manager admin center
- Select Devices >Windows >Configuration profiles >Create profile.
In Create Profile, Select Platform, Windows 10, and later and Profile, Select Settings catalog (preview). Click on Create button.
On the Basics tab, enter a descriptive name, such as Remove Recently Added Apps From Start Menu. Optionally, enter a Description for the policy, then select Next.
In Configuration settings, select Add settings.
Remove Recently Added Apps using Intune Policy
Select Start, Under these settings, you will see all the settings in this category. After adding your settings, click the cross mark at the right-hand corner to close the settings picker.
Here, I selected the Hide Recently Added Apps option below.
Note – In policy, use Add settings > Search to find specific settings. You can search by category or a keyword, such as Hide Recently Added Apps .
All the settings are shown and configured with a default value. If you don’t want to configure a setting, then select the minus. The above is the brain of the policy to Remove Recently Added Apps from the Start Menu using Intune.
Set Hide Recently Added Apps to Enabled, Enabling this policy hides recently added apps from appearing on the start menu. Click Next.
Under Assignments, In Included groups, select Add groups and then choose Select groups to include one or more groups. Select Next to continue.
In Scope tags, you can assign a tag to filter the profile to specific IT groups. Add scope tags (if required) and click Next.
In Review + create, review your settings. When you select Create, your changes are saved, and the profile is assigned.
A notification will appear automatically in the top right-hand corner with a message. Here you can see, Policy “Remove Recently Added Apps From Start Menu” created successfully.
This completes the steps to hide recently added apps using Intune. The policy is also shown in the Configuration profiles list.
Your groups will receive your profile settings when the devices check-in with the Intune service.
Once the policy applies to the devices, the list of recently installed applications will no longer appear in the Start menu. This policy may require a reboot device to take effect.
Author
About Author -> Jitesh has over 5 years of working experience in the IT Industry. He writes and shares his experiences related to Microsoft device management technologies and IT Infrastructure management. His primary focus area is Windows 10 Deployment solution with Configuration Manager, Microsoft Deployment Toolkit (MDT), and Microsoft Intune.
The Windows 10 Start Menu introduces a new All Apps section that, by default, lists all of the applications installed on a user’s PC. Although quite similar in name to the “All Programs” list from Windows 7 and earlier, the Windows 10 All Apps list doesn’t function in the same way. It does not allow the user unable to manually add, remove, or rearrange applications directly via the Start Menu. Thankfully, there’s a workaround that brings some of this functionality back to the user, although it includes some important caveats. That said, here’s how to add, remove, and organize the All Apps list in Windows 10.
A Note About Universal Apps
The Windows 10 All Apps list is home to both traditional “desktop” apps as well as “universal” apps from the Windows Store. Unfortunately, the steps described in this tip apply only to desktop apps, and won’t work with universal apps. You can still remove a universal app from your Start Menu’s All Apps list, but you’ll need to uninstall it completely (right-click on the app’s entry in the Start Menu and select Uninstall).
What are Universal Apps?
Microsoft has launched an initiative for all apps across their different platforms to be universal. This implies that apps in your Windows computer will also be compatible with Xbox, Windows phones, and tablets. The software can be primarily downloaded through the Microsoft Store.
Although this limitation is restrictive, the relatively good news is that users can re-download purchased apps from the Windows Store at any time, so the process of getting a universal app back if you regret uninstalling it later shouldn’t be a major issue. When it comes to desktop apps, however, the steps below demonstrate how you can, among other things, remove their icons from your All Apps list while keeping the apps installed and fully functional.
Removing Apps from the All Apps List
To remove a desktop app from the Windows 10 Start Menu’s All Apps list, first head to Start > All Apps and find the app in question. Right-click on its icon and select More > Open File Location.
Of note, you can only right-click on an application itself, and not a folder that the app might reside in. This doesn’t mean that you can’t remove or modify folders in the All Apps list (we’ll show you how in a moment), but you’ll need a specific application icon itself to get to the next step.
After clicking Open File Location, a new File Explorer window will appear showing you the application shortcut. Depending on whether the app is available to all users or limited to your own user account, you’ll be looking at one of the following directories, respectively:
Changes made to the contents of these directories will be reflected in the All Apps list. For example, we want to remove Microsoft Access 2016 from our All Apps list, but we don’t necessarily want to uninstall the application. Using the steps above, we can locate the Access 2016 shortcut in the corresponding “Programs” folder and delete it. When we open the Start Menu’s All Apps list again, the entry for Access 2016 will not show.
You can remove other applications, including folders, from File Explorer to get rid of any unwanted apps that would otherwise clutter up your All Apps list. Note, however, that there are certain system files and entries that you can see in File Explorer but not in your All Apps list. It’s best to leave any entries that don’t show up in the All Apps list alone in case Windows or other applications rely on them.
Organizing Apps in the All Apps List
Rather than deleting apps from the All Apps list, some users may prefer to organize their apps into folders; thus, reducing desktop clutter and making it look more organized. This can be accomplished by repeating the steps above to find the app’s shortcut location. Instead of deleting any apps, however, you can create a new folder (or use an existing folder) and simply drag and drop the appropriate apps into place.
For example, all of our Adobe Creative Cloud apps are listed in the top-level Programs folder, but we can move them all to an “Adobe” folder to clean up our All Apps list while still maintaining easy access to our Adobe apps.
Folders in the All Apps list don’t need to be limited to certain developers, of course. Users can create custom folders such as “Games” or “Work” and populate them with the desired list of apps. You can also rename apps or folders in File Explorer and have the changes reflected in your All Apps list.
Once you’re done organizing your Start Menu in Windows 10, you’ll be able to search and find content and apps faster than ever before.
Choose Which Apps Show in Your Start Menu
There are apps which your want to be readily available in your Start Menu for easy access. There is a way to customize your Start Menu to show all the available apps or just the ones you use most of the time. To do this, you have to:
- Click the Start Menu.
- Go to Settings.
- Click Personalization, and adjust the settings you want to change.
– Last updated on July 10, 2017 by VG
Recently an AskVG reader asked me about a method to disable the “NEW” tag present on newly installed program shortcuts in Start Menu of Windows 10.
Actually in Windows 8 , Windows 8.1 and Windows 10 operating systems, after installing a new software program if you check its shortcut entry in Start Screen or Start Menu, you’ll see a “NEW” tag present next to the shortcut as shown in following screenshot:
It’s a feature of Windows OS which helps users in identifying the newly installed programs easily but sometimes this feature becomes very irritating when the “NEW” mark is displayed on several newly installed programs.
Microsoft has not provided any option to permanently disable or hide the appearance of “NEW” tag on newly installed programs. Also I was unable to find any group policy or registry tweak to turn off the “NEW” tag display in Start Menu.
I also tried the good ol’ registry trick to disable highlighting of newly installed programs in Start Menu which requires creating new DWORD Start_NotifyNewApps in “HKEY_CURRENT_USER\Software\ Microsoft\Windows\CurrentVersion\Explorer\Advanced” key and settings its value to 0. It used to work in older Windows versions such as Windows XP but unfortunately it no longer works in Windows 8/8.1/10.
As of now I’m aware of only 2 ways to remove the “NEW” tag from newly installed programs shortcuts in Start Menu which are as following:
METHOD 1:
If you launch the newly installed program by clicking on its shortcut present in Start Menu/Start Screen, it’ll immediately remove the “NEW” tag from the shortcut. So you just need to open the program once and the “NEW” tag will disappear.
METHOD 2:
If you don’t want to open the program, just right-click on the program shortcut which is showing the “NEW” tag. As soon as you right-click on it, the “NEW” tag will disappear from the shortcut.
These are the only ways to get rid of the “NEW” tag from newly installed program shortcut in Start Menu. If I come across any working solution to completely disable this feature, I’ll update this tutorial.
You are here: Home » Windows 10 » [Windows Tip] How to Remove “NEW” Tag from Newly Installed Program Shortcuts in Start Menu
About the author: Vishal Gupta (also known as VG) has been awarded with Microsoft MVP (Most Valuable Professional) award. He holds Masters degree in Computer Applications (MCA). He has written several tech articles for popular newspapers and magazines and has also appeared in tech shows on various TV channels.
Comments
NOTE: Older comments have been removed to reduce database overhead.
Since the fall creators update 2017 windows 10 I keep getting the ‘new’ tag randomly, on programs ive had for years. Super annoying I can’t turn it off. I remember a few weeks ago I went through the entire list of programs right clicking to get rid of it. Just keeps popping up sporadically.
For your convenience, Windows 11/10 displays the programs you installed last, in the Start Menu, under the Recently added list, so that you easily open it. We have seen how to remove the items in Most Used list. Today, let us see how to show or hide the Recently added apps in the Start Menu of Windows 11/10.
Hide Recently added apps group in Start Menu
Windows 11
Press Win+I in combination to open the Settings. Alternatively, you can right-click the Start button on the Taskbar and choose Settings from the list of options displayed therein.
From the side-panel on the left, select Personalization heading.
Switch to the right to locate the Start tile. When found, click to expand its menu.
Under the list of available options, scroll down to Show the recently added apps heading. Move the slider button next to it to the Off position.
Windows 10
If you wish to hide the full Recently added app group in the Windows 11/10 Start Menu, you can do the following.
Open Windows Settings app > Personalization > Start.
Under the Customize list, you will see Show the recently added apps. Move the slider button to the Off position.
Open your Start Menu now and you will see that this Recently added apps group is not displayed at all.
Remove Recently added app from Start Menu
Windows 11
If you wish to remove a particular software from the Recommended list:
Click the Start Menu, right-click on the item under Recommended list and choose Remove from list option.
Windows 10
If you wish to simply remove a particular software from the Recently added list:
- Open your Start Menu
- Right-click on the item under Recently added
- Select More >Remove from this list.
That particular item will not be displayed, when you close and re-open your Start Menu.
There are several such tips to customize Windows 10 or Windows 11 Start Menu. Windows 10 Start customization tips – They will personalize your Windows computing experience. Take a look at them!
What is a Start menu group?
When you start Windows on your computer, you will see icons of the apps pinned to the Start menu. These icons or apps arranged in organized groups, represent the Start menu group. You can add the frequently used apps to it, if required.
What is Personalization in computer?
Personalization is the method by which a user can customize the appearance of his Desktop screen, or Web-based interface, to suit personal preferences. Almost all operating systems offer this customization to give a personalized touch and feel and make the devices work as its user deems fit.
Date: June 21, 2020 Tags: Start Menu
Related Posts
How to create a folder in Start Menu of Windows 11
How to Backup and Restore items pinned to Start Menu in Windows 11/10
Windows Start Menu does not close and remains frozen in Windows 11/10
[email protected]
Anand Khanse is the Admin of TheWindowsClub.com, a 10-year Microsoft MVP (2006-16) & a Windows Insider MVP. Please read the entire post & the comments first, create a System Restore Point before making any changes to your system & be careful about any 3rd-party offers while installing freeware.
Primary Sidebar
report this ad
Lots of programs or applications on Windows fire up as quickly as you start up your Windows computer and also begin running in the history. The important things to keep in mind right here is that start-up applications can add in the direction of your Computers slow-moving starting rate, so handling them is very important.
In earlier Windows variation– View and also 7– customers needed to utilize Msconfig in order to include or get rid of programs from the Windows start-up, however Microsoft made points a little bit less complex for Windows 8 and also Windows 10.
We have actually gone over just how to include and also get rid of programs from Windows 8 right here and also a comparable procedure likewise puts on handling start-up programs for Windows 10.
Additionally Review: Below is Exactly how to Switch off Windows 10 Updates.
Just How to Eliminate Programs from Windows 10 Start-up?
Disabling a programme/application from going for the moment of start-up simply requires you to terminate up the job supervisor– it’s truly as basic as that plus a couple of even more actions.
You can just release the job supervisor by right-clicking on the taskbar and also picking Job Supervisor.
When introduced, click ‘Startup’ from amongst the tabs on the top of the Job Supervisor.
After that pick the application that you want to quit from introducing on start-up, right-click and also pick ‘Disable’.
That’s it, currently the impaired application will certainly not release when the computer is started the following time. You can make it possible for the program later on if required by means of the Job Supervisor making use of the exact same actions.
Just How to Include Programs to Windows 10 Start-up?
Including a program to Windows 10 start-up food selection is a little bit extra difficult than simply skyrocketing the job supervisor and also enabling/disabling.
You’ll require to access the Start-up folder within your Windows folder in the drive where Windows has actually been mounted.
You can either attempt to get to there by means of the traveler or right here is a quicker means– Simply kind ‘shell:startup’ in the ‘Run’ box and also it’ll bring the start-up folder for you.
The ‘shell’ command can be made use of to bring any type of concealed or unique Windows folders, as long as you recognize the name of the folder.
As Soon As on the ‘Startup’ folder, situate the program that you want to include in Windows 10 start-up and after that just drag and also drop it to the ‘Startup’ folder.
Either you’ll be asked whether you intend to develop a faster way or as remained in our instance, a faster way will certainly be produced immediately when you go down the picked application right into the ‘Startup’ folder.
Currently you can inspect if your program has actually been included from the ‘Task Manager’ under the ‘Startups’ tab and also can enable/disable it from there.
You can include as numerous applications to go for the moment of starting the computer, however this might detrimentally impact the moment your device requires to boot along with prevent its efficiency while running as a majority of applications will certainly be sharing the system memory.
The Most Used apps list on the Windows 10 Start menu can be convenient, but you might want to remove it. Here’s how.
The Start menu on Windows 10 contains a lot of app information, including live tiles, and is highly customizable. One of the default features is the “Most used” list at the top of the left-hand column. It allows for quick access to the apps and other system items that you use frequently. However, you might want to remove certain items from the list or remove the list entirely. Here’s how.
Remove Apps from the “Most Used” List on the Start Menu
Click the Start button or hit the Windows key on your keyboard to launch the Start menu. Then to remove an app or other item from the “Most used” list, right-click on it and select More > Don’t show in this list.
Remove the Most Used List from Start
If you find that this list takes up too much room or you don’t want it on the Start menu, you can delete it. To do that, open Settings from the Start menu.
Then from the Settings menu, click on Personalization.
Now in the Personalization section, click on Start from the left-hand list. Then turn off the “Show most used apps” switch.
That will remove the entire “Most Used” list from the Start menu.
It’s also worth noting that from the Start Personalization section in Settings, you can remove other lists from the Start menu, too. You can remove the “Recently Added” apps list, for example. Or you can remove the Apps list from the Start menu entirely.
Here is an example of completely removing the Apps list from the Start menu.
On the other hand, you can add more items to the Start menu. For example, if you are a fan of app tiles, you can add a fourth column of app tiles to Start.
If you are new to Windows 10 and need assistance with any part of the operating system, or if you want to have more Windows or Microsoft discussions, make sure to join our free Windows 10 Forums!
Benj Edwards is an Associate Editor for How-To Geek. For over 15 years, he has written about technology and tech history for sites such as The Atlantic, Fast Company, PCMag, PCWorld, Macworld, Ars Technica, and Wired. In 2005, he created Vintage Computing and Gaming, a blog devoted to tech history. He also created The Culture of Tech podcast and regularly contributes to the Retronauts retrogaming podcast. Read more.
While using Windows 10, you might see a list of “Most Used” apps in your Start menu. Whether you’d like to simplify to Start menu or conceal the list due to privacy concerns, hiding the most used apps list is easy. Here’s how to do it.
When enabled, the “Most Used” section of the Start menu keeps track of which apps you use the most, and it displays them in a Start menu list.
If you’d like to remove the Most Used app list from the Start menu, we’ll need to visit Windows Settings. First, launch “Settings” by opening the “Start” and clicking the “Gear” icon (or by pressing Windows+I).
In Settings, select “Personalization.”
In Personalization, click “Start.”
In Start settings, flip the switch labeled “Show Most Used Apps” until it is turned “Off.”
(If the switch is grayed out, then you already have the feature disabled in your privacy settings. See below for more information on that.)
The next time you open the Start menu, the “Most Used” section of the app list will be hidden.
If you’d like to completely disable the Windows feature that keeps track of which apps you use the most, open “Settings” and navigate to Privacy > General. Flip the switch beside “Let Windows track app launches to improve Start and search results” to “Off.”
After you’re done with that, you can simplify your Start menu even further by revisiting the “Start” section in “Settings” and turning off other switches for items like “Show recently added apps” and “Show suggestions occasionally in Start.” What you disable depends on your personal preferences. Have fun customizing your Start menu!
Uninstalling unwanted apps and programs can help a PC run faster and more efficiently, so it makes sense to get rid of ones that are no longer needed.
There might be some apps and programs on Microsoft’s Windows 10 that are no longer needed. As many users are aware, installing an app or program is as easy as a few clicks, but uninstalling those same apps and programs can seem like a painful and complicated endeavor. So much so that some users may just give up on the process of uninstalling apps and programs entirely.
Getting rid of these unwanted programs and apps is necessary to free up disk space or unclutter the Start Menu. In addition, uninstalling unwanted apps and programs can help a PC or laptop to run faster and more efficiently. Therefore, it makes perfect sense to put the effort in and get rid of unwanted programs. This is especially true if they are causing problems and can’t be repaired.
According to Microsoft, there’s more than one way to remove unwanted apps and programs in Windows 10. If the app or program cannot be found in one location, try looking for it elsewhere. Keep in mind that there are some programs built into Windows 10 that cannot be uninstalled. To uninstall an app or program from the Start menu, simply select Start and find it from the list shown, press and hold on the app (or right-click on it), and then select Uninstall.
Uninstalling Programs From Settings Or Control Panel
The Settings page can also be used to uninstall an unwanted app or program. To Uninstall from the Settings page, select Start, then select Settings > Apps > Apps & features. Find and select the app to be removed and then select Uninstall. Another option is to remove the app or program using the Control Panel. To uninstall programs from the Control Panel, type Control Panel in the search box on the taskbar and select it from the results. Select Programs > Programs and Features and then either right-click or press and hold the app or program that needs to be removed and select Uninstall or Uninstall/Change and simply follow the on-screen instructions.
If there is an error message while attempting to uninstall an app or program, try using the Uninstall Troubleshooter or Program Uninstall. Keep in mind that Windows’ uninstallers don’t always remove all of the files and settings. For those who want to deep clean their PC or laptop, a third-party uninstaller can sometimes be helpful to ensure apps and programs have been completely removed from Windows 10.
If you are not happy with default icons in Windows 11 Start, you can remove or add apps to the Start menu manually.
To delete apps from the Start menu in Windows 11, you need to follow the same logic as removing live tiles in Windows 10. Do the following:
Remove app icons from the Start menu in Windows 11
- Click the Start button at the center of the taskbar. In Windows 11, it has an icon with four blue squares. Alternatively, press the Win button on your keyboard.
- Find the app you want to remove from the list of pinned applications in the Start menu in Windows 11.
- Right-click the app and select Unpin from Start.
- Alternatively, you can right-click an icon on the Desktop and select Unpin from Start. Keep in mind that that will only work if the app you want to remove from the Start menu has a Desktop shortcut as well.
That is how you remove apps from the Start menu in Windows 11.
How to pin apps to the Start menu in Windows 11
Again, you can pin apps to the Start menu in Windows 11 in the same way you used to pin live tiles in Windows 10. All that is changed is the Start menu now uses simple icons with labels, not live tiles. Newcomers to Windows 11 may still have a hard time finding the list of all apps in the new system, so our guide is here to help.
To add apps to the Windows 11 Start menu, do the following.
- Press the Start button and then find the All apps button in the top-right corner.
- Find the app you want to pin to the Start menu in Windows 11 and right-click it.
- Select Pin to Start.
- You can also pin apps and folders to the Start menu from the Desktop.Right-click the app or folder you want to pin and select Pin to Start.
That method also works from any other folder open in File Explorer. Unfortunately, it does not work with regular document and image files. That is how you add apps to the Start menu in Windows 11.
Tip: A new centered taskbar may add to your confusion even more. Luckily, you can move icons on the taskbar from the center to the left using a dedicated guide.
Winaero greatly relies on your support. You can help the site keep bringing you interesting and useful content and software by using these options:
If you like this article, please share it using the buttons below. It won’t take a lot from you, but it will help us grow. Thanks for your support!
Author: Taras Buria
Taras is here to cover stories about Microsoft and everything around, although sometimes he prefers Apple. You can stay in touch with him on Twitter. View all posts by Taras Buria
2 thoughts on “How to Remove or Add Apps to the Start menu in Windows 11”
The unpin option isn’t available, I can only drag it around or uninstall the app, sadly.
I don’t have the pin to start menu 🙁 How does one fix this? I seriously need my apps pinned to the start menu (don’t wanna fill up taskbar)
Leave a Reply Cancel reply
Connect with us
We discontinued Facebook to deliver our post updates.
If you’ve ever right-clicked on an app icon on the taskbar or in the Start menu, you might’ve seen that Windows shows you a list of recent items that you’ve opened with that application. In fact, Windows also shows you the recently opened files and frequently accessed places in the File Explorer’s File menu, too. This is pretty helpful for some users. However, if you are not using this feature or don’t like showing your recent items and frequent places for privacy reasons, you can easily disable them.
Also read: How to Delete Windows Explorer Address Bar History in Windows
Disable Recent Items from Settings App
If you just want to disable recent items and frequent places for your user account, only then you can use the Settings app to do that. It is faster and easy to configure from the Settings app; there’s no need for registry hacks or policy changes.
1. To open the Settings app, click on the “Notifications” icon appearing at the bottom-right corner, and then click on the “All Settings” button.
2. In the Settings app, go to “Personalization” and then “Start” appearing on the left sidebar. On the right panel, toggle the switch under “Show recently opened items in Jump Lists on Start or the taskbar” to “Off.”
As soon as you toggle the switch to the off position, the recent items and frequently places will be turned off immediately. If you want to enable them, just toggle the switch to the On position.
Disable Recent Items Using Group Policy (All Users)
While the Settings app allows you to turn off recent items and frequent places on a per account basis, it has no option to disable them for all users. For that, you need to modify a policy within the Group Policy Editor which is available to all Pro and Enterprise users. This method is particularly useful for system administrators.
1. Open the Start menu, search for “gpedit.msc” and press Enter to open Group Policy Editor. Next, go to “User Configuration -> Administrative Templates -> Start Menu and Taskbar” location.
2. On the right panel find and double-click on the “Do not keep a history of recently opened documents” policy. This is the policy that lets you enable or disable recent items and frequent places.
3. In this Window select the “Enabled” radio option and click on the “Apply” and “OK” buttons to save the policy changes.
Group Policy changes require system restart or force update to apply the changes, so either restart the system or execute gpupdate /force in the command prompt as an administrator.
To enable the recent items and frequent places feature, you just have to select “Disabled” or the “Not Configured” option.
Also read: How to Use Clipboard History in Windows 10
Disable Recent Items from Registry (All Users)
If you are using the Windows 10 Home version and need to turn off recent items and favorite places for all users on your system, then you can use the Registry Editor.
1. First, press Win + R , type regedit and press Enter to open the Windows Registry. Now, copy the below path, paste it in the address bar and press Enter to go to the target key.
2. On the right panel, see if you have a value named “NoRecentDocsHistory.” If you have the value, proceed to the next step. Otherwise, right-click in the empty space and select “New -> DWORD (32-bit) Value.” Name the value as “NoRecentDocsHistory.”
3. Double-click on the newly created value and set the value data to “1.”
You’ve now successfully disabled recent items and frequent places in Windows 10. To make the changes take effect, restart the system. If you want to revert the changes, change the value data back to “0” to simply delete the “NoRecentDocsHistory” value.
Our latest tutorials delivered straight to your inbox
Created for convenience, it could also be a source of embarrassment
Back in the days, I wrote an article on how to clear the recent items list in Windows. If you added the Recent Items option to the Start Menu, you or anyone else could see all the files you recently opened!
If you’re a privacy freak who doesn’t want someone else to see what kind of documents you’ve been opening, clearing this list is essential! However, starting with Windows 7, there was a new feature introduced called a Jump List. You can read my previous post to understand how Jump Lists work.
With Jump Lists, that functionality basically moved from the Start Menu to the taskbar in Windows 8 and Windows 10! For example, if you open several Word documents and then right-click on the Word icon in the taskbar, you’ll see the following list:
It’s even worse for something like a web browser. When I right-clicked on the Chrome icon in my taskbar, I was surprised to see a list of my most visited sites and recently closed tabs!
If no one else uses your computer, that’s fine, but otherwise it’s like a quick peek into your personal stuff! Obviously, Microsoft created this feature for convenience purposes, so you could easily open a web page you visit very often or file that you had recently worked on.
Each program has to individually support this feature in order to see the list. If a program doesn’t support Jump Lists, you won’t see anything when you right-click on the icon.
Clearing Individual Jump List Items
Now when it comes to removing items in the Jump List, there are a couple of ways to go about it. Firstly, let’s start with removing individual items from the list. An easy way to get rid of one item is to just right-click on the item and choose Remove from this list.
Obviously, that’s just for clearing a small number of items. If you remove all of the items, you have to configure a setting in Windows. The procedure for doing this is different depending on what version of Windows you are using. I’ll show you how to do it in Windows 7 and Windows 10.
Turn Off Jump Lists in Windows 7
To prevent Windows from storing and displaying a list of recent items in the taskbar, you first need to right-click on the taskbar and choose Properties.
Now click on the Start Menu tab and then uncheck the Store and display recently opened items in the Start menu and the taskbar box.
Click OK and all the data stored for recently opened items will be deleted. Now when you right-click on any program in the taskbar, no personal data will show up. Note that this is a good way to wipe out all the stored data and start from scratch.
If you want, you can check the box again and it will begin to store recently opened items, but from a clean slate. Obviously, just leave it unchecked if you never want Windows to store your history.
Turn Off Jump Lists in Windows 10
In Windows 10, the procedure has changed. If you right-click on the taskbar and go to Properties, you’ll see there isn’t even a Start Menu tab anymore.
For Windows 10, you have to click on Start and then Settings first. Then click on Personalization.
Click on Start in the left-hand menu and then click on the Show recently opened items in Jump Lists on Start or the taskbar toggle button so that it says Off.
Manually Clear Jump Lists
All recent items in any Jump List are stored by Windows in a hidden location, which you can get to in Windows 7 or higher by browsing to the following folder location in Explorer:
%APPDATA%\Microsoft\Windows\Recent\AutomaticDestinations
Copy and paste that into Windows Explorer and press enter. Now you will see a list of files with very long and convoluted names. This is because all the Jump Lists are encoded. Each file represents a list of recent items for a particular programs’ Jump List.
It’s impossible to tell which entries go with which Jump Lists unless you open the file in a text editor and browse through it. However, since all of the files are just recent items in a Jump List, you can delete all the files and it will clear all recent items on all Jump Lists.
Those are all the different ways you can clear the list of recent items from a Jump List in Windows. If you have any questions, feel free to comment. Enjoy!
Founder of Online Tech Tips and managing editor. He began blogging in 2007 and quit his job in 2010 to blog full-time. He has over 15 years of industry experience in IT and holds several technical certifications. Read Aseem’s Full Bio
This tutorial is about How to Create New Tile Groups on Windows 10 Start Menu. Recently I updated this tutorial and will try my best so that you understand this guide. I hope you guys like this blog, How to Create New Tile Groups on Windows 10 Start Menu. If your answer is yes after reading the article, please share this article with your friends and family to support us.
- Check How to Create New Tile Groups on Windows 10 Start Menu
- Tile groups in the Start menu in Windows 10
- Create your own groups of tiles in the Start menu
- Change the size of Start menu tiles
- Pin apps to get started
- Move entire groups of tiles
- Final remarks: How to Create New Tile Groups on Windows 10 Start Menu
Check How to Create New Tile Groups on Windows 10 Start Menu
You can turn recently added apps, most used apps, and recently opened items on or off. You can choose which folders you want to see on the Start menu, and remove, add, or move specific icons from the Start menu. You can also move the taskbar to the left to return the Start button to its most familiar place. Here are some ways to tweak the Windows 11 Start menu. First, let’s take a look at the new Start menu to see how it looks and works. In Windows 11, click the Start button on the taskbar. At the top of the window is a search box that you can use to search for apps, files, settings, and other items. The next section shows all the apps that you pinned or that you pinned by default.
Click the up or down arrow on the right to see all your pinned apps. Most of the pinned apps are already installed; Some will be installed when you first click on them. Accessing all installed apps requires an additional step when clicking the All Apps button. The Recommended section displays recently added apps and recently opened items, including apps and files. Your profile icon will appear at the bottom, allowing you to change account settings, lock your PC, or sign out.
Tile groups in the Start menu in Windows 10
When you first start Windows 10, you’ll see that some tiles are already in groups. For example, you’ll see a group of “Productivity” and “Explore” app tiles. You can easily add more tiles to those existing groups by dragging them into an existing group.
The process is similar to rearranging the icons on your smartphone. I’m moving the Microsoft News tile from the “Explore” group to the “Productivity” group in the example below.
Create your own groups of tiles in the Start menu
But let’s take a look at creating a new custom group of tiles. Just drag the tiles you want in a group to an open area of the Start menu. In the example below, I pinned some system settings to Start and made a group of system settings tiles. I dragged everything I wanted into an open area of the Start menu.
- Then, to give your group of tiles a name, hover over the group and you’ll see “Group Name” appear.
- Click Group Name and a field will open so you can type whatever name you want to give your tile group.
Change the size of Start menu tiles
Note that you can also change the size of the tiles in the Start menu. This allows you to organize and arrange the tiles in your group to your liking. To do that, right-click on a tile and choose Resize and select between small, medium, large, or wide.
Pin apps to get started
Note that not all installed apps will create a tile on the Start menu. So to get everything in place, you probably need to pin some of your installed apps to the Start menu. To do that, drag an app from the Apps column on the left side to a group of tiles on the right. Or, you can right-click an app in the list and click Pin to Start, then move the tile where you want it.
Move entire groups of tiles
After you create a group, you can move it all to wherever you want on the Start menu. Just click on the group name bar and drag it where you want. For example, here I am dragging the System Settings group closer to the top.
Final remarks: How to Create New Tile Groups on Windows 10 Start Menu
I hope you understand this article, How to Create New Tile Groups on Windows 10 Start Menu. If your answer is no, you can ask anything via the contact forum section related to this article. And if your answer is yes, please share this article with your friends and family to give us your support.
Windows 10 has been around for a long time, but not all users know all the functions of this operating system. In this article, TipsMake.com will guide you how to delete the most used applications so that they no longer appear in Start Menu.
- Instructions to customize your Start Menu bar on Windows 10
- What is Classic Shell? How to use Classic Shell to customize Menu on Windows 10, 8, 7
Windows 10 has been around for a long time, but not all users know all the functions of this operating system. One of the best things that this operating system offers is the ability to customize from the main content. In it, the Start Menu is a customized and customized repository.
Specific examples are the ability to delete each application or the entire list of most used apps from the Start Menu. If you want to restore the default screen properties or simply don’t want that information to be displayed on the Start Menu, you can do the following to remove it.
- Instructions for fixing errors Start Menu and Cortana do not work on Windows 10
- Tips or help you master the Start Menu on Windows 10
- How to reduce lag, jerk game play on Windows 10?
Delete each application
If you want to delete a specific application from the list, follow these steps:
- Click on the Windows button to open the Start Menu.
- Right-click the application you want to delete from the Most Used list
- Click More> Don’t show in this list .
Delete the entire list
If you want to remove the entire list from Start Menu, follow the steps below:
Go to Settings> Personalization> Start . In the Show most used apps section , turn off the Show most used apps feature .
What are your favorite Windows 10 customizations? How do you use it? Let us know by commenting below!
The Start Menu in Windows is used to locate all the installed applications on your system. All of the application icons will appear in an alphabetical list on the left side of the Start Menu screen. The Start Menu settings in the Settings app provide options that the user can show or hide from the Start Menu. However, as an administrator, you can also keep the settings permanently the same and disable the access to the Start Menu settings for the standard users. In this article, we will tell you the methods that you can use to achieve this specific task.
Start Menu settings in Windows 10
Preventing Users from Changing Start Menu Settings
This setting will disable and gray out the settings for the Start in the Settings app. It will also disable the Taskbar settings (Taskbar properties) context menu option that you can access by right-clicking on the Taskbar.
However, it will not disable the Taskbar settings from the Settings app. The reason that it has a Taskbar included in this setting is that in the previous version of Windows, a user had to open the Taskbar and Start Menu settings by right-clicking on the Taskbar and choosing the properties option. By disabling that context menu through the previous version of Windows would have completely disabled the Taskbar and Start Menu settings.
Microsoft documents about this setting
Whereas in Windows 10 the settings appear in the Settings app, so it does disable the Start Menu settings but not the Taskbar settings. You can use it to at least disable some of the Start Menu settings. Some of the settings in the Local Group Policy Editor were designed for previous versions of the operating system, but it can still work on the newest versions.
Method 1: Using the Local Group Policy Editor
The settings for disabling the Start Menu settings can be found in the Local Group Policy Editor. It is listed under the User Configuration, and it’s not available for the Computer configuration. The policy settings in the Local Group Policy Editor also show the details about that setting that you clicked.
However, you can skip this method if you are using the Windows Home Edition because the Local Group Policy Editor isn’t available in that operating system.
- Open a Run command dialog box by pressing Windows + R keys on your keyboard, then type “gpedit.msc” and press the Enter key to open the Local Group Policy Editor.
Opening the Local Group Policy Editor
- In the Local Group Policy Editor window, navigate to the following category path:
Navigating to the setting
- Double-click on the policy-setting named “Prevent changes to Taskbar and Start Menu Settings” and it will open up in another window. Now change the toggle option from Not Configured to Enabled.
Enabling the setting
- Finally, click on the Apply/Ok button to save the changes made. This will prevent users from changing the Start Menu settings.
- To enable the settings for Start Menu again, you need to change the toggle option back to Not Configured or Disabled.
Method 2: Using the Registry Editor
The Registry Editor is connected with the first method. Whenever you change the policy setting in the Local Group Policy Editor, it will automatically update your Registry. However, if you are using Windows Home Edition, then this may be the only method available for you. It requires a bit more steps than the first method, but it is not that hard. You can easily disable the Start Menu settings by following the below steps:
Note: We always recommend users to create a backup before making any changes in their Registry Editor.
- Open a Run command dialog box by pressing the Windows + R keys on your keyboard, then type “regedit” and press the Enter key to open the Registry Editor. Choose the Yes button for UAC (User Account Control) prompt.
Opening the Registry Editor
- In the Current User hive, navigate to the following key:
- In the Explorer key, right-click on the right pane and choose the New > DWORD (32-bit) Value option. Name this newly created value as “NoSetTaskbar“.
Creating a new value in Registry Editor
- Double-click on the NoSetTaskbar value to open it and then change the value data to 1.
Enabling the value
- Lastly, you need to restart your system to apply the changes to the system. This will disable the Start Menu settings for that specific user account.
- To enable it back, you need to open the NoSetTaskbar value again and change the value data to 0. You can also simply remove the value from the Registry Editor.
Windows 11 comes with a revamped taskbar and Start menu. The new start menu gets a centered launcher-like interface, has rounded corners, and looks slick for the most part. However, it has a “Recommended” section that shows recently opened files and can be annoying for many people. Thankfully, it’s quite easy to get rid of these recommendations. Here’s how you can remove recommended files from the Start menu on Windows 11.
Remove Recommended ‘Recently Opened’ Files from Windows 11 Start Menu
Table of Contents
The Start menu on Windows 11 consists of three sections- Pinned, All apps, and Recommended. The Pinned section at the top consists of pins arranged in a grid. Whereas clicking All Apps shows the list of all apps installed on your computer.
Below the Pinned area is the Recommended section that displays your most recently opened files, documents, and installed apps. This makes it easy to jump into files you have recently accessed- it shows up to six items with an option to view them all via the ‘More’ button.
However, many people may find it annoying and not want others to see what they’ve opened lately. In that case, you can disable the recommended files completely from the Start menu. You can also remove particular files individually from the list.
Stop Recently Opened Files from Appearing in Start Menu
1] Open the Start menu and select Settings. You can also open Settings directly by pressing Win + I on your keyboard.
2] Select Personalization from the sidebar at the left.
3] In the Personalization settings, scroll down and click on Start.
4] Here, turn off the toggle for “Show recently opened items in Safari, Jump Lists, and File Explorer.”
You can further disable “Show recently added apps” if you want to hide the recently added apps from the Start.
That’s it. The files you recently opened will no longer appear as recommendations on the Windows 11 start menu.
Remove Recommended Files Individually
If you have a problem with only a few files and want to hide them from the Recommended section, just right-click the file and tap Remove from list. The file will disappear from the Start menu.
Can I Hide the “Recommended” Section from Start Menu?
The recommendations space stays on the Start menu even after “Show recently opened files” is disabled. As of the initial developer preview build, I couldn’t find any option to hide or remove the Recommended area from the Start menu.
However, Microsoft might make changes in the coming updates. We really hope they allow users to disable this area and utilize the complete start menu for showing apps.
Wrapping Up
This was one can disable or remove the Recommended files from the Start menu on your Windows 11 computer. I hope you now have a better and cleaner experience with the new Windows. Anyway, let me know your opinion in the comments below. Stay tuned for more.
You can also follow us for instant tech news at Google News or for tips and tricks, smartphones & gadgets reviews, join GadgetsToUse Telegram Group or for the latest review videos subscribe GadgetsToUse Youtube Channel.
Table of Contents
How do I turn off recommendations in Windows 11?
Now right click on the taskbar and open Properties. There will be a problem to open the explorer patcher properties. 3. Next, go to the “Start Menu” chapter on the left sidebar and change the direction on the “Disable Recommended Partition” switch.
How do I turn off Windows recommendations?
Select Start > Settings > Apps > Features.
In the “Install Application” section, consider one of the available options. To minimize the display of app recommendations, you can select either Allow apps from anywhere or Disable app suggestions (options vary by Windows version).
How do I remove items from the Start menu list?
Press the Start button or the Windows key on your computer to launch the Starter Kit. Then, remove an app or even another item from your favorites list, right-click it, and choose More > Don’t show in this favorites list.
How do I remove Explorerpatcher?
And find the Control Panel on your PC.
Switch the idea view and click on the “Uninstall a program” option in the category.
How to choose when Windows 11 turns off your screen?
William Hartnell and Patrick with Troughton Jon Pertwee in The Three Doctors.
Troughton and Pertwee, who have Peter Davison in The Doctors 20th Anniversary Special, with newly released footage of Tom Baker and fellow actor Richard Hurndall portraying
Patrick Troughton with Colin Baker in The Two Doctors.
More articles
How to replace the start menu in Windows 11?
Download and install StartAllBack from our official website.
Choose a topic. I recommend Proper Thirteen.
Select “Icon Size” on the Start tab if you want smaller or larger icons.
Select “Never” from the “Merge” buttons on the taskbar if you don’t want your icons to be combined.
How to fix windows 11 unresponsive taskbar and Start menu?
Press Windows Fundamental + to open the Run dialog box.
When you see this user control, click Yes to grant administrator access.
In the classic panel management interface, click “Uninstall a specific program” (under “Programs”) to open the uninstall a program screen.
More articles
How to hide recommended list on Windows 11 Start menu?
So, here’s what you need to do to hide the Recommended section in the main Windows 11 Start Menu: Open Settings by pressing Windows key + I (or you can right-click the Start button and select Settings) ).
Go to the “Personalization” section.
Switch the options “Show apps added in the last few weeks”, “Show top apps and”, “Show recently opened items” in the “Launch Jump List” and “File Explorer” settings to “Disabled”.
Which types of dependencies are most common is project schedules select an answer finish to start/finish to finish finish to start start to Start Finish to Finish Start to start start to finish finish to finish?
The most common dependency relationships are end-to-end employment relationships. Task P (the predecessor) must be completed before task S (the successor) can complete it. A less common relationship is a specific start-end relationship. Project Insight, a project management software, supports four obsessive relationships.
Whether you like or hate Windows 10, it is undeniable that Start Menu in Windows 10 is very flexible. It can be expanded to fit your personal needs and of course, it contains the applications and programs you want to have the most access to.
- Instructions to pin web pages to Start Menu in Windows 10
- How to disable the Windows key shortcut
Whether you like or hate Windows 10 , it is undeniable that Start Menu in Windows 10 is very flexible. It can be expanded to fit your personal needs and of course, it contains the applications and programs you want to have the most access to.
While most people know you can store your favorite websites from Internet Explorer, Edge, including Chrome and Firefox . Then with this tip you can add your favorite website shortcuts right on the Start Menu of Windows 10.
First, you need to open the website you want to host. Next to the address bar, you’ll see an icon and depending on the web page, the icon will be a small key, piece of paper or a globe. Click here and drag it to your computer to create a shortcut.
Now, right click on the shortcut you just created and select Copy from the context menu.
Next, start the Run dialog box by typing Run into the Cortana search field and then type shell: programs in the Run dialog box. Then right-click on the background of the Explorer window and click Paste .
Now, the websites you need to add will be in the All Apps section. In order for the website shortcut to appear on the Start Menu, simply scroll to and drag it to the upper right of the menu.
- Instructions to disable (turn off) Bing on Windows 10 Start Menu
- 2 ways to disable (turn off) Action Center on Windows 10
- Tips to customize Taskbar on Windows 10 effectively
This tutorial is about How to add pins in Start menu of Windows 11. Recently I updated this tutorial and will try my best so that you understand this guide. I hope you guys like this blog, How to add pins in Start menu of Windows 11. If your answer is yes after reading the article, please share this article with your friends and family to support us.
- Check How to add pins in Start menu of Windows 11
- How to pin apps to the Start menu in Windows 11
- Final remarks: How to add pins in Start menu of Windows 11
Check How to add pins in Start menu of Windows 11
The Windows 11 taskbar is a huge step back in usability compared to Windows 10, and now Microsoft is starting to make improvements. A new update that Windows Insiders is currently testing brings the clock and date to the taskbar on secondary or multiple monitors. This is a change that multi-monitor users will appreciate as many of them had to install third-party apps like ElevenClock just to get this basic feature in Windows 11.
I have had no qualms criticizing the taskbar changes in Windows 11. I hate the new taskbar, so I’m glad Microsoft made this first change. There’s a lot more to improve, and hopefully we’ll see the return of the ability to drag and drop files into taskbar apps, as well as general customization options.
How to pin apps to the Start menu in Windows 11
- Open the Start menu and click or tap the All apps button in the upper right area.
- Then scroll through the alphabetical list of apps until you find the one you want. Right click or press and hold to open the context menu and click or tap “Pin to startup”.
- Some applications create a folder with the same name in the All Applications list. Open the folder, right-click or press and hold the app, and then click or tap the “Pin to startup” option.
- There are some apps in Windows 11, like the command prompt, that don’t show up in All apps. Find the program and then right-click or press and hold the result to reveal the “Pin to startup” option. An alternative is to click or tap on “Pin to Start” in the section to the right.
- If a desktop shortcut is available for your application, you can also right-click or press and hold to open a context menu, where you can click or tap “Pin to start.” You can even do this for the Recycle Bin.
- An alternative way to pin a program to the Start menu is from the context menu of its executable file. Open File Explorer and navigate to the location where the application is installed or saved. Then right-click or long-press the EXE file to open a context menu and click or tap “Pin to startup.”
Final remarks: How to add pins in Start menu of Windows 11
I hope you understand this article, How to add pins in Start menu of Windows 11. If your answer is no, you can ask anything via the contact forum section related to this article. And if your answer is yes, please share this article with your friends and family to give us your support.
This tutorial is about How to Customize the Windows 11 PC Start Menu. Recently I updated this tutorial and will try my best so that you understand this guide. I hope you guys like this blog, How to Customize the Windows 11 PC Start Menu. If your answer is yes after reading the article, please share this article with your friends and family to support us.
- Check How to Customize the Windows 11 PC Start Menu
- Change the location of the Start menu on the taskbar
- Remove recommended section
- Final remarks: How to Customize the Windows 11 PC Start Menu
Check How to Customize the Windows 11 PC Start Menu
Although the new Start menu isn’t as customizable as the one in Windows 10, there are ways to make it look and work the way you want. If that’s not enough, consider jumping to a Windows 11 Start menu alternative like Start 11 and StartAllBack to recreate a more traditional Start menu and configure the look, layout, colors, and other elements. Before we change anything, let’s see what the default Windows 11 Start menu looks like. A search box at the top of the menu lets you search for apps, files, and settings.
The Pinned section shows apps that have been pinned; Scroll up and down to see them all. To see a list of all installed apps, click the All apps button. The Recommended area displays recently added and opened apps and files. Click the More button to see a longer list. Beneath this section is your profile icon, which allows you to change account settings, lock your PC, or sign out. The power button on the right allows you to put Windows to sleep, shut down, or restart your PC.
Change the location of the Start menu on the taskbar
You’ve probably noticed that Windows 11 shifts the Start menu (and other taskbar icons) to the center of your screen. If you prefer your usual location to the left, here’s how to do it:
- Open configuration.
- Select ‘Personalization’ in the left panel, then ‘Taskbar’ from the options that appear.
- Scroll down to ‘Taskbar Behaviors’, then click to display more options.
- Next to ‘Taskbar Alignment’, click the dropdown menu and choose ‘Center’.
Remove recommended section
By default, the Start menu is divided into ‘Pinned’ and ‘Recommended’ sections. If you prefer to remove the latter, the process is just as simple:
- Open configuration.
- Choose ‘Personalization’, then ‘Start’ this time.
- Click the buttons next to ‘Show recently added apps’, ‘Show most used apps’ and ‘Show recently opened items in Start, Jump Lists and File Explorer’ to turn them off.
Final remarks: How to Customize the Windows 11 PC Start Menu
I hope you understand this article, How to Customize the Windows 11 PC Start Menu. If your answer is no, you can ask anything via the contact forum section related to this article. And if your answer is yes, please share this article with your friends and family to give us your support.
Many files and folders are created using the PC. Over time, it may be difficult for you to remember the location of every file and folder. This is normal. Not everyone has a brain with super memory. However, it is also very necessary to master some PC skills. This article gives you some tips on how to quickly locate files/folders in your PC. These tips will help you increase your PC productivity and balance your work and life effectively.
Among the many files and folders created by the PC, some files and folders are frequently used. You can enable them on a daily or weekly basis. Some files and folders are used less frequently, and you only open them once a month or even once a year. Of course, as you know, there is no absolute relationship between how often a file or folder is opened and how long it takes. This is a comparative level.
Use Quick access to locate files & folders quickly.
Pin a folder to Quick Access
Tip: There are three ways to quickly find and open File Explorer.
Find File Explorer from the start menu;
Win+E shortcut key to run File Explorer;
Click the File Explorer icon in the taskbar;
Step 2. Pin folders in Quick access.
Right-click the folder—-Click Pin to Quick access.
Pinned folders are immediately displayed into frequently used folders for quick access.
Remove folders in Quick access
If you don’t want to see this folder anymore, you can remove it from the frequently used folder.
Quick access—- Right click on the folder—- Click on Unpin from Quick access.
Or, you can just need to click the pin icon to unpin it.
Use Wise JetSearch to locate files quickly
The above is a quick way to view recently used or frequently used files/folders. There are still some files/folders that are not listed in this location, how can I find them quickly? Don’t worry, as long as you remember the extension of the file. It is recommended that you use Wise JetSearch.
Wise JetSearch is a free local file search tool. It supports fast searching of files, videos, images, music and everything on local drives and removable drives. And it also supports FAT and exFAT drives.
Step 1. Download and Run Wise JetSearch
Step 2. Select the Disk where the file is located and File Extension.
Step 3. Click Search.
Step 4. Double-click the search result and Preview.
Wise JetSearch is simple and practical, and the search speed is very fast. It is compatible with all versions of Windows, including Windows 11.
Summary
Some features on PCs are not used by most people. However, once you master these skills, you will do more with less. Quickly finding files located on your PC saves you a lot of time. You can choose Quick access function or Wise JetSearch program according to the characteristics of different files/folders.
WHY CHOOSE WISECLEANER?
Try before you buy with a free trial – and even after your purchase, you’re still covered by our 60-day, no-risk guarantee.
Secure Online Payment
We value your privacy and protect your financial and personal data, support several safe methods of payment.
7 X 24 SUPPORT SERVICE
Knowledgeable representatives available to assist you through email response within 24 hours.
Table of Contents
Is windows 11 better than Windows 10?
Users may wonder how Windows Eleven is different from Windows 10. Microsoft’s latest operating system is more Mac-like with aesthetically pleasing productivity features. In addition, you can offer Android apps on your computer that offer at least Windows 11.
How to downgrade a new windows 11 PC to 10?
To upgrade from Windows 11 to 10, be sure to do the following: Go to the Microsoft support site.
In the Windows 10 installation media walkthrough, click the Download Tool Now button.
Save the installer to your device.
Double-click the MediaCreationToolXXXX.exe file to launch this tool.
Click the “Accept” button.
Select the Upgrade this PC now option.
Click accept again.
More articles
What is the advantage of Windows 11 over Windows 10?
11: Windows Every big difference in the new design and interface of the operating system.
Integration with Android app.
The best desktop support on the web.
Easy transition from monitor to laptop.
Microsoft Teams if you want to add a taskbar.
Widgets (or filters) Launch widgets on the Windows 11 taskbar to see the weather, news, stocks, and more at a glance.
Improved touch screen and pen maintenance.
More articles
How to rollback from Windows 11 to Windows 10?
Select > Startup Options > System > Recovery.You
If you are still in the recovery period, the back button is available in the previous version of Windows. Look, move on.
Choose rationality to return.
Before rolling back, you will have an absolute choice: install updates (if available) and try to fix the available problem.
Can I downgrade from Windows 11 to Windows 10?
The catch is that you just can’t “downgrade” from Windows 11 to Windows 10; You need to make a nice and clean install. This means that you need to backup and restore your data files and therefore reinstall all applications.
Can I install Windows 10 on Windows 11?
As mentioned in the latest Askwoody on.com thread, the correct Windows 11 license is a digital license that allows you to install ten Windows on a 17-inch computer. But as noted in a Lenovo support note, a fresh installation of Windows 10 may require your family to download the required drivers.
How do you remove Windows 11 and install Windows 10?
Open Start in Windows 11.
Find “Settings” and click on the end at the top to open the app.
Click Systems.
On the corresponding page, click Recovery Page.
In the Recovery Options section, click the Back button with your mouse.
Select reasons for uninstalling Windows 11.
Click “Next”.
How do I get back to Windows 10?
Here are some tips on how to do this: Startup Recipe > Windows Settings > Update > Advanced Options > Recovery > Previous Windows Application (you can search for “Back” instead). That’s all!
At the edge of tweaking
This post will show you how to add or remove the Chat button from the taskbar on Windows 11. The Chat button in Windows 11 integrates Microsoft Teams directly into the taskbar. It allows you quickly chat with your friends using Teams (RIP Skype) using text messages, voice, or video calls. All that is needed is to click the Chat button and start a conversation. Apart from traditional Task View and Search buttons, Windows 11 comes with new Widgets and Chat buttons by default. We have already covered how to add or remove the Widgets button from the taskbar in Windows 11. Now it is time to talk about that new Chat button.
While the idea of having such a Chat button itself sounds nice, not all users like it when Microsoft clutters the taskbar with unnecessary or unwanted apps and services. The recent addition of the News and Interests panel to Windows 10 was already controversial enough. Now Microsoft tries to force Windows 11 users to jump on to Microsoft Teams. Do not want to participate? Here is how to remove the Chat button from the taskbar in Windows 11.
Remove Chat Button from Taskbar in Windows 11
- Right-click the Chat button on the taskbar.
- Select the only option available: Hide from Taskbar.
- The Chat icon will disappear from the taskbar.
That is it; the Chat button is gone. It is worth mentioning that you do not actually delete the Microsoft Teams app – you just remove it from the taskbar. You can restore the Chat button at any time. We will review this in a dedicated chapter.
The above option is the quickest method to remove the Chat button in Windows 11, but there is one more way to do that.
Using Settings
- Press Win + I to open Settings.
- Go to the Personalization section and click Taskbar.
- In the Taskbar Items list, find the Chat button and disable it. That will remove the Chat button right away.
Add the Chat button to the taskbar in Windows 11
Adding the Chat button to the taskbar in Windows 11 is identical to how you remove it. To add the Chat button to the taskbar, do the following.
- Open Windows Settings; press Win + I for that.
- Go to Personalization > Taskbar.
- Enable the Chat toggle.
Note : At the time of publishing this article, Microsoft is slowly rolling out new Teams integration for Windows 11. That means you might not get it right away, as the Chat button is part of a “Controlled Feature Rollout.”
The rollout is staged, which means only some Windows Insiders can test the feature right now. If you are eager to try out Microsoft Teams integration in Windows 11, you can force-enable it using a simple command in a third-party tool called ViveTool.
Force-enable Chat button on the taskbar in Windows 11
- Download the ViveTool app from its repository on GitHub and extract it into any folder.
- Next, run Windows Terminal as Administrator in Windows 11.
- Go to the folder with ViveTool using the CD Here is an example: cd C:\Users\Winaero\Desktop\Vivetool .
- Now enter the following command: ViVeTool addconfig 31371065 2 . Press Enter to execute the command.
- Windows Terminal should notify you about a successful feature configuration set.
- All that is left is to restart your computer. After you log back in, Windows 11 will greet you with a new Chat button right in the middle of the taskbar.
Now you can click the Chat button and proceed with installing Microsoft Teams app. If this doesn’t happen, you can download the Microsoft Teams MSIX file from official Microsoft Servers to install the app manually.
Ready for use bat file
You can save yourself few clicks by using a dedicated bat-file that will do all the job for you. Do the following.
- Download this ZIP archive and extract it into any folder.
- Next, run the ms_teams.bat file as an Administrator. Right-click it and select Run as Administrator.
- Restart your computer.
It is worth mentioning that Microsoft engineers do not recommend enabling hidden features using ViveTool. But the practice showed that there is no harm in force-enabling capabilities Microsoft rolls out “in waves.” Of course, if you do not want to upset Windows developers, you can just sit back and wait for your computer to get the feature.
Credit for the latter finding goes to @WithinRafael.
Winaero greatly relies on your support. You can help the site keep bringing you interesting and useful content and software by using these options:
If you like this article, please share it using the buttons below. It won’t take a lot from you, but it will help us grow. Thanks for your support!
About Taras Buria
Taras is here to cover stories about Microsoft and everything around, although sometimes he prefers Apple. You can stay in touch with him on Twitter.
Microsoft has several security features and one of them is passwords for the user accounts. Since the past few versions of the Windows operating system, the company has added support for the PIN to sign in to the system. Windows Hello supports three sign-in methods — PIN, Facial Recognition, and Fingerprint Recognition.
When you are setting up the Windows 11 system for the first time, you will be forced to enter a PIN for the account instead of using a password. Also, the PIN is required to set up a fingerprint or facial recognition feature.
If you are looking for a guide on removing the PIN from your computer, then here is a step-by-step guide for the same. We have also covered a situation where the PIN removal button is greyed out.
How to remove PIN from Windows 11 computer
Step 1: Open the Settings app on your Windows 11 computer. For this, you can either click on “Settings” from the Start Menu or press the Windows + I keys on the keyboard.
Step 2: In the Settings app, click on the “Accounts” from the left pane and then select “Sign-in Options” from the right pane.
Now, when you click on PIN (Windows Hello), you will notice that the “Remove” button is greyed out. This is because the option to only allow Windows Hello sign-in for Microsoft accounts is enabled on your PC.
Step 3: Under the Additional settings section, look for the “For improved security, only allow Windows Hello sign-in for Microsoft account…” option and turn the toggle switch OFF.
Once you make these changes, close the window for the changes to take effect.
Step 4: Now, reopen the Settings app and again go to the Sign-in options and select the PIN option and click on the “Remove” button.
You will also see some additional sign-in options now available on your system, including Password and Picture password.
Step 5: You will get a few warning points related to this action. If you are sure to proceed further, then click on the “Remove” button again to remove the PIN.
Step 6: After this, you will be asked to enter the password linked to your Microsoft Account. Enter the password and click on the “Ok” button to proceed.
That’s it. Once you complete this process, the Sign-in PIN will be removed from your Windows 11 computer. Now, you will need to use your Microsoft account password or the local account password to log into the system.
Have you recently added some apps to your Windows 11/10 but couldn’t find a way to remove them? The Start menu shows up all the recently added apps to your computer, and you don’t want to show them to your users. In this article, we will try to solve this problem in a layman’s language. Windows makes it quite an easy task for you to open any app in one click and represent all the apps in the start menu, so you don’t even search for it. But what if you don’t want to display all the lists to these apps? Wait, we have a solution to it in this post.
With various designs to display the app list, Windows 11 also has multiple sizes and resolutions compared to Windows 10. Hiding or removing the recently added apps will help you sort your work quickly and look more compact. Like the other users, you may find removing the extra/unwanted apps from the start menu very useful. Through this article, let’s see the process of removing recently added apps to your Windows 11. Continue with us, read this post and get the solution here.
Get the step-wise solution from here if you want the Start menu to look compact for quick access to your work.
You may get some extra apps in your Recently Added Apps section with Windows updates. We found three solutions to remove them. So we are going to discuss all three methods here. Make sure you follow all the given steps below. Here’s what we are going to discuss in this article:
- Registry Method
- Group policy editor
- Windows Settings App
Anyone can use this and customize it according to their choice.
1] Using A Reg file-Disable Recently Added Apps List
This method will help you remove recently added apps to be deleted using a reg file. We are going through a technical part of your computer to do this task, so if you are a beginner, you make sure you’re not missing any step or making a typo in command because you need to reach the correct path or create it. Yes, you may have to create the key if you do not have which we will discuss next. Also, make sure to take a backup of the Registry.
You have to use a long path to start exploring the reg file. Note it down in the notepad file to use further.
- Open Notepad and paste the following registry details:
- Save this file by any name, but make sure you add the .reg extension to the end.
- Open it and select the merge option to save the file with a local registry when creating the file. A warning will appear on the screen. You should click yes to proceed. Recently added apps will now be removed from the start menu.
If you do not find the previous one workable for you, we have the following method.
2] Using Local Group Policy Editor – Disable Recently added Apps List
We have reviewed Registry Editing already, but if you are using Windows Pro Education or Enterprise Edition, you can use the Group Policy Editor app as it is strictly available to Windows Pro.
- Open Local Group Policy Editor. If you don’t know how to open it frequently, try this > Open run window (Windows key + R) > type gpedit.msc > Press the Enter key. Local Policy Editor will open.
- Navigate to the following path: Computer Configuration -> Administrative Templates -> Start Menu and Taskbar.
- Expand Start Menu and Taskbar to Remove Recently added list from Start Menu.
- Please set it to Enabled from Not configured.
- Click on OK to save the changes.
- Close the Group Policy Editor window and check for the Recently Added Apps in the Start Menu. You will not find any of the previously visible apps. Now it is removed permanently from the shortcut menu.
If you don’t see the changes after enabling the default settings, you can go with the previous method of the registry editor.
Please note that you can use the same method to enable the recently added apps from the Start menu. Choose to disable it.
3] Using Settings App – Remove Recently Added Apps List
If you have checked both the above ways to hide/remove the recent apps but still did not find the solution, we have brought the third option for you, using the Settings App.
You must be aware of how to access it. If you are not familiar with this, you can continue reading the detailed explanation below from accessing to making the changes in the Settings App.
- Open the Settings menu by clicking on the gear icon from the Start or use Win + I
- Then go to Personalization > Start
- You will find the top three options as Start more tiles on Start, Show app list in Start menu and Show recently added apps.
- Select the toggle bar of Show Recently Added Apps and Disable it.
How To Delete Shortcut Of An App On Desktop?
To delete an app’s shortcut on Desktop, right-click on the App and select the delete option from the menu. Please note that this will only delete the shortcut to the App and not uninstall it. To Uninstall the App, you need to go through settings.
How To Hide All Icons On Windows Desktop?
Right-click on the desktop and hover the cursor over the view option. It will open another menu—Show desktop icons. Select it. If you had any icons on the Desktop, they would appear instantly.
Arranging your apps, files, and documents in the correct and most optimized way is one thing that can surely boost your productivity a lot. We hope you liked this article. Please make sure you share this with everyone who might find it helpful.


