Walter Glenn is a former Editorial Director for How-To Geek and its sister sites. He has more than 30 years of experience in the computer industry and over 20 years as a technical writer and editor. He’s written hundreds of articles for How-To Geek and edited thousands. He’s authored or co-authored over 30 computer-related books in more than a dozen languages for publishers like Microsoft Press, O’Reilly, and Osborne/McGraw-Hill. He’s also written hundreds of white papers, articles, user manuals, and courseware over the years. Read more.
If you’ve ever wondered whether you can remove the “Send To” submenu from the Windows context menu, it turns out you can. You just have to make a quick Registry edit.
The “Send To” menu is one of those little Windows features that people either find very useful or not at all useful. We’ve talked about how to customize the “Send To” menu and how to add things like Dropbox to it. But if you don’t use it at all and would rather the “Send To” folder just be out of your way, it’s not hard at all to accomplish.
Remove the “Send To” Menu by Editing the Registry Manually
To remove the “Send To” folder from the context menu, you just need to make a couple of quick edits in the Windows Registry.
Standard warning: Registry Editor is a powerful tool and misusing it can render your system unstable or even inoperable. This is a pretty simple hack and as long as you stick to the instructions, you shouldn’t have any problems. That said, if you’ve never worked with it before, consider reading about how to use the Registry Editor before you get started. And definitely back up the Registry (and your computer!) before making changes.
Open the Registry Editor by hitting Start and typing “regedit.” Press Enter to open Registry Editor and give it permission to make changes to your PC.
In the Registry Editor, use the left sidebar to navigate to the following key:
Next, you’ll modify the (Default) value inside the Send To key. Double-click the (Default) value to open its properties window.
In the “Value data” box, delete the text that’s currently shown, leaving the “Value data” box empty, click “OK.”
The changes should take place immediately. To test it out, just right-click any file and make sure the “Send To” folder is gone.
If you want to reverse the changes at any time and restore the “Send To” folder, just head back into the Registry and open up that (Default) value inside the Send To key. In the “Value data” box, enter the following text and then click “OK.”
Download Our One-Click Registry Hacks
If you don’t feel like diving into the Registry yourself, we’ve created a couple of registry hacks you can use. The “Remove Send To Folder from Context Menu” hack empties the data from the Send To key’s (Default) value. The “Restore Send To Folder to Context Menu (Default)” hack restores the original value. Both hacks are included in the following ZIP file. Double-click the one you want to use and click through the prompts.
These hacks are really just the Send To key, stripped down to the (Default) value we talked about in the previous section and then exported to a .REG file. Running the hacks just modifies the value. And if you enjoy fiddling with the Registry, it’s worth taking the time to learn how to make your own Registry hacks.
One of the easiest ways of transferring a file or folder to any predefined location in windows system is through Send-To context menu. It means any user can just go to context menu by right clicking on any file and selecting show more options which is introduced in windows 11 for the better look and feel. The show more options displays the context menu which was present in the previous versions of the windows operating system In this context menu, you will find Send-To option and on hovering over it, you can find many shortcut locations where you can transfer the file you want. What if we tell you that you can customize these shortcuts and add or remove any shortcut you want as per your requirement? Yes you can do that and we are going to explain in this article how to do it.
How to Add Shortcuts to the Send-To context menu in Windows 11
Step 1: Press Windows + R keys on your keyboard to open Run dialog box.
Step 2: In the Run box, type shell:SendTo and hit the Enter key.
Step 3: In the SendTo folder, Right click on the empty space inside the folder and hover over New option.
Step 4: Then, Click Shortcut from the list as shown below.
Step 5: Then, Click Browse… button in the Create Shortcut window as shown below.
Step 6: Then, Select any target location you want to add in the send-to menu.
Step 7: Click OK button to add and close the window.
Step 8: Then, Click Next button to proceed.
Step 9: Give an appropriate name to the shortcut to define the target location you selected.
Step 10: Then, Click Finish button to create the shortcut and add it in the SendTo folder.
Step 11: Now you can see that the newly created shortcut is located in the SendTo folder as shown below.
This is how one can add the shortcut to the Send-To context menu in windows 11 system.
How to Remove the Shortcuts from the Send-To context menu in Windows 11
Step 1: Press Windows + R keys on your keyboard to open Run dialog box.
Step 2: In the Run box, type shell:SendTo and hit the Enter key.
Step 3: In the SendTo folder, Select any shortcut which you want to remove.
Step 4: Right click on it and click Delete icon on the top of context menu as shown in the below screenshot.
That’s it. This way you can remove the shortcut from the send to context menu in windows system.
How to Add Printer Shortcut to Send-To context menu in Windows 11
Step 1: Press Windows + R keys together to open Run dialog box.
Step 2: Then, Type shell:PrintersFolder in the run box and press the Enter key on your keyboard.
Step 3: In the Printers folder, Select any printer that you want to add to the Send-To context menu.
Step 4: Right click on it and click Create shortcut option from the context menu as shown below.
Step 5: Then, you might get a warning window saying “Windows cannot create a shortcut here“.
Step 6: Click Yes to allow windows to create a shortcut on the desktop.
Step 7: Close the Printers folder.
Step 8: Press Windows + R keys to open Run dialog box again and type shell:SendTo.
Step 9: Then, Hit Enter key to open Send to folder.
Step 10: Press Windows + D keys together to go to Desktop.
Step 11: Then, locate the Printer shortcut we created earlier.
Step 12: Right Click on it and click Cut button on the context menu top.
Step 13: Then, Go back to SendTo folder we opened.
Step 14: Right click on the empty space inside the folder.
Step 15: Click Paste icon from the top of the context menu as shown in the below image.
Step 16: Now Right click on any file and Select Show more options from the context menu as shown below.
Step 17: Then, Hover over Send to option and see that the Printer shortcut has been added to the Send to submenu as shown below.
Step 18: Close the SendTo folder.
This is how you can add a printers shortcut to the Send to context menu in windows 11.
Hope this article was useful and informative. Please let us know in the comments section below.
Hey! I am a software engineer who loves to solve technical issues and guide people in a simple and effective way as possible. Currently writing articles on tech problems is my thing!
In Windows 10, when you right-click on a file, the context menu that appears has a specific entry called Send to device which allows users to export the file to a device connected to their computer. As useful as this feature may seem, there are very few Windows 10 users who actually use it, and there are many Windows 10 users who actually want to remove the feature. Send to device right-click context menu option to tidy up the context menu a bit.
Well the Send to device The option can certainly be removed from the right-click context menu in Windows 10, and the following are the two different methods you can use to do so:
Method 1 – Use a .REG file specifically designed for this purpose
The easiest way to remove the Send to device The right-click context menu option in Windows 10 is to create and use a simple .REG file that is designed specifically for this purpose. To do so, you will have to:
Open the Start Menu.
Look for “pad” and then click on the search result titled Bloc.
Write the following text in the blank space Bloc document:
Windows Registry Editor Version 5.00
[HKEY_LOCAL_MACHINESOFTWAREMicrosoftWindowsCurrentVersionShell ExtensionsBlocked]
Press Control + S to save the file.
Open the dropdown menu in front of Save as type and select All the files.
You can name the file whatever you want as long as you give it a .REG extension. For examplenaming the file record it will do very well.
Browse to the desired location for the file and click Save.
Navigate to the directory where you saved the .REG file and double-click it to launch it.
When the file asks for permission to edit your registry, give it the permission it needs.
Restart your computer and you will no longer see the Send to device entry in its context menu. You can delete the .REG file once you are done with it.
Method 2 – Use ShellExView to disable input shell extension
Si Method 1 isn’t working for you or you just don’t want to mess with something as delicate as your computer’s registry, there is another method you can use, a method that involves the use of a third party application known as ShellExView. ShellExView is a program that allows you to see all the shell extensions installed on your computer and enable/disable them as you wish. To use this method to remove the Send to device context menu entry in Windows 10, you must:
Click here! Download ShellExView.
Unzip the ShellExView .ZIP folder to a new folder using a compression program like WinRAR.
Open the newly unzipped ShellExView
Launch ShellExView clicking on the application called shexview.
You will find a list of all the shell extensions installed on your computer once the program finishes compiling it. In this list, locate and right-click on a shell extension called Play.
In the context menu, click Disable selected items.
Exit ShellExView y Reiniciar your computer and you should no longer see the Send to device option in the context menu once it starts.
Once you are done with ShellExView, you can remove it from your computer. To re-enable the Send to device entry, simply repeat the steps listed above, but this time click Enable selected items after right clicking on the Play shell extension.
- How to fix “Open With” option missing from Windows 10 context menu
- Create a new option in the context menu
- Google removes the Undo Close Tab option from ChromeTab context menu’, here’s how.
- How to add or remove Manage item in File Explorer context menu?
The right click menu, also known as “Context Menu” appears when you press the right button of your mouse. The context menu will give you more commands over the selected item. You can also open the context menu by pressing the keyboard key if the relevant key is available on your computer’s keyboard. You can right click on the desktop, a file, folder or a program in Windows 10.
Why Should You Modify Right Click Menu?
Below is a sample menu that will appear when you right click on empty area on File Explorer.
Remember, different applications installed on your PC may modify menu items in the context menu. Though very helpful when you want to perform various actions on a file or an app, the context menu can be overloaded with so many options that you do not even use. However, you can customize it by either removing, adding or renaming some of the context menu items in Windows 10. This article explores various methods of personalizing the right click menu in Windows 10.
3 Ways to Customize Right Click Menu in Windows 10
- Using registry editor
- Add or remove items from “Send to” menu
- With third party content menu editors
1. Customizing Context Menu From Registry Editor
- Press the “Win + R” keys on the keyboard, on the “Run” utility, type “regedit” and then click “Ok”.
- On the “Registry Editor”, click the arrow beside the “HKEY_CLASSES_ROOT” folder.
- Let us say you want to remove a context menu item, like “Open with”. Expand the folder path “* > shellex > ContextMenuHandlers”.
- Look for the item you want to remove “Open With”, right click it and select “Delete” from the list. This will remove the key, its sub-keys and the option will not appear when you right-click a file.
Adding Context Menu Item
- Another way to personalize the context menu is to add your own command to facilitate action(s). For instance, we can add a new item “Chrome” on the menu list.
- Under the “*” or unknown keys, select and right click the “Shell” keys, hover the mouse over “New” and from the expanded options choose “Key”.
- Rename the key to “Chrome” and then repeat the process to create a sub-key for this new key.
- Rename the sub-key to “Command”.
- Click the created sub-key and on the right-side panel double-click “(Default)” to add the command.
- Under the “Value data” text box, enter the command you want the item to execute such as path and the name of a program it will execute (in this case path for Chrome) and add the name of the executable file at the end of the command.
- Close the registry editor and then right click a file to confirm whether the new entry, “Chrome” displays on the context menu.
- If you click it, the Google Chrome browser will open.
2. Add or Remove Item in “Send to” Context Menu
- You can add or remove an item from the “Send to” menu options.
- Open “Run” by pressing “Win + R” keys on the keyboard, type “shell: send to” and click “Ok”.
- Right click an empty space and go to “New” from the options. Here you have the option to add a program, a new folder or a shortcut to an app or a folder.
- You can add an option to send a file to a specific contact. Select “Contact”, add the contact and enter the details and then click “Ok”.
- The new item will be added to the “Send to” menu.
3. Customize Using Third-Party Context Menu Editors
Using the “Registry Editor” can be difficult as you need to know the specific key for a given menu item or the command for the item you need to add. Another simple way is to use trusted third party menu editors for Windows 10. Many free context menu editors enable you to view and edit the items on the menu.
Some of the popular right click menu editors are:
- Right-Click Extender for Windows.
- Context Menu Editor for Windows.
- Ultimate Windows Customizer.
Conclusion
The right click menu provides more commands to help you perform various activities on a given file or program. However, sometimes the menu item may be cluttered with items that you never use or need. Luckily, you can personalize the context menu by adding or removing some of the options either through the Windows Registry Editor, or using free third party software. Either method will give you full control of the context menu option, thus enhance your productivity with Windows 10.
By Stella | Follow | Last Updated August 18, 2021
Summary :
Do you get used to the new context menu in Windows 11? Perhaps, you don’t and you even want to revert File Explorer to the Windows 10 look. Fortunately, Windows allows you to disable the new context menu and go back to the old one. Now, in this post, MiniTool Software will show you how to disable the new context menu in Windows 11.
Windows 11 comes with a new UI look. For example, Microsoft centralizes the taskbar and the Start menu. With deeper use, you will find more appearances different from Windows 10. When you open File Explorer in Windows 11, you will see a new context menu.
In the beginning, you may feel fresh. But when you begin to use it, this new context menu may confuse you and even make you feel difficult to use. Some options are not where they should be. In File Explorer, the top toolbar also gets changed. These changes may make you feel uncomfortable or you even want to go back to the old context menu in Windows 11.
The good news is that you can turn off the new context menu in Windows 11 and restore the old look like in Windows 10. We will show you a guide in this post.
The first Windows 11 Insider preview build 22000 has been released. In this post, we will show you what’s new in this build.
How to Disable the New Context Menu in Windows 11?
This instruction shows you how to restore to the old context menu in Windows 11 (to make it go back to Windows 10’s look):
- Press Win+E to open File Explorer.
- Click the 3-dot icon from the top toolbar.
- Select Options from the drop-down menu.
- The Folder Options interface will pop up. Then, switch to the View tab.
- Scroll down to find Launch folder windows in a separate process (this option is not selected by default) and check it.
- Click Apply.
- Click OK.
After these steps, File Explorer will automatically close and launch again. Then, you can see the traditional Windows 10 context menu comes back.
How to Enable the New Context Menu in Windows 11?
If you want to re-use this new context menu, you can get it back. Here is how to turn on the new context menu in Windows 11:
1. Press Win+E to open File Explorer.
2. Click View on the top menu bar.
3. Click Options and select Change folder and search options.
4. Switch to the View section on the Folder Options interface.
5. Scroll down to find Launch folder windows in a separate process and uncheck it.
6. Click Apply.
7. Click OK.
After these steps, the Windows 11 new context menu will be back.
The first Windows 11 Insider preview build was released. In this post, we show you how to download and install Windows 11 Insider preview build.
How to Use the Windows 11 New Context Menu?
The simplification of the context menu of Windows 11 will make it easier to use, but now you are not used to it. Now, let’s look at how to operate this new context menu.
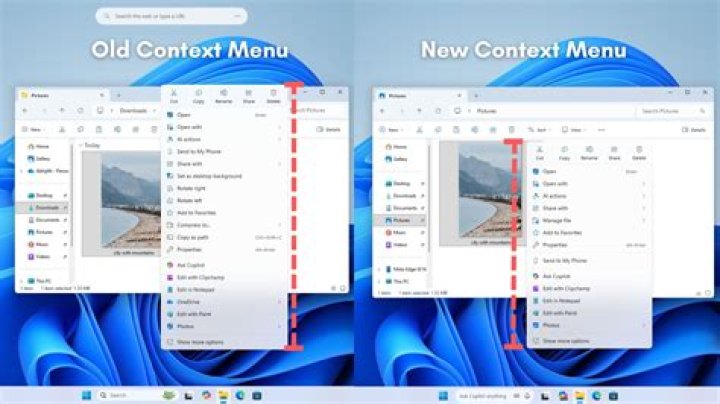
After right-clicking one file, you will see a very simple context menu. On the top, they are the common functions you use, including cut, copy, rename, share, and delete. The rest are some other options you may use, including open, open with, compress to ZIP file, etc.
How to See to Old Context Menu in Windows 11?
You will see there is a Show more options option at the bottom of the context menu. When you click it, a context menu with more options will pop up. This context menu is just the same as the Windows 10 context menu.
All in all, the commonly-used options will be firstly display in the new context menu. This gives you quick access to the function you want to use. As you get used to this new menu, you will like it.
ABOUT THE AUTHOR
Position: Columnist
Stella has been working in MiniTool Software as an English Editor for more than 4 years. Her articles mainly cover the fields of data recovery including storage media data recovery and phone data recovery, YouTube videos download, partition management, and video conversions.
Customizing this context submenu is as easy as adding shortcuts to the Send To folder.
Former CNET contributor
Dennis O’Reilly began writing about workplace technology as an editor for Ziff-Davis’ Computer Select, back when CDs were new-fangled, and IBM’s PC XT was wowing the crowds at Comdex. He spent more than seven years running PC World’s award-winning Here’s How section, beginning in 2000. O’Reilly has written about everything from web search to PC security to Microsoft Excel customizations. Along with designing, building, and managing several different web sites, Dennis created the Travel Reference Library, a database of travel guidebook reviews that was converted to the web in 1996 and operated through 2000.
About a year ago I tested a Sony GPS device. The device is long gone, but a shortcut to the product’s personal My Documents folder remained among the Send To options on my context (right-click) menu.
Getting rid of this useless entry was as easy as opening Windows’ Send To folder and removing its shortcut. Press the Windows key and R, type Shell:sendto, and press Enter to open the Send To folder. In the right pane, right-click the shortcut associated with the item you want to remove and choose Delete > Yes.
Remove an unwanted entry from the Send To menu by deleting its shortcut. Microsoft
Adding an entry to your Send To menu is just as easy. Right-click in the right pane and select New > Shortcut. Enter the path to the folder you want to create a Send To shortcut for, or click Browse, navigate to it, and click Next. Enter a name for the shortcut, and click Finish.
Enter the path to the folder you want to access from the Send To menu. Microsoft
Note that just dragging a shortcut from the Start menu or elsewhere into this window and dropping it there may not work. You have to enter the exact path, particularly if you want to add a shortcut to Notepad or another application.
Tomorrow: an antivirus-software buyer’s guide.
Context menu is a menu that appears when you perform a right-click on Windows 10 or other Windows versions. The number of items available on the context menu is not the same on each PC. It depends on the number of apps you have. The more apps you have, the more options available on the context menu as well. If you think that context menu displays too many items, in which make it looks cluttered, you can remove the ones you never use.
Sometimes, some apps failed to remove its item from the context menu even if you have removed the concerned app. In general, there are two ways to remove an item from the context menu: by editing the Windows Registry and using a third party app. In this article, we will show you how to remove an item from context menu using the first method.
Since Registry is sensitive enough, make sure to backup it first before making any change.
Removing context menu items via Registry
To get started, open the Registry Editor. You can do that by pressing the Ctrl+R keys on keyboard and type regedit on the Run dialog box and hit enter.
You will need a little effort to find the context menu items you want to remove because they are located on the different locations on Windows Registry. You can find them on one of the following locations.
You can use the left panel to go to the paths above.
On this example, we are going to remove a context menu item from the Droplr app.
On our case, the Registry key that shows Droplr context menu item is located on the following path.
Once you found the key, you can simply delete it and the menu item handled by this key will disappear from the context menu. Right-click and select Delete to delete the key.
There is an additional option you can take. Instead of deleting the key, in which will remove the item on the context menu, you can add a new string to disable the menu item. This option allows you to get the menu item back in case you change your mind.
To add a new string, select the key you want to disable on the left panel. Click the Edit menu and select New -> String Value.
Name the string value “LegacyDisable”.
As soon as you create the LegacyDisable value, the change should be immediate. Try to right-click a file or folder on File Explorer and you should not see the menu item anymore.
If you think that editing Registry is too risky since you haven’t familiarized, you might want to use a third party app instead. NirSoft is one of the utility app you can use in this case.
Lowell is the founder and CEO of How-To Geek. He’s been running the show since creating the site back in 2006. Over the last decade, Lowell has personally written more than 1000 articles which have been viewed by over 250 million people. Prior to starting How-To Geek, Lowell spent 15 years working in IT doing consulting, cybersecurity, database management, and programming work. Read more.
You’ve seen the SendTo folder in action any time you right-click a file and select the Send To folder from the context menu. What you might be unaware of is that you can customize the items in this menu.
Go ahead, right click a file and choose Send To from the menu. You should see something that looks like this:
Changing the Send To Shortcuts
To get to the SendTo folder, you’ll need to open up an Explorer window, and then paste in the following to the address bar.
This is a special value that actually maps to the real folder, which is found in C:\Users\ \AppData\Roaming\Microsoft\Windows\SendTo
You should now see a bunch of shortcuts, which you can modify or delete as you see fit. Fax recipient? Really? Sounds like a good one to delete.
Adding Items to the Send To Menu
Let’s say you wanted to add an item to the Send To menu to open files in Notepad. You could just drag a shortcut to Notepad into this folder, or create a new shortcut. Now you can see the new Notepad item in the menu:
This method should work for any application that allows you to open a file by using a command line argument.
The Windows ‘Send to’ menu is a handy way of sending a file to a specific folder, application, or other item. But you’re not stuck with the menu as is.
The “Send to” menu has been a cool and useful feature in Windows for generations. Use it to send, copy, or print an individual file to a specific location, device, application, or other item. But you may not think of using the Send to menu, as it might contain entries you don’t use or not include entries you want. Well, that problem can easily be corrected as you can tweak the Send to menu to suit your needs. Let’s see how this works.
First, open File Explorer in Windows 10 or 8.1 or Windows Explorer in a prior version of Windows. Right-click on a file, such as a word processing document, spreadsheet, text file, or image file. From the pop-up menu, move your mouse to the Send to command. The Send to menu flies open, revealing various locations and applications to which you can send the file.
Click on a specific entry, such as a Bluetooth device, a compressed zip file, a Mail recipient, or your Documents folder. The file you click on is then sent to the entry you select.
Okay, that’s cool. But how do we beef up the Send to menu to display the locations and apps that you want? Press the Windows Key+R. At the Open field, type shell:SendTo and then click OK.
File Explorer, or Windows Explorer, opens to the SendTo folder for your user account; specifically it’s: c:\users\[username]\AppData\Roaming\Microsoft\Windows\SendTo. From here, you can delete any entries you would never use by right-clicking on them and selecting Delete from the pop-up menu.
For example, you may never send a file as a fax to someone, so might want to delete the entry for Fax recipient. Or perhaps you don’t envision sending a file to a Bluetooth device, so you can delete that entry as well.
If you’re on the fence about deleting a certain entry, you can cut and paste it into another location, such as a backup folder. That way you can always move it back to the SendTo folder should you want it in the future.
Adding New Entries
To add new entries to the SendTo folder, open up another instance of File Explorer or Windows Explorer. Position the two Explorer windows side by side with the first one still open to the SendTo folder.
Now, let’s say you want to add your Pictures folder as an entry for the Send to command. In the second Explorer window, right-click on the Pictures folder and select Copy from the pop-up menu.
Move to the SendTo folder in the first Explorer window, right-click, and select Paste Shortcut from the pop-up menu.
A shortcut for the Pictures folder appears in the SendTo folder. You can rename the shortcut if you wish, perhaps to remove the word Shortcut. Now if you click on a photo, you’ll be able to send it directly to the Pictures folder by using the Send to command.
As another example, you can add an application to the Send to menu. Let’s say you use Adobe Photoshop from time to time to edit images, and you want to create a SendTo entry for it. In the second Explorer window, move to the following folder: C:\Program Files (x86)\Adobe\Adobe Photoshop CS5. Look for the file named Photoshop.exe. Right-click on it, and select Copy from the pop-up menu.
Then right-click in the SendTo folder in the first Explorer window and choose Paste Shortcut from the menu.
Now you can click on an image file and open it in Photoshop by sending it to the Photoshop Send to entry.
You can experiment with other locations, applications, and devices to set up the Send to menu just the way you want it.
For more, check out:
Get Our Best Stories!
Sign up for What’s New Now to get our top stories delivered to your inbox every morning.
This newsletter may contain advertising, deals, or affiliate links. Subscribing to a newsletter indicates your consent to our Terms of Use and Privacy Policy. You may unsubscribe from the newsletters at any time.
Your subscription has been confirmed. Keep an eye on your inbox!
Chris Hoffman is Editor-in-Chief of How-To Geek. He’s written about technology for over a decade and was a PCWorld columnist for two years. Chris has written for The New York Times and Reader’s Digest, been interviewed as a technology expert on TV stations like Miami’s NBC 6, and had his work covered by news outlets like the BBC. Since 2011, Chris has written over 2,000 articles that have been read nearly one billion times—and that’s just here at How-To Geek. Read more.
Windows 10’s context menu can slow down over time. Third-party programs often install context menu extensions, and badly coded ones can slow things down. Here’s how to fix context menus that open slowly, freeze, or hang when you right-click.
Use ShellExView to View Third-Party Extensions
We’re going to do this the easy way. Yes, you can directly remove context menu entries from the Windows registry. But that’s a slow process, and we’re going to quickly pin down the problem.
With that in mind, we recommend ShellExView, one of the excellent free utilities from NirSoft. It runs on Windows 10 and older versions of Windows, too. Download and launch ShellExView to get started.
You’ll see a long list of Windows shell extensions. However, many of them are created by Microsoft and included with Windows. Those shouldn’t be slowing down your system. To hide all the Microsoft extensions, click Options > Hide All Microsoft Extensions.
You will now see a more manageable list of the third-party shell extensions from the programs you installed. For example, on our Windows 10 PC, we saw extensions from programs like 7-Zip, Notepad++, NVIDIA’s graphics drivers, Dropbox, Google Drive, Malwarebytes, and Paint.NET.
Disable Extensions in ShellExView to Troubleshoot
You’ll want to figure out which shell extension is causing the problem. This involves disabling one or more shell extensions, restarting Explorer, and then seeing whether your problem is solved.
For example, you could do this in several ways:
- Disable all third-party extensions and add them one by one until the problem appears.
- Disable shell extensions one by one until the problem is fixed.
- Disable extensions in groups. For example, you could disable half the extensions at once. If your problem is solved, you know that one of the extensions you disabled caused it, and you could go from there. This is the fastest method.
However you choose to do it, here’s how to disable extensions:
First, select the extensions you want to disable. You can click one to select it, press Ctrl+A or click Edit > Select All to select all of them, press and hold the Shift key while clicking to select a range, or press and hold the Ctrl key while clicking to select multiple extensions.
To disable one or more selected shell extensions, right-click them and select “Disable Selected Items” or click File > Disable Selected Items. (To re-enable them after, select “Enable Selected Items” here.
Disabled shell extensions will say “Yes” under the Disabled column.
Your change won’t take effect until you restart Windows Explorer. You’ll see an option for this in ShellExView’s Options menu, but we don’t recommend that—it caused Explorer and the Windows taskbar to reload over and over until we signed out.
Instead, we recommend using Task Manager. To open it, press Ctrl+Shift+Esc or right-click the taskbar and select “Task Manager.”
Click “Windows Explorer” under Apps on the Processes tab. (If you don’t see this tab, click “More Details.”) Then, click the “Restart” button at the bottom-right corner of the Task Manager window.
Explorer will restart. Now, try right-clicking a folder, file, or your desktop—whatever was slow before. Is it still slow? Then you need to try disabling more shell extensions. Is it faster than it used to be? Then you’ve disabled a shell extension that was slowing it down.
Repeat Until You Solve the Problem
Repeat this process to turn extensions on and off and determine which is causing your problem. By testing your context menus after every time you make a change (be sure to restart Explorer first!), you can determine which one is causing the problem.
Feel free to leave any extensions you don’t want to use disabled, too. You can always re-open ShellExView and re-enable them in the future.
By the way, with our PC, the culprit slowing down our folder context menus was Google Drive’s “GDContextMenu Class” extension. Apparently this is a known problem. But, with the extension disabled in ShellExView, our PC’s context menus returned to their usual speed.
And, if you want even more speed, you can disable animations in Windows 10. Context menus will quickly pop up with no time-wasting animations after you do that. That’s just one of many ways to speed up your Windows 10 PC.
Windows includes a special desktop toolbar called the taskbar, which displays at the bottom of the display by default. This guide will show you how to delete the toolbar from the taskbar on Windows 10.
- How to delete / hide the language icon on the Windows 10 Taskbar
- How to add wallpaper to taskbar on Windows 10
Windows includes a special desktop toolbar called the taskbar, which displays at the bottom of the display by default. The taskbar allows you to find, view, open and switch between your applications. You can also see the date and time, system icons and items running in the background on the notification area.
You can make the taskbar look the way you want it, manage your calendar, pin your favorite apps to it, resize, change the position on the screen, and specify how the taskbar buttons together when you open multiple windows.
You can also add toolbars to the taskbar. The default toolbars include Address (link), Links (link), Desktop and any new (customized) toolbars added by the user or application.
If you have multiple monitors connected to your PC, the toolbar will only display on the taskbar on the home screen by default.
This guide will show you how to delete the toolbar from the taskbar on Windows 10.
Remove the toolbar from the taskbar using the taskbar context menu
Right-click or hold and hold on the taskbar, click Toolbars , and then click the selected toolbar (for example, Desktop ) you want to delete.
Remove the toolbar from the taskbar using the taskbar context menu
Remove the toolbar from the taskbar using the toolbar’s separator context menu
1. Unlock the taskbar if not already done.
2. Right-click or click and hold the separator on the taskbar just to the left of the toolbar (eg Desktop ) you want to delete and click the Close toolbar .
Click the Close toolbar
3. Click OK to confirm.
Click OK to confirm
This blog is about the How to Edit “Send to” Context Menu in Windows 10. We will try our best so that you understand this guide . I hope you guys like this blog, How to Edit “Send to” Context Menu in Windows 10. If your answer is yes after reading the article, please share this article with your friends and family to support us.
- Check How to Edit “Send to” Context Menu in Windows 10
- Understand the “Send to” option
- Manage the “Send to” option manually
- Use a third-party tool to manage the “Send To” option
- Tips and Tricks for the “Send To” Option
- Final words
- Final remarks: How to Edit “Send to” Context Menu in Windows 10
Check How to Edit “Send to” Context Menu in Windows 10
The The “Send To” option in the Windows context menu is amazingly useful, but it’s also one of the most underrated features. I will blame your weak predetermined inputs for receiving the cold shoulder.
But what if you can customize the “Send to” option from the context menu, you could help you easily send any file to desired location with just one click, or even open files in a respective program without forcing you to jump between different locations.
So in this post, I will tell you everything you need to manage the “Send to” option. Read on after the jump.
Understand the “Send to” option
In its essence, The “Send to” option is very similar to the drag and drop function.. If you drag and drop a file into a folder, it will be moved to it. Similarly, if you drag and drop a file into a specific program, that program will try to open that file (if possible).
When you right click on a file and select a program / location in the “Send to” option, copy the file to that location or open it in the selected program. So basically Send To (as the name also suggests) sends the selected file to the selected location or program.
Manage the “Send to” option manually
Getting to the sweetest part, adding and removing items in the “Send To” option is all you need to know to be productive when moving or opening files. Curiously, The “Send to” option is backed by a simple folder., it is not surprising that it is called Send to.
Everything that is added in this folder is shown under the “Send to” option, and similarly, everything that is deleted is also removed from the “Send to” option (and you thought it would drag you to the registry, right? ).
Access Send to binder
The SendTo folder is located in the directory mentioned below:
C: UsersusernameAppDataRoamingMicrosoftWindowsSendTo
Here Username is your real username on your PC. You can go to this directory manually to access the folder. Alternatively, you can also use a Run command to open this folder. Press Windows + R keys to open the To run dialog and enter this command shell: sendto. When you press Enter, the Send To folder will open.
Here you can add the shortcut to any program or folder and it will immediately appear in the context menu option “Send to”. Although make sure copy a shortcut to the original program / folder to keep confusion to a minimum.
Just right click on the required program / folder and select create shortcut from the context menu. This will create a shortcut that you can move to the SendTo folder.
Use a third-party tool to manage the “Send To” option
Adding and removing items from the “Send to” option is not that difficult, but if you want to make it even easier; then a third party tool can help. For this purpose, Send To Toys is an interesting tool which offers various ways to add or remove items from the “Send to” option and also add some useful entries of your own.
Use Send to Toys
After installation, Send To Toys automatically add more useful entries in the “Send to” option. Entries include a Quick Launch shortcut, a Recycle Bin shortcut, a clipboard copy shortcut, a folder shortcut to send files directly to a default folder, and a few more.
The program settings window lists all the items for the “Send to” option and provides Add Y Get rid of button to easily add more items or remove unnecessary ones. You can also configure the Binder option to leave you send files to last accessed folder, user box, or a predefined folder.
The best feature of this tool is its Context menu entries that allow you to add or remove any item from the “Send To” option by right clicking on it and selecting the desired option.
For example, if you want to work on a folder and add items to it frequently, you don’t need to go to the Send to binder. Just right click on it and select Add to Send to menu and it will be added. Then when you’re done working on it, just right-click on it again and select Remove from Send to menu for easy removal.
Tips and Tricks for the “Send To” Option
Now that you know how to manage the “Send To” option, here are some tips and tricks to get you started:
Access an extended “Send to” list
Windows also has an extended “Send To” list that also shows all the folders within your User binder. Just press and hold the Change and then right-click the item.
Now move to Send to option and you will see a extended folder list. If you often work with folders within your user account, such as videos, documents, and music, etc., this trick will surely help you.
Add a cloud storage folder in “Send to” for quick sync
I usually use the “Send to” option to easily send any file to my Google Drive folder and sync it with my Google Drive account. If you have a Dropbox folder or a Google Drive folder, you can add your shortcut in SendTo folder for quick sync.
Add a shortcut to the uninstaller
If you use a third-party uninstaller like IObit Uninstaller, you can simply add your shortcut in the “Send to” option to quickly remove any program from anywhere.
Final words
The “Send to” option can be very useful when you need to work with multiple folders at the same time, or you need to open items quickly with a dedicated program. If you frequently use the “Send to” option, I will recommend that you Send to Toys tool for easy addition / removal of items and get more control.
Final remarks: How to Edit “Send to” Context Menu in Windows 10
I hope you understand this article, How to Edit “Send to” Context Menu in Windows 10. If your answer is no, you can ask anything via the contact forum section related to this article. And if your answer is yes, please share this article with your friends and family to give us your support.
In the latest version of Windows 10, when you right-click on a file in File Explorer, Share option appears in the context menu. If you click on the Share option, you get the modern Share flyout which displays frequently used apps and contacts.
The Share option in the file context menu (right-click menu) is very helpful to share files with your friends and family quickly. You don’t need to open an app to share a file quickly. Simply right-click on file, click Share, and click on the app using which you want to share. Since the Share flyout also displays your favorite contacts, you can quickly share files with your important contacts.
Now, if you don’t share files very often, you might want to get rid of the Share option to tidy the context menu.
The best part is that you will be able to share files even after removing the Share option from the context menu. To share a file, select the file, click the Share tab, and then click the Share icon to open the same flyout. So, sharing a file is not a problem even after removing the Share context menu option.
Removing the Share option from the file context menu is quite easy. You just need to delete a folder from the Registry to make it happen. In this guide, we will see how to remove the Share option from the file context menu in Windows 10.
Remove Share option from right-click menu in Windows 10
IMPORTANT: We suggest you create a system restore point before removing the Share option so that you can easily restore the option using the restore point.
Follow the given below instructions to remove the Share option from the context menu in Windows 10.
Step 1: Open the Registry Editor. To do that, type Regedit in Start/taskbar search field and then press Enter key. Click Yes button when you get the User Account Control prompt.
Step 2: In the Registry Editor, navigate to the following folder.
HKEY_CLASSES_ROOT\*\shellex\ContextMenuHandlers
Step 3: Expand ContextMenuHandlers folder. You should now see the ModernSharing folder.
Step 4: Finally, right-click on ModernSharing folder, and then click Delete option to delete the same.
Step 5: Click Yes button when you see a dialog with “Are you sure you want to permanently delete this key and all of its subkeys?” message.
The Share option will no longer appear when you right-click on a file in Windows 10.
On previous versions of Windows, the right-click ‘Send to’ menu was easy to use. Now with Windows 10, things are a bit more challenging.
Windows 11 is Microsoft’s next operating system that’d a major overhaul of the OS and will include other improvements under the hood. But as the company continues to move forward, some users want things to stay the same. For example, you can add extra locations to the “Send To” right-click context menu. You can still do that on Windows 11, but the steps are a bit different. Here’s how to do it.
Here is an example of using the ‘Send to’ menu on Windows 10. It’s much like previous versions of Windows. You right-click a file and have options to send it to different locations. But things are getting kind of weird for Windows 11. More on that below, so let’s get started.
Add or Delete Locations from the ‘Send to’ Context Menu
To get started with this process, you need to make sure the item you want to add is accessible and can move locations. Then, hit the keyboard shortcut Windows Key + R and type: shell:sendto in the Run dialog and click OK or hit Enter.
That opens the “Send to” folder. Here is where you can delete locations (for example, who needs a Fax recipient?) and apps or add them with a drag and drop – but hold on – it’s not quite the same.
Drag and drop the icon for the app or location you want to be added to the “Send to” menu – like a networked folder, for example. Here I’m dragging a shortcut I made for OneDrive.
That’s it. The first part is complete. I now have the OneDrive folder in the “Send to” location.
On Windows 11, when you right-click a file or an empty spot on the desktop, you get the following Context menu. This is different than previous versions of Windows.
To get the “old school” menu, you need to click on the bottom where it says “Show more options” on the menu.
Summing Up
After clicking the bottom option, I get the classic menu I’m looking for to send the file to OneDrive. And, of course, OneDrive is an available location because I put it in the “Send to” menu.
If you like to use the mouse, this is just an unneeded extra step, and it isn’t enjoyable when you’re trying to get things done. And speaking of annoyances, make sure to read our article about removing the News & Interests gadget from Windows 10. You can also hide the button on Windows 11.
However, it is worth noting that for those who dig keyboard Kung Fu, there is a keyboard shortcut for the action; select your file and use Shift + F 10, and that opens the classic menu directly.
– Last updated on April 19, 2008 by VG
Many times Windows users don’t get “Send To” menuitem in context menu (right-click menu) in Windows Explorer. Whenever they right-click on a file/folder, they don’t get “Send To” menuitem in context menu as shown in following screenshot:
This problem occurs when a required registry key gets corrupted or deleted in Windows Registry.
If you also facing this problem and can’t find “Send To” menu item in file/folder context menu, this article will help you.
To fix this problem, copy following piece of code and paste it in Notepad. After that save the file with the name “Sendto.REG” (including double-quotes):
Windows Registry Editor Version 5.00
Now double-click on the REG file and accept the confirmation. It’ll immediately add missing Send To menu.
PS: For your convenience, we are also providing a ready-made Registry script. Simply download following Zip file, extract it and then run the extracted .REG file:
It’ll ask for confirmation, accept it. That’s it. It’ll restore the missing “Send To” menu item and you can use it without any problem.
Also Check:
You are here: Home » Troubleshooting Guides » How to Restore Missing “Send To” Menuitem in File and Folder Context Menus in Windows?
About the author: Vishal Gupta (also known as VG) has been awarded with Microsoft MVP (Most Valuable Professional) award. He holds Masters degree in Computer Applications (MCA). He has written several tech articles for popular newspapers and magazines and has also appeared in tech shows on various TV channels.
Comments
NOTE: Older comments have been removed to reduce database overhead.
I want to add Documents to my Send to: this option I had it,but now it is no longer there.How do I restore or fix it?
thanks for helping to deliver the solution I have returned to normal laptop and transfer files to flash
Thanks for the Send To reg file. Very very helpful. This is what the net is all about and you have exceeded all expectations with your unknown help.
I did all that you said but it still is not in the context menu. If I go to the “Send to ” folder it is there but it simply still does not display in the context menu. What now?
i have also done what u said but again the same problem send to is there but it only displays DVD option in context menu. even when i type shell:sendto in run it gives an error. please help
Thanks and it worked instantly and no reboot required.
For those of you still having problems with this even though you followed these steps I have one more thing you can check and it is an easy fix.
Make sure the files are not marked hidden. You need to be able to see those folders. Just an easy fix I came across while troubleshooting here.
Is this supposed to work in W7? It didn’t work in mine. The only sendto option that I get these days is “DVD drive…” (and I don’t even have a DVD drive! There must be some way to fix this in the registry (besides this “fix”)…anybody know how?
In Win10 Mail, I’m trying to create a “send to” option upon right clicking a photo. This would allow me to transfer photos directly to the flash drive, as I have done for the past several years on my previous Vista system.
I can edit the Send to folder in Explorer but still no “send to” option in mail -completely missing. It only displays “open” or “save” as options on right clicking the photo.
Thanks in advance!
The script you already did worked fine. I wish I would have done that before the slow way, which you list first.
A perfect and clear instruction..it worked..Thanks
The 12 Best Linux Distributions for Windows Users
How to Turn Fast Startup On or Off in Windows 10 & 11
How to View Devices by Connection in Device Manager
Here Are All the Device Manager Error Codes and Solutions
Show Your Support for MajorGeeks a Donation
5 Ways to Open Administrative Tools in Windows 10 & 11
How to Create a Safely Remove Hardware Shortcut in Windows 10 & 11
How to Play Minecraft Classic For Free
How to Check Your Available VRAM in Windows 10 & 11
Should You Clean Your Windows Registry?
Published by Timothy Tibbetts on 02/01/2020
The Context Menu is a handy part of Windows that allows you to right-click on a file or folder and quickly perform frequently used actions. Some third-party applications add Context Menu items. You can also delete, edit, or add items yourself. Here’s how.
TIP : Hard to fix Windows Problems? Repair/Restore Missing Windows OS Files Damaged by Malware with a few clicks
We’ve seen the Context Menu cause problems, including crashing Windows Explorer or File Explorer, and sometimes you want to clean up the clutter. Editing your Context Menu items can be done through the registry, although we prefer to use free third-party apps for more control and a graphical user interface.
Either way, please back up your registry and create a System Restore point before you proceed.
1: CCleaner
Many people have CCleaner and might have overlooked the Context Menu editor that’s built-in. Click on Tools > Startup and click on the Context Menu tab. Right-click any entry, and you can disable or delete it. You can also save to a text file or open in Regedit or the folder that it resides in.
2: ShellExView
ShellExView from NirSoft is one of our favorites. The app is free and portable, so extract the contents to a folder and double-click shexview.exe.
Because ShellExView shows all shell extensions, you will see hundreds of entries. Click on Options and click on Hide All Microsoft Extensions.
Click on any entry you want to remove, and right-click. You can now disable or enable that Context Menu item. Another neat feature of ShellExView is that you can also add that shortcut to My Computer, your Desktop, or the Control Panel. Look for File > Add Selected Items To.
3: ShellMenuView
ShellMenuView from NirSoft simplifies what ShellExView does if you find ShellExView a bit complicated.
4: Context Menu
Surprisingly, there aren’t a lot of good or still working apps to add custom Shell Extensions. Some no longer work, while others have disappeared. Context Menu is one of the few that still works and is easy to use. You can browse to any program, create a custom icon and entry name, and that’s it. You can also add to Desktop, File, or Folder and remove it if you change your mind.
5: Registry Editing
As we wrote this article, we realized that there’s an app that simplifies the process — finding a shell extension in the registry has changed over the years and requires a lot of searching and understanding of the registry.
If you’re an experienced registry user and like to do things the hard way, you can find shell extensions inside of HKEY_CLASSES_ROOT.
Once you find the Shell Extension you want to remove, find the ShellNew subkey and delete that. One of the problems here is many Shell Extensions are listed by file type, so once again, we wouldn’t waste our time.
Similarly, to add an item or file extension to your Context Menu, search for the file-type, right-click on it and select New > Key and name that ShellNew. In the right pane, select New > String Value, name it NullFile and set the Value data to 1.
Few things can be more annoying or confusing in Windows than an overpopulated context menu. If you right click and suddenly half of the screen is covered on your 24″+ monitor, it’s time to clean things up.
You remember CCleaner? It’s that groovy utility that we normally use for dropping a nuclear strike on our computer’s browsing history. This time, I’ll show you a lesser known feature that has been added recently. It lets you manage the Windows context menu. The context menu appears when you right-click an item from the Windows desktop or in Explorer. Normally it’s a pain to edit, so this free utility comes in handy.
If you have a new computer, or you don’t install much, then you probably don’t have a context menu full of junk. A quick way to check is to just right click a folder or application somewhere in Windows. As you can see from the screenshot below, I have a bloated and confusing context menu. It’s filled with a lot of extra entries, and I don’t use most of them.
If you don’t have CCleaner installed already, you can grab it from Piriform’s official download page. There’s a free, paid, or enterprise version of the software. The free version is practically the same thing as the others, but if you like it, you can purchase the Professional edition to show you appreciate the developer’s hard work.
To access the Context Menu manager go to Tools > Startup > Context menu.
Enabling and disabling context menu items is just a matter of clicking them and selecting the appropriate option. You can also Save a copy of the list of items to a text file, which can then be sent to your IT guy or your favorite groovy geek’s Answer community for advice.
In just a few minutes your context menu is clean and tidy. Here’s my context menu after cleaning it up — much smaller than when I started.
The editor in CCleaner doesn’t support every context menu entry, but it’s a big step up in usability compared to complicated context menu editing apps or going in and modifying the Windows registry.
By: Waseem Patwegar
Many users do not find the default options in Send to Contextual menu interesting or useful enough. However, it is possible to customize Send to Menu in Windows 10, in order to make it more useful.
What Makes it Easy to Customize Send to Menu in Windows 10
The default options that appear in Send to menu are basically Shortcuts to Programs and Folders on your computer.
What makes it easy to customize Send to menu in Windows 10 is that all the Shortcuts that appear in Send to menu are stored in a simple Folder known as “SendTo”.
Anything that is added to the “SendTo” Folder becomes an option in the “Send to” contextual menu. Similarly, anything that is removed from the SendTo Folder gets removed from the Send to Contextual Menu.
The SendTo Folder is located at C:\Users\Your Username\AppData\Roaming\Microsoft\Windows\SendTo and it can be easily accessed by using File Explorer or by using “Shell:SendTo” command.
Add Shortcuts to Send to Menu in Windows 10
Follow the steps below to Add a new Shortcut to Send to menu in Windows 10.
1. Right-click on the Start button and click on Run in the menu that appears.
Note: You can also Press Windows + R keys to open the Run Command.
2. In the Run command window, type shell:sendto and click on Ok .
3. Once you are in SendTo Folder, add the Shortcut for items that you want to see in the Send to menu.
For example, in the above image, dragging OneDrive Shortcut to SendTo Folder will make the OneDrive Shortcut available in Send to menu.
Remove Shortcuts From Send to Menu in Windows 10
In case you find that the Send to menu has unnecessary items, you can remove those items from Send to menu by following the steps below.
1. Press Windows + R keys to open the Run Command.
2. In the Run command window, type shell:sendto and click on Ok .
3. Once you are in SendTo Folder, delete the Shortcut for item that you want to remove from Send To Menu.
For example, to remove Fax Recipient, right-click on it and choose the Delete option in contextual menu that appears.
How to Access Extended Send to Menu
When you right-click on a File or Folder, you get to access a limited number of items in the Send to menu. In order to see more options in Send To Menu, you can bring up an extended “Send to” menu by following the steps below.
1. Press and hold the Shift key and then right-click on the File/Folder .
2. Move the cursor to Send to option in the menu that appears and you will see the extended Send to List.
This option is useful, in case you like working or organizing things in specific folders on your computer, such as Photos, Video, Music, documents and so on.
In almost every Operating System and applications, the context menu (the menu that pops up when you right click the mouse) is always an important feature that is often overlooked by the users. Imagine a life without context menu, you won’t be able to right-click the mouse and quickly change the desktop settings, or to open a folder with another application. How unproductive would it be? On the other hand, if you are able to manage and edit your context menu rather than accepting the default, you will be able improve your efficiency and productivity to a higher level. Let’s see how you can achieve this in Windows.
Here are 5 free tools and utilities that you can use to manage the context menu in Windows.
1. ShellExView
ShellExView is a very small, simple and portable tool from Nirsoft which can be used to view and alter the shell extensions installed in the context menu of Windows. It also lists down the type of the shell extension. The type determines where the shell extension will appear in the context menu. For example, if registered, you will find “Set as Desktop Background” option in the context menu options if you right click an image in Windows 7. Since more items in the context menu make the right click menu heavy, you can lighten it by removing unnecessary items. To find unnecessary items, see their names from the context menu and then find (Ctrl + F) them in ShellExView to remove them.
2. Context Menu Editor
Context Menu Editor has a better graphical user interface (GUI) than ShellExView. Unlike ShellExView, context Menu Editor deletes and removes the items present in the context menu. There is no way to backup or restore the menu items so you should be very careful when using Context Menu Editor. The benefit of this tool is that it gives a lot of information about each context menu item. You can select different types of context menus from the drop down menu. This will only show the items present in the selected context menu. If you want to remove any item, just select it from menu items and press the “Delete From Menu” button. Please be careful as doing this is an irreversible process.
3. Right Click Context Menu Extender
Right Click Context Menu Extender is not exactly a full fledge tool to manage the context menu. Context Menu Extender can add many useful options to the right click menu. Context Menu Extender can also take a backup of Windows registry so that you may be able to restore it if anything goes wrong. You will not be able to remove any items from the context menus using Context Menu Extender.
4. FileMenu Tools
FileMenu Tools adds the functionality of Context Menu Extender and Context Menu Editor. You can add or remove items and menus from the context menu. There are some important options pre-defined that can be added to the context menu with a single click. FileMenu Tools also takes care of the Send To items. You can add and remove items from Send To menu. This is the best tool for managing the context menus in my opinion. It also lets you define and create your own context menu item. Just click on “Add Command” under Actions pane and build up your own customized context menu.
5. Ultimate Windows Context Menu Customizer
Ultimate Windows Context Menu Customizer is yet another tool for adding, removing and customizing the existing context menu. I like the graphical user interface of Ultimate Windows Context Menu Customizer as it gives me details about everything on the same window. I can add or remove an item according to the location of the context menu i.e, if I want to change the context menu of the Desktop, I can choose Desktop in the first step and then add or remove context menu items from there. You can also make use of the pre-defined items shown on the same window.
Did you ever need a context menu editor? What did you use for removing or adding new context menu items?
Our latest tutorials delivered straight to your inbox
I have a namespace extension, which provides a virtual view of files/folders in a server.
In the IContextMenu::QueryContextMenu() I have added some of the custom menu items.
I have also set couple of SGAOF flags in the IShellFolder::GetAttributesOf() to get the rename, delete, and properties, in the context menu.
Is there any way I can get the “Send To” option in the context menu for items in my namespace extension? and How do I handle these commands once these are enabled?. Please advise.
This is the code I tried as Denis Anisimov suggested
The default context menu is created as part of GetUIObjectOf. and the instance of MyNSEContextMenu class is through the Classfactory.
Related registries written are as follows
2 Answers 2
SendTo is just simple shell extension which implements IContextMenu(2,3). CLSID of extension is in Windows 7 (dont forget to check correct CLSID in other Windows versions you want to support). So just use something like this:
But your should be ready that some command of SendTo will be hidden and some will not work correctly because some of them requests real files but you have virtual only.
Normal Send to menu:
Send to menu in NSE:
The simple way is to add a shortcut to the SendTo folder. To find that, simply paste %APPDATA%\Microsoft\Windows\SendTo into an Explorer window.
This only works if you have a command line program that takes a file name as an argument. If this is not what you need please edit your question with further details of how your extension code is accessed. Also, if this is C# please tag it so.
How do I restore the Windows 10 context menu?
In the Task Manager window, scroll down and find the “File Explorer” process on your computer. c. Right-click on it and then click on “Restart” to restart the process on your computer. After restarting File Explorer, right-click and check, “New” context menu will be restored successfully.
How do I uninstall and restore the default new context menu items in Windows 10?
To remove default New context menu Items in Windows 10, do the following.
- Open Registry Editor.
- Go to the following Registry key: HKEY_CLASSES_ROOT.contact.
- Here, remove the ShellNew subkey.
- The New – Contact entry is now removed.
How do I edit the Windows context menu?
Press the Windows key and R simultaneously, type regedit and press Enter. Navigate to HKEY_CLASSES_ROOT*shellexContextMenuHandlers and you will see a series of keys that related to existing menu entries. It is easy to delete any you no longer need access to – just right click a key and select Delete.
How do I bring up the context menu?
In Microsoft Windows, pressing the Application key or Shift+F10 opens a context menu for the region that has focus.
What is the context menu in Windows 10?
The Right Click Menu or the Context Menu is the menu, which appears when you right-click on the desktop or a file or folder in Windows. This menu gives you added functionality by offering you actions you can take with the item. Most programs like to stuff their commands in this menu.
How do I manage right click menu?
Edit Right Click Menu for Desktop
You can also add any application to the desktop right-click menu pretty easily. Just right-click on the shell key and choose New – Key. Name the key whatever you want as that will appear in the context menu. In my example, I created a key called Paint.
How do I reset my right click options?
how to restore right click option
- Press Windows + I to open Settings.
- Click Devices.
- On the left pane, click Mouse & touchpad.
- Click Additional mouse options.
- Make sure that the Button configuration was set to left click or the Switch primary and secondary buttons is unchecked.
Is Microsoft release Windows 11?
Microsoft has confirmed that Windows 11 will officially launch on 5 October. Both a free upgrade for those Windows 10 devices that are eligible and pre-loaded on new computers are due. This means that we need to talk about security and, specifically, Windows 11 malware.
How do I change right click Settings in Windows 10?
Editing right click menu on Windows 10
- Go with the mouse over to the left side of the screen.
- Click (left click) in the search box in the upper left of your screen.
- Type in the search box “Run” or an easier way to do this is by pressing the buttons “Windows key” and the “R” key on the keyboard(Windows key + R).
What is context menu computer?
A context menu (also know as a contextual menu, shortcut menu or pop-up menu) is the menu that appears when you right-click and offers a set of choices that are available for, or in context of, whatever it was you clicked. The available choices are usually actions specifically related to the selected object.
Countless numbers of free audio and video players are available for Windows. Most Windows users have installed at least two or more third-party media players. Users who have set Winamp, foobar2000, or any other audio player as their default media player may want to get rid of Windows Media Player entries from the context menu.
With default Windows installation settings, you can see Play and Add to Windows Media Player List entries in the context menu. Add to Windows Media Player List entry is visible even if you have set a third-party audio player as your default player. So, users who use a media player other than WMP may want to remove these entries.
Sure, one can always use available free utilities to remove entries from the context menu, but one can easily remove WMP entries without using a third-party tool. Just follow the simple steps given below to quickly remove Windows Media Player entries from the right-click menu.
This method works on Windows 10, 8.1, 8, and 7.
Remove Windows Media Player entries from the context menu
Procedure:
Step 1: Open Default Programs. To do this, open the Start menu on Windows 7 and then click on Default Programs. On Windows 10, type Default Programs in Start menu search and then press Enter key to open Default Programs. Windows 8 users can simply type Default Programs in Start screen, and press the Enter key to launch the same.
Step 2: Here, click Set program access and computer defaults to open Set Program Access and Computer Defaults window.
Step 3: Select Custom and then click the down arrow icon to expand the list. Here, under Choose a default media player, disable Enable access to this program next to Windows Media Player.
Step 4: Click the Ok button to exit the window. You are done! You just removed Windows Media Player entries from the context menu.
You might also like to know how to reinstall Windows Media Player, how to download and install Windows Media Player skins, and how to change Windows Media Player background picture guides.
Microsoft added new entries to the File Explorer context menu in Windows 10 that some users of the operating system may like, and others may call bloat.
If you right-click on files in the most recent release build of Windows 10, the Creators Update, you get up to three additional context menu items.
You may get “Edit with Paint 3D” to edit an image with the built-in Paint 3D application, a “Cast to Device” entry to cast the media file to another device, and the “Share” entry which opens the Share UI of Windows 10 when selected.
Windows 10 Insider systems feature an “Edit with Photos” entry on top of that. That’s three edit options for images on Windows 10 in the context menu without any option to disable these entries.
Note: I recommend that you create a backup of the Registry before you make any changes to it. This allows you to restore the state before any editing. You can use a program like Erunt or RegBak for that, or with a right-click on any key (those on the left side) that is linked to adding, changing, or deleting values or entries, and selecting export.
Remove Windows 10 Context Menu bloat
Edit with Paint 3D
Paint 3D was included in the Windows 10 Creators Update. It is a modernized version of the classic Paint application that comes with a new UI, as an application, and ships with new features such as 3D functionality.
There is only one situation where the “Edit with Paint 3D” entry in the context menu makes sense: when you use a different default image editor for editing, but use Paint 3D sometimes for editing jobs. Even then it is possible to use “open with” instead to open the image in Paint 3D.
One issue that you will encounter when it comes to the removal of the context menu entry is that it is mapped to different file extensions, and that you need to remove Registry keys for each file extension individually to remove Paint 3D completely from the context menu.
To remove Edit with Paint 3D, do the following
- Tap on the Windows-key on the computer keyboard, type regedit.exe and tap on the Enter-key to open the Windows Registry Editor.
- Confirm the UAC prompt.
- Go to HKEY_LOCAL_MACHINE\SOFTWARE\Classes\SystemFileAssociations\.bmp\Shell
- Right-click on 3D Edit, and select Delete.
- Go to HKEY_LOCAL_MACHINE\SOFTWARE\Classes\SystemFileAssociations\.gif\Shell
- Right-click on 3D Edit, and select Delete.
- Go to HKEY_LOCAL_MACHINE\SOFTWARE\Classes\SystemFileAssociations\.jpg\Shell
- Right-click on 3D Edit, and select Delete.
- Go to HKEY_LOCAL_MACHINE\SOFTWARE\Classes\SystemFileAssociations\.jpeg\Shell
- Right-click on 3D Edit, and select Delete.
- Go to HKEY_LOCAL_MACHINE\SOFTWARE\Classes\SystemFileAssociations\.png\Shell
- Right-click on 3D Edit, and select Delete.
- If you notice the “Edit with Paint 3D” entry next to any other image type, repeat the process outlined above for it. All you need to do is go to HKEY_LOCAL_MACHINE\SOFTWARE\Classes\SystemFileAssociations\, click on the image file type, then on Shell to delete the 3D Edit value.
Edit with Photos
Edit with Photos is a new context menu option that is not part of the Creators Update version of Windows 10. It shows up in the latest Windows 10 Insider Builds that showcase features that will likely be part of the Fall Creators Update out later this year.
If you don’t use the Photos application to edit images on Windows 10, you may want to remove the entry from the File Explorer context menu.
To remove Edit with Photos, do the following
- Tap on the Windows-key on the computer keyboard, type regedit.exe and tap on the Enter-key to open the Windows Registry Editor.
- Confirm the UAC prompt.
- Go to HKEY_CLASSES_ROOT\AppX43hnxtbyyps62jhe9sqpdzxn1790zetc\Shell\ShellEdit
- Right-click on ShellEdit, and select New > String value.
- Name it ProgrammaticAccessOnly.
Cast to Device
If you don’t use the casting functionality of Windows 10, you have no need for the Cast to Device entry in the File Explorer context menu.
Basically, what it allows you to do is stream media files to devices that support Miracast or DLNA.
To remove Cast to Device, do the following
- Tap on the Windows-key on the computer keyboard, type regedit.exe and tap on the Enter-key to open the Windows Registry Editor.
- Confirm the UAC prompt.
- Go to HKEY_LOCAL_MACHINE\SOFTWARE\Microsoft\Windows\CurrentVersion\Shell Extensions
- If there is no Blocked key under Shell Extensions, right-click on Shell Extensions and select New > Key. Name the key Blocked.
- Right-click on Blocked, and select New > String Value.
- Name it
- Double-click on the newly created String value, and change the Value data field to Play to menu.
- The change takes effect when you log out and on, restart the PC, or restart the Windows Explorer process.
Tip: To restore the “Cast to Device” entry in the Windows 10 context menu, go to the Blocked key in the Registry, right-click on and select delete from the menu that opens.
Share
Share may not be active on all systems by default. It is on by default in recent Windows 10 Insider Builds. You may use it to share files using the built-in Windows 10 share functionality.
To remove Share, do the following
- Tap on the Windows-key on the computer keyboard, type regedit.exe and tap on the Enter-key to open the Windows Registry Editor.
- Confirm the UAC prompt.
- Go to HKEY_Classes_ROOT\*\shellex\ContextMenuHandlers\
- Right-click on Modern Sharing, and select Delete from the context menu.
Software programs you may use for the task
If you don’t like editing the Windows Registry, you may use free programs to remove some of the context menu entries as well.
The portable Nirsoft applications list shell menu items. You may disable those so that they don’t show up anymore.
The program is free to use, and can be used to remove “Edit with Paint 3D”, and “Cast to Device” from the context menu. Check out our review of Winaero Tweaker here.
Now You: Spotted another entry that you want to remove? Let us know in the comments and we figure it out and let you know how to do it.
You can quite easily add The File Eraser to the Send To context menu of MS Explorer and / or remove!
This works with BlankAndSecure in Windows 11 and 10 (8.1, 7) and all other Win systems! The Send To menu will also appear in all other programs that use the “Send to” menu, in example the Quad-File-Explorer Q-Dir!
Info: You can use this solution, for all other programs that accept file lists as parameters!
Contents / Shredder-Solution / Tips:
1.) . Add to “Send To” context menu in MS-Explorer!
2.) . Remove from the “Send To” context menu in MS-Explorer!
3.) . Other options to transfer files or lists of files to “Blank And Secure”!
4.) . This Solution is valid for Windows:
5.) . From version 5.11 you can also shred the trash content!
1.) Add to “Send To” context menu in MS-Explorer!
First, you click the right mouse button on BlankAndSecure.exe (or other Program) and select the option “Copy”
(. see Image-1 Arrow-1)!
Then easy press the [Windows+R] key combination and enter the command shell:sendto in the Windows Run-Dialog. To see the SendTo directory (folder) in the MS Explorer (. see Image-1 Arrow-2).
In the “Send To” folder, you can now access via the right mouse button menu and select “Paste Shortcut”.
(. see Image-2 Arrow-1) . Optionally, you can also add the shortcut via right mouse drag & drop action to send selected files or folders lists to the program via Windows “Send To” Menu.
So, and now is “Blank And Secure” in the Windows Explorer context menu (. see Image-3 Arrow-1)!
| Image-1 |
Add to “Send To” Windows Context Menu in MS-Explorer! |
Paste via right-click on an empty area!
| Image-2 |
Paste shortcut to Explorer share-with context menu (Windows 7,9,8.1, XP) |
3.) Remove from the “Send To” context menu in MS-Explorer!
Works just like adding! Please press the [Windows R] key combination and enter in the Run dialog the command shell:sendto to open the SendTo directory (folder) in MS Explorer. Click the right mouse button on security option “Delete” to remove the program from send-to menu. (. see Image-4 Arrow-1)!
| Image-4 |
Remove Delete from Explorer context menu (Windows 7,9,8.1, XP)? |
Other options to transfer files or lists of files to “Blank And Secure”!
You can drag and drop files or lists of file, from the MS Explorer and other programs on the BlankAndSecure.exe (. see Image-5 Arrow-1) or on the the program itself (. see Image-5 Arrow-2)!
| Image-5 |
Options to transfer files or lists of files to Blank And Secure |
4.) This Solution is valid for Windows
To ad the save delete file to right click “Send to Menu” is Suitable for Windows 11, 10 Pro, Enterprise, Home, Windows 8.1, Windows 8, Windows-Server 2019, 2016, 2012, Windows 7 Basic, Professional, Starter, Ultimate a nice easy way to erase files and folders easier via MS file explorer context menu!
5.) From version 5.11 you can also shred the recycle bin / trash content!
Added on user request! Please Register to the context menu version 5.11.
| (Image-6) Recycle Bin Contents Safe Delete via Explorer context menu! |
The user wishes to delete trash contents 😉
First time thanks for this great free software. I’m always enthusiastic about programs that are very small and can therefore be executed quickly. Also great is the Send-to and Context menu implementation and the very easy ways to set it up. What else I would wish for is the ability to pass files from the Windows Recycle Bin to Safe-Delete. This is not possible with drag and drop. Another approach would be to say SafeDelete, it should delete the Windows Recycle Bin completely safely.
Background is above all that I have many photos. If I clear out the occasional, then I can in the example IrfanView with the button “Remove / Delete” directly in the trash to move without having to leave the full-screen photo view. This is so fast and I often come to a lot of excess images. Therefore, for me, the methods that we have so far with safe deleting are not really considered.
Thus, I collect my pictures to be deleted quickly and easily in the “folder” trash and then wants this stack (yes, synonymous usually synonymous different source folders affected) can safely dispose of. And that Windows can only “uncertain”.
I hope you can come up with a solution. I also think that I’ve seen something like this in one of those inflated tuning tools (only had a demo, which was then deleted again) that you had the right to “Recycle Bin” with a right-click on the trash.
From the version trash shredding is no longer a dream These screenshots have been made under Windows 10 and 7, as you can see above under Windows 10 shot screenshot. You can easily and fast use this example as a Recycle Bin Shredder Solution on both previous and older versions of Microsoft’s Windows operating systems, whether it’s a Windows desktop computer or you’re on the go, or if you want to shred your tablet, Surface Pro / Go, or even as a Shredder on a server operating system.
It really makes very good sense to use this trash shredding feature, it is a simple yet effective trash shredding tool, and once in a while it makes perfect sense to use this improved trash shredding feature; it has been tested and tested on various MS OS successfully verified.
In Windows Explorer, ‘Context’ menu [or the right-click menu] is a very useful and handy option. You can perform a number of tasks using this menu, thus reducing the number of keystrokes and mouse clicks.
Ever wondered if you could add/remove entries in this menu? Well, wonder no more! Today we will see how to add our commonly used options/entries to this menu. This menu on my pc looks somewhat like this:
” data-medium-file=” data-large-file=” title=”sendto11″ src=” alt=”A typically modified Send To menu” srcset=” 389w, 150w, 300w” sizes=”(max-width: 389px) 100vw, 389px” />
A typically modified Send To menu
What gets listed in the Send To menu is actually a shortcut to a certain item which has to be placed in a certain folder called “SendTo”, in your Windows. The path to this folder may be different depending on which version of Microsoft Windows you are running.
So, instead of knowing the exact location, we can use the shortest way to directly open that folder. Pressing Win+R will open the ‘Run’ dialog on your desktop. Now type either of the commands below to open the actual ‘SendTo’ folder on your desktop:
” data-medium-file=” data-large-file=” title=”sendto1″ src=” alt=”How to open the ‘Send To’ folder” srcset=” 347w, 140w, 279w” sizes=”(max-width: 347px) 100vw, 347px” />
How to open the ‘Send To’ folder
Here is what opens up on my pc:
” data-medium-file=” data-large-file=” title=”sendto41″ src=” alt=”The actual “SendTo” folder” srcset=” 386w, 131w, 263w” sizes=”(max-width: 386px) 100vw, 386px” />
The actual “SendTo” folder
Now, in this folder, you can put shortcut to any folder or program that you like. If you happen to be adding a lot of entries, you can always organize them just as you would do with any conventional sub-folders. Again a quick view of this on my pc:
The “Send To” menu with a sub-menu
Similarly, the name of the subfolder on my pc for this sub-menu looks something like this:
” data-medium-file=” data-large-file=” title=”sendto5″ src=” alt=”Subfolder created inside “Send To” folder” srcset=” 386w, 117w, 234w” sizes=”(max-width: 386px) 100vw, 386px” />
Subfolder created inside “Send To” folder
And the actual subfolder looks like this:
” data-medium-file=” data-large-file=” title=”sendto6″ src=” alt=”The contents of the subfolder inside “Send To” folder” srcset=” 422w, 150w, 300w” sizes=”(max-width: 422px) 100vw, 422px” />
The contents of the subfolder inside “Send To” folder
I hope it was helpful to at least some of you [newbies].
With the launch of Windows 11, Microsoft brought a whole lot of UI changes to our beloved desktop OS. Whether it’s the new widgets, centered start menu, or the updated icons, there’s a lot to like about the new Windows 11 design language. One of the major changes also included a revamped context menu with a simpler design and fewer options. While that does make for a cleaner look, not everyone (including me) is a fan of the new context menu. Sure, you can use the Show more options to get a full-fledged context menu, but doing that every so often can be tiring.
Luckily, there’re ways through which you can revert to the old (Windows 10 like) context menu in Windows 11. In this article, we’ll go through all of them. So, without any further ado, let’s get started.
Disable New Context Menu in Windows 11 File Explorer
With Windows 11, Microsoft introduced a new File Explorer that blends well with other UI changes. For instance, it dropped the ribbon interface at the top and replaced it with some basic icons such as New, Cut, Copy, Paste, Rename, etc.
If you’re looking to get the old context menu back along with the old File Explorer in Windows 11, then you can do that directly from the Folder options in the File Explorer. Here’s how.
1. Press the Windows key + E to quickly launch the File Explorer on your PC. Click on the three-dot menu icon at the top and select Options from the list.
2. In the Folder Options window that appears, switch to the View tab. Under Advanced settings, scroll down to find and check the Launch folder windows in a separate process option. Then click on Apply and OK.
Once done, the File Explorer will automatically close and launch again. You’ll find that the File Explorer will now be reverted to its old interface. With the older look, you’ll also get the old context menu back.
Enable New Context Menu in Windows 11 File Explorer
If at any point, you get tired of using the old File Explorer in Windows 11 and decide to switch back to the newer one, doing so is simple enough. Here’s how.
1. Open the File Explorer again. Switch to the View tab and click on Options at the top.
2. In the Folder Options window, under the View tab, uncheck the Launch folder windows in a separate process option. Then click on Apply and OK.
Again, the File Explorer will restart automatically. Once it does, you’ll get the new File Explorer back along with the new context menu.
How to Switch to Old Context Menu in Windows 11
Using the Folder Options in the File Explorer only gets you the old context menu in the File Explorer itself. If you’re looking to get it back across the entire system then you’ll need to make some changes in the Windows Registry. Here’s how to do it.
1. Open the Start menu, type in Regedit and press Enter to open the Registry Editor.
2. In the address bar at the top, type in the following address to quickly navigate to the required key.
3. Right-click on the registry key 4 on the left sidebar, and choose Key > New. Name that key as 586118283.
4. Inside the 586118283 key, right-click anywhere in the right window-pane and choose New > DWORD (32-bit) Value and name it EnabledState.
5. Double click on the EnabledState DWORD file and change its value to 1. Then click on OK.
6. Repeat the same process mentioned above to create the following DWORDs.
7. Once done, just restart your PC and you’ll have the old context menu from Windows 10 back in Windows 11.
That’s all there is to it. If at any point you decide to go back to the new context menu, all you’ve to do is delete the 586118283 key from the Windows Registry and restart your PC.
Closing Remarks: Disable/Enable New Context Menu in Windows 11
Windows 11 and Microsoft’s new design language will definitely take some getting used to for some users. Until then you’ve options to enjoy the best of both worlds by tweaking some of the new Windows 11 designs to your liking.
By Ariel | Follow | Last Updated November 22, 2021
Summary :
The “Cast to Device” is a practical feature in Windows PC, but a lot of users don’t know how to add or remove it. Now, this post of MiniTool will guide you on how to add or remove Cast to Device context menu in Windows 11.
Quick Navigation :
- How to Add or Remove Cast to Device Context Menu in Windows 11
- User Comments
Windows 11 is a fully new operating system compared with other Windows operating systems. This version brings many new features and changes. Compared with Windows 10, one of the biggest changes is the Windows 11 context menu.
When right-clicking an item in File Explorer Windows 11, you will find a modern condensed context menu with Show more options, instead of a full context menu. So, many users want to add some new context menus in Windows 11 like “Copy to Folder and Move to Folder”, “Pin to quick access”, and the one discussed here.
Cast to Device is a Windows feature that allows you to stream media content to your Miracast/DLNA devices directly, for example, smart TVs, Xbox, multimedia hardware, etc. However, in Windows 11, this context menu is not available on media files and folders that are supported for this feature. How to add or remove Cast to Device context menu in Windows 11? Let’s keep reading.
A lot of users don’t know how to add or remove thumbnail previews Windows 11. This post provides 3 ways to set thumbnail previews in File Explorer Windows 11.
How to Add or Remove Cast to Device Context Menu in Windows 11
There are 2 simple ways on how to turn on or off Cast to Device context menu in Windows 11. Before you start the following steps, make sure you sign in as an administrator to add or remove the context menu smoothly.
Method 1. Use “Cast to Device” Bat File
The first and simplest method to turn on or off Cast to Device context menu in Windows 11 is to download the registry hacker file of this context menu. For that:
Step 1. Click here to download the Add_Cast_to_Device_context_menu.bat file and save it on your desktop.
Step 2. Right-click the downloaded .bat file and select Run as administrator.
Step 3. Click on Yes in the UAC confirmation window. After that, you will see that a Command Prompt window opens and closes as the explorer process is restarted to execute the registry changes successfully.
Step 4. To use the Cast to Device context menu, you can right-click the media file you want to cast in File Explorer and select Show more options. Then select Cast to Device in the full context menu.
Once completed, you can delete the .bat file if you like.
Method 2. Use Registry Editor
Another method on how to turn on or off Cast to Device context menu in Windows 11 is to manually change some value keys in Registry Editor. To do so, follow the steps below carefully.
Step 1. Press Win + R keys to open the Run dialog box, and then type regedit in it and hit Enter. Click on Yes in the pop-up UAC window to confirm the operation.
Step 2. In the Registry Editor window, locate the following path via the left navigation bar.
HKEY_LOCAL_MACHINE\SOFTWARE\Microsoft\Windows\CurrentVersion\Shell Extensions\
Step 3. Right-click the Shell Extensions folder and select New > Key from the context menu to add a new key. Then name the new key Blocked.
Step 4. With the Blocked key selected, right-click the blank area in the right pane and select New > String Value from the context menu.
Step 5. When the string value appears in the list, copy and paste the following name to it.
Step 6. After that, close your registry editor and reboot your computer or Explorer.exe to make the changes take into effect.
Once done, you should remove Cast to Device context menu in Windows 11. To re-add the Cast to Device context menu, you can delete the Blocked registry key in the same location as Step 5 and restart the Explorer.exe.
How to clear all event logs in Event Viewer Windows 11/10? If you are trying to figure it out, you come to the right place. This post provides you with 4 ways.
ABOUT THE AUTHOR
Position: Columnist
Ariel is an enthusiastic IT columnist focusing on partition management, data recovery, and Windows issues. She has helped users fix various problems like PS4 corrupted disk, unexpected store exception error, the green screen of death error, etc. If you are searching for methods to optimize your storage device and restore lost data from different storage devices, then Ariel can provide reliable solutions for these issues.


