Marshall is a writer with experience in the data storage industry. He worked at Synology, and most recently as CMO and technical staff writer at StorageReview. He’s currently an API/Software Technical Writer based in Tokyo, Japan, runs VGKAMI and ITEnterpriser, and spends what little free time he has learning Japanese. Read more.
If Word is acting glitchy and abnormal, resetting it might be necessary. Although Microsoft doesn’t provide a “reset” button to bring Word’s user options and registry settings back to default, a couple of fairly simple solutions are available.
Running Microsoft’s Easy Fix Wizard
The first (and easiest) solution is to run Microsoft’s Easy Fix Wizard that automatically resets Word’s user options and registry settings for you. To find the Wizard, go to the “Here’s an Easy Fix” section of Microsoft’s Troubleshooting page. Select “Download” and, once finished, open the application.
Note that all Office applications must be closed for the Wizard to work.
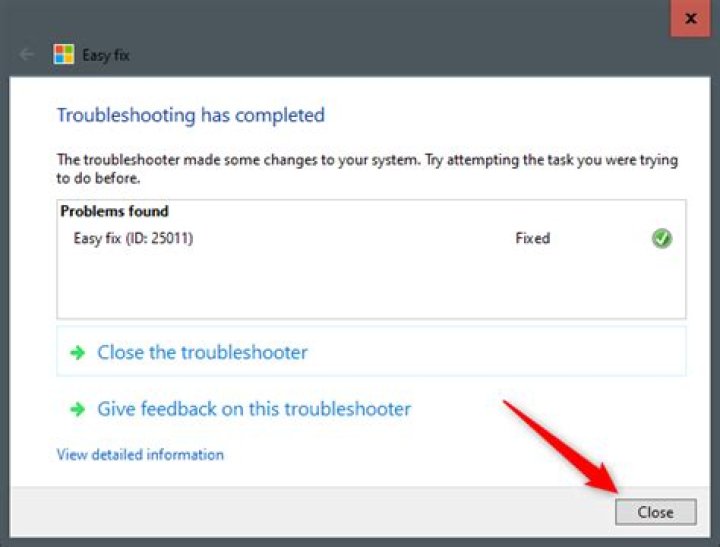
The Easy Fix window will appear. Read the basic information and select “Next.”
Let the Wizard run through its troubleshooting process. When it’s finished, select “Close.”
Now, the user options and registry settings are reset. The next time you open Word, you’ll be prompted to run through the setup process.
Reset Using the Registry Editor Utility
While we recommend the aforementioned method, you can manually reset the options and settings in Word using the Registry Editor.
Standard Warning: Registry Editor is a powerful tool and misusing it can render your system unstable or even inoperable. This is a pretty simple hack and as long as you stick to the instructions, you shouldn’t have any problems. That said, if you’ve never worked with it before, consider reading about how to use the Registry Editor before you get started. And definitely back up the Registry (and your computer!) before making changes.
First, press Windows Key + R to open the “Run” window. Next, type Regedt32.exe and select “OK.”
This opens the Registry Editor Utility. Navigate to the location of the key you want to delete. The key appears in the following file path:
Note that “16.0” in the file path might be different depending on which version of Office you’re using. If you’re using Office 2013, you need to look for “15.0.” Microsoft provides a comprehensive list of key locations if you need further help.
Next, select the key you want to delete. Once selected, click on Edit > Delete.
You’ll then be asked if you’re sure you want to delete the key. Click “Yes” to confirm; then the key will be deleted.
That’s all there is to it. The next time you run Word, it will take you through the setup process.
How to reset user options and registry settings in Word
If Word is crashing and abnormal, you may need to reset it. Although Microsoft doesn’t provide a “reset” button to return Word’s user options and registry settings to default, there are a couple of fairly simple solutions available.
Running the Microsoft Easy Fix Wizard
The first (and easiest) solution is to run Microsoft’s Easy Fix Wizard, which automatically resets user options and registry settings in Word. To find the wizard, go to the “Here’s an easy fix” section of . Select “Download” and once finished, open the app.
Note that all Office applications must be closed for the wizard to work.
The Easy Fix window will appear. Read the basic information and select “Next”.
Let the wizard run its troubleshooting process. When you’re done, select “Close.”
Now, the user options and registry settings are reset. The next time you open Word, you’ll be prompted to run through the setup process.
Reset using the Registry Editor utility
Although we recommend the method mentioned above, you can manually reset options and settings in Word using Registry Editor.
Standard warning: Registry Editor is a powerful tool and its misuse can make your system unstable or even inoperable. This is a pretty simple trick and as long as you follow the instructions you shouldn’t have any problems. That said, if you’ve never worked with it before, consider reading up on how to use Registry Editor before you begin. And definitely back up the Registry (and your computer!) before making any changes.
First, press Windows Key + R to open the “Run” window. Next, type Regedt32.exe and select “OK”.
This opens the Registry Editor utility. Navigate to the location of the key that you want to remove. The key appears in the following file path:
Note that “16.0” in the file path may be different depending on the version of Office you’re using. If you are using Office 2013, you should search for “15.0”. Microsoft provides a if you need more help.
report this ad
Next, select the key you want to delete. Once selected, click Edit > Delete.
You will then be asked if you are sure you want to delete the key. Click “Yes” to confirm; then the key will be deleted.
That’s all about it. The next time you run Word, it will guide you through the setup process.
For convenient, I think, you have changed the settings in word, excel. And now, you want to restore default settings in Word, excel but you do not know to do it? Please, follow this tutorial, I will guide to you how to reset default settings in Word, excel?
There are 2 ways to restore default settings in Word, excel are Registry Editor and 3rd software but in this post, I will do it by Registry Editor.
I. Restore default settings in Word, excel by Registry Editor
For this tutorial, I will restore default settings in Word, other software, you can do the same way.
1. From your keyboard, press Windows + R and typing the keyword “regedit”, click OK or press enter button.
2. In the registry editor dialog, select HKEY_CURRENT_USER -> Software -> Microsoft -> office -> 16.0 -> word.
Note: I am using office 2016 so path is 16.0. If you are using other version, the path will be different.
+ Office 2003. HKEY_CURRENT_USER -> Software -> Microsoft -> office -> 11.0 -> word.
+ Office 2007. HKEY_CURRENT_USER -> Software -> Microsoft -> office -> 12.0 -> word.
+ Office 2010. HKEY_CURRENT_USER -> Software -> Microsoft -> office -> 14.0 -> word.
+ Office 2013. HKEY_CURRENT_USER -> Software -> Microsoft -> office -> 15.0 -> word.
+ Office 2016. HKEY_CURRENT_USER -> Software -> Microsoft -> office -> 16.0 -> word.
+ Office 2019. HKEY_CURRENT_USER -> Software -> Microsoft -> office -> 17.0 -> word.
At path “ HKEY_CURRENT_USER -> Software -> Microsoft -> office” you can software that you already installed. As picture above, I already installed 4 software excel, outlook, power Point, word.
3. At the 16 path, right-click on the word and select delete to delete current settings and return default settings.
Conclusion.
Right, so I have just instructed you in great detail how to restore original settings in word, excel…of all current OFFICE versions in a very safe and effective way!
Hopefully this article will be useful to you.
Good luck.
Published by Ian Matthews on February 8, 2012 February 8, 2012
If you have changed your default font, boarders, page size, and you can’t remember how to undo those changes or if you just have a weird Word 2007 2010 2013 problem, you can easily reset your settings back to default by deleting a few files.
Before you begin, close Word.
- Delete NORMAL.DOTM and BUILDINGBLOCKS.DOTX
- Normal.DOTM and BuildingBlocks.DOTX usually reside in C:\Users\ \AppData\Roaming\Microsoft\Templates
- The default NORMAL.DOTM files used for new profiles are stored C:\Users\Default\AppData\Roaming\Microsoft\Templates
- These files are rebuilt automatically when word is started
- Use regedit to delete HKEY_CURRENT_USER\Software\Microsoft\Office\14.0\Word\Data
- This key is rebuilt automatically when word is started
Click to enlarge these screen shots.
The first one shows you where how to determine where Word is looking for Normal.DOTM and the second screen shot shows you the key to delete.
Word2007 2010 2013 Normal dot dotm reset
Word 2007 2010 2013 Reset Settings Registry
Every application has certain things or operations set by default. Some allow you to customize them, some don’t. MS Office suite too has lot of things set to perform standard actions and thankfully, we can vary them as per our needs.
You must have noticed that when you write or create a new document, it saves in a definite location and in a definite format. We aren’t talking about the Save As feature (which allows you to choose what you want); we are talking about only Save. And if your requirements are same most of the times but do not match the default, you might want to consider changing those settings. That’s what we will teach you in this post – changing the default ‘Save’ settings on MS Office.
Let us see how to do that.
Steps to Change Default Save Settings in MS Office
In the steps below, we will show how you can change the default settings in MS Word. Similar steps apply for MS Excel and MS PowerPoint.
Step 1: Click on the Office Button placed on the top left of the interface and navigate to Word Options (or Excel Options or PowerPoint Options).
Step 2: On the Word Options dialog that comes up, select Save on the left pane. This will show the section containing default save actions.
Note: Check out the section for Save documents and the options under it. You may change the save format and the location. Interestingly, you may also modify the auto recover settings (say, like reduce the time from 10 minutes to 5 minutes and play safer).
Step 3: Choose the file format you want, edit the location (which by default is similar to C:\Users\Sandeep\Documents\) and make changes to auto recover if you wish.
Why Consider Doing This?
Well, you will not have to go through the trouble of Save As each time you want to save a new document and customize things. Also, if you just save a document and miss where it has been placed, just navigate to the Save document section and check the location rather than doing random searches.
Conclusion
If you are a frequent MS Office user, the suggestion is to set your own defaults when it comes to the Save options in order to ensure a more productive way of working with those tools every day. On my applications, I have set my own defaults. Will you be doing this as well?
Last updated on 03 February, 2022
The above article may contain affiliate links which help support Guiding Tech. However, it does not affect our editorial integrity. The content remains unbiased and authentic.
Read Next
Polaris Office vs WPS Office: Which Is the Best Free Office… Most of the Microsoft Office suite apps are available on Android. So if you’re looking for a free all-in-one office suite for your phone, you…
How to Change Language in WPS Office for Android and iOS Microsoft does offer a free version of its Office suite for mobile devices. Still, a lot of users gravitate towards other free alternatives like WPS…
How to Change Default Chrome Incognito Color With Themes Say what you can about Chrome, but nothing gets close to the seamless cross-platform synchronization and sheer add-on functionality that Google’s browser brings to the…
How to Change Default Font, Size, and Spacing in Google Docs Last week I ditched Microsoft’s word-processing software Word and made a jump to Google Docs. While the overall transition has been smooth and glitch-free, one…
How to Change Default PDF Viewer on Android When you open any file on your Android phone for the first time, your phone asks you to choose a default app for viewing that…
2 Best Ways to Change Default Ringtone App on Android Many like to use custom ringtones on our Android phones. For that, we usually have to take the help of a file manager or a…
What Is Default Account in Chrome and How to Change It Google Chrome makes it easy to switch between multiple Google accounts. One would think that’s an amazing feature by Google. Yes, that’s true, but it…
Top 4 Ways to Change Default Background Color in Chrome Everyone has different preferences. That’s true for colors as well. While some like light colors, others prefer bold and bright colors. Fortunately, even apps let…
DID YOU KNOW
WaveLAN, DragonFly, Weca — these were some of the previous names for Wi-Fi.
More in
7 Best Ways to Fix Dark Mode Not Working in Gmail and Other Google Apps
Top 5 Chromium-Based Browsers for Windows
JOIN THE NEWSLETTER
Get Guiding Tech articles delivered to your inbox.
How to Turn Fast Startup On or Off in Windows 10 & 11
How to View Devices by Connection in Device Manager
Here Are All the Device Manager Error Codes and Solutions
Show Your Support for MajorGeeks a Donation
5 Ways to Open Administrative Tools in Windows 10 & 11
How to Create a Safely Remove Hardware Shortcut in Windows 10 & 11
How to Play Minecraft Classic For Free
How to Check Your Available VRAM in Windows 10 & 11
Should You Clean Your Windows Registry?
How to Properly Uninstall Programs in Windows 10 & 11
Published by Timothy Tibbetts on 09/08/2021
Windows 10 comes with two programs to edit most documents – Notepad and WordPad. Notepad allows you to view and edit text documents, while Wordpad will enable you to open and edit other documents, including RTF, DOCX, ODT, TXT. Here is some information on how to run, use, and reset Microsoft Word.
TIP : Hard to fix Windows Problems? Repair/Restore Missing Windows OS Files Damaged by Malware with a few clicks
If, for some reason, you’re lacking Microsoft Word, you can download Microsoft Office Word Viewer from MajorGeeks. You can’t edit, but Microsoft Office Viewer will do the job if you need a viewer in a hurry. You can also consider a free Microsoft Office alternative.
1: Running Microsoft WordPad
Windows should have WordPad installed by default. You can open WordPad in different ways:
Start > Windows Accessories > WordPad
Press the Windows Key + S and begin typing, and click on Wordpad.
Press the Windows Key + R and type in wordpad.exe or write.exe.
Double-click on wordpad.exe found at C:\Program Files\Windows NT\Accessories folder.
2: Reset Microsoft WordPad
If WordPad is causing problems or not working, we can delete the options registry folder for WordPad and start like new.
Open the registry editor and navigate to HKEY_CURRENT_USER\SOFTWARE\Microsoft\Windows\CurrentVersion\Applets\Wordpad. Right-click on Optins and click on delete. Restart WordPad.
3: Using Microsoft WordPad
We’d recommend you poke around before getting serious. Type in some letters and check out the available options in the three tabs; File, Home, and View.
You should easily spot the standard options, including copy, paste, and find, but there’s so much more.
The File tab is where you can open, save, print, or email a document.
The Home tab lets you pick your font options, including the font type and color, bold, italic, size, colors, and more. Moving over, you can increase or decrease the indent, set line spacing, align left, right, center, and more. You can also insert pictures, objects, change the date and time.
Don’t forget the View tab. Here you can zoom in or out, turn the ruler and status bar on or off, and more.
4: Frequently Asked Questions
How do I delete a document?
Open File Explorer and look for your Documents folder on the left under Quick Access. Click on any document, right-click, and click on delete. You can also type in any document name or extensions (RTF, DOCX, ODT, TXT) and use Search.
Microsoft Word looks weird on my tablet?
Microsoft Word has been known to look weird on some tablets. You can download Word Mobile from the Microsoft Store.
Does WordPad have page border options?
It does, but not where you’d expect. Click the File menu, then click Page setup. Yes, this is the printer page setup, but that should work for you. Otherwise, check the Paragraph section in the Home tab. You can find it near the center. The lower right option (paragraph again) might be of help.
The print preview option is not working.
Follow the steps above to reset Microsoft WordPad.
Can WordPad check spell checking and punctuation?
No. While WordPad is better than Notepad, it’s still just a light version of Microsoft Word from the Microsoft Office Suite. If you need these features and can’t or don’t want to buy Microsoft Office, , try a freeware Microsoft Office alternative.
Have another question? Leave a comment below.
Change, back up, and restore your Outlook email settings
:max_bytes(150000):strip_icc()/Heinz-Tschabitsche-c6d01096ad5f47b8800846cebc7d99b1.jpg "How to reset user options and registry settings in word")
- Tweet
- Share
- Tweet
- Share
What to Know
- Open the Start menu and search for regedit. In the location field, enter HKEY_CURRENT_USER\Software\Microsoft\Office\.
- On the left side of the Editor, select your Outlook version’s directory, then open Preferences. Double-click the entry to modify (0 or 1).
- Back up registry entries: Select File >Export. Make sure your Outlook branch is selected, and choose a name and location for the file.
Outlook keeps tons of email settings (enabling Cloud access, hiding favorites, showing Bcc, and more) in the Windows Registry. Here’s how to find out where your Outlook settings are so you can edit them.
Find Your Outlook Settings in the Windows Registry
To find your Outlook settings in the Windows Registry, open the Registry Editor and find the Outlook directory.
Open the start menu and search for regedit.
At the top of the Registry Editor window, there is a location field. Type HKEY_CURRENT_USER\Software\Microsoft\Office\ and press Enter.
On the left side of the Editor under the Office directory, select your Outlook version’s directory. If you have Outlook 365, Outlook 2019, or Outlook 2016, you’re on version 16.0. If you have Outlook 2010, you’re on version 14.0
In your Outlook directory on the left side of the screen, open the Preferences directory. On the right side of the screen, your Outlook settings registry entries appear.
Double-click an entry to modify an entry. Entries are set to either 1 or 0, which corresponds to either on or off, respectively. Changing a 1 to a 0 changes a setting from on to off and vice versa.
To back up registry entries, click File and then select Export. Make sure your Outlook branch (the Outlook directory you’ve been working in) is selected, and choose a name and location for your backed-up registry file.
Editing the Registry can be risky. Anytime you make a change, back up your original settings so you can revert to them if something goes wrong when changing settings.
Applicable Products
- XenApp 6.5
- XenApp 6.0 for Windows Server 2008 R2
Objective
This article contains instructions to save the toolbar customization on the User Profile Manager (UPM) store.
Background
By default, UPM does not save Microsoft Office User Interface settings, such as Toolbar. The reason for this is that by default UPM has exclusion for the AppData folder of the user profile. Microsoft Office saves all these type of settings in the same location. This article provides information on how to add these settings to the UPM profile, so the settings are available to all servers that the user logs on.
The settings in Microsoft Office are saved in a collection of * .officeUI files. Each one of these files contain the user interface settings and preference for each one of the office applications. The Microsoft Office 2010 User Interface Settings are located in the following locations:
Microsoft Windows XP: C:\Documents and Settings\%username%\Local Settings\Application Data\Microsoft\Office
Microsoft Windows Vista/7: C:\Users\%username%\AppData\Local\Microsoft\Office
Instructions
To save the toolbar customization on the UPM store, complete the following steps:
Enable the following option at different locations.
Enable the Allow roaming of all user customizations option in the Office Customization Tool, to add the setting to the Office installation.
If the option is not enabled during installation, then enable the Allow roaming of all user customizations option by using the registry.
Caution! Refer to the Disclaimer at the end of this article before using Registry Editor.
Modify the following registry setting:
HKEY_CURRENT_USER\Software\Microsoft\Office\14.0\Common\Toolbars
Value: CustomUIRoaming
Type: DWORD
Data: 1
Note: This registry setting is a user registry. Therefore, you must modify the settings for each user and its profile that log on to the server. A logon script is a good method to apply the change to multiple servers.
The policy is available with the Office 2010 Administrative Template (*.adm). The template can be downloaded from Office 2010 Administrative Template (Microsoft).
Create a new policy in Active Directory; ensure the policy applies to the correct users that require this setting.
Open the Group Policy and browse to User Configuration > Policies > Administrative Templates > Microsoft Office 2010 > Global Options > Customize.
In the folder locate and enable the option Allow roaming of all user customizations.
Open Group Policy Management Editor.
Expand the Policies > Administrative Templates > Citrix > Profile Management > File System > Synchronization.
Double-click Files to synchronize.
Select the Enabled option in the Files to synchronize window.
Click Show, as shown in the following screen shot:
Type the path AppData\Local\Microsoft\Office\*.officeUI in the Show Contents window, as shown in the preceding screen shot.
Note: Type the path Local Settings\Application Data\Microsoft\Office\*.officeUI, if the server is installed with Windows Server 2003 or Windows XP.
Click OK.
This post shows students and new users how to change and customize the Quick access feature in Windows 11.
When you want to find files, folders and settings in Windows 11, the Quick access feature is there to help you without searching through the entire system hard drive which can contain thousands of files. By default, File Explorer opens to Quick Access.
When you want to file or folder content quickly in Windows 11, you can pin it to Quick access so it’s at your fingertip when you need it again. Just right-click the folder and select Pin to Quick access. Unpin it when you don’t need it there anymore.
The new Windows 11 will come with many new features and enhancements that will work great for some while adding some learning challenges for others. Some things and settings have changed so much that folks will have to learn new ways to work with and manage Windows 11.
If you ever used Quick access in Windows 10, then there’s not new to learn, except some File Explorer UI changes. Lot of things have changed in File Explorer that it may it time to getting used to.
To get started with Quick access in Windows 11, continue below.
How to disable Quick access in Windows 11
Windows automatically adds frequently access files and recent folders to Quick access so you can find them quickly when you need them. Quick access is how you find things quickly. However, if you don’t want frequently accessed items to show up, you can simply disable the Quick access feature.
You can also customize and change Quick access settings so that it only shows you pinned files and folders and not show recent and frequently accessed files and folders.
To do that, open File Explorer and go to the three dots on the menu, and then select Options as highlighted below.
In File Explorer folder option general tab, select Open File Explorer to: This PC. And then in the Privacy section, clear the checked boxes and select Apply.
Apply your changes and quick access will be disabled.
How to pin or remove items from Quick access
If you frequently use a particular folder, you can have that folder show up in Quick access so it’ll be easy to find when you need it again. To do that, simply right-click the target folder and select Pin to Quick access.
To unpin or remove the folder from Quick access, simply right-click the folder and select Unpin from Quick access as highlighted below.
How to show only pinned folder in Quick access
Quick access has some good features. If you don’t want to completely disable it, but turn off recently access files and folders, you can enable Quick access but disable the recently access feature.
Open File Explorer and go to the three dots to get to the Options settings. Make sure the option to Open File Explorer is set to Quick access. And In the Privacy section, clear the check boxes and select Apply.
Now Quick access will only show your pinned folders.
That should do it!
Conclusion:
This post showed you how to change Quick access settings in Windows 11. If you find any error above, please use the comment form below to report.
Published by Richard
In my spare time, I research topics that are interesting and worthwhile for users and students who want to try something new. I, too, am a student and my focus here is to help other students and new users get started with managing Ubuntu Linux, Windows, Content Management Systems (CMS) and others.
I try to do my best explaining the topics and detailing the instructions so that anyone can understand. These tutorials may not work in all situations and for all users. However, if you run into trouble, please ask your questions below and I or someone from the community may help you resolve. Thanks for reading and hope you come back.
4 Comments
So there is no way to remove Quick Access in Windows 11??
And there seems to be no way to remove the Recommended section in the Start menu?!
This is ridiculous
You can remove Quick Acces via Registry editor. The W10 guide works fine.
The content of the Recommended section can be removed via Settings -> Personalisation -> Show recently… OFF Unfortunatelly the text “Recommended….” in Start menu can’t be removed.
I followed the instructions and nothing happened.
“You can remove Quick Access via Registry editor. The W10 guide works fine.” is your response to Luka – so where do I find W10 Guide? because I don’t want the stupid Quick Access.
Well, you can change the default folder to “This computer”, which is fine for me. (I never got the idea of quick access folder. All app I need to quickly access are pined to taskbar).
Cheers
Michala
Leave a Comment Cancel reply
This site uses Akismet to reduce spam. Learn how your comment data is processed.
I n this tutorial, we are going to see how to disable the lock screen on Windows 10 using the registry. Every time your computer boots up or wakes up from sleep, you have to click your mouse button or swipe your finger to make the lock disappear before you are hit with a login prompt.
You can save time by disabling the lock screen and going straight to the login screen in Windows 10. Here’s how to do it.
How to Disable Lock Screen on Windows 10 Using Registry
Step 1: Open the registry editor. Press Start + R, then type regedit in the prompt, then press Enter. Click Yes if you get a warning from the User Account Control.
Step 2: Go to HKEY_LOCAL_MACHINE\SOFTWARE\Policies\Microsoft\Windows.
Step 3: Create a new registry key called Personalization if it does not already exist.
To create the key, right-click, select Key from the menu, and then rename the key to Personalization.
Step 4: Click on the Personalization key, then right-click and select New, then 32-bit DWORD value.
Step 5: Name the new value NoLockScreen.
Step 6: Set NoLockScreen to 1 by double-clicking on it, type “1” in the Value data field and press OK.
After your next reboot, the lock screen will disappear. If you want to re-enable it, simply change the registry setting from 1 to 0.
Outlook’s resiliency logic, which was introduced with Outlook 2013, allows you to control the way slow add-ins are handled. It gives users option to disable add-ins that take more than 1 second to load, during Outlook launch.
In this post we will learn how to force Outlook to always load a specific add-in, by modifying Windows Registry settings.
To get started with this, you will first need to know the fully qualified name of the add-in that you want to forcely loaded by Outlook client. You can get this information from the Windows Registry. To do this, open the Registry Editor (regedit.exe) and navigate to this path: HKEY_CURRENT_USER\Software\Microsoft\Office\16.0\Outlook\Addins , where ‘ 16.0 ‘ is the product version of Outlook 2016. Copy the name of the add-in that you want to apply. Here’s a screenshot to refer:
Next step is to force Outlook to load the add-in, even though it is performing slow during Outlook loading time. For this, navigate to the registry path: HKEY_CURRENT_USER\Software\Microsoft\Office\16.0\Outlook\Resiliency\DoNotDisableAddinList and create a DWORD registry KEY. Give it the same name of the add-in that you copied from the previous section.
Now, set the DWORD value to ‘ 1 ‘ to ask the system to always enable it:
Once done, restart Outlook and navigate to File and click on the button Slow and Disabled COM Add-ins , as shown below:
The following screen will be shown with the list of add-ins, which contains the add-ins having performance impact and/or forcely loaded by Outlook. The add-in that you have added to the ‘ DoNotDisableAddinList ‘ registry key, will be listed here as ‘ Always Enabled ‘.
I hope that the post was helpful and would give you the basic understanding to forcefully enable Outlook to load an add-in even though it is performing slow during launch. Based on this, you can now programmatically configure this settings to always load a specific add-in.
In this tutorial, I will guide to you how to turn off Compatibility mode in Word? You can turn off by compatibility mode, word options setting, delete Normal.dotm, edit in Registry,…
When open a document in Word, sometimes you may see the text: Compatibility Mode in the Title bar next to the document name. This means, the document right now is last created or saved in an earlier version of Word than the one you are using.
In general, Compatibility Mode allows you to view files with old formats on new software versions, but the working environment is the old environment. To find out more about it please checkout the content below.
I. Compatibility mode.
For example when you open a .doc file with Word version 2010 or more, you will encounter the text Compatibility Mode which means this mode has been enabled.
You can still edit with this document but some features will be limited. This is to ensure that after editing, it can still be opened with Word 2003. That is the working principle of this Compatibility Mode feature.
However, in reality, for some subjective or objective reason, the mode will not work according to its principle, may appears every time you open Word or generally displayed in a bluff.
Well, to help you solve the problem above, I will guide you on how to turn off the Compatibility Mode also to convert text from Compatibility Mode to normal mode.
II. Turn off Compatibility Mode.
1. Word options setting.
Step 1: Open Word, in File choose Options.
Step 2: Appears the Word Options box. Go to Save. In the Save files in this format section, select Word Document (*.docx). Then OK to save.
2. Delete Normal.dotm
This method works well in case you have multiple versions of Word installed on your computer.
Step 1: Press Window + R to open Run dialog box. Then you enter the command below:
%appdata%\Microsoft\Templates
Step 2: Then delete the Normal file, Word will automatically create a new file and the problem will be solved.
3. Edit in Registry.
If neither of the above methods work then you should try this one, but remember to back up the Registry before doing so.
Step 1: Open Run by pressing Window + R. Enter “regedit” then Enter.
Step 2: Depending on the version of Word you are using, select the appropriate key. The key has the following form:
Word 2007: HKEY_CURRENT_USER\Software\Microsoft\Office\12.0\Word\Options
Word 2010: HKEY_CURRENT_USER\Software\Microsoft\Office\14.0\Word\Options
Word 2013: HKEY_CURRENT_USER\Software\Microsoft\Office\15.0\Word\Options
Word 2016 and Word 2019: HKEY_CURRENT_USER\Software\Microsoft\Office\16.0\Word\Options
Step 3: In the right column:
Find and delete the DWORD named CompatMode
If not found, create a DWORD with the same name and set its value to 0
Step 4: After that reset your computer and the problem has been solved.
III. Switch Compatibility Mode to Normal mode.
Step 1: In File, choose Info, then Convert.
Step 2: A Microsoft Word box appears, just click OK.
You can check at the option Do not ask me again about converting documents if you don’t want the box to appear again in the future.
CONCLUSION
Okay, so I have finished showing you how to handle the problem when Word automatically switches to Compatibility Mode, and in addition, also how to switch Compatibility mode to normal mode as well.
The new version of Word can easily open files created by the old version of Word, but the reverse is not always the case. Then you will have to convert the file extension, which I have made an article to talk about, so check it out if you need it sometimes.
Hope this article will be useful to you. Goodbye and see you in the next posts!
-hhchi
Quite a few of your tips discuss options in Outlook that can only be configured in the Registry.
I see things then like Key, Value name, Value type and Value.
How does it work exactly and what should I do with those values?
Those values represent the location and the construction of the registry key. Let’s walk through it by means of an example;
Key: HKEY_CURRENT_USER\Software\Microsoft\Office\ \Outlook\Preferences
Value name: ShowBcc
Value type: REG_DWORD
Value: 1
Step 1: Open the Registry Editor
The first step is opening the Registry Editor of course. There are various ways to do this but the easiest is to simply search for it in the Start Menu;
- Start-> type; regedit
You can also open the Registry Editor directly by locating regedit in the Windows folder. The default location is;
C:\Windows\regedit.exe
When opening the Registry Editor, you’ll most likely be prompted by User Account Control (UAC). In this case you’ll either have to press Continue or supply administrator credentials.
Step 2: Locate the key
Once in the registry, you’ll have to locate the key. In our example this is;
HKEY_CURRENT_USER\Software\Microsoft\Office\ \Outlook\Preferences
Basically it is just like browsing through a folder tree in Explorer to get where you need to be. In our example you see I’ve written . This is actually not the name of the key but should be replaced with the version number of Outlook that you are using. Click on the link to find out your version number of Outlook if you do not know.
Version 16.0 is used for Outlook 2016, Outlook 2019 and Outlook as part of a Microsoft 365 subscription.
When you get to the Outlook key, it could be that the location behind it (in our example: Preferences) is not there in the registry yet. In this case, you’ll have to create the key via;
Edit-> New-> Key
The ShowBcc key value name in the Preferences key of Outlook in the Registry Editor.
Step 3: Create or edit key values
Once you are in the correct location, you’ll find the key values in that location within the right pane. In our case the key value name is: ShowBcc
If the key value name is not in the right pane, then you need to create it manually. This is where the value type plays a role. In our case: REG_DWORD.
You can create a new key value name of the type REG_DWORD via;
- 32-bit version of Windows
Edit-> New-> DWORD Value - 64-bit version of Windows
Edit-> New-> DWORD (32-bit) Value
Note that sometimes the key value names are case sensitive, in which case you’ll have to use the name exactly as indicated. So in our example, ShowBcc would be correct and ShowBCC or showbcc would be wrong.
There are the following value types and their corresponding name in the Edit menu;
| REG_SZ | String Value |
| REG_BINARY | Binary Value |
| REG_DWORD | DWORD Value or DWORD (32-bit) Value |
| REG_QWORD | QWORD (64-bit) Value |
| REG_MULTI_SZ | Multi-String Value |
| REG_EXPAND_SZ | Expandable String Value |
Step 4: Assign the value
After you have created the key value name with the correct value type, you can assign it its value. In our case; 1.
To set this value, simply double click the created key value name and type it in the Value Data field.
REG_DWORD and REG_QWORD values can be shown or entered in both a hexadecimal form or in a decimal form. Upon opening the value name, you can toggle the between the 2 base types. It is usually either specified or clear whether the value is represented in a decimal or a hexadecimal form. When the value is between 0-9, the base type doesn’t matter. If the value contains letters (between A-F), then it is always hexadecimal.
The REG_BINARY value type works a bit different as well. When you open these, you’ll see it starts with 0000 and if it has a second line , it will be 0008 . These are indicators of how many bytes have been specified. These bytes are in the center and grouped by 2 character ranging from 0-9 and from A-F (hexadecimal). In the right column there is a character representation of the hexadecimal value. Because of the nature of the REG_BINARY key, this could look like gibberish to you. When you need to type in a REG_BINARY value manually, they are usually referring to typing in the middle column only and the value is grouped by two. For instance: 00 00 01 00
Effect of the key
For this particular key the value of 1 means that it will enable the option and a value of 0 will disable it. All other values for this key are ignored and the default is assumed. The default is as if the key did not exist. For this particular key the default is 0 .
Other keys could behave differently though, which is why there usually is a description for the Value of the registry entry as well. In some case, after applying the key, you’ll either need to restart the application or your computer. That is usually specified as well.
In this exercise, we’ll step through how to set Registry permissions via Group Policy. For the purposes of this exercise, we’ll select the default domain policy. However, in practice, you might apply these settings to an OU, a site, or a domain.
1. Click Start | Run, type mmc in the Open text box, and then click OK to launch the Microsoft MMC.
2. Click File | Add/Remove Snap-in.
3. In the Add/Remove Snap-in dialog, click Add. Scroll through the list until you locate Group Policy Object Editor. Click to select then click Add.
4. The Select Group Policy Object Wizard will launch. The default Group Policy Object (GPO) selected is Local Computer. Click Browse.
5. In the Browse for a Group Policy Object dialog, locate Default Domain Policy on the Domains/OUs tab and then click OK.
6. Click Finish to close the Select Group Policy Object Wizard. Click Close to close the Add Standalone Snap-in dialog. Click OK to close the Add/Remove Snap-in dialog.
7. In the left pane of the MMC, click the + to the left of Default Domain Policy to expand the tree.
8. Click the + to the left of Computer Configuration. In the expanded tree, click the + to expand Windows Settings.
9. Click the + to expand the Security Settings. In the list under Security Settings, locate the Registry node. Click to select the Registry node. If there are no subnodes, the tree will not expand but the + will not be displayed, as shown in Figure 9.15.
Figure 9.15 Registry Node in Group Policy Object Editor Snap-In
Figure 9.15 Registry Node in Group Policy Object Editor Snap-In
10. If any Registry policies exist, you can view or modify them here. If none exists, you can add a key.
11. For this exercise, let’s assume you want to limit the ability to run the Regedt32 command. Click Registry, and then on the menu, click Action | Add Key. The dialog, Select Registry Key, is displayed as shown in Figure 9.16.
Figure 9.16 Adding Key to Registry Access
Figure 9.16 Adding Key to Registry Access
12. In the Select Registry Key, three keys are visible: CLASSES_ROOT, MACHINE, and USERS. Click the + to the left of USERS to expand the tree.
13. Click the + to expand .DEFAULT and locate the Software node, as shown in Figure 9.17.
Figure 9.17 Selecting the Software Node
Select Registry Key
Select Registry Key
Expand the Software node, click the + to the left of the Microsoft node, and scroll down until you locate RegEdt32.
Click RegEdt32 to select it and then click OK. The Database Security for Users\.DEFAULT\Software\Microsoft\RegEdt32
dialog is displayed. You can now view or modify permissions for this key, as shown in Figure 9.18. The Administrators group is selected by default and has Full Control and Read permissions set to Allow by default.
Figure 9.18 View or Modify Permissions for Registry Key
Database Security loi USERSVBEFÀULT\Su[lwdi(AMi. |
Administrators (S MALLBU S INE SS Administrators)
Group oi user names:
CREATOR OWNER fJJ SYSTEM
permissions for Administrators
For special permissions or for advanced settings, click Advanced
For special permissions or for advanced settings, click Advanced
16. Click Users and notice that in the Default Domain Policy, Users permissions are set to allow Read only, shown in Figure 9.19.
Figure 9.19 Users Permissions Set to Read Only by Default
Database Secuiitv foi UbLHSVLIEI-AJL I \Sollwarc\Mi. |
Security | Group or user names:
£ Administrators (SMALLB US I NE SS Administrators] 3 CREATOR OWNER S SYSTEM
Permissions for Users
Permissions for Users
For special permissions or for advanced settings. Advanced click Advanced. -—-
17. Users need to be able to read the Registry in order to perform normal system tasks, but they do not have the ability to modify the Registry in any way.
18. You can access Advanced settings to modify how permissions are inherited, to set auditing, or to change or delegate ownership as well. Remember, these settings will be applied via group policy. These options are shown in Figure 9.20.
Figure 9.20 Advanced Settings Options
Figure 9.20 Advanced Settings Options
Click Cancel to exit the Advanced Settings dialog without saving changes, or click OK to accept any changes you’ve made.
Click OK (or Cancel) to exit the Database Security for Users\.DEFAULT\Software\Microsoft\RedEdt32b dialog.
When you click OK, you will be prompted by an Add Object dialog. The default setting is Configure this key then. Propagate inheritable permissions to all subkeys. You can also select Configure this key then. Replace existing permissions on all subkeys with inheritable permissions. These two options were discussed in the previous exercise. The third option is to select Do not allow permissions on this key to be replaced. These options are shown in Figure 9.21.
Figure 9.21 Modifying Permissions for the RegEdt32 Registry Key
Figure 9.21 Modifying Permissions for the RegEdt32 Registry Key
22. If you want to modify permissions, you can click the Edit Security button. Otherwise, click OK.
23. In the MMC, you now have an object listed in the right pane, which should reflect the Registry key we just added USER\DEFAULT\ Software\Microsoft\RegEdt32, as shown in Figure 9.22.
Figure 9.22 Default Domain Policy with RegEdt32 Permissions Specified
Figure 9.22 Default Domain Policy with RegEdt32 Permissions Specified
24. For the purposes of this exercise, we’ll want to delete this key to leave the Default Domain Policy in its original state. Click the object, click the red X on the menu, or right-click and select Delete.
25. A Security Templates alert is displayed asking Are you sure you want to delete USERS\.DEFAULT\Software\Microsoft\RegEdt32? Click Yes to delete the key. Note that this does not delete the key from the Registry; it simply deletes the object from the policy.
26. Click File | Exit to exit the MMC. Click No when prompted to Save console settings.
Was this article helpful?
Recommended
Advanced Registry Cleaner PC Diagnosis and Repair
Q: I am having a problem trying to update the registry. I am using the New-ItemProperty cmdlet, but it fails if the registry key does not exist. I added the –Force parameter, but it still does not create the registry key. The error message says that it cannot find the path because it does not exist. Is there something I am not doing? I include my script so you can see what is going on. Help me, please?
A: Let’s look at how you can use PowerShell to add or update any registry key value.
The Registry
Before answering the query, let me cover some of the background basics. You probably already know this but I start with a look at the Registry and how PowerShell providers relate to the query. I hope this is not too basic!
In Windows the Registry is a database of configurations information used by Windows and Windows applications. The registry is critical to the operation of Windows – I learned that long ago (and got practice reinstalling Windows NT). Using the registry editor can be dangerous, so be careful!
The registry is a set of hierarchical keys – a registry key can have zero, or more sub-keys, and so on. Each key or sub-key can have zero or more value entries. Each value entry has a data type and a data value. Any registry key can have values of any data type. The registry allows you to create any key and to put pretty much any kind of data into a value entry.
The registry is implemented in Windows as a set of registry hives. A hive is a logical group of keys, sub-keys, and values in the registry. Each hive has a set of supporting files that Windows loads into memory when the operating system starts up or a user logs in. For more details about registry hives see the Registry Hives on-line help text.
Ever since Windows NT 3.1, it is easy to edit the registry using the built in registry editor – regedit.exe . Windows NT also had the reg.exe command that allowed you to manage the registry programatically and you can still usew it today. You can also use the WMI to access WMI, as shown in this excerpt from Richard Siddaway’s book PowerShell and WMI.
For IT Pros using PowerShell, the Windows PowerShell team, created a very simple way through the use of the Registry provider which is the focus of this article.
Providers and the Registry Provider
Windows contains a number of data stores that are critical to the operation of Windows and Windows applications. These data stores include the registry, as well as the file store, the certificate store, and more. The developers of PowerShell, when faced with the challenge of enabling IT Pros to access all this information had two main options.
The first option was to create a huge number unique cmdlets for each data store This would be a lot of work and would be almost certain to introduce inconsistencies. The second option was to use an intermediate layer, the provider, which converted the data store into something resembling the file store. With the provider you use the same command(s) to get access the registry, access files and folders, etc.
To discover the providers on your system, you use the Get-PSProvider cmdlet like this:
Provider Drives
With a provider, you can create a drive that allows access to part of one of the provider-based data stores. For the filestore provider, PowerShell provides you with provider drives pointing to the Windows volumes in your system, such as C:, D:, etc. You can also create a provider drive called DB: that points to D:\Dropbox by using the New-PSDrive cmdlet. You can persist the drive name by adding the statement to your profile should this be useful.
With the registry provider, PowerShell provides you with two built-in drives: HKLM: and HKCU: . The HKLM: drive exposes the local machine registry hive – which you (and Windows) use for system wide settings. You use the HKCU: drive to access the current user’s registry hive.
You can discover the provider based drives by using the Get-PSProvider cmdlet, like this:
Some Windows features come with additional providers, such as the the ActiveDirectory RSAT module. This feature includes an AD provider:
Registry Value Entries
As I mentioned above, a registry key can contain value entries. You can think of each value entry as an attribute of a registry key. You use the *-ItemProperty cmdlets to manage individual registry values. But how does this relate to the question? Let’s begin by looking at the script in question:
The script used the New-ItemProperty to create a Version value entry to a specific key. This script, however, fails since the registry key, specified in $RegistryPath variable does not exist.
A better approach is to test the registry key path first, creating it if needed, then setting the value entry, like this:
A small word of warning
Playing with the registry can be dangerous. This is true when using both the Registry Editor and the PowerShell commands. Be careful!
Summary
It is easy to change add registry keys and values. You can use the New-Item cmdlet to create any key in any registry hive. Once you create the key, you can use New-ItemProperty to set a registry value entry.
Tip of the Hat
I based this article on one written for the earlier Scripting Guys blog Update or Add Registry Key Value with PowerShell. It was written by Ed Wilson.
Account Information
Share with Your Friends
How to change ownership of files and folders in Windows 10
How to change ownership of files and folders in Windows 10
Changing file or folder ownership in Microsoft Windows 10 requires a deep dive into Properties Settings.
When you create a file or a folder in Microsoft Windows 10, you are designated the owner of that file or folder by default. Ownership grants you permissions power regarding who can access and modify that file or folder. It is an important responsibility in a collaborative environment where many people may be required to access a specific document.
Must-read Windows coverage
- Get Microsoft Office for Windows with this lifetime license
- Kaspersky uncovers fileless malware inside Windows event logs
- How to find your Windows 11 product key: 3 simple methods
- How to enable access to god-mode in Microsoft Windows 11
However, there are times, particularly within a dynamic business environment, when file or folder ownership must be changed to someone else. Changes in personnel and changes in project responsibility are just two examples when document ownership may have to be transferred. The process can be completed by the current owner of a file or folder, or by an individual with proper system administration credentials.
This how-to tutorial shows you how to take ownership of a file or folder in Microsoft Windows 10. This article updates Quick Tip: Take ownership of files and folders in Windows, which was published in January 2011.
Take ownership of a file or folder
To start the change of ownership process, activate Windows File Explorer and navigate to the specific file or folder to be changed. Right-click that file and then click the Properties item in the context menu. Click the Security tab to reveal the screen shown in Figure A.
As you can see, I currently have full control over this file. Click the Advanced button to reach the screen where ownership may be changed (Figure B). Click the Change link to make your ownership changes and note that you may have to provide administrative credentials to continue further.
As you can see in Figure C, the system will then ask you to enter a valid username. You can click the Advanced button on this page to reveal a query box that you can use to search for valid usernames. (Note: I am the only user so there are no other names to choose from.)
If you are making an ownership change to a folder, you will also have the opportunity to apply that change to all of the sub-folders and files located in that folder.
In addition to changing ownership (Figure B), you can also review who has permission to access the file or folder, and how the file or folder is shared. Collaboration and sharing have become important concepts for business operations since this tip was originally published in 2011. However, making changes to the share settings will require a different application.
Windows Registry tweaks
It is possible to include ownership functions as part of the context menu for a file or folder, thus avoiding the necessity to wade through so many settings screens. The tweak could be a time saver for many system administrators. The process requires a rather involved set of Windows Registry changes, which we will explain in a follow-up article.
By: Waseem Patwegar
Not being able to login to your computer due to Corrupted User Profile can be quite frustrating. You will find below the steps to Fix Corrupt User Profile in Windows 10.
Corrupt User Profile in Windows 10
According to Microsoft, User Profile can get corrupted if the Antivirus program on your computer was busy scanning the PC while you were trying to Login to your User Account.
Apart from this, there could be many other reasons for Corrupted User Profile in Windows 10.
If the User Profile is Corrupted, you won’t be able to login to your User Account. You can either Login to another User Account (with Admin privileges) or boot your computer in Safe Mode and use any of the following methods.
- Fix Corrupted User Profile Using Registry Editor
- Create New User and Transfer Files from Old to New User Account.
1. Use Registry Editor to Fix Corrupt User Profile in Windows 10
Login to another User Account (With Admin Privileges) or boot your computer in Safe Mode and follow the steps below to Fix Corrupted User Profile in Windows 10.
1. Right-click on the Start button and click on Run .
2. On the Run Command window, type regedit and click on OK .
3. On the Registry Editor screen, navigate to HKEY_LOCAL_MACHINE\SOFTWARE\Microsoft\Windows NT\CurrentVersion\ProfileList .
4. Open the ProfileList Folder and you will see Folders starting with S-1-5. Each of these Folders represents a User Profile or a User Account created on your computer.
Now, the task is to identify the right S-1-5 Folder that belongs to the Corrupted User Profile. You can do this by clicking on each S-1-5 Entry and taking a look at the “Data” Column for ProfileImagePath Entry.
As you can see in above image, the “User Name” is visible in the “Data” Column for ProfileImagePath Entry.
5. Once you find the right S-1-5 Folder , double-click on the State Field in the right pane. This will launch an Edit DWORD Window.
6. On the Edit DWORD Window, change the Value Data from 1 to 0 and click on the OK button.
7. Similarly, double-click on RefCount entry and change the Value Data from 1 to 0 .
If you cannot find “RefCount”, right-click anywhere (blank space) in the right pane > click on New > DWORD (32 bit) and type RefCount as the Name for this New DWORD.
8. Close the Registry Editor and Restart your computer.
After this, you should be able to Login to your User Account.
2. Create A New User Account
Another method to Fix Corrupted User Profile in Windows 10 is to create a New User Account and transfer Files from Old to New User Account.
In case you have an alternate Admin Account that is not blocked, you can straight away Login to your Spare Admin Account and create a New User Account.
However, if your Admin Account is blocked, you can follow the steps below (2.1) to get access to Hidden Admin Account that Microsoft makes available for such occasions.
2.1 Access Hidden Admin Account
1. Start your computer in Safe Mode.
2. Next, right-click on Start and click on Command Prompt (Admin) .
3. In the Command Prompt window, type net user administrator /active:yes and press the Enter Key on the Keyboard of your computer.
4. You will see a message reading “ The command completed successfully “.
5. Now, Restart your computer and you will be able to login to the Secret Admin Account that you just activated.
2.2. Create New User Account
When you reboot your computer after enabling the Hidden Admin Account, you will be able to see both your New Admin Account and also the Corrupted User Account.
Login to the secret Admin Account (no password required) and follow the steps below to create a New User Profile on your computer.
1. Go to Settings > Accounts > click on Family & other users > Add someone else to this PC .
2. Follow the instructions to create a New User Account .
Note: You can either create a New User Account that is linked to your Microsoft ID or create a local user account that is not linked to Microsoft ID.
Important: The Account Name of the New User Account needs to be different from the Corrupted User Account. Later on you can Rename the Account (if you want to maintain the same User Name as before).
2.3. Transfer Files From Old to New User Account
Now the last and final step is to Transfer all your required files from Old to New User Account.
1. Go to Users Folder located at C:/Users.
In this Folder, you will find sub-folders for every User Account on your computer, including the User Account with Corrupted User Profile and the New User Account that you had just created.
3. Open the Corrupted User Profile Folder and copy Desktop, Contacts, Downloads and other Files that you want to transfer to the New User Account.
Important: Do not copy the entire User Folder, as you will end up copying the following hidden system files that are related to your Corrupted User Profile.
- Ntuser.dat
- Ntuser.dat.log
- Ntuser.ini
4. Next, open the New User Account Folder (located at C:/Users) and Paste the Files into the New User Folder.
Now, Login to your New User Account and you will be able to see all the Files from your Corrupted User Account.
Your new User Account will not be exactly the same as your old account, you will still need to change your desktop background, create Folder/Program shortcuts as required by you.
User template is designed to format a specific type of document and allow you start writing immediately. Therefore you can save much time and effort by using user template to create similar document. It is unfortunate the Microsoft does not make it easy to modify the template. The first step in modifying template is to open the template location to load one. This tutorial will show you two methods to open the user template location.
Recommended Productivity Tools for Word
Open user template location manually
Amazing! Use Efficient Tabs in Word (Office) like Chrome, Firefox and New Internet Explorer!
There is no easy way to open template location. Normally, we open user template location manually.
Step 1: In Word 2010 and 2013, click File > Options > Advanced;
In Word 2007, click Office Button > Word Options > Advanced.
Step 2: Click File Locations to bring up the File Locations dialog. In the File Types list, choose User Templates. If the path for the templates is short enough, you may be able to see it in the dialog box right now. If so, you can skip steps 3 .
Step 3: Click the Modify button (even though you won’t be modifying anything.). Word displays the Modify Location dialog. The Look In drop-down list, at the top of the dialog box, contains the current path name used for templates. Select the path and copy it.
Step 4: Click File > Open, then paste the user template file location in the address bar of Open dialog box and press Enter button to open the location. In the file type dropdown list, select All Files.
Open user template location with Kutools for Word
Actually there is a very easy and convenient way to open the user template location.You don’t need to apply the tedious operation as above showing. After you have installed Kutools for Word, you can open user template location with just one click.
Kutools for Word, a handy add-in, includes groups of tools to ease your work and enhance your ability of processing word document. Free Trial for 45 days! Get It Now!
1. Please click Kutools > More > Open User Templates Locations. See screenshot:
2. Then the user templates location will be opened.
For more detailed information about Open User Template Folder of Kutools for Word, please visit: Open User Template Folder description.
Windows Hello is a Biometrics based technology that enables Windows 10 users to authenticate secure access to their devices, apps, online services, and networks with just a fingerprint, facial recognition, PIN, or iris scan. It is a relatively new way to log into your Windows 10 Computer without a Password or Passcode. Windows hello is a more user-friendly, secure, and reliable method to access critical windows devices and services. Not all the PC has Windows capability. Windows hello requires specific hardware requirements. Most of the Modern PCs and Laptops support Windows hello. You can set up Windows 10 Hello PIN using the PIN sign-in option from windows settings. If you’re on Windows 10 version 1607 or later and joined to Active Directory domain, then you are not able to add PIN. This Sign-in Option will be greyed out sometimes, if you’re experiencing the same issue, you can use the registry editor method to set up Windows Hello PIN. Microsoft Says You cannot configure a PIN When Convenience PIN and Hello for Business Policies are Enabled.
Setup Windows Hello PIN Using Registry Editor:
Note: Modifying the Registry is risky, and it causes irreversible damage to your OS Installation Follow the steps correctly. Friendly advice Before Modifying Registry Creating Restore Point is recommended.
Open Run command by pressing Windows + R and type Regedit and hit enter. This command will open Registry Editor Console.
Now Navigate to the following Path.
HKEY_LOCAL_MACHINE\SOFTWARE\Policies\Microsoft\Windows\System
From the Left-hand side click on the System and from the Right-hand side right-click on an empty area and choose New > DWORD (32-bit) value. And name the DWORD as AllowDomainPINLogon.
Double click on AllowDomainPINLogon DWORD and Modify the value from 0 to 1.
Click on OK and Restart the system once. After restart, you can see the PIN option.
The latest Preview version of Outlook 365 for Windows includes a cloud storage option for settings. Which settings are being saved?
Customers have long wanted the ability to share Outlook settings, especially Signatures, across different installations of Outlook. That’s now coming though the vital details aren’t easily available.
In recent Outlook 365 for Windows previews you might see this pop-up message.
At the moment, saving Outlook settings to the cloud is an option, though it appears that it’ll default on at some future time.
Change Outlook cloud storage options
The choice ‘Store my Outlook settings in the cloud’ is at File | Options | General .
Here’s the little Microsoft has disclosed about the feature.
“A new option found under General Cloud storage options that allows users to choose if they would like to store their Outlook settings in the cloud. This will enable a number of capabilities such as Privacy Settings and Focus Inbox to be consistent if they use Outlook on multiple computers and eventually Outlook on the web and mobile. “
Microsoft doesn’t properly document changes beyond some hyped up broad statements. It’s an all too common problem with new features in Office.
This option is apparently related to shared Signatures it’s not certain from the muddled info coming from Microsoft.
Tony Redmond quotes Microsoft saying these are some of the ‘example settings’ saved to the cloud.
General
Make Outlook the default program for email
Mail
Editor options like default format for messages (HTML, plain text, etc.).
Mail also includes signatures, now stored in user mailboxes.
Calendar
When the working day starts and ends
Groups
Attachment option for messages.
People
Display user photos alongside messages.
Tasks
Default reminder time for tasks.
Search
Where to search (current folder, mailbox, or all mailboxes),
Ease of Use
Suggest names to mention when @ is typed in message text.
Advanced
What folder to display when Outlook starts.
There are a few problems with this list. It’s not complete, it’s just ‘example settings’. That Microsoft list doesn’t mention either Privacy Settings nor Focused Inbox which are specifically mentioned elsewhere by the company.
Customers are entitled to know exactly what is saved to the cloud and how it will be used.
Exchange Server only?
Saving Outlook settings seems to require an Exchange Server mailbox (because that’s where the settings are saved). That may or may not include accounts.
Profiles?
How are Outlook Profiles handled by cloud saving of Outlook settings?
Again, not a word from Microsoft.
Test docs and software
This feature is in late testing to ‘Insiders’ which is no excuse for a lack of documentation. For such an important change, with data privacy implications, the customer documentation should be part of the testing just as much as the software itself.
Taking advantage of Microsoft Word’s proofing and editing options can help you maintain a scholarly level of writing and complete the dissertation process more quickly. For many writers, it is hard to focus on the minute details, including spacing between sentences and whether the use of affect or effect is correct. With so much emphasis on the content and making sure one’s ideas and findings come across clearly, the meticulous details often fall by the wayside. However, Microsoft Word has various built-in features to help combat formatting and grammatical errors. Through this blog, I specifically reference features in Word 2016, but many of these features are available and similarly labelled in earlier versions.
Discover How We Assist to Edit Your Dissertation Chapters
Aligning theoretical framework, gathering articles, synthesizing gaps, articulating a clear methodology and data plan, and writing about the theoretical and practical implications of your research are part of our comprehensive dissertation editing services.
- Bring dissertation editing expertise to chapters 1-5 in timely manner.
- Track all changes, then work with you to bring about scholarly writing.
- Ongoing support to address committee feedback, reducing revisions.
The first step to turning on the proofing and editing features is knowing how to access these options. The quickest way to access this is to go File à Options (should be at the bottom of the File drop-down). After selecting Options, a more in-depth panel should appear that includes a new list of options to choose from (see Figure 1). The Proofing option should appear on the left; in Word 2016, this option is the third down from the top.
Figure 1. Word Options panel.
Within the Proofing tab, there are various formatting choices that one can make, depending on school and formatting guideline requirements. If following APA style, make sure that the Dictionary is set to English (United States). To check this, click on the Custom Dictionaries… button and under the Dictionary language drop-down and select English (United States). This will ensure that Microsoft Word is checking the proper spelling of words throughout the entire document.
As shown in Figure 1, it is best to select all of the options in the section titled When correcting spelling and grammar in Word, such as Check spelling as you type. This will help limit spelling errors while writing, instead of conducting one long spell-check at the end of the document—which can be daunting when the document contains more than 100 pages of text! At the bottom of this same section, there is a drop-down menu to the right of Writing Style. At this drop-down menu, make sure Grammar & Style is selected (you want to check both, not just grammar). To the right of this drop-down, there is a button titled Settings… This option is very important to choosing the basic style or formatting elements required by APA or the university style guide.
Under Settings. . . it is generally best to select all options and then decide whether you agree or not when Microsoft Word flags them throughout the document (see Figure 2). For example, you may not care about Date Formatting, but do want to check for the use of Comma Missing after Introductory Phrase (which is an APA requirement, e.g., According to Author,).
Figure 2. Grammar settings in Microsoft Word 2016.
Make sure to scroll through and read the options, as you may be surprised to learn the lengthy list of grammar and style elements that Microsoft Word will automatically change or highlight as errors. At the bottom of the Options, there is a section titled Punctuations Conventions. Per APA, make sure the Oxford Comma box is selected, the Punctuation Required With Quotes is set at inside, and the Space Between Sentences is set at one space OR two spaces (see Figure 3). APA prefers two spaces between sentences; however, most university guidelines require one space between sentences. Either way, it is best to keep this formatting consistent throughout and selecting this feature will ensure that Microsoft Word underlines any spacing between sentences that do not meet this requirement. Select OK when you have finished reviewing and choosing the options.
Figure 3. Grammar settings continued.
As a final step, and to verify that you have applied these settings to the document you are working in, select the Recheck Document button (see bottom of Figure 1) and then choose Yes when presented with a prompt. Before closing out of the Word Options box, Proofing settings, verify that the Hide spelling errors in this document only and Hide grammar errors in this document only options are NOT selected. Having either of the boxes checked will essentially turn off Microsoft Word’s spelling and grammar check features.
I hope this blog has been helpful and informative! Knowing how to turn on and navigate these basic grammar and formatting features will help speed up the editing process and decrease the number of errors that may hold back your dissertation from advancing toward publication.
Keeping the desktop clean is important to access the files easily and speed up the booting time of your PC. However, most of us add many files on the desktop to make it clutter. In addition, visually finding a file will become a difficult task with too many icons on a desktop. Some solutions to clean up the desktop include arranging the icons with sufficient spacing and adjusting the size to make them readable. In our earlier article, we have explained how to increase or decrease the Launchpad icon size on Mac. In this article, let us explore how to change desktop icons size and spacing in Windows 10.
Adjusting Desktop Icons in Windows 10
You have different options in Windows 10 to setup the desktop icons as per your preference. Two main attributes you can modify are the size and the spacing of the icons.
Change Desktop Icons Size
In order to change the icons size, right-click on any empty area of your desktop. Click on the “View” option to expand the menu.
By default, Windows will setup the icons as medium size. However, you can change the size to smaller or larger as per your preference. Remember, even when you have fewer icons, setting up the size as larger will occupy the entire screen. Only use the larger size when you have visual problem to read the captions.
Grid Layout
Other than resizing, you can also align the icons properly using auto arranging and align to grid options.
- Grid layout will force the icons to align in a grid, which means you cannot freely place the icons on different place. When you drag and drop the icons, it will automatically aligned to the grid position (horizontally and vertically). Disable this option if you want to keep icons on different positions on the desktop.
- Auto arranging will force the icons to align in the column and row format. When enabled, placing icons anywhere on the desktop will auto arrange to the columns.
Changing Icons Spacing
We recommend enabling the grid layout in order to have good looking and avoid overlapping of icons. In grid layout, the spacing between the icons remains same regardless of whether you keep the smaller, medium or larger icons on your desktop. By default, Windows assigns the desktop icon spacing value as -1130 units for both the horizontal and the vertical spacing to keep the space between icons. Unfortunately, you cannot change the horizontal or vertical spacing between the icons with the context menu. However, you can easily change the spacing by using the registry editor.
- Press “Win + R” shortcut keys on the keyboard and open Run dialog box.
- Type “regedit” and enter to open RegistryEditor.
- Go to the path “HKEY_CURRENT_USER > Control Panel > Desktop > WindowMetrics”.
- After opening “Window Metrics” double click on “Icon Spacing”
- Modify the “Value data” of horizontal spacing from -1125 to any value between -480 to -2730.
- -480 is the minimum spacing and -2780 is the maximum spacing allowed in Windows.
- Click “OK” to save your changes.
- In order to adjust the vertical spacing all you need to do is double click on “IconVerticalSpacing” key. Similar to horizontal icon spacing, set any value between -480 to -2730. Click “OK” to save changes.
- Restart your computer to view the change in spacing on desktop icons.
In cash if the spacing is not looking good, you can modify or reset to original values by following the same process.
Other Options for Adjusting Icons
In addition to adjusting size and space, you can do the followings to control the visibility.
- Right click on the desktop and disable “Show desktop icons” option under “View” menu. This will completely disable all icons on your desktop. You can toggle the option to make the icons visible again.
- Choose “Display Settings” on the right click context menu to go to the Windows Settings app. In “Display” section, you can adjust the font size, resolution and orientation of the monitor display.
Wrapping Up
Windows 10 is a comprehensive operating system that offers many features to customize the desktop icons and spacing. You can change the size and display with the frontend setting. However, you need to adjust the spacing by modifying registry keys as explained above.
Occasionally, your toolbars and/or menu bar may disappear when you start Microsoft Word 2000. There are several possible causes for this:
- Word is running in full-screen mode.
- A macro is running when you start Word.
- Another program or Word add-in has modified the user interface.
- The Windows registry key that stores the display settings for Word is damaged.
Full-screen mode
If you exited Word while it was running in full-screen mode, it may still be in this mode. To restore the toolbars and menus, simply turn full-screen mode off. From within Word, press Alt-v (this will display the View menu), and then click Full-Screen Mode . You may need to restart Word for this change to take effect. If Alt-v does not reveal the View menu, continue with the following steps.
Macro running when you start Word
To determine whether a macro is running when you start Word, try starting Word from the command line, as follows:
- Click Start and then Run. .
- Enter the path to winword.exe . This is typically:
- If Word starts correctly, the problem is that a macro is running when you start Word.
If you have determined that a macro is starting with Word, you are most likely starting Word from a shortcut on your desktop. To fix this, modify the shortcut to prevent the macro from starting, following the steps below:
- Right-click the shortcut, and from the menu that appears, choose Properties .
- Click the Shortcut tab.
- Look at the “Target:” box for a command line similar to the following, where /mmacroname is the name of a macro:
- If you see /mmacroname on the command line, remove it, and then start Word normally.
Modified user interface
To determine if another program or a Word add-in has modified the interface, follow these steps:
- Click Start and select Run. .
- Click Browse .
- Use the “Look in:” box to locate Winword.exe , and then click to select it.
- Click Open .
Note: This step fills in the “Open:” box in the Run dialog box.
Click inside the “Open:” box after the text:
Note: The path to the Winword.exe file in the Run dialog box is enclosed in quotation marks. Be sure to click to the right of the closing quotation mark.
If the steps above solve the problem, your global template may be corrupt. /a switch, as described above, your toolbar settings will never be saved after you exit Word. –> To prevent formatting, AutoText, and macros that are stored in the global template ( Normal.dot ) from affecting the behavior of the program or documents that are opened, rename your Normal.dot file.
Renaming your Normal.dot template allows you to quickly determine whether the Normal template is causing the problem or behavior. Renaming this template resets several options back to the default settings, including custom styles, custom toolbars, macros, and AutoText entries. For this reason, Microsoft strongly recommends that you rename the Normal.dot file.
Certain kinds of configurations may create more than one Normal.dot file. These situations include cases in which there are multiple versions of Word on the same computer, or several workstation installations on the same computer. In these situations, be sure to rename all copies of Normal.dot .
To rename the Normal.dot file, follow these steps:
- Quit all instances of Word. If you use Word as your email editor, be sure to quit Microsoft Outlook also.
- Click Start and select Find (in Windows 2000 or XP, select Search ), and then Files or Folders .
- In the “Named:” box, type Normal.dot .
- In the “Look in:” box, select your local hard disk (or an alternate user template location if you are running Word from a network server).
- Click Find Now to search for the file.
- For every Normal.dot file that appears in the Find dialog box, right-click the file. From the menu that appears, select Rename . Enter a new name, such as OldNormal.dot or Normal-1.dot .
- To close the Find dialog box, from the File menu, select Exit . Then restart Word normally (without using the /a switch).
Damaged registry key
If the problem persists, the Windows registry key that stores Word’s default display settings is probably damaged, and the key will have to be renamed.
Renaming the Data key resets several options to the default settings, including the Most Recently Used (MRU) file list on the File menu and many settings that you customize when you click Options on the Tools menu. Word rebuilds the Data key by using built-in default settings the next time you start Word.
To rename the Data key, follow these steps:
- Quit all Windows applications.
- Click Start and select Run. .
- In the “Open:” box, type regedit and click OK .
- Locate the following key by double-clicking the appropriate folders:
- With the Data folder selected, from the Edit menu, select Rename .
- Enter a new name for the Data folder, for example:
- To close the Registry Editor, from the Registry menu, select Exit . Restart Word normally (without using the /a switch).
If Word starts correctly, you have resolved the problem. You may need to change a few settings to restore the options you had selected.
The information in this article is adapted from article 242368 in Microsoft’s knowledge base.
This is document ajln in the Knowledge Base.
Last modified on 2018-01-18 13:04:28 .
Administrators can perform all typical registry operations using either the old-good “Regedit” user interface or the reg.exe utility. But there is another option — Windows PowerShell. PowerShell provides a large set of tools for interacting with the Microsoft Windows registry, either on the local machine or remotely.
In this article, we’ll show how to get, edit, create and delete registry keys with PowerShell, perform a search, and use PowerShell to connect to the registry from a remote computer.
Getting Registry Key Values Locally with PowerShell
To get the values of all the registry keys on a local machine, we first have to find the path to the registry. Let’s get a list of all the local drives:
As you can see, there are two entries for the registry: HKEY_CURRENT_USER (HKCU) and HKEY_LOCAL_MACHINE (HKLM). These are two logical groups of keys, or “hives,” in the registry.
Therefore, we can navigate to the local machine registry root key by running the following command:
Alternatively, we can set our current working location to a particular path in the registry using the Set-Location cmdlet:
Then we can use the Get-ChildItem cmdlet to output all the registry keys in the current hive with their properties:
To get the parameters for a specific key (such as the Run key), we would use Get-Item cmdlet, specifying the path:
Getting Registry Key Values Remotely with PowerShell
PowerShell enables you to connect to a computer’s registry remotely and view it using WinRM. To do that, you need to use the Invoke-Command cmdlet:
Editing the Registry Remotely with PowerShell
To edit a registry remotely, we first need to connect to it using Enter-PSSession cmdlet:
The system will prompt you for the password for the user account you specified. After authentication, you will be able to use PowerShell commands on the remote computer.
Searching in the Registry with PowerShell
To find particular keys in the registry, use a script like the following, which searches the registry for keys that contain “Netwrix” in their name:
Editing the Registry with PowerShell
If we want to change one of the parameters for a registry key, we need to use the Set-ItemProperty cmdlet. For example, we could use the following command to set a new string value for the “VMware User Process” parameter of the “Run” key:
Creating a Registry Key with PowerShell
To add a key to the registry, we need to use the New-Item cmdlet. Let’s create a new key named “NetwrixKey” in the KEY_CURRENT_USER hive:
And now let’s create a parameter called “NetwrixParam” for our new key and set its value to the string “NetwrixValue”:
Let’s have a look at it in the registry:
Deleting a Registry Key or Parameter with PowerShell
Now let’s delete the “NetwrixKey” parameter we just created using the Remove-ItemProperty cmdlet:
And then let’s remove the key “NetwrixKey” itself:
The –Recurse parameter authorizes PowerShell to delete all the subkeys without additional confirmation (of course, we didn’t create any subkeys in this example).
If you want to delete all subkeys inside the specified key without deleting the key itself, you should add the “*” symbol at the end of the path:
Renaming a Registry Key or Parameter with PowerShell
To rename a registry key, use the Rename-Item cmdlet:
To rename a parameter of a registry key, use the Rename –ItemProperty cmdlet:
Conclusion
Now you know the basic registry management capabilities of Microsoft Windows PowerShell. As you can see, registry key management is rather easy and fast — but remember, that even one little change can lead your operating system to the blue screen of death.
Therefore, before you make any changes to the registry, you should be 100% sure of what you are changing, have current backups of your system and data, and track all the changes you make. Netwrix Auditor for Windows Server can help; it tracks, reports on and alerts on changes to the Windows registry.
Microsoft Office uses the language of the system to display interface elements usually. That’s usually what users of the program want, but some users may want it to use a different language instead.
I for instance prefer to run the English version of Microsoft Office. The reason is simple: whenever I write an article about Office, I need to use the English terms for menus and options as I write these articles in English.
It would not do anyone good if I would reference these in German, as users would not be able to locate those in the interface. Changing the language may also be useful if you write in different languages regularly.
Office distinguishes between three areas where language may be changed:
- The user interface includes all menus, buttons, preferences, and basically any text that is displayed as part of the interface.
- Proofing tools are used to check the grammar and spelling of text.
- The editing language in which content is edited.
How to change the language of Microsoft Office
It is a good idea to check the available options in Office directly first before you start installing new language packs for the application.
You do that with a click on File > Options, and the selection of Language from the sidebar menu. Note that what you change here applies to all Office applications, not just the one you opened the language preferences in.
There are two main language configuration options on that page. You can change the editing languages (which include proofing), or change the display language.
It is rather easy to add another editing language to Office. All it takes is to pick one of the available languages from the “add additional editing language” menu, and click on the add button to add it.
If I wanted to add Australian English to Office, I’d simply pick the language from the menu and click on the add button to do so.
You can remove editing languages by selecting them and hitting the remove button, and set one language as the default.
Changing Office’s display language
Changing the display language is not as straightforward as changing editing languages in Office. Microsoft recommends that you change the system language to the desired language if you want to change Office’s interface language permanently.
Here is a short guide on how you do that:
Windows 10
- Select Start > Settings > Time & Language > Region & Language.
- Pick “add a language”.
- Select the language from list of supported languages. Windows 10 starts the download right away.
- You can switch between languages with a click on the language abbreviation in the System Tray area of the system.
Windows 8.1
- Open the PC Settings.
- Select Time and Language > Region and Language.
- Select “Add a language”.
- Pick the language from the list to add it to the system. You may get a “language pack available” notification. Click on options if that is the case, and then on download.
Windows 7
- Select Start > Control Panel > Clock, Language and Region > Region and Language.
- Select Keyboards and Languages.
- Click on install/uninstall languages, and follow the instructions to install a language.
With that out of the way, head over to the Language Accessory Pack for Office page on the Office website.
Select your Office version (2016, 2013 and 2010 are available), and then the language that you want to add to Office.
This comes in form of a executable file that you need to run after the download completes. It installs the language, so that you may select it in the language preferences and make it the default language of Office.
Change Local user account password on Windows 11!
Let’s admit it; Windows 10 is right now the best and most popular desktop operating system. From security options to infinite sets of tools, Microsoft’s Windows offers you everything.
The same sets of features were also seen on Microsoft’s latest desktop operating system – Windows 11. If we talk about security, Windows 11 provides you with a built-in antivirus, multiple sign-in options, and more.
While installing Windows 11, Microsoft asks users to create a local account. Although local accounts can be created in easy steps, managing multiple accounts could be complicated.
Also, users should change their login passwords every three months. Just like Windows 10, Windows 11 also lets you change passwords on Windows 11 in easy steps. So, if you have already set a password for your device and want to change it, you are reading the right guide.
2 Methods to Change Local User Account Password on Windows 11
Hence, this article will share some of the best methods to change passwords for a local account in Windows 11. Let’s check out.
1. Change Windows 11 Password via Settings
In this method, we will use the Settings app to change the Windows 11 Local account password. Here’s what you need to do.
1. First of all, click on the Windows 11 start button and select Settings.
2. On the Settings page, click on the Accounts option, as shown in the screenshot below.
3. On the right pane, click on the Sign-in options as shown in the screenshot below.
4. Now, under the Ways to log in section, expand the Password option.
5. Now click on the Change button behind. You’re all set up.
6. On the next page, you will be asked to enter your current password. Enter the password and click on the Next button.
7. On the next Window, enter the new password, confirm the password, and set the password hint. Once done, click on the Next button.
8. On the next page, click on the Finish button.
That’s it! You are done. This is how you can change passwords for a local account on Windows 11.
2. Change Password via CMD
You can also utilize the Command Prompt to change the Windows 11 local account password. For that, you need to follow the guide we have shared – How to Change Windows Password via CMD (Command Prompt)
It’s much faster to change Windows 11 passwords through the command prompt; you need to execute the correct commands.
So, this guide is all about how to change the Windows 11 login password. I hope this article helped you! Please share it with your friends also. If you have any doubts related to this, let us know in the comment box below.
While recently battling an old NeuLion web interface, I was challenged with changing the “Require server verification (https:) for all sites in this zone” checkbox in Internet Explorer’s Trusted Sites options:
I needed to do this to a large number of domain-joined workstations, but strangely enough after much searching and experimenting I could not find a Group Policy setting that would directly affect this.
Luckily Windows Registry came to the rescue. The following value can be modified to either check or uncheck aforementioned option:
Reg Key: HKCU\SOFTWARE\Microsoft\Windows\CurrentVersion\Internet Settings\Zones\2
Value Name: Flags
Value Type: REG_DWORD
Value Data (in decimal): 67 (to uncheck) or 71 (to check)
Once the Registry is changed, Internet Explorer will need to be restarted (assuming it was opened) for the change to take effect. It’s also worth noting that if the specific IE Trusted Sites window pictured above happens to be opened when the Registry is modified, the change will not take effect and the Registry value will be reverted.
From Group Policy
I decided to use Group Policy to directly push the Registry change to the computers I needed. To do this from Group Policy Mangement:
- Edit the desired GPO
- Browse to User Configuration >Preferences >Windows Settings >Registry
- Right-click and then select New >Registry Item
- Enter the following options in the properties window:
- Action: Update
- Hive: HKEY_CURRENT_USER
- Key Path: Software\Microsoft\Windows\CurrentVersion\Internet Settings\Zones\2
- Value name: Flags
- Value type: REG_DWORD
- Value data: 67 (or 71)
- Base: Decimal
- Click OK
From Command Line
The following commands can be used to apply the above Registry change. This is useful for scripting.
To uncheck the box:
To check the box:
Something else nice about this: Because the Registry change exists in HKEY_CURRENT_USER, it can be made even from an account that does not have administrator rights.
Typing special characters and accented language letters is a difficult task using the English keyboard layout in Windows 10. You can use alt code shortcuts to insert symbols and letters. However, it is also easy to install additional language input to type accented letters. In our earlier article, we have explained how to change input method to Unicode Hex Input on Mac. In this article, let us explain how to install language and change the keyboard layout in Windows 10.
How to Change Language in Windows 10?
Follow the below steps to install a new language in Windows 10:
- Type “control panel” in the Windows search box and open Control Panel app.
- Change the Control Panel view to “Category” so that it is easy to find the options.
- Click “Add a language” link under “Clock, Language, and Region” section.
- You will see a list of already installed languages on your computer. Click on “Add a language” option.
- Windows will show you all the available languages in alphabetical order. You can group the languages by name or writing system or press the keyboard key to go to that section. For example, press G to the section showing all languages starting with G.
- Click on the language box and then click on “Open” button.
- You will see all available variants of the language and select the variant you want to install on your computer.
- Click “Add” button to install the language pack.
If your computer does not have preinstalled language pack, then you need to have language pack installation CD for installing the language pack. Otherwise, you will not be able to add new language.
Customizing Installed Language
After successful installation, you can go back to “Control Panel\Clock, Language, and Region\Language” and view the installed languages.
- Click on the “Options” link against the newly installed language.
- You can make the installed language as a primary language on your computer. This will change all the menu items in the new language.
- Click on the “Preview” link under “Input method” to view the keyboard layout of the language.
Adding Input Method
If you want to add a new input method for an installed language, click on “Add an input method” link under the “Input method” section.
- Select the input method from the available list and click “Add” button.
- You can view the preview of the input method to understand which keys to use for the special characters. Below is an example of German keyboard input method using standard English keyboard. The highlighted letters are some of the differences.
Using Input Language
When you want to change the input, click on the “Language Bar” in the tray of your taskbar and toggle the language input.
After toggling to the new language, keyboard input will work as per the preview you have seen. For example, when you have selected German language, pressing comma will produce ä as shown in the preview layout.
Setting Office Preferences in Office
When you have multiple languages installed on your computer, you can setup the language for editing in Office package like Word, Outlook and PowerPoint.
- Open Word and go to “File > Options” menu.
- Under “Language” section, select the editing and display language.
- Alternatively, you can directly search “language preferences” in Windows Search and open Office Language Preferences.
Uninstalling Language
You can uninstall or remove the language any time.
- Go to “Control Panel\Clock, Language, and Region\Language\Language options” section and click on “Uninstall language pack” option to completely remove the installed language package.
- Alternatively, when you are in “Control Panel\Clock, Language, and Region\Language” section, select the language and click on “Remove” button to only remove the language from input method. This will remove the language from the Language Bar.
You can click on the “Advanced settings” link on the right sidebar of the Control Panel language section to setup additional options for display and input method languages.


