Unless you have a special setup, you typically only need a single IP address from your ISP to run your network. With your network sitting behind a firewall/router, you can direct your incoming traffic to the appropriate servers to handle email, web, remote connections and anything else. The problem comes when you have multiple servers which need to receive traffic from a common port. Instead of adding more public IP addresses (and cost), we are going to show you how to handle this situation using on a single IP.
In our article, we are going to cover handling multiple terminal servers (using the RDP protocol which runs on port 3389), again, in a network which only has a single public IP address. In our environment, we use a DD-WRT based router (flashed on a $25 Linksys router) which acts as both our firewall and router. If you are not using a DD-WRT based router, the same method may be available on your firewall/router. Additionally, we cover an alternate method which should work in any environment.
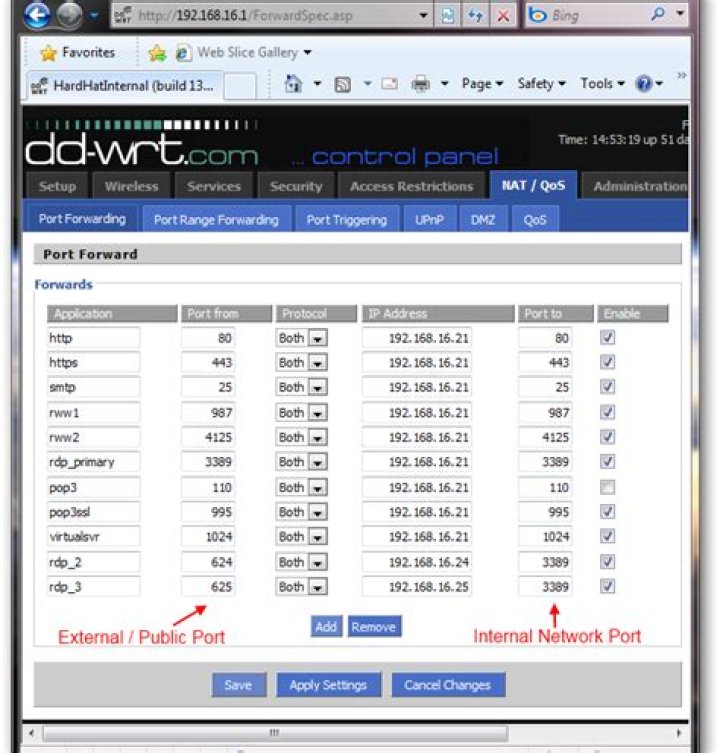
Configuring Port Forwarding
One of the nice features of port forwarding in DD-WRT is the ability to seamlessly apply port “remapping”, that is the external port the client connects to at the router is mapped to an alternate port which is sent to the target machine in your network. The advantage to this method is you do not have to make any configuration changes on the server machines since the traffic is sent to it using the default port.
In the example below, there are 3 terminal server/RDP servers inside the network:
- Local 192.168.16.21 (rdp_primary) runs Small Business Server 2008
- Local 192.168.16.24 (rdp_2) runs Windows Server 2003 Standard
- Local 192.168.16.25 (rdp_3) runs Windows Server 2008 Standard
In the DD-WRT control panel under the NAT/QoS > Port Forwarding tab you can configure port remapping. In our example we are using the default RDP port (3389) to connect to ‘rdp_primary’ and using external ports 624 and 625 to route RDP traffic to ‘rdp_2’ and ‘rdp_3’ on the default port of 3389. Simply put, when traffic comes in to ports 624 or 625, the router automatically applies the translation which sends the data to ports 3389 on the target machines. The target server never knows the difference.
Connecting
The connections below show how the client would connect to desired server using the configuration settings above.
Connecting to the default RDP port (3389) routes to the Small Business Server 2008 machine.
Connecting to RDP using port 624 routes to the Windows Server 2003 Standard machine.
Connecting to RDP using port 625 routes to the Windows Server 2008 Standard machine.
Alternate Method
As an alternate to using port remapping, you configure each server machine to use a different RDP port by editing the following registry value and then rebooting the machine:
If you go this route, you must remember to configure port forwarding on your master firewall as well as update any local firewall rules (i.e. the Windows Firewall) running on the respective machine to allow the alternate port number.
After making these configuration changes, the end users would access the terminal servers running on the alternate port the same way illustrated above.
Conclusion
For our article, we used RDP as the example for illustrating how you can use port remapping eliminate non-standard configurations on your servers, but you can just as easily apply the same methodology for any other services such as HTTP or SMTP.
When you install Internet Information Services (IIS) on Windows, an empty “Default Web Site” is created by default and listens on the standard web HTTP port – TCP 80. In IIS terms, this means that this site is bind to the port TCP/80. To open this site, just enter the name of the IIS server ( “ ) or its IP address ( “ ) in your browser. A single IIS web server can serve dozens and hundreds of websites, and you can run multiple web sites on it, listening and responding on the same TCP port (80, 443, or whatever). However, the interface of IIS Manager does not make it evident that you can host another website without binding it to some other port (e. g., 8080). In this article we’ll show how to host multiple websites on the same IIS server and bind them to the same port and IP address, or to different IP addresses.
- IIS Web Site Binding
- Hosting Multiple Website on IIS using Host Headers
- Run Multiple Sites with Different IP Addresses on IIS
- Managing IIS Site Bindings Using PowerShell
IIS Web Site Binding
A single web IIS server running on Windows Server can host multiple websites. However, in order IIS to distribute HTTP requests correctly, each website has to be identified with some unique value. In case of an IIS website, it consists of three attributes that make up a unique combination for each website. These are:
- a TCP port number
- an IP address
- a host header (host name)
The information about the hosted websites is stored in the ServerBindings attribute of the IIS metabase in the following format: IP:Port:Hostname . Thus, if you want to host multiple websites on the same port and IP address, you will have to use a unique Host header. What is it? Host header is a part of an HTTP request to the server sent by a client that specifies which website it is addressed to. Accordingly, this host header must be specified on the side of the web server, and the DNS contains the correct record that matches the hostname and the IP address of the IIS web server.
Let’s suppose that you have a website running on IIS and listening 80 port. And you need to bind second website to the same port.
In the IIS Manager, create another website (Add Website) with the name TestSite, which files will be located in c:\inetpub\TestSite (do not specify the hostname yet).
After you click OK, a warning appears that you cannot use the binding *:80 for both sites.
Agree to this warning. So you have got another site bound to port 80, you cannot start it without stopping the first site.
Hosting Multiple Website on IIS using Host Headers
To create a unique binding, specify another name (Host Name) for the second IIS website. Right-click TestSite and select Edit Bindings. Select the binding you need and click Edit.
Specify the unique host name the users will address to, like TestSite, in the Host Name field.
You can configure the IIS site binding using the command prompt. In this case, for IIS 7 or newer the command to configure the binding looks like this:
C:\Windows\System32\inetsrv\appcmd.exe set site /site.name:testsite /+bindings.[protocol=’http’,bindingInformation=’*:80:testsite’]
Now you can start the second website as well.
All you have to do is to add a DNS alias for the server (A or CNAME) to pointing to the IP address or the hostname of your IIS web server. If you are using an Active Directory domain, you need to create DNS records on the domain controller.
You can create a CNAME record for the name testsite in the DNS console ( dnsmgmt.msc ) and specify the domain name of your IIS server as FQDN target host.
Add-DnsServerResourceRecordCName -HostNameAlias web-srv1.woshub.com -Name testsite -ZoneName woshub.com
Try to open in your browser. It should open successfully.
Here are some useful notes worth to be mentioned.
If you are using a standalone IIS server, the mapping of site names to the server’s IP address is done via the file C:\Windows\system32\drivers\etc\hosts
The bind settings are stored in the IIS configuration file section of the IIS config file C:\Windows\System32\inetsrv\config\applicationHost.config .
In our case, this section contains the following data:
Likewise, you can host and run several hundred sites on the same port of your IIS web server.
Run Multiple Sites with Different IP Addresses on IIS
Now let’s try to run two sites on the IIS web server at different IP addresses. First of all, you need to add a separate VLAN interface on Windows Server or simply assign an additional IP address (alias) to your NIC.
In this example, the server has the main IP address 192.168.13.100, and I will add an additional IP alias 192.168.13.101 to the same network adapter:
Get-NetIPAddress | ft IPAddress, InterfaceAlias, SkipAsSource
New-NetIPAddress –IPAddress 192.168.13.101 –PrefixLength 24 –InterfaceAlias “Ethernet” –SkipAsSource $True
Now you need to create an A record for the new site on the DNS server (we will additionally create a PTR record in the reverse zone with the –CreatePtr option):
Add-DnsServerResourceRecordA -Name NewSite3 -IPv4Address 192.168.13.101 -ZoneName woshub.com -TimeToLive 01:00:00 –CreatePtr
It remains to open the Site Binding settings and bind the site to the additional IP address of your host.
Managing IIS Site Bindings Using PowerShell
You can manage the binding of sites on an IIS server using PowerShell. For this, the WebAdministration module is used:
Display information about all available IIS sites and their bindings:
Or about a single site:
(Get-Website -Name NewSite).bindings.Collection
To change the binding of this site (you can change the IP addresses, port or name):
Set-WebBinding -Name NewSite1 -BindingInformation “192.168.13.101:80:NewSite1” -PropertyName ‘Port’ -Value ‘8080’
Set-WebBinding -Name NewSite1 -BindingInformation “192.168.13.101:8080:NewSite1” -PropertyName ‘IPAddress’ -Value ‘192.168.13.100’
To add a new binding to the specific IIS site, run:
New-IISSiteBinding -Name NewSite1 -BindingInformation “*:9090:” -Protocol http
To remove a binding:
Remove-IISSiteBinding -Name NewSite1 -BindingInformation “*:9090:”
Thus, you can run several sites on the IIS web server both on different IP addresses and on the same IP address and TCP port number.
The concept of creating or configuring multiple IP addresses on a single network interface is called IP aliasing. IP aliasing is very useful for setting up multiple virtual sites on Apache using one single network interface with different IP addresses on a single subnet network.
The main advantage of using this IP aliasing is, you don’t need to have a physical adapter attached to each IP, but instead you can create multiple or many virtual interfaces (aliases) to a single physical card.
Create Multiple IP Addresses in One NiC
The instructions given here are applies to all major Linux distributions like Red Hat, Fedora, and CentOS. Creating multiple interfaces and assign IP address to it manually is a daunting task. Here we’ll see how we can assign IP address to it defining a set of IP range. Also understand how we are going to create a virtual interface and assign different range of IP Address to an interface in one go. In this article we used LAN IP‘s, so replace those with ones you will be using.
Creating Virtual Interface and Assign Multiple IP Addresses
Here I have an interface called “ifcfg-eth0“, the default interface for the Ethernet device. If you’ve attached second Ethernet device, then there would be an “ifcfg-eth1” device and so on for each device you’ve attached. These device network files are located in “/etc/sysconfig/network-scripts/” directory. Navigate to the directory and do “ls -l” to list all devices.
Sample Output
Let’s assume that we want to create three additional virtual interfaces to bind three IP addresses (172.16.16.126, 172.16.16.127, and 172.16.16.128) to the NIC. So, we need to create three additional alias files, while “ifcfg-eth0” keeps the same primary IP address. This is how we moving forward to setup three aliases to bind the following IP addresses.
Where “:X” is the device (interface) number to create the aliases for interface eth0. For each alias you must assign a number sequentially. For example, we copying existing parameters of interface “ifcfg-eth0” in virtual interfaces called ifcfg-eth0:0, ifcfg-eth0:1 and ifcfg-eth0:2. Go into the network directory and create the files as shown below.
Open a file “ifcfg-eth0” and view the contents.
Here we only need two parameters (DEVICE and IPADDR). So, open each file with VI editor and rename the DEVICE name to its corresponding alias and change the IPADDR address. For example, open files “ifcfg-eth0:0“, “ifcfg-eth0:1” and “ifcfg-eth0:2” using VI editor and change both the parameters. Finally it will look similar to below.
ifcfg-eth0:0
ifcfg-eth0:1
ifcfg-eth0:2
Once, you’ve made all changes, save all your changes and restart/start the network service for the changes to reflect.
To verify all the aliases (virtual interface) are up and running, you can use “ifconfig” or “ip” command.
Ping each of them from different machine. If everything setup correctly, you will get a ping response from each of them.
Sample Output
Seems everything working smoothly, With these new IPs’ you can setup virtual sites in Apache, FTP accounts and many other things.
Assign Multiple IP Address Range
If you would like to create a range of Multiple IP Addresses to a particular interface called “ifcfg-eth0“, we use “ifcfg-eth0-range0” and copy the contains of ifcfg-eth0 on it as shown below.
Now open “ifcfg-eth0-range0” file and add “IPADDR_START” and “IPADDR_END” IP address range as shown below.
Save it and restart/start network service
Verify that virtual interfaces are created with IP Address.
If you having any trouble in setting up, please do post your queries in the comment section.
If You Appreciate What We Do Here On TecMint, You Should Consider:
TecMint is the fastest growing and most trusted community site for any kind of Linux Articles, Guides and Books on the web. Millions of people visit TecMint! to search or browse the thousands of published articles available FREELY to all.
If you like what you are reading, please consider buying us a coffee ( or 2 ) as a token of appreciation.
We are thankful for your never ending support.
Unless you have a special setup, you typically only need a single IP address from your ISP to run your network. With your network sitting behind a firewall/router, you can direct your incoming traffic to the appropriate servers to handle email, web, remote connections and anything else. The problem comes when you have multiple servers which need to receive traffic from a common port. Instead of adding more public IP addresses (and cost), we are going to show you how to handle this situation using on a single IP.
In our article, we are going to cover handling multiple terminal servers (using the RDP protocol which runs on port 3389), again, in a network which only has a single public IP address. In our environment, we use a DD-WRT based router (flashed on a $25 Linksys router) which acts as both our firewall and router. If you are not using a DD-WRT based router, the same method may be available on your firewall/router. Additionally, we cover an alternate method which should work in any environment.
Configuring Port Forwarding
One of the nice features of port forwarding in DD-WRT is the ability to seamlessly apply port “remapping”, that is the external port the client connects to at the router is mapped to an alternate port which is sent to the target machine in your network. The advantage to this method is you do not have to make any configuration changes on the server machines since the traffic is sent to it using the default port.
In the example below, there are 3 terminal server/RDP servers inside the network:
- Local 192.168.16.21 (rdp_primary) runs Small Business Server 2008
- Local 192.168.16.24 (rdp_2) runs Windows Server 2003 Standard
- Local 192.168.16.25 (rdp_3) runs Windows Server 2008 Standard
In the DD-WRT control panel under the NAT/QoS > Port Forwarding tab you can configure port remapping. In our example we are using the default RDP port (3389) to connect to ‘rdp_primary’ and using external ports 624 and 625 to route RDP traffic to ‘rdp_2’ and ‘rdp_3’ on the default port of 3389. Simply put, when traffic comes in to ports 624 or 625, the router automatically applies the translation which sends the data to ports 3389 on the target machines. The target server never knows the difference.
Connecting
The connections below show how the client would connect to desired server using the configuration settings above.
Connecting to the default RDP port (3389) routes to the Small Business Server 2008 machine.
Connecting to RDP using port 624 routes to the Windows Server 2003 Standard machine.
Connecting to RDP using port 625 routes to the Windows Server 2008 Standard machine.
Alternate Method
As an alternate to using port remapping, you configure each server machine to use a different RDP port by editing the following registry value and then rebooting the machine:
If you go this route, you must remember to configure port forwarding on your master firewall as well as update any local firewall rules (i.e. the Windows Firewall) running on the respective machine to allow the alternate port number.
After making these configuration changes, the end users would access the terminal servers running on the alternate port the same way illustrated above.
Conclusion
For our article, we used RDP as the example for illustrating how you can use port remapping eliminate non-standard configurations on your servers, but you can just as easily apply the same methodology for any other services such as HTTP or SMTP.
By Alex
Post date
With only one public IP-address you’ll have to use different ports if you want to use multiple webservers. But that’s kind of useless as you can’t ask users to type example.com:81 in the browser instead of just example.com. So how do we solve this problem?
Use a reverse proxy
By directing all traffic on port 81(HTTP) and 443(HTTPS) to a server running a reverse-proxy you’ll be able to choose what server the traffic should be forwarded to based on the host header that the browser sends with the request.
How we’re gonna use HAProxy to solve our problem.
There is two popular proxy options: HAProxy and NGINX. In this guide we’ll be using HAProxy on Ubuntu 18.04. We will also set up Lets Encrypt to handle TLS-certificates.
Install HAProxy
HAProxy is easy to install, so let’s get to it.
So now we have haproxy installed and it’s time to configure it.
Configuring HAProxy
In this setup we have two webservers each hosting a seperate website. Server 1 with the IP-address 10.0.0.10 and Server 2 with the IP-address 10.0.0.20. Server 1 hosts example1.com, while Server 2 hosts example2.com. Now it’s time to configure it.
Open the /etc/haproxy/haproxy.cfg file and add a frontend and three backends to the bottom of the file like this:
Currently we have set the web_1 backend as the default, but you can set it to whatever fits you.
Get ready for certificates and add a default one
You’ll need a certificate folder that HAProxy can check for certificates, so let’s create one:
HAProxy needs a certificate in that folder to start and we don’t have any yet. Therefore we just create a self-signed one. You can just press enter on all fields:
Now you can restart HAProxy like this:
And then access the IP of the server running HAProxy in the browser to check that you get a certificate warning.
Did you get a warning? Then everything is going as planned.
Create valid certificates
The proxy host will also run Let’s Encrypt certbot to create and renew certificates. Since the proxy will handle all TLS/HTTPS traffic for you, you’ll have to make sure the backends are using HTTP.
First off, let’s install Let’s Encrypt:
Then create a script that will be used to move new and renewed certificates into the /etc/haproxy/certs/ folder. The script also needs to reload HAProxy to make use of the new certificates when they change.
Create /root/renew.sh with the following content:
Then make it executable:
Make sure this script is used when ceritificates are renewed by editing /lib/systemd/system/certbot.service like this:
Set up DNS
Make sure that both example1.com and example2.com points to the IP-address of HAProxy. It can take some time for the changes to come into effect, so give it some time to update.
Get valid certificates
Now you just have to get the certificates. Remember to replace with your own email:
Congratulations, you now have two webservers behind the same IP-address.
I bought a Slicehost VPS (the cheapest, 256MB one, running Ubuntu) because I’m interested in expanding my web development experience/understanding beyond the classroom. I’m hoping to have the Slicehost run (1) a blog, (2) a wiki I can use for private organization purposes (myself and a few friends), and (3) development, in multiple languages (Ruby, PHP, python). What I’m realizing is that there are a number of drawbacks to this. First of all, I’d be launching one gigantic and ugly Apache process for each visitor (not that I expect any), and secondly, that would make configuration a nightmare.
Is there a way that I can run separate Apache processes to handle each program, but do so in a URL-transparent way? I’d like to be able to have blog.mywebsite.com only load the relevant modules and configuration stuff for Movable Type, while having pydev.mywebsite.com load only the modules/config for an Apache running python, and railsdev.mywebsite.com run on Apache/Passenger or whatever. I understand how to do this if I’m willing to have the URLs be mywebsite.com:8081/, mywebsite.com:8082/, etc., but is there a way to have one server listening to *.mywebsite.com:80 and have it pass requests along to the appropriate servers (which are listening on port 8081-8084 or so)?
4 Answers 4
What you want is a reverse proxy configuration. Yes, it is doable. Essentially, the reverse proxy pretends to be a web-server to the client. Then, based on the domain name requested, it can proxy the connection to specified back-end web-server(s).
So, you can have different web-servers listening on differen ports on 127.0.0.1 and have your reverse proxy redirect to them.
Popular light-weight reverse proxies are varnish and pound. However, even apache can be configured to be a proxy thru mod_proxy. Ditto with lighttpd and nginx.
You want a reverse proxy, but keep in mind, since you’re starting out, you shouldn’t worry too much about a development server’s apache processes, or how ugly the solution is, if your goal is to learn MT, Django, and RoR, you’re probably better off doing separate vhosts, or having multiple instances running on different ports. Setting up a reverse proxy will work, but debugging issues will take longer as you won’t know if the proxy is acting up, or you’re actually sending a bad request. With that disclaimer in mind, you need to do: apt-get install libapache2-mod-proxy-html a2enmod proxy_http
and then configure your default vhost to something like.
Where localhost:8090 points to your MT instance, and repeat the process, for different vhosts.
Either way, you will have one ugly apache process setup :).
Expanding on sybreon’s answer:
A Reverse proxy is a plugin for the web server (in your case Apache) that translates URLs onto different servers, of your choosing.
For example, if a request comes in for /Wiki/ , Apache will see it and forward your request to example.com:81 (or whatever you specify – you can use a RegEx to only forward parts or all of your request, re-arrange it, do whatever) and will forward on whatever it receives.
The great thing about this method is that you can mix technologies as well. We’ve got an IIS website that does a reverse proxy to Subversion and Apache, on two completely different boxes, but one public address space.
I need to run multiple(more than 4) instances of JBoss server on a single machine. I am using JBoss 4.2.3 GA.
9 Answers 9
I found the answer. We have to configure the jboss-service.xml to run multiple instances in the same machine.
We may need to keep the same “default” instance same as it is under the JBOSS_HOME\Server.
We have to create another folder say “instance2” under JBOSS_HOME\Server. Copy all the contents from JBOSS_HOME\Server\default to this newly created folder.
Now goto conf folder under JBOSS_HOME\Server\instance2 directory. Edit the jboss-service.xml. Search for mbean code=”org.jboss.services.binding.ServiceBindingManager” in this configuration file.
By default this xml tag is commented. We have to un comment it and change the value ports-00 to ports-01.
Then start this instance2 jboss instance. We can access this application by using the port number 8180.
We can go for at maximum of 3 instances with this way.
To run more than this we have to add some more running tags in JBOSS_HOME\docs\examples\binding-manager\sample-bindings.xml.
You can make things a lot simpler by simply changing the IP that the server is bound to.
You will need to copy the entire jboss folder several times and configure run.bat to use the -b parameter on startup.
If this is a Windows server and you’re running jboss as a service, you might want to edit the service.bat for each instance too so that the servers all have different names in the services control panel.
Part of the problem we ran into when trying to use different HTTP ports was that jboss uses ‘lots’ of ports for different purposes and it was a pain to edit all of these port numbers to be unique on each instance. By changing the bind address you can avoid this problem entirely.
Create multiple loopback adapters and bind each ip address to different instance.
No need of changing port.
1) Copy the default folder with new name: instance name
2) In jboss-service.xml Uncomment the ServiceBindingManager mbean and change the ServerName to ports-01 or 02 or 03 e.g:ports-01 and ports-01/02/03 configuration should be there in sample-bindings.xml(present in docs/examples/binding-manager) And make the changes in all the ports mentioned under ports-01/02/03 tags, So that ports will not get conflict. Remember the server will run on the binding port like 8080/8180/8182.
from cmd promt go to the bin folder and run the instances with cmd:
run -c instancename
Running multiple instances of JBoss on the same server:
- We should keep the “default” instance same as it is under the **JBOSS_HOME\Server
- Copy the default folder with new name (instance name) say default2 under JBOSS_HOME\Server. Copy all the contents from JBOSS_HOME\Server\default to this newly created folder.
- The binding service manager needs to be enabled in conf/jboss-service.xml for instances that are not using the default ports. a. (i.e.) In the copied instance, go to conf folder under JBOSS_HOME\Server\default2 directory. Edit the jboss-service.xml. b. Search for mbean code=”org.jboss.services.binding.ServiceBindingManager” in this configuration file. c. By default this xml tag is commented. We have to uncomment it and change the value ports-00 to ports-01.
In the same file, Under “Socket transport Connector”, in the “Configuration” section, serverBindPort must be changed to another value or it will conflict with the default (4446).
In default2/deploy/ , for the remoting.transport.Connector mbean, port 3873 must be changed to another value or it will conflict with the default.
set redirect port value to the one configured in step 4
Also, the port value configured in step 5
In summary, the directory structure for setting up two other instances would be something like the below with modifications in the filenames in bold.
$JBOSS_HOME/server/default2/deploy/
$JBOSS_HOME/server/default2/deploy/
$JBOSS_HOME/server/default3/deploy/
$JBOSS_HOME/server/default3/deploy/
7.From command prompt go to the bin folder and run the instances with cmd:
run -c instancename
In this case, it is: run -c default2
Microsoft Windows Terminal Server is a core component of Windows Desktop products and Microsoft Windows Server that allows remote computers to connect to a Windows operating system computer using a remote terminal session. With the remote terminal session, remote computers can run applications on the remote machine and run multiple remote connections independently of each other.
Microsoft introduced this concept by releasing Terminal Services as a part of the Windows Server operating system. Terminal Services was an integral part of Windows Server OS editions beginning with Windows NT 4.0. With the release of Windows Server 2008 R2, Terminal Services was renamed Remote Desktop Services (RDS). Before implementing this technology, it is essential to know what a Terminal Server is, how it works and why you should use one.
Why Use Terminal Server?
Terminal Server (now known as Remote Desktop Session Host) is popular it enables businesses to centrally host applications and resources and publish them to remote client devices, regardless of the location and platform of the end-user device. A Terminal Server provides multiple benefits.
- Provide end-users with access to company resources from anywhere and from any device.
- Facilitate a single point of maintenance and allow you to monitor the infrastructure from a central dashboard.
- Applications are installed once and regularly updated on the server, so there is no need to install or update a program on each machine in the network.
- With concurrent licenses instead of per-device ones, businesses can reduce licensing costs, and thin clients allow businesses to optimize costs and power savings for a better ROI.
- The lifespan of desktop hardware extends is extended, and network security is significantly improved.
What is Terminal Server Architecture?
It is also important to understand the Terminal Server architecture which consists of three crucial components:
- A multi-core server where resources are centrally hosted.
- A remote desktop protocol that enables data transmission between the server and the client.
- Client software on each remote client device. This client program allows the device to connect to the server via Remote Desktop Protocol (RDP).
In addition, there is the Terminal Services Licensing Service, which provides the server with the TS CAL licenses for devices to connect to it. The sessions list is saved in the Sessions Directory Service. This list is indexed by username, allowing the user to reconnect to the same server.
What is Terminal Server Licensing?
Each user/device connecting to the TS server should have an RDS CAL. The terminal server licensing role is installed on an RDS license server. The role of this TS licensing server is to store and track all RDS CALs installed for a group of servers. A single licensing server can serve multiple TS servers. The license server should be activated to provide permanent RDS CALs; otherwise, it issues temporary RDS CALs. It is important to know what terminal server licensing is to estimate costs.
To deliver virtual desktops and applications to remote users, terminal services use the RDP protocol. It works on TCP/IP and listens on port 3389. The RDP protocol was improved to provide a rich graphical experience to end-users. The new version, RemoteFX, was introduced in Windows Server 2008 R2 SP1. Using RemoteFX technology, businesses can seamlessly deliver graphic-intensive applications such as AutoCAD and the Adobe Suite to remote client devices.
Terminal Services Use Cases
Let’s say, for instance, that a company has a geographically dispersed network of 1,000 users connected over WAN. The company develops a new application which is to be used by all employees. The application is not web-based, and employees work from different locations. The company has to provide access to that application for every user/device. Terminal services are an excellent solution to this issue. With one server, a TS server OS license, TS licensing server, and RDS CALs for each user/device, you can set up a Terminal Services environment to centrally host applications and deliver them to remote client devices with ease.
Parallels RAS Enhances Terminal Server
Many businesses still use a Windows OS, but there are several challenges associated with the terminal server setup. While the complexity of installing and configuring multiple components is the primary challenge, the cost of RDS CALs is another burden. Secondly, a Terminal Services environment only supports Windows and Mac environments. Parallel®s Remote Application Server (RAS) allows you to use the Terminal Services or RDSH environment while eliminating its limitations. Parallels RAS is easy to install and manage. By using a simple wizard, you can set up the tool in five minutes. Secondly, all the virtualization components come auto-configured out of the box. Another important advantage of Parallels RAS is the support of a range of client devices, including iOS, Android and Chromebooks. Most importantly, Parallels RAS is cost-effective and reduces the total cost of ownership (TCO).
This document will take you through the process of adding an additional IP address to a Linux Server Network Configuration. The files you need to amend vary based on the distribution of Linux installed; however, all changes are executed at the command line that is accessed via SSH using the default IP address of your server.
To get SSH access, you will need your root password (displayed in the Control Panel) and an SSH client. We recommend Putty, which can be downloaded for free at:
Consult the guide, Connecting to a Linux Server via SSH for instructions on how to download and configure Putty to launch the terminal window with the command line.
Follow the below steps once you have a terminal window open:
Configuring an IP Address for Ubuntu & Debian
- Open /etc/network/interfaces. An example of the file is below:
(Screen 1) - Below the line:
auto eth0
Add the following line:
auto eth0:1
Below the first interface description iface eth0 add the description of the second interface:
iface eth0:1 inet static
address 207.210.118.58
netmask 255.255.255.224
broadcast 207.210.118.63
network 207.210.118.32
gateway 207.210.118.33
Make sure the mask and gateway are correct. These would be identical to the ones already specified. The only thing that changes is the IP address you want to add. The resulting file should look like this:
(Screen 2)
Configuring an IP Address for Centos
The process for Centos is slightly different in that you create a new interface file instead of amending and adding to the existing one.
- Go to the following directory on your server:
/etc/sysconfig/network-scripts
(Screen 3)
If you do an ls on this directory, you will see several files listed as illustrated below:
(Screen 4)
Verify which interface you will use to add IP addresses. Typically, this will be eth0 for public IP addresses. Type:
ifconfig
This will produce output similar to the following:
(Screen 5)
(Screen 6)
(Screen 7)
(Screen 8)
Apply the changes made to the network configuration. Watch for any errors identified when restarting the service.
Use the following command again to verify the IP address assigned to your server:
Try to get SSH access to the server using the newly-added IP address to make sure it has been correctly added and is properly working.
Ping Multiple IP Address in One Command
In this article we will see how to create batch file to ping multiple ip address at one click.
ping is a computer network administration software utility used to test the reachability of a host on an Internet Protocol (IP) network. It measures the round-trip time for messages sent from the originating host to a destination computer that are echoed back to the source. The name comes from active sonar terminology that sends a pulse of sound and listens for the echo to detect objects under water,[1] although it is sometimes interpreted as a backronym to packet Internet groper.[2]
Ping operates by sending Internet Control Message Protocol (ICMP) echo request packets to the target host and waiting for an ICMP echo reply. The program reports errors, packet loss, and a statistical summary of the results, typically including the minimum, maximum, the mean round-trip times, and standard deviation of the mean.
The command-line options of the ping utility and its output vary between the numerous implementations. Options may include the size of the payload, count of tests, limits for the number of network hops (TTL) that probes traverse, and interval between the requests. Many systems provide a companion utility ping6, for testing on Internet Protocol version 6 (IPv6) networks, which implement ICMP6.
H, !N or !P – host, network or protocol unreachable
S – source route failed
F – fragmentation needed
U or !W – destination network/host unknown
I – source host is isolated
A – communication with destination network administratively prohibited
Z – communication with destination host administratively prohibited
Q – for this ToS the destination network is unreachable
T – for this ToS the destination host is unreachable
X – communication administratively prohibited
V – host precedence violation
C – precedence cutoff in effect
ping 172.16.0.142
ping 172.16.0.215 -n 2
ping 172.16.0.194 -t
Save As “AnyName.cmd”
See Below Image for more Information:
With Computer Name:-
Start “PrinterServer” ping 172.16.0.142
Start “DHCPServer” ping 172.16.0.215 -n 2
Start “ADServer” ping 172.16.0.194 -t
If you have ever added multiple IP addresses to a single Windows server, going through the graphical interface is an incredible pain as each IP must be added manually, each in a new dialog box. Here’s a simple solution.
Needless to say, this can be incredibly monotonous and time consuming if you are adding more than a few IP addresses. Thankfully, there is a much easier way which allows you to add an entire subnet (or more) in seconds.
Adding an IP Address from the Command Line
Windows includes the “netsh” command which allows you to configure just about any aspect of your network connections. If you view the accepted parameters using “netsh /?” you will be presented with a list of commands each which have their own list of commands (and so on). For the purpose of adding IP addresses, we are interested in this string of parameters:
netsh interface ipv4 add address
Note: For Windows Server 2003/XP and earlier, “ipv4” should be replaced with just “ip” in the netsh command.
If you view the help information, you can see the full list of accepted parameters but for the most part what you will be interested in is something like this:
netsh interface ipv4 add address “Local Area Connection” 192.168.1.2 255.255.255.0
The above command adds the IP Address 192.168.1.2 (with Subnet Mask 255.255.255.0) to the connection titled “Local Area Network”.
Adding Multiple IP Addresses at Once
When we accompany a netsh command with the FOR /L loop, we can quickly add multiple IP addresses. The syntax for the FOR /L loop looks like this:
FOR /L %variable IN (start,step,end) DO command
So we could easily add every IP address from an entire subnet using this command:
FOR /L %A IN (0,1,255) DO netsh interface ipv4 add address “Local Area Connection” 192.168.1.%A 255.255.255.0
This command takes about 20 seconds to run, where adding the same number of IP addresses manually would take significantly longer.
A Quick Demonstration
Here is the initial configuration on our network adapter:
Now run netsh from within a FOR /L loop to add IP’s 192.168.1.10-20 to this adapter:
FOR /L %A IN (10,1,20) DO netsh interface ipv4 add address “Local Area Connection” 192.168.1.%A 255.255.255.0
After the above command is run, viewing the IP Configuration of the adapter now shows:
I’m trying to make a Python server where multiple clients can connect but I’ve run into a problem I tried everything that I found on the internet. I’m running a laptop whit windows 7 and an I3 processor.
This is the file called tcp:
This is the server:
This is the client:
Feel free to change anything you want. If you need any info in plus just ask.
1 Answer 1
You are creating a socket in the client with tcp.make_client . You are then using that socket to connect to the server via tcp.client_connect . Presumably you successfully receive the new port number back from the server. But then you are trying to re-use the same socket to connect to those ports.
This is the proximate cause of your error: A socket can only be used for a single TCP connection. If you want to create a new connection, you must first create a new socket.
That being said, if you are simply trying to create a server that will accept multiple connections, you’re making it way too complicated. The server can receive any number of connections on its single listening port, as long as a different address/port combination is used by each client.
One way to structure this in a server is something like this:
There are several others ways to do it as well: you can create multiple threads to handle multiple connections, or you can handle all connections in a single thread by using select or with asynchronous I/O.
The client is typically much simpler — as it usually only cares about its own one connection — and doesn’t care which way the server is implemented:
If the client does wish to connect to the same server again, it simply creates a second socket and call its connect method with the same server IP and port.
Usually, the client never needs to specify its own port, only the server’s port. It simply calls connect and the client-side operating system chooses an unused port for it. So the first time, the client creates a socket and connects it (to the server’s listening port), the client-side OS may choose port 50001. The next time it creates and connects a socket, it may get 50002 and so on. (The exact port numbers chosen depend on the operating system implementation and other factors, such as what other programs are running and creating connections.)
So, given client IP 192.168.0.101 and server IP 192.168.0.102, and assuming the server is listening on port 8000, this would result in these two connections:
- (192.168.0.101/50001) ====> (192.168.0.102/8000)
- (192.168.0.101/50002) ====> (192.168.0.102/8000)
I have two questions:
- There are multiple remote linux machines, and I need to write a shell script which will execute the same set of commands in each machine. (Including some sudo operations). How can this be done using shell scripting?
- When ssh’ing to the remote machine, how to handle when it prompts for RSA fingerprint authentication.
The remote machines are VMs created on the run and I just have their IPs. So, I cant place a script file beforehand in those machines and execute them from my machine.
10 Answers 10
There are multiple remote linux machines, and I need to write a shell script which will execute the same set of commands in each machine. (Including some sudo operations). How can this be done using shell scripting?
You can do this with ssh, for example:
When ssh’ing to the remote machine, how to handle when it prompts for RSA fingerprint authentication.
You can add the StrictHostKeyChecking=no option to ssh:
This will disable the host key check and automatically add the host key to the list of known hosts. If you do not want to have the host added to the known hosts file, add the option -o UserKnownHostsFile=/dev/null .
Note that this disables certain security checks, for example protection against man-in-the-middle attack. It should therefore not be applied in a security sensitive environment.
Install sshpass using, apt-get install sshpass then edit the script and put your linux machines IPs, usernames and password in respective order. After that run that script. Thats it ! This script will install VLC in all systems.
This work for me.
Syntax : ssh -i pemfile.pem [email protected]_address ‘command_1 ; command 2; command 3’
There are a number of ways to handle this.
My favorite way is to install on the remote systems and also your own public key. (Figure out a way to get these installed on the VM, somehow you got an entire Unix system installed, what’s a couple more files?)
With your ssh agent forwarded, you can now log in to every system without a password.
And even better, that pam module will authenticate for sudo with your ssh key pair so you can run with root (or any other user’s) rights as needed.
You don’t need to worry about the host key interaction. If the input is not a terminal then ssh will just limit your ability to forward agents and authenticate with passwords.
You should also look into packages like Capistrano. Definitely look around that site; it has an introduction to remote scripting.
Individual script lines might look something like this:
If you are able to write Perl code, then you should consider using Net::OpenSSH::Parallel.
You would be able to describe the actions that have to be run in every host in a declarative manner and the module will take care of all the scary details. Running commands through sudo is also supported.
For this kind of tasks, I repeatedly use Ansible which allows to duplicate coherently bash scripts in several containets or VM. Ansible (more precisely Red Hat) now has an additional web interface AWX which is the open-source edition of their commercial Tower.
Ansible:
AWX:
Ansible Tower: commercial product, you will probably fist explore the free open-source AWX, rather than the 15days free-trail of Tower
There is are multiple ways to execute the commands or script in the multiple remote Linux machines. One simple & easiest way is via pssh (parallel ssh program)
pssh: is a program for executing ssh in parallel on a number of hosts. It provides features such as sending input to all of the processes, passing a password to ssh, saving the output to files, and timing out.
Example & Usage:
Connect to host1 and host2, and print “hello, world” from each:
Run commands via a script on multiple servers:
Usage & run a command without checking or saving host keys:
If the file hosts.txt has a large number of entries, say 100, then the parallelism option may also be set to 100 to ensure that the commands are run concurrently:
Options:
-I: Read input and sends to each ssh process.
-P: Tells pssh to display output as it arrives.
-h: Reads the host’s file.
-H : [[email protected]]host[:port] for single-host.
-i: Display standard output and standard error as each host completes
-x args: Passes extra SSH command-line arguments
-o option: Can be used to give options in the format used in the configuration file.(/etc/ssh/ssh_config) (
/.ssh/config)
-p parallelism: Use the given number as the maximum number of concurrent connections
-q Quiet mode: Causes most warning and diagnostic messages to be suppressed.
-t: Make connections time out after the given number of seconds. 0 means pssh will not timeout any connections
When ssh’ing to the remote machine, how to handle when it prompts for RSA fingerprint authentication.
Disable the StrictHostKeyChecking to handle the RSA authentication prompt.
-o StrictHostKeyChecking=no
by Nik · Published January 29, 2016 · Updated February 1, 2016
Here’s how you can get the list of IP addresses, FQDN and Ping status with a simple Powershell server list script.
For a start create a servers.txt file in C:\temp folder with the list of servers you would like to resolve. You need to put one server per line. You also need to have Microsoft Excel installed on the system since the result will be exported to .csv file.
C:\temp\servers.txt
servers.txt example:
Now create a new text file and rename it to serverlist.ps1
Save the script to the same folder at C:\temp.
Before you’ll be able to run the script you will have to enable execution policy on your system:
Start the Powershell in elevated mode (Run as Administrator) and run the following command:
Set-ExecutionPolicy RemoteSigned
Now run the Powershell script by using this command:
powershell -noexit “& “”C:\temp\serverlist.ps1″””
You should get the results on screen and also saved to C:\temp\IP address.csv file.
Please feel free to comment if you have any advices regarding this simple server list script.
There are also some third-party free tools available for download like:
We all know about PING (Packet INternet Groper) network commandline utility, right? Yeah, it is used to verify a host can able to communicate over the Network with another Computer or Network devices. Using Ping command, we can send ICMP Echo request to our target host, and test whether the destination host is alive or not. We can ping systems in LAN and WAN. The ping utility was originally written by Mike Muuss in December 1983 for troubleshooting problems in the network.
A typical usage of ping command is given below.
To ping an IP address in a LAN, run:
Sample output:
ping an ip address
To ping a host / domain / website:
Sample output:
As you see in the above outputs, both hosts are alive, and we can able to communicate with them.
The one problem with PING command is we can’t ping multiple hosts at a time. We can only ping one system at a time. If you ping to multiple hosts, the PING utility will wait for one host’s timeout or reply, and try to communicate with the another. If one host doesn’t go down, the PING utility will keep showing a particular host’s connectivity, and It will not show whether the other hosts are up or down.
Let me show you an example. I am going to ping the following hosts.
- 192.168.1.100
- ostechnix.com
- google.com
- ubuntu.com
Sample output:
ping multiple hosts
As you see in the above output, the PING utility shows only one host’s connectivity (ubuntu.com), and it doesn’t show the results of other hosts. No worries! Here is where fping utility comes in handy. Using fping utility, we can ping any number of hosts at once.
fping is similar to PING utility that can used to test the connectivity of computers and network devices in LAN and WAN. Unlike PING command, fping will send a ICMP Echo request to one host, and move to the another host in a round-robin fashion.
Install fping in Linux
fping utility is available in almost all modern Linux/Unix operating systems.
To install fping on Arch Linux, run:
On Debian / Ubuntu:
On RHEL / CentOS / Scientific Linux / Fedora:
Ping Multiple Hosts At Once Using fping In Linux
fping usage is simple and very similar to PING command.
For example, let us ping an IP address in a LAN:
Sample output:
To ping multiple hosts, run:
Sample output:
Ping Multiple Hosts At Once Using fping In Linux
Also, you can put the hosts that you want to ping in a text file, and ping them all at once.
Let us create a new text file called ping_hosts.txt.
Add the list of hosts, IP addresses, domains, websites etc.
That’s enough. Save and close the file.
Now, run the following command to ping all hosts which we mentioned in the text file as shown below.
Sample output:
Sample output:
Ping Multiple Hosts At Once With fping In Linux
In this article, you will learn how to find IP address of website or server (Mac, WIndows and Linux)
IP addresses basically provide info regarding the location of your device on the internet.
Every computational device on this network uses a unique number, necessary to send messages to computers that are present outside your local network.
Every website on the internet has one or more IP (Internal Protocol) addresses assigned to it. You may not be concerned with the IP address of any random website, but it is crucial to know the IP address of your own website.
Website IP address can be beneficial to:-
- Divert website-blocking applications
- Block specific sites
- Finding the geographic location of a web server
Finding IP address of website can be a difficult task for people who have less technical knowledge.
But don’t worry, in this article, we will be discussing various ways of website IP lookup.
Following are the 3 ways you can check website IP address:
- Check your Welcome Mail: IP address of the server is typically mentioned in the welcome email by the company.
- Use Ping Command: You can ping the webserver with the CLI, and find the webserver
- Global DNS Checker for IP Lookup: Use Global DNS checker tool online.
1. Check your Welcome Mail
The IP address of your domain or server is mentioned in the welcome mail sent by your hosting company.
If you are not able to find the domain to ip, proceed to the steps mentioned below. You can also raise a support ticket regarding the same.
2. Using Ping Command
You can also use the command line to find ip address of website.
a. Follow the steps below to open a command line in Linux:-
Press Ctrl+Alt+T to open CLI
b. 3 ways to open the command line in Windows:-
- Press WIndows+X to open CLI
- Tap the search button on the taskbar, type cmd and select Command Prompt on the top.
- Right-click the bottom-left corner to open the menu, and then select Command Prompt on it.
c. 3 ways to open the command line in Mac:-
- Go to launchpad
We hope you find these tips useful.
If you would like any other help, you can contact us or just leave a comment below. We will definitely get back to you.
A Few years back, ifconfig was the favorite way to know IP address in Linux. Unfortunately, ifconfig command has been deprecated. If you try to use this command today, you are most likely to see the following error:
So, how do you find the IP address then? Let me show you how to do that.
Find IP address in Linux command line
Well, you can use the ip command for this purpose. ip command is versatile and can be used for several other things related to networking.
But just to show the IP address, use the command with ip addr, ip a or ip address options (all are same) in the following manner:
And you will see an output like this:
In the above output, you can ignore the first one called lo (loopback). You can see that the IP address is displayed 192.168.1.20. The 24 that follows it is the subnet mask.
That’s it. That’s how you display IP address of host system in Linux command line.
Other ways to find the IP address of your system in Linux
There are more ways to check the IP address in Linux. Let me show you them as well.
Show IP address with hostname command
The hostname command usually displays the hostname of your system. It can also be used to display the IP address of the host:
It will simply display the IP address of the host in the terminal.
Display IP address with nmcli tool
Most Linux distributions come with a Network Manager tool. This tool has a command line interface called nmcli. You can use this nmcli tool to view a number of network configurations.
The IP address can be displayed with:
You should see the IP address in the output.
What about ifconfig?
Actually, you can still use ifconfig command. It is present in net-tools package. You can install it using the package manager of your system. However, use of net-tools is not encouraged so I suggest sticking with the ip command.
In Ubuntu-based distributions, you can install net-tools using this command:
Now you can use the ifconfig command to display the IP address of your system.
The output will be like this:
Again, ifconfig has been deprecated and should not be used.
Bonus Tip: Finding the public IP address of your system
What you saw so far was to display the private IP address of your system. What I mean is that if you use a network router, you are most probably behind a NAT.
The IP address of your system is a private one, used only for communicating with the devices on your sub-network. Any device outside your home/work network won’t be able to find you with this IP address. They need to now the IP address of your router. Your router recognizes your device and communicates via the private IP address.
How do you get your public IP address (IP address of your router)? You’ll have to utilize third party tools.
For example, you can use the host command with OpenDNS and get the public IP address:
The output should be similar to this:
In the end…
I hope this quick tip helped you in finding the IP address of your system in Linux command line. You may also read about finding the gateway IP in Linux.
As always, feel free to provide your feedback and suggestion in the comment section below.
RDP is a protocol developed by Microsoft, that allows a user to access remote systems graphically. The default Windows servers allow only one remote desktop session at a time. But, in some cases, we are required to enable remote desktops for multiple users to allow access at a time.
You can achieve this by making little changes to the system registry keys. Once the changes are done, multiple users can connect to your system using the RDP client. You can also limit the number of users who can connect at a time.
In this tutorial, we will discuss enabling and disabling multiple remote desktop sessions in Windows servers in 2012, 2012 R2, 2016, and 2019.
Enable Multiple RDP Sessions
Follow the below steps to enable multiple remote desktop sessions on a Windows system.
- Log in to the Windows system.
- Open the start screen (press the Windows key) and type “Edit group policy” or “gpedit.msc”, and launch it.
- Navigate to Computer Configuration >>Administrative Templates >>Windows Components >>Remote Desktop Services >>Remote Desktop Session Host >>Connections.
- Double click on “Set Restrict Remote Desktop Services user to a single Remote Desktop Services session and set this to Disabled.
- Next, double click on “Limit number of connections” and set the RD Maximum Connections allowed to 999999. You can also set the limit to 2 to allow two session only.
Below is the screenshots of changes being made:
Disable Multiple RDP Sessions
To disbale the multiple remote desktop sessions, follow below instructions:
- Log in to the Windows system.
- Open the start screen (press the Windows key) and type “Edit group policy” or “gpedit.msc”, and launch it.
- Navigate to Computer Configuration >>Administrative Templates >>Windows Components >>Remote Desktop Services >>Remote Desktop Session Host >>Connections.
- Double click on “Set Restrict Remote Desktop Services user to a single Remote Desktop Services session and set this to “Enabled.
Wrap Up
This tutorial helped you to enable for disable multiple remote desktop sessions on a single Windows system. That is useful for the teams working on the same remote systems.
A terminal server, also sometimes called a communication server, is a hardware device or server that provides terminals, such as PCs, printers, and other devices, with a common connection point to a local or wide area network (WAN). The terminals connect to the terminal server from their RS-232C or RS-423 serial port. The other side of the terminal server connects through network interface cards (NIC) to a local area network (LAN), usually an Ethernet or token ring LAN, through modems to the dial-in/out WAN, or to an X.25 network or a 3270 gateway. (Different makes of terminal server offer different kinds of interconnection. Some can be ordered in different configurations based on customer need.) The use of a terminal server means that each terminal doesn’t need its own network interface card or modem. The connection resources inside the terminal server are usually shared dynamically by all attached terminals.
Some terminal servers can be shared by hundreds of terminals. The terminals can be PCs, terminals that emulate 3270s, printers, or other devices with the RS-232/423 interface. Terminals can use TCP/IP for a Telnet connection to a host, LAT to a Digital Equipment Corporation host, or TN3270 for a Telnet connection to an IBM host with 3270 applications. With some terminal servers, a given terminal user can have multiple host connections to different kinds of host operating systems, such as UNIX, IBM and DEC.
Although the concept of a terminal has its origins in the mainframe world, the Windows Server operating system has long had the ability to act as a terminal server.
The way that a terminal server works tends to vary from one vendor to the next. In the case of a Windows terminal server, the Windows operating system is configured to support multiple user sessions. This is different from other multi-session environments such as a Windows file server because the operating system renders a user interface (UI) for each of the sessions.
End users connect to a terminal server by using a remote desktop protocol (RDP) client, a desktop or mobile application whose job it is to connect to the terminal server, and display the session’s contents. The RDP client communicates with the terminal server through a connection port. A session manager component keeps all user sessions separate, and also handles tasks such as allowing a user to reconnect to their session after accidentally closing the RDP client. The sessions actually run as a part of the terminal server service, but the session manager is responsible for managing those sessions.
When a user needs to interact with a session through keyboard, mouse, or touch inputs, those inputs are made within the RDP client. The RDP client then transmits the inputs to the terminal server for processing. The terminal server is also responsible for performing all graphical rendering, although it is the RDP client that actually makes the session visible to the user.
A terminal Server and a remote desktop both serve a similar purpose. They allow a user to interact with a remote session through an RDP client. The main difference is that terminal servers run on a Windows Server, and the user is therefore provided with a Windows Server desktop. Conversely, remote desktop environments typically have desktop operating systems such as Windows 10 running within virtual machines (VM). As such, the user is provided with a true desktop operating system, rather than a session running on a server.
I’m aware of the methods where you can run a Bash for loop and ping multiple servers, is there a Linux CLI tool that I can use which will allow for me to do this without having to resort to writing a Bash script to ping a list of servers one at a time?
Something like this:
NOTE: I’m looking specifically for CentOS/Fedora, but if it works on other distros that’s fine too.
12 Answers 12
If you look into the NMAP project you’ll find that it includes additional tools on top of just nmap . One of these tools is nping , which includes the following ability:
Nping has a very flexible and powerful command-line interface that grants users full control over generated packets. Nping’s features include:
- Custom TCP, UDP, ICMP and ARP packet generation.
- Support for multiple target host specification.
- Support for multiple target port specification.
- .
nping is in the standard EPEL repos to boot.
Usage
To ping multiple servers you merely have to tell nping the names/IPs and which protocol you want to use. Here since we want to mimic what the traditional ping CLI does we’ll use ICMP.
The only drawback I’ve found with this tool is the use of ICMP mode requiring root privileges.
fping is in a Fedora package of the same name, and allows for many hosts, or a set of ip addressses.
fping will send out a ping packet and move on to the next target in a round-robin fashion. if a target replies, it is noted and removed from the list
I would suggest using GNU Parallel
output will be interleaved
oping uses ICMP packages (better known as “ping packets”) to test the reachability of network hosts. It supports pinging multiple hosts in parallel using IPv4 and/or IPv6 transparently.
This package contains two command line applications: “oping” is a replacement for tools like ping(1), ping6(1) and fping(1). “noping” is an ncurses-based tool which displays statistics while pinging and highlights aberrant round-trip times.
I know it’s specifically not what you are asking for, but a bash script to accomplish this:
This will take your endpoints as command line arguments and send a 5 count ping to each one as a background process and then wait for all to finish before exiting. It will print the last three lines of the ping output which contains useful stats about the success rate and latency.
I suppose this can do for you ?
It takes advantage of printf ‘s ability to “auto-iterate” its arguments while re-using its format string over each argument. The above printf therefore produces a sequence of ping & strings for each host provided as argument, and feeds such sequence of commands through Command Substitution to the eval command to have them executed immediately.
printf and eval commands are POSIX standard, as well as Command Substitution.
Enclosing whole such command in a subshell comprising an and-ed wait like this:
provides the ability to interrupt everything at will with a simple Ctrl+C .
Else you can control each ping command singularly through the shell’s usual job control.
If your shell has support also for Process Substitutions, you may also use the following:
for a few chars less to type.
The gist is the same as for the eval , but feeds the sequence of ping s to the . (aka source ) command through the Process Substitution.
4sysops – The online community for SysAdmins and DevOps
- Author
- Recent Posts
- Compress-Vhdx: Compress multiple VHDX files using the PowerShell cmdlet Optimize-VHD – Wed, Nov 17 2021
- Display the progress of long-running tasks in PowerShell with Show-Progress instead of Write-Progress – Wed, Jul 28 2021
- Import Microsoft Defender Firewall rules from an Excel sheet with PowerShell in Windows 10 – Tue, Jul 6 2021
Of course, you could always connect remotely to each and click about 85 times in each remote session multiplied by the number of servers and NICs. And that’s assuming they’re not running Server Core (Server Core is good for you; please use Server Core whenever you can). Given a large enough number of servers, your house would crumble to dust before you were done. And the keys would be useless at that point anyway, assuming you’ve found them in the meantime.
Or, you could work smart and use Windows Admin Center. We all know that nothing is faster than a web browser when it comes to making a lot of changes. No, I’m not dissing the WAC, but honestly, it is not quite the fastest way to do A LOT of changes.
Well, worry not. The function below helps you to update the IP address of a specific computer on a specific NIC. You can also disable DHCP and even clean up the old IP addresses from the DNS.
Let’s look at the code and then we can go through some of the interesting details.
There are a few parameters the function expects you to provide:
- First, a computer name. If none is provided, it will attempt to perform the changes on the local computer. The function is kind enough to mention this to you (if you selected Verbose mode).
- Then, you will need to provide a new IP address. I’m quite proud of this function, but I’ll be the first to admit it is not able to guess an IP address for you. I know, I know.
- You can disable DHCP on the NIC by setting the parameter DisableDhcp. If you don’t specify it, it will be disabled by default. Once again, the function is kind enough to inform you about this (still assuming you’re running the function with the Verbose switch).
- You can also disable DNS registration for the NIC. Normally, you wouldn’t be interested in doing that on a “public-facing” NIC, but if the network interface will be used for management or as part of a cluster-traffic-only subnet, you may want to skip this. You need to specify this with the value “Yes;” otherwise, DNS registration will not be disabled. Once again, the function is kind enough to inform you about this.
- A DNS server. This is where the function will attempt to connect and clean up the old IP address. If one is not provided, it will attempt to do this on the DC your computer is logged on to. Normally, the DCs are DNS servers, too. If they are not DNS servers in your environment, or you are not in an AD environment, well . please do provide a DNS server. You’re probably used to it by now, but . yes, the function will inform you. Just make sure you’ve selected Verbose mode.
You can get more information by using Get-Help Update-IPv4Address.
(Hint: also try the switch -Examples).
Once you’ve provided all these bits of information, the function will attempt to connect to the target computer. As this will be done via WinRM, the function will check for connectivity on that port. You don’t need ping for this, and you don’t need to allow all inbound traffic in the Windows Firewall. You don’t allow all inbound traffic through the Windows Firewall for your computers, do you? Do you? I know, I was just making sure. Good job. Anyway, WinRM is enabled by default on modern Windows Server versions. If you disabled it previously, you’ll need to enable it, at least for the computer where you’re doing this.
Anyway, if the computer is reachable, the function will check whether the new IP address isn’t already configured on your target computer and on the target NIC. If it is, you’ll be prompted about this, and the function will stop. Gently.
If the IP address is different, the function will perform the following:
- Assign the new IP address to the specified NIC on the target computer.
- Configure DNS registration (if instructed to do so).
- Register the address in DNS.
- Wait for the local computer (the computer from which you’re running the function) to “learn” the new IP address of the target computer.
- Disable DNS registration (if prompted to do so). Of course, if you omitted this or mentioned that you wanted DNS registration, this step will not be performed.
- Remove the old IP address(es) from the specified NIC on the target computer. If Verbose mode is selected, you will be informed about these old addresses, too.
Remotely updating and IP address with Update IPv4Address
First, we look at the IP address of our target computer, DC1. (If you’re interested in Get-IPAddressPretty, give us a shout and I’ll create a quick post about it, too.) The NIC we’re interested in has the current IP address 10.0.1.51.
Then, we use our shiny function to update the IP address of the NIC (creatively) named “TheOtherNic” to 10.0.1.101. Check the result and you’ll see the new address assigned to the NIC.
Subscribe to 4sysops newsletter!
Finally, we update it again (this time to 10.0.1.102), using the Verbose switch. This will show more information about what the function does.
How to find all possible DNS records for a server
I have decommissioned a Windows 2012 domain controller naming USDC-01.
I want to find out each and every possible records (any records) for USDC-01 from all the forward, reverse lookup zones or conditional forwarder so that I can delete them.
Currently I have 18 forward lookup zones, one reverse lookup zone for that IP range and 11 conditional forwarding.
Is there any command to get that?
4 Answers
- Sort by Created Created
- Sort by Oldest Oldest
- Sort by Votes Votes
For searching records in DNS you could use 2 tools – nslookup and Resove-DNSName (newer). Look at A, PTR and SRV records relating to former domain controller.
For DNS Forwarders try to get all records (in all zones) using Get-DnsServerForwarder
You may find the need to check the status of your domains DNS records, or check the Name Servers to see which records the servers are pulling.
Launch Windows Command Prompt by navigating to Start > Command Prompt or via Run > CMD.
Type NSLOOKUP and hit Enter. The default Server is set to your local DNS, the Address will be your local IP.
Set the DNS Record type you wish to lookup by typing set type=## where ## is the record type, then hit Enter. You may use ANY, A, AAAA, A+AAAA, CNAME, MX, NS, PTR, SOA, or SRV as the record type.
Now enter the domain name you wish to query then hit Enter.. In this example, we will use Managed.com.
NSLOOKUP will now return the record entries for the domain you entered.
You can also change the Name Servers which you are querying. This is useful if you are checking the records before DNS has fully propagated. To change the Name Server type server [name server]. Replace [name server] with the Name Servers you wish to use. In this example, we will set these as NSA.managed.com.
Once changed, change the query type (Step 3) if needed then enter new a new domain (Step 4.)
1) Check DNS Records Using Dig Command Dig stands for domain information groper is a flexible tool for interrogating DNS name servers. It performs DNS lookups and displays the answers that are returned from the name server(s) that were queried. Most DNS administrators use dig to troubleshoot DNS problems because of its flexibility, ease of use and clarity of output. Other lookup tools tend to have less functionality than dig.
2) Check DNS Records Using NSlookup Command Nslookup is a program to query Internet domain name servers. Nslookup has two modes interactive and non-interactive.
Interactive mode allows the user to query name servers for information about various hosts and domains or to print a list of hosts in a domain.
Non-interactive mode is used to print just the name and requested information for a host or domain. It’s network administration tool which will help them to check and troubleshoot DNS related issues.
3) Check DNS Records Using Host Command host is a simple utility for performing DNS lookups. It is normally used to convert names to IP addresses and vice versa. When no arguments or options are given, host prints a short summary of its command line arguments and options.
Knowing your server’s IP address(s) can be useful information to have for various reasons. After all, other than your domain, the server’s IP is the main address used to reach the server. Knowing a server’s IPs may be necessary when making changes to: DNS, networking, and security. A server may have a single IP, or multiple IPs, but sometimes, you may need a quick method to double-check since it’s easy to forget.
In this tutorial, we will show you how to verify the IPs of any modern Linux server. To follow along, you will simply need access to the server via SSH or TTY.
Prerequisites
- This tutorial requires basic knowledge of SSH and command line.
See our KB article on command line access via SSH. - You must have SSH access to the server.
Check IPs with Command Line
Step 1.
Begin the process by logging into your server via SSH.
Step 2.
Now logged in via SSH, run the following command to check the servers IP.
This command is using the `ip` tool and is calling the `route` object.
This command prints the current routing table.
Reading the Results
Once we execute the command you will see an output similar to the text below.
This information shows us the servers IP routing table, which is essentially a set of rules used to determine where data will be directed.
When using this technique to find a server’s IP, you will want to notice the lines containing `src` followed by an IP address. On these lines, the IP address following `src` are the IP(s) configured on the server.
Any device using IP addresses will have a routing table that is used to determine the behavior of the networking devices. In the example above, we can see the servers routing table, showing that the server has an IP address of `203.0.113.86`.
While it may not look like much to new users, these lines are filled with valuable information. Each line of the routing table is there to describe a different behavior or condition. More information on these settings can be found in the ip commands man pages. These settings are found in the command line using `man ip route`. Additionally, we can read the man page for the IP command online.
Conclusion
Our Support Teams are filled with experienced Linux technicians and talented system administrators who have intimate knowledge of multiple web hosting technologies, especially those discussed in this article.
Should you have any questions regarding this information, we are always available to answer any inquiries with issues related to this article, 24 hours a day, 7 days a week 365 days a year.
If you are a Fully Managed VPS server, Cloud Dedicated, VMWare Private Cloud, Private Parent server, Managed Cloud Servers, or a Dedicated server owner, and you are uncomfortable with performing any of the steps outlined, we can be reached via phone at @800.580.4985, a chat or support ticket to assisting you with this process.
A jump host (also known as a jump server) is an intermediary host or an SSH gateway to a remote network, through which a connection can be made to another host in a dissimilar security zone, for example a demilitarized zone (DMZ). It bridges two dissimilar security zones and offers controlled access between them.
A jump host should be highly secured and monitored especially when it spans a private network and a DMZ with servers providing services to users on the internet.
A classic scenario is connecting from your desktop or laptop from inside your company’s internal network, which is highly secured with firewalls to a DMZ. In order to easily manage a server in a DMZ, you may access it via a jump host.
In this article, we will demonstrate how to access a remote Linux server via a jump host and also we will configure necessary settings in your per-user SSH client configurations.
Consider the following scenario.
SSH Jump Host
In above scenario, you want to connect to HOST 2, but you have to go through HOST 1, because of firewalling, routing and access privileges. There is a number of valid reasons why jumphosts are needed..
Dynamic Jumphost List
The simplest way to connect to a target server via a jump host is using the -J flag from the command line. This tells ssh to make a connection to the jump host and then establish a TCP forwarding to the target server, from there (make sure you’ve Passwordless SSH Login between machines).
If usernames or ports on machines differ, specify them on the terminal as shown.
Multiple Jumphosts List
The same syntax can be used to make jumps over multiple servers.
Static Jumphost List
Static jumphost list means, that you know the jumphost or jumphosts that you need to connect a machine. Therefore you need to add the following static jumphost ‘routing’ in
/.ssh/config file and specify the host aliases as shown.
Now try to connect to a target server via a jump host as shown.
Login to Target Host via Jumphost
The second method is to use the ProxyCommand option to add the jumphost configuration in your
.ssh/config or $HOME/.ssh/config file as shown.
In this example, the target host is contabo and the jumphost is vps1.
Where the command Proxy Command ssh -q -W %h:%p vps1 , means run ssh in quiet mode (using -q ) and in stdio forwarding (using -W ) mode, redirect the connection through an intermediate host (vps1).
Then try to access your target host as shown.
The above command will first open an ssh connection to vps1 in the background effected by the ProxyCommand, and there after, start the ssh session to the target server contabo.
For more information, see the ssh man page or refer to: OpenSSH/Cookbxook/Proxies and Jump Hosts.
That’s all for now! In this article, we have demonstrated how to access a remote server via a jump host. Use the feedback form below to ask any questions or share your thoughts with us.
If You Appreciate What We Do Here On TecMint, You Should Consider:
TecMint is the fastest growing and most trusted community site for any kind of Linux Articles, Guides and Books on the web. Millions of people visit TecMint! to search or browse the thousands of published articles available FREELY to all.
If you like what you are reading, please consider buying us a coffee ( or 2 ) as a token of appreciation.
We are thankful for your never ending support.
What is RemoteApps?
Specify individual applications that are hosted/run on the virtualized machine but appear as if they’re running on the user’s desktop like local applications. The apps have their own taskbar entry and can be resized and moved across monitors. Ideal for deploying and managing key applications in the secure, remote environment while allowing users to work from and customize their own desktops.
RemoteApp programs are programs that are accessed remotely through a special type of Remote Desktop Connection, and appear as if they are running on the end user’s local computer. Instead of being presented to the user in the desktop of the server, as with a traditional Remote Desktop Connection, the RemoteApp programs are integrated with the client computer’s desktop, running in their own resizable window, with their own entry in the taskbar. If the programs use notification area icons, the icons appear in the client computer’s notification area. Any popup windows are redirected to the local desktop, and local drives and printers can be redirected to appear within the RemoteApp programs. Many users might not be aware that a RemoteApp program is any different than a local program.
For this demo, Infrastructure Requirement:
- 1 DC SERVER (DC-CLOUD.Sifad.ae)
- 1 Client PC running Windows 10 (CLIENT-10)
01 – open Server Manager Click Add roles and features.
02 – Click Next to proceed
03 – Choose Remote Desktop Services installation button and click next to proceed.
04 – on the Select deployment type box, click Quick Start (I choose this because I only have One Server for RDS and Remote Apps)
05 – Next, on the Select deployment scenario box, choose Session-based desktop deployment.
06 – On the Select a Server box, verify your RDS server and the IP address (in my case, my RDS server is DC-CLODU.Sifad.ae / 172.16.1.254).
07 – On the Confirm selections box, verify the roles to be installed and click Restart the destination. box and then click Deploy.
08 – wait till the process completed. your server will restart after the RDS roles installed.
09 – once you log in to the server, on the Server Manager, click Remote Desktop Services. and then click QuickSessionCollection to proceed with next configuration.
10 – On the RemoteApp Programs column, Click TASKS and click Publish RemoteApps Programs.
11 – Next, on the Select RemoteApps programs box, choose any software that you want to publish to our users. for my case.. I going to use Server Manager to publish to Administrator. so I Select Server Manager.
12 – Next, on the confirmation box, verify the program that you want to publish and click Publish button then Close.
13 – Next, on the Windows 10. open Internet Explorer and type your full server link such as in my case this is to log in to your RDWEB website.
14 – Next, click on the More information then Click on Go on to the webpage (not recommended).
15 – on the Work Resources page, enter your Domain user name & password.
16 – Finally, you should have your Server Manager on the RDWEB page. in my case, is my Server Manager for Administrator Purpose only.
17 – to verify the functionality of the program, double click on the Server Manager and click on the Connect button.
18 – And see on… my Server Manager is now open.
that’s all for now. any Doubts type a commend.. 🙂
Docker provides the ability to package and run an application in a loosely isolated environment called a container.
I know what you might be thinking – come on, not another post explaining what Docker is, it’s everywhere these days!
But don’t worry, we are skipping that basic introduction. The target audience for this article should already have a basic understanding of what Docker and Containers are.
But have you ever wondered how to get a Docker Container IP Address?
Docker network explained
First, let’s understand how the Docker network works. For that we are going to focus on the default bridge network. When you are using Docker, if you don’t specify a driver this is the type of network you are using.
Docker network from: understanding-docker-networking-drivers-use-cases
The bridge network works as a private network internal to the host so containers on it can communicate. External access is granted by exposing ports to containers.
Bridge networks are used when your applications run in standalone containers that need to communicate.
In the picture above db and web can communicate with each other on a user created bridge network called mybridge .
If you’ve never added a network in Docker you should see something similar to this:
The default bridge network is listed, along with host and none . We will ignore the other two, and use the bridge network when we get to the examples.
Docker Container IP Address
By default, the container is assigned an IP address for every Docker network it connects to. And each network is created with a default subnet mask, using it as a pool later on to give away the IP addresses.
Usually Docker uses the default 172.17. 0.0/16 subnet for container networking.
Now to better understand it, we will execute a real use case.
Docker Example
To illustrate this, we will use a Hive and Hadoop environment, containing 5 Docker Containers.
Check out the docker-compose.yml file we are about to execute:
No one wants to read a HUGE config file, right? So here’s a picture:
Much better! Now let’s start up those containers:
We can see 5 containers:
Next let’s check our Docker networks:
Wait a minute. there’s a new network called docker-hive_default !
By default docker compose sets up a single network for your app. And your app’s network is given a name based on the “project name”, originated from the name of the directory it lives in.
So since our directory is named docker-hive , this explains the new network.
Next some examples on how to get the Docker IP Address.
How to Get A Docker Container IP Address – examples
And now that I have your attention, we are going to unveil the mystery.
1. Using Docker Inspect
Docker inspect is a great way to retrieve low-level information on Docker objects. You can pick out any field from the returned JSON in a fairly straightforward manner.
So shall we use it to get the IP Address from the dockerhive_datanode ?
Didn’t you say that Docker uses the default 172.17. 0.0/16 subnet for container networking? Why is the returned IP Address: 172.18.0.5 outside it?
Image created on ip-address-in-cidr-range
To answer that we have to look at our network settings:
We executed this example in a Compute Engine VM, and in this test, the docker network was assigned a different subnet: 172.18.0.0/16. That explains it!
Furthermore, we can also lookup all IP Addresses inside the docker-hive_default network.
So we don’t need to look up each Container’s IP individually:
If you didn’t notice, we used jq help to parse the Containers map object.
2. Using Docker exec
In the following example we will work with the dockerhive_namenode .
3. Inside the Docker Container
We can even find other containers’ IP Addresses that are inside a container in the same network:
Data node
Hive mestastore
Hive server
Wrap up
All examples were executed in a linux distribution Compute Engine VM. If you execute them in macOS or Windows environments the sample commands might change a bit.
Also bear in mind that those IP Addresses in the examples given are internal to the sample docker-hive_default network. So if you have a use case to connect to those containers externally, you would need to use the host machine’s external IP (assuming that you are exposing the containers ports correctly).
Or if you are using kubernetes, for instance, to manage your Docker containers, let it handle the IP Addresses for you kubernetes-expose-external-ip-address ?.
* Illustrations from icons8.com by Murat Kalkavan.
H ow many processes can ‘listen to’ the same port of localhost? I know the answer, and it is ONE port.
TL;DR Depends on OS configuration and socket options, you could run multiple apps on localhost with the same port.
Run a server Crystal application to listen to port 3000
I shrank it into one command, so you can start doing experiments right now (if you have Crystal installed , of course). Feel free to save the code to a file and run it via crystal run .
Current sample starts a TCP server application. On each connection prints a message and closes a connection.
To verify that the server is working, try to open a client connection in a new terminal:
Looks Good To Me. Nothing suspicious. Let’s continue our crash course.
What if I run another TCP server on the localhost and use the same port? Should I get a runtime error?
In the new terminal window, run the same code:
It works in my case! If you see an error, you can scroll to the end. The first process is still running at the same time. Okay. I’m starting getting the hang of this.
How could it be that multiple processes can listen to the same port?
It is possible, only if you set socket option SO_REUSEPORT . It works differently and depends on the OS. On Mac OS you can check socket options with lsof command with the -Tf argument:
There is no SO_REUSEPORT in the list of socket options. Let’s continue to run more servers, and see if there are some limits.
It is running well as hell. Next one:
Great, there is the expected error. It means — no more new servers.
Why can I run 3 servers on localhost? What happened with the 4th instance?
To answer those questions, we can analyze the passive sockets for incoming connections. Run our lsof , for the current scope of applications:
The difference between all three lines is the address. The same line of code TCPServer.new(“localhost”, 3000) produces the following addresses: [::1]:3000 , [fe80:1::1]:3000 and 127.0.0.1:3000 .
What are these addresses?
Localhost is not an interface or address. It is a standard hostname, that resolves to IP addresses assigned to the loopback device with name lo0 in my case. To show thelistening addresses for our server we need to stop all currently running servers and run the next code snippet in each terminal:
In the output, you can see the servers’ addresses. My OS has IPv6 enabled, so I have 2 extra IP addresses for localhost. Amazing, that in old times we have only one IP address assigned to localhost — 127.0.0.1 . That’s why I remember the rule of ONE.
Clients
What could TCP clients say about our servers? In the new terminal run a standard TCP client tool nc :
It chose the same IP address again as the first server. Check connections to all servers, with a magic shell script:
Why the server tries to listen to the next free IP address?
What I like in Crystal (and of course Golang), is that you can read sources of standard libraries in the same language. I started my learning from tcp_server.cr and in a few jumps between functions I came to LibC::Addrinfo.new. From this step I searched for man page of getaddrinfo(3)
The getaddrinfo() function allocates and initializes a linked list of
addrinfo structures, one for each network address that matches node
and service, subject to any restrictions imposed by hints, and
returns a pointer to the start of the list in res. The items in the
linked list are linked by the ai_next field.
There are several reasons why the linked list may have more than one
addrinfo structure, including: the network host is multihomed, acces‐
sible over multiple protocols (e.g., both AF_INET and AF_INET6); or
the same service is available from multiple socket types (one
SOCK_STREAM address and another SOCK_DGRAM address, for example).
Normally, the application should try using the addresses in the order
in which they are returned. The sorting function used within getad‐
drinfo() is defined in RFC 3484; the order can be tweaked for a par‐
ticular system by editing /etc/gai.conf (available since glibc 2.5).
— getaddrinfo(3) — Linux manual page
It means, the libc function returns a linked list of all addresses, and an application should decide (ideally use the same order) which one of the addresses to choose.
That’s why we saw, the command nc localhost 3000 connected to the first process pong from [::1]:3000 .
You can try to restart the processes in order to prove this theory.
Example: Stop the first process, and then try again to run nc localhost 3000 .
Try to modify /etc/hosts : change the order of lines with localhost and restart the process to check a new order of addresses.
We deal with the localhost every working day developing web applications. Consider the chance to have multiple processes running with the same port, as it could save a few minutes, to understand why there are no recent changes applied to an application after restarting a process.
Be accurate with the localhost. One of the solutions is using IP address 127.0.0.1 instead of localhost .
Michael Nikitochkin is a Lead Software Engineer. Follow him on LinkedIn or GitHub .
Actually I am learning Computer Networks and while at it, I am confused in how a web server maintains multiple connections?
Simply to state, I learned trough some googling is that sockets handles a each client request.
So lets say there is a web server and lets say 2 clients with IPs
They both try to connect to the server at port 80.
Now, from googling what I got is, the server listens at port 80 for incoming requests. Then lets say a client A tries to connect to the server (make TCP/IP connection). During which a socket is created between these two. Then it is executed as separate thread for its further communication making the server to again listen for other client requests at that particular port. And Client B connects the same way.
Now my first question is:
Now practically not only 2 clients but thousands and millions user may connect to a server.
Then my next question is:
Lastly, my 3rd question is:
These are my basics questions that I’m not getting. Please correct me if I’m getting it all wrong. You can suggest me some books/pdfs to read if the answers are detailed or not partiularly focused on specific part. Thanks
1 Answer 1
Now, from googling what I got is, the server listens at port 80 for incoming requests.
Indeed, more specifically there is a special type of socket called a “listening” socket.
Normally a socket is associated with a combination of local IP, local port, remote IP and remote port.
A listening socket is different. It is not associated with any specific remote IP and port. It is associated with a specific local port. It may or may not be associated with a specific local IP.
Normally your web server will have a listening socket with a local port of 80
Then lets say a client A tries to connect to the server (make TCP/IP connection). During which a socket is created between these two.
A pair of sockets actually one on the client, one on the server.
The client application creates a socket and asks the client OS to connect it to the server.
The client OS allocates a random local port, chooses a local IP (normally based on which interface the packet will be sent out on) and fills in the remote IP and port requested by the client application. Then it starts the process of connecting to the server.
The server OS notifies the holder of the listening socket that a new connection is coming in. The server application accepts the connection and a new socket is created to handle it.
Multiple threads or even processes may monitor the same listing socket. The OS will ensure that exactly one of them gets to accept a given connection.
Then it is executed as separate thread for its further communication
That is up to the implementer of the server application. They may choose to use multiple threads or they may choose to use an API like “select” or “poll” that allows a single thread to monitor multiple sockets for activity.
- How does server communicate with these two clients simultaneously
after the connection has been established?
The server OS will match the packets against sockets by the combination of source IP, source port, destination IP and destination port and deliver them to the appropriate socket.
Now, how do those thousands of clients get connected to a single server?
If we assume every client is connected to the server through wire, it is not practically possible to maintain that many sockets on a hardware for connection. How those thousands connections are made and handled?
“Socket” in this context does not refer to a physical socket, just to a data structure within the operating system.
Still there are limits, thousands is easilly doable on a modern server, millions gets difficult.
Isn’t it like while a student is asking question to a teacher, other can’t ask at the same time since that particular student is busy or occupying the teacher at the moment so others should wait, which we compare than client B should wait when client A is communicating.
Computers are much better at splitting their attention than people are. Obviously if the server has only one processor core it can only be doing one thing at a time but if it can switch between things quickly enough the clients won’t notice that.
And of course many servers nowadays do have multiple processor cores.
A new connection, not socket, gets created. I think you are extending the OP’s confusion about what a socket is.
It seems the problem is that the rfc differs from actual practice in it’s definition of socket.
I just went and looked up the documentation for “accept” for three major operating systems, all of them talk about accept creating a new socket.


