How to Extract Data from PDF to Excel?
There are 3 different methods to extract data from PDF to Excel; they are mentioned below:
- Extract Data using Simple Copy and Paste Command
- Extract Data using Microsoft Word
- Extract Data using Adobe Reader Software
Now let us discuss each of the methods in detail –
#1 Extract PDF Data using Simple Copy and Paste Method
The following steps are followed to extract the data using simple commands copy and paste.
- Select the PDF file and open it in Adobe Acrobat Reader software, as shown in the figure.
Select and copy the data presented in the table.
Go to Excel and select the drop-down section of the “paste” and click on the Paste Special.
It opens the “paste special” dialog box, as shown in the figure.
Select the paste option as “text” and click on “OK”.
The data extracted into the Excel sheet is shown in the below-mentioned screenshot.
As shown in the figure, data is entered into only one column.
Select the data and click on the “Text to column” option in excel in the “Data” tab.
Choose the file type as “Delimited” and click on the “Next” button, and it opens the following screenshot.
Choose the Delimiters as “Space” and click on “Next”.
After clicking next, the following wizard will be opened.
Click on “Finish” to close the wizard, and then the text is converted to columns, as shown in the figure.
Clean up the data to ensure that “blue LED value” into one cell, “green LED value” into one cell, and “red LED value” into one cell.
#2 Extract PDF Data to Excel Using Microsoft Word
The following steps are followed to extract the data using Microsoft word.
- Step 1: Select the PDF file and open it in Adobe Acrobat Reader software.
- Step 2: Select and copy the data presented in the table.
- Step 3: Open Microsoft Word document and paste data into it, as shown in the figure.
- Step 4: Again, copy the table and paste now it into an Excel sheet, and it will be displayed as.
- Step 5: Arrange the table headers properly, as shown in the PDF file, by applying the merging and unmerging on cells.
#3 Extract PDF Data to Excel using Adobe Reader Software
The following steps are followed to extract the data using the Adobe reader
- Step 1: Select the PDF file and open it in Adobe Acrobat Reader software, as shown in the figure.
- Step 2: Go to the “File” menu and select the “convert to Excel, Word, or PowerPoint” option.
After clicking on the convert option, the following page will be displayed.
Things to Remember
- Extracting data from PDF to Excel is possible only when we are able to copy the data in a table in PDF file.
- The data directly copy-pasted directly from the PDF to Excel will unwind into an only column or one cell. This requires clean-up activities to arrange the data properly.
- To extract data using the Adobe Reader software, a user account is necessary with the adobe.com.
Recommended Articles
This has been a guide to Extract Data from PDF to Excel. Here we discuss how to extract data from pdf to excel using 3 methods, which include 1) Copy and Paste Option, 2) Microsoft word, and 3) Adobe Reader along with some examples. You may learn more about excel from the following articles –
Vann Vicente has been a technology writer for four years, with a focus on explainers geared towards average consumers. He also works as a digital marketer for a regional e-commerce website. He’s invested in internet culture, social media, and how people interact with the web. Read more.
Saving an Excel spreadsheet as a PDF can be confusing, and the finished file often looks different from how we want it to be presented. Here’s how to save a sheet as a readable clean PDF file.
Excel Files as PDFs
There are many scenarios when you may want to save an Excel document as a PDF file instead of a spreadsheet. For example, if you wish to send out only a specific portion of a larger sheet, or you don’t want it to be editable. However, converting an Excel file to a PDF can be a bit tricky.
We often don’t think of Excel spreadsheets as documents with borders, pages, and margins. However, when it comes to turning these files into PDF documents that can be read, printed, or distributed to others, it’s something that you should be conscious of. Your file should be readable and understandable, without random stray columns on other pages or cell sizes that are too small to read.
Here’s how to turn your spreadsheet into a presentable and printable PDF document.
Setting Up the Page
If you’re using Office 2008 or later, navigate to the Page Layout tab. Here, you’ll see several options grouped under the Page Setup section. Here are the first three:
- Margins: How large the whitespace is between the edge of a document and the first cell
- Orientation: Whether you want your finished file to be in landscape or portrait
- Size: The page size of your finished document
These work mostly the same as they do in a Word document, so set them based on how you want your finished PDF to look like. Take note that most Excel spreadsheets are more readable in landscape orientation than in portrait, unless you have very few columns. Sheets that are saved in portrait tend to have columns that fall outside of the final print area, which can make your document very difficult to navigate and read.
Additionally, you can add a header and footer to your final layout. Click the arrow on the lower-right corner of the Page Setup section, then click on the Header/Footer tab. You can select one of Office’s generated options, or create one of your own by using the “Customize” feature.
You also have the option to change the background of your printout. To do this, click the Background button in Page Setup. You can select an image from your laptop or from the cloud, and this image will be tiled across your entire sheet.
Defining a Print Area and Fitting
Next, you need to determine what area is going to be turned into a PDF, as well as how many rows and columns will be on each page.
The first way to define the area is by using click and drag to select all the cells that you want in your document. Afterward, go to Page Setup > Print Area > Set Print Area. This will create a thin grey line around the entire area that will be printed. When you create your PDF, everything outside this area will not be included. You can also manually input the cells by clicking the arrow on the lower-left corner and going to Sheets > Print Area.
Similar to Microsoft Word, you can also create page breaks to segment different tables. These page breaks can be both horizontal and vertical. Go to the cell where you want to place a page break, click the “Page Layout” tab on the ribbon, and select Page Setup > Page Breaks > Insert Page Break. This will create a break right above and to the left of your current cell.
Another important thing to do is to define the Scale to Fit option. To the right of Page Setup, you’ll see three options: Width, Height, and Scale. The Width and Height options allow you to set how many pages the rows or columns of your table will appear in. For example, if you have a lot of rows but just a few columns, setting the Width to one page is ideal. Scale, on the other hand, will determine the overall resizing of your entire print area.
Sheet Options
The last menu you should pay attention to is Sheet Options. These are settings that affect the appearance of your final printed sheet. To access the full sheet options, click on the arrow on the lower-left corner of Sheet Options sections.
Here’s an overview of the various customizations you can do in this menu:
- Print Titles: You can freeze specific rows and columns of the sheet in place so that they appear on every page, such as headers and labels.
- Gridlines: This lets you set whether or not to show gridlines, which are the lines between cells that appear when there’s no border painted on them.
- Headings: This allows you do display headings, which are the fixed alphabetical (A, B, C) and numerical (1, 2, 3) labels on the x-axis and y-axis of Excel spreadsheets.
- Comments, Notes, and Errors: This displays the embedded comments, notes, and error warnings in the final document.
- Print Order: This lets you set whether to create a document going down first or going right first.
In this menu, you can go to the Print Preview screen, where you can get a glimpse of your final document. You can also go to the screen with the shortcut Ctrl+P.
Saving or Printing as PDF
With your document correctly formatted and all set to go, there are two ways you can create a PDF.
To save the file as a PDF in Excel, open the Save As dialog, and select PDF from the “Save as type” dropdown menu. Alternatively, you can go to Export > Export to XPS/PDF. From here, you have a few options. You can decide whether to optimize the file for Standard or Minimum, which will determine the final quality and filesize of the document. You can then click “Options” to select the area to publish:
- Selection: The current cells you have selected
- Active Sheets: The current sheet that you’re in
- Entire Workbooks: All the workbooks in the current file you’re working on
- Table: A defined table that you’ve created via Microsoft Excel
You can also opt to ignore the print area you’ve set entirely.
You could also print the file as a PDF. Microsoft has a built-in PDF printer called Microsoft Print to PDF that you can select in the printer dropdown menu. If you have another PDF drive, such as Adobe PDF, Foxit, or PDF Xchange, you can use one of those as well. Before you click “Print”, look through your print preview to make sure everything looks correct.
Contents
Convert Excel to PDF with Desktop PDF Tools
SwifDoo PDF
SwifDoo PDF is an device-agnostic PDF converter, with the ability to convert multiple Office formats to PDFs, including Excel. As to convert Excel worksheets to PDFs offline, SwifDoo PDF simplifies the conversion process and convert an Excel spreadsheet into a PDF in one page. Let’s look at how to work with SwifDoo PDF to convert an Excel into a fillable PDF for free.
Step 1: After downloading and installing SwifDoo PDF on your computer, launch the program;
Step 2: Since this is your first time to opening the application, you can click PDF to Word or PDF to Image to activate the SwifDoo Converter;
Step 3: When a new window pops up, select Office to PDF;
Step 4: Upload the Excel worksheet from a local computer, choose where to store the PDF, and hit the Start button to finalize the conversion process.
If you need to batch convert multiple Excel files into PDFs, just click “Add Files” to upload more Excel files to the workplace, and that’s it. SwifDoo Converter will help you turn these Excel files safe and sound. The conversion speed largely depends on the file size.
Microsoft Office
Before converting Excel to PDF, the priority is to set page layout and design in Excel. These elements are usually ignored and invisible in Excel sheets, but they matter greatly when converted to PDF.
Since PDF displays content page by page, it is crucial to set the page layout in the right orientation and keep/adjust page margins. By clicking on Page Layout, you are allowed to alter the margins, orientation, page size, and other settings.
By Save As
When the layout of your document is correctly organized and everything has been set up accordingly, it’s time to start converting. To save the Excel sheet as a PDF document, you can follow the steps below to transform an Excel spreadsheet into a PDF in Office 2010:
Step 1: First things first, save all the changes made in the Excel file by clicking on the Save icon in the top left corner or by using the Ctrl + S shortcut key;
Step 2: Go to the File tab and click Save as or use F12 to pop-up the following window (see image);
Step 3: Click Browse and a second window will pop up (see image);
Step 4: At this step, you’ll be promptedto choose a file location and rename the PDF document.
If you need to change the output format, click Save as type to choose .xlsx or .xls.
By Export
If you are running Microsoft Office 2013 on your PC, you can try another method – Export, to transform an Excel document to a PDF, which only takes a few more clicks to finish:
Step 1: Find the File tab and click Export (see image);
Step 2: SelectCreate PDF/XPS Document and the next window will pop up;
Step 3: Enter the file name or change the output location for this PDF document;
Step 4: If you only want to export aportion of an Excel or make other changes, click Options to make corresponding changes. Don’t forget to tick the Entire workbook box if in need of saving the whole Excel worksheet into a PDF.
Convert Excel to PDF on Mac
For Mac users, converting Excel spreadsheets into PDFs is a breeze. With the built-in PDF viewer Preview, users can complete many different conversion tasks, including Excel to PDF conversion. Here’s how to:
Step 1: Open the Excel spreadsheet in Preview;
Step 2: Click the File tab and move your cursor to the Print option;
Step 3: Choose Save as PDF in the pop-up Print window.
Convert Excel to PDF with Online PDF Tools
Besides the aforementioned program, most web-based PDF converters (Online2PDF, iLovePDF, Zamzar) are available to help you process a large number of digital files, including converting an Excel sheet to a PDF document. Here’s the how-to:
Let’s take iLovePDF as an example for exploring how to complete the conversion process:
Step 1: Open the official website and select Excel to PDF;
Step 2: Upload your Excel documents from either a local computer or cloud service provider (Google Drive or Dropbox);
Step 3: The newly created PDF document will automatically download once you finish the above operations.
Furthermore, you are free to save this document into your Google Drive or Dropbox account. If all of these methods are inconvenient to you, you can alternatively share a downloadable link or scan a QR code to access the PDF document.
Conclusion
Turning an Excel worksheet into a PDF is an easy work, and the key point is to make use of reliable technologies. To employ a professional PDF program can ensure a time-saving process and the desired conversion results.
Common FAQ about How to Convert Excel (.xls and .xlsx) to PDF with Online & Offline Tools
Q:What is the difference between XLS and XLSX?
Q:How do i convert Excel to Google Sheets?
Step 1: Visit and log in Google Drive with your account;
Step 2: Click New on the top left and choose File upload;
Step 3: Import your Excel document to your Drive space;
Step 4: After the file is uploaded, right click the Excel worksheet to choose Open with, and then select Google Sheets.
Q:How do I convert Excel to XML for free?
Roche
Roche has been an active PDF user for 6 years and tried different types of professional PDF tools (both online and desktop version) since at his bachelor degree. Now, Roche works as a columnist for SwifDoo PDF over the course of the last one year, and provides useful and practical solutions pertaining to various PDF topics for users from different features.
SwifDoo PDF
Editing a PDF Document is as Easy as Text files
System & Hardware Requirements
OS: Windows 11, 10, 8, 7, and XP (32 & 64)
Processor: 1 Ghz processor or above
Hard Drive Space: 150 MB or above
RAM: 1 GB RAM or above
Customer Rating
4.8 by 1251 users
If you want to save your Excel spreadsheet as a PDF, here’s what you’ll need to do.
While certain files can easily be converted to other formats, that isn’t true for Excel files. While you can embed Excel data elsewhere, it isn’t a format that converts well to other document formats like PDFs.
This is largely due to formatting. Excel files, with its cell grid structure, have to be set up in a way that allows the data to be presented without losing its layout. To save an Excel spreadsheet as a PDF, here’s what you need to do.
Setting Page Layout and Design in Excel
While page layouts and margins aren’t usually visible in Excel, they do exist. As a PDF is a document format that displays content across pages, it’s important to ensure that your Excel data can easily be displayed without the layout being broken.
That’s why changing the page layout in Excel is the first thing you’ll need to do before you can save it as a PDF file. To start, open your Excel spreadsheet and press the Page Layout tab on the ribbon bar.
From here, you can determine the page margins, orientation, size, and overall print area. All four elements can impact how your Excel file is displayed when converted to a PDF.
While the default page margins should be acceptable, press the Margins button and select one of the available options in the drop-down menu if you want to change them. You may do this if you want less (or more) white space around the edges of your data.
By default, Excel is set to a Portrait page orientation. If you have a large number of columns, you may wish to switch this to Landscape instead.
You can do that by pressing the Orientation button and selecting one of the options available.
The page size will have the biggest impact on how much Excel data you can fit onto a single page. These are based on typical physical paper sizes.
Press the Size button and select one of the page sizes from the drop-d0wn menu. A4 is recommended in most cases as a common size to allow for printing.
Setting Excel File Print Options
When you select a print area in Excel, you determine the cells you wish to print. Setting this also allows you to select the data you wish to save to your PDF file if you choose to print to a PDF file directly.
Select the columns and rows you wish to see in your PDF file using your mouse. With the data selected, click Page Layout > Print Area > Set Print Area.
If you have a vast amount of data in your print area (for instance, with a large number of rows or columns), you can change how many of them appear on a single page.
Select a number of rows or columns within your print area, then set the Width or Height options under the Page Layout > Scale to Fit section to 1 page. You can also change the overall scale percentage (the amount of space the print area will use to fill up a page) using the Scale option box provided.
You can also make further changes to your final Excel layout by pressing the Print Tiles button.
In the Page Setup window, change any of the available options listed under the Print and Print Titles sections. Any change you make will be added to your final, converted Excel to PDF document.
Converting an Excel File to a PDF
There are two ways you can convert an Excel file to a PDF.
The first is to save it as a PDF file directly—to do this, press File > Save As and ensure that PDF is selected under the Save as type drop-down menu. Press Save once you’re ready.
Windows users can also print to a PDF file, saving the printer output to a file rather than printing it. This will apply many of the print options above to your file and will use the print area you set. This is a good option if you only want to save some of your Excel data to a PDF file.
To do this, press File > Print and select Microsoft Print to PDF from the printer list. Press Print once you’re ready.
In the Save Print Output As window that appears, select where to save your file, give the file a name, then press Save to save the file.
Using Excel Data Elsewhere
Saving an Excel spreadsheet as a PDF is one way to use your Excel data in another format. It’s easy to insert Excel data into PowerPoint, as well as export it to other Office software like Word.
You might also be able to copy and paste Excel data into other files and software without losing its formatting, too, although your mileage may vary.
See all How-To ArticlesSave Multiple Sheets as PDF in Excel & Google SheetsThis tutorial will show how to save multiple sheets as PDF in Excel and Google Sheets.Export Multiple
Admin
See all How-To Articles
Save Multiple Sheets as PDF in Excel & Google Sheets
This tutorial will show how to save multiple sheets as PDF in Excel and Google Sheets.
Export Multiple Sheets as PDF
By default, when you save an Excel file as a PDF, only the first worksheet is saved. However, you can select multiple sheets to save as PDF. Suppose you have the following Excel file with three sheets (Sheet 1, Sheet 2, and Sheet 3) with the same data.
- Select all the worksheets you want to save as PDF. Hold down the CTRL key and click on the tabs of each sheet you want to save (Sheet 1 and Sheet 2).
- In the Ribbon, select File> Export
- Select Create PDF/XPS Document and click Create PDF/XPS.
- In the Search window, enter (1) a name and (2) a destination for the file, and then (3) click Publish.
By default, the new PDF file has the same name and destination as the original Excel file.
As a result, a PDF file is saved with all the worksheets (Sheet 1 and Sheet 2) selected in the Excel file. Each sheet starts on a new page in the PDF file.
Save a PDF Copy
Another way to achieve the same result is to change the file type when saving.
- Select all the worksheets you want to save as PDF. Hold down the CTRL key and click on the tabs of each sheet you want to save (for example, Sheet 1 and Sheet 2).
- In the Ribbon, select File> Save Copy (Save As).
- Select the PDF (*.pdf) file type and click Save.
The result is the same as in the previous method: A new PDF file is created from the Excel worksheets.
Save Multiple Google Sheets as PDF
Like an Excel workbook, a Google Sheets file can also be saved as a PDF.
- Go to File> Download> PDF Document (.pdf) in the Menu.
- In the Print window, (1) under Export, select Workbook. (2) Tick Sheet 1 and Sheet 2 for the selection, and (3) click Apply. Finally (4) click Export.
A new PDF file with the selected worksheets from the Google Sheets file is now saved under the same name in the Downloads folder.
Video liên quan
Sign up for more like this.
What did you like most about your last job best answer
One of the most common questions youll be asked in an interview is Why did you leave your last job? or maybe Why are you looking to leave your current job? It can be a tricky quest
How to increase a number by a percentage calculator
Percentage Increase FormulaThe formula for percentage increase can be stated as:Percent Increase = [(New value Original value) / Original value] × 100If the percentage increase va
data ________ is the organization method used to manage multiple data points within a dataset.
What is Data Redundancy?Knowledge center»Data integrity and governance»What is Data Quality? Definition, Exampl»What is Data Redundancy?Related articlesWhat is Data Profiling?What
Explore the different ways to convert your Excel workbook to a PDF and preserve formatting.
Excel spreadsheets are an intuitive way to display and share data. But if your formatting is off, it can be hard for other people to read — and it’s not unusual for this to happen when you export workbooks as PDFs. Keep your margins in place like a pro with these tips on how to preserve formatting when converting Excel to PDF.
Use a PDF tool to convert Excel sheets.
If you want to preserve your Excel spreadsheet’s margins, text, and more, the best place to start is with a PDF tool like Adobe Acrobat online services. Open from any web browser and simply follow the steps below:
- Click Select A File and drag and drop your Excel sheet, or select the file and upload.
- Watch as Acrobat online services convert your Excel sheet to PDF automatically.
- Download the converted file as a PDF.
All of your formatting translates over perfectly in just a few seconds. You can also preserve Excel workbook formatting with Acrobat on your desktop, laptop, or mobile device.
Change advanced settings in Excel.
If you don’t have access to a PDF tool, you can download your workbook as a PDF directly from Excel. Avoid cut-off text or shifted margins, by adjusting adjust some of the advanced settings like:
- Page and sheet margins
- Orientation
- Print tiles and print area
Once you’re happy with the formatting, go to File then select Save As and choose the PDF option.
Discover what more you can do with Acrobat online services and Acrobat to convert and share PDFs.
Saving an Excel spreadsheet as a PDF is a solution that I often use when I have data that I want to share with other people, but I want to avoid giving them the option to easily edit that data. Unfortunately the PDF version of an Excel worksheet suffers from the same issues that a printed worksheet does, and you may wind up with a PDF file that contains several unnecessary pages. Therefore, you might find yourself in a situation where you need to save a spreadsheet as a one page PDF in Excel 2013.
Fortunately you can achieve this requirement by adjusting a setting on the Print menu, then saving the file as a PDF. Our guide below will walk you through the process so that you have a PDF file of your data that is easy to print and share with others.
How to Fit a Spreadsheet to One Page and Save it as a PDF in Excel 2013
The steps below will show you how to adjust the settings on your spreadsheet so that the entire thing fits on one page. We will then save the spreadsheet as a PDF so that you can easily share it with others, or print it again in that format.
Step 1: Open your spreadsheet in Excel 2013.
Step 2: Click the File tab at the top-left corner of the window.
Step 3: Click the Print option in the column at the left side of the window.
Step 4: Click the No Scaling button under the Settings section.
Step 5: Select the Fit Sheet on One Page option. Note that large spreadsheets can print very small with this setting. You might have better results with the Fit All Columns on One Sheet or the Fit All Rows on One Sheet option.
Step 6: Click the Save As option in the left column.
Step 7: Click the Save as type dropdown menu, then select the PDF option.
Step 8: Click the Save button to create the PDF file.
You might find that the options you selected above don’t provide the exact results that you were looking for. In that case, check out our Excel printing guide to see some of the options and settings you can use to produce a file with your most optimized print options.
Matthew Burleigh has been writing tech tutorials since 2008. His writing has appeared on dozens of different websites and been read over 50 million times.
After receiving his Bachelor’s and Master’s degrees in Computer Science he spent several years working in IT management for small businesses. However, he now works full time writing content online and creating websites.
His main writing topics include iPhones, Microsoft Office, Google Apps, Android, and Photoshop, but he has also written about many other tech topics as well.
In Excel 2010 and later, you can export a sheet, or a group of sheets, as a PDF file. This tutorial shows sample code for doing this.
Export Active Sheet as PDF File
The following macro code will export the active sheet (or sheets) in PDF format. Copy the code to a regular code module, then select the sheet(s) you want to export, and run the macro.
See the section further down, for details on how the macro works.
NOTE: There are two additional macros below:
- Create PDF file with name from worksheet cells – automatically overwrites existing file, if any
- Create PDF file with name from worksheet cells – check for existing file, prompt to overwrite or choose different name
The Export As PDF Code
Copy the following VBA code to a regular code module, then select the sheet(s) you want to export, and run the macro.
How The Macro Works
Before you run the macro, select the sheet(s) that you want to export to the PDF file.
When the macro starts, it sets variables for the active sheet, and the active workbook. Those will be used to set the default file name and folder.
A time stamp will be added to the default name, in the format yyyymmdd_hhmm.
In the format string shown below, a backslash is entered before the underscore, to indicate it is a literal character. Otherwise, Excel would interpret the underscore as the spacing character that is used in Excel number formatting.
Next, the macro gets the default path for saving the PDF file. If the active workbook has been saved, its path is used. If the active workbook has not been saved, Excel’s default save folder is used.
The name of the active sheet is cleaned up — spaces are removed, and periods are replaced with underscores.
The file path, revised sheet name, and the “.pdf” extension are combined.
The Save As dialog box opens, with the current folder selected, or the default save folder. The folder is filtered, to show only the PDF files that it contains.
At the top of the Save As window, the customized title is shown, “Select Folder and FileName to save”
The default file name is filled in, and you can overwrite it, to save the file with a different name. You can also select another folder –just browse to a different location.
Then, click the Save button, or click Cancel, if you change your mind.
- If you click Cancel, the value of myFile is “False”, and nothing more happens — the macro ends.
- If you click Save, the PDF file is created.
Then, if the file was created, the macro shows a confirmation message with the file path and name.
Click the OK button to close the message box.
Macro 2 – No Prompt
The previous macro creates a default name with a time stamp, based on the active sheet name. It prompts you to select a folder for the saved PDF file, and you can change the default name, if you prefer something different.
In the macro below, the default name is based on the values in cells A1, A2 and A3 on the active sheet. The PDF file is automatically saved in the current folder — you are not prompted to choose a folder, and cannot change the default name.
Macro 3 – No Prompt – File Check
In the macro below, the default name is based on the values in cells A1, A2 and A3 on the active sheet. The PDF file is automatically saved in the current folder, with no prompts.
However, if a file with that name already exists in the current folder, a message asks if you want to overwrite the file. Click Yes or No in the message box.
- Yes – the new file overwrites the old file
- No – you are prompted to choose a folder, and/or enter a different file name.
NOTE: Be sure to copy the bFileExists Function too, below the main macro
Error – Could not create PDF
If you run these macros in Excel for Office 365, you might see an error:
- Could not create PDF.
Or, if you try to manually export a PDF file in Excel for Office 365, you could see this error:
- Document not saved. The document may be open, or an error may have been encountered when saving
In one of the Excel forums on the Microsoft website, someone posted the following solution to the problem.
- As always, make a backup of the Registry, before making any changes to it, and try this at your own risk!
Quoted from Microsoft Excel Forum:
After hours of studying Process Monitor reports on two different computers and comparing them, I discovered that Microsoft Office apps look for “sRGB Color Space Profile.icm” in the wrong place and don’t find it. By deleting the following Registry values, the problem goes away:
- Path: HKEY_CURRENT_USER\Software\Microsoft\Windows NT\CurrentVersion\ICM\RegisteredProfiles
- Value name: sRGB
- Path: HKEY_LOCAL_MACHINE\SOFTWARE\Microsoft\Windows NT\CurrentVersion\ICM\RegisteredProfiles
- Value name: sRGB
For the record, these values are all okay. There is nothing wrong with them. (The Color Management applet in the Windows Control Panel creates them.) The blame is entirely on Microsoft Office, i.e. this is a bug.
How to Copy Macro Code to Regular Module
This short video shows the steps for copying macro code to a regular code module. For written steps, go to the Copy Macro Code page.
Get the Sample File
To see how the macro works, you can download the Export Excel Sheet as PDF sample file. The zipped file is in xlsm format, and contains macros. Be sure to enable macros, if you want to run the macro.
Every day in business or any other field lots of information are there that are required to store for future use. For anyone, it is very difficult to remember that information for a long time. Earlier data and information are stored in a form of a registrar, file, or by paperwork but finding it may be difficult for us. It takes a lot of time. To resolve this issue Microsoft brings a software called MS Excel.
Microsoft Excel is a software that allows users to store or analyze the data in a proper systematic manner. It uses spreadsheets to organize numbers and data with formulas and functions. MS Excel has a collection of columns and rows that form a table. Generally, alphabetical letters are assigned to columns, and numbers are usually assigned to rows. The point where a column and a row meet is called a cell. Generally, it is used to keep records, data in various fields of business.
Features of MS Excel :
- Auto calculate- This helps you to calculate a group of data and it automatically shows the result in the status area. You can also create your own formulas.
- Shared- You can share your data file over a network.
- Templates- It gives us a variety of elegantly designed templates for your home or business purpose.
- Excel Charts- Excel charts help to convey your information in a very easy way. If you choose charts wisely and formatting them cleanly, you can deliver a lot of information to them.
- Conditional Formatting- It helps users to focus quickly on important topics of data or to highlighted errors and to identify important patterns in data.
- Sorting and Filtering- It is used to sort or filter data according to your need. You can also reorder the data. It saves your time a lot.
- Toolbars- It has a Collection of buttons that provide one-click access to commonly used commands such as Save, undoes, and many more.
- Ribbon- It has commands and controls organized tasks in Tabs and groups.
1. CONVERT EXCEL FILE INTO A PDF FILE:
Step 1: First open the MS Excel file from the computer.
Step 2: Now click on the File option on the navigation menu bar as shown in the figure below:
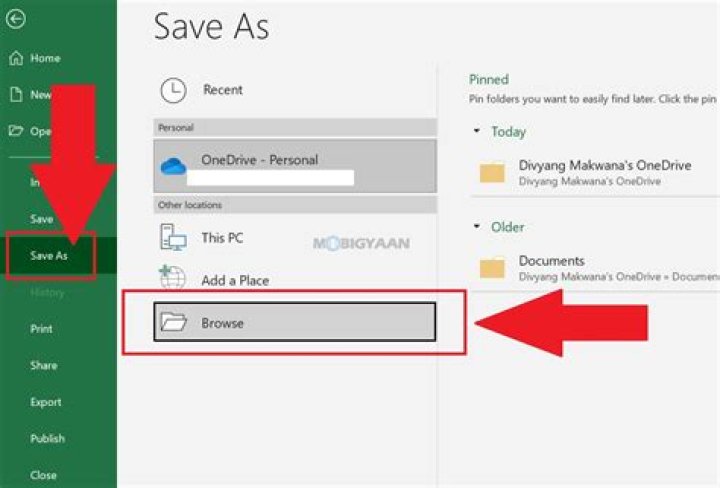
Step 3: Select Save As option from the left menu.
STEP 4: Next click on the Browse option as shown in the figure below:
Step 5: After that, the Save As dialog box will pop up on the screen.
Step 6: Now select the storage drive from the left panel menu as shown in the figure below:
Step 7: Enter the file name in the file name section.
Step 8: Next click on the drop-down arrow menu button.
Step 9: Select the PDF option from the menu as shown in the figure below:
Step 10: Then click on the SAVE option.
As you see in the figure below, the Excel file is converted into a PDF file.
2. Export an Excel File as PDF:
Follow the below steps to export an excel file as PDF:
Step 1: On the navigation menu bar click on the File option as shown in figure below:
Step 2: Now click on the Export option from the left menu.
Step 3: Next select the Create PDF / XPS document option.
Step 4: Click on the highlighted box ( Create PDF / XPS ) as shown in the figure below:
Step 5: After that, ( Publish as PDF or XPS ) dialog box will pop up on the screen.
Step 6: Now select the storage drive from the left panel menu as shown in the figure below:
Step 7: Enter the file name in the file name section.
Step 8: Next click on the drop-down arrow menu button.
Step 9: Select the PDF option from the menu as shown in the figure below:
Step 10: Then click on the Publish option.
As you see in the figure below, the Excel file is converted into a PDF file.
3. Publish as PDF/XP:
Follow the below steps to publish an excel file as a PDF:
Step 1: Click on the drop-down arrow menu button as shown in the figure below:
Step 2: Select the More commands option from the menu.
Step 3: After that, an Excel Options dialog box will pop up on the screen.
Step 4: Select the Quick Access Toolbar from the left panel menu as shown in the figure below:
Step 5: Next click on the drop-down arrow menu button and then select the All Commands option from the menu.
Step 6: Scroll down below and select the Publish as PDF/XPS option from the menu.
Step 7: Next click on the Add option.
Step 8: After that click on the OK option.
As you see in the figure below, a new icon is added in the Quick Access Toolbar.
Step 9: Click on the highlighted icon as shown in the figure below:
Step 10: Now select the storage drive from the left panel menu.
Step 11: Enter the file name in the file name section.
Step 12: Then click on the Publish option.
Finally, the Excel file is converted into a PDF file.
These are some ways to convert an Excel file into a PDF file using MS Excel.
Learn how to easily export your PDF files to editable Excel documents with Adobe Acrobat.
Adobe Acrobat DC
Learn how to easily export your PDF files to editable Excel documents with Adobe Acrobat.
No matter where you are, Adobe Acrobat takes the effort out of creating an Excel spreadsheet from a PDF file. Now, you don’t need to worry about inputting numbers, formatting cells, or wasting time.
No matter where you are, Adobe Acrobat takes the effort out of creating an Excel spreadsheet from a PDF file. Now, you don’t need to worry about inputting numbers, formatting cells, or wasting time.
Convert it automatically.
When you convert your PDF to the XLS or XLSX file format with Acrobat, you can rest easy knowing that all of your columns, layouts, and formatting carry over. No more reformatting or manual data entry.
Work from anywhere.
Use the PDF to Excel converter on your browser or mobile device to convert your PDF files into fully editable spreadsheets no matter where you are.
Make scans editable.
Only have a printout? No problem. Just scan to PDF and convert to Excel. The Acrobat PDF converter automatically extracts and formats the data into editable text thanks to optical character recognition (OCR).
Choose only the data you need.
When you don’t have to edit an entire PDF, simply select the data you need and let the OCR technology take care of the Excel conversion.
How to convert PDF files into Excel spreadsheets:
- Open a PDF file in Acrobat DC.
Click on the “Export PDF” tool in the right pane.
Choose “spreadsheet” as your export format, and then select “Microsoft Excel Workbook.”
Click “Export.” If your PDF documents contain scanned text, Acrobat will run text recognition automatically.
Name your new Excel file and click the “Save” button. That’s it.
Related features
Get more out of Adobe Acrobat with these tips:
A pdf (portable document format) file is a file that can be easily opened by most computers, devices and smartphones. It’s therefore often helpful to convert your files and documents into pdf format to share with others. In this post we’ll walk you through the steps to convert excel to pdf for free. Read below for instructions to convert one or multiple sheets into a single pdf file.
Note: This post may contain affiliate links.
PDF Converters and Writers
The pdf format was developed by the co-founder of Adobe in the early 1990s. Adobe later released the specifications for this type of document and it became an industry standard. However, creating and editing pdf documents was typically done using Adobe Acrobat, which could be costly. Since them some free pdf converters have been released allowing more users access to this format.
Microsoft Office Save as PDF
Around 2007 Microsoft released a save as pdf add-on for office 2007 to allow you to convert your documents and spreadsheets to pdf format. The newer versions of office have this functionality built right in.
With Adobe (and most other pdf writers) to convert a file to pdf you select print from the file menu and then the pdf converter shows up as a printer. With the new save as pdf add-on you create the pdf differently. Instead of selecting print from the file menu you select save as. Then, in the save as dialog box, you select pdf as the file type.
Convert Excel to PDF for Free
Now, with the newer versions of excel, or with the save as pdf add-on when you’re done with your excel sheet and want to convert it to a pdf file it’s similar to saving it. Here’s how to do it.
Note: If you’re new to Excel you may be interested in our Excel Basics post.
- Click file to open the file menu
- Click save as
- On the right side, toward the top, select where you’d like to store your new pdf file
- In the next field, create a name for the pdf
- The field below the file name will say something like Excel Workbook (.xls); Click the dropdown arrow in this field
- Scroll down and select pdf from the dropdown list
- Click save
That’s it – your excel spreadsheet is now a pdf file!
Convert Multiple Excel Sheets into One PDF
To convert multiple excel sheets to a pdf file you do it the same way as above with one minor change. You need to select multiple sheets before you click save as pdf.
- Click on one of the sheets you’d like to print to a pdf
- While holding the control (ctrl) key down continue clicking on each worksheet you’d like included in your pdf file
- When you’ve selected all the sheets you’d like included in your pdf click let go of the control key
- Click on the file menu to open it
- Select the location to save your file
- Create a name for the excel pdf
- In the file type dropdown select pdf
- Click save
Now you have multiple excel sheets saved to one pdf file. Each excel sheet will be saved as an individual page in your pdf.
Conclusion
The new convert excel to pdf feature is a nice way to share an excel sheet (or multiple sheets) without giving someone access to the entire file. It also makes it easier to view your excel sheet(s) on a mobile device. If you have any questions or problems saving multiple excel sheets to a pdf leave a comment below.
By: Waseem Patwegar
You can convert any Excel File or Spreadsheet to PDF Format using “Save As PDF” or “Print to PDF” features as available in Microsoft Excel. You will find below the steps to Print to PDF or Save As PDF in Microsoft Excel.
Print to PDF and Save As PDF in Microsoft Excel
With Windows 10 featuring in-built support for PDF (Printable Document Format), saving or printing any Excel Spreadsheet to PDF format is easy.
While both “Print to PDF” and “Save As PDF” basically convert an Excel File to PDF format, the end product produced by the two methods are different.
When you use Print to PDF in Microsoft Excel, the resulting PDF File will be stripped of all its Metadata (Links, Author info, Bookmarks, etc.) and it will only contain information as available on a printed File.
In comparison, when you use Save As PDF in Microsoft Excel, the resulting PDF File will contain all the Metadata and almost the same information as available in the original document.
How to Print to PDF in Microsoft Excel
Follow the steps below to use Print to PDF in Microsoft Excel.
1. Open the Excel File that you want to Print to PDF.
2. Once the File is open, click on the File tab located in the top menu bar to open the File menu.
3. In the drop-down File menu, click on the Print option in the left pane. In the right-pane, make sure that PDF Printer (Microsoft Print to PDF) is available and adjust page size, orientation and margins as required.
Note: If Microsoft Print to PDF is not available, you will have to make the PDF Printer ready using steps as provided in the next section.
4. Once you are happy with the print settings, scroll up a bit and click on the Print box .
5. On the next screen, type a Name for your file > choose the Location where you want to save the resulting PDF file and click on the Save button.
Note: Make sure “Save as type” is set to .pdf before clicking on the Save button.
Once the PDF Print File is saved, you will be able to send the File for printing or share it electronically with anyone.
As mentioned above, the PDF File produced by using Print to PDF feature in Microsoft Excel will not contain Links and other Metadata associated with the original Excel File.
What to Do if Microsoft Print to PDF is Not Available
If you had previously printed to an actual printer, Microsoft PDF Printer may not be available when to try to Print to PDF in Microsoft Excel.
In such a case, you will have to make Microsoft PDF Printer available and ready, before being able to Print to PDF.
If “Microsoft Print to PDF” is not available, click on the current available printer and choose Microsoft Print to PDF in the menu that appears.
After this, you will be able to Print to PDF any Microsoft Excel File by clicking on the Print box as shown in step 3 above.
Save As PDF in Microsoft Excel
Another way of converting Microsoft Excel File or Spreadsheet in to PDF format is to use “Save As PDF” feature, as available in Microsoft Excel.
As mentioned above, the resulting saved PDF File will contain almost all the information as available in the original document.
1. Open the Excel File that you want to Print to PDF.
2. Once the File is open, click on the File tab located in the top menu bar.
3. From the drop-down menu, click on Save As option in the left pane. In the right-pane, click on Browse .
4. On the next screen, type the Name for your PDF File > select Location for the PDF file and click on Save .
This will save the Microsoft Excel File as a PDF File that you can print or share with anyone.
Whether you use Save as PDF or Print to PDF, the resulting file will retain its Fonts, Formatting and Pagination across all devices and platforms.
I am trying to save an Excel file as a PDF for printing purposes. I have set the column width and row height in cm, as I want to print at a specific size (it’s a file of name tags that have to fit the tags themselves). However, when I convert to PDF, they come out at the wrong size, slightly smaller than I have set in the excel (8.5 cm comes out as 7 cm). The same thing happens if I print directly from Excel as well. How do I get Excel to save to PDF or print at the actual size I have put in?
1 Answer 1
Is it possible that your Excel is scaling to fit? Go to page layout on the top ribbon and in the “width” and “height” drop downs of the scale to fit section, change these to “automatic”. For me, Excel had automatically set to 1 page for each, meaning that Excel tries to scale them down to fit a page. However, keep in mind that this will make Excel print to multiple pages.
Otherwise, there is also a suggestion from Microsoft here to change the styling (added and slightly modified as mine didn’t follow this entirely):
Change the font of the Normal style to match the font used in the worksheet:
- Press CTRL+A to select all columns and rows in the workbook.
- On the Format menu, click Style. (is “cell styles” in my Excel and this appears in the home section of the ribbon)
- In the Style name list, click Normal. Then, right click Modify.
- On the Font tab, select the correct font (whatever font you are using in the workbook).
- Click OK twice.
BenSvuettner
New Member
- Nov 6, 2014
I have a question: I am trying to find a better way of saving an Excel sheet into .pdf format. I am aware that under File -> Save As, I can choose “PDF” as a file format. However, I want the Excel sheet to include a letterhead. The letterhead will remain the same and will not change, so I guess I am looking for something similar to what is described in the link, but for Excel 2010.
What I do at the moment to have my Excel sheet with letterhead as a .pdf, is to physically print the Excel sheet on letterhead, then scan it and save as .pdf. However, I reckon this effort can be reduced Appreciate your help!
Thank you,
BenSvuettner
Excel Facts
mgee57
New Member
- Nov 6, 2014
BenSvuettner
New Member
- Nov 6, 2014
mgee57, you can do so by clicking File -> Save As. and in the “Save As type:” drop down list, choose .pdf.
My question though is if there is a possiblilty to save .pdf on letterhead paper.
BenSvuettner
New Member
- Feb 1, 2015
MrExcel MVP
- Feb 1, 2015
Excel contains over 450 functions, with more added every year. That’s a huge number, so where should you start? Right here with this bundle.
Want to export and save each worksheet as a PDF file? You can do that with a single click using Excel Macros!
Make sure your Excel has the Developer Tab enabled following this tutorial.
I explain how you can do this below step by step!
What does it do?
Save each worksheet as a PDF file
Copy Source Code:
Final Result:
Exercise Workbook:
We want to export these worksheets into pdf files:
STEP 1: Go to Developer > Code > Visual Basic
STEP 2: Paste in your code and Select Save.
Remember to change the directory on where you want to save the pdf files. Close the window afterwards.
STEP 3: Let us test it out!
Open the sheet containing the data. Go to Developer > Code > Macros
Make sure your macro is selected. Click Run.
Let us check the folder, and you will see these worksheets:
Let us open one of the files, and it is exactly the same as the one in the workbook!
How to Save Each Worksheet as a PDF File Using Macros In Excel
This tutorial demonstrates how to save an Excel workbook or Google spreadsheet as a PDF.
Save Excel File as PDF
Save by Exporting
Say you have the following data in an Excel file (.xlsx) and want to export and save it as a PDF.
- In the Ribbon, go to File > Export.
- Select Create PDF/XPS Document on the left and click Create PDF/XPS.
- In the browser window, enter a name and destination for the file. Then click Publish. By default, the PDF file will have the same name and destination as the original Excel file.
Finally, a new PDF file is saved from the Excel file. By default, Excel will export the current sheet only.
Save a Copy
Another option to achieve the same result is to change the file type while saving.
- In the Ribbon, go to File > Save a Copy (Save as).
- Choose file type PDF (*.pdf) and click Save.
The result is the same as with the previous approach: A new PDF file is saved from the Excel worksheet.
Note: You can also save an Excel file as a PDF using VBA code.
Save Google Sheets File as PDF
Just like an Excel workbook, a Google Sheets file can also be saved as a PDF.
- In the Menu, go to File > Download > PDF document (.pdf).
- In the Print window, change Paper size to Letter and Page orientation to Portrait. Then click Export.
A PDF file with the Google Sheets file’s data is now saved with the same name in the Downloads folder.
November 11, 2014 by Barbara
Converting an Excel work sheet or work book to a PDF document is a great way of sharing content without allowing other users to amend your work.
From Excel 2010 onwards this is really easy to convert to PDF, even for Excel documents.
- Open the Excel document you want convert to PDF
- In the Excel ribbon select File then Save As
- If you have not already entered a file name then do so this stage
- In the Save As Type drop down box scroll down to PDF or hit the letter P on the keyboard to take you down to PDF
There are a few options to play around with in the next section before you share your document. Firstly you will see Author Name. This will be pre populated with the your name or the name that the current Excel program is registered with. Just click in the name area to add in another author name if you need to.
The Add Tags option – this will allow you to tag the document with key words to enable it to be found quickly, on your machine. There is also options for Title and a Subject if you want to record those features.
There are some optimisation options available in the next section. If you want to share the document online and make it available for download then you need to select the Optimise For Online option. This will allow great quality both printing and publishing online. If you want to just publish online and reduce the size of the file if it is of importance then the second option Minimum Size for Publishing Online will do just great.
You can also choose to take a sneak preview of your created PDF file then tick Open File After Publishing. You need to have Adobe Viewer in stalled the open the file for preview.
The next set of options are in the Options button. This where you decide exactly what you want to export in your Excel file.
In the Page Range area you can select
- All pages or
- Select a range of pages from and to
The Publish What area gives you the options of
- Selection
- The entire Excel workbook
Excel and PDF are two very popular file types.
There’s a good chance you’ve probably needed to convert your Excel file into a PDF.
In this post, I’ll show you 5 ways you can easily convert your Excel file into a PDF.
Video Tutorial
Save as PDF
This is the most commonly used method and you might have already used this once or twice already.
Save a copy of the file as PDF.
- Go to the File tab.
- Go to the Save a Copy tab.
- Select PDF as the file type.
- Press the Save button.
Easy enough, and your new PDF file will be saved in the same location as the Excel file is saved.
If you want to change the save location or access other advanced PDF file options then you can click on the More options link just below the file type selection.
This will open up a the Save As menu and you can navigate to a new save location as well as access the advanced Options for PDF files.
Export as PDF
I never really noticed this, but there’s an Export option in the File menu.
It turns out, you can use this to export your file as a PDF!
To Export your Excel file as a PDF.
- Go to the File tab.
- Go to the Export tab.
- Select Create PDF/XPS Document.
- Press the Create PDF/XPS button.
This will open up the Publish as PDF or XPS menu, which is exactly like the Save As menu and you can choose the location to publish as well as access advanced PDF Options.
Publish as PDF Quick Access Toolbar Command
You can add the publish as PDF command to the quick access toolbar to avoid the step of going to the File tab.
Right click anywhere on the quick access toolbar and choose Customize Quick Access Toolbar from the menu.
This will open up the Excel Options menu and you can add the Publish as PDF or XPS command from here.
- Make sure you’re on the Quick Access Toolbar tab in the Options menu.
- Select All Commands.
- Scroll down and select Publish as PDF or XPS.
- Press the Add button to add the command into your selection of Quick Access Toolbar commands.
- Press the OK button.
You can now use this command from the Quick Access Toolbar to publish your Excel file as a PDF document.
Email as PDF Attachment Quick Access Toolbar Command
This is one of my favourites on the list as it does two things for you. It will convert your Excel file to PDF and then create a new email message with the PDF attached.
All without any code needed!
This is super useful if you need to email your files as PDF’s.
Again, right click on the quick access toolbar and choose Customize Quick Access Toolbar from the menu.
In the Excel Options menu and you can add the E-mail as PDF Attachment command.
- Make sure you’re on the Quick Access Toolbar tab in the Options menu.
- Select All Commands.
- Scroll down and select E-mail as PDF Attachment.
- Press the Add button to add the command into your selection of Quick Access Toolbar commands.
- Press the OK button.
This will place the E-mail as PDF Attachment command into your quick access toolbar.
When you press this command, it will automatically create a new Outlook email with a subject line of the Excel workbook name. The PDF of the converted Excel file will also be added as an attachment.
This will save you many clicks.
Convert File to PDF in Power Automate
All the previous options to convert your Excel file to PDF are great and they will save you valuable clicks, but they are not automated.
There is a Power Automate action that can convert files to PDF. This means you can convert PDF files as part of some automated process.
You could use this to do things like automatically create and send PDF invoices by email at the end of the month.
The file you want to convert will need to be saved in OneDrive.
You’re going to need to add two actions to your automation. The first to convert the file and the second to create the file.
- Add a Convert file action from the OneDrive connector.
- Select the file you want to convert.
- Select PDF as the Target type for the conversion.
- Add a Create file action from the OneDrive connector.
- Select the folder where you want to create the PDF.
- Give your PDF file a name. Make sure to end the name with the .pdf extention.
- Press the dynamic content button and add dynamic content for the File content using the content created from the Convert file OneDrive action.
Conclusions
Converting your Excel files to PDF is a common task.
Luckily it’s pretty easy and there are a few options available.
There is also a Power Automate option for converting Excel to PDF which means you can create automated processes that convert your files to PDF.
Which one is your favourite? Let me know in the comments!
Microsoft Excel program contains macros, diagrams, and mathematical calculations. The Excel files may also contain external links to various sources. All these factors make it hard or impossible to send the Excel files by email or publish them in the web. If you try and open the Excel document received by email, first thing you will get will be a security warning. Attempts to turn off the macros though may lead to incorrect data interpretation.
Mathematical calculations should be treated as intellectual property, that’s why making them available in the open sources is not the best solution. In case the Excel file contains links to outside resources, it may become impossible to open the Excel file on the side computer.
The best way to approach the Excel files will be to convert them to PDF before sending via email. The PDF format offers the ability to save the information of the Excel file exactly as it is and to accurately represent it on any electronic device.
How to Convert Excel Worksheet to PDF
Open worksheet in Microsoft Excel. Select Universal Document Converter toolbar and click Convert to PDF:
Convert the Excel Worksheet into Single-page PDF
If you deal with the Excel worksheet, but would like to save it as a single–page PDF, follow the instruction:
- Open the worksheet in Microsoft Excel
- Select Page Layout toolbar and open Page Setup window
- Select the option Fit in 1 page wide x 1 page tall and click ОК
- Click Print and select Universal Document Converter from the list of printers
- Click Properties and select PDF Document as the output file format
- Click OK to apply the introduced settings
- On the Print window click ОК to start converting Excel worksheet into PDF.
Convert the Excel Workbook into a Single PDF File
Please follow this video tutorial to learn how to convert the Excel workbook into a single PDF:
Save Excel as a Password Protected PDF
To limit the access to your Excel data you can save your Excel document as a password protected PDF file:
- Open the worksheet in Microsoft Excel
- Click Print and select Universal Document Converter from the list of printers
- Click Properties and select PDF Document as the output file format
- In PDF Standard dropdown select Password protected
- Enter the password and click OK to apply the introduced settings
- In the Print window click ОК to start saving the Excel worksheet as a password protected PDF
Placing a Watermark to Protect Your Copyright
- Open worksheet in Microsoft Excel
- Click Print and select Universal Document Converter from the list of printers
- Click Properties and select PDF Document as the output file format
- In the Watermark area select Text label or Picture and change settings according to your preferences
- Click OK on the Universal Document Converter settings panel to apply changes
- Click ОК in the Print window to start converting the Excel worksheet to PDF
Convert Excel Files in Batch Mode
When there is a necessity to convert the Excel files into PDF in batch mode, use Print Conductor. This software has been designed to automate the batch conversion of the Excel files.
- Add the files you wish to convert to the Print Conductor
- Select Universal Document Converter form the list of printers and click Change Settings
- Select PDF document as the output format
- You can password protect your files or place a watermark on your files for extra security measures
- Click OK to apply the introduced settings
- Click Start to convert your Excel files to PDF in batch mode.
Examples for Developers to Automate Excel Conversion
Software developers can use the conversion kernel available with the Universal Document Converter and utilize the existing resources for their own projects. Public API and code examples are available for integration.
Examples on how to convert Excel to PDF in different programming languages are here.
4 easy ways to convert Excel files to PDF
:max_bytes(150000):strip_icc()/tim-fisher-5820c8345f9b581c0b5a63cf.jpg "How to save an excel sheet as a pdf")
- Tweet
- Share
- Tweet
- Share
In This Article
Jump to a Section
There are many ways to convert an Excel file to the PDF format. One reason to do this type of conversion is so the spreadsheet is more comfortable to open and read on other computers, phones, and tablets, all without having to have a spreadsheet program or app installed.
Excel files that remain in the XLSX or XLS format are 100% editable with Excel or another similar spreadsheet program (e.g., OpenOffice Calc and LibreOffice Calc), but PDFs are not. While there are PDF editors available, they don’t usually work as well as editing the raw file.
Why Use the PDF Format
Excel files require a specific program to read and edit them, so it can be hard to share such documents with people who don’t have the needed software. However, the PDF format is much more ubiquitous, so as long as there’s a PDF viewer installed on the computer, you can view the file without the need for a spreadsheet viewer/editor.
Use Microsoft Excel to Create a PDF File
If you’re working with Excel documents, there’s a good chance you already have Excel on your computer. If so, you can easily convert XLSX to PDF, or the older XLS to PDF.
These instructions apply to Excel versions 2021, 2019, 2016, 2013, 2010, and Excel for Microsoft 365.
Exporting on a Windows PC
Windows users can convert Excel documents to PDF through the Export menu:
Open the File > Export menu.
Choose Create PDF/XPS.
Double-check that PDF (*.pdf) is selected next to Save as type. The other option is for making an XPS file.
You can optionally use this time before making the PDF to enable or disable some advanced options. Go into Options in the save dialog box to do things like export only specific pages to PDF, export all the worksheets, and more.
Choose where the PDF should be saved, and then select Publish.
Exporting on a Mac
If you’re on a Mac computer, making a PDF from an Excel file can be completed through the Save As menu item.
Go to File > Save As to open a pop-up box for saving the Excel document.
Next to File Format, at the bottom of that window, choose PDF.
Take note of the options just below the format selection drop-down box. You can choose Workbook or Sheet to convert either the whole workbook to PDF (all the sheets that have data in them) or just the sheet that’s open right now.
Select Save to convert the Excel file to PDF on your Mac.
Export to PDF With Google Sheets
Sheets is Google’s online spreadsheet creator and editor. Since you can upload Excel files to Google Sheets, and because Sheets can export documents to the PDF format, it serves as a great way to convert XLSX/XLS to PDF on any computer.
Open Google Sheets, and use the file picker button off to the right to browse for and open your Excel file.
Go to File > Download > PDF (.pdf) to see a preview of the document as a PDF. You can edit what should be exported and some other settings.
Select EXPORT to save the spreadsheet as a PDF.
Online Converters
Another option is to use a file converter. Since XLS and XLSX files are documents, you can use a free document file converter.
There are even some online Excel to PDF converters that make this even easier, and since they work with any web browser, they can convert Excel to PDF on any operating system.
A few of our favorites include Smallpdf, iLovePDF, Soda PDF, and Online2PDF.
Another one we like, shown below, is FileZigZag. Upload your Excel file there and choose PDF as the target format. Select Start Converting to convert the Excel file to PDF and get the download link.
‘Print’ to PDF
If you don’t have Excel installed, you can still save the XLSX or XLS file to PDF with Microsoft’s free Excel Viewer program. However, since that tool is only an Excel file viewer (not editor), you have to install another program along with it to make it support the PDF conversion.
One way is with a free PDF printer. PDF printers work by having you ‘print’ the document to PDF, which is an easy way to send the Excel file to the PDF converter, after which the program will save it to the PDF format.
Open Excel Viewer and select the Excel file you want to convert to PDF.
Use the button at the upper left-hand side of the program to select Print.
Change the printer from the drop-down menu next to Name to be the PDF printer you installed.
In our example, we can choose Foxit Reader PDF Printer from the drop-down menu.
Make any other changes you want to the print preferences, like to print a certain number of pages, and then select OK to launch the PDF printer software, Foxit PDF Reader in this case.
Some PDF printers will open the program with further instructions, and others will save the PDF without any other prompts.
That’s it! You’ve created a PDF file from the Excel document!
In this example, we will convert a Specific Excel Worksheet to PDF in Microsoft Power Automate. You can follow the same steps if you are using Azure Logic Apps.
Our first step in setting up our flow is getting the contents of an XLSX file from Azure Blob (this could be retrieved many other possible file sources as well, such as OneDrive, SharePoint, Box, Google Drive, etc.). We can then take this file and perform the “Split a single Excel XLSX into Separate Worksheets” action in the Cloudmersive Document Conversion Connector. If you are new to using one of our API Keys in Power Automate or Azure Logic Apps, you will be prompted to insert your API Key.
After this step, you will need to plug in the “Apply to Each” control and insert our output from the previous step, “ResultWorksheets”. From here, you can set your Conditions; in this case, we will select “WorksheetNumber” and set it equal to the sheet number for whichever worksheet you would like to convert to PDF. Then, in the “If Yes” option, we will pass the “WorksheetContents” output into the Cloudmersive Document Conversion connector with the “Convert Excel XLSX Spreadsheet to PDF” action, along with the desired file name. After this, we can add a “Create File” connector for OneDrive or other file drive to save our output content.
You can see here how our flow should look once you have followed these steps:
Then, we can run it, and below, you will see the result:
Now, you have an easy to use template for splitting and then converting your Excel worksheets to PDF in Power Automate.
If you need help, here’s a step-by-step visual walkthrough of the flow:
Published: Aug. 10, 2019
Describes how to convert an Excel sheet to PDF using Python.
There seem to be many libraries for manipulating Excel files in Python, but this time I will use a module called win32com.
win32com can handle Windows COM objects. Just like using COM objects in Excel VBA.
Environment
- Windows 10
- Microsoft Excel 2016
- Python 3.6.2
Install
win32com is not included by default, so install it.
Now you can do import win32com .
Convert Excel file to PDF
I prepared the pre-conversion Excel file (I just brought an Excel template).
One sheet is a calendar for one month, and there are 12 sheets (one year).
Convert this to a single PDF file.
To convert an Excel file to PDF, simply operate Excel from win32com, open the file and save it as PDF.
The following is a sample program.
All 12 sheets are specified and exported to a PDF file.
The output PDF is as follows.
Output PDF file
I was able to create PDF more easily than I expected.
It is interesting that there are many other possibilities.
Reference
Related Posts
[Python] Replace text in Excel cells
Replace strings in Excel cells with Python. It can be used …
How to open Excel file with password in PowerShell
Open an Excel workbook with password in PowerShell. When …
Replace string in Excel with PowerShell
Replace strings in cells in Excel using PowerShell. Imagine …
Make Python & Selenium program executable (.exe) (How to include webdriver in .exe)
Make a program created with Python & Selenium into an …
[PyInstaller]Make Python an executable file
PyInstaller can be used to convert a program created with …
[PyInstaller] Create multiple exe’s in one folder
PyInstaller makes it easy to create an exe, but I …
Hide the console in Python Selenium
Running Python Selenium causes the ChromeDriver console …
It’s Not Easy, But Here is MY Workaround
Have you run into this problem? You include hyperlinks to external content in an Excel file, but as soon as you send it to PDF, the links are dead…
Painful to say the least!
Here’s how I solve it. If you know another approach, please let me know!
- Excel workbook with live hyperlinks.
As you see, the key is to have the links “hyperlinked” with the actual URL displaying.
The challenge in my workbook is that one link is Static and the second link is dynamic (it changes based on the content included in the report).
For the STATIC link, just copy and paste the URL into a separate location. Make sure that the URL is a live link (if this doesn’t happen automatically upon pasting, use the “Insert >> Link” process from the Home Ribbon to make certain it’s a live link).
For the DYNAMIC link, insert the formula and and use the “Insert >> Link” process from the Home Ribbon. As the underlying source link changes, the displayed URL changes and stays live.
The final step is DO NOT “Print” the report to PDF — depending on the specific approach you use, links will break! Always use the Adobe Add-In ribbon (if you have Adobe Licensed Software).
About Don
Don is passionate about helping professionals and organizations keep up, develop and adapt to the changing business world that we operate in.
Every day in business or any other field lots of information are there that are required to store for future use. For anyone, it is very difficult to remember that information for a long time. Earlier data and information are stored in a form of a registrar, file, or by paperwork but finding it may be difficult for us. It takes a lot of time. To resolve this issue Microsoft brings a software called MS Excel.
Microsoft Excel is a software that allows users to store or analyze the data in a proper systematic manner. It uses spreadsheets to organize numbers and data with formulas and functions. MS Excel has a collection of columns and rows that form a table. Generally, alphabetical letters are assigned to columns, and numbers are usually assigned to rows. The point where a column and a row meet is called a cell. Generally, it is used to keep records, data in various fields of business.
Features of MS Excel :
- Auto calculate- This helps you to calculate a group of data and it automatically shows the result in the status area. You can also create your own formulas.
- Shared- You can share your data file over a network.
- Templates- It gives us a variety of elegantly designed templates for your home or business purpose.
- Excel Charts- Excel charts help to convey your information in a very easy way. If you choose charts wisely and formatting them cleanly, you can deliver a lot of information to them.
- Conditional Formatting- It helps users to focus quickly on important topics of data or to highlighted errors and to identify important patterns in data.
- Sorting and Filtering- It is used to sort or filter data according to your need. You can also reorder the data. It saves your time a lot.
- Toolbars- It has a Collection of buttons that provide one-click access to commonly used commands such as Save, undoes, and many more.
- Ribbon- It has commands and controls organized tasks in Tabs and groups.
1. CONVERT EXCEL FILE INTO A PDF FILE:
Step 1: First open the MS Excel file from the computer.
Step 2: Now click on the File option on the navigation menu bar as shown in the figure below:
Step 3: Select Save As option from the left menu.
STEP 4: Next click on the Browse option as shown in the figure below:
Step 5: After that, the Save As dialog box will pop up on the screen.
Step 6: Now select the storage drive from the left panel menu as shown in the figure below:
Step 7: Enter the file name in the file name section.
Step 8: Next click on the drop-down arrow menu button.
Step 9: Select the PDF option from the menu as shown in the figure below:
Step 10: Then click on the SAVE option.
As you see in the figure below, the Excel file is converted into a PDF file.
2. Export an Excel File as PDF:
Follow the below steps to export an excel file as PDF:
Step 1: On the navigation menu bar click on the File option as shown in figure below:
Step 2: Now click on the Export option from the left menu.
Step 3: Next select the Create PDF / XPS document option.
Step 4: Click on the highlighted box ( Create PDF / XPS ) as shown in the figure below:
Step 5: After that, ( Publish as PDF or XPS ) dialog box will pop up on the screen.
Step 6: Now select the storage drive from the left panel menu as shown in the figure below:
Step 7: Enter the file name in the file name section.
Step 8: Next click on the drop-down arrow menu button.
Step 9: Select the PDF option from the menu as shown in the figure below:
Step 10: Then click on the Publish option.
As you see in the figure below, the Excel file is converted into a PDF file.
3. Publish as PDF/XP:
Follow the below steps to publish an excel file as a PDF:
Step 1: Click on the drop-down arrow menu button as shown in the figure below:
Step 2: Select the More commands option from the menu.
Step 3: After that, an Excel Options dialog box will pop up on the screen.
Step 4: Select the Quick Access Toolbar from the left panel menu as shown in the figure below:
Step 5: Next click on the drop-down arrow menu button and then select the All Commands option from the menu.
Step 6: Scroll down below and select the Publish as PDF/XPS option from the menu.
Step 7: Next click on the Add option.
Step 8: After that click on the OK option.
As you see in the figure below, a new icon is added in the Quick Access Toolbar.
Step 9: Click on the highlighted icon as shown in the figure below:
Step 10: Now select the storage drive from the left panel menu.
Step 11: Enter the file name in the file name section.
Step 12: Then click on the Publish option.
Finally, the Excel file is converted into a PDF file.
These are some ways to convert an Excel file into a PDF file using MS Excel.
Excel files are great for comparing and organizing data, but you may encounter situations where someone you are working with either requests a PDF file, or your workflow dictates that a PDF file is more useful. There are thrid-party applications that can generate and convert Excel files to the PDF file format, but Excel 2010 includes its’ own tools for generating PDFs from your existing worksheet. So continue reading below to learn the steps needed to create a PDF from your Excel file.
How to Convert Microsoft Excel Files to PDF
This tutorial will show you how to convert either a single Excel worksheet to a PDF, or the entire workbook to a PDF. If you convert the entire workbook, each worksheet will be included as part of a single PDF file.
Step 1: Open the Excel file that you wish to convert to the PDF format.
Step 2: Click the File tab at the top-left corner of the window.
Step 3: Click the Save As option in the column at the left side of the window.
Step 4: Click the drop-down menu to the right of Save as type, then choose the PDF option.
Step 5: Click inside the File name field, then type the desired name for the PDF file.
Step 6: Locate the Optimize for section of the window, then choose either the Standard or Minimum size option. If you want to keep the file size as low as possible, select the Minimum size option.
Step 7: If you just want to save the active sheet as a PDF, then you can click the Save button at the bottom of the window and your PDF file will open automatically. If you want to save the entire workbook as a PDF, click the Options button.
Step 8: Click the Entire workbook option in the Publish what section of the window, then click the OK button.
Step 9: Click the Save button at the bottom of the window to create your PDF file.
Are you looking for a program that will allow you to make PDF files from scratch, including forms? Adobe Acrobat is an immensely helpful program that can create, edit and convert a number of different files to the PDF format. Click here to learn more about Adobe Acrobat, read reviews and check pricing.
We have also written about how to convert Word files to PDF files as well.
Matthew Burleigh has been writing tech tutorials since 2008. His writing has appeared on dozens of different websites and been read over 50 million times.
After receiving his Bachelor’s and Master’s degrees in Computer Science he spent several years working in IT management for small businesses. However, he now works full time writing content online and creating websites.
His main writing topics include iPhones, Microsoft Office, Google Apps, Android, and Photoshop, but he has also written about many other tech topics as well.
Your Custom Text Here
Creating PDF Files with Excel VBA
Creating PDF files is a very useful tool as it allows you to put data in a format which cannot be altered. Creating this automatically is awesome. Adobe has created possibly the most widely used business application for PDF files. This can be downloaded free, Adobe Acrobat Reader. If you don’t already have it you will need reader to run this report. It can be downloaded free from the Adobe website.
The following will print all of the visible worksheets within a workbook. If there are sheets which you do not wish included in the PDF file, I guess the easiest way to get around this would be to to hide the sheets you don’t want printed before you run the procedure.
Sub CreatePDF() ‘Excel VBA to create PDF files.
Dim str As String
str= “C:\Test\”
ThisWorkbook.ExportAsFixedFormat xlTypePDF, str & “ReportA” & “.pdf”
To use it change the file path remembering to include the back slash \ after your directory name. If you are using the below code to test workings then ensure you have a folder path called C:\Test\
The files is saved as ReportA however it maybe more flexible if you link the file name to a cell within the workbook.
Creating a Batch of PDF Files from Excel
The following procedure will create a batch of reports and save them as PDF documents. One thing to remember is it will copy the first 3 sheets (change to suit) to PDF.
Dim i As Integer
For i=2 To Range(“A” & Rows.Count).End(xlUp).Row
The above is very useful if you have lots of reports to push into PDF format. I will attach an example of the above to give the procedure context.
PDF is a popular file type for sharing. Fortunately, Excel has a couple of tools for an Excel to PDF conversion. The process becomes even easier thanks to Excel’s Page Layout options, where you can define page sizes and properties. In this article, we are going to show you how to convert Excel workbooks into PDF using 4 methods.
Save as PDF
Simple as it sounds. You can save your Excel spreadsheet as a PDF file. Instead of the Save option, you need to use Save as PDF. Here are the exact steps:
- Open the File tab
- Click Save As
- Select the folder you want to save the file
- Select PDF as the file type
- Press Save button
Usually, these steps will be enough for most circumstances. To see extra options for saving as PDF, click the Options button unser Save As.
Also, you can choose an optimization type and whether you want to open file after creating.
Export As PDF
Another way you can open the Save As dialog using the steps below:
- Open the File tab
- Activate Export
- Click Create PDF/XPS Document
You will see the same Save As dialog, the file type is already set as PDF.
Publish as PDF
Excel also has some hidden features for converting Excel Files to PDF. One such feature is is Publish as PDF or XPS. This is a hidden command which you can add to your Excel (actually Excel’s Ribbon or Quick Access Toolbar).
Follow the steps to add Publish as PDF or XPS to the Quick Access Toolbar:
- Right-click on Ribbon or Quick Access Toolbar
- Select Customize Quick Access Toolbar (Alternatively, you can open via Options window)
- While left pane displays available commands, the right one shows the active commands. Make sure select All Commands for the commands in the left panel
- Scroll until you find Publish as PDF or XPS
- Select it and click the Add button to add the command into the right panel
- Click OK to apply the settings. After this step you should be able to see the command in Quick Access Toolbar
Clicking the PDF or XPS buttons displays the Save As dialog with PDF file type selected.
Email as PDF Attachment
The last approach we are going to take a look at is another hidden command – Email as PDF Attachment. This command is very useful if you send your Excel-PDF files via emails frequently. Once this command is triggered, Excel automatically saves the file as PDF and attaches it to a new blank email.
You can find Email as PDF Attachment command by following same steps in the previous topic.
Click Email as PDF Attachment icon send your file with an email.
Our free Excel to PDF converter converts all your files fast, whether you need to convert XLS, XLSX, or another Excel file format. Not only is it easy to use, but our Excel to PDF converter converts your Excel spreadsheet with tables and formulas to PDF perfectly.
Plenty of tools
We have several online PDF editing tools available at your disposal. More than an Excel to PDF converter, we’ve got all of your bases covered from removing and rotating pages, to splitting and merging PDFs, to file compression. With so many tools to use, you’ll never need another PDF converter.
File security
There’s no need to be concerned about the privacy of your data when you use our online Excel to PDF converter. All files on our server, including your XLS, XLSX, and PDF files, are securely encrypted using 256-bit SSL Encryption technology, making your data harder to intercept. We also won’t share or sell any information provided to us with outside parties.
Easy to use
If you can access the Internet, you can utilize our free PDF converter and file editing tools. Regardless of the device you’re using, you can convert XLS and XLSX files to PDF to be viewed by any device, anytime you need it.
Give it a test run
Use our online Excel to PDF converter for free, or sign up for a paid membership to use all of our PDF conversion and editing tools with unlimited access. Additionally, you can download multiple files, and you get uncapped file sizes.
Delete your files automatically
After you turn your Excel file into a PDF document, all files uploaded to our servers will automatically be deleted, just in case you forgot to delete them yourself.


