Jason Fitzpatrick is the Editor in Chief of LifeSavvy, How-To Geek’s sister site focused life hacks, tips, and tricks. He has over a decade of experience in publishing and has authored thousands of articles at Review Geek, How-To Geek, and Lifehacker. Jason served as Lifehacker’s Weekend Editor before he joined How-To Geek. Read more.
It’s all too easy to stuff your Android phone or tablet to the gills with data and find yourself without room to install new apps or download new media. Today we’re taking a look at how to quickly assess what’s eating up all your disk space.
Everytime I install an Android app, that little notification pops up at the bottom of the screen and tells me how much free space I have left. I’ve been watching it dwindle for months but never got around to investigating (or, for that matter, uninstalling anything). Last night I went to install a new app and it failed to install because there wasn’t enough room to install it. Ouch.
What can I do? I know I could just blindly uninstall applications or remove media I have saved on the phone, but there has to be a more calculated way to go about it, right? Back in the day when computer HDD space was at a premium I remember using disk space visualizers to help me decide what directories to look at pruning. Is there such a thing for Android?
You’re definitely on the right path with the request for a disk space visualize as they’re quite handy for your needs. Before we dive into that, however, let’s look at the built-in disk space visualizer.
If you navigate to Settings -> Storage you’ll see a simple breakdown of how your internal and external SD card space is divided.
This screen is the only practical way to visualize your storage consumption in Android and it’s fairly limited; you can’t drill down into the categories and see what in, say, “Audio” is chewing up all your disk space. The best feedback you’ll get here is a general sense of what category is consuming the most storage. Sometimes this is useful in the sense that you can easily glance over it and say, “OK, I need to clear out my ‘Downloads’ folder” or some simple solution. Oftentimes it leaves you wanting more information.
That’s where the very handy and free app DiskUsage. It’s exactly like the kind of data visualizers you recall from your days of managing small Windows HDDs. Once you’ve installed the application you can fire it up and view your data. Upon first run it will prompt you to select which storage device you want to examine. Here’s what one of our phone’s rather full internal SD cards looked like:
Just by looking at the first display, we can see a huge amount of wasted space we can immediately clean up. The Dolphin Browser’s cache has swelled to 1.6GB, and various firmware files like Cyanogen Mod updates and the ClockworkMod installer take up a collective 3GB or so. Those files alone account for roughly one fourth of our total internal SD card storage use.
Even better yet (and unlike the built-in space analyzer) you can also use the same tool to browse your external SD card to get a sense of how you’ve filled up your add-on storage.
Once you’ve located the source of your disk-clogging woes you can mediate the situation. Oftentimes, it’s as simple as moving some media off your phone (like audiobooks you’re no longer using), other times you’ll need to cull through your apps or purge the cache files of apps like Dolphin Browser and Facebook that tend to eat up disk space. For additional advice on dealing with disk space and how to purge it, check out this How-To Geek School lesson.
Have a pressing tech question? Shoot us an email and we’ll do our best to answer it.
I’m using CyanogenMod 11 on an i9300. The internal memory of my phone is quite full, but when I tried to find out what was taking this space I found out something really strange.
I installed the program Disk Usage & Storage Analyzer, and as you can see it shows that I actually have 10.25 GB occupied in the internal memory. But when I try to analyse what is taking up this space it seems that I have only 1.61 GB Occupied
Click images for larger version
This problem came up when I tried to install an app and the Play Store app told me that the internal memory was full.
How can I free that space?
1 Answer 1
There are three questions asked in the garb of one title. I’ve addressed them below.
First, about the title:
How can I find out what’s using all of my internal storage?
I use an app called DiskUsage to see what’s using my Internal/External SD card. The diagrams (hierarchy in size) it shows are extremely helpful. If your device is rooted, then the possibilities to scan directories in / pops up.
It’s simple to use as well. Launch the app, choose the storage and see the stuff. You can also choose to see any folder inside your default File Manager by selecting the folder and tapping on Show.
About the question before the end:
This problem came up when I tried to install an app and the Play Store app told me that the internal memory was full.
This Play Store message is more or less related to the memory available for your apps installation ( /data ) and not the Internal SD card which you possibly have understood AFAIK. You can see similar questions/answer under the tag insufficient-memory.
In shortcut. Something is taking too much space. How can i get information about what could it be?
Well i have Samsung A20e with Android 9.
Which has 16 GB internal storage.
I have additional 16 GB SD card. Everything is stored in this SD card except apps that cannot be moved to SD card.
Storage information says:
System/ user data: 15.7 GB
Available space: 358 MB
And now, what is interesting, the so called “user data”:
Documents: 266 KB
Images: 2.44 MB
Videos: 224 MB
Audio: 26 MB
Applications: 1.8 GB
Installation files: 222 MB
Other: 15.17 GB.
What is that other? Well, obviously it’s the system, but i don’t think system is so big.
How can i get more information on this “Other” data?
Welcome to Android Central! Try DiskUsage to get a better idea of what’s taking up storage.
Do you use Kik Messenger? A forum member recently discovered that it can build up an enormous cache.
Please register on this forum, which will allow you to engage in discussion more easily, as well as post images. community.html
Thanks for reply. I downloaded DiskUsage and tried that, root folder was ok and eve emulated/0 storage was ok. Only thing i found was a lot of linked files, which is just linked files, not real storage eating files.
So i think this needs to be software issue, so i am just gonna backup my files and with really happy face i am just gonna do a factory reset.
I will then do a compare of folder structure before and after factory reset and i will see what was the problem.
Thanks for reply, but i need to ask if you read it completely. Everything i download and apps that can be moved to SD card is stored in external SD card. No connection to internal storage.
Yes I did read everything, and not all app data can be stored to sd card , how many apps you downloaded to the phone?
What you can do with photos
The Your Phone app lets you view the photos you’ve taken with your Android device. In addition, you can:
Save a photo to your PC
Edit a photo from your Android device on your PC
Delete a photo from your Android device on your PC
Share a photo with someone else
Copy a photo and paste it into an Office document, an email message, or to your desktop.
Insert a picture from Your Phone into a text message
Selecting a photo opens it into a gallery view. Here you’ll be able to view and take action on your photo. You can open your photo using the Windows Photos app to edit it as you like. If you save your changes, they’ll be saved as a new file and your original photo remains unchanged on your Android device.
If you encounter issues with photos, these troubleshooting tips may help.
Save a photo to your PC
Quickly save a photo to your PC desktop
In the Your Phone app, select Photos.
Find the photo you want, then drag it with your mouse onto the PC desktop. A copy of the original photo is saved on your PC desktop.
Save a photo to a specific folder on your PC
In the Your Phone app, select Photos.
Long-press on a photo (or right-click if using a mouse) and then select Save as.
Navigate to the folder where you want save the image, then click Save.
You can then paste the photo into an Office document, an email message, or to your desktop.
Edit a photo from your Android device on your PC
You can open an image in Windows Photo Editor, modify it as you wish, and save it on your PC. Windows Photo Editor lets you edit an image, print it, add it to a slide show or album, and more.
You can crop or rotate an image, apply a color filter or adjust the lighting, or even draw on the image.
Edit a photo
In Your Phone, select Photos.
In the grid view, select the photo you want to save. A larger version of the image appears.
On the toolbar at the top right, select Open to open it in Windows Photo Editor.
In Photo Editor, select Edit & Create > Edit.
At the top of the window, select the option that reflects what you want to do: Crop & rotate, Filters, and Adjustments.
Follow the prompts to make your changes. To crop the image, simply select one of the corner handles on the image and drag.
To save your changes, select Save a copy at the bottom right corner of the window.
In Photo Editor, when you save your changes, they’ll be saved as a new image file on your PC; your original photo remains unchanged on your Android device.
Send an edited photo back to your Android device
You can easily send the edited version of the image back to your Android device, if you like:
Select Start, and type file explorer in the Search box.
In File Explorer, navigate to the location of the edited photo, then select the file.
Right-click the image and select Send to > Bluetooth device.
In the window that opens, select your Android device, then select Next.
On your Android device, accept the prompt to transfer the file.
Delete a photo from your Android device
Now, you can delete individual photos on your Android device directly from your PC using the Your Phone app. Photos are deleted from your Android device’s local storage only – photos you delete won’t be removed from any cloud backups you’ve done. To delete a photo:
Right-click on the photo you’d like to delete
Select Delete from the menu
Confirm Delete photo on the confirmation screen, or choose Cancel if you’ve changed your mind
While the photo is being deleted from your Android device, it will be greyed out in the Your Phone app and removed from view once the process is complete.
Note: Please wait for a photo to be deleted before selecting “Refresh” on the page. Refreshing the page may stop the process of deleting your photo.
Are deleted photos also deleted from my cloud account or backups?
No, the Your Phone app does not connect to any of your cloud backups. Deleting photos in the Your Phone app will only delete photos in your Android device’s local storage.
Why can I still see deleted photos in my Gallery?
When you delete photos using the Your Phone app, they’re only being deleted from your Android device’s local storage. You may still see them in your cloud backups. Your Gallery may be connected to a cloud account, displaying the backed-up version of your photos.
Can I delete multiple photos at a time?
Currently, you can only delete one photo at time.
Note: You can start deleting the next photo while your device is finishing deleting a previous photo. Don’t refresh the page, as this may interrupt the process and prevent your photos from being deleted.
What happens to deleted photos?
Photos are deleted from your Android device. If your Android device has “trash can” or “recycle bin” functionality, then deleted photos will appear there.
Can I turn this feature off?
Yes, in Your Phone app settings. Go to Settings > Features > Photos> and turn off the toggle next to Allow this app to delete photos from my phone.
Share a photo with someone else
When you share a picture a person, it’s sent to them via email from your PC.
When you share a picture with an app, a copy of the image is opened in that app.
Select and hold (or right-click) the photo, and select Share.
In the Share window, select the person or app you want to share with.
Copy and paste a photo
To copy or save a photo:
Long-press on a photo (or right-click if using a mouse) to Copy or Save as.
You can paste the photo into an Office document, an email message, or on your PC’s desktop. Learn more about copying and pasting content between your devices (for Surface Duo and select Samsung devices).
Insert a picture in a text message
You can’t copy a photo directly into a text message, but you can insert photos from the Your Phone app or your PC into a message.
When you’re choosing a new Android device, one of the key factors that influence your decision is the amount of internal storage space. Some of it is already used up by the operating system and bloatware or pre-installed apps, which means you may not even be enjoying the exact amount of the promised storage available. Thankfully, there are plenty of ways to free up storage space on Android.
Why Is My Android Storage So Full?
There are many reasons why you are not having enough storage space:
- The phone comes with a huge operating system which takes up the bulk of the storage space. This is especially true for phone manufacturers that add a lot of customization to the Android OS.
- Plenty of bloatware. Most Android phones come with bloatware, but for some especially cheap phones, the amount of bloatware on it is ridiculously huge.
- Plenty of text threads with photos and videos. Media files, especially videos,. take up a lot of storage space.
- Apps that contain massive media files such as games, audio or video-editing apps, files downloaded for offline consumption.
- Resource-heavy media files.
Tips for Freeing Up Storage Space on Android
If you regularly run out of space and constantly need to manage it, here are some things you can do to free up storage space on Android.
Android’s Native Storage Manager
Newer Android phones come with a “Storage” option in the Settings menu that allows you to view what is taking up the storage space in your phone and a button to free up storage space.
1. Open Settings on your phone and search for “Storage.”
2. You’ll see information on the available space and an analysis of the used space.
3. From here, you can navigate to each app folder to see which files are taking up your storage space. You can then decide if you want to uninstall the app or just remove some of its files.
Uninstall Apps on Your Android Device
Apps often consume the most storage space on your device. Often when an app is downloaded, there’s a tendency to keep it even though it is not being used, with the thinking that we may have use for it later on.
You can free up storage space by removing apps you never use, hardly use, or haven’t used in months. It’s easy to find how long you’ve gone without using an app you installed using these steps:
1. Open Play Store and go to “My apps & Game.”
2. Next, tap Installed.
3. Go to “On this device” and tap the icon on its right side to sort your app list.
4. Select “Last Used.” Here you’ll see the apps you’ve used recently, but you can still find apps you have not used for some time.
Use a File Manager
Your Android device may have unwanted, duplicate or outdated files that are hogging space, especially if you’ve used your device for a long time.
Most Android phones comes with a File Manager app that allows you to view and manage your files. If it doesn’t come with one, or you are not happy with your current one, you can check out some of the best file manager apps for Android here.
A file manager can help you see the file folders that are taking up space on your device and what they contain. Plus, some file managers can help you find and delete files that waste your storage, like extremely large files and duplicate and junk files, without you doing it manually.
Ideally, you should have the opportunity to look through the files that the File Manager intends to remove just so that your important stuff isn’t deleted altogether.
Use SD Maid to Free Up Storage Space
Even if you use your file manager to erase all potential storage consuming files and applications, it can still leave traces on both the external SD card and internal storage.
This functionality is where the SD Maid app comes in. It is carefully designed to get rid of the junk to maximize the device’s storage space.
1. Download SD Maid from the Play Store.
2. Open the app. You will see various options such as CorpseFinder, SystemCleaner, and AppCleaner among others.
3. Select the CorpseFinder. It will start to search and erase any left behind by a previously uninstalled app.
4. If you select the AppCleaner, it will clear all your apps’ cache. The Databases option will optimize all the apps’ databases.
5. Finally, the SystemCleaner will look for standard folders and files that are not in use and delete them safely.
Upload Media Files to the Cloud
If you have plenty of photos and videos that you are not willing to delete, one way to free up their space is to upload them to the cloud. There are plenty of cloud storage services around, so getting this done is an easy task.
To get started, your photos are probably already uploaded to Google Photos. If not, start backing up your photos to Google Photos and let it free up space on your phone.
For music files, upload your collection to YouTube Music instead of storing them on your phone and stream on your phone or tablet via an Internet connection.
Offload Your Data to a Micro SD Card
Still running out of space? You can offload your files and data to a micro SD card. Many Android devices have slots for micro SD cards, though this is becoming less common in high-end phones.
If yours has one, buy a micro SD card, place it into the device and have extra storage space to hold media files and apps. Remember to format the SD card and mount it as internal storage, then you can start to move the apps to free space on the card.
With the storage space freed up, you can now get your phone to run faster, multitask properly, or even install Fortnite on your Android phone.
Never Miss Out
Receive updates of our latest tutorials.
Rahul Nambiampurath started his career as an accountant but has now transitioned into working full-time in the tech space. He is an ardent fan of decentralized and open source technologies. When he’s not writing, he’s usually busy making wine, tinkering with his android device, or hiking some mountains.
Now An android device becomes the common household appliance for the modern people and users become dependent on these devices. These devices are used for daily works along with entertainment. In this digital age, people of all ages, organizations, companies are rapidly communicating via Android device, creating important digital documents such as text files, photos, audio and video contents.
The internal storage space of Android phones and tablets can be quickly clutter and insufficient since you have downloaded some apps, taken many photos, added media files such as music and films, and user’s cache data. To clear the caches and junk files has become the weekly even daily ritual.
The insufficient storage space can prevent you from installing or using another app. What’s more, you may find that you take a long time to boot your device, or slowly open an APP. Of course, the short of storage space can slow down the Android device as well as disabled to use some applications. The following are top five ways to free up your storage space of Android.
Before freeing up the storage space
These six methods can divide into three groups depending on the device you have.
- Ways for all Android devices.
- Ways for all Android devices but require an external SD card connected to your device.
- Ways for Android devices but require an root access.
1. Remove Caches and Junk Files by Using Built-in Storage Tool ( All Androids )
The storage pane of modern versions of Android device shows exactly what is taking up storage on device and then to clear the caches and junk files. And you may do this work weekly or daily.
- Go to “Setting” and tap “Storage”.
- Clear the cached data or clear the data of every option.
- Uninstall or delete useless apps or images.
- You can also install an APP help you to do this work.
2. Remove Logs folders hogging too much storage space ( all Androids )
A “logs” folder appears that can grow extremely huge, even can up to 1GB in size and it occupies a slice of space of the internal memory. If you delete the log files then easily your Android smartphone will get some free space. If the folder size is insignificant, you may as well not remove it.
- Go to “File Manager”.
- Check if there is a “logs” folder.
- Delete the folder.
3. Move the photos and videos to an added external SD card ( SD card )
Most of users use the camera of a phone more than a camera like Canon to shot photos to remember the precious time. The storage space can be filled significantly by the photos and videos compared with the caches and junk file. What’s more, this can happen silently, creeping up on you even if you take a few pictures or videos each day, such that one day suddenly your Android internal storage will be overwhelmed seemingly without explanation.
Of course, you can delete some photos and videos you don’t like or move them to the PC, but there is no need to do that since the external SD card has much free space. Easy to do that:
- Get a SD card. Many Android devices ship with SD card slots, although they are becoming less and less common on new devices.
- Go to the camera APP “SETTING”.
- Tap the “Storage” and select “Memory card”.
4. Move the APPs or the Save Folder of Media APPs to External SD Card ( SD card )
A smart phone is more important than a computer to many users for its convenience. Many users would rather use a phone to watch the videos on YouTube or listen to the podcast on Android. These media APPs always eat up much internal storage space as well as the save folder during the downloading or watching without realizing what is going on until the internal storage space is fully occupied. What to do about these intensive used APPs:
- Find out the APPs that you download media consistently,such as audios, videos, images and so on.
- Move those APPs which are moveable to SD card.
- Move the default folder where a media app save its data since the APPs are not moveable. Go to the APP SETTING, switch the default save folder to external SD card.
- Download and install an alternative app. There are numerous of APPs on the Google Play, the same kind may have the same functions, then to find the one which occupies the storage least.
- Get rid of seldom used APP.
5. Uninstall the bloatwares (root access )
The bloatwares are those APPs can’t be removed which are loaded and preinstalled by manufactures and carriers. You seldom use these apps but can’t be uninstalled also can eat up your storage space. In order to uninstall them, first you must have root access.
- Root your Android device. KingoRoot apk is a one-click root tool for free. You can download and install for rooting. ( root tutorial click here )
- Download a third-party app to help you, such as System APP Remover.
- Delete the bloatware.
6. Android Storage Manger Apps to Free Up Storage Space.( root access )
If you have rooted your device and performed the process as above ways. However you can deeply free up your storage space. Using third party app can easily manage Android storage space with one click.
- Storage Analyser Storage Analyser is a powerful app to analyze your Android storage. You will be able to analyze the device system partitions, internal, external SD cards or the usb storage without rooting devices.
- Disk & Storage Analyzer [Root]. This app will display information about the stored apps, multimedia files or data on the internal and external SD card without any ads or virus but to cost for $ 1.99. Root access is needed.
- MEGA Storage Manager. MEGA Storage Manager App will provide you the cloud services. You will get access to the MEGA cloud from Android device. Now you will able to store your images, documents or other files and folders in the cloud safely and can keep free storage space on your Android device.
KingoRoot on Windows
KingoRoot Android on Windows has the highest success rate. It supports almost any Android device and version.
KingoRoot for Android
KingoRoot for Android is the most convenient and powerful apk root tool. Root any Android device and version without connecting to PC.
Not every app is designed well. With nearly 3 million apps on the Play Store and countless more that you can sideload from other sources, there are bound to be a few stinkers. And many of them do a terrible job using RAM.
Poor memory management by apps hurts everyone. Whether you have a budget phone with 4 GB or less of RAM or have a flagship with 8+ GB, when just one app is consuming more memory than it needs, the whole system can slow down. Thankfully, most Android devices have a built-in tool that helps with this problem.
Method 1: Find Running Services
If your phone is running Android 6.0 or later, it has a preinstalled RAM manager. Known as Running Services, this menu shows all the components of apps that are performing operations in the background for an extended period.
To access this built-in RAM manager, you need first to unhide Developer Options. Go to “About phone” in Settings, then tap “Build number” seven times (Galaxy users will need to select “Software information” after “About Phone” to find “Build number”). You will find Developer Options either at the very bottom of your Settings menu or under Settings –> System –> Advanced.
Now, open Developer Options and select “Running services.” There will be a list of background services and a bar graph showing the current RAM usage by apps. If at least 1/3 of your total RAM is free, you likely don’t have a memory issue, and the slowdown you are experiencing is something else. However, if you are below this threshold, you found your problem.
Starting from the worst consumer (which is located at the top of list), select an app. Depending on the app, you will see either “Stop” or “Settings.” “Stop” will simply kill the service, while tapping “Settings” will redirect you to the corresponding “App info” page in Settings where you can either uninstall or force stop the problematic app.
Method 2: View Memory Usage
On some Android smartphones, you will find a “Memory” item in Developer Options. Again, you must first enable Developer Options, then open the menu from the very bottom of your Settings list or in Settings –> System –> Advanced. Once inside Developer Options, scroll down and choose “Memory.”
Here you will see your phone’s current RAM usage. Select “Memory usage” to see the average usage of apps for the past three hours. You can adjust this time frame by selecting the down arrow next to “3 hours,” and you can tap the menu button in the upper right corner and choose “Sort by maximum usage” if you’d like. Select an app to see even more information about its memory usage, then use this info to decide if you want to uninstall the problematic app.
Method 3: Use Samsung Device Care
Samsung Galaxy users have access to another tool, Device Care. Under Settings –> Device Care –> Memory, you’ll find the currently available RAM for your device. Samsung will suggest apps that you are either not using or are problematic, and list them here under the “Clean now” button. However, you don’t want to use this button to free up space, as it doesn’t solve the problem. Instead, use this information to either put the apps in question to sleep or uninstall them.
Keep Your Connection Secure Without a Monthly Bill. Get a lifetime subscription to VPN Unlimited for all your devices with a one-time purchase from the new Gadget Hacks Shop, and watch Hulu or Netflix without regional restrictions, increase security when browsing on public networks, and more.
Applications that are common for every android especially the widely used ones like Instagram, Twitter, and Snapchat, also eat up a lot of space.
Regardless of the storage capacity of your phone, a point comes when android users face a lack of space on their device and that leads to their phone getting slower. This can be due to a number of reasons from huge cache files piling up to unnecessary media files lying in your android.
On the other hand, applications that are common for every android especially the widely used ones like Instagram, Twitter, and Snapchat, also eat up a lot of space. Moreover, with every update, these applications occupy even more space on your android device.
So, in order to identify the culprit which is taking the most space on your phone causing it to lag, here are certain easy steps you need to follow.
Step 1: First, open Google Play Store on your phone and make sure that you are logged in.
Exclusive | No Siri, Alexa, Smart Devices in Secret Meetings: Intel Note to Govt Officials on Tech Threats
Missing Dislike Numbers On YouTube? Here’s How You Can Bring Them Back
Step 2: Then click on your profile icon on the top right corner of the page.
Step 3: Next, select ‘Manage apps and device’ from the pop-up menu.
Step 4: Now, click ‘Manage’ and a list of all the applications installed on your phone will appear.
Step 5: You can now sort the applications by clicking on ‘Recently Updated’ and from there select ‘Size’. You can also order them according to their ‘Name’ or ‘Least used’ and ‘Most used’ basis by selecting the option from the menu.
Step 6: Once you have ordered them according to their size, the app taking up the most space will be listed first followed by other heavy applications.
Step 7: Now if you think that the largest app or any other app is not much of your use, you can easily uninstall it by checking the box beside the app. Multiple apps at a time can also be selected and uninstalled together.
Step 8: However, if you wish to uninstall a particular app which is lying dormant yet eating space then you can do that from within the settings of your phone also. For that, just open settings on your android device and select the application from the ‘Apps and Notifications’ menu. Now, go ahead and click ‘Uninstall’.
Even though contemporary devices usually come with more than enough storage space, there’s a limit to anything. Especially if your storage space is on the downside and you take a lot of high-resolution videos, photos, play AAA games, and store a lot of music. Over an extended period of time, it tends to fill up. And then some users are unable to update apps or system firmware on Android due to the “Storage is full” error. Today, we’ll show you how to simply address this problem by making some room in your internal storage.
How to fix the “Storage is full” issue on Android
- Use Cloud or PC storage to relieve some storage space
- Inspect your storage for the ‘heaviest’ files
- Use your SD card as internal storage
- Clear apps cache
- Reset your device to factory settings
1. Use Cloud or PC storage to relieve some storage space
First and foremost, online storages are your best bet to easily put away your data and reach for it whenever is needed. Additionally, it is the safest option. You may lose or break your phone or corrupt SD data.
With the files uploaded, you may stay sure they will be there the next day: safe and accessible. Android implements Google Photos which offers unlimited photo storage (at least until late June 2021). For other file types, you can choose between Dropbox, One Drive, Google Drive, MEGA, and many others.
A viable option is moving data to a PC. True, you won’t be able to access it on the move, but remember, that will give you more space for new photos, videos, and other multimedia files. All while keeping enough storage space to avoid the “Storage is full” error on your Android.
2. Inspect your storage for the ‘heaviest’ files
Android phones have a built-in Storage tool that will give you an insight into what is exactly taking all that space on your storage. It is good enough for the classic clean-up of the drive but won’t show all the details.
There are leftovers of uninstalled apps and unnecessary or duplicated files. Many OEMs offer all kinds of cleaners to deal with this, but you can also turn to 3rd-party apps, like Google’s File Manager, SD Maid, and similar apps.
In addition, you probably want to uninstall apps you rarely use and free more storage space. There are probably a few apps on your device that are of no particular use and removing them would be a good idea. Remember that you can install them from the Store in a matter of minutes if the need arises.
3. Use your SD card as internal storage
Everyone knows that you can use an SD card as external storage for multimedia files. Of course, if your device, despite current industry trends, supports SD cards. You can always use your SD card to transfer music, videos, and photos to empty some space from the internal storage.
But what if you can make your phone read your SD card as internal storage? After Android 6.0 Marshmallow, it is possible to set up your SD card is internal storage.
While this will create more space for your apps, it has a few drawbacks. First, your SD card is likely to be slower than the standard internal storage. Second, once formatted, the SD card can’t be accessed from other devices. Moreover, as the system will read it as an internal rather than external memory, it shouldn’t be removed. Still, if you are down with that, grab yourself some fast SD and try it out.
To do so, follow the instructions:
- Insert the SD card.
- Tap Setup.
- Select Use as internal storage.
- The card will be formatted and all its data lost.
- Choose to Move now or Move later.
Remember that you can change SD back to an external storage or migrate files anytime. This can be done by accessing Settings > Storage and USB > Tap the name of the card > Settings.
4. Clear apps cache
Don’t be surprised if you see a 100 MB app taking 1GB of storage space after some time. The thing is, the app, its cache, and data, are all summarized in that amount. If you are, for example, using WhatsApp and sending the photos to your friends, all the photos will be stored in the app’s data folder. Not to mention Facebook that caches everything locally and takes a lot of storage space. So, cleaning the cache and data once in a while can free you a lot of space.
To do so, follow the instructions:
- Open Settings.
- Choose Apps & notifications.
- Expand All apps.
- On the list, locate all apps that are large and open them one by one.
- Tap Storage.
- Clear cache.
- You can clear data from apps, as well. Just ensure that related files like received photos and sign-in credentials are backed up.
5. Reset your device to factory settings
Finally, if you are still getting the “Storage is full” error on your Android, despite making more than enough space, we suggest resetting your device to factory settings. Everything you need to know about factory reset can be found, here. Make sure to follow instructions closely, in order to avoid data loss.
That’s it. Thank you for reading and make sure to check our Facebook and Twitter pages for more informative and educational content on Android and iOS.
Editor’s note: This article was originally published in January 2017. We made sure to revamp it for freshness and accuracy.
And how to find additional storage
When I bought my latest Android smartphone, I went a little crazy using the cool video features, ripping through the 32GB storage in a flash. People who game, download a lot of apps or take video may be hungry for space, especially if they opted for a lower-storage phone to save money. If you are feeling the memory squeeze, here are some great cost-effective ways to access more storage for your Android smartphone.
1. Limit the Size of Photos and Videos
Avid picture and video taking takes up a ton of storage. One reason is camera resolution has increased dramatically on phones. But do you really need to shoot at the highest quality when taking a daily selfie with your dog? Check the default settings and choose a lower resolution (or frame rate for video), then change it selectively for important pics or videos.
2. Stream, Don’t Store
Music libraries, video clips and movies take up a huge amount of phone storage. To save space, access these type of files through a service such as YouTube or Netflix. Keep in mind that streaming can eat up data fast if you are not using a Wi-Fi connection. Set up a data usage alert to make sure you don’t go over your allotment and get unexpected overage charges.
3. Get Rid of Bloatware and Data
All phones through major carriers come pre-installed with a variety of apps that most people do not need or want. The easiest way to see the complete list, and delete the ones you don’t need, is in the Settings > Apps, or Settings > Applications menu. You can sort the list by size to see which ones are taking up the most space and delete away. Apps can always be reinstalled later, so if you haven’t used it in a while, clear it off.
For the apps you want to keep, periodically clearing the data that the programs store will free up more space. For Android 6.0 Marshmallow or later, tap on Storage, then clear the data. Doing this may lose your history in game apps, unless your data is backed up separately such as through a Google Play Games account. You are clearing any and all settings that go along with that app and basically starting over as if it were the first time you installed it.
4. Clear Your App Cache
Wiping out phone cache, the little bits of memory computers store each time an app is opened, can be deleted without risk. In most phones you can clear cache all at once by going into Settings>Storage then tap Cache and delete.
5. Add a MicroSD Card
While smartphones with MicroSD capability are getting harder to find, there are still a few great Android phones with a slot, including the Samsung Galaxy S9. A MicroSD card is an easy and cheap way to add storage space to your device. Cards do vary in read and write speeds, but you should be able to snag a good quality Class 10 64GB card for about $30.
If you plan to keep the card installed permanently in your phone, format it as internal storage during the setup process. The phone system will then automatically copy some apps and data onto it. Just keep in mind that it will be formatted to the device, so the card won’t work with your PC or other devices. Alternately, format it as portable storage, to be able to remove it when transferring files, or to take it out and re-use it when you get a new phone.
6. Backup to the Cloud
It’s always a good ideal to back up essential data from your phone, and the cloud is a convenient place. Google Photo will relieve image file space by providing unlimited storage if you are willing to limit photo resolution to 16 megapixels and video resolution to 1080p. Higher resolutions can be saved, but the storage counts against your Google Drive quota. Install the Google Photo app, and set it to automatically back up your photos and videos. If an image hasn’t been backed up yet, a cloud icon with a line through it will appear at the top.
Google Drive, Microsoft OneDrive and Dropbox are other free cloud storage spaces where you can back up any kind of files. With files saved in an alternate location, you can worry a little less when deleting them off your phone.
7. Use USB OTG
If you don’t have a MicroSD slot or a cloud connection to back up files, the solution may be as easy as inserting a USB drive into your phone. A USB adaptor came with my last Samsung phone, and I wondered what else I could connect with it. Turns out it’s a lot. USB OTG stands for On-The-Go. Just hook up the connector and attach a memory stick or removable hard drive. Tap the Android system notification labeled USB drive, and transfer files off your phone. You can also access files the other direction, such as playing stored videos on your phone. OTG works with other USB peripherals such as keyboards, mice, game controllers and much more.
If your phone didn’t come with an adapter, you can get an OTG connector for about $5 on Amazon . Just make sure to check whether your phone supports USB OTG or not by using this simple app first.
8. Good Housekeeping
This may be a no-brainer, but if there are files you can live without on your phone, get rid of them. That huge pdf service manual you downloaded to fix a problem? Delete. You can always download it again. Go to Settings > Storage and take a hard look at data in the Other, Miscellaneous, and Files area. The Download folder is another place to check.
9. Delete Old Messages
It drives my husband crazy, but I do not delete old messages because I often have to refer back to them for work. You can either delete old messages, as he does, or archive messages as I do, and keep the ability to access them. Either way will free up space on your phone.
From Android Messages:
1. Open the Android Messages app
2. Touch and hold each conversation that you want to archive or delete
+ Archive
To put the selected conversations into your archives, tap Archive. Archived conversations disappear from the Home screen, but you can still read them.
+ Mark All as Read
Tap More, Mark all as read.
+ Delete
To delete the selected conversations from Android Messages, tap Delete. Deleted conversations are removed from Android Messages, but not from any other messaging apps on your device.
Is your Android phone running out of space and thus showing the error message ‘Insufficient storage available’ every time you try downloading or updating an app from the Google Play Store? This issue is certainly caused on Android phones with low internal storage and even on devices like Samsung Galaxy Note with 16GB of built-in storage but partitioned, that means only a small portion of this space is dedicated to ‘System memory’ while remaining space is meant for data, referred as ‘USB Storage’. As you may know, by default several Android apps are installed on system/ phone memory which eventually results in low internal memory, regardless of how much space is there on your internal SD card.
There are various ways to increase internal space on Android, but that varies according to your device. Some of the methods are listed below, use what works best for you.
1. Delete the Log files (Easiest and Recommended)
Open the phone dialer, dial *#9900# and select the 2nd option “Delete dumpstate/logcat” in the prompted menu. Select ok to ‘Delete Dump’ and hit exit. This will restore heaps of storage space by deleting all the log files in the device memory. It doesn’t require root either. For instance, we’re able to restore 500MB of system memory on Galaxy Note.
2. Move Apps to USB storage or external SD card
This is one of the most efficient ways to free up system storage. You can manually move most apps from phone memory to internal memory by using the built-in “Move to USB storage” option from the Manage Apps menu. If the option isn’t available, then use a third-party app like App 2 SD to batch move apps. If your phone is rooted, then Link2SD is a much better app with extended functionality and the option to move non-movable user apps as well.
3. Clear App Cache and Data
Go to Menu > Settings > Applications > Manage applications > Menu > Sort by size. Then open the highest memory-consuming apps and either Clear cache or Clear data as desired. (Note: Clearing data will remove the app settings and data). File managers, Browser, Twitter, Gmail, Google Play Music, Google search, Facebook, Messenger, Dropbox, Soundcloud, etc. are some of the storage hog apps.
4. Clear All Cached App Data at once (in Android 4.2)
Android 4.2 Jelly Bean comes with a useful option that lets you delete cached data for all apps at once. This was possible earlier too but one had to manually clear cache for every single app, hence the task being tedious. To Clear cache, go to Settings and open Storage. Then tap on the “Cached data” option and select ok. The benefit here is that you can see the total cached data size prior to deleting, hence it’s all your decision to clear it or not.
5. Change the default installation location to SD card of all the applications
Follow the procedure mentioned here (not tried personally though).
6. Uninstall unused apps
This is an obvious way to free up space which you can simply do by removing all the inactive apps. It is advisable to remove apps stored in phone memory and bloatware apps that come pre-installed can be removed after rooting the phone using “Titanium Backup”.
Hope you found this post useful. 🙂
With Google’s Android 8.0 Oreo release, meanwhile, the file manager lives in Android’s Downloads app. All you have to do is open that app and select the “Show internal storage” option in its menu to browse through your phone’s full internal storage.
Where is the internal storage folder on Android?
Head to Settings > Storage > Other and you’ll have a full list of all the files and folders on your internal storage. (If you’d prefer this file manager be more easily accessible, the Marshmallow File Manager app will add it as an icon to your home screen.)
Where is the internal memory in the phone?
Technically yes, you can replace internal memory chip of your phone. Your internal memory and all other things are embedded on motherboard.
How do I free up internal storage on my Android?
Use Android’s “Free up space” tool
- Go to your phone’s settings, and select “Storage.” Among other things, you’ll see information on how much space is in use, a link to a tool called “Smart Storage” (more on that later), and a list of app categories.
- Tap on the blue “Free up space” button.
How do I access internal storage?
Managing files on your Android phone
With Google’s Android 8.0 Oreo release, meanwhile, the file manager lives in Android’s Downloads app. All you have to do is open that app and select the “Show internal storage” option in its menu to browse through your phone’s full internal storage.
How do I access internal storage on Samsung?
Transfer pictures and media to a computer to remove them from the phone memory.
…
To view the amount of free internal storage, follow these steps:
- From any Home screen, tap the Apps icon.
- Tap Settings.
- Scroll down to ‘System,’ and then tap Storage.
- Tap ‘Device storage,’ view the Available space value.
How can I read my phone internal memory?
Access Android Internal Storage via USB Cable. If you would like to use the traditional USB method of transferring files, you can use a USB cable with your Android device to access your internal storage. You are going to connect your device to your computer with a USB cable to then be able to view your files.
Can we change internal memory of Android phone?
If you are running out of storage space on your Android phone, you can generate more internal memory through several different methods. To substantially increase your phone’s memory, you can transfer data to an Secure Digital (SD) card.
What is the difference between data and storage on a mobile phone?
The Phone Storage (ROM) is simply the memory of a phone used to store apps, files, multimedia etc. … Same difference between memory and storage on a computer. Memory holds active running programs and data, storage holds ALL programs and data, and is read into memory when it needs to be used.
Why is my storage full when I have no apps Android?
In most cases: Open the Settings app, tap Apps, Applications, or Applications Manager option. … Tap an app to see how much storage it is taking, both for the app and its data (the Storage section) and for its cache (the Cache section). Tap Clear Cache to remove its cache and free up that space.
Why is my internal storage full Android?
Apps store cache files and other offline data in the Android internal memory. You can clean up the cache and the data in order to get more space. But deleting data of some apps may cause it to malfunction or crash. … To clean your app cache head right over to Settings, navigate to Apps and select the app you want.
How do I clear storage on my Android phone?
To clean up Android apps on an individual basis and free up memory:
- Open your Android phone’s Settings app.
- Go to the Apps (or Apps and Notifications) settings.
- Make sure All apps is selected.
- Tap on the app you wish to clean.
- Select Clear Cache and Clear Data to remove the temporary data.
How do I see all files on Android?
On your Android 10 device, open the app drawer and tap the icon for Files. By default, the app displays your most recent files. Swipe down the screen to view all your recent files (Figure A). To see only specific types of files, tap one of the categories at the top, such as Images, Videos, Audio, or Documents.
How do I access files on my Android?
On your phone, you can usually find your files in the Files app . If you can’t find the Files app, your device manufacturer might have a different app.
…
Find & open files
Even with a micro SD card, it doesn’t take long for space to run out
Some Android smartphones hold a key advantage over all models of iPhone in terms of storage — and that’s thanks to the microSD card slot, which makes it easy and affordable to massively increase storage space.
But, for owners of Android phones without space for a memory card — or for those who find even that option is quickly getting used up — there are several ways to free up some extra space. Deleting unused apps and large videos is the obvious place to start, but as with the iPhone, there are plenty of other tricks to help win back some gigabytes.
Here are five ways to free up storage space on your Android smartphone (or tablet).
Read More:
Delete unused apps
First, the obvious steps you can take to free up those precious gigabytes. If you haven’t used some apps for a while (especially those hogging a lot of space, like games) it’s time to bid them farewell.
You can always download them again later (those you’ve paid for will be free), and when you do, all their associated data will be restored too.
Some apps and their associated data can take up a lot of space Getty Images
Delete large media files
Another obvious one, but if you have lots of large media files, like movies downloaded in the Netflix app for a flight you took a year ago, it’s time to delete them. Even files like podcasts and audio recordings can take up a chunk of space if you have a lot of them (we recently cleared out 17GB of podcasts), so be sure to check the downloads section of every media app on your phone.
Remove backed-up photos
If you use the Google Photos app then photos and videos taken with your Android are automatically backed-up to the cloud. This means your content is always available no matter what device you are on, but also means you can delete everything from your phone that has been backed up online.
Open the Photos app and tap on the ‘Free Up Space’ button in the left-hand side bar. The app then shows how much space can be saved by removing photos and videos from your phone that are safely backed up in the cloud. Tap the blue button and that space will be instantly freed up.
You can still pull any photo or video back down from the cloud at any time (providing your phone has space, of course).
If your photos aren’t already backing up automatically, open the Photos app, tap on the menu icon in the upper-left corner and tap on Settings. Now tap on ‘Back up & sync’ and make sure the toggle is switched to the On position.
You can set your phone to automatically remove photos that are safely backed-up to the cloud every 30, 60 or 90 days. This is called Smart Storage and is found by opening the Settings app and navigating to Storage then tapping on Smart Storage and picking which of the three schedules you’d like to use.
Use the Files by Google app
Files by Google app for Android Google
When it comes to making more space on an Android phone, much of the heavy lifting can be done by Google’s own Files app. If it isn’t already installed on your phone, you can grab it from the Play Store for free.
Files by Google shows how much storage you have remaining (on both your phone and its SD card if one is inserted), and which applications and files are taking up the most space. The app also flags up duplicate files, helps you delete all downloaded files with a tap, and recommends apps to uninstall if they are taking up lots of space.
More feature-rich apps like this are also available for Android, but for most users we recommend sticking with Google’s own product. That way you won’t accidentally delete anything important.
Are you one of those people who lets thousands and thousands of emails pile up in your inbox? If so, you might be losing more space than you realize.
You already know that opening suspicious emails can cause a lot of problems. But did you know that letting emails sit around can also be an issue? Emails can take up tons of space on your Android operating system. If you keep thousands — or even hundreds — of emails around, then it’s time that you clear a significant amount of space by deleting these emails in Gmail.
Clean Up Your Device
If you want to clear up even more room on your phone, and make it operate more efficiently, use Quick Cleanup. Quick Cleanup helps you to remove junk files, caches, temporary files, and other trash files that are taking up unnecessary space on your device. After a sweep with Quick Cleanup, you’ll have more internal memory and storage space for new files, apps, photos, and videos. Remove your junk files by clicking above.
Get Rid of Emails With Attachments
Emails with big attachments can take up the most space in your inbox. So, if you’re only going to delete certain emails, these are the ones with which you should start. To find emails with attachments, search for “has:attachment” in the Gmail search filter. If you’re hesitant about how to begin getting rid of your emails, clearing out these big attachments is a good way to start.
Clear Out Your Largest Emails
Getting rid of the emails that are taking up the most space is the best thing to do, but it isn’t always simple. If you use an IMAP client such as Mozilla Thunderbird, you can start sorting emails by size and attachments. By using the IMAP client and sorting your email sizes, you can then delete the emails that are taking up most of your phone’s memory.
Find Your Biggest Emails Instead
If you don’t want to download an IMAP client, you can also use a third-party service called Find Big Mail to scan your messages. This web-based service takes temporary access to your email, scans through your emails, and creates labels in your account so you can browse for large messages without engaging the Find Big Mail site.
If your phone is feeling a little laggy, here are some tips to clear out old apps and other things that may be slowing it down.
Send any friend a story
As a subscriber, you have 10 gift articles to give each month. Anyone can read what you share.
Give this article
By Thorin Klosowski
Mr. Klosowski is a staff writer at Wirecutter, a product recommendation site owned by The New York Times Company.
If you’ve never bothered to organize the apps on your phone, clean out old files or wrangle your notifications into a sensible order, that disorder can make your phone an overwhelming, slow and buggy device. You can fix this and give your phone new life. Decluttering takes just a few minutes.
Delete apps you don’t use
Ever downloaded an app for a single purpose, such as a conference, work meeting or vacation, and then left that app on your phone to digitally rot away on the home screen? Be honest.
The fastest, easiest way to declutter your phone is to get rid of apps you don’t need, and both Apple’s iPhone and Google’s Android provide simple ways to figure out which apps you don’t use.
The easiest way to find those neglected apps is to look at all of your apps in a list, organized by the ones you use least often. On an iPhone, head to Settings, General, iPhone Storage. On Android, open the Play Store, tap the hamburger menu in the top-left corner, tap My Apps & Games, Installed, Alphabetical and change it to Last Used. Delete apps that are listed as Never Used or that you haven’t opened in months. I also prefer to delete rarely used apps for services where I can just use the website instead.
Once you’ve cleared out apps you don’t need, it’s time to organize the home screen. Everyone’s sense of order is different, but having a system — any system — in place is useful to prevent clutter in the future.
Melanie Pinola, managing editor for Zapier, has a simple method for organizing folders: “One thing I learned is to group apps into folders by verb or action. So, ‘Write,’ ‘Contact,’ ‘Read,’ etc. This makes it easier to get directly to what you want to do on your phone and is also gratifying in a way to tie an app you’re opening with a purpose and action item.”
Sometimes organization is fruitless, and if your phone takes too much time to organize, there’s one easy solution: Don’t bother.
Instead, get in the practice of launching apps from the search menu. On an iPhone, pull down on the home screen to open search, type the first few letters of an app name, and then tap the app when it pops up. On Android, swipe up from the bottom of the screen to pull up the app drawer and then start typing. Once you get the hang of launching apps like this, I recommend limiting your home screen to four or five rows of apps you use the most and hiding everything else on another page.
Free up storage
Sometimes I miss 16 gigabyte phones — the studio apartments of phones — which required a certain mindfulness and decision-making to prevent them from overflowing. In this age of nearly infinite storage, it’s easy to collect more junk, and as you run out of space your phone begins to feel sluggish. To clear this out and speed up your phone, you need to peek into some menus you may have never visited.
First up are your messages. Threads filled with GIFs, memes, videos and photos can take up a ton of space. In iOS, you can change how long your phone stores messages so it clears out those old threads automatically, without you having to do it.
[Like what you’re reading? Sign up here for the Smarter Living newsletter to get stories like this (and much more!) delivered straight to your inbox every Monday morning.]
Head to Settings, Messages, and Keep Messages. Once there, set how long you want to keep messages before they self-destruct. If you want to keep the text but delete attachments, head instead to Settings, General, then iPhone Storage, scroll down to Messages and then tap Review large Attachments. This screen will show you all the big files.
Android’s Messages app doesn’t have a setting like this, but you can swipe left or right on a message thread in Messages to archive old threads. Most third-party apps, including WhatsApp and Facebook Messenger, have some means to clear out old messages.
The biggest storage hogs on your phone are likely photos and videos. Back them up to an online cloud backup service like Apple iCloud, Google Photos or Amazon’s Prime Photos. Once you back up the photos, you can delete them from your phone and access them remotely through the backup service.
If you’re still short on space even after taking those steps, the culprit might be an app that’s hoarding data. Podcasts, music services and video apps are usually the biggest offenders. To see what’s taking up space in iOS, head to Settings, General, then iPhone Storage. On Android, pull down the notification shade, tap the cog and then select Storage. This screen displays a list of all the apps on your phone.
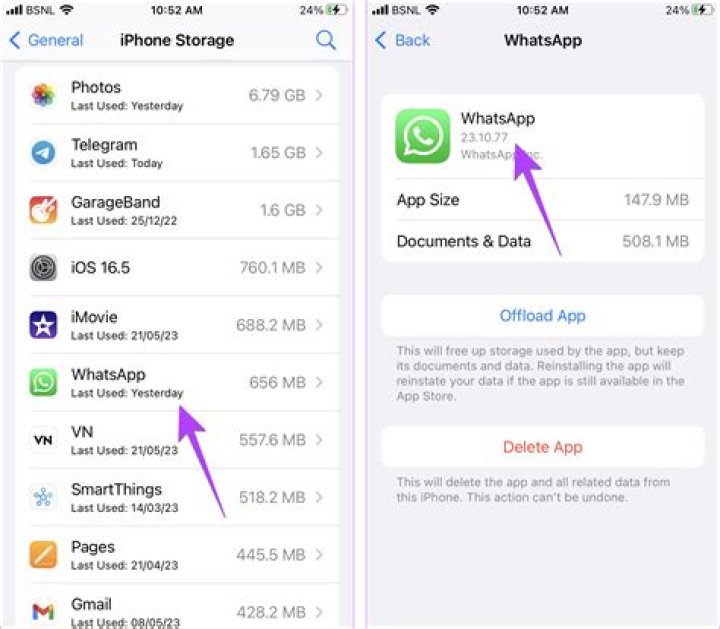
For example, the Amazon Prime Video app on my phone takes up two gigabytes of space, even though I’ve never downloaded a video. To clear out app data on an iPhone, tap the app from the Storage screen and then tap Offload. Once the phone is done deleting everything, tap Reinstall. On Android, tap the app name and then the Clear Cache button.
Sign up for the Wirecutter Weekly Newsletter and get our latest recommendations every Sunday.
Your smartphone is probably full of junk apps you may never need or use. (Photo: Getty Images)
You probably have more than enough space on your phone to hold whatever you want. The bad news: Your phone is probably full of junk you never think to remove.
Take your photo gallery. How many duplicates, screenshots, and memes are clogging things up? Cleaning it up isn’t so bad if you have the right tools. Tap or click here for my top picks to easily organize your photos.
Then it’s time to tackle your apps. Don’t make the mistake of uninstalling apps without first deleting the associated account. Tap or click for easy steps on identifying apps you no longer use and removing them.
When you’re ready to start deleting, tackle these apps first:
1. QR code scanners
If you never heard of these codes before the COVID-19 pandemic, you probably recognize them now. To limit unnecessary touching, many restaurants ditched traditional menus in favor of QR, or Quick Response, codes. They’re small squares with black squiggles that wind around in a vague maze shape.
Instead of typing a URL, you can snap a photo of a QR code, and your phone takes you to the site.
If you have an iPhone running iOS 11 or newer, your phone has this feature built-in. There’s no need for a separate app. The same goes for an Android running Android 8 or later.
Trying to get your business on the top of Google Search results? It’s all in the SEO. Learn the SEO secrets you can implement now in this podcast.
2. Scanner apps
When you need to scan a document, there’s no need to download a special app for that purpose.
• Open the Notes app. Create a new note by clicking the icon that looks like a square with a pen located at the screen’s bottom right.
• Tap the camera icon at the bottom of your new note and select Scan Documents.
• Hold your phone over the document you want to scan. Tap the photo shutter button at the bottom of the screen.
• You can edit the image by dragging around the page corners.
• When finished, tap Save on the bottom right of your screen. Your file will save as a PDF.
You can get the job done using your camera or the Google Drive app on an Android phone. To do this using Google Drive:
• Open the Google Drive app. Tap Add in the bottom right corner.
• Tap Scan, and take a photo of the document you’d like to scan. Hit Done.
3. Facebook
How long have you had Facebook installed? If it’s been a few years, this app could be eating up a huge chunk of space on your phone. Even browsing the timeline adds temporary and cached files to your device, which consumes valuable space.
There’s an easy fix: Delete Facebook from your phone and then download it again from the App Store or Google Play Store. Ultimately, though, this is a temporary solution. The only way to stop this app from taking up space long term is to delete it permanently.
4. Flashlight apps
These apps were super popular when smartphones first came out. Nowadays, this function is built right in.
You can still find a ton of them available for download on the Google Play Store or Apple’s App Store, though. I’ll let you in on a secret: They want your data.
Many of these apps request permission to track your location, and they could even be hiding malware. Tap or click here to see what these creepy programs are capable of.
Cut off your flashlight app and trust in your phone’s natural abilities.
5. Pop the bloatware bubble
Our phones preloaded with apps we never use. This “bloatware” eats up your space and the device manufacturer locks some to make sure you can’t uninstall them.
Most, though, you can remove. Stop swiping past the compass app or a music player you’ll never use and uninstall it. See the full list of preinstalled apps you can delete from your iPhone here.
If you’ve got an Android, you’ve got more options for cutting the fat. There are even apps that can help you out. (You should delete those when you’re done, too.) Tap or click to clean up your Android phone.
Need any tech help fixing a printer, slow PC, or audio issues? Post your tech questions to get fast, concrete answers from me and other tech pros. Visit my Q&A Forum and get tech help now.
— Question. Could all the spam I’m getting explain why I use up half of my phone’s data cap in a couple of weeks?
Answer: Sorry, probably not. Most e-mail takes up little bandwidth, and spam — typically, several lines of text for each junk e-mail — uses even less.
Most mobile Web browsing also doesn’t do much to eat up a bandwidth quota. To get a grasp of what apps can get you into trouble, employ a few simple data-usage tools.
Apple includes a bandwidth meter on the iPhone (open the Settings app, tap its General heading, then Network) and the 3G and 4G versions of the iPad (Settings, then Cellular Data). This will report the total data consumed by the device; third-party apps can provide the same info for WiFi-only iPads and the iPod touch.
On Google’s Android, the Ice Cream Sandwich version now shipping on a few devices offers a more nuanced data-usage gauge that breaks down the bill on an app-by-app basis. On earlier versions, other firms’ software has to suffice; I’ve run the free NetCounter.
Years of spot checks with these tools have convinced me that Web radio — sometimes labeled a bandwidth hog— shouldn’t be a problem either. For example, I’ve clocked Pandora’s Web-radio app using no more than 30 to 40 megabytes per hour of listening.
Web video, however, can get the meter spinning — especially on devices with larger screens. On an Android phone, an hour of Netflix viewing ate up almost 180 MB. But on an iPad 2, an hour of Netflix accounted for about 670 MB (though that figure may include background activity such as checking e-mail). On a new Android tablet, the same 60 minutes of the same movie chewed through 656 MB.
I’ve heard of even worse examples —Houston Chronicle tech columnist Dwight Silverman recently tweeted that watching two 30-minute episodes of The Big C in Showtime’s app on a new iPad ate up a full one gigabyte of Verizon LTE data.
Unusual situations can yield odd results, however. When I took a Samsung Galaxy Nexus to the SXSW Interactive conference in Austin and cruelly overused it, its data-usage gauge reported that my frequent Web use topped the leaderboard, at 117 MB for that week. Facebook followed at 56 MB, then Google’s Play Store (what used to be called the Android Market) at 47 MB. That’s a lot of News Feed scanning and software updates.
The easiest way to stay out of trouble with bandwidth caps, however, is not to worry about particular apps but to use Wi-Fi instead of 3G or 4G whenever possible.
In a follow-up e-mail, the reader who sent this query suggested that his frequent lookups of satellite photos and weather radar could have been at fault. I don’t know that he’s right, but those theories make more sense than an overload of junk mail — not that you don’t have plenty of other reasons to be annoyed at that.
Tip: Battery-saving black backgrounds on some phones
The abbreviations used to describe the screens on mobile devices usually invite yawns — if people take note of them at all. But one particular kind of display, OLED, allows for a special power-saving trick.
Organic Light Emitting Diode screens can generate brighter colors and deeper blacks than some other kinds, but as an analyst reminded me a couple of months ago, they also use varying amounts of power to produce those colors. That means that, much like plasma TVs, OLED displays need less electricity to display a dark area than a bright one.
I tested this by setting a phone with a particularly enormous OLED screen, Samsung’s Galaxy Note, to use an all-white and then an all-black background. To keep wireless activity from skewing the results, I switched the Note to airplane mode; to give that 5.3-in. screen as much influence as possible on power consumption, I set it to stay illuminated.
The results: An hour of showing the white background left the Note with 87% of a charge, compared to 92% after an hour with the black background.
When selling your phone, it is essential to find out its storage capacity (GB). GB is short for gigabyte, which is a unit of data storage capacity that approximately equates to one billion bytes. This number will tell you how much built-in storage your phone has. Knowing your phone’s storage capacity before placing the trade-in order is important as it will determine, in part, how much money you will get for it. The higher the GB, the higher the value of the handset. The way that you can check the storage of your phone will depend on whether you have an iPhone or an Android device.
In Case You Have an iPhone
Open the Settings menu, scroll down and tap on General. At the top select About and scroll down looking for Capacity. The two or three digit number against Capacity will indicate your iPhone’s internal storage.
In Case You Have an Android
The way that you can find your Android phone’s storage capacity will depend on the manufacturer and there is also a variance between models. Typically, storage capacity information is stored in Settings > Storage, however if you have a Samsung phone, you can find the total storage capacity information under Settings > Device Care.
The capacity may show as a slightly lower number than the total number (for instance 62.5GB for a 64GB phone), but this is because brand-new phones come with the software installed that takes up a significant amount of space, additionally over the time you’ve owned the phone, you’ve used a portion of its built-in storage.
What Do I Do If I Can’t Turn the Phone On?
If you are unable to turn the device and access the Settings menu, you can look at the device’s original box where it will have the storage information written on it. In case you do not have the device’s original box, then you can use an IMEI checker tool online which will provide you with your device’s storage specification.
The IMEI number of your phone can be found either on the back of the device for most Android phones and iPhones older than the iPhone 6. For newer iPhones, it will be printed inside the SIM tray when you eject the SIM card.
Tired of low storage on your android device. Learn these 12 ways to ensure you get plenty of free storage space on your android device. So if you are one of those, then read till last, and I am very much sure this will definitely help you to solve your problem. Learn how to free storage space on your phone.
Phone Storage technology has been improved in the latest generation smartphones, and that’s because of the high internal storage capacity of like 64 GB or even 128 GB. But many people still have an android phone with 16 GB, or even 32 GB phone storage is facing an issue like “Storage Full”, and they have to clear memory or transfer the data to other devices often. Moving app data to sd card doesn’t always work. So here is what works:
- Delete duplicate files free storage space
- Use google photos or drive to free up storage by saving content online
- Clear app data and clean caches
- Delete temp files from your phone
- Delete the pics downloaded from social media.
- Uninstall apps that you don’t use and don’t need
- Uninstall or Disable Bloatware
- Copy files to PC/Laptop or buy a memory Card
- Use lite applications
- Move apps to SD Card
- Use a high-speed memory card as internal storage
- Factory reset
Solution 1- Delete duplicate files free storage space
There are high chances that storage is getting used up by duplicate files. Files like images, videos or even audio files created by your phone. So clearing them up will make a small but significant memory space. There are lots of apps that can be used for deleting duplicate files like Files Go, cCleaner or Clean master. files go
Solution 2- Use Google Photos or Drive to free storage space
Google Drive provides a storage space of 15 GB. If you sync your google account and with which it will auto-upload all pictures to google drive. This will definitely save a lot of internal memory. Also, there are many similar services like mega sync, etc. store data on drive
Best of all if you have an amazon prime subscription you can get free storage space for android via their play store app.
Solution 3- Clear App data and cache memory
Every app you install has specific data that is stored in your Phone > Android > data/obb. This data may remain even after uninstalling the app, so deleting the unnecessary app data before uninstalling any app may prove helpful. The same goes for cache memory. free up space
In the phone settings section, you can delete the cache memory, as shown above:
Solution 4- Delete Temporary files of uninstalled apps to free storage space
Many apps have leftover temp files after uninstalling. The temporary files are mostly internet files, so deleting cache memory or cleaning most files that are with extensions of “.tmp” is recommended. Use the CCleaner app from the android store or Files Go from Google. Both work great.
You can manually clean by using es explorer to get the extra storage space you need.
Do note: Do not delete temp files of apps that you use. delete temp files of apps you don’t need
Solution 5- Social media data cleaning to save storage space
The files of WhatsApp and Facebook take large space for their junk and downloaded files. So taking them out acts like taking out trash from your phone. Having many images and videos makes the phone cluttered and also makes the phone very slow filling valuable storage space with videos you do not watch.
So just delete all the auto-downloaded files and posts. Facebook
Solution 6- Uninstall Unnecessary Applications
There are many unnecessary apps or bloatware on your phone which you don’t use but still haven’t got rid of it. Get rid of that and see the difference in performance as well as storage. If saving space is your end goal, then make sure you remove all the unnecessary apps and files you do not require. uninstall apps
Solution 7- Uninstall or disable Bloatware apps
Many android phones come with apps preinstalled. These are what you call bloatware apps. Many of these apps can be disabled or uninstalled. Take some time and remove all those apps. Some apps cannot be removed. You can disable those apps instead.
This will speed up your android phone as well as free up storage.
Solution 8- Copy files to PC/Laptop or buy a memory Card
If you don’t want to delete the data then you can move and backup all the data in your desktop or laptop. That way you don’t have to delete anything. And you can free storage space on your android device.
If you do not have a desktop or a laptop then buy a good memory card.
Due to the increase in technology, you can buy 64GB and 128GB memory cards at a dirt-cheap rate. So save some money and get yourself a good sd card.
Solution 9- Use lite Applications
There are lots of applications that come in their lite version, which takes less space and consumes less data (FB lite, Uber lite). These apps are tiny in size. They require fewer internet data as well as processing power. Facebook lite
If you want to get the maximum free storage space, then uninstall and replace apps with their lite versions
For, e.g. Facebook app is over a 100mb
But the Facebook lite is only 5mb
Solution 10- Move app data to SD card
You can transfer app data to the SD card, thus freeing more space to install any other app. This method is limited to a few branded devices because the newer phones either don’t support memory cards or do not support the move feature. If your device supports it, then you should definitely try this one out.
Solution 11- Use a memory card as internal storage
In the Phones running Android Nougat or higher have a feature/functionality to use SD card as internal storage. This will clearly solve a lot of problems with internal storage.
Especially if you have a high-speed and large sd card says a 32gb or 64gb card which is class 10 or above.
By using this card, you can free storage space for all your favorite apps and games without any additional costs.
Solution 12- Factory Reset
If all the answers given above doesn’t prove as fruitful as you expected, then you can reset your phone to factory settings. Do not forget to take the backup of your device data before proceeding. This method is a last resort and should be used with caution. reset android phone
Thanks for reading. I hope you liked this Guide and were able to free storage space on your device. Make sure you share and help fellow gamers. See you in-game.
Nightfury
Gamer and Tech Nerd. Love Outdoors as well but nothing beats a day of LAN gaming sessions with my buddies. Use to troubleshooting games for Friends and Family. Gaming and Writing are what make me smile. Happy Gaming. See you in-game
Do you need more storage space, or do you just need to clean up your phone?
Top Deals On Great Products
Picked by Techconnect’s Editors
It doesn’t matter how much storage space your new phone has—or how much additional storage space you add with a microSD card—you somehow always find yourself bumping up against that limit. So what do you do? Go out and buy a $1000 512GB microSD card and try to cram it into your microSD-less Samsung Galaxy Note 5? Or…clean up your dang phone?
Let’s go with the latter.
Here are 10 things taking up space on your phone that definitely don’t need to be there.
All your text messages, ever
It’s one thing to save a cute voicemail from your significant other, or a few texts from your mom. It’s a different thing to save 4,632 back-and-forth texts between you and your roommate about which Game of Thrones house is better.
Selfies
I completely understand, and condone, taking 50 selfies to make sure you get the perfect shot for Instagram. But once you find that perfect shot…you don’t need to save all 50.
Apps you never use
All those apps you downloaded because they were free and so why not? They’re taking up tons of space (especially the games) that you need back.
Screenshots
I take a lot of screenshots. Sometimes they’re for work, sometimes they’re to send to people (OMG check out her new haircut in her Facebook profile pic…!). But never do I need them later.
Videos of your dog
Videos take up tons of space. Your dog is adorable, but unless he’s flying or catching seven Frisbees in his mouth, you can probably move that video to the cloud.
Music
Have you never heard of Spotify?
Cached data
The more you use your phone, the more apps store info in their caches. And it’s not always necessary info (like passwords). Sometimes it’s just junk. Here’s how to fix that.
Random downloads
If you click on every attachment that comes through your Gmail, chances are you have a lot of random downloads stored somewhere on your phone. Pretty sure you don’t need multiple/any copies of your boss’s May 2014 expense report.
Instagram photos
Instagram has a convenient feature where it saves both the original picture and the Instagrammed photo on your phone. Do you need two copies of the same photo? (Yes, they’re the same photo, even if they vary slightly in color thanks to the Valencia filter.)
People you never contact
Android handily imports all of your contacts from other services, such as Gmail and Facebook, into your contacts list. But I’m willing to be that you don’t need 42,000 Gmail contacts and 4,611 Facebook contacts in your phonebook. Syncing contacts isn’t all it’s cracked up to be.
Sarah is a freelance writer and editor based in Los Angeles. She has a love/hate relationship with social media and a bad habit of describing technology as “sexy.”
- ‘)” data-event=”social share” data-info=”Pinterest” aria-label=”Share on Pinterest”>
- ‘)” data-event=”social share” data-info=”Reddit” aria-label=”Share on Reddit”>
- ‘)” data-event=”social share” data-info=”Flipboard” aria-label=”Share on Flipboard”>
Related
- How to Browse an iPod on a Desktop
- How to Take Pics Off of an iPod to a Computer
- How to Erase VCards on the HTC EVO
- How to Disable a Built-in Sound Card
- How to Load a GIF in Android
Although Android gives you control over some of its contents, through features like managing apps and downloaded content, it doesn’t allow you to simply browse your device’s contents like you would on a computer. If you want to do this, you can connect your device to a PC and access its memory card’s contents, allowing you to view or edit its contents or use it as a flash drive. This can help you optimize storage and transfer files, making your device work more efficiently for you in your business. Different versions of Android do require different steps, but the process doesn’t take more than a few minutes regardless.
Android 2.3
Connect the USB cord for your Android device to a free USB port on your computer and to your device.
Slide your finger from the top of the Android device’s screen to the middle or bottom of the screen to open the Notifications panel.
Tap “USB connected.”
Tap “Turn on USB storage.”
Click the Start button on your computer and then click “Computer.” Your device will be displayed here as a drive. If you don’t see it, wait a moment or two for your device to complete mounting as a drive.
Double-click your device to open its contents. You can now view files and folders by double-clicking them.
Right-click your device in the “Computer” window on your PC when you’re ready to disconnect it.
Click “Eject.” You can now safely disconnect your Android device from your computer.
Android 3.0
Connect the USB cable that came with your Android device to the device itself and to a free USB port on your computer.
Click the Start button on your PC.
Click “Computer.” If your Android device is not listed as a drive currently, wait a moment for it to finish mounting as a drive.
Double-click your device in the “Computer” window. You can now browse its files and folders just like any other directory on your computer.
Disconnect your device from your computer when you’re done browsing its contents.
Android 4.0 or 4.1
Connect your Android device to a free USB port on your PC using the cable provided with your device.
Tap your Android device’s “Settings” icon.
Tap “Wireless & networks,” then “More,” then “Tethering & portable hotspot.” A check mark should appear in the box beside “Tethering & portable hotspot.”
Click the Start button on your PC, then click “Computer.” Your device should appear as a drive in the window. If not, wait a few moments for it to finish mounting as a drive.
Double-click your device to access its contents. You can browse its files and folders the same way you would navigate directories on your PC.
Disconnect your device from your computer when you’re done browsing its contents.
- Google Android 4.1 for Galaxy Nexus Help: Connect to a Windows Computer via USB
- Google Android 4.0 for Nexus S Help: Connect to a Windows Computer via USB
- Google Android 3.0 OS Help: Connecting to a Windows Computer via USB
- Google Android 2.3 OS Help: Connecting to a Computer via USB
- Windows 7 Help & How-To: Safely Remove Devices from Your Computer
- You cannot use USB tethering, which extends your device’s Internet access to your PC, at the same time you use USB storage.
- Don’t alter, move or remove any files or folders unless you’re confident they won’t interfere with your device’s operation. Although important system files are not stored on the memory card, you could corrupt apps and potentially lose personal data if you alter the wrong files or folders.
A lover of technology in all forms, Matt Skaggs began writing professionally in 2010, specializing in Windows computers and Android devices. His writing has appeared on many websites providing a plethora of technology information and tutorials. In 2008 Skaggs graduated from Bob Jones University with a Bachelor of Arts in humanities.
We all know how annoying it is when we are attempting to download or update a certain app on our Android devices and then we get hit with a message that says “Insufficient Storage Available”. At that moment, we mostly go into panic mode and start scouring our phone for less used apps to delete. However, we bring to you today a number of tips to help you solve space issues on your device’s internal memory.
It is known that the internal memory of any Android device is never the exact figure that is represented. For a device with 16GB of memory, a lot of this memory is occupied by preinstalled apps, the operating system and also space used on how the OS formats the storage medium.
When attempting to update apps, you sometimes get the “Insufficient Storage Available” message even when the app takes less space than is currently available on the Android device. Most times, there is sufficient space to update or install the app but not enough memory space to execute the process.
Well, if you have ever suffered such fate at the hands of your Android device, then we have some tips for you on how to combat it without necessarily needing to visit a technician:
- Clear App Cache:
In most instances, the lack of functional space to utilize is the major reason for the insufficient space message. Normally, an Android app uses three sets of storage for the app, the app’s cache and the app’s data files.
In cases where the cache is heavy in size, it will take up a large part of memory space on the Android device. Here, you can free up space by emptying the app cache. You can do this by following these steps:
- Go to settings from your home screen and then check or applications manager or application.
- Here, you will see all the downloaded apps on your device and how much of memory space they are currently taking.
- Click on menu or more to arrange these apps according to size, this way, you get to see which ones are actually taking the most memory.
- Tap the desired app to see the memory space occupied by the app, its cache and its data sections.
- Click on clear cache to empty cache, this will inadvertently free up some space on your internal memory.
- Delete Cache Files:
This can be achieved by locating the settings function on your Android device. Here, you can follow the pathway settings>storage>Device Memory. Then click on cache data and delete. This will get rid of all cached data from all apps and provide you with more internal memory space.
- Save pictures and videos on External Storage Device:
We all understand the importance of memories and that is why a lot of us have pictures of friends, relatives and loved ones on our devices. However, there are certain times that these pictures and videos end up consuming too much space on your device’s memory and you need a way to free up memory space.
You can fix this by getting an SD card (if you do not have one yet) and storing your pictures and videos there. You can simply achieve this by changing the default storage location to SD card. To do this, go to settings>Camera. Then, go to Storage location and change the pathway to SD card if it is set to Device.
Well, have you tried out any of the tips yet? Were they helpful? Then get across to us and drop a comment below let’s know if you have solved this Android dilemma.
By Zim Watson 2018-07-03 18319 4
Android devices are fantastic for their ease of use and customization options, however eventually all your precious space is filled. We will look at ways to effectively free up Android phone storage. This problem is particularly acute for phones more than a year old; performance is impacted if the user does not release Android phone storage. We will look at ways to effectively free up Android phone storage.
Why Storage Disappears So Fast?
The storage is not a live creature that can run away itself, so check whether you match any of the following conditions:
Lots of pre-installed apps: some manufacturers are notorious for bloatware (e.g. Asus and Samsung), so their pre-installed apps, along with system-level Android OS, both take their toll immediately – literally right out of the box.
Install apps in built-in phone space: sometimes you didn’t notice that the app installation location was set as the built-in phone space not the SD card. The limited phone space is easier to be filled with apps.
Limited storage capacity: even though you can address limited internal storage (e.g. 16GB) with external storage, the low storage warning will also appear with the microSD card if you are a heavy multimedia user.
Phone trash accumulates: temp files, duplicates files, cache, and other unnecessary files are produced all the time. This is a natural by-product of apps, system files, and the OS itself. Over time, this is cumulative and can have a major impact on phone responsiveness if you do not clean the junk regularly.
How to Check Storage Condition on Android?
Before to start a storage release, we should figure out what takes the most space on our phone for solving this problem effectively.
1. Go to your phone main menu, and find out the “File” icon inside to tap in. Clearly you will see different options there – Category, Storage, and Cloud. Simply tap the “Storage“, your phone space using condition is clearly presented here.
Here you are allowed to view total space and available space on both phone and SD card. Also, simply tap the two locations individually, all the folders inside will show up for your checking.
2. Enter your Android “Settings” to look for the “Power and Storage” option. Tap to access it, the “Storage Space” is there showing the ROM and SD card available space. Tap the button, a circle graph presents you the space that each type of data takes up, for both phone and SD card as well.
How to Free up Space on Android Phones?
There are four ways to reclaim your storage:
1. Clean out junk items regularly
Always use a good mobile management app to clean/remove your phone junk. Examples of junk includes outdated cache, installation packages (APK), uninstalled app remnants, and app cache. This is an effective way to release Android phone space.
Note: Most Android phones already feature pre-installed management app, e.g. Huawei , Xiaomi , OPPO, Meizu, etc. If your phone doesn’t already have one, simply download one from the Play Store (for example, Tencent WeSecure)
For our example, we will use the OPPO FIND 7 built-in app.
• Launch your app of choice.
• Tap “Scan” to commence scanning – this will search for viruses, potential dangers, and junk items using up space.
• Once scanning finishes, the app will automatically delete the junk.
• Or enter the “File” menu to use the “Clearup” feature to clean the useless cache.
• Tap “End all” to wipe them out.
2. Expand external storage (if available)
Add a large capacity Micro SD card , the card storage better starts at 32GB.
3. Files transfer
If you don’t want spend money on a SD card, you can do like these to release plenty of space:
• Transfer large files like videos, images, and music to your computer.
• Alternatively, upload the big files to the cloud like Google Photos, Dropbox, Microsoft OneDrive, Flickr, etc. You can download the apps to backup your files and delete the copies on your phone or just upload on the website.
4. Uninstall rarely used apps
Fast uninstall:
• Long press the app icon until a small “x” appears near the icon.
• Tap the “x” to commence uninstalling.
• Tap “Delete” to confirm app deletion.
On some Android phones, long press the app icon and drag it to the trashcan at the screen top instead.
Direct uninstall:
• Enter the phone “Settings”.
• Enter “Application management”.
• Choose “Installed” category.
• Select the apps you rarely use and tap “Uninstall”.
• Tap “Uninstall” to confirm the selection.
Note: Following app deletion, use the phone management app to clean any residual files from the uninstallation process to free more space.
5. App transfer
Transfer pre-installed to the external SD card. (Only available to Android devices with external storage)
• Enter the phone “Settings”.
• Enter “Application management”.
• Choose the “Installed” or “All” category including the pre-installed apps.
• Select all the apps individually and tap “Move to user space” to transfer to the SD card.
• Use the phone management app to clean the trash.
If your Android device is more than 3 years old, we would strongly suggest changing to a more up-to-date device with more advanced features and storage. You’ve though about it as well? Then both OnePlus 3T and UMI Super are pretty good choices that not only sport large storage but also fast process speed – 6GB RAM+128GB storage and 4GB+32GB (256GB expansion). Therefore, you won’t be bothered by the storage limitation again. Want more affordable premium Android phone choices? You can have a look here on Gearbest .
Before I forget, there is currently a top phone brand sale at that with up to 68% off for a limited time only. Have a look before it’s too late! Hope this article does work for you 🙂
Last Updated: 29th May, 2020
- On your Android device, open Files by Google . If youdon’t have the app, get it from the Play Store.
- On the bottom left, tap Clean .
- At the top of the screen, you’ll see the used and availablestorage space. If your phone has a memory card, you’ll alsosee its storage space.
Beside this, how do I find out what’s taking up space on my Android?
Head over to the Setting app and tap the Storage tab.Inside you’ll find a handy rundown of everything that’staking up space on your phone, just like on Nougat. But inOreo, you have more control over your files. Tap on any of thesections and you’ll see a list of related apps and how muchspace they’re using.
how do I increase storage space on my Android? Quick Navigation :
- Method 1. Use Memory Card to Increase Internal Storage Space ofAndroid (Works Quickly)
- Method 2. Delete Unwanted Apps and Clean All the History andCache.
- Method 3. Use USB OTG Storage.
- Method 4. Turn to Cloud Storage.
- Method 5. Use Terminal Emulator App.
- Method 6. Use INT2EXT.
- Method 7.
- Conclusion.
In respect to this, how do I check my phone storage?
Use your iOS device to check itsstorage Go to Settings > General > [Device]Storage. You might see a list of recommendations foroptimizing your device’s storage, followed by a list ofinstalled apps and the amount of storage each one uses. Tapan app’s name for more information about itsstorage.
Will clearing cache delete pictures?
By clearing cache, you remove thetemporary files in the cache, but it WON’T deleteyour other app data like logins, settings, saved games, downloadedphotos, conversations. So if you clear cache of Gallery orCamera app on your Android phone, you won’t lose any of yourphotos.
I just try to write a bash shell for my Android Phone.
When I want list all the files in my Android Phone. I found that the Android shell terminal doesn’t support find command.
So I just want to know which is the best way to travel the sdcard files?
5 Answers 5
I might be wrong but “find -name __” works fine for me. (Maybe it’s just my phone.) If you just want to list all files, you can try
You probably need the root permission though.
Edit: As other answers suggest, use ls with grep like this:
-i is for ignore-case. and / is the root directory.
Open cmd type adb shell then press enter. Type ls to view files list.
just to add the full command:
this is actually a pretty fast lookup on Android
This command will show also if the file is hidden adb shell ls -laR | grep filename
Some Android phones contain Busybox. Was hard to find.
To see if busybox was around:
If you know it’s around. You need some read/write space. Try you flash drive, /sdcard
upload to your computer. Upload the file. Get some text editor. Search for busybox. Will see what directory the file was found in.
to make busybox easier to access, you could:


