If you want to have your own Minecraft server that constantly stays online, Mojang has a simple answer
Share this story
- Share this on Facebook
- Share this on Twitter
Share All sharing options for: How to host a Minecraft Realms server
The Bedrock Edition of Minecraft is playable with friends using peer-to-peer online multiplayer, where you can join your friends’ active sessions for free. But if you want a server that will stay online even when you’re not, you’ll need a Realm.
Realms are the Mojang-provided servers that players can buy using a subscription-based payment. For $7.99 a month, players can get a Realm that will host up to 11 people, including the host.
Note that more than 11 other people can join your server over the course if its life, but only 11 people can be online at once.
Bedrock Edition players will need Realms Plus, which also includes over 50 different Marketplace packs. Realms Plus can be purchased within the Minecraft Marketplace. For those using Minecraft’s Java Edition, you’ll need to purchase a Realm from the Minecraft website. Keep in mind that Bedrock Edition players cannot play on the same servers as Java players.
Image: Mojang/Microsoft via Polygon
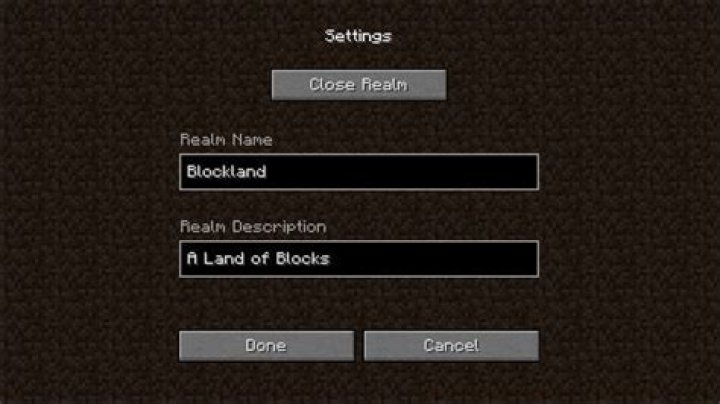
After buying your Realm or signing up for a free trial, you’ll be able to access it from your Worlds tab. You can click the pencil to edit the difficulty, set the game mode, rename the Realm, and invite your friends.
Image: Mojang/Microsoft via Polygon
Note that using Realms is the easiest way to host a server for playing with a small-sized group. It’s possible to host a server without using Realms, but it often requires paying for a third-party service. It’s also possible to host your own servers, but doing this requires a fairly powerful PC to host, as well as a base level of knowledge about navigating your internet router, so it’s definitely not for beginners.
Client Incompatible . please help
I just downloaded minecraft on a new pc and just paid for minecraft realms. I bought a second account so my sons and I can play together in the same world. I launch minecraft and click on the “realms” button. An error comes up saying “Client Incompatible. Your Client is not compatible with minecraft realms, please consider updating it.”. Argh. A little stressed. I paid for realms to make it super-easy as advertised to make a multiplayer world. I see absolutely zero links, buttons, options or anything anywhere in the launcher or game that allows me to update the client. The client says version 1.8.3 I know of no more current version.
Please help. my head is exploding.
- Carpenter
- Join Date: 3/19/2015
- Posts: 40
- Member Details
Of course after I post this I realize I just make a profile “using the latest version”. It works. No I have to figure out how to make it work with voxelmap. any help appreciated, thanks.
- Iron Miner
- Join Date: 9/22/2012
- Posts: 255
- Minecraft: RainbowTea
- Member Details
The mod itself must be 1.8.3 to work with your client and be able to log into the realms server.
“My mother was about as nurturing as a steak knife. “ – Grey’s Anatomy
- Carpenter
- Join Date: 3/19/2015
- Posts: 40
- Member Details
So now I have a realm and a working server. I should have done more research before buying anything. Ladyyura909, I will check for a current version of voxelmap. I am not sure if texture packs work with realms either. No texture pack and no mod on realms = deal breaker for me. Especially considering I already have a running server with both the texture pack and the mod running smoothly on it.
The only advantage of realms is ease of creation and the server is online even when the “host” is not online. Otherwise it is incredibly limited. I don’t mind but to be honest, if a person has to grind to get compatible mods and texture packs, they might as well grind to make a server. Server = 10 minutes of youtube videos.
Since I already paid for realms I m going to see if I can find an up to date version of voxelmap and if I can use the texture pack I like (KOP).
Nowadays, many people enjoy spending their free time while playing games. One of the best games that people enjoy to play is the mining adventure that is found in Minecraft. Minecraft is one of the games that needs good playing skills. Among the participant, there are players who have good mining skills and the other doesn’t have the needed skills. However, to the people who have limited mining skills they don’t need to stress themselves anymore, this is due to the availability of Xray Ultimate resource pack. This pack has been well designed and also introduced in order to help every player who loves this game and need an extra assistance. Generally, this pack is uniquely designed in order to assist the player with the gameplay. This aspect makes Xray pack different from the other packs since it does not elevate the entire game visuals and thus it gives you the essential assistance you need.
This means, the entire pack highlights all the mineral blocks and ores for you while you are playing the game. Concerning this type of assistance offered by X-ray pack, the player will be able aware of where to go mining and thus help in saving time. However, in order to know how Xray pack works, one should be aware of different x-ray pack features that are simple to understand and to follow. Knowing every feature of this pack will effectively help every player to have the needed mining skills. Generally, the entire pack comprises of the x16 resolution that helps in eliminating any fps drops. In order to run the entire pack competently it definitely important to use Optifine; the Optifine generally helps the player to have an effective night vision effect and also the player the capability to turn off the smooth lighting whenever in need.
X-Ray Ultimate should be compatible with all of these Minecraft versions: 1.18.1 – 1.18 – 1.17.1 – 1.17 – 1.16.5 – 1.16.4 – 1.16.3 – 1.16.2 – 1.16.1 – 1.16 – 1.15.2 – 1.15.1 – 1.15 – 1.14.4 – 1.14.3 – 1.14.2 – 1.14 – 1.13.2 – 1.13.1 – 1.13 – 1.12.2 – 1.12 – 1.11.2 – 1.11 – 1.10.2 – 1.10 – 1.9.4 – 1.9 – 1.8.9 – 1.8.8 – 1.8.1 – 1.8.6 – 1.8
X-Ray Ultimate — Video & Screenshots
How to install X-Ray Ultimate Resource Pack:
NOTE: Many resource packs require optifine to be preinstalled, so be sure to install it.
- Download the X-Ray Ultimate texture pack for Minecraft from the download section below. – if there are many different versions, just pick the one that you like or that you think your PC can handle
- Launch the game client through the Minecraft launcher.
- On the main menu, click “Options”.
- On the options menu, click “Resource Packs. “.
- Click on “Open Resource Pack Folder”. – folder titled “resourcepacks” will pop up
- Move the .zip file you downloaded in the first step to the newly opened “resourcepacks” folder.
- Click “Done”.
- Click on “Resource Packs. ” again.
- Your pack should have appeared in the left window, just hover over it and click on the arrow pointing to the right.
- Click “Done” again.
- The pack has now been successfully loaded and ready to be used in your world!


