While possessing an iPhone, have you ever craved to click that awesome view just in front of you but unable to do it due to low light? Although iPhone camera embraces a sound strength and always undoubtedly satisfies you with the perfect shot, carrying out low light photography with iPhone can be a little demanding too. Your iPhone camera can’t read your mind what you wish to capture when there isn’t much light. But thankfully, there are some tips and tricks available that can be executed at the moment you want low light iPhone photography. So, let us discover those techniques and make our low light photos more interesting via this article.
Tips and Tricks for iPhone Low Light Photography
The right technique at the right time is always helpful for getting the desired results. So, we are revealing 7 useful tips here.
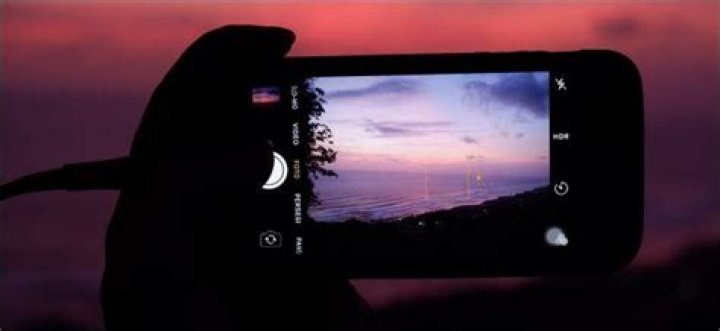
1. Use a slow shutter speed
When you make your mind to take photo from your iPhone in low light, make sure to slow down the shutter speed. This will help in collecting more light from the view and the more time the shutter will take to close, the more ‘light’ will it be able to gather to the sensor. Along with this, ensure to have a wide aperture so that the subject exposure will be adequate. Hence, the first tip tells you to let more light enter to the lens by slowing shutter speed for a better photo in dim light through the iPhone.
Image source: iPhone Mad
2. Stabilize your camera
When following the first tip, it is necessary to keep the camera stable to avoid any blurry or shaky image. You would not want a clumsy dim light image, right? Therefore, the next tip includes keeping your camera still and steady. You can either hold the camera tightly or place it at a stable fixed object like a tripod or door frame for support. Try this technique and you will definitely get a perfect image you want to capture even in the low light.
3. Use flash sparingly
‘Flash or no Flash’, that is the question. Well! Flash has always been there to give a better result while photographing with iPhone. Here, we would recommend you to use flash in small quantities when want to work with iPhone in dim light photography. There are times when using a flash goes pointless giving you a very undesirable results. When you wish to click a faraway subject, working with flash for low light iPhone photography can be inadequate. Also, please note that this recommendation is not for all digital cameras.
4. Don’t zoom
Contrasting the list of all the do’s for better low light photography, here is one ‘don’t’ that you must follow for having what you desire i.e. to get a perfect dim light photo with your iPhone. The rule says ‘Don’t Zoom’ while thinking about photography with your iPhone. A common photography saying goes “zoom with your feet” which means it’s better to move a little further to the subject rather than opting for zooming option. And this is indeed true for Smartphone cases since the device’s inbuilt camera contains a worthless zoom feature. You can rarely think of using digital zooming when shooting picture with your iPhone, one on five times, to be precise and that too when doing day time photography. Don’t ever think of it for low light photography as it will result in grainy look as well as reduced resolution than original. If you can’t move closer, we would suggest you cropping the picture post capturing. This will also keep the resolution intact.
5. Use HDR to get details
Image source: Gadgetzz
Another helpful tip you should know when using iPhone for low light shooting is to make use of HDR feature of the iPhone’s camera. This will help you in highlighting the details what the normal camera can miss. With the HDR feature, you will come up with the best quality low light photo detailing the exposures in an improved way. Ergo, the fifth technique that will assist you in snapping an excellent view when there is low light will be going along with HDR effect.
6. Convert to black and white
A yet another tip you can follow when having tried all above is capturing the photo in black and white. This could help you when you fail in every mentioned attempt above. Black and white will not leave you in any way. Even the grainy shots take benefit of black and white effect and seem more acceptable than in colored pictures. Sticking and adapting to ‘black and white’ is sometimes handy when you are in the mood of low light iPhone photography.
Image resource: Pexels
7. Post production
Post production, keeping the honesty, refers to doing a little cheating in order to create the low light shots non-clumsy. In other words, this technique wants to explain you to taking the desired shot at day time and adding few filters to the shot ultimately making it similar to a night time shot. For instance, by using blue or darker filters or say under-exposure, you can yourself produce a deceptive night impression. You are not new to filters and it would be not wrong to say you have worked with filters before
After the sun has set and the city lights come to life, you have a choice: put your camera aside until the daylight returns or take on the challenge of shooting in the dark. Night photography with your smartphone can be daunting: you’ll face low light, extreme contrast, and pesky camera noise. But luckily, you can creatively work around those limitations to capture beautiful, sometimes beautifully surreal photos of the night. Here are 10 tips for night photography with your phone!
1. Use Apps for Long Exposures
When shooting in low light with a film camera or DSLR, your answer to getting the right exposure is a long shutter speed. The smartphone’s answer to controlling shutter speed (or simulating it)? Apps! Try Manual (iOS) or Manual Camera (Google Play) – both let you control how long the shutter on the camera stays open.
2. Keep It Stable
The best way of preventing motion blur and getting a tack-sharp photo during a long exposure is to keep your camera stable. In this case, you’ll want to use a mobile tripod or a portable alternative like the Glif stand.
3. Capture Motion
One thing that comes out to play at night: car lights. Set your phone to a long exposure and frame a road busy with cars. It’s an idea that can be infinitely varied: boats on a bay, cars crossing a bridge, or even planes flying overhead. Here’s a great project by Kevin Cooley that captures the light trails of airplanes overhead and Tsuneaki Hiramatsu’s photos of the firefly flight paths. Check out this tutorial on photographing firefly light trails.
4. Dare to Be Astract
Darkness may prevent you from getting the perfectly-lit shot. But the long exposures and big contrasts actually make for a great opportunity to take abstract or surreal photos: Consider the darkness a backdrop in front of which you can isolate shapes and colors – it’ll make your photos more mysterious, weirder, and also more wonderful.
5. Get the Best From Your Phone’s Flash
When it’s dark, you can always use extra light on what you’re shooting. Your phone’s flash is convenient, so why not put it to use? Since the flash will be somewhat harsh and flat, there are a couple of ways to adapt it. Try placing tissue or paper over the flash to soften the light, or use a color filter to give it a different feel. You can also use your flash to dramatically lighten up an object close to you – which will make it stand out, but has a great effect.
6. Use an Outside Light Source
These days, there are all kinds of amazing mobile accessories, in particular those that will allow you control the lighting in your night photos better than your phone’s built-in flash. See The Pocket Spotlight and the Smartphone Ring Light. Don’t limit yourself there: flashlights, lamps, bike lights are all handy ways to get extra lighting into your photo. Find some DIY photography lighting ideas in our guide.
7. Edit With a Photo-Editing App
When shooting in low-light, exposure and contrast are your friends in the photo editing toolbox. Try the editing tools in the EyeEm app – you’ll find everything you need in there.
8. Stylize Your Photo With Grain and Black & White
Low light and high ISOs can lead to noise in your photo. But a little grain doesn’t ruin it: Edit your photo to turn those flaws around. For example, grain is often valued by photographers for its dramatic effect. Got a photo that’s too grainy and doesn’t have great colors? Just make it black and white, maybe brighten it up a little and you’ll be emulating a very classic photographic style.
9. Take Advantage of Backlighting
Night can be a time to find extreme lighting situations, and backlighting is just one way to get a creative visual effect. Catch silhouettes in front of store windows, street lights, or wherever lights conveniently shine behind your subject.
10. Embrace Night Lights
City lights and storefronts, neon signs and strobe lights – you simply can’t get this during the day, so take the time to see how you can creatively use them.
How effective is the iPhone 11 Night Mode and can you confidently use the iPhone 11 Pro for low-light shooting?
The Apple iPhone 11 Pro has been applauded for the quality of the onboard camera – but just how good is it shooting in lowlight? In the past, Apple has been a little slow off the mark in equipping its models with some kind of night or low-light mode. But this has now changed, thanks to the iPhone 11 Night Mode.
We’ve seen other manufacturers implementing very impressive night or low-light modes over the past couple of years. Particular mention has to be made to Huawei’s Night mode, which is found not only in its flagship models like the Huawei P30 Pro, but also in its mid-range offerings from its sister-brand, Honor.
Also very impressive is Google’s Night Sight mode, which we’ve tested to great effect in the Pixel 3, and I’m sure will also be fantastic in the newer Pixel 4.
So it’s always been a little bit disappointing that Apple hasn’t also included something similar on its iPhones – until now. It’s not uncommon for Apple to hold back on certain functions until it knows that it can do it well, so it’s not too much of a surprise that it’s taken them this long to bring one to the iPhone 11 series.
Having been using the new iPhone 11 , iPhone 11 Pro, and iPhone 11 Pro Max for the past few weeks, we’ve been able to make some conclusions about the quality of the Night Mode, especially as we’ve been used to using similar Android features over the past couple of years.
Apple’s mode works in a very similar way to others on the market. Essentially what it does is take a series of short exposures, then merges them together to give the appearance of a longer exposure. By working this way, you shouldn’t need to use a tripod or anything else to steady the phone for the majority of shots, as each individual exposure is short.
Using the iPhone 11 Night mode
The first thing to say about the iPhone 11 Pro (and iPhone 11) night mode is that while it’s often described as a mode, it’s not something which is actually selectable by the user.
Instead, the mode will activate automatically when the phone believes itself to be in a low light situation. This of course will most of the time be at night, but it could also apply to shooting indoors in darker situations at any time of the day.
We’re a little disappointed not to be able to select it for ourselves, or have it as a standalone mode, but considering that Apple is all about taking control and doing it for you, we’re not entirely surprised that it’s done it this way. The good news, however, is that once it has been activated, you can make some adjustments yourself if it’s not behaving in exactly the way you’d like it.
When to use the iPhone 11 Night mode
You’ll know that the mode is activated as you’ll see a small moon icon appearing at the top of the screen (or to the left if you’re holding the phone in landscape orientation). If you tap that icon, you’ll see a slider appear at the bottom of the screen (or right if shooting in landscape). With this you can choose to reduce or increase the number of seconds that it shoots for, or turn the mode off altogether.
The phone will choose the number of seconds it believes is the most appropriate length of time to shoot from. I’ve seen it vary normally between three and five seconds. However, if there’s something moving within the scene (such as a person, or an animal), it’s better to reduce the number of seconds, or switch it off altogether as you’ll end up with a blurred shot.
Alternatively, if you’re shooting something completely still, such as a landscape or architecture shot, you might want to increase the number of seconds to boost detail. Since staying in the exact same position for each frame for more than 10 seconds is tricky, you’ll need a tripod or some other way to stabilise the phone – indeed, the phone won’t let you select very long exposures unless it detects that it is completely still.
If you have the iPhone 11, you’ll notice that Night mode only triggers when using the standard (1x / 26mm) lens, while if you have the iPhone 11 Pro, you can use it with the standard and the telephoto lens. It’s disappointing not to see it available for the ultra-wide-angle lens on either model, but perhaps that’s something Apple might introduce down the line with a software upgrade.
How good are the iPhone 11 Pro’s night mode photos?
So of course, the main thing here is the quality of results
As is very often the case, the results look best when you’re viewing them on the phone screen, rather than scrutinising them in great detail at 100% on a computer screen. If you do the latter you will see some loss of detail and image smoothing in parts of the scene when Night Mode has been activated, but, realistically, how often is anybody doing that.
More importantly, the pictures look fantastic on your phone screen, on social media and even printed out at relatively small sizes (A5 is probably the largest I’d want to go for best results).
The other thing to note is that even without Night mode activated (or if you switch its off), the phone can still capture some pretty impressive low-light images, so sometimes it’s not even necessary.
Comparing the shots with similar ones taken on other phones, such as the Pixel 3 or the Huawei P30 Pro reveals that, overall, it’s probably the P30 Pro which just about edges it, with slightly better detail – but again, this is when really scrutinising the images, at normal (phone) screen sizes, there’s not a whole lot in it.
So of course, the main thing here is the quality of results.
As is very often the case, the results look best when you’re viewing them on the phone screen, rather than scrutinizing them in great detail at 100% on a computer screen. If you do the latter you will see some loss of detail and image smoothing in parts of the scene when Night Mode has been activated, but, realistically, how often is anybody doing that.
More importantly, the pictures look fantastic on your phone screen, on social media and even printed out at relatively small sizes (A5 is probably the largest I’d want to go for best results).
The other thing to note is that even without Night mode activated (or if you switch its off), the phone can still capture some pretty impressive low-light images, so sometimes it’s not even necessary.
Comparing the shots with similar ones taken on other phones, such as the Pixel 3a or the Huawei P30 Pro reveals that, overall, it’s probably the P30 Pro which just about edges it, with slightly better detail – but again, this is when really scrutinising the images, at normal (phone) screen sizes, there’s not a whole lot in it.
The holidays are here, and that means one thing — Christmas lights.
And while many avid photographers will hit the streets with full gear this festive season, the rest of us will probably shoot with what’s in our pockets.
Thankfully, phone cameras keep getting better and better at low-light photography, although there are some things to keep in mind for even more striking photos.
Singapore-based photographer Ivan Kuek shared some of his photos and tips on night photography with Mashable.
These photos of the National Gallery’s facade during a light show were taken with his iPhone. Kuek said he held the phone steadily with both hands, and stretched up as high as he could to minimize angle distortion.
“Keep the phone’s face parallel to the building,” he said.
To make colors pop he said to tap the subject of interest in order to let the phone meter the shot properly. Tapping a light source instead of a subject usually makes the phone overcompensate, rendering the shot too dark.
Portrait mode can make objects stand out
The latest iPhone 7 Plus also comes with “portrait mode,” which uses its dual cameras and some software processing to fake some nice — and often impressive — depth-of-field effects.
In this shot of an art installation’s dimmed bulbs, you can see the effect at play: the bulbs in the foreground are sharp while the background is blurry.
Kuek said portrait mode requires a bit more light than the regular camera mode to work well.
“There should be a clear distance between the background and the subject in the foreground, to create a better bokeh effect,” he added.
And because the effect is done with software trickery, it can get confused. Kuek noted that the iPhone can miss little patches of background areas in a photo, such as the triangle that’s formed in the crook of the arm when someone poses with their arms on their hips.
The iPhone has also had trouble figuring out what to blur out with transparent materials or reflective surfaces.
This is the same scene as the one above, shot with the regular camera mode.
Related Video: Hands-on with Kodak's throwback Super 8 film camera
Apple’s Night Mode feature lets you shoot amazing photos in low light environments. This ensures that the pictures and selfies you take in a dark restaurant, night parties, festivals, etc. are brighter, sharper, and significantly better than regular images. On iPhone 11 series, you can use the rear camera for night mode photography. But its successor iPhone 12 lineup lets you enjoy this on both the back and front cameras. Let us get straight in and show you how to use Night Mode on supported iPhone models.
The steps below are applicable for iPhone 11, 11 Pro, 11 Pro Max, iPhone 12 mini, 12, 12 Pro, and 12 Pro Max.
How to Take Low-Light Photo with Night Mode on iPhone
- Open the Camera app, and when you low-light environment, Night mode automatically turns on, which looks similar to the Crescent moon.
- If the moon icon is yellow, you are ready to shoot.
- If the moon icon is white, tap on it to manually switch to Night mode.
- Press the camera Shutter button and hold the iPhone still for some time.
Adjust Night Mode Manually
You can also choose to configure the Night mode effect manually. For this, tap on the moon icon and drag the slider located above the Shutter button towards the right to increase the time. To decrease the time, simply swipe the slider towards the left.
The time range shown on the slider depends on the various parameters. For example, the iPhone uses the on-device gyroscope to learn if you are holding it in hands or have it on a tripod. If it detects that you are using a tripod, then the exposure times may be significantly longer (up to 30 seconds), which delivers even more detailed low-light shots!
How to Take Night Mode Selfies on iPhone 12 Series
- Launch the Camera app on your iPhone 12. Switch to the front camera by tapping on the camera chooser icon from the bottom left.
- Look at the moon icon from the top left corner. If you are in an environment with low light, dark mode will automatically kick in. In this case, you will see the moon icon as yellow. You are all set to click night mode selfies. Tip: You can tap on the same yellow moon icon to manually adjust the exposure time.
- Is the moon icon white? In this case, tap on it to manually turn on the night mode for selfies.
- Once done, hold the iPhone still, and tap on the camera Shutter button.
Note: When the light around you is very bright, you won’t see the moon icon, which means you can not use Night mode.
You can take Night mode Portrait only on iPhone 12 Pro and Pro Max. This is because Night mode Portrait shots use the LiDAR Scanner for depth, which is available only on these higher-end models and not the regular iPhone 12, 12 mini, or any predecessor.
How to Use Night Mode Portrait Shots on iPhone 12 Pro and 12 Pro Max
- Open the Camera app and swipe to PORTRAIT.
- If you are in an environment with low light, Night mode automatically becomes active, and it’s crescent moon icon turns yellow. You are ready to shoot!
- If you are in an environment with reasonably low light, but the Night mode icon is still white in colour, you can tap on it to manually enable Night mode.
- Tap the Shutter button and hold the iPhone steady until it finishes shooting.
All the rest of the basics like manually adjusting exposure, etc. are the same as any other Night mode shot.
How to Turn Off Night Mode on iPhone
To turn off Night mode on iPhone 11 and 12 series, tap on the moon icon when it is yellow and drag the slider all the way from left to right.
Furthermore, the rear flash, front screen flash, and Live Photos are not available during Night mode. If you enable any of these options, the Night mode will be deactivated automatically.
Signing Off
This is how you can use Night mode to take impressive pictures on iPhone 11 and iPhone 12. Apart from this, the Camera app also has some cool features and enhancements like 4K selfie video and Slofie.
READ NEXT:
iGeeksBlog has affiliate and sponsored partnerships. We may earn commissions on purchases made using our links. However, this doesn’t affect the recommendations our writers make. You can read more about our review and editorial process here.
If you shoot videos with your iPhone in low-light situations, you may not always get the results you expect, and that applies to 4K, 1080p, and even 720p resolutions. But there is a way to maximize your video’s quality when shooting in dark environments — you just need to change a few settings.
When taking photos with the Camera app, as long as you have an iPhone 11 model or iPhone 12 model, it can intelligently detect whenever the scene is too dark, and Night mode will kick in to help improve image quality. But when shooting videos, it won’t do the same thing since Night mode is only supported for time-lapse videos on the iPhone 12 models.
When shooting at 60 frames per second (fps), less light can come in through the shutter since it takes one frame every 16.67 milliseconds. Less light in dark situations with an iPhone X S or higher contributes to grainier footage with the loss of extended dynamic range. It also means the codec works harder in fast-moving scenes, which increases the file size. The result looks more like a cheap home video rather than a high-quality recording you might expect from an iPhone.
- Don’t Miss: Control Focus & Exposure Locks Separately in the iPhone’s Camera
Now compare that to 30 fps. With 30 fps, a frame is captured every 33.33 milliseconds, so twice as much light can come through the shutter. With more light coming in, low-light scenes will look much better in video captures. Drop that to 24 fps, and you get 41.67 milliseconds for light to do its thing, so your darkly lit video will look even more clear. And all of this applies to whether you’re shooting in 4K, 1080p, or 720p resolution.
alt=”How to Improve Video Recordings in Low-Light Scenes on Your iPhone for Better Quality Footage” width=”532″ height=”532″ />
To help you out, Apple has a setting that you can enable that will reduce the fps rate automatically in dark environments to improve the quality of your video. To set it, go to Settings, then “Camera,” followed by “Record Video.” From here, what you do depends on which iPhone model you have.
iPhone 12, 12 Mini, 12 Pro, 12 Pro Max
Select the “Auto FPS” option, then apply the Auto FPS to the 30 fps video setting. Unlike with older iPhone models, you can also apply Auto FPS to both 30 fps and 60 fps video recordings. That way, you don’t have to change to 30 fps shooting mode to benefit.
iPhone X S , X S Max, X R , 11, 11 Pro, 11 Pro Max, SE (2nd Gen)
Toggle on the “Auto Low Light FPS” switch. It can only be enabled in 30 fps shooting modes, so you have to be set on 720p HD at 30 fps, 1080p HD at 30 fps, or 4K at 30 fps. No matter which mode you turn it on in, it’ll enable it for the other 30 fps modes; the switch works for all 30 fps rates, not just selected ones.
If you’re using iOS 14 or later, you can switch to these recording modes from inside the Camera app directly by tapping on the frame rate in the corner. However, you need to make sure the “Auto Low Light FPS” switch is toggled on for each setting before you can do all of the work from Camera.
How It Works When Shooting
In the Camera app, whenever you’re recording video and iOS detects that the scenery is not lit well enough, it will switch over to 24 fps. It can do this before you start shooting or during a current recording if the lighting has changed enough to have it kick in.
You won’t notice the frame rate change in the indicator in the Camera app before hitting record — it will always show your selected frame rate even if it plans on using 24 fps (as seen below). You can tell it kicked in, though, by utilizing an EXIF analyzer on your iPhone, which will tell you the frame rate the video was shoot with.
If it were dark the entire time, it would be a flat 24 fps, but if the lighting changed in the middle of filming, you might get something more like 25.5 fps or even 43 fps depending on what mode you selected, how long the video footage is, and how often it was at 24 fps versus your chosen option.
Keep Your Connection Secure Without a Monthly Bill. Get a lifetime subscription to VPN Unlimited for all your devices with a one-time purchase from the new Gadget Hacks Shop, and watch Hulu or Netflix without regional restrictions, increase security when browsing on public networks, and more.
Portrait photography on iPhone XR yields surprisingly good results in some low light situations where it’s unusable on the costlier iPhone XS and iPhone XS Max devices.
A surprising finding
Some reviewers have noted the surprising discrepancy between the portraits shot on the XR and XS, including Daring Fireball’s John Gruber. Even though the XR has a single-lens camera, it uses Focus Pixels and machine learning running on the A12 Bionic chip to compute depth.
This is the same technique employed on Google’s single-lens Pixel phones.
It lets the XR support advanced photography features found on the pricier XS series without a second lens, including Portrait and Portrait Lightning shooting modes as well as Depth Control and Smart HDR. Dual-lens iPhones still benefit from the more natural-looking portraits captured in daytime, but the single-lens XR definitely rules low-light portraits.
To illustrate the point, John used his iPhone XR and iPhone XS to snap up some great comparison photographs of his son in a dark room at night, lit only by a nearby TV.
Low-light Portrait mode shootout: iPhone XS, at left, and iPhone XR, at right
As you can see for yourself, the difference is pretty striking and definitely not what you’d expect from an Apple smartphone that’s at least $250 cheaper than the flagship XS models.
I have done no post-processing on these images other than to scale them to a smaller size, and I shot both with the Camera app. The original images, untouched other than converting from HEIF to JPEG when exporting from Photos, are about 2.2 MB in size.
“Portrait Mode is usable on the XR in some low light situations where it’s unusable on the XS,” John summed it up nicely. For an even better comparison, he kindly provided the full-resolution original files captured using his iPhone XR and iPhone XS.
iPhone XR vs. XS cameras
First, let’s assess the XR cameras.
The front-facing camera on iPhone XR is exactly the same seven-megapixel shooter like on the iPhone XS and iPhone XS Max models, and that of course goes for the infrared TrueDepth camera in the notch as well. The rear shooter is the same 12-megapixel wide-angle part part as found on the XS with the same f/1.8 wide-angle lens and sensor.
When shooting portraits on an XS, the phone consults its wide-angle lens but only for computational help. The actual image is shot by the f/2.4 telephoto camera. While the telephoto camera sports a much more appropriate focal length for portraiture photography, it has a smaller sensor that can gather only half as much light as the wide-angle shooter.
The problem is, iOS forces all dual-lens iPhones to shoot portraits with their telephoto camera (you can’t pick the lens to shoot a portrait with). On the XR, there’s no telephoto camera so Portrait mode images have to be taken with the faster, more sensitive wide-angle camera.
How iPhone XR shoots portraits
You can see the discrepancy in image quality between the wide-angle camera and the telephoto camera by shooting some low-light stills, then compare the result. “By using the camera with the faster lens and bigger sensor, Portrait Mode on iPhone XR works significantly better than on the XS in very low light scenarios,” he noted.
Needless to say, the XR only shoots better-than-XS portraits in poorly-lit situations. If there’s plenty of light, the XS will take much better portrait photographs than iPhone XR.
In John’s own words:
I don’t want to make too much hay over the XR’s ability to shoot portraits in low light, because the XS models can just shoot regular still photos in low light and in a lot of cases that’s probably the way to go.
Are you surprised that the XR beats the pricier XS in terms of low-light portraits?
Toggle Dark Mode
Apple made the most significant improvements in the camera department with the new iPhone 11, iPhone 11 Pro, and iPhone 11 Pro Max. This led to new features that hadn’t been possible before, like slo-mo selfies and the Night Mode feature.
Regarding Night Mode, this is basically a new feature that takes advantage of the new wide-angle camera on the iPhone 11 models. When this feature is activated, a sensor will determine how dark it is so the cameras can take brighter pictures absorbing all of the light available.
This is not done just by using the camera flash. Instead, the iPhone 11 models use machine learning to take different pictures at a certain amount of time and fuse them together. That’s thanks in large part to the new A13 Chip and the updated cameras. So don’t expect to get Apple’s Night Mode on your older iPhone models.
However, you can still take some great pictures at night with your iPhone 8, iPhone X, iPhone XS or iPhone XR. You’ll need to use an app instead. Today, I’ll be discussing three apps to mimic ‘Night Mode’ in your iPhone pictures. One is cheaper, one is more expensive, and one is free. So you can choose the most suitable one for you.
Night Camera: Low Light Photos
Night Camera is a free app that lets you take pictures in dark places with a light exposure up to 1 second. You get settings and options like speed shutter control right on the screen. And it also lets you use the volume buttons take pictures and fade the HUD elements in an out of the screen.
Besides that, it comes with some other features, like changing your focus and exposure at the same time with just one tap. As mentioned before, this app is free to use with a few features, but you also can get the full version, Night Camera HD for $2.99.
NightCap Camera
NightCap Camera focuses on taking the best pictures of the sky and the scenery in low light or at night. It comes with 4 dedicated astrophotography camera modes to help you take better photos of the Southern Light, shooting starts, and even fireworks.
It also has an AI camera control that automatically sets the best exposure and focus for a better, brighter picture. But you can also manually change the settings if you know what you’re doing.
NeuralCam – Night Mode Camera
NeuralCam is considered one of the best apps for taking night pictures, and it might be because of the way the app works. Funny enough, the way NeuralCam explains how it works is similar to the way Apple’s Night Mode works.
This means that NeuralCam will take a bunch of frames in the span of a few seconds and then merge them together with the help machine learning and its processing algorithms. Then it brightens the picture to get a better, sharper and more colorful image.
Taking clear photos at night with your iPhone is about as likely as making it through a whole day on a single battery charge. That is to say, it doesn’t happen. But it’s not necessarily Apple’s fault.
Odds are you’re making some critical mistakes as a nighttime photographer, so here are some quick and easy tips to snap better low-light shots with your smartphone, without filtering it to all hell on Instagram.
Use a tripod, or make one on the fly
One of the most common pitfalls when it comes to low-light photography is rampant blurriness, since the shutter stays open longer to accommodate for limited light. To combat this, you could arm yourself with one of many excellent pocket-sized tripods out there, or in a pinch, steady your phone against a solid surface (like a railing) while you shoot the pic. If neither of those are viable options, steady yourself against something (a wall, lamp post, car, etc.) and hold your breath when you hit the shutter.
And use your headphones to control the shutter
Simply tapping the the shutter button on the screen is enough movement to botch a good shot, so do yourself a favor and use your Apple earbuds (or any ‘phones with in-cord volume control) to take the photo. Once you’ve composed the shot to your liking, keep the phone steady and just tap the volume up or down button to release the shutter.
Manually reduce the exposure
If your photos are looking grainy and gray, or the highlights in the frame are a bit blown out, try reducing the exposure to produce a crisper and better-composed shot. To do this, tap the screen to set the focus, then drag your finger down. Keep moving your finger down until the gray graininess is black, and the highlights clearly pop — in low light you always want to expose for the highlights.
Play around with HDR mode
One of the standout features of the iPhone’s native camera app is High Dynamic Range mode, which snaps several photos simultaneously when you hit the shutter, each at different exposures. Your phone then automatically merges them together into one photo, incorporating the best/most well-composed elements of each exposure. In low light, this often results in a final image that looks a lot closer to what your eyes are seeing in real life.
Jose Luis Pelaez Inc/Blend Images/Getty Images
Use a third-party long-exposure app
If you’re noticing graininess even with exceptionally reduced exposure when using the phone’s native camera app, consider downloading a third-party app like Cortex or Camera+, which both have the option to enable extended exposure times. This will cut down on noise and produce much crisper, clearer finished shots — it can also produce some really interesting color-blurring when your subject is moving (think fireworks or car headlights).
Try “torch mode” when a flash is necessary
Although it’ll set you back a cool $3, Camera+ boasts a suite of excellent and worthwhile features, including what’s known as “torch mode.” This enables you to preview how up-close subjects will look in a flash exposure, by keeping the flash constantly illuminated. This is helpful because flash photos are generally tough to frame in low light, since your subjects are dark (or even invisible) in the viewfinder except for microsecond the flash goes off.
When all else fails, convert to black and white
If you’ve tried everything but are still having a hell of a time getting a clear shot, consider processing the shot in black and white (using the camera app’s own edit tools) to emphasize the contrasting light levels (which will better define your subjects). Lingering graininess also tends to look much, much better in black and white than in color.
Sign up here for our daily Thrillist email, and get your fix of the best in food/drink/fun.


