File Explorer is one of the best apps that Microsoft has developed. It’s been a part of the OS for years and Windows’ users generally like it. You might see recommendations for a few alternate file managers for Windows but the major portion of users stick with File Explorer.
Why is File Explorer so slow?
File Explorer can generally handle large folders really well, even those with lots of heavy images in them. A folder will open within seconds and you will be able to see thumbnail previews for supported file types. The folder view will be presented however you’ve set it. In some cases, the File Explorer does slow down and it can slow down to a point where you have to wait quite a few seconds before you can interact with files in a folder.
There are quite a few different symptoms of File Explorer running slow. Generally, when you open File Explorer it tends to take a few seconds to show files, the thumbnails may not generate right away, the location bar that fills with a green progress bar may take exceptionally long to fill, the folder view may take a few seconds to load, navigating between folders might be slow, and more. Since there are so many different things that can slow down in File Explorer, you will find a variety of different fixes.
Possible fixes for File Explorer slow:
1. Rebuild thumbnail cache
Thumbnails may seem like a small thing but it isn’t easy generating thumbnails for lots of files. If File Explorer has slowed down, or the files in a folder are taking a long time to load, it is possible that the thumbnail cache has errors in it. You can rebuild it easily.
- Open File Explorer.
- Go to This PC.
- Right-click the C drive, or your Windows drive, and select Properties from the context menu.
- On the General tab, click Disk Cleanup.
- Make sure Thumbnails is selected and click OK.
2. Reset Folder options
Resetting folder options can help speed up File Explorer but it will also reset the folder layouts you’ve set up. It is worth it though since it can speed up File Explorer.
- Open File Explorer and go to the View tab.
- Click the Options button.
- Select Change folder and search options.
- Go to the View tab.
- Click the Reset Folders button.
3. Rebuild search index
File Explorer indexes files as they are added or created. This allows the files to be found quickly when you use Windows Search or when you use the search bar in File Explorer. Rebuilding it can speed the app up.
- Open Control Panel in the Icons view.
- Select Indexing Options.
- On the Indexing Options window, click Advanced.
- On the Advanced Options window, click Rebuild.
4. Reset Winstock settings
Resetting Winstock can fix all sorts of problems with File Explorer.
- Open Command Prompt with admin rights.
- Enter the following command and restart your computer.
5. Change/Toggle File Explorer home folder
File Explorer can open to one of two locations; This PC and Quick Access. It can help if you set it to open to This PC instead of Quick Access.
- Open File Explorer and go to the View tab.
- Click the Options button.
- Select Change folder and search options.
- On the General tab, open the ‘Open File Explorer to’ dropdown.
- Select This PC.
6. Run Search and indexing troubleshooter
The Search and Indexing troubleshooter can resolve quite a few problems with File Explorer.
- Open the Settings app.
- Go to the Update & Security group of settings.
- Select the Troubleshoot tab.
- Run the Search and Indexing troubleshooter, and run it.
7. Restart File Explorer
If File Explorer tends to run sluggishly on occasion, restarting it is often a good, quick solution. There are several different ways to restart File Explorer but here’s the quickest method.
- Right-click the taskbar and select Task Manager.
- Go to the Processes tab.
- Look for Windows Explorer.
- Select it, and click the Restart button at the bottom right.
8. Run sfc scan
An sfc scan is a lot like the restart your PC solution. It can help fix a lot of problems.
- Open Command Prompt with admin rights (right-click it and select run as administrator).
- Run the following command. It will take 15 minutes at the very least to complete.
9. Shell extensions
File Explorer’s functionality can be expanded by installing extensions. They are, generally, small apps that can marginally improve File Explorer. That said, too many extensions can slow it down so go through the ones you have and uninstall the ones you don’t need.
- Open Control panel.
- Go to Programs.
- Click Uninstall a program.
- Select an extension and click Uninstall.
10. Edit the context menu
Apps tend to add items to the context menu. These items can also slow File Explorer down. You can disable items that you don’t use.
- ShellMenuView and run it.
- Run it and it will populate all the items that appear in the context menu.
- Select items that you do not use, and click the disable button.
Which one fixed your problem?
File Explorer is a very robust app. Over the years, it’s only improved in terms of features and performance. It can handle exceptionally complex file directories and lots of files. If it does happen to slow down, there is usually an easy way to fix it. Which one did?
Leave a Reply Cancel reply
This site uses Akismet to reduce spam. Learn how your comment data is processed.
Have you installed Windows 11 on your old device but find the machine runs slowly? You come to the right place and you can find some methods to speed up Windows 11 from this post offered by MiniTool. After trying them, the machine can run fast and Windows 11 performance improves.
Windows 11 Computer Runs Slowly
Windows 11, a brand new operating system, has been released to the public. Many users are curious about this new OS and want to install it on their machines. Perhaps you are also the one among them. Before the installation, Windows 11 compatibility check is necessary.
If your device is compatible with Windows 11, you may install this system. But, you may find the new OS is quite laggy and very slow to respond on your computer, especially on old machines.
But fortunately, you can optimize Windows 11 to make it faster and improve performance via some tips. In the following part, we will show you how to do this work.
How to Speed up Windows 11 for Better Performance
Turn Off Visual Effects
Windows allows you to select the settings you want to use for the performance and appearance of your computer. By changing some settings about visual effects, you can make Windows 11 faster.
Step 1: Type advanced to the search box and click View advanced system settings.
Step 2: Click Settings from the Performance section.
Step 3: Choose Adjust for best performance and then check the boxes of Show thumbnails instead of icons and Smooth edges of screen fonts.
Step 4: Click Apply and then OK. This can reduce some visual effects but your Windows 11 computer can run faster without any lag.
Disable Startup Apps
If you have many apps to run at startup, the PC can take much time to boot up. To speed up Windows 11, disabling startup apps is a good option.
Step 1: Press Win + I to open Settings and choose Apps from the left sidebar.
Step 2: Click Startup and disable the toggle for apps that you don’t want to run at startup.
Activate Storage Sense
Windows 11 continues using the Storage Sense feature of Windows 10. It helps to monitor the storage of a computer and automatically delete junk files like Recycle Bin items, app files, and more to free up space.
To improve Windows 11 performance, you should make sure this feature is enabled.
Step 1: Click the Windows icon and choose Settings.
Step 2: Go to System > Storage and turn on Storage Sense.
Step 3: Configure cleanup schedules in the Storage Sense interface.
Turn Off Notifications
Constant notifications may slow down your computer. Like the old versions of Windows, Windows 11 allows you to disable notifications.
Step 1: Open Windows Settings and go to System > Notifications.
Step 2: Turn off notifications from unnecessary apps. You had better not disable notifications for important apps.
Switch to Performance Power Plan
This is another way to improve Windows 11 performance if you are using a laptop. Follow the steps below:
Step 1: Type power plan to the search box and click Choose a power plan.
Step 2: Go to High Performance and click Change plan settings.
Step 3: Click Change advanced power settings and expand Processor power management, then set the minimum and maximum processor state to 100%.
How to make Windows 10 run faster? This post shows some tips for Windows 10 performance tweaks.
Final Words
Windows 11 runs slowly on old machines? How to speed up Windows 11? Try these tips above to easily make Windows 11 faster and improve performance. If you have other suggestions for optimizing Windows 11, let us know.
ABOUT THE AUTHOR
Position: Columnist
Vera is an editor of the MiniTool Team since 2016 who has more than 5 years’ writing experiences in the field of technical articles. Her articles mainly focus on disk & partition management, PC data recovery, video conversion, as well as PC backup & restore, helping users to solve some errors and issues when using their computers. In her spare times, she likes shopping, playing games and reading some articles.
Speed Up a Windows Folder: There is a curious phenomenon of you have probably encountered, even with a fast Windows computer, there are loads Windows folder and files with agonizing slowness. Fortunately, the solution is simple and the results are immediate.
Why Your Folders Load So Slowly
He is a longtime Windows Explorer feature that dates all the way back to Windows Vista, where you can tell Windows Explorer kind of content in specific folders to optimize the way content is displayed.
For example: you can tell Windows Explorer to a particular folder is where you store your music files, and it will present the more useful files for navigation of music (such as detailed list column options like playtime file automatically activated). Even if you do not tell Windows Explorer to do this, some files automatically default to various parameters (the library folder “Music” is naturally default to view type of music files), and then uses a feature called Automatic Discovery of a file type on the rest. The automatic detection system is a best guess of what is in the folder based on the number of file types, last added files, and so on.When it works, it’s a great feature. When it does not work, it is a rather annoying bug: when a folder with many files is optimized for “images”, he churns immediately through all the files in the folder, regardless of whether or not the file is miniature view to check and update all thumbnails for all files in it.
Even on a beefy computer with a modern CPU, lots of RAM, and a fast solid state drive, this process can take 10-15 seconds to more than a minute, depending on the number of files in the folder. On older computers, it may even completely block Windows Explorer (not just the file in question).
An excellent example of this slowness desperate churn-bug-file in action is the Windows “Downloads” folder, thanks to what any automatic Discovery a file type is usually set in mode on most computers picture. If we were placing paris on what you bring to this article, we would be pleased bet that you came looking for a solution to your Downloads folder taking minutes to load and view files. Do not worry, we will not judge your cluttered downloads folder if you do not judge ours.
Fortunately the problem is as simple as saying Windows to stop treating the file as an image gallery.
How to change file optimization
As long as you know where to look, it is easy peasy to change your folder optimizations. First, locate the folder that you are having problems with. Generally most people have one folder that is particularly slow, but if you have a whole series of issues that have hurt you can adopt a top-down approach and change the settings of the parent folder to apply the changes to all sub records.
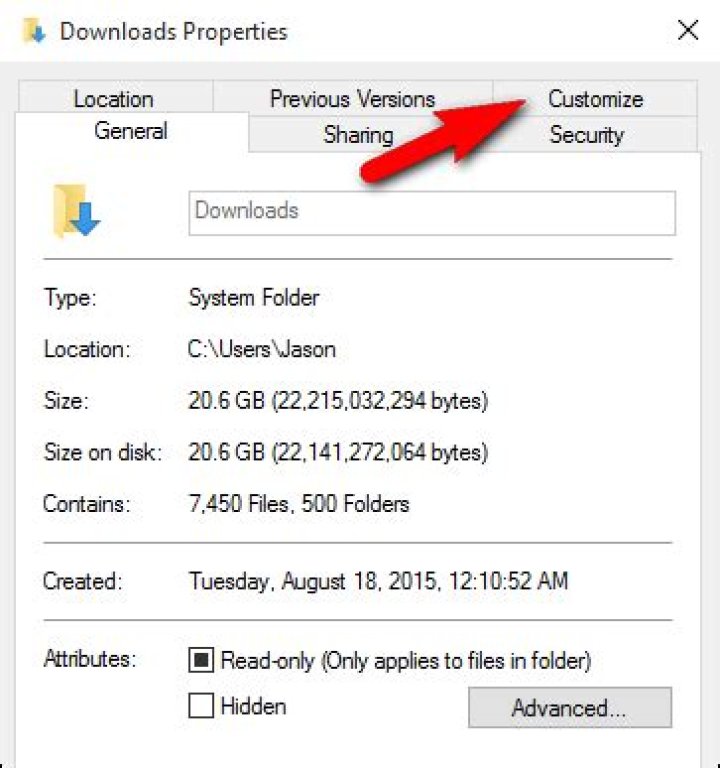
Once you have located the folder, simply right-click on either the file itself or in Windows Explorer, if you have the file open, an empty space in the Windows Explorer pane. Select from the context menu right click “Properties.”
In the Properties menu, click the “Customize” tab option.
In the Customize tab, you will find an entry “Optimize this folder for” with a drop down menu. Then Select “General items” option.If you want to apply the changes to all files in this folder, select “Also apply this template to all subfolders” in the dropdown menu.
Click “Apply” and “OK” at the bottom of the Properties menu. Back in the troublesome folder, press F5 to reload the file and folder.
The changes should take place immediately and the dreaded time waiting for file-load should be long gone.
With a simple little tweak you need to take a coffee break waiting to find your Downloads folder loading.
File Explorer [1] is one of the main applications on Windows. It allows accessing folders, files, drivers and other computer locations. There’s no doubt that we all want to go to the needed directory quickly and without any obstacles. However, Windows 10 user report about slow File Explorer. In the Microsoft forums, users complain about long folder loading time and “unacceptably slow” performance. However, we are here to help you to fix slow File Explorer on Windows 10.
Slow File Explorer can be fixed!
Fix slow File Explorer on Windows
We have listed 7 methods to make File Explorer fast again. However, there are many other options that might help you too. However, these solutions are the most popular and helped the majority of Windows 10 users.
Option 1. Turn off Cortana
Disable Cortana to fix slow File Explorer.
Windows 10 virtual assistant might be useful. However, at the same time, it might cause numerous problems, [2] including slow File Explorer. Thus, you should disable Cortana and see if it helps:
- Press Windows key + R to open the Run window.
- Type regedit and click OK.
- In the left pane of the Registry Editor, go to this key: HKEY_LOCAL_MACHINE\SOFTWARE\Policies\Microsoft\Windows\Windows Search
However, if you cannot find it, you have to create it by clicking Windows key > clicking New > choosing Key > naming it as Windows Search. - In the Windows Search key, right-click on the empty space in the right pane. Choose New and then DWORD (32-bit) Value from the drop-down menu.
- Name the new DWORD as AllowCortana.
- Then double-click AllowCortana DWORD and set Value data to 0.
- Click OK to save the changes and close Registry Editor.
- Restart the computer.
Option 2. Alter folder optimization settings
If you have noticed poor Explorer’s performance when accessing a specific folder, you should change its optimization:
- Right-click the problematic folder and choose Properties from the drop-down menu.
- Open Customize tab.
- Find Optimize this folder for entry and set its value to General items. If you see this entry already set, choose any other option, and then choose General items again.
- Mark the tick near Also apply this template to all subfolders entry.
- Click Apply and then OK to save changes.
Option 3. Check Quick access list
Probably, you have saved a bunch of folders to the Quick access pane to go to the most used locations quickly. [3] However, they might be responsible for the problem. Thus, you have to unpin a problematic folder from the menu:
- Open File Explorer and find the troublesome folder in the Quick access menu.
- Right-click this entry and choose Unpin from Quick access from the menu.
Check if the problem was solved. If it remains, try eliminating all entries from the Quick access list. If it helps, you can add back all removed entries.
Option 4. Set File Explorer view to default
In the Windows search box, type file explorer options and choose this entry from the results.
- Open View tab and click on Reset Folders button.
- In the confirmation pop-up click Yes.
- Click Apply button and then OK to save changes.
Option 5. Alter File Explorer settings
If none of the methods helped to fix slow File Explorer, you should change program’s settings. Follow these steps:
- Open File Explorer and right-click Quick access entry in the left pane.
- Choose Options from the menu to open Folder Options window.
- In the General tab, you should see Open File Explorer to option. Choose This PC from the drop-down menu.
- Click Apply and then OK.
Additional tips
- You can also disable all options under the Privacy section and clicking the Clear button.
- You can also disable Always search file name and contents (this might take several minutes) option. In order to do so, from the File Explorer Options go to the Search tab and unmark the tick from this entry.
Option 6. Create new File Explorer shortcut
- Right-click the empty space on the Desktop.
- Click New and choose Shortcut.
- In the Create Shortcut window find Type the location of the item box. Enter C:\Windows\explorer.exe there.
- Click Next.
- Type a new name for the shortcut and click Finish.
- Right-click on the new shortcut and select Properties.
- Go to Shortcut tab. Here find the Target box and add /n at the end, for instance, if the Target was C:\Windows\explorer.exe, it has to look like C:\Windows\explorer.exe /n.
- Click Apply and then OK.
Option 7. Run sfc /scannow command
Run fsc scan to fix slow File Explorer issue.
If you are still dealing with a slow Explorer, we suggest running sfc scan [4] to fix the problem. You can do it by following these steps:
- Press Windows key + X and choose Command Prompt (Admin) from the appeared list.
- In the Command prompt enter sfc /scannowcommand and click Enter.
- When the scan is over, the slow File Explorer issue should be fixed.
Launch DISM scan
If you cannot run this command, you can use DISM [5] to perform the scan. Follow these steps:
Network sharing allows users to share resources over a network.
In Windows 10 , this comes feature comes as a native feature and can be easily accessed via the Control Panel . A typical network sharing environment consists of a wired or a wireless network, multiple devices, and supporting software. If configured properly, the devices and the files which are known as resources in a networked environment can be shared with each other. The speed of data transmission depends on many factors, including the speed of the Ethernet port/wireless device, HD read and write speed, RAM capacity and speed as well as the quality of the software used to transfer the files. This article teaches how the users can tweak these factors to speed up the data transfer in a networked environment with ease. You can use the Windows cleaning software, ST Cleaner.
Make Your PC Faster and Stable with ST Cleaner (Download Now)
Solutions
Solution 1: Disabling “Large Send Offload (LSO)”
A file can vary between a few Kilobytes ( kB s) to several Gigabytes ( GB s) in size. While it is being transferred over a network, it’s broken into pieces known as segments. Each segment is put inside of a frame and sent over the network through the switch or the router to another device. The size of a frame is 1500 Bytes which is the standard size for MTU ( Maximum Transmission Unit ). Sending a frame larger than this size often causes the frame to be dropped, and thus the overall speed of the network goes down drastically as the frame must be re-sent.
When the Large Send Offload option is enabled, the segmentation takes place in the Ethernet adapter instead of the server. Since the Ethernet adapter is unable to identify the MTU of the switch, sending a wrong frame size leads the frame to be dropped. However, if this process happens in the server then the MTU size can easily be identified, hence data equal to the MTU size is despatched, and consequently, the overall data transfer speed is improved at the expense of the CPU ’s performance.
- Right-click on the Network adapter icon in the taskbar and select Open Network and Sharing Center .
- Click on Change adapter settings to access the list of all adapters present in the computer.
Solution 2: Update Network Driver
Updating the Network Driver not only improves the overall network sharing speed, but also secures the network from anyone accessing it unauthorized. Usually, the drivers are available from the manufacturer’s website, so all the user needs to do is to identify the Network adapter ’s brand name and the model. If it’s an onboard Network adapter , then downloading the drivers from the motherboard’s website is the best option.
- Open up Command Prompt .
- Type the following command and press Enter to execute it:
wmic baseboard get product,Manufacturer,version,serialnumber - Note the product name from the output result.
Solution 3: Update Windows 10
Windows 10 frequently rolls out updates through its Update Center , and installing such updates often brings about a big improvement in the overall system performance. Therefore, it’s recommended to keep Windows up-to-date at all times. Even though Windows 10 is designed to update itself automatically, but if the user has disabled automatic updates, performing the following steps becomes necessary.
- Search for Windows Updates in the Start menu.
- Located the Download button and click it to begin the process.
Solution 4: Use A Better Transferring Client
As stated earlier, the application which is used to transfer the files across the network bears heavily for a better speed of the network sharing; hence either updating it or using a better client can improve the overall file sharing speed. This does not only speed up file sharing, but also boosts other resource sharing such as printer if printing is done through the client.
In Android , one of the best file transfer applications is ES File Explorer File Manager . If files are being transferred either from or to Android devices, simply use this app for an exceptional experience.
In the fast-paced world of the technology, there are many resources in regard to electronics playing part in enhancing lives. Data transfer is a highly used technology paralleling your computer peripherals and smart technology devices. Yes, you heard it right? We are talking about the small equipment flash drive “USB Drive”, through which your data is transferred hassle-free. But there is always a hack of causes, fixes, and step by step guide to get the best use of the resources. It’s necessary to stay above the competitive range of the advancing hacks and advancements.
With the speedy technology of refined research, USB port is now available to tablets, laptops, TVs and so on, so you can easily plug USB drives into them. If you are facing the issues of the slow speed with the transfer of the files, here are a few guides to increase the data transfer with a flash drive. Let’s see some common causes of a slow run of the Flash Drive.
Possible Causes of Slow USB transfer Speeds
Here we are discussing only possible reasons that cause accidentally drops on USB drive transfer speed, like from 500MB/s to 2MB/s, especially after some changes on computer or USB stick.
- Upgrade to Windows 10 from Windows 7 or Windows 8
- Format USB flash drive, for example, in order to transfer large files to FAT32
In these cases, actions, like “Better performance” optimization, turning off Windows Defender or disabling some settings, may not work, or at least won’t make significant difference.
Solution 1. Fix Slow USB Transfer Speeds by Updating USB Driver
If the transfer speed of your USB drive slows down after upgrading computer to Windows 10, then there is possibly a driver issue.
Update driver from Windows Update
When you upgrade from Windows 7 or 8 to Windows 10, there may exist compatibility problem on USB driver. However, Microsoft is keep releasing updates for Windows 10 to fix known errors. Make sure you didn’t disable Windows 10 update completely, then follow steps below.
- Step 1. Go to Settings > Update & security > Windows Update.
- Step 2. Check pending updates. You should get a preview of available updating items.
- Step 3. Start the update. Save all opened work in case computer restarts itself after update.
- Step 4. Reboot computer if it doesn’t and check if USB transfer speed is increased.
Update USB controller driver from Device Manager
- Step 1. Press Windows key + X at the same time, then select Device Manager.
- Step 2. Expand Universal Serial Bus controllers.
- Step 3. Right-click on a USB driver and choose Update drive. Follow the guide to complete update. Repeat and update all drivers
- Step 4. Restart computer and check if this speeds up USB transfer.
You can also go to your computer manufacturer’s website and download latest USB drivers for Windows 10.
Solution 2. Fix Slow USB Transfer Speeds by Formatting to exFAT or NTFS
It is actually not suggested format a new USB drive unless it is really necessary. Some premium USB drives, especially those made by giant manufacturers, are built with best structure and alignment, which may lose after formatting. However, if the USB transfer speed is already slowed down, you may give it a try.
Usually, USB disk drives come with FAT32 file system. Depending on future application scenarios, you can format USB drive as NTFS or exFAT. Generally speaking, NTFS is better working in Windows computers, while exFAT is better in Mac.
- Step 1. Back up your USB drive data, then connect it to a Windows computer.
- Step 2. Open Windows Explorer (My Computer), then right click the USB drive and choose Format…
- Step 3. Set File System as NTFS (or exFAT), untick Quick format.
- Step 4. Click Start, then choose OK to confirm and start formatting.
Now test the USB transfer speed after formatting. In case you lose important files due to formatting, please a try a professional data recovery software.
Solution 3. Speed up USB Transfer by Using Copy Utility
If none of the above tricks work for you, then you can consider a third-party utility to replace default Explorer for USB file transfer. TeraCopy is one of the most famous copy utilities. It has a lot of useful features that Windows Explorer doesn’t provide. It also works for some people (if not everyone) to speed up USB transfer.
With the technology shaping the people lives with the small devices, latest USB 3.0 and 3.1 are very speedy for file copy and transfer. It is worth of effort to try those solutions in order to keep and speed up USB transfer. Tell us your cases and get helpful suggestion now!
This article helps administrators to diagnose and resolve the issue of slow file copy in your organization.
Applies to: Windows 10 – all editions, Windows Server 2012 R2
Original KB number: 10118
Determine the cause of the issue
Slow file copying can be caused by storage issues, client issues, and server issues.
On the file server that hosts the shared folder, copy the file to its local hard disk. If the file-copying speed is unusually low (much slower than average speed), try to update the driver for your storage. If the issue still occurs, contact the driver manufacturer for further troubleshooting.
If the speed is normal, use another client computer to copy the files from or to the shared folder.
- If the file copy speed is still slow, see server-side troubleshooting.
- If issue doesn’t occur, see client-side troubleshooting.
Client-side troubleshooting
Let’s verify the kind of the shared folder. To do so, open the properties of the shared folder. For the Distributed File System (DFS) shared folder, the DFS tab is displayed.
The share folder is a DFS shared folder
Let’s determine whether the problem is caused by the DFS path. Try to use the UNC path instead of the DFS path to open the shared folder. Then, you can check whether the issue still occurs. This step can help you determine whether the problem is caused by the DFS path. How to determine the UNC path of the DFS shared folder:
- Right-click the shared folder, and then select Properties.
- On the DFS tab, you see the UNC path in Referral list.
If the issue does not occur when you use the UNC path, follow these steps to verify the DFS referrals.
Verify the DFS referrals
- Right-click the shared folder, and then select Properties. On the DFS tab, locate all active referrals.
- Remove UNC paths that aren’t active or servers that aren’t reachable or are removed.
- Connect these paths one by one, and make sure that all destination paths can be reached directly from the client. By design, if the client can’t connect the first referral, it will switch to the second and so on. It will create a delay.
If the issue is still not resolved, see server side troubleshooting.
The share folder is not a DFS shared folder
Check when the slow file copying problem occurs.
Slow performance occurs only when you copy a folder or multiple files
If you compare the copying time for a folder that contains multiple files with the copying time for a file of the same size, copying the folder will always require more time. This behavior is expected. The more files that are in the folder, the slower the file-copying process.
Slow performance occurs when you copy a single file, a folder, or multiple files
To resolve this issue, follow these steps on the client computer that has the problem:
Delete the third-part network provider from client computer. The default options are as follows. (Any other provider can be considered as a third party.)
Remove additional values from the following registry keys. To do this, open Registry Editor. Located the following keys. Each key contains a Provider Order value. HKEY_LOCAL_MACHINE\SYSTEM\CurrentControlSet\Control\NetworkProvider\HwOrder HKEY_LOCAL_MACHINE\SYSTEM\CurrentControlSet\Control\NetworkProvider\Order
Check to make sure that each Provider Order value has only three values: " RDPNP ," " LanmanWorkstation ," and " webclient ."
Compare the settings of Jumbo Frames and Large send offload with the settings on working computers. and adjust the settings of Jumbo Frames and Large send offload accordingly. (If it is disabled, enable it, and then check whether that helps)
Make sure that the workstation service is running.
Make sure that client for Microsoft networking is selected in the network connection properties.
Server-side troubleshooting
Install the hotfixes for the file server that hosts the shared folder.
For Windows Server 2008 or Windows 7, install all the hotfixes that are described in KB 2473205.
For Windows Server 2012 or Windows 8, install all the hotfixes that are described in KB 2899011.
If the issue isn’t resolved, follow these steps to troubleshoot the issue:
- Check whether the client is connected to a remote/WAN DFS server. (Ideally, it should be connected to the local site DFS server). If it is connected, double-check the site and subnet mapping in Active Directory Sites and Services. If subnets aren’t mapped correctly, DFS will give an incorrect priority to remote DFS servers while it presents referrals.
- Make sure that the local DFS server is working. .
- If IPv6 is enabled in the environment, configure IPv6 subnets in Active Directory Sites and Services. Or, as a workaround, disable IPv6 in the environment.
How to determine the referral DFS server to which the clients are connecting:
- On a client computer, right-click the shared folder, and then select Properties.
- On the DFS tab, check the referral list. The current DFS server is marked as active. In the following example, the client is connecting to the server HAOMS1.
Last year I wrote this article “What to Do When Creating Folders or Accessing Files on Remote Computer is Very Slow.” In that article I mentioned several troubleshooting techniques and tips on fixing the issue of slow network access to shares. In this article, I will share another method to address the issue. After I had fixed the issue last year. I started to have the same problem again. This time I used the following registry modification to fix the issue. The problem was related to the SMB2 cache redirection as explained by Microsoft in the article SMB2 Client Redirector Caches Explained.
PROBLEM
Access to network files and folders is very slow. The network drives are mapped in Windows 10, Windows 8, or Windows 7.
SOLUTION
- In Windows Search box type regedit and press Enter to access the Registry Editor.
- Go to HKEY_LOCAL_MACHINE and locate System\CurrentControlSet\Services\Lanmanworkstation\Parameters.
- Create a new DWORD value for DirectoryCacheLifetime.
- Double-click the value and set it to zero (0).
- It’s not necessary to disable additional caches, but if the above setting doesn’t fix the problem then you may want to disable two additional SMB cache values. One for FileInfoCacheLifetime and another for FileNotFoundCacheLifetime. You need to add both of them as type REG_DWORD and set the value zero (0) to disable them, if they don’t already exist in the registry.
Here’s the description provided by Microsoft for each of these cache values.
FileInfoCacheLifetime: File attribute information which is contained in the File_Network_Open_Information structure which is useful in conserving network IO for retrieving common file metadata information. To disable or turn off the caching behavior the value of this registry key should be changed to 0. Turning off the file information cache is not recommended as it could nearly double the number of network transactions required for executing a given scenario. Default is 10 seconds.
FileNotFoundCacheLifetime: This is a cache of files which the client failed to open because the file was not present on the server. This prevents the client from repeatedly attempting to open files which are known not to exist on the server. This cache is likely to affect distributed applications running on multiple computers accessing a set of files on a server – where the applications use an out of band mechanism to signal each other about addition/deletion of files on the server. Default is 5 seconds.
DirectoryCacheLifetime: This is a cache of recent directory enumerations performed by the client. Subsequent enumeration requests made by client applications as well as metadata queries for files in the directory can be satisfied from the cache. The client also uses the directory cache to determine the presence or absence of a file in the directory and uses that information to prevent clients from repeatedly attempting to open files which are known not to exist on the server. This cache is likely to affect distributed applications running on multiple computers accessing a set of files on a server – where the applications use an out of band mechanism to signal each other about modification/addition/deletion of files on the server. Default is 10 seconds.
Is Microsoft Outlook running super slow? Still have the loading dataset message showing up for you? I just love it when Microsoft tries to make their software better by adding a bunch of useless features to them! I have no idea why it would take hours to load a single profile!
Unfortunately, making sense and talking about Microsoft products at the same time is usually not possible, so you’ll just have to live with the fact that each newer version of Windows and Office is only going to slow your computer down even more!
So, if you’re in the middle of checking your email or creating a new rule and suddenly everything grinds to a halt with “loading dataset” showing up or Outlook just being stuck, you’ll have to take some tough actions against Outlook if you ever want to be able to do any work.
Here’s a couple of ways you can speed up Outlook and hopefully get rid of those annoying delays and hangups:
1. Disable Useless Outlook Add-ins
Yes, they are useless, except for one maybe. In order to disable all of the add-ons that are active by default, you’ll need to open Outlook in Administrative mode (on older versions of Outlook).
First, go to C:\Programs\Microsoft Office\OfficeXX, right click on the Outlook.exe program and choose “Run as Administrator”.
Then, once Outlook loads, go to Tools from the top menu and then Trust Center.
In newer versions of Outlook, you click on File and then Options. You’ll see Add-ins listed on the side of the Outlook Options dialog.
Click on Add-ins in the left hand menu and then click on the Go button at the very bottom of the dialog where it says Manage and has a drop down box.
Now you’ll get a list of add-ins that you can uncheck. I suggest you un-check ALL of the add-ins except for Windows Indexing.
Go ahead and choose the other option in the drop-down box, which is Exchange Client Extensions. Do not disable the Exchange add-ins if you’re connected to a corporate network.
This one change significantly increased the speed of my Outlook installation. It also helped to reduce the number of instances of loading dataset.
2. Disable RSS feeds in Outlook
Another annoying default feature in Outlook is the large number of RSS feeds that come pre-configured and that eat up resources in due to synchronization.
Outlook will keep checking for updates to these feeds and therefore slow things down considerably. If you use another reader for your RSS feeds, like Google Reader, make sure to remove the RSS feeds from Outlook.
In Outlook, go to Tools, Account Settings and then click on RSS Feeds.
In newer versions of Outlook, click on File and then click on Account Settings on the Info tab.
As you can see, I’ve removed all of my RSS feeds so that no CPU power is being used up for this purpose! Just click the remove button for each RSS feed listed.
3. Compact your Outlook.pst Personal Folder
One other thing you can do to speed up Outlook is to compact your email folders so that they are not as large. It’s best to delete out any emails with large attachments or even to archive some emails if your file is larger than 1GB.
In older versions of Outlook, click on File and then Data File Management. In newer versions of Outlook, you click on File, then Account Settings.
Click on the Data Files tab and then double-click on the data file that you want to compact.
Now go ahead and click on the Compact Now button to reduce the size of the personal folder file.
4. Run Mailbox Tools
Newer versions of Outlook also have some great built-in tools to clean up and reduce the size of your main PST file. Just click on File and then click on Tools.
You’ll see three options here: Mailbox Cleanup, Empty Deleted Items Folder and Clean Up Old Items. Mailbox cleanup has several tools that you can use to archive emails, empty the deleted items folder and an option to help you find the largest emails in your Outlook data file.
The AutoArchive function is the most important as it will move all the older emails to a separate PST file, which will make things run a lot smoother. If you have thousands of emails in many different folders, Outlook will run slow on most systems.
5. Use Cached Exchange Mode
If you have an account that is connected to Microsoft Exchange, then you should make sure Cached Exchange Mode is enabled. You can do this by clicking on File, then Account Settings and then clicking on the Change button for the account listed on the Email tab.
This will keep the most recent mail offline, so everything will load faster when you access those recent emails. You can also download more emails if you like by adjusting time frame.
That’s all of the methods I could figure out so far! If you know of any other method that will help speed up the super slow Outlook, do post a comment and let us know! Also, if you’re having trouble starting Outlook, check out my other post. Enjoy!
Founder of Online Tech Tips and managing editor. He began blogging in 2007 and quit his job in 2010 to blog full-time. He has over 15 years of industry experience in IT and holds several technical certifications. Read Aseem’s Full Bio


