Craig LloydCraig Lloyd
Writer
Craig Lloyd is a smarthome expert with nearly ten years of professional writing experience. His work has been published by iFixit, Lifehacker, Digital Trends, Slashgear, and GottaBeMobile. Read more.
The touchpad on top of the HomePod can be pretty sensitive, making it likely you’ll trigger something accidentally if you haven’t already. There is a way to prevent accidental touches, though.
To do this, you’ll actually be taking advantage of some Accessibility features included with the HomePod. While they’re technically meant for disabled users, those features can be useful for just about anyone.
To get started, open the Home app. On the “My Home” page, in the “Favorite Accessories” section, either long-press or 3D touch the HomePod icon.
On the HomePod’s page, tap the “Details” button.
On the details page, scroll down towards the bottom, and then select the “Accessibility” category.
On the “Accessibility” page, tap the “Touch Accommodations” setting.
On the “Touch Accommodations” page, turn on the “Touch Accommodations” toggle to enable it. This is the master switch that lets you completely turn on and off any and all Touch Accommodations that you have set up.
First, you can enable the “Hold Duration” accommodation. When this feature is enabled, you have to press down on the touch panel for a specific amount of time before it registers your touch. After enabling the option, you can hit “+” or “-” to change the duration required to register your touch.
Next, you can enable the “Ignore Repeat” option. This feature makes it so that multiple touches within a specific amount of time are only registered as one touch. And just like with the setting above it, you can tap on “+” or “-” to change the duration.
Finally, there’s the “Tap Assistance” section at the very bottom. This is great if you tend to slide your finger on the touch panel rather than tap on it.
If you tend to slide your finger to the point where you actually want to tap, select the “Use Final Touch Location” option. If you tend to slide your finger after you tap on the right spot, select the “Use Initial Touch Location” option. If you don’t find yourself doing either of these things, just leave the setting off.
You can set up whatever combination these settings you want to use and, as mentioned above, you can tap the toggle switch next to “Touch Accommodations” at the very top to enable or disable all the settings at once.
- › Why Sublime Text Is Great For Writers, Not Just Programmers
- › What Is a ULED TV, and How Is It Different?
- › Why Professionals Will Actually Want a 2021 MacBook Pro
- › How to Add Images to Questions in Google Forms
- › How to Delete Your Photos on Facebook
Craig Lloyd
Craig Lloyd is a smarthome expert with nearly ten years of professional writing experience. His work has been published by iFixit, Lifehacker, Digital Trends, Slashgear, and GottaBeMobile.
Read Full Bio »
With the launch of iOS 14.4, Apple added a new feature for the HomePod mini that’s designed to provide haptic feedback when your iPhone 11 or 12 is near the speaker to facilitate the simpler handing off of songs from one device to another.
alt=”HomePod mini iOS 14″ width=”2500″ height=”1406″ />
When moving your iPhone closer to a HomePod mini after installing the iOS 14.4 update, the iPhone vibrates quicker and quicker as it gets closer to the speaker, and HomePod mini controls pop up on the screen. If you happen to keep your HomePod mini on a desk or another location where it’s often close to your iPhone, the proximity notifications can get frustrating fast.
If you’ve run into this problem and want the popups and vibrations to stop, follow these directions:
- Open the Settings app.
- Tap on “General.” alt=”homepod mini handoff settings” width=”2000″ height=”1967″ />
- Tap on “AirPlay & Handoff.”
- Toggle off “Transfer to HomePod.” alt=”disable homepod transfer” width=”1484″ height=”1390″ />
With this feature, your iPhone will no longer attempt to transfer music or media to your HomePod mini when it’s near the speaker, preventing the haptic feedback and song transfer interface from showing up. The haptic vibrations and transfer features are limited to the HomePod mini and the iPhone 11 and iPhone 12 models, but the option can also be disabled on other iPhones to prevent the standard transfer interface from coming up.
Neil Hughes | Feb 14, 2018
AppleInsider is supported by its audience and may earn commission as an Amazon Associate and affiliate partner on qualifying purchases. These affiliate partnerships do not influence our editorial content.
There are two different ways to lock your HomePod from outside access — restricting access to AirPlay only, disabling messages, reminders and notes. AppleInsider shows you how to access and control both of these.
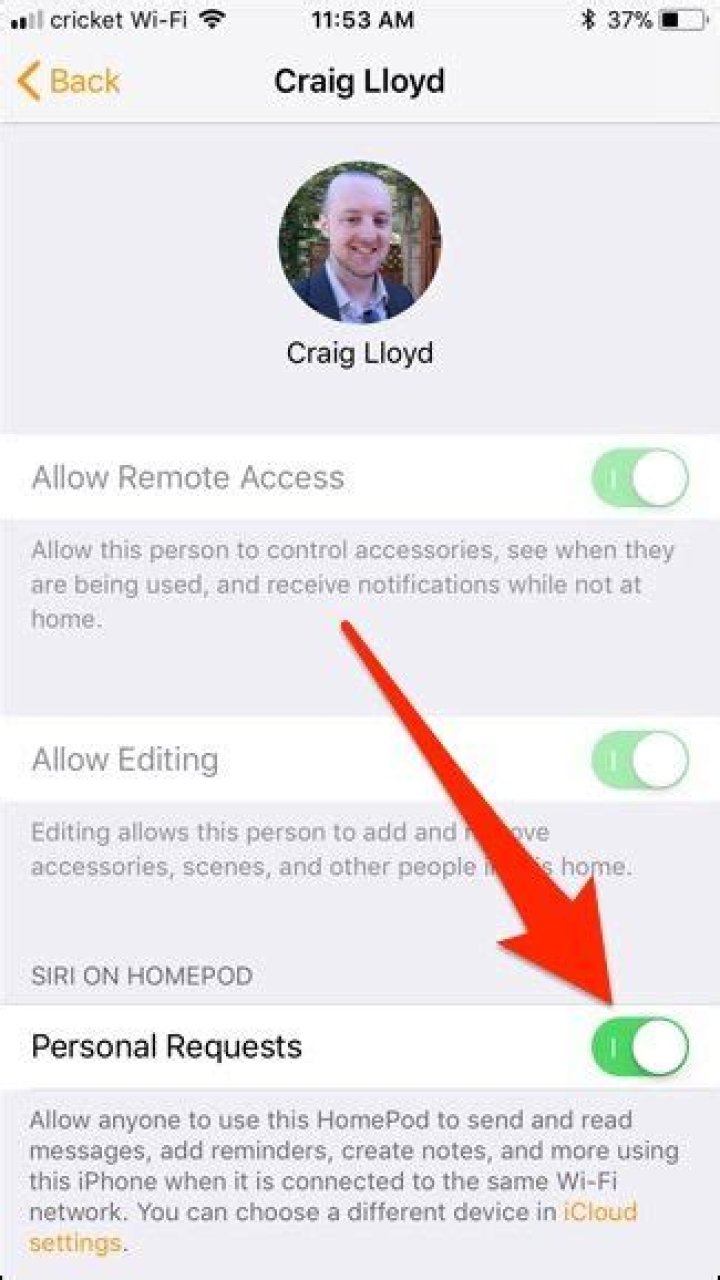
For the most security, you’ll want to disable what Apple calls “Personal Requests” on HomePod. Personal Requests include the ability to send and read messages, to add reminders, and to create notes.
Whoever does the initial HomePod setup will have the device tethered to their and only their iCloud services. But anyone who can speak to HomePod can access these services when Personal Requests are enabled. So if you want to prevent that, you’ll need to turn it off.
To do this, open the Home app on your primary setup device, then tap the location icon in the upper left, then select your HomeKit and iCloud account.
From there, you’ll see a section called Siri on HomePod that includes a submenu for Personal Requests. Tap that, and you’ll see two options: a toggle for Personal Requests, and the ability to require authentication for secure requests, like asking to send a message. By default, secure requests do require authentication.
If you turn off Personal Requests, no one — including yourself — will be able to create reminders or send text messages with HomePod.
To restrict music access, go back two screens to the list of people where you selected your iCloud account. Scroll past the people authorized to access HomeKit to find a Speakers section. The first option is where you will update your HomePod when new firmware arrives, but for this tip we are focused on the second one, Allow Speaker Access.
This setting are largely the same as other AirPlay devices, including Apple TV units and speakers. You have three choices: allowing everyone in the vicinity to AirPlay music to the HomePod, restricting access to those on the same Wi-Fi network, or, in a new HomePod and HomeKit twist, restricting access even further to only people who are authorized to control your smart home accessories.
By default, “Anyone On the Same Network” is enabled.
Finally, Apple also includes a “Require Password” option. If you turn that on, it will generate a six-digit code that you can customize and must share with users if they wish to use AirPlay.
To be clear: These restrictions are for AirPlay only, when streaming from an iOS device or Mac to the HomePod. Users can still speak to Siri to control Apple Music or iCloud Music Library content.
For more HomePod tips, tricks and in-depth looks, see AppleInsider’s coverage:
While Apple’s reputation for privacy and security is nearly unmatched, it’ll never be perfect when Hey Siri is always listening. Aside from iOS devices, Hey Siri always listens for questions and commands on the HomePod and HomePod mini smart speakers. If you rarely use Hey Siri on those speakers, it’s worth disabling the feature for some extra privacy.
Apple, the “beacon” of privacy and security, got into some hot water for how it used to handle users’ Siri data. The company previously used third parties to review recording snippets from user interactions with Siri. Those parties later reported hearing a wide range of personal and private interactions from Apple customers, even when users did not use the “Hey Siri” keyphrase.
- More Info: Apple Saves Your Siri & Dictation History — Here’s the Easy Way to Delete It
So it’s perfectly OK to have second thoughts about the use of Hey Siri in your home. While those troublesome third parties are now gone, Siri recordings live on, but only if you opt into them. As useful as Siri is, having a hot mic turned on at all times in your home doesn’t feel like the most secure feature imaginable.
Disabling Hey Siri can be tricky if you’ve never done it before on your HomePod or HomePod mini. The “off” switch is hidden from plain sight, and it’s not very obvious since there are few actual buttons to work with and no microphone mute switch like you’d find on an Amazon Echo. But once you know how to deactivate Hey Siri on your HomePod or HomePod mini, it’ll be hard to forget.
Method 1: Just Ask Your HomePod
Even if you’re not a fan of “Hey Siri” on HomePod, there’s a good chance you’ll want to use the feature to disable the feature, as odd as that seems. While it doesn’t sound right for a feature to be able to “kill” itself off, even if temporary, you can actually ask Siri itself to turn off your HomePod’s Hey Siri feature — just like that. All you need to do is say one of these:
- “Hey Siri, disable Hey Siri.”
- “Hey Siri, stop listening.”
Siri will then let you know that it can disable Hey Siri, but that to get Siri’s attention in the future, you’ll need to touch and hold the top of the HomePod. If that works for you, say “yes” when your HomePod asks if that’s what you want.
Method 2: Disable Hey Siri Through Settings
HomePod’s settings are tough to find if you don’t know where to look. To start, open the Home app on your iPhone or iPad, long-press on your HomePod, then scroll down to open your HomePod’s settings. Keep scrolling until you see the Siri section, then disable the “Listen for ‘Hey Siri'” toggle.
alt=”How to Stop Your HomePod from Spying on You” width=”532″ height=”532″ />
It doesn’t matter which method you use above. As long as that toggle is disabled, your HomePod model will no longer listen for Hey Siri. As such, it has no reason to take in any audio until you prompt it by touching and holding the top of your HomePod, leaving your privacy (as well as accidental Siri prompts) alone.
To be fair, Apple states that “nothing you say is sent to [its] servers until HomePod recognized ‘Hey Siri.'” And when the speaker hears “Hey Siri,” its top will light up to indicate it’s listening. Until then, it’s using offline intelligence to wait for the keyphrase to trigger it, then the “communication between HomePod and Apple servers is encrypted, and anonymous IDs protect your identity.”
Still, there may be slip-ups, and what’s sent to Apple are recordings that can be stored for up to six months. You still might say some personally identifiable information that Apple’s quality checks may hear, despite your Siri Data being associated with a random, device-generated identified and not your Apple ID.
You can delete your stored Siri Data manually whenever you want, and you can ask Apple not to store or listen to it at all by going to your HomePod settings, tapping “Analytics & Improvements,” then toggling off the “Improve Siri & Dictation” switch.
Keep Your Connection Secure Without a Monthly Bill. Get a lifetime subscription to VPN Unlimited for all your devices with a one-time purchase from the new Gadget Hacks Shop, and watch Hulu or Netflix without regional restrictions, increase security when browsing on public networks, and more.
Earlier this week Apple announced the official HomePod launch date and revealed more details about the Siri-equipped smart speaker, including a built-in speakerphone feature and support for third-party music app streaming via peer-to-peer AirPlay, both of which anyone in the home can use. However, Apple has yet to adequately clarify the extent of its multi-user functionality with regards to Apple Music and other iCloud integrations, leaving many readers wondering if the HomePod is the right fit for their home.
alt=”homepod availability interior placement 012218″ width=”800″ height=”499″ />
In possibly the first hands-on HomePod report since Apple’s launch date announcement, Refinery29 on Wednesday shed further light on the device’s multi-user capabilities. According to the article, many of Siri’s personal assistant features can only be tied to the individual iCloud account used to set up the HomePod. These features can be manually disabled by the account holder, but they also appear to be automatically disabled when said account holder isn’t home.
Although everyone in your apartment will be able to use the speaker, only the person who sets up HomePod on their iCloud account will be able to send texts, set up reminders, and get calendar notifications via voice commands.
If you do set up personal notifications on HomePod, these will only be available when you are on the network, so you don’t need to worry about your texts being read aloud at home when you are at work. If you don’t want them read aloud when you’re home, you can go into your HomeKit settings and turn off the notifications.
Apple hasn’t revealed how the HomePod detects when the owner of the iCloud account it is linked to is home, but the article suggests the speaker is able to keeps tabs on any iOS devices serving the same user account on the same local network. This function also appears to relate to how HomePod makes a (presumably single-user) Apple Music subscription accessible to other users at home when the owner is away, as revealed in documentation shared with Apple Store staff:
Everyone can enjoy music – After HomePod is set up, anyone in the home can enjoy music even when you’re not there. HomePod streams Apple Music directly so your iPhone doesn’t need to be nearby.
We already know that if no Apple Music subscription is linked to a HomePod during setup, users are still able to play content that’s been purchased from iTunes along with Beats 1 radio content and podcasts, but it remains unclear to what extent this content is available to others when the user of the iCloud-linked account isn’t home. Also still up in the air is how Apple Music’s personally tailored curation service will fare under the pressures of multi-user HomePod access, as well as how Apple Music Family subscriptions will factor in.
Otherwise, the Refinery29 article comments on the HomePod’s design and acoustic intelligence similar to what we’ve heard in previous hands-on reports, including its “crisper and clearer” audio quality when compared against speakers like the Google Home Max, the latest Amazon Echo, and Sonos One. However, it’s worth noting Google Home and Amazon Echo can recognize different voices and serve personalized content to multiple users, something which the HomePod doesn’t seem capable of at this stage.
Craig LloydCraig Lloyd
Writer
Craig Lloyd is a smarthome expert with nearly ten years of professional writing experience. His work has been published by iFixit, Lifehacker, Digital Trends, Slashgear, and GottaBeMobile. Read more.
Apple’s HomePod is an amazing speaker, but it comes at a price. Not just a dollar amount, but also the toll it could take on your finished wooden furniture. If you’ve discovered white rings appearing on your furniture (or have heard about this phenomenon and want to prevent it), here’s what you can do.
Wait, What’s the Problem?
Many HomePod owners have witnessed their new smart speakers leaving weird cloudy white ring marks on their wooden furniture—specifically, wooden furniture finished with some type of oil.
According to Apple’s support page, the company says it’s “not unusual” for the base of the HomePod to leave ring marks on some wooden surfaces, which is due to the oils in the finish diffusing when the silicone base of the HomePod sits on the surface for any length of time.
This issue can also happen with other objects, including other speakers, so it’s certainly not a specific problem with the HomePod—but rather how the wood finish reacts to silicone and other materials in general. In any case, you’re not completely out of luck and there are some ways to fix it.
How to Get Rid of the Rings
Apple says the ring marks “will often go away after several days” when you take the HomePod off of the surface, but if not, using a soft damp cloth to wipe away the marks might also work.
If the marks still won’t go away after a quick wipe, there are a few things you can try, most of which are the same tricks you’d use for water stains left behind by beverages (which is a common occurrence).
You can try using a clothing iron or a hair dryer to gently apply low heat to the area and draw out the stain. If you use an iron, be sure to set a towel or cloth on top of the surface first. Then check every 10 seconds or so to see if the ring is coming out.
You can also try other home remedies like wiping down some toothpaste, mayonnaise, or salt, but be sure not to go at it aggressively or you’ll likely damage the finished surface even more.
How to Prevent Rings from Forming
Unfortunately, wooden surfaces that are finished with any kind of oil must be treated with care. And while you wouldn’t think the HomePod would damage your furniture, it’s actually not too difficult to damage a wooden finish, HomePod or otherwise. However, here are some things you can do with your HomePod to prevent this from happening in the future.
Use an Oversized Coaster
Those cloudy white rings are precisely the reason why drink coasters exist. So if anything, your HomePod needs its own coaster as well if you plan on placing it on a finished wooden surface.
Luckily, oversized coasters are a thing, and you can get them in all different shapes and sizes to match your tastes. Ikea even sells some basic cork coasters for super cheap. Or you could just take the easy way out and use anything lying around your house, like the notepad pictured above.
Stick On Some Rubber Bumpers
If coasters aren’t your thing, you can go with something a bit more discreet in the form of small rubber bumpers that you can stick onto the bottom of the HomePod.
I have these all around the house for various purposes, so you can buy a big pack of them and use them on other things as well, like drawers and cabinets, as well as objects that you want to prevent from sliding around.
Mount Your HomePod to the Wall
If you want your HomePod off all surfaces to begin with, you can install a wall mount and stick your HomePod in it to have it in a place up high.
Of course, this does require a bit more work to accomplish, since you’ll have to bust out your tools and and get your hands a little dirty with some DIY work. But it’s easy enough if you don’t want your HomePod taking up any extra real estate on your end tables or countertops, and it looks nice to boot.
- › Why Sublime Text Is Great For Writers, Not Just Programmers
- › What Is a ULED TV, and How Is It Different?
- › Why Professionals Will Actually Want a 2021 MacBook Pro
- › How to Add Images to Questions in Google Forms
- › How to Delete Your Photos on Facebook
Craig Lloyd
Craig Lloyd is a smarthome expert with nearly ten years of professional writing experience. His work has been published by iFixit, Lifehacker, Digital Trends, Slashgear, and GottaBeMobile.
Read Full Bio »
Pushing music from your iPhone to your HomePod or HomePod mini by just moving the devices close to each other is certainly a great party trick. But if Handoff is too easily triggered, you might not think it’s worth the wow factor. Thankfully, there’s an easy way to stop your iPhone from sharing audio to your HomePod or HomePod mini (and vice versa) if you’re finding it happens way too often.
Handoff is Apple’s name for seamlessly moving a task from one device to another. For example, you can handoff a text you’re writing on an iPhone to a Mac, a quick thought in Notes on your iPad to an iPod touch, and music from your iPhone to the HomePod or HomePod mini speaker. With iOS 14.4, the iPhone 11 and iPhone 12 lineups even have haptic feedback as you get closer to your HomePod, with an expanded playback window once the Handoff occurs.
- Don’t Miss: 10 New Features & Changes for Your iPhone in iOS 14.4
You don’t need to disable Handoff completely to stop the process on your HomePod. Apple separates the two options in settings, so you can still enjoy Handoff from iPhone, iPad, iPod touch, Mac, and Apple Watch, without worrying about your HomePod model. To do so, just head to Settings –> General –> AirPlay & Handoff, then toggle off the “Transfer to HomePod” switch.
alt=”How to Stop Your iPhone from Automatically Sharing Audio to Your HomePod or HomePod Mini” width=”532″ height=”532″ />
From now on, it’s perfectly safe to place an iPhone near a HomePod or HomePod mini playing your music without worrying about Handoff getting in the way!
Keep Your Connection Secure Without a Monthly Bill. Get a lifetime subscription to VPN Unlimited for all your devices with a one-time purchase from the new Gadget Hacks Shop, and watch Hulu or Netflix without regional restrictions, increase security when browsing on public networks, and more.
Siri can optionally read texts out loud to you through your AirPods or Powerbeats Pro, as soon as they arrive, allowing for true hands-free messaging when your hands are busy.
They’re calling it “Announce Messages with Siri”.
About Announce Messages with Siri
Apple’s personal assistant can speak incoming notifications from messaging apps into your AirPods or Powerbeats Pro when you can’t reach for your phone. The feature doesn’t work on the original AirPods, but if you have a second‑generation model you’ll be fine.
It also supports Powerbeats Pro, leading us to suspect that Announce Messages with Siri requires Apple’s H1 headphone chip that powers AirPods 2 and Powerbeats Pro.
Being able to quickly listen, and respond, to an incoming message is no doubt an awesome enhancement. No more are you required to double-tap an AirPod in order to summon Siri and ask her to read out loud the text you just received.
Follow along with iDownloadBlog’s step-by-step tutorial to learn how to set up Siri to have her automatically read incoming messages out loud.
Have Siri automatically read messages aloud
Follow the steps below to have Siri automatically read your latest incoming message out loud.
1) Open Settings on your iPhone, iPad or iPod touch.
2) Tap Notifications.
3) Tap Announce Messages with Siri.
4) Slide the switch next to Announce Messages with Siri to the ON position.
5) To avoid Siri reading your transcribed reply back to you before sending it, toggle off the option Send Replies Without Confirmation.
If you’re not a native English speaker or Siri’s speech-to-text doesn’t impress you, you should leave this setting off in order to make sure Siri gets everything right.
6) Now tap Messages underneath the heading Announce Messages From.
7) Choose whom you want to receive messages from this way:
- Everyone: Siri will read out loud texts from everyone.
- Recents: Siri will only read out loud texts from people who recently messaged you.
- All Contacts: Siri will read aloud incoming texts no matter the sender.
- Favorites: Only messages from your favorite contacts will be read out loud to you.
According to Apple, if notifications have been turned off for a particular messaging app, enabling Announce Messages with Siri will also turn back on notifications.
Aside from Messages, third-party messaging app installed on your iPhone or iPad will be listed in Settings → Notifications → Announce Messages with Siri, allowing you to separately manage this feature for every messaging app, which is pretty great.
How Announce Messages with Siri works
With the feature turned on, your trusted personal assistant will read an incoming message aloud, be it an iMessage or a text originating from a third-party messaging app, as long as it integrates with the personal assistant using Apple’s SiriKit APIs.
Siri announces the sender before reading aloud the contents of their message into your ear. Right after reading the message out loud, Siri will then listen for a reply on your part. Simply tell them your message, no need to use the “Hey Siri” wake-up word before responding.
As an example, you may be running on a treadmill. Perhaps you’re playing with your kids or your hands are simply busy. Regardless, now you can quickly and easily engage with a conversation even if you’re doing something else at the time.
Seriously, it just works.
More on AirPods
If you own Apple’s wireless earbuds, you’ll enjoy another cool new feature called Shared Listening, which lets a friend listen to the same song or watch the same movie or hear the same audiobook that you’re enjoying through your own AirPods.
This is possible because all iPhones from iPhone X onward, as well as the second-generation AirPods and Apple’s truly wireless Powerbeats Pro sporty earbuds, include the latest Bluetooth 5.0 wireless protocol that—aside from more reliable performance and increased range—packs in support for pairing with two audio accessories at a time.
Before iOS 13, showing someone what you’re listening to required handing over one of your AirPods, which meant only using one and enjoying half the experience.
By the way, Siri can also announce who’s calling (this is actually an old feature from prior iOS editions). If you’re running iOS 13 or later, your iPhone can automatically silence unknown callers to cut down on the amount of spammy robocalls and other unwanted calls.
Need help? Ask iDB!
If you like this tutorial, pass it along to your friends and leave a comment below.
Read receipts are a great way to know when someone has received and read your text messages, but they’re a double-edged sword – not only can it be annoying to get frequent notifications that your messages are read, but you also might not want other people to know if you have received or read their messages.
Ordinary SMS text messages only have the ability to send notifications about the delivery of the message, while MMS multimedia messages can also inform the sender when the message has been opened and read.
If you prefer to disable some or all of these read receipts, they are easy to turn off.
Check out the products mentioned in this article:
Samsung Galaxy S10 (From $899.99 at Best Buy)
How to turn off read receipts on a Samsung Galaxy
1. Start the Messages app.
2. Tap the three dots to open the pop-up menu.
3. Tap “Settings.”
4. In the Messages Settings screen, tap “More settings.”
5. Tap “Text messages.”
6. Turn off “Delivery reports” by swiping the button to the left.
7. Tap the Back button to go to the previous screen.
8. Tap “Multimedia messages.”
9. Turn off “Delivery reports” by swiping the button to the left.
10. Also turn off “Read reports” in the same way.
After turning these settings off, you will no longer receive read receipts, and anyone you text will not get those notifications either.


