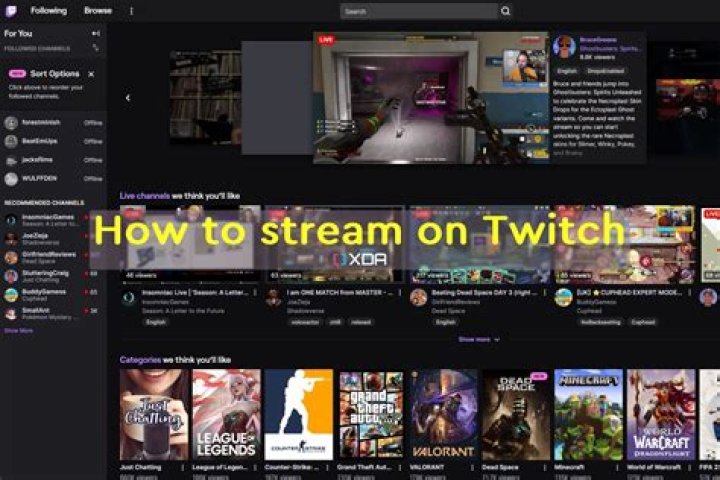
Most gamers who don’t mind being called gamers will know all about Twitch. It is the world’s largest streaming platform that draws in audiences numbered in their millions. You can watch games being played all day long across all platforms but you can stream your own too. Today I will show you how to stream a PC game on Twitch.
You can stream PS4, Xbox and Nintendo Switch to Twitch too but as I don’t have any of those, I will concentrate on PC.
According to Twitch themselves, they have over 100 million unique visitors per month that devour over 16 billion minutes of content. Of those users there are around 2 million broadcasters streaming everything from basic games to competitive multiplayers. The site is clean and easy to use, which adds to its appeal.
Stream a PC game on Twitch
There are a few pre-requisites you will need to stream a PC game to Twitch. You will need decent PC hardware, a good connection and a Twitch account. The company recommends a minimum PC spec of an Intel Core i5-4670 or AMD equivalent and at least 8GB DDR3 RAM.
You will also need a stable internet connection with at least 2Mbps upload capability. More would be better but this is the least you require for decent performance.
You will also need a broadcasting app to make everything work. Three of the best are Open Broadcaster Software (OBS), Gameshow and XSplit. OBS is free and open source but needs a little configuring. Gameshow is supposed to be pretty good but I have never used it. XSplit is good too but needs a premium subscription to access its best features. I will use OBS for this guide.
- and get a Stream Key. You will need this to be able to stream your games. Once signed up, you should see a dashboard, select the Stream Key tab and hit Show Key. Keep the page open for a minute.
- Download and install OBS.
- Open OBS as an Administrator and select Settings in the top left menu.
- Set up your name, default language and anything else you might like to customize.
- Select Encoding from the left menu and ‘Use CBR’ and ‘Enable CBR padding’. Use AAC with a bitrate of 128 for the audio codec. If you have a lot of bandwidth, you can play around with these settings a little if you wish.
- Select Broadcast Settings from the left menu of OBS.
- Select Twitch as the stream and hit Optimize.
- Add your Stream Key from Twitch into the box labeled ‘Play Path/Stream Key then hit OK.
- Close Settings.
- Right click Sources in the bottom center of the main OBS window .
- Select Add, Game Capture and select the game you want to stream from the Application dropdown box.
- Select Monitor Capture to display whatever happens on your computer monitor.
- Add a feed and select Video Capture to display you via your webcam as you play. This is optional but offers a bit more interest to the stream.
- Select Preview Stream to set everything up before going live. Make any changes you need and make sure your webcam is positioned correctly.
- Select Start Streaming in the main OBS dashboard to being your stream.
There are a ton of settings you can mess around with in OBS but the ones listed above will get you up and running in the shortest amount of time. If you would like to dig a little deeper into the setup, this Twitch page has everything you are ever likely to want to know about setting up OBS for Twitch.
Adding the extra source stream of you on webcam is optional but when you watch Twitch streams, those with the player commenting on camera are easily the most entertaining. Just make sure you have a good webcam and that you set it up so there is very little distraction in the background. Your audience will be dividing their attention between gameplay and your commentary so should not be distracted by goings on behind you.
OBS does take a little configuring but considering it is free, is a very powerful tool to use if you want to stream a PC game on Twitch. If you took a look at that Twitch configuration page, there are literally hundreds of settings you can tweak to enhance or customize your feed. The instructions above will get you streaming quickly but it is likely that as you gain experience, you will tweak these settings to suit.
Got any OBS specific settings to suggest to new Twitch users? Got any tips for creating interesting streams? Tell us about them below if you do.
If you want to set-up online streaming via Twitch from your Xbox you have two options after you create a Twitch Account: Use the Native Twitch App within the gaming device.
Connect console to a PC with a capture card or capture device.
Can you stream Xbox one on twitch?
While the Xbox One can’t stream to Twitch out of the box, you can enable Twitch streaming just by installing the free Twitch app from the Store. After you go through the setup process once, broadcasting on Twitch is quick and easy.
How do I stream on Twitch with PC?
How to Stream a PC Game on Twitch with OBS
- Get a Twitch stream key from your Twitch.tv profile.
- Download Open Broadcaster Software and set up Game Capture mode.
- Add your Twitch key to OBS’ Stream Settings.
- Click “Start Streaming” and play your game.
How do I stream from my PC to Xbox One?
How to Stream Xbox One to PC
- Make sure your Xbox One is turned on.
- Launch the Windows 10 Xbox app.
- Locate the icon on the left that looks like an Xbox One and click on it.
- Locate your Xbox One in the list and click Connect. Note: This step is only done once.
- Click Stream.
How do I start streaming on Xbox one?
How to stream on an Xbox One using Twitch
- Select the game you want to stream and press the “A” button on your controller to launch the game.
- Once you want to begin streaming, press the Xbox button on your controller to open the guide.
- On the Twitch app, navigate to the “BROADCAST” tab and press “A” on your controller.
Can you use a webcam on Xbox one for twitch?
Before you start a stream on Twitch from an Xbox One gaming console you can add a webcam and a microphone to your stream. If you have a Kinect sensor you can easily turn it into a webcam, but if you don’t, you can use any webcam that is compatible with a Windows PC and that has a USB port.
I searched the forums and didn't find any help so forgive me if this has been posted already. I'm on windows 10.
I wanted to stream some older PC games on twitch (Half-Life, System Shock 2, and Deus Ex). But all 3 games are borderless full screen games. This means I can't minimise or exit the game at the top right as the controls are not there. With Half-Life and System Shock 2 pressing Alt and Enter, a control that makes certain games bordered, doesn't make these games bordered. The only way I can access OBS while these full screen games are running is to press Alt and Tab, which minimises the games and puts OBS at the foreground. My problem is that OBS can not detect games/sources that have been minimised, so I have no way of streaming these games via the "Window Capture" OBS feature.
I can use Display capture with captures the entire PC's screen, but for some reason these games on when viewed via OBS only take up a small portion of the screen, and it can't be resized and made bigger.
With Deus Ex, pressing Alt and Enter actually makes the game bordered but resizes the screen to be a lot smaller. Making the game bordered and resized means I can access OBS without minimises the game, which means OBS's "Window Capture" can detect the game as a source. But the problem is that for some reason when you do this (press Alt and Enter), the game on OBS is not full screen. And I would like it to be full screen for my potential viewers.
I hope all this made sense. I'm a total noob when it comes to streaming and if it didn't make sense, my short question is "Is it impossible to stream certain PC games (borderless full screen) with OBS, using its Window Capture feature?"
Twitch is a top platform when it comes to game streaming. It allows a player to show off their gaming skills, gain popularity, and get paid. However, its streaming features are sometimes unreliable. If you’re an aspiring streamer, we’ve listed some of the other tools you can use to live stream game on Twitch.
How to Live Stream Game on Twitch
Stream Android game on Twitch with Mobcrush
First on our list, we have Mobcrush. It is a free broadcast streaming platform which allows users to live stream game on Twitch. You can use the app on either your Android and iOS devices. Though it is easy to use and provides clear graphics, it does not display the chat during streaming nor your camera while gaming. Nonetheless, it can still reach a vast audience and offers great visuals for streaming.
- Download and install the application on your mobile device.
- Go to Mobcrush’s official website and sign up. Once you’re done, launch the app and log in.
- Next, tap the three lines on the upper left corner and tap Broadcast.
- Select the Twitch icon and choose the game you will play by tapping the Select button right beside the Game.
- Then, you can customize your Broadcast Title, turn on the Receive Chat Messages, and hit Start your broadcast to begin streaming.
- **Note: To know you’re Live, you will see the Mobcrush icon on your screen while you’re playing.
Stream Android game on Twitch with StreamLabs
StreamLabs is one of the biggest and most notable streaming platforms. It is an all-in-one streaming portal that also features personalized streams with pro overlays. And with its newest update, you can now multistream, or in other words, stream a video that and broadcast it on multiple platforms at once. Below are the steps on how to stream games on Twitch using StreamLabs.
- Install the app on your mobile phone.
- Launch the app and log in with your Twitch account.
- On the upper right corner, tap the Stream icon and wait for a dialog box to appear on your screen.
- After receiving the notification, click Start now to start streaming.
- Once the stream is active, click the three-dot icon and choose Edit stream info. Here, you will customize your stream information such as the name and your content. Lastly, tap OK and start playing.
Stream PC game on Twitch using ApowerMirror + OBS Studio
To stream PC game on Twitch, you will need a reliable mirroring application such as ApowerMirror combined with a streaming tool like OBS Studio. ApowerMirror features a smooth, fast, and stable mirroring process ideal for streaming your content on Twitch. Just follow the guide below to start streaming.
Set Up ApowerMirror
- Get the app installed on your phone and pc.
To Start Streaming
- Open OBS Studio and click File > Settings > Stream. Select Twitch from the list and paste the stream key.
- You can find the stream key on Twitch by going to Settings > Channel and Video, and copy the primary stream key.
- Then, once you’re all set, hit the Start Streaming button to begin streaming.
Conclusion
All the tools we’ve gathered in this article will help you stream on Twitch. If you feel comfortable using your mobile phone when streaming, you can choose between StreamLabs and Mobcrash. But if you want to use your PC, you can always rely on ApowerMirror and OBS Studio.
In reality, Streamlabs OBS is virtually identical to the original OBS, just with a few different add-ons. This is because it was built off of the original Open Broadcaster Software. This means it’s almost the same process to add a game to Streamlabs OBS.
However, there are a few distinct differences that make Streamlabs OBS much easier to manage over its counterpart.
Today, I’ll show you how to add your game to the software whether you’re creating live streams or recording videos to upload to YouTube.
How to Add the Game to Streamlabs OBS
To add a game to Streamlabs OBS, you simply need to add a Game Capture from the Sources window. And in most cases, you can leave the game settings for Steamlabs OBS as their default values.
For this tutorial, I’m going to assume you have Streamlabs OBS already installed.
Make sure you have the scene selected where you want to add your gameplay.
1. Add a New Source
Click the “+” icon of the Sources window. This will load up an easy-to-use source window.
Step 2: Add the Game Capture
Click the option for “Game Capture.” This will highlight the option.
NOTE: Take note, this is also where you can find a variety of widgets to add to your stream. This means you can quickly add things like an alert box, follower goals, viewer counts, and much more depending on your Streamlabs account settings.
Click the “Add Source” button on the bottom right.
Input a new name and click the “Add Source” button. Make it something easy to identify if you have to make changes later. For example, I’m just going to use, “Computer Game.”
Step 3: Adjust the Source Settings
In the next window, you’re able to change a few settings depending on what you want to stream or record. For most newer users, leaving everything as default should be good enough for now.
However, let’s go over the Mode selector real quick.
When you click the Mode drop-down window, you have a few different options:
- Auto
Streamlabs OBS will detect your game automatically, in most cases. - Capture any fullscreen application
This will let you add any fullscreen app you are currently running on your computer. This will add a couple of extra options such as changing the resolution of the app to fit your stream or video. - Capture specific window
In this setting, you can choose which windows to add to your broadcast. This includes things like browser tabs and any program you’re currently running. For instance, you can show the Photoshop screen should you want to create a video tutorial about Photoshop. This also works great if you play games in window mode. - Capture foreground window with hotkey.
With this setting, you can switch to the foreground window of your computer just by hitting a hotkey saved in OBS.
In reality, I use the “Auto” and “Capture specific window” settings for most of my videos. That’s because I do a lot of tutorials showing the web browser.
For now, let’s leave the Mode as its default “Auto” setting for now. This is the easiest way to add a game to Streamlabs OBS.
Step 4: Save the Game Capture Settings
Click the “Done” button to close the game capture settings.
Now, your game is added to Streamlabs OBS as a source.
A Few FAQs About Adding a Game to Streamlabs OBS
It really is that simple to add your game to Streamlabs OBS. But, perhaps you have a question or two about what you can do or how the process works.
Let me see if I can answer a few of the more common ones.
Does this work when using a capture card or USB capture device?
The way Streamlabs OBS works is that it detects when gameplay is active, or you can specifically tell it to record or stream specific windows. As long as you can see the gameplay on your monitor, you can use it in Streamlabs OBS.
Sometimes, this means having software specifically to show console games on your computer system. Most of which do, nowadays.
This means you can either play the game directly from the console or use the “Capture specific window” setting to show game display programs.
Can you record videos with Streamlabs OBS without streaming live?
To record video in Streamlabs OBS, all you have to do is hit the “REC” button on the bottom right of the software. Then, it will save your video in its default folder. For PC users, this is the Video folder default of your user profile.
Streamlabs OBS isn’t merely for streaming on Twitch or YouTube. You can use it to record videos for editing, such as using Adobe Premiere Pro or HitFilm Express.
Can you use your own overlays in Streamlabs OBS?
You can add your own overlays as a new source. For instance, I use a Halloween-themed PNG image I created myself. I add it as an image source and make sure the game is under the image while streaming.
Does it cost money to use Streamlabs OBS?
Streamlabs OBS is free to use, just as its predecessor. However, to get most of the cool widgets or premium overlays, you’ll need to pay for the Streamlabs Prime account.
However, you can add a game to Streamlabs OBS, the basic alert boxes, and many other free widgets without paying a single dime.
What Game Will You Play on Streamlabs OBS?
Adding a game to Streamlabs OBS is fairly simple. In fact, a lot of the widgets you’ll use are also easier to add when compared to the original Open Broadcaster Software.
The hardest part about streaming is finding what your target audience wants to watch you play most.
In this tutorial we’ll show you how to stream on twitch with OBS Studio streaming software.
First of all, you need to download OBS and install it. Then, follow the instructions below.
Best OBS settings for Twitch TV
In the first step you should get a twitch stream key for OBS. You can find it in your Twitch dashboard (tab Stream Key).
- In OBS Studio go to “File” → “Settings” → “Stream” and set “Stream Type” to “Streaming Services”
- Choose “Service” → “Twitch”
- Choose “Server” which is closest to your location
- Enter “Stream key” which you’ve got in your dashboard on Twitch.TV
In the second step you should configure OBS Studio for the best quality and performance. Twitch developers are recommending these settings:
- Rate Control: CBR
- Aspect ratio: 16:9 (that means you need to use resolutions such as 1920×1080, 1280×720, etc.)
- Video bitrate (kb/s):
- 60fps:
- 1080p: 6000
- 720p: 4500
- 30fps:
- 1080p: 4500
- 720p: 3000
- 480p: 1500
- 60fps:
- Keyframe interval: 2
- Audio: AAC with a bitrate 64-128 kb/s
Also it is worth mentioning advanced settings. You can use different encoders (x264, Intel QSV, Nvidia NVENC H.264, AMD AMF) and presets for them.
For more information on this and for further instructions about scene setup you can read an article: how to setup OBS Studio for streaming.
If this guide was useful, don’t forget to save a bookmark and share it in social networks.
First of all, it’s not a must to have a webcam to stream gameplay on Twitch, but viewers prefer seeing the person who is playing. This tutorial will guide you through setting up your first Open Broadcaster Software (OBS) scene, complete with a game stream and a webcam video stream.
Step 1: Download Open Broadcaster Software
First, you need to have OBS. Duh.So you can download it here (Mac and Linux users should download OBS MultiPlatform while Windows users should download the latest version of OBS).
When you have OBS installed, you will need to tweak the settings. This is necessary to do only once, the first time you use OBS. Open the settings by clicking the Settings button in the lower right corner. Under General, choose your language. Also, if you like you can create a Setting Profile, but you don't have to.
Settings in OBS can be tweaked for your streaming needs.
In the Video Encoding section, under Encoding, make sure both 'Enable CBR padding' and 'Use CBR' are checked. Twitch recommends your Max Bitrate be 3300 or 80% of your upload throughput, whichever is lower. In order to find your upload throughput, you can do an upload test here. It will give you your upload speed in megabits per second. Then multiply this number by 1,000 to get your upload speed in Kb/s (kilobits per second). If the number is lower than 3,300, you can enter it in the Max Bitrate box.
In the Audio Encoding section, Twitch recommends using an AAC codec with a bitrate of 64 to 128 kbps.
Your Video Adapter, under Video, should be set to your default graphics card. In case you have multiple graphics cards, choose the one you'll be playing your game on. The Base Resolution should be the native monitor resolution ( and again – in case you have more than one monitor, choose the one you'll be playing the game on).
The Resolution Downscale can be set to downscale the resolution of your monitor to output a lower-resolution feed. Less bandwidth will be used by a lower resolution; you might want to use this feature if your Max Bitrate from the Encoding section is low. For this guide, FPS should be 30, the Filter should be Bilinear, and Aero should be enabled.
For Broadcast settings, check out Going live and for Audio settings, check out Making yourself heard.
Step 2: Create a scene
When using OBS to stream, you first need to build a "scene" of all the elements you want your viewers to see. These elements include things like your computer’s desktop, your webcam’s video feed and the game you're playing.
Creating a scene is super simple: Right-click in the box of Scenes and click Add Scene from the drop-down menu. Give your new scene a name and then click OK.
If you want to delete a scene, right-click its name and then click Remove. You can also reorder, rename, and copy scenes.
Building multiple scenes is useful if you stream different video games. For example, one video game has its user interface in the upper left corner, so you put your webcam's feed in the upper right corner, while another video game has its interface in the upper right corner.
Step 3: Add your gaming source
The first important thing to add to your scene is a gaming source. It’s the source that displays the game you're playing. In total there are three different sources you can use for that: Window Capture, Game Capture, and Monitor Capture.
In order to add to your scene a source, make sure the scene is selected, then right-click inside the Sources box. Click Add and finally choose the source type you wish to add.
Game Capture
Game Capture is the one that captures the feed from a single game. It's the only source that is able to capture games running in full-screen mode (although it can be unstable now and then).
Pick out the game you wish to capture for your Twitch stream right here.
Then add Game Capture as a source, give it a name (the name of your game should be good enough) and choose the game you want it to capture. Remember, the game must be open for OBS to see it. In case you don't see your game, make sure it's open, and then click the Refresh button. Game Capture only supports OpenGL and DirectX 8, 9, 10, 10.1, 11 games.
Window Capture
Window Capture captures the feed from a single window. For example, it could be a Web browser, a game (running in windowed mode), or any other app/program. Window Capture is more stable than Game Capture, as well as works with all games (and windows). The only difference is that it will not capture a game running in full-screen mode.
You can choose to capture a specific window as well.
Add Window Capture as a source, give it a name and choose the specific window you want to capture. You can choose to capture only the entire window (including the title bar) or the inner window. In addition, you can choose whether or not you want mouse movement to be captured. For this guide, don't worry about the other settings.
Monitor Capture
Monitor Capture is the one that captures your entire monitor. Monitor Capture is not very efficient if you're running Windows 7 or an older version. Also, it will not capture games running in full-screen mode.
Monitor Capture gives you a chance to capture your monitor's image.
Add Monitor Capture as a source and give it a name. Choose the monitor you wish to capture (listed by number) and then choose whether or not you want mouse movement to be captured. For this guide, don't worry about the other settings.
Step 4: Add the source of your webcam
You can add your webcam, once you have your game source set up. Right-click in the Sources box, then click Add > Video Capture Device and type in a name for your source.
This window lets you choose your webcam for your stream.
A Device Selection window will open. In here, you can choose your Device (you should see your Webcam here if you only have one video streaming device) and tweak how your video looks. You can flip your image horizontally or vertically and choose a custom resolution. In order to open up your webcam's settings, click the Configure button. Some webcams have microphones that are built-in, so you'll want to make sure the correct Audio Input Device is selected (under Audio section).
Step 5: Edit your scene
By now, you should have two sources in your scene – a webcam source and a game source. But you will not be able to see any visuals in OBS until you start recording, streaming or previewing your stream. In order to see what your scene will look like to your viewers, click Preview Stream.
At first, your sources will be all over the place. Perhaps your webcam feed is covering an important part of your game's interface. In order to move and resize elements, click Edit Scene. Now you can drag elements around the screen as well as resize them with your mouse. If you wish to bring an element forward, right-click on it in the Sources box, then click Order > Move Down, Move Up, Move to Bottom or Move to Top. Also, you can resize and position elements from this menu – right-click on the element in the Sources box and then click Position/Size.
When your stream finally looks exactly the way you want it to look, click Edit Scene to exit the editing mode.
Online transactions are indispensable at times like now with our current global crisis. Many find online shopping very convenient and enjoyable. What’s more, even concerts and tv shows are broadcast online. And these days more people are looking for ways to earn money online. That’s why the number of content creators has doubled; though mostly in the tech and gaming worlds. Most sites like YouTube and Twitch are offering payment if a content creator or gamer reach the minimum requirement of followers and views. So get started with your content and become one of the many who earn while doing what they are interested in. As an objective, this article will show you how to use these OBS apps on Twitch. So, here’s how to Stream Game on Twitch.
How to Stream Game on Twitch
StreamLabs
StreamLabs is an Open source broadcasting system that allows and provides tools for streamers and content creators to make your Live streaming better. This system gives you the opportunity to create good content for your vlog because it allows you to record your video with the camera, audio, and do live streaming at the same time. Also, the interface of the tool is very simple and easy to understand. Most game streamers prefer using this tool because it is linked with Twitch. Notice that when you Sign-in to use this tool, you can use your Twitch or Youtube Streaming account. On the other hand here is how to stream Android game on Twitch in any case
- Visit StreamLabs, Install and set the app.
- Once installed Log in via Twitch or whatever video sharing platform you are using.
- Then Allow access to all necessary permissions and skip widgets set up.
- Do not forget to enable chat permission to show it on your screen while doing Live streaming.
- Click the computer icon with the arrow pointing to the right.
- Then tap the gear icon and set the Title and the game that you are playing.
- To go “Live” tap the Red button at the bottom right of the interface.
- It is advisable to launch the game first before going live and make sure that the audio is turned up to include the audio while doing a live stream. Finally, tap “Start Now” to start broadcasting
Omlet-Arcade
Monetizing your gameplay on Twitch is much easier when you use Omlet-Arcade. This app allows you to customize your “Live broadcast” and gives you a unique experience for your viewers. Through this app you can also support other streamers. You can follow them also. Just like StreamLabs this is a video recording and Live broadcasting tool. Meanwhile, here is how you can use it to stream PC game on Twitch.
- Download and Install the app on your phone
- Create an account
- At the bottom center the interface, tap the “Plus” sign and choose the game you wanted to play.
- A window then will pop where you can choose which video sharing platform you are going to use. Tap on “Twitch” and the streaming will begin.
OBS Studio
OBS STUDIO is considered the most reliable tool to stream PC games on Twitch. This allows you to screen record and do “Live Broadcasting” of your game or content. It is easier to use because it supports some of the most popular video-sharing platforms like YouTube, Livecoding.tv Twitch and a lot more. Also, The split window functionality accommodates multiple media sources.
- Download and Install the app
- Set the settings according to your preference.
- Go to your dashboard and click select settings at the top part of the page.
- Then look for the “stream Key” and copy and what is in there.
- Go back to OBS and input your stream key into the field. Click on “Apply” then hit “OK”.
Conclusion
Do now you have a tool to use, you can now Stream Game on Twitch and start growing your subscribers and eventually earn. If you are wondering which is the best among them, OBS and StreamLabs are Highly recommended.
I have looked through numerous threads of people having the same issue as myself, have tried the different resolutions that people have suggested, but I’ve finally decided to post here in hopes of an actual fix because, for the life of me, I cannot figure it out. In most games, I say most because not all have this affect, each time I go live on obs, I get a huge decrease in FPS in game, which is then, in turn, noticeable on stream. I originally believed it was because I had monitors of different refresh rates all attached to the one GPU, so I moved my two secondary monitors to the iGPU and my gaming monitor stayed attached to the GPU but this also didn’t fix my problem. This is the last act of a very, very desperate man and I’m really hoping I can get this resolved with the help of the community here. I’ll post my logs below.
Thanks in advance
traiLZ
New Member
LiveWithFields
New Member
carlmmii
Active Member
Those logs don’t show any recording/streaming attempt, so it’s missing critical information as far as where you’re experiencing frame loss.
From what it does show though, you have Game Bar and Game DVR enabled, both of which can reduce capture performance.
LiveWithFields
New Member
Those logs don’t show any recording/streaming attempt, so it’s missing critical information as far as where you’re experiencing frame loss.
From what it does show though, you have Game Bar and Game DVR enabled, both of which can reduce capture performance.
LiveWithFields
New Member
Screenshots of Performance Menu, and Game bar/dvr settings. Link to new log files below as well
Attachments
LiveWithFields
New Member
Screenshots of Performance Menu, and Game bar/dvr settings. Link to new log files below as well
LiveWithFields
New Member
Narcogen
Active Member
14:37:35.281: Windows Version: 10.0 Build 17134 (revision: 523; 64-bit)
Windows is out of date and game mode is on. Run the October 2018 update and deactivate game mode. Instructions are below in the signature.
LiveWithFields
New Member
Updated and turned game mode off. Problem still exists
LiveWithFields
New Member
I guess its worth noting also my specs:
1080Ti
7700K
32 GB
1000W Supply
Narcogen
Active Member
11:39:28.650: Video stopped, number of skipped frames due to encoding lag: 456/1988 (22.9%)
Your CPU isn’t able to run your game and the 720p60 capture at the same time. If you can’t reduce CPU load some how, suggest using NVENC encoder instead of software x264, or QuickSync.
You’re also at the low end of Twitch’s suggested bitrate for 720p60, and this may be more noticeable using NVENC.
LiveWithFields
New Member
koala
Active Member
LiveWithFields
New Member
Coolios
New Member
I have looked through numerous threads of people having the same issue as myself, have tried the different resolutions that people have suggested, but I’ve finally decided to post here in hopes of an actual fix because, for the life of me, I cannot figure it out. In most games, I say most because not all have this affect, each time I go live on obs, I get a huge decrease in FPS in game, which is then, in turn, noticeable on stream. I originally believed it was because I had monitors of different refresh rates all attached to the one GPU, so I moved my two secondary monitors to the iGPU and my gaming monitor stayed attached to the GPU but this also didn’t fix my problem. This is the last act of a very, very desperate man and I’m really hoping I can get this resolved with the help of the community here. I’ll post my logs below.
Thanks in advance
LiveWithFields
New Member
koala
Active Member
Matthew M. Dean
Member
Your cpu should be fine playing at 1080p and streaming 720p60 but at 2560×1440 I’m certain its a different thing all together.
I would disable the integrated chip, start with blank scene’s and profiles and have only 1 source, game capture. My OBS uses less then 16% cpu doing 720p60 at 4800 bitrate with an I5-7600K. If it still doesn’t work, try changing your resolution to 1080p to see if it’s the solution.
Personally I find anything below 4mbps 720p30 to be "too dirty". What game is it?
LiveWithFields
New Member
My problem with 1080 is it would have to be ran at 30 fps i believe, as i am not partnered, therefore, i leaned more towards the 720 at 60. As far as my resolution, native is 2560×1440 but scaled to 1280×720. The only reason my onboard video is enabled was because i read somewhere that monitors of different resolutions on the same gpu can cause an issue, which this was obviously not fixed when i put the 60 fps monitors on the onboard gpu as the problem still persists. When you’re streaming at 720p60 and 4800 bitrate, is that on nvenc or x264? I will remove the scenes other than my live one as well though. Had thought that could potentially be an issue as well.
Edit: I actually just noticed you meant playing the game in 1080 rather than 1440.


