@Marshall_G08
Aug 28, 2020, 9:30 am EST | 3 min read
Microsoft provides an audio transcription feature for the online version of Word that converts audio (recorded or uploaded from a file) directly to text, and even separates the text based on the speaker. Here’s how to use the feature.
To transcribe audio with Word, you must be a Microsoft 365 premium subscriber. If you have the free version and you try to use the feature, you’ll be met with a message asking you to subscribe.
Record and Transcribe Live Audio
You can have Word transcribe audio that you record directly within Word. Sign in to Microsoft 365, and open Word. In the “Home” tab, click the arrow next to “Dictate” and then select “Transcribe” from the menu that appears.
If this is your first time using the feature, you’ll need to give Microsoft permission to access your microphone.
The “Transcribe” pane will open in the right-hand side of the window. Select “Start Recording.”
Once selected, the timer will start. Now, you’ll want to begin speaking. You won’t see the transcription happen live as you’re speaking because Microsoft found that to be a bit too distracting during its testing.
After you’re finished, click the “Pause” button and then select “Save and Transcribe Now.”
It may take a few minutes for Word to finish transcribing the audio recording and uploading it to OneDrive.
Once this is done, you’ll see the transcription appear in the same pane you recorded the audio. Each section will have a timestamp, the speaker’s name, and the transcribed text. Microsoft automatically separates the text by the speaker.
If Word detects multiple speakers, you’ll see “Speaker 1,” Speaker 2,” and so on. If Word can’t detect multiple speakers, you’ll just see “Speaker.”
You might notice that the transcript doesn’t perfectly reflect the recorded audio accurately. You can edit a section of the transcript by hovering your mouse over the incorrect text and then selecting the pen icon.
Now you can edit the transcription found in this section. You can also edit the name of the speaker, as well as every instance where the speaker (i.e., Speaker 1 or Speaker 2) appears by ticking the box next to “Change All Speaker.” When you’re finished, click the checkmark.
If necessary, you can use the playback controls to revisit the audio recording. This is necessary if the transcript is long, and you can’t remember exactly who said what. Here’s the function of each button, from left to right:
- Playback speed
- Rewind
- Play/Pause
- Fast forward
- Volume
When you’re finished editing the transcript, you can add it to the document by selecting the “Add All To Document” button at the bottom of the pane.
Once selected, the audio recording and the content of the transcript will appear in the document.
Upload and Transcribe an Audio File
If you already have an audio file that you want to transcribe, you can upload it to Word. Sign in to Microsoft 365, and open Word. In the “Home” tab, click the arrow next to “Dictate” and then select “Transcribe” from the menu that appears.
The “Transcribe” pane will open in the right-hand side of the window. Select “Upload Audio.” You can upload these audio file types:
- WAV
- MP4
- M4A
- MP3
File Explorer (Finder for Mac) will open. Navigate to the location of the audio file, select it, and then click “Open.”
Microsoft will begin transcribing the audio file. Depending on the size of the file, this could take quite a bit of time.
Once Microsoft finishes transcribing the audio file, the text will appear in the pane.
If you face the same issue with your audio file, you can edit the text by hovering over the section and clicking the “Pen” icon. If you need to hear the audio again, you can do so by using the audio controls.
Next, edit the name of the speaker (and each instance that the speaker appears by ticking the “Change All Speaker” box) and the text from that section. When finished, click the “Checkmark.”
Once you’ve edited the content of the transcript, click “Add All To Document.”
The audio file and text of the transcript will be added to the Word document.
While not perfect, this feature can potentially save you a lot of time, especially if the speaker in the audio is speaking clearly.
Rev › Blog › Resources › How to Transcribe with the Microsoft Word & 365 Transcription Feature
Office 365 subscribers who use Microsoft Word for the web, will now have a transcription option. The new feature allows you to transcribe recorded audio and video files, as well as live meetings, in the web version of Word.
Interested in giving it a try? Here’s a step-by-step guide on how to use Transcribe in Word. Additionally, find out how it stacks up to the competition.
Step 1: Activate transcription feature
To activate the transcription feature in Microsoft Word, click the arrow next to the blue microphone. It’s on the right-hand side of the main toolbar.
When the dropdown menu appears, select “transcribe.”
This will open the transcribe pane.
Step 2: Upload recorded audio or start a new recording
Microsoft Word allows you to upload and transcribe .mp4, .m4a, .mp3, or .wav files. When you click on “upload file,” a screen will appear allowing you to select an audio file from your computer.
On the other hand, if you want to transcribe a meeting in real-time, click “start recording.” Microsoft Word will then begin to record and distinguish between the speakers.
If you need to take a break but don’t want to end the recording, click the pause button.
When you’re ready to start up again, click the microphone button.
Once your meeting is over or your uploaded audio is ready, select “save and transcribe.” This will save the recording to the transcribed files folder in OneDrive and begin the transcription.
Step 3: Edit the transcription
Once Word has transcribed your audio, it will give you an editable record of the conversation. It won’t be perfect and you will find errors.
To help you clean up the file, Microsoft allows you to access the full recording and time-stamped clips from each speaker.
You can play, pause, and adjust the playback speed of the recording using the controls in the transcribe pane. To listen to one of the clips, click on the timestamp.
If you come across an error, you can edit the transcription by clicking the pencil icon next to the section you want to change. Once you click it, a cursor will appear in the text and you can make changes.
When you finish, click the checkmark to save your corrections. If you don’t want to make any changes, click the “X” button to cancel.
Step 4: Import the transcription
Once you’re done editing, you can import either the entire transcription, or individual sentences, into your Word document.
To import the full transcript, click “add all to document.” If you want to import a single quote, click the plus sign that appears when you hover over a section of the transcript.
After you import the transcription, you can share the Word document as normal, allowing others to access it.
The new feature is pretty simple and straight-forward but it’s only available to Microsoft 365 subscribers. And it wasn’t the only feature recently released. Enhanced voice commands in Word also came out to simplify the process of dictating and editing your documents. The new commands allow you to bold sentences, delete words, and more using your voice.
But how does the transcription service stack up to the competition?
Microsoft Transcription Isn’t the Best Out There
If you’re a subscriber, Microsoft’s 365 transcription feature can help you transcribe audio, but its accuracy falls short. Users will see an average word error rate (WER) of 16.51%. While better than Amazon’s speech recognition technology with an 18.42% WER, it falls behind Rev.com’s automatic (AI generated) transcription service offering a 14.22% WER. Microsoft also doesn’t offer support if you’d prefer to skip the transcript editing altogether, such as Rev.com’s 99% accurate human transcription option.
Rev’s 50,000 human transcriptionists actually train the speech recognition engine to be the best in the world, and no other transcription service or company has that kind of training process. Rev AI, Rev’s speech recognition transcription service, and Zoom Live Captioning service all run off Rev’s world-class speech to text artificial intelligence.
Harness the power of your voice
Now more than ever, we’re all very busy—juggling family, work, friends, and whatever else life throws our way. New enhancements in Office leverage the Azure Cognitive Services AI platform so you can harness the power of your voice to spend less time and energy creating your best work and focus on what matters most.
Save time and create great content using Transcribe in Word for the web
Whether you’re a reporter conducting interviews, a researcher recording focus group sessions, or an online entrepreneur recording informal discussions, you want to be able to focus on the people you’re talking to without worrying about taking notes and without having to spend hours transcribing your conversations after-the-fact. If that sounds like you, Transcribe in Word is here to help.
Now you can record your conversations directly in Word for the web and transcribe them automatically. Transcribe detects different speakers so after you finish recording, you can easily follow the flow of the transcript. After your conversation, you can revisit parts of the recording by playing back the time-stamped audio and you can even edit the transcript if you see something amiss.
Your transcript will appear alongside the Word document, along with the recording, which enables you to leverage your transcript to create great content in the way that is best for you. Say you want to pull the perfect quote from an interview to support the main point of your story—just click the plus icon on any line of the transcript and voila, the exact quote is inserted. Want to send the entire transcript to your colleague? Simply click “add all to document” and your full transcript will be laid out in Word.
Like many people, you might use a variety of tools to get the job done – that’s why Transcribe enables you to upload audio or videos you recorded outside of Word. Whether you record on your phone or via one of the many calling and video conferencing apps, you can simply select the file to upload and transcribe. Transcribe supports .mp3, .wav, .m4a, or .mp4 files.
Transcribe in Word is available today in Word for the web for all Microsoft 365 subscribers and is supported in the new Microsoft Edge or Chrome browsers. With Transcribe you are completely unlimited in how much you can record and transcribe within Word for the Web. Currently, there is a five hour limit per month for uploaded recordings and each uploaded recording is limited to 200mb. Transcribe in Office mobile will be coming by the end of the year! Currently, transcribing audio into English (EN-US) is the only language supported, but we are working on support for more languages.
Transcribe in Word enables you to stay focused on your conversation in the moment, saves you valuable time and energy by transcribing it for you, and is integrated into Word so you can focus on the message of your document and not fuss around with different windows or applications.
Break away from the keyboard using dictation with voice commands
Since Dictate arrived on the scene, millions of people have leveraged the power of their voice to conquer the blank page. Whether you’re stuck waiting in the car to pick up takeout, on a short walk to stretch your legs, have a temporary or permanent disability that makes typing difficult, or you just think better when on the move, you need flexibility to transition throughout your day while getting everything done. We’ve been adding voice commands to Dictate so that you can break away from the keyboard. Whether on desktop or mobile (or transitioning between devices), you can stay in the flow and focus on your message by using dictation with voice commands to add, format, edit, and organize your text.
Say things like “start list” or “bold last sentence” to let your ideas flow without stopping to adjust your text. Voice commands understand a variety of symbols so you can add things like “ampersand” and “percent sign”, and you don’t have to sound like a robot! We’ve based commands on the way people naturally talk so that you can capture your ideas easily. So saying things like “dot dot dot” when you can’t remember “ellipses” works just as well.
Since you’re constantly juggling work and life, you may get that phone call you’ve been waiting for while working on your paper. There’s no need to rush to the keyboard in a panic. Simply say “pause dictation” and take the call. Working with others in the document? You can collaborate using your voice too—say “add comment [with your content here]” and capture your message in one shot without missing a beat.
Dictation can also help with informal writing as well—sometimes a message needs some personality! You can now say things like “smiley face” or “heart emoji” to give your message that little extra touch. Check out this article for a list of all the voice commands.
Dictate with voice commands in Word is available in Word for the web and Office mobile for free when signed into your Microsoft account. Voice commands are coming to Word desktop and Word for Mac apps towards the end of the year for Microsoft 365 subscribers.
We hope these new voice capabilities save you time and allow you the flexibility you require as you move throughout your busy day!
Microsoft Word has become the go-to software for creating documents. Alongside the traditional downloadable Office Suite, Microsoft also offers an online version of Microsoft Word as part of the Microsoft 365 package. An additional feature available in the online version of Word is an audio transcription feature. This allows you to convert audio directly to text. The text can even be separated based on the audio speaker.
Here we show you how to transcribe audio in Microsoft Word 365.
Transcribe Audio in Microsoft Word
First, make sure you are a premium subscriber of Microsoft 365. Open your browser and log in to Microsoft Word on Microsoft 365.
Open the “Home” tab. Click the arrow next to “Dictate” and select “Transcribe” from the menu that appears.
The “Transcribe” pane will open in the right side of the window.
If you want to upload an audio for transcription, you can do so by clicking on “Upload audio.” We’ll focus on doing it directly through “Start Recording.”
You may be asked to give Microsoft permission to access your microphone.
The recording will start automatically, accompanied by a timer. Don’t worry, as there’s no time limit for the recording – it’s just there to let you know of how long your recording is. It’s recommended to speak slowly and clearly so Word can easily understand and transcribe everything you’re saying.
You can pause the recording in between if you need a break. Once done, click on “Save and Transcribe Now.”
Microsoft Word may take a few minutes to transcribe the audio. Once done, you’ll see the transcription appear in the same pane. Each section will also have a timestamp and the speaker’s name (in addition to the transcribed text). If Microsoft detects multiple speakers, the separate text spoken by each will be denoted by “Speaker 1,” “Speaker 2” and so forth. If there’s only a single speaker, it’ll be denoted by “Speaker.”
As is expected from an automated transcription, there may be some inaccurate transcribed text. You can easily edit a section of the transcript by hovering your mouse over the incorrect text and clicking on the pen icon.
You can also edit the name of the speaker. You can change this to the speaker’s actual name to make it easier to sort the text out later. To do this, simply edit the name of the speaker, and enable the option next to “Change All Speaker.” Click the checkmark when done.
If you’re unsure of what you said or who said what during a transcription, simply use the playback controls to listen to your audio recording again. The functions include options to increase/decrease the playback speed, rewind, play/pause and fast forward the recording respectively.
Once you’re finally done and satisfied with the transcript, simply add it to the document by selecting the “Add All to Document” button at the bottom of the pane.
This will add both the recording and the content of the transcript in the document.
Using an Audio Recording for Transcription
If you’re opposed to doing a live recording, you can also use an audio file for transcription. In the Transcribe menu, click on “Upload Audio” to select your audio. You can upload these audio file types:
- WAV
- MP4
- M4A
- MP3
Once the file is selected, Microsoft will begin to transcribe the audio file. You can edit the transcription once it’s done, similar to the way you edit a live recording.
If this feature is not of your liking, there are many other ways you can convert audio to text.
Related:
Shujaa Imran is MakeTechEasier’s resident Mac tutorial writer. He’s currently training to follow his other passion become a commercial pilot. You can check his content out on Youtube
I’d like to try using MS word to transcribe some audio interviews I have conducted for a research project. I saw on the internet that its possible to click on the dictate button and have access to the transcribe function where you can upload a audio file to transcribe. But I don’t have this option, I can only dictate.
I have updated to the latest word but the option is still not available!
Anyone know how to get access to this function or enable it?
Thanks in advance,
Hi! Thanks for sending in the feedback. The Transcribe feature also only works on English at this time but we are working on expanding support for other languages. This means that even though your Word app interface language is in Spanish, as long as your conversations and interviews and recordings are in English the Transcribe feature should work. If you want to speak in Spanish though, the Transcribe feature will not transcribe correctly.
Here’s a workaround to get the Transcribe button enabled even with Spanish app language, assuming you’ll be speaking in English:
- Create a new document
- In the bottom-left part of the screen, click on the proofing language – in this screen shot it’s English (U.S.), but your’s probably says something else.
- Select English (US)
- Type something in English in the document.
- Refresh document.
- The Transcribe button should be enabled now, even though the Word app interface language is still Spanish.
Keep in mind that while your proofing language is English, the spellcheck and grammar checker will assume that any text in the document is English. This workaround shouldn’t be necessarily forever as we’re working on fixing the bug.
Let me know if this doesn’t work!
Tracy
Now you can do all your transcription work without leaving Microsoft Word.
Speech Tools gives you everything you need in to transcribe your audio and video files using Microsoft Word as your editor. Speech Tools adds a built-in media player that snaps inside your Microsoft Word document window. You can dock the player to the top or sides of the window, or drag it out of the way to make more room.
Speech Tools takes much of the hard work out of transcription. You’ll get more done with less effort.
Transcribing with Speech Tools is incredibly fast and easy. You already know how to use Microsoft Word, so there’s not much else to learn. Just click the media player buttons with your mouse, or use speech commands to control playback. Just say “play” to start and “pause” to stop. This leaves you free to type your documents. And of course, you can dictate your transcripts and finish in record time.
Try out Speech Tools at no charge for 30 days.
Download and use Speech Tools. You’ll love how responsive and precise the controls are. And the Speech Tools media player supports all popular audio and video file formats, so you can use it for all your transcription projects.
Transcription Features in Speech Tools
Click the Start Button to see a demonstration of Transcription with Speech Tools
Media Player Designed for Transcription
Convenient Repeat Button.
Couldn’t catch what was said? Click the Repeat button, or just say “repeat that.” Playback resumes from the point where playback was last started, so you can easily repeat exactly the same segment. Say “repeat that” as many times as needed until you can make it out.
Configurable Restart Offset.
The Restart Offset will save you a lot time. When you resume play after a pausing, Dual Writer restarts one second before the pause point. This ensures that you hear the beginning of the sentence you paused at. The Restart Offset is configurable so you can adjust it to any amount of time you want.
Adjustable playback speed.
Change the playback speed to more easily catch what the speakers are saying. You can slow down the speed to 75% of normal speed, or even 50%. With playback at half speed, it’s much easier to keep up with the speaker while you type or dictate the text. And you won’t need to replay as often to catch hard to hear passages.
The Timestamp feature lets you instantly add a timestamp to your document. You can click the Timestamp button or simply say, “Timestamp” to enter the current playback position into the document. The timestamp is totally configurable, so you can make it look exactly how you want it.
The All-in-One Solution
No need for a separate transcription application.
Speech Tools allows you to do all your transcription inside Microsoft Word, by either typing your documents or dictating them. Most transcription programs provide only a striped down editor. But now that you can do your transcription with Microsoft Word, you can also finish up your editing, proofing, spell checking and formatting in the same place, without switching between applications.
Powerful Media Player
Supports most popular file formats.
Speech Tools integrates Windows Media Player inside Microsoft Word, so you can play just about any audio or video file to transcribe it. The controls are specially designed for transcription. You get precision control with and responsive, voice activated commands to play and navigate through the media file.
Fast and Friendly Playback Controls
Who needs a foot pedal?
Some transcription software programs support a foot pedal to start and stop playback of media files. But Speech Tools gives you the best interface of all – voice commands. Just say, “go” to start playback, or “repeat” to replay from the last pause point. You can also move through the audio file by saying, “skip 10” or “skip 30” to advance that many seconds. To go back, say “jump” and the number of seconds to move backwards through the file.
Work the Way That’s Most Comfortable
You take control.
Transcribe the way you want to. You have the option of clicking the media player buttons with the mouse and dictating your transcript. Or you can use voice commands to control the media player and type your transcript. You can even ditch the keyboard completely, and use voice commands to control playback while you dictate the transcript.
Why type? When you can dictate or transcribe.
You can edit, share or even add the complete audio file in a Word document
- Microsoft Word online has a new transcription feature
- You can record or upload audio files, and Word converts it to text
- This feature works only for Office 365 subscribers
Microsoft Word is a great app for writing but we’ve always wanted an easy way to convert speech to text within this app. As journalists, we spend way too much time transcribing recorded audio from interviews and even converting voice notes into written text. Microsoft recently launched a new feature for Word with which you can do both those things. Follow this guide as well tell you the easy steps that let you transcribe audio in Microsoft Word.
Microsoft Word: How to transcribe an audio file
To start transcribing an audio file in Microsoft Word, follow these steps.
- Go to Microsoft Word online and log in to your account.
- After you have logged in, create a new document.
- In the Home tab, hit the down arrow right next to Dictate and click Transcribe.
- You’ll now see two options — Upload audio and Start recording.
- Go ahead and hit Upload audio to upload an audio file for transcription. This takes a little while so don’t close the window or refresh the page while your file uploads. One more thing to note is that you can only upload audio files in wav, M4a, mp4 and mp3 formats.
- Once this is done, the transcription will be available to you in the pane right below.
- Now that your file is transcribed, you can edit a segment by clicking the pencil icon. After you’re done making the changes, hit the tick icon to confirm.
- Besides, you can also add the whole transcription to a document by clicking Add all to document or you can even add a specific section by hovering over the cursor over the section and clicking +.
- You can also play around with the audio controls if you want to hear the audio file for making corrections.
- Apart from uploading audio, you can also record your audio and transcribe in real time.
- To do that, again from the Home tab, hit the down arrow right next to Dictate and click Transcribe.
- Click Start Recording to begin.
- Once you’re done recording, hit Save and transcribe now to save your file.
- After this, you can repeat the earlier steps to edit or make changes.
Transcribe audio to text free online
If you’re looking for alternatives that offer much of the same functionality, don’t worry, we’ve got you covered. Check out these other options.
Otter.ai
Otter.ai is a good option for someone who wants to record and take notes in real time. Otter is a paid service that’s available online as well as on smartphones. All you need to do is sign up with your email ID and you’re good to go. It is also pretty easy to use. You can simply import an audio file for transcription or you can record audio in real time. Besides, when your audio has been transcribed, you get options to edit it, share it or you can even export the text or audio if you prefer. Otter offers up to 600 minutes per month on the free tier. However, if you really like the services and don’t mind spending on the features, you can get Otter Premium for $9.99 a month (roughly Rs. 735) or $99.99 a year (roughly Rs, 7,355). Besides, there’s also Otter for Teams that lets you transcribe Zoom meetings. This costs $30 a month (roughly Rs. 2,207) or $720 annually (roughly Rs. 52,970).
Descript
Descript is another great transcription service, but unlike Otter, it is only available as an app for Windows and Mac. So, once you have the app installed on your computer, all you need to do is sign up for the service and you’re ready to transcribe. Descript has all the options that let you record, add an audio file, edit it, share it etc., but the catch here is that you only get three hours of transcription time on the free tier. If you want to continue using Descript, you’ll either have to go for a Creator account that costs $15 a month (roughly Rs. 1,107) or if you want the best of the best, you can opt for the Pro account that costs $30 a month (roughly Rs. 2,207).
Google Docs
Google Docs might not be as feature-rich as the other transcription services on this list, but if you simply want to take notes while speaking, then look no further than Google’s offering. To start recording your voice, open Google Docs on your computer > create a new document > click Tools > click Voice typing. Now, all you need to do is speak and Docs will do the rest for you. Of course, you’ll have to tweak your document a bit, but isn’t tweaking a document better than writing a complete one? And the good part is that all of this is free.
Write it down in the comments if you prefer Google Docs voice-typing or are you willing to pay the premium for other transcription services.
- Here’s How to Make WhatsApp Video Calls
- Here’s How to Download YouTube Videos in Bulk
- Use Google Docs Without an Internet Connection
- Microsoft Word Guide: How to Collaborate in Real Time
- Here’s How to Enable Dark Mode on Google Docs
- Microsoft Excel: How to Enable Macros to Speed Up Repetitive Tasks
- Best Tips and Tricks to Master Instagram
- WhatsApp Web: Here’s How to Instantly Enable Dark Mode
For more tutorials, visit our How To section.
Is Android One holding back Nokia smartphones in India? We discussed this on Orbital, our weekly technology podcast, which you can subscribe to via Apple Podcasts, Google Podcasts, or RSS, download the episode, or just hit the play button below.
For the biggest CES 2021 stories and latest updates, visit our CES hub.
Share:
- Click to share on Twitter (Opens in new window)
- Click to share on Facebook (Opens in new window)
- Click to share on Pinterest (Opens in new window)
What comes to mind when you think of the word transcription? Does it evoke images of leaning over your computer, headphones on, while trying to stop and start an audio recording as you type?
It’s one thing to turn written notes into typed text. Tap or click here to find out how. But transcribing audio files on your own can a huge pain, especially if you aren’t trained in the art of transcription.
You can always go the old school route of transcribing it yourself, which could take you hours, or you can opt to use a transcription app to convert your audio files to text instead. There are plenty of free or low-cost options out there to choose from — and most of them work in minutes. Here are five of the best to help you out.
The 5 best ways to convert audio files to text
1. Otter.ai
Transcription software can be pretty expensive depending on the features it offers, but if you’re looking for a free or affordable way to get the job done, check out Otter.io. It’s a real-time, cloud-based speech to text program that transcribes your audio files for you on smartphones and computers — and it’s one of the most affordable options out there.
You can use Otter to transcribe interviews, lectures or meeting recordings, or for live captioning and to collaborate between teams. If your recording has multiple speakers, each person is assigned a different ID to make it easier to understand the transcriptions. You can also use the app to organize and share your audio or text files.
Tech news that matters to you, daily
Privacy, security, the latest trends and the info you need to live your best digital life.
What’s nice about Otter is that you can try it for free before you buy it with the basic plan. You’ll get 600 minutes of free service when you sign up for an account, and once you’re out of minutes, you can choose from the Premium plan and the Teams plan. The cost starts at about $8.50 per month for the Premium plan (when paid annually), and gives you a ton of extra features and up to 6,000 minutes of transcription.
2. Transcribe in Word
Are you a Microsoft Word user who’s looking for a transcription service? You’re in luck because Word recently rolled out a feature called Transcribe in Word that you can use to transcribe your .mp3, .wav, .m4a or .mp4 audio recordings.
The features allow you to record your conversations directly in Word for the web or upload audio files and then transcribe them automatically. It can identify different speakers within the recording and even timestamps your transcription to let you easily replay the parts of the audio file you need to edit.
There are tons of other cool tools you can use with the transcription feature, too. Want to highlight a quote from the transcript and add it to a Word document? All you have to do is click the plus icon on the line you want and it’s inserted into your document. Or, if you want to send a full transcription of the audio file to someone else, all you have to do is click “add all to document.”
This feature is available for all Microsoft 365 subscribers and is supported in the new Microsoft Edge or Chrome browsers. Microsoft 365 personal plans start at $6.99 per month, and you’ll get up to five hours of transcription services per month with your subscription.
3. Dragon Anywhere
If you’re looking for an excellent speech-to-text option that works with your smartphone, Dragon Anywhere is an app that offers top-notch dictation capabilities straight from your phone. This app offers continuous dictation, no word limits and claims to be 99% accurate.
Unlike some of the other options on this list, Dragon Anywhere shines because it can learn how you speak, making each transcription more accurate than the last. You can use it to transcribe interviews, spoken notes and other audio files, and you can format and edit your transcriptions quickly. You can also share them with anyone or any device via Dropbox or another cloud service.
This transcription app is built on accuracy, so if that’s your top priority, Dragon Anywhere is one of the best options around. You can try it out free for a week, but you’ll have to purchase a subscription to use Dragon Anywhere after that free trial is up. Subscriptions start at $14.99 per month.
4. Amazon Transcribe
If most of your audio files are recorded in loud public places, check out Amazon Transcribe. This cloud-based automatic speech recognition platform was built to convert audio files to text, and it works well with low-quality or noisy audio files.
While Amazon Transcribe is primarily geared toward businesses, you can still use it for your individual transcription needs. In return, you’ll get accurate, well-formatted transcriptions of the audio files you submit for transcriptions.
Amazon Transcribe automatically adds punctuation and formatting, and you’ll also get access to other features that you can use to edit and manage your transcribed texts. Your transcriptions will have time stamping, speaker identification, and even document annotation if you need it.
The nice thing about Amazon Transcribe is that you have the option to pay as you go, so if you aren’t in need of regular transcription services, you won’t have to pay monthly for them. There is also a free tier option, which gives you 60 minutes free per month for 12 months. For more information on Amazon Transcribe’s pricing, tap or click here.
5. Google Keyboard
Are you an Android user? You may already have access to a text-to-speech app right on your phone with Gboard – the Google Keyboard.
While Gboard is limited compared to some of the other options on this list, it’s still a great text-to-speech option to use for transcribing your audio files to text. All you need is an audio file to upload and Google Keyboard will convert your audio to text in minutes with about 90% accuracy.
What’s cool about Google Keyboard is that it works with a number of languages: English, French, German, Hebrew, Hindi, Italian, Portuguese and Spanish. It also works in tandem with Google Translate so you can transcribe and translate your audio files if you need to.
Even better, though? It’s free. Use Gboard to transcribe audio files with no limits and no extra cost to you.
Thanks to a powerful new productivity enhancement, Microsoft 365 subscribers can now transcribe audio files with multiple speakers, at no extra cost. Our tips and tricks show you how to save time and money with Transcribe.
Microsoft recently announced a new feature in Word that automatically transcribes audio files, specifically conversations between two or more speakers. For people who regularly record interviews, talks, and other conversations, this new transcription tool lets them get written text of their audio files with very little work and no extra cost, which is all a productivity boost.
I gave the new feature a spin and have to admit that even with a few first-timer problems, it saved me between one and two hours of time for a 22-minute recording. Plus, thanks to the way the feature is implemented, it’s easy to listen to the audio file and make corrections to the text at the same time. I found Word’s transcription feature to be an incredibly useful time-saver. Here’s what you need to know about it, how to get it, and how to use it.
How to Get Transcribe for Word
Transcribe for Word is currently available in the web version of Microsoft Word, and you have to be a Microsoft 365 subscriber to get it. You also must use the Chrome or Microsoft Edge browser to access this feature. To find the tool, go to the Home toolbar and look on the far right side for Dictate. Click it, and find the Transcribe option from the short drop-down menu (it’s the second choice).
As of this writing, Transcribe is only available for American English, though, in the future, it will work with whatever language you set as your preference in Word. There’s no limit on the size of the file you can upload. Finally, you need an internet connection for the feature to work.
What Is Transcribe and How Is It Different From Dictate?
Transcribe is a new feature that transcribes an audio file into text. You can record audio directly in Word or upload an audio file that you record elsewhere.
How is it different from the Dictate feature? Dictation interprets one person speaking. Transcribe handles multiple speakers. Dictate is something you do instead of writing but usually while still thinking about how you will turn your words into a final piece of writing. When you use the Transcribe tool, you likely want to focus on the conversation and save your thoughts about how you will use those words in the final piece for later.
Security and Privacy With Microsoft Transcribe
How does Microsoft turn audio into text, and is it private and secure? According to a press briefing, the company uses AI rather than humans to transcribe the audio. Any file you upload or record gets saved to your OneDrive account. Look for a new folder called Transcribed Files in OneDrive. These files are protected by the same privacy policy as other files you save to OneDrive.
When you share a Word document with someone and it contains a transcribed file, the recipient can see everything in the Transcribe pane. In other words, they can see the full, original transcribed text in text blocks with time stamps. They cannot, however, play the audio file.
How Does Microsoft Transcribe Work?
As mentioned, you can record conversations from Word or upload an audio file to be transcribed. I tested the feature by uploading a 22-minute file, and it took about 30 minutes to transcribe. If you record in real time using Word, however, the app sends pieces of your audio to the AI transcriber as you go, which means you get the final transcription back much faster.
In terms of playback controls, you can listen to the audio file right in the Word window, as well as pause, skip forward or backward in five-second increments.You can also jump ahead or back anywhere in the file by clicking on the audio file’s playback line. When you navigate to a new spot in an audio file that’s already transcribed, the app automatically jumps to the matching text below. You can slow down the playback to half speed, or you can speed it up 1.25, 1.5, and 2.0 times.
In my test file, and in other demos I watched from Microsoft, the app was pretty good at differentiating voices. My test file had two female speakers. The app initially decided there were three people. It labels people as Speaker 1, Speaker 2, and so on. In the end, the app only misidentified one line as from a third speaker, so it was very easy to correct.
Related
- Google Translate App to Transcribe and Translate in Real-Time
- Get Organized: Tools for Better Meetings
- What Is Microsoft 365?
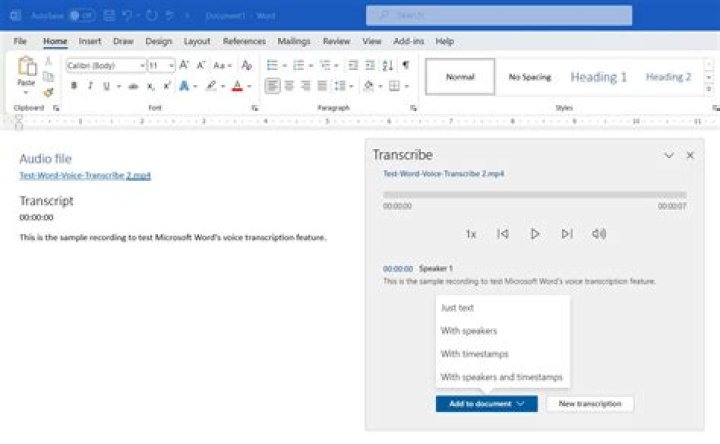
The final transcription appears in a panel to the right of your document, rather than in the document itself. That way, you can choose to include the entire transcription or just certain quotes.
Tips and Tricks for Microsoft Transcribe
Here are a few tips to working productively with the new Transcribe tool.
Rename Speaker 1, Speaker 2 First. Before doing any other editing, you should rename Speaker 1, Speaker 2, and so forth in the Transcribe panel. You can do it once and then choose to correct all instances. If you have more than two speakers, you probably should double-check any quotes you use by listening to the audio and making sure the voice lines up with the name, as it can still go wrong.
Add Text to Your Document Piece by Piece or All at Once. Each transcribed block of text has a plus sign in its block. When you click that plus sign, it adds the text to your document wherever your cursor is. Alternatively, you can add all the text to your document by choosing the option at the bottom of the panel that says Add all to document.
Pay Attention to Time Stamps. Each transcribed block of text has a time stamp on it. Those are helpful when you want to back up the audio to listen again and make sure the AI transcribed the text correctly.
Check for Random Capitalization. One of the most common errors I saw was the random capitalization of words. Pay attention as you edit your final copy.
Bad Words Get Bleeped. My test transcription contained the phrase “piss pouring” and the transcription came out as “**** pouring.” Depending on how you intend to use your final document, you may want to look out for bleeped words.
Productivity Booster
The next time you have to transcribe an interview or your want a recording and typed transcript of a meeting, you can use Word to do it with no extra cost (as long as you’re a Microsoft 365 subscriber) and a whole lot less effort than doing it by hand.
For groups that transcribe audio in bulk, a transcription service may be a better bet. Some of these services are even free. Office 365 is not free, but for the right user, having a built-in transcription feature that’s so tightly integrated with Word is a game-changer.


