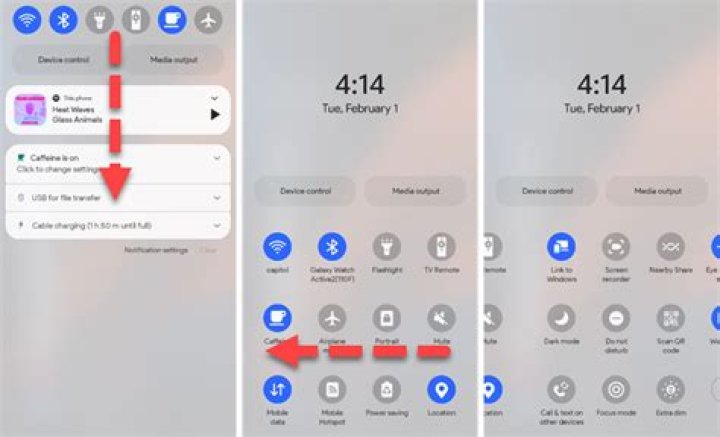
A hidden feature in Android Marshmallow lets you add, remove, and rearrange shortcuts in the Quick Settings tray. Here’s how to use it.
Top Deals On Great Products
Picked by Techconnect’s Editors
Android’s Quick Settings tray isn’t new in Marshmallow, but tucked away in the bowels of Google’s new mobile OS is a hidden feature that lets you customize what appears there. It’s a useful tool if you don’t want certain items you’ll never use taking up space in the Quick Settings tray, or if you want to rearrange the icons so that the shortcuts you use most often are in an easy-to-reach place. It takes a little trickery to get to this feature, but it’s still easy enough to get to.
First, you need to enable Android Marshmallow’s System UI Tuner. To do so, first swipe down from the top of the screen to open the notification drawer, then swipe down again to open the Quick Settings tray (or, swipe down with two fingers). Next, press and hold the gear icon in the upper right corner for a few seconds until the gear icon starts spinning. Release your finger, and you’ll be presented with a message telling you that System UI Tuner is up and running.
Android Marshmallow’s hidden System UI Tuner settings screen.
Open the Settings app if it isn’t already, scroll down, then tap System UI Tuner under the System subheading. If this is your first time using System UI Tuner, you’ll get a message warning you that System UI Tuner features are “experimental” and “may change, break, or disappear in future releases.” Read and dismiss the message, then tap Quick Settings.
You can quickly and easily add, remove, or rearrange shortcuts that appear in the Quick Settings tray.
At this point, you can rearrange, remove, or add items to the Quick Settings tray quickly and easily. To rearrange items, simply drag them around. If you want to remove an icon, drag it from its location in the Quick Settings tray to the Delete icon. If you want to add (or re-add) an item, tap Add tile, then tap the name of the setting you want quick access to.
The Quick Settings customization tool works reasonably well, but it’s still a little rough around the edges. That said, it works well enough that I could totally see Google building it out a little more and making it easier to access.
Nick is a freelance contributor and a former editor for TechHive and PCWorld. He likes puns and the color yellow.
Android quick settings is a very useful feature that makes things easier and the users have an opportunity to customize this Quick settings tray, which is awesome. Thankfully, the latest version of Android, 7.0 Nougat comes wrapped up with this feature and users can go for customizing it to get the best out of it. But in order to customize the quick settings for Android Marshmallow, users are required to enable a hidden feature, System UI tuner first. The process to customize Quick settings is explained below for each version of Android.
Methods To Customize Android Quick Settings
Android 7.0 Nougat
Android 7.0 Nougat comes with a built-in customization feature for Quick settings, so the process is not difficult enough, just a few steps and you will be good to go. The best part is you are not required to either root or enable any feature in order to customize the Android drop down menu in Quick settings. Here is the step by step process for that.
- First, swipe down the screen to have the pull-down notification and quick settings panel.
- Next, pull down the screen one more time which will bring the complete Quick settings menu. You will notice an Edit button at the bottom right corner of the same page, just tap on that which will allow you to customize the quick settings Android tray.
- In order to arrange any icon, just long press, drag and drop that in the desired place and that’s all. To delete something, long press the icon and drag that to the required place. Similarly, you can add some custom apps as well in the quick settings menu. Custom apps are available in the play store but that should be first installed on your device and then go for adding it to the quick settings menu.
Almost 9 icons stay on each page while normally two pages are there for Quick settings menu and you can easily navigate to another page by swiping it.
Android 6.0 Marshmallow
If you have upgraded your device to Android 6.0 Marshmallow then the good news is that you are not required to root your device for customizing the Quick settings menu rather just a hidden features, is to be enabled and it will provide you enough room for customization. So, the process is explained here in full detail.
Step 1: Enable System UI Tuner
This is the first step in Marshmallow to customize Android Quick settings. For customization, System UI tuner should be enabled first.
- Swipe down the screen first to get the Quick settings panel and notification area.
- Swipe again which will get you the Quick settings.
- A gear icon will appear on the same page at the top of the screen. Just long press on that till a message is being shown to you saying ‘congratulations’, the System UI Tuner is being added to the settings.
Step 2: Customize Android Quick Settings
So, you have successfully enabled the System UI Tuner and now the customization can be done easily following some easy steps.
- Go to the app drawer from the home screen of your device and head towards settings.
- Open the System UI Tuner option then that will be available under the about phone or about tablet section.
- Tap on that option and Google will warn you that this System UI Tuner feature is experimental which may change, disappear or break in the future release. Just read it and then dismiss to tap in the Quick settings
- Now you can rearrange, remove or add some apps in the quick settings menu just by long-pressing and drag the icons.
- In case you wish to get back the default layout, just go to the menu button and press on ‘reset’.
Other Android versions
In case you are not using Nougat or Marshmallow version but the previous version and still want to customize the Android Quick settings then root your android device and it will let you customize the Quick settings menu in Android along with other things.
So, the process to customize Android Quick settings menu is explained in this article, you can follow the needed procedure depending which Android version you are using and saves lots of unused space by removing the unused items while rearranging the icons will offer a new and helpful look to your device.
Dave, I just switched from the iPhone to a new Google Pixel 5 and so far am really liking the Android experience. I’m curious about whether I can customize the pull-down shortcut buttons on my phone, however. Is that possible? Can you show me the basics?
Welcome to the world of Android. It’s a lot more similar to iOS than it is different, but there are plenty of quirks and changes to the user experience that will keep you on your toes for a few weeks. There are also a ton of great features that are included in Android, and since you have the Google Pixel, you’ll be the first to get new versions of Android too, which means you’ll have even more stuff to figure out! Good stuff, though. 😁
What you’re asking about is known in the Android world as the Quick Settings area and it is divided into two areas: The mini Quick Settings, a single row of icons without any explanation that you see on your first swipe down from the very top edge, and the Quick Settings windows that show up when you swipe down a second time. The mini area can’t be customized directly, but if you look closely, it turns out that it’s the first six shortcut buttons that you have on your Quick Settings main window, so it can be customized indirectly.
That’s a lotta chatter, let’s just jump in with some examples.
THE ANDROID QUICK SETTINGS WINDOWS
Different versions of Android have slightly different icons for the various shortcuts. Everything I show is based on Android 11 on a Google Pixel 5. To start out, here’s my mini Quick Settings icon row:
You know what all those icons mean, right? No? Left to right, it’s Wi-Fi, Bluetooth, Do Not Disturb, Flashlight, Auto-rotate, and Battery Saver.
I know flashlight is popular – which is a bit weird if you think of the technology required to bring a modern smartphone to life – but I never use it, so that’s definitely one I can bump off the mini screen without a problem. For that matter, I very rarely disable auto-rotate so that probably doesn’t need to be a quick shortcut either.
How do you change these? In the bigger Quick Settings area. But before we change things, let’s just swipe down one more time to see the bigger view, thankfully with labels:
There are those same six icons, but this time there’s the brightness slider along the top and, of course, text labels. Also notice that along the bottom are three blue dots, one dark blue, two light blue. That is a super subtle indicator that I have three screens of shortcut buttons. Okay. Swipe from right to left to slide the next set of buttons into view:
Notice the tiny blue circles now indicate that this is the middle of three screens. Hopefully you have already figured this out. But look at all these useful new shortcuts!
HOW TO EDIT AND CHANGE YOUR QUICK SHORTCUTS IN ANDROID
To change the order of your shortcut buttons – and add new ones that aren’t included! – simply tap on the pencil icon on the lower left. If you’re running an earlier version of Android, there might be a tiny “EDIT” link on the lower right instead.
The Edit screen lets you easily rearrange your tiles (as they call them):
To reorder things, simply tap and hold your finger on an icon for a second or two, then drag it up or down. Things rearrange as you go so it’s easy to pull Flashlight out of my top six, for example, and replace it with something more useful.
What’s not obvious, however, is that there are additional tiles, err, shortcuts that can be added too! Just swipe from the bottom upwards and you’ll find a whole ‘nother set of buttons waiting to be added:
If you want to get rid of an existing shortcut entirely, just tap, hold and then drag it down to the “ADD TILES” area. To add a new shortcut, tap, hold and drag it up to where you’d like it to appear. Keep in mind that the first six you have in the main display are the ones that will also show up on the mini quick settings area too.
When I finished up customizing my own Quick Settings, here’s what I ended up with on screen one:
Did you notice that I removed enough that I now only have two quick settings shortcut windows (as denoted by the two, not three, blue dots on the bottom)? Here’s my second window:
Much more the features I need to access, and with the rearrangement of the first six, this means that my mini quick settings has changed too, which is terrific:
Much better: Wi-Fi, Bluetooth, Airplane mode, Hotspot, Screen Recording and Do Not Disturb.
Now it’s time for you to grab your Android phone or tablet and fix it all up as you desire too!
Pro Tip: I’ve been writing about Android since the beginning of the operating system. Please do check out my extensive Android help area while you’re visiting, for lots more useful tutorials and guides! Thanks.
The Quick Settings panel in Android is easily one of the most accessed and useful parts of the OS. It allows you to quickly toggle settings like Wi-Fi, mobile data, and control other system settings in just a tap. But did you know that you can customize Quick Settings to your liking as well?
Google revamped the Quick Settings panel in Android 9.0 Pie and gave it a nice makeover. It is purely a visual overhaul though as the panel remains as useful as before. If you recently got an Android device running Pie or got the Android 9.0 update on your existing device, read our guide below to know how to customize Quick Settings in Android 9.0 Pie.
How to Customise Quick Settings in Android 9.0 Pie
While almost everyone using an Android device uses the Quick Settings panel frequently, not many people know that it can be customized as well. The visual overhaul to Quick Settings in Android 9.0 Pie includes a dark theme which is automatically triggered when one uses a dark wallpaper.
To completely expand Quick Settings in Android Pie, swipe down twice from top to down. First swipe will show a list of notifications along with top six or five tiles from quick settings. When you swipe down again, the Quick Settings panel will expand completely. This will reveal additional Quick Setting tiles and one can access even more tiles by swiping left on the panel.
How to Rearrange Tiles in Quick Settings
Expand Quick Settings and tap the pencil icon located on the bottom-right corner. You have now entered the customization mode of Quick Settings panel. From here, simply drag and move the tiles that you want to rearrange.
It is possible to drag and drop tiles from one page to another. The first six tiles in quick settings show when you swipe down once to expand the notification shade so make sure to have your most toggled settings/action tiles in the top six.
How to Add or Remove Icons to Quick Settings
Adding new tiles to the Quick Settings panel in Android 9.0 Pie is pretty easy as well and the steps remain the same as before.
Step 1: Expand the Quick Settings panel and tap the pencil icon at the bottom left. You will now enter the customization mode of Quick Settings panel.
Step 2: At the bottom, you will see more QS tiles from third-party apps and some uncommon ones like storage, grayscale, location, etc offered in Android 9.0 Pie.
Step 3: Hold and drag the tile on the main panel and drop it. This will add it to the Quick Settings panel. To remove any unwanted tile, drag and drop it to the section which says “Drag here to remove it.”
The best way to use Quick Settings is to only keep the important tiles and remove the ones that you don’t use often. The less the clutter, the easier and faster it will be to use the Quick Settings panel.
Unlock the System UI Tuner to hide and reveal status-bar icons, rearrange the “quick settings” buttons, and more.
Today’s Best Tech Deals
Picked by PCWorld’s Editors
Top Deals On Great Products
Picked by Techconnect’s Editors
If you’ve ever been annoyed by the clutter of icons along the top of your Android home screen, good news: There’s something you can do about it.
Turns out there’s a trio of secret settings for customizing the Android user interface, and one of them will let you hide or reveal icons in the status bar. You can also rearrange the pull-down Android “quick settings,” as well as make a small but important tweak to the Android battery meter.
You won’t find any of these settings by poking around the standard Settings screen. Instead, you’ll need to unlock the hidden “System UI Tuner” first. Here’s how to do it.
How to reveal the System UI Tuner
First, flick down from the top of the screen to reveal the full “quick settings” window shade, then tap and hold the Settings button (the one that looks like a gear) in the top-right corner of the display.
Tap and hold the Settings button until you see the little wrench icon appear.
Hold the Settings button for long enough, and a little wrench icon will appear next to the Settings button. Once you see the wrench, tap the Settings button again, then scroll all the way down to a new Settings section—the one marked System UI Tuner.
When you first launch the System UI Tuner, you’ll see a warning that reads (in part) that “these features may change, break, or disappear in future releases” and to “proceed with caution.” Tap Got it to continue—and don’t worry, you can always disable the System UI Tuner if you’d rather not mess with such “experimental” Android settings.
After you dismiss the warning, you’ll have access to the System UI Tuner settings. Let’s take a tour, shall we?
Rearrange the ‘quick settings’ buttons
You probably already know how to reveal Android’s “quick settings” panel by swiping down from the top of the screen with two fingertips. What you may not know, though, is that you can add, remove and rearrange the quick settings buttons—or at least, you can with help from the System UI Tuner.
You can rearrange or hide any of the “quick settings” buttons you wish, all with a little help from the System UI Tuner.
Tap Quick Settings from the main System UI Tuner screen, and you’ll see the standard panel of quick settings buttons.
To move a button, tap and hold it, then drag it over another button to make the two switch places. To hide a button from the quick settings panel, tap and hold it, then drag it to the Delete icon. To put any deleted buttons back, tap Add tile, then tap the name of a button.
If you want to revert to the old quick settings buttons, tap the three-dot menu button in the top-right corner of the screen, then tap Reset.
Take charge of the status bar
If all the Bluetooth, Wi-Fi, alarm, and “Do not disturb” icons in the Android status bar are a bit too much, the System UI Tuner will help you cut down on the clutter.
Just flick a switch to hide a specific icon from the status bar of your Android device.
Tap the Status bar setting to see a list of 10 status bar icons, ranging from Cast and Hotspot to Cellular data and Airplane mode, each with its own switch. By default, each icon is enabled; to hide an icon, just flick off its switch.
You can disable just about any icon in the status bar, save for the battery meter and the clock.
See your remaining battery life as a percentage
If you want a more precise reading of how much of a charge your Android device’s battery has left, you can use the System UI Tuner to stamp a percentage reading onto the standard Android battery icon.
A simple System UI Tuner setting will add a percentage reading on the Android battery icon.
Go back to the main System UI Tuner screen, then flip on the Show embedded battery percentage switch. Once you do, you’ll see a tiny percentage reading sitting in the battery icon up in the status bar.
Deactivate the System UI Tuner panel
Google isn’t making any promises about the features squirreled away in its hidden System UI Tuner. As you’ll recall, that initial Tuner pop-up message warns that any and all of its customization options may change or disappear at any time.
If you’d rather not worry about when your favorite new settings will disappear, you can simply pull the plug early. From the main System UI Tuner screen, tap the three-dot button in the top corner of the screen, then tap Remove from Settings.
You can always change your mind, of course; simply head back to the quick settings slide-down and tap and hold the Settings button again.
Ben has been writing about technology and consumer electronics for more than 20 years. A PCWorld contributor since 2014, Ben joined TechHive in 2019, where he covers smart home and home entertainment products.
Share:
- Click to share on Twitter (Opens in new window)
- Click to share on Facebook (Opens in new window)
- Click to share on Pinterest (Opens in new window)
Did you know Android has a secret menu for customizing your phone’s system user interface? It’s called the System UI Tuner and it can be used for customizing an Android gadget’s status bar, clock and app notification settings.
Introduced in Android Marshmallow, this experimental menu is hidden but it’s not difficult to find. Once you get to it, you’ll wish you knew about it sooner.
That’s why we’re going to show you how to access Android’s secret menu. Here are the steps to unlock it.
Unlocking the System UI Tuner
To turn this feature on, swipe down from the status bar to access your Quick Settings panel then hold down the Settings gear icon in the top-right corner. If executed correctly, your Android phone will vibrate and a message will appear saying that you’ve successfully added the System UI Tuner to your Settings.
Here, you can do nifty user interface tweaks like selecting what icons show up on the status bar or have the battery level display while charging. You can also switch your clock to show hours and minutes plus the seconds, if you desire.
Tech news that matters to you, daily
Privacy, security, the latest trends and the info you need to live your best digital life.
You can have the Do Not Disturb toggle show up with the volume bar or turn off the volume shortcut for it.
One other useful toggle is the Power notification control. With this you can set different notification levels for each app, ranging from Level 0 (block all notifications) to Level 5 (highest importance).
Currently, there’s also an option to enable split-screen by swiping from the app overview icon.
How to turn off the System UI Tuner
Beware that these System UI tweaks are experimental. As the System UI Tuner warning states:
“System Tuner gives you extra ways to tweak and customize the Android user interface. These experimental features may change, break, or disappear in future releases. Proceed with caution.”
To remove the System UI Tuner and any tweaks you have made, swipe down from the status bar again to access Quick Settings then hold the Settings gear icon again until your phone vibrates.
A prompt will then pop up asking if you want to “Remove System UI Tuner from Settings and stop using all of its features?” Select “Remove” to clear it out.
Alternatively, you can just simply go into the System UI Tuner menu, tap on the three vertical dots located in the upper-right corner then select “Remove from Settings.”
Bonus: Secret Android codes you can try
For more hidden Android tricks, dial these numbers out (as if you’re making a phone call), then hit the call button:
Posted February 1, 2013 by Lê Hoàng in Android
Android 4.2 through the Quick Settings panel introduces a new way to centralize all your frequent places and settings. By default, it displays many tasks that are common to most users. However, if you want to rearrange the order of the items and swap the tiles for other settings, this tech-recipes tutorial will be helpful for you.
In case you did not know, accessing the Quick Settings menu is accomplished by using a single finger to pull down on the far right side of the Notification’s bar. Now, here are the steps for tweaking which options appear in the Quick Settings area.
1. Open the app drawer and access the Settings section. In this section, choose System.
2. Once you are in the System section, choose Quick Settings panel to continue.
3. Scroll down to the Static tiles section, and tap on Tiles and layout.
4. You will then be presented with a grid of current tiles in the quick settings panel. To add a new tile, tap Add.
5. Find the tile that you want from the list. On tap, the tile will be added to the panel right away. The list is very long, so you may have to scroll down to find for what you are looking.
6. In addition, if you want to delete unnecessary tiles from the panel, just drag them to the delete tile which is only visible when a tile is dragged. Rearranging the tiles can also be done by drag and drop.
Android 11 has plenty of new features as you’d expect, including a fancy new embedded media player. Rather than a constant notification, your audio controls now get pushed up into the Quick Settings panel when playing music. However, to make way for this new media player functionality, your total number of quick settings tiles had to be cut from nine down to six.
This new Android 11 change may not be welcomed by some since six tiles in a three-by-two panel could seem too little. Luckily, developer Tulsadiver has put together a little Magisk module to solve this very issue. Even better, there’s no extra fluff — its only purpose is to bring back the 9-tile layout in your Quick Settings panel, just like Android 10 used to have.
Requirements
- Root access
- Pixel device running Android 11 (mod not tested on other models)
- Magisk installed
Step 1: Download the 9 Tiles QS Module
To kick things off, you’ll need to download the Magisk module, so tap the link below from your Android 11 Pixel device. Depending on your browser, you may need to long-press and choose “Save file.”
It should be mentioned, Tulsadiver got permission to use the base for this 9 Tiles QS module from j to the 4n, the developer of the Edge Sense Plus mod.
Step 2: Install the Module
Since this is a third-party module and not listed in the official Magisk repo, you’ll need to manually install it. Open Magisk Manager, tap the “Modules” icon at the bottom, then press the “Install from storage” button. It should show your recent downloads, but if not, navigate to the location where the file is saved (the “Download” folder by default).
Note: If you’re on the old version of Magisk Manager, head to “Modules” from the hamburger menu instead.
Tap the “9tiles.zip” file once, then it’ll begin installing. This might take a minute or so to process, so give it some time. Once finished, hit the “Reboot” button at the bottom to restart your device and activate the module.
Step 3: Enjoy Your 9-Tile Quick Settings Panel
Now it’s time to check and make sure the module worked on your device. Swipe down to access your quick settings panel like usual and behold — you should now see a 3 by 3 grid with 9 icons. If not, hit the “Edit” pencil icon, then drag and drop more tiles onto your quick settings panel. You need a minimum of nine tiles now when making changes here.
Even with the embedded media controls when playing music, the 9 tiles should stay put most if not all the time. I have seen it push the bottom column back up occasionally, temporarily going to the stock 6 tiles. However, the latest version of this mode doesn’t do this anymore during my testing and stays active all the time now.
Final Note
If you ever want to go back to the default number of Quick Settings tiles, you can do so with ease. Open Magisk Manager, go back to the “Modules” section, then hit “Remove” under the “Tulsadiver Increased Tiles to 9” entry. Press the “Reboot” button at the top to remove the module and restart your device. After the reboot, it’s back to the default settings as per usual.
Keep Your Connection Secure Without a Monthly Bill. Get a lifetime subscription to VPN Unlimited for all your devices with a one-time purchase from the new Gadget Hacks Shop, and watch Hulu or Netflix without regional restrictions, increase security when browsing on public networks, and more.
Android Phones comes in different shapes and sizes but most are always tailored to function and behave in the same way which makes it one of the most popular operating systems running on phones worldwide. The simplicity and availability on all almost 1 out of 5 devices make it a perfect fit for everyone, Guru8 has gone around to organize for you some hidden settings that will make you set everything to your fashion your needs.
Before we start just a quick forewarning: as we all know Android developers always add in a new layer of patch or upgrade the current Android versions due to myriads of reasons including security and user experience among others. Our instructions specifically apply to the current stock version Android, 7.0 Nougat currently running on new devices coming out. Meanwhile, you may get other settings in the lower android versions as well as well as the latest Android 8.0 Oreo.
- Increase font size
With Android 7.0, You don’t have to squint and strain your eyes when viewing Android screens: Open the Settings app and choose Display, followed by Font size, to make adjustments. Drag the pointer along the slider to make changes, and check the preview window to see what the end result will look like. Once you set the Android font size, most apps will apply it. Isn’t that awesome !!
- Make sure you can find your phone
You nolonger have to worry about losing your phone? To maximize your chances of recovering a missing device, make sure to activate Android’s built-in tracking system: Open Settings, go to Security & location, and tap Find My Device. After that, if you should misplace your phone, head to this page in any browser and log in to your Google account. You’ll be able to view your handset’s location on a map, among other options. But remember it is most reliable only when the device is connected to the internet.
- Tweak the Quick Settings panel
Here is quick tip everyone with a smartphone has done it before probably but Justin Drag two fingers down from the top of the screen, and you’ll open Android’s Quick Settings panel, which provides immediate access to settings such as Wi-Fi, Bluetooth, and flashlight mode. These shortcuts are useful, but you can make them even handier by customizing which ones show up and the order in which they appear. Open the panel, tap the pen icon on the lower left, and you’ll be able to add shortcuts and drag the icons into a new arrangement to make it suit your style.
- Change app permissions
Privacy of personal info has been the discussions since the genesis stages of Internet breakthrough.With the latest Android version, you can control how much of your personal information can any individual app access? You can see exactly which permissions an app has been granted by going to Settings, tapping Apps & notifications, and picking an app (or hitting See all to view the full list). Then, to view and edit that app’s access, tap Permissions. For example, you might allow an app to access your location list but not your Microphone or Contact list.
- Control battery use
Android now optimizes apps so they won’t drain the battery as much. For example, your email app can still run in the background, checking for updates, but it does so less frequently. However, you can stop certain apps if you want them to always have full control. Open Settings and tap Battery, then the menu button on the top right, thenBattery optimization. Next, hit the Not optimized link, then All apps. Finally, select an app and pick the Don’t optimize option.
- Wake your phone with your voice
Google Assistant can really be helpful and vital component on the daily arrays of apps you use. You don’t have to touch your phone to gain access to Google Assistant. You just need to adjust your settings. Open the Google app, tap the menu button (three horizontal lines on the bottom right), and then hit Settings followed by Voice. Choose Voice Match, and then the phrase “OK Google” will work at any time, even when your device is locked. In fact, you can use voice recognition to unlock your phone this way.
- Customize notifications from specific contacts
To help you instantly identify who’s calling—and to decide whether or not to pick up—you can assign certain contacts unique ringtones. Your default ringtone will remain the same—change it in Settings, under Sound, via the Phone ringtone option. To change notification settings for individuals, launch the Contacts app, tap on a contact name, open the menu (three dots on the top right), and choose a Set ringtone. Then you can select a specific sound from a list. You can as well set someone’s favorite songs as their ringtone.
- Change volume levels separately
You might not want to play your alarm at the same volume as your ringtone. To adjust those separately, launch Settings and open the Sound menu. Here, you’ll find volume sliders for media, alarms, and ringtones. You can also access individual volume settings by pressing the physical volume button, which will make one slider appear on screen, and then tapping the down-pointing arrow to the right. This will open a drop-down menu where you can see all three volume
- Get help from Cortana
When it comes to various AI assistants, everyone has a favorite. Your friend Joe may prefer iPhone’s Siri but If you like Microsoft’s digital helper to Google Assistant or Bixby, you can install Cortana for Android. You can even make it the default app that appears when you hold down the Home button: Open Settings, go to Apps & notifications, and then tap Advanced, Default apps, Assist & voice input, and Assist app.


