For users who do not have specialized keyboards, letters with accent marks may only be created using shortcut keys or through the menu bar.
Inserting accented letters with the menu bar or Ribbon
- Open Microsoft Word.
- Select the Insert tab on the Ribbon or click Insert in the menu bar.
- On the Insert tab or the Insert drop-down, select the Symbol option.
- Select the desired accented character or symbol from the list of symbols. You can scroll through the entire list or select from the Subset drop-down list to view a specific type of symbols.
In Word 2003 and earlier versions, you can click the More Symbols option to see a larger list of available symbols to insert.
- After selecting the desired accented letter or symbol, click the Insert button.
If you insert an accented character using the steps above, once a character is inserted, you can copy that character and paste it anywhere else in the document.
Use keyboard shortcuts
Microsoft Word users can also utilize the following combinations of keys to add accent marks to their letters. For example, to get the à character, you’d press and hold the Ctrl key, and press the ` key (the tilde key). Then, release both keys and quickly press the A key.
You must press the letter key quickly after releasing the shortcut keys. Otherwise, the non-accented letter is created.
To get uppercase accent letters, turn on Caps Lock before using the shortcut keys. Alternatively, after pressing the shortcut keys together, release all but the Shift key, then press the desired letter to create an uppercase accent letter. The Shift key option only works for those shortcuts utilizing the Shift key, as listed below.
Accent marks (sometimes referred to simply as accents) and accented characters are important elements in both written and spoken language, and, by extension, in typography. While their use in English is largely confined to proper names or “borrowed” words of foreign origin, such as résumé and tête-à-tête, they occur frequently in several other European languages, including Spanish, French, Italian, German and Portuguese.
The most common accents are the acute (é), grave (è), circumflex (â, î or ô), tilde (ñ), umlaut and dieresis (ü or ï – the same symbol is used for two different purposes), and cedilla (ç). Accent marks (also referred to as diacritics or diacriticals) usually appear above a character. One exception is the cedilla, which appears directly underneath the letter c; several less common accent marks appear next to the character.
These small yet significant symbols indicate pronunciation, including emphasis. In some instances, the accent mark also clarifies the meaning of a word, which might be different without the accent. With names and other proper nouns, neglecting to include the correct accent marks can be seen as a sign of disrespect.
Most professional-quality fonts include both a range of individual, floating accents and composite or prebuilt accented characters. Floating accents are used to create accented characters on-the-fly, while the prebuilt version is used as-is. Basic OpenType® fonts as well older Type1 and TrueType fonts have a standard set of the most commonly used accents and accented characters. OpenType Pro fonts have expanded foreign language support, and offer a much more extensive selection of accents and accented characters.
Prebuilt accented characters can be accessed either directly from the glyph panel or by using specific key combinations; many more can be created on-the-fly by using key commands to add the floating accent to create the desired character. Note that keyboard commands vary between Mac and other PC software, as well as for non-U.S. keyboard layouts.
When setting type that requires accented characters, take the time to locate these somewhat uncommon glyphs. Be sure to select or create the correct one, as some can be easily confused, such as the acute and the grave accent. Proper, consistent inclusion of accent marks and accented characters is an essential element of professional typography, as well as an opportunity to satisfy clients and help inform readers.
CAROL FINCH
Windows provides a few different ways to create accented letters. Its Character Map allows you to copy letters to your system’s clipboard so you can paste them into programs. In Microsoft Office programs, such as Word 2013, you can insert letters directly through the Symbols menu without copying them. You can also type accented letters into your work by using keyboard commands and shortcuts.
Explore this article
- Use Character Map or Symbols
- Use Keyboard Shortcuts
1 Use Character Map or Symbols
From a Windows 8 Start screen, type character map; in Windows 7, click Start and type character map into the search bar. In either OS, select the tool from the results to open it. Set a font in the Font bar and scroll through the characters to find the one you want to use. Double-click to insert it into Characters to Copy and select Copy. You can now paste the letter in your work.
To insert accented letters in Office programs, go to the Insert tab, select Symbol and then More Symbols. Keep the default of Normal Text to use your current font, select your character and then Insert to place it in your document.
2 Use Keyboard Shortcuts
Windows has a couple of types of keyboard commands that create accented letters. To use numeric shortcut codes, hold down the Alt key and key in the number that matches the letter. For example, if you type Alt-0224, you create the letter à; type Alt-0241 to make an ñ.
You can also use punctuation shortcuts to create select accented letters with Ctrl, Alt or Shift key combinations. For example, Windows assigns acute accents to the apostrophe key, allowing you to type letters such as á, é or í by holding down Ctrl-‘ and then typing the letter.
See Resources for lists of numeric codes and punctuation shortcuts.
For keyboard shortcuts in which you press one key immediately followed by another key, the keys to press are separated by a comma (,). For example, for è you would press Ctrl + ` , release and then type e.
To type a lowercase character by using a key combination that includes the SHIFT key, hold down the CTRL+SHIFT+symbol keys simultaneously, and then release them before you type the letter. For example, to type a ô, hold down CTRL, SHIFT and ^, release and type o.
à, è, ì, ò, ù,
À, È, Ì, Ò, Ù
CTRL+` (ACCENT GRAVE), the letter
á, é, í, ó, ú, ý
Á, É, Í, Ó, Ú, Ý
CTRL+’ (APOSTROPHE), the letter
â, ê, î, ô, û
Â, Ê, Î, Ô, Û
CTRL+SHIFT+^ (CARET), the letter
(TILDE), the letter
ä, ë, ï, ö, ü, ÿ,
Ä, Ë, Ï, Ö, Ü, Ÿ
CTRL+SHIFT+: (COLON), the letter
[email protected], a or A
CTRL+SHIFT+&, a or A
CTRL+SHIFT+&, o or O
CTRL+, (COMMA), c or C
CTRL+’ (APOSTROPHE), d or D
The Unicode character for the specified Unicode (hexadecimal) character code
The character code, ALT+X
For example, to insert the euro currency symbol , press 20AC, and then hold down the ALT key and press X.
The ANSI character for the specified ANSI (decimal) character code
ALT+the character code (on the numeric keypad)
Make sure that NUM LOCK is on before you type the character code.
For example, to insert the euro currency symbol, hold down the ALT key and press 0128 on the numeric keypad.
For more info on using Unicode and ASCII characters, see Insert ASCII or Unicode character codes.
If you’re working on a laptop without a separate numeric keyboard, you can add most accented characters using the Insert > Symbol > More Symbols command in Word. For more info, see Insert a symbol in Word.
If you plan to type in other languages often you should consider switching your keyboard layout to that language. For more info see Switch between languages using the Language bar.
How to Put an Accent over a Letter in Microsoft Word?
How to put an accent over a letter? If you don’t have a specialized keyboard, you have to do a bit of extra work to type letters with accent marks in Microsoft Word. Here are a few ideas to get it done.
If you type daily in a language other than English, you presumably have this all worked out already. Maybe you even use a specific keyboard that offers typing letters with accent notes easier. But if you’re typing essentially in English, there are still times you might require to type an emphasized letter.
After all, English uses several words acquired from other languages, including jalapeño, déjà vu, doppelgänger, and résumé, for instance. And while we usually type those words without rhythms in English, sometimes it’s nice to take the more conventional approach. In the states where you do, Microsoft Word provides a few easy ways to make it happen.
Accent Over A Letter On Word
How to Put an Accent over a Letter?
If you only have to enter accented characters hardly, it’s simple enough to pop open Word’s Symbol window and search for the letter you need.
Navigate to the “Insert” tab, and then press on the “Symbol” button.
The dropdown menu shows your most-recently-used symbols. If the symbol you’re after is there, click it. If not, click the “More Symbols” command instead.
The Symbol window that opens displays a vast number of characters to choose from—3,633 to be exact. Word does support by giving you filter by font and subset, though.
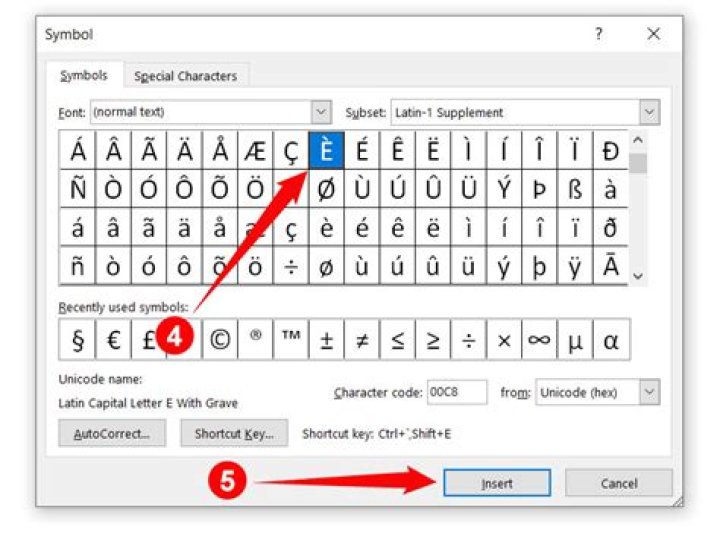
Use the “Font” dropdown menu to choose the font you’re using (or you can select the “Normal Text” entry). Following, the “Subset” dropdown allows you to jump to distinct subsets of letters. If you scroll into the available characters, you can see the Subset value difference. First, though, go forward and select “Latin-1 Supplement” from the “Subset” dropdown. That’s where you’ll possibly get the accented letter you’re after.
Pretty simple, right? But what if you need to insert some symbols often and don’t want to open up and search that Symbol window every time? Well, we have a couple of tricks to teach you.
How To Put An Accent Over A Letter Mac
Insert Accented Letters with Keyboard Shortcuts
Word has lots of excellent keyboard shortcuts, and shortcuts for accentuated letters are no exception. You may have noticed earlier back at the “More Symbols” screen that Word tells you what the shortcut key is for that character.
And the greatest part is that these shortcuts support a kind of formula, so you don’t surely have to memorize them all. Rather, you’ll use the Ctrl or Shift key along with the articulation key on the keyboard, followed by a quick press of the letter.
For instance, to notice the á character, you’d hold Ctrl+’ (apostrophe), release those keys, and then instantly press the A key. Note that if you want Á instead of á, you’d have to enable caps to lock before using the shortcut key since using the Shift key would change the shortcut.
How To Put An Accent Over A Letter On Word
Insert Accented Characters with ASCII Codes
And what use would we be if we didn’t reveal you the geekiest form of all? But, on the other side, if you’re going to be using a lot of accented letters—particularly the same characters over and over—it might be worth your time to read a few ASCII codes.
The American Standard Code for Information Interchange (ASCII) is an encoding system that provides a way to represent specific characters using the respective code. We won’t be going over the complete list of ASCII codes, as there are hundreds of characters, and it’s impossible to learn them all. So instead, we’ll go through the basics and give you a few short codes to quickly take care of those foreign words with diacritics.
To use this method, you’ll require a number pad (either as a component of your main keyboard or as an add-on). You’ll also have to make sure you’ve turned NumLock by touching the NumLock key at the top-left corner of the number pad. Most keyboards have a pointer light to let you recognize when NumLock is on.
To insert an ASCII code, all you have to do is hold down the Alt key while typing out a numeric code on the number pad of the Keyboard. For instance, the code for the lowercase character “a” with a grave accent is 133. So, hold down Alt, type 133, and then let go of the Alt key. As soon as you press, the letter appears—voilà!
It would be hard to learn a ton of ASCII codes for various accented letters, but it simplifies the whole method if you constantly use a few.
How To Put An Accent Over A Letter In Word
AutoCorrect Keyboard Characters to Special Characters
You can also use Word’s autocorrect feature to insert accented characters when you type certain letter combinations automatically. And, although this sounds like it would be the easiest method, it’s quirky and, in practice, not as helpful as it might sound.
Back at the Symbols window, select the character you want to set up an autocorrect function for. Then, click the “AutoCorrect” button at the bottom left.
In the “Replace” box, enter the words that you need to trigger the autocorrect replacement. When you’re done, click the “Add” button and then the “OK” button.
In this case, we’re telling Word that when we type the letter “a” followed by the accent grave (`) and then space, Word should automatically replace that with an “a” that has the accent grave above it.
When you touch-type a word, you have to enter the accented letter first. In other words, if you want to type “Voilà,” you’d first need to type a+’ then go back and type the “Viol” behind it. Otherwise, you’ll end up with Viola’—because Word won’t trigger the autocorrect when the trigger letters are part of a more powerful word. And, as you can imagine, this makes it annoying if you have multiple accented characters in a single word.
If you are working on a specialised keyboard, adding accents to your letters in Microsoft Word will be as simple as clicking a key.
For many of us, working on standard, English keyboards inserting an accent over a letter is a bit of a manual process, but worth it in the end.
Why adding an accent over an English word is not always necessary, we do borrow words such as résumé from other languages so its nice to add the accent to formalise your document or just to make you feel a little bit fancy.
Before you jump in and starting adding accents to all of your letters, make sure you check which way the accent is going and use the grave and acute accents in the right way.
Here’s a accent cheat sheet:
In this post, we will show you how to insert an accent over a letter in Microsoft Word leaving you to correctly accent your words like a pro.
Inserting an accent mark over a letter in Microsoft Word
- Open Word
- Place your cursor where you would like to insert the letter with an accent
- Click the Insert Tab
- Click Symbol
- Within the Symbol box, find and click the letter and accent you want to insert
- Click Insert
- Click Close
You have now successfully inserted a letter with an accent mark into your Word document. Repeat these steps for each letter as required.
Looking for a better way to Collaborate in Microsoft Word?
You’re not the only one!
If you are facing the frustrations that seem to come hand in hand with collaborating in Microsoft Word. Frustrations such as version control, tracking changes, merging documents, saving over old versions, missing edits…this list could go on forever but you know as well as we do that there has to be a better solution.
With technology making our lives so much easier, why hasn’t Microsoft clocked onto this yet and updated Word to never save over an existing file without asking, or to automatically track changes and keep a backup version of your old file – just in case you want to revert back to it later.
Well while we wait for Microsoft, i’d like to introduce you to a a new software that solves ALL of our collaboration issues…
Meet Simul Docs.
Simul Docs was built with collaboration in mind, they personally faced the same frustrations as you and I and decided to create a nifty, easy to use solution that integrates directly into your existing Microsoft Office.
Firstly, Simul Docs will automatically track every change you make to any document.
Simul knows you need them tracked and doesn’t expect you to remember to turn tracked changes, it’s automatic. You can focus on making the changes, while Simul Docs focuses on tracking them without you having to think about it.
Open the document, Simul will track all changes. Close the document and Simul will save it as a new version for you.
Simul also has your version control covered.
When a document is created Simul will automatically give this document a version number of 0.0.1. From there, every time the document is opened, edited and closed a new version will be created, named 0.0.2 followed by 0.0.3 and so on.
A versions list will appear on the left hand side of your document, making it easy for you to refer back to older versions at any time or track who in your team made edits where.
Once you are a Simul user, there are two ways you can use the Simul solutions with your existing or new Word Document.
Either edit your document directly in Simul’s user-friendly web page or download the document and edit in Word as you would if Simul wasn’t in the background making your life a whole lot easier.
All of Simul’s features will be working no matter where you decide to edit.
So Simul Docs is the solution you have been searching for, now it’s over to you to give it a try!
The series Microsoft Word and MLA Style shows writers how to use Word to make their essays conform to MLA style guidelines. This post explains how to generate accent marks in Microsoft Word.
When you quote from texts in foreign languages, you will frequently need to type accent marks. Some common accent marks are the acute accent (e.g., on the e in the French word éclair), the umlaut (on the a in the German Fräulein), and the tilde (on the n in the Spanish piñata). Accent marks appear in some English words too, usually those that have been adopted from other languages, such as déjà vu.
This post explains how to generate accent marks in Microsoft Word. It also addresses the differences between generating accent marks in versions of Word for PC and Mac.
There are two basic ways of generating accent marks in Microsoft Word.
Using the Insert Tab
The most straightforward way of typing accent marks in Word is to use the Insert tab to call up a list of special symbols. This approach will work with any kind of keyboard, whether you are using a Mac or a PC.
First, click on the Insert tab in the menu at the top of the screen. You will then see a tab labeled Symbol on the right end of the menu. Clicking on this tab will bring up a drop-down list of your most recently used special characters. If the accent mark you need isn’t on this list, click on the More Symbols tab. This will bring up a large grid of special characters. When you find the one you need, you can insert it into your text in one of two ways—either by double-clicking on the square containing the accent mark or by clicking on the square once, to highlight it, and then clicking on the Insert icon in the bottom right of the window.
First, click on the Insert tab in the menu at the top of the screen. In the drop-down menu, hover your cursor over the word Symbol. You will then have a choice between clicking on Symbol Browser and Advanced Symbol. Both options will lead you to the same list of special characters, but Advanced Symbol contains more options of how to style the text, such as a choice of fonts. In the list that appears when you choose Symbol Browser, find the accent mark you need and click once on it to insert it into your text. In the Advanced Symbol list, you can insert an accent mark into your text in one of two ways—either by double-clicking on the square containing the desired accent mark or by clicking on the square once, to highlight it, and then clicking on the Insert icon in the bottom right of the window.
Using Keyboard Shortcuts
A quicker way of generating accent marks is to use keyboard shortcuts. Below, I lay out the basic approaches to using these shortcuts in Word on a PC and on a Mac.
If your keyboard has a number pad (a rectangular grid containing the numerals 0 to 9), you can generate accent marks and other special characters by typing a capital U followed by a combination of numerals on the number pad, or by a combination of letters and numerals. These unique combinations of numbers, or numbers and letters, are known as unicodes. While Word itself does not provide a list of unicodes, you can find many such lists online. One that contains a limited, but useful, list can be found here.
If your keyboard does not have a number pad, you can use various other combinations of keys to generate accent marks. Most of these combinations begin with the control key or the alt key. Microsoft provides a list of shortcuts here. For instance, to generate an e with an acute accent (é), hold down the control key and then, simultaneously, press the apostrophe key. Then, release those two keys and quickly press the e key. To generate a capital E with an acute accent, hold down the shift key at the same time you hold down the control and apostrophe keys, then release the three keys and press the e key.
On a Mac, you can use a nifty feature to quickly generate accent marks. Simply hold down the key of the letter you need to add an accent mark to, and a little window will pop up with a list of accents to choose from. Each choice is given a number, and by typing the number after releasing the letter key, the letter with the chosen accent will appear. You can also click on the chosen accent mark to get it to appear. To create an e with an acute accent, for instance, hold down the e key until the window pops up above it, and then press the number 2 key, which corresponds to the acute accent mark; or, just click directly on the é in the window.
You can also use key combinations to generate accent marks, the same way you would on a PC. The steps are exactly the same, except that the alt key is called the option key on Mac keyboards.
Beyond Accent Marks
As senior editor of MLA publications, Barney Latimer has copyedited PMLA articles for more than ten years. He holds an MA in English from New York University. He has taught high school and college classes in writing and literary analysis, as well as seminars in poetry writing at several nonprofit organizations that serve New Yorkers with mental illness.
Published 29 June 2020
3 Comments
David Carter 12 January 2021 AT 03:01 PM
The hold-down Mac shortcut to open a choice of accent marks doesn’t work in OS 11.1 Big Sur, or at least not with Word for Mac v16.44. Slowing down Key Repeat in Keyboard on Systems Preferences doesn’t help, and neither does turning off Key Repeat.
C. Barney Latimer 13 January 2021 AT 12:01 PM
Thank you for your message; I’m sorry the shortcut I described doesn’t work for you. I’m afraid the post couldn’t cover all versions of Word and all operating systems. Users may have to seek out other solutions depending on their version of Word or their operating system.
- Register
- .
- Sign In/Register
- .
- Help
What are you looking for?
- Samsung Community
- :
- Products
- :
- Computers & IT
- :
- accent marks over letters
Original topic:
accent marks over letters
- Subscribe to RSS Feed
- Mark Topic as New
- Mark Topic as Read
- Float this Topic for Current User
- Bookmark
- Subscribe
- Printer Friendly Page
- Mark as New
- Bookmark
- Subscribe
- Mute
- Subscribe to RSS Feed
- Highlight
- Email to a Friend
- Report Inappropriate Content
10-10-2016 01:08 PM in
how do I make accent marks show up over letters I’m typing in word?
I am writing something in french, and i need to use accent marks.
- All forum topics
- Previous Topic
- Next Topic
1 Solution
- Mark as New
- Bookmark
- Subscribe
- Mute
- Subscribe to RSS Feed
- Highlight
- Email to a Friend
- Report Inappropriate Content
11-10-2016 05:59 PM in
In that case it does depend entirely on the programme you are using to type in.
Most word processors like Microsoft Word have a solution to get characters such as these:
In the Microsoft office suite users can utilize the following combinations of keys to add accent marks to letters. For example, to get the character à, you’d press the Ctrl Key, and while holding that key, press the ` Key as well. Then, release both keys and quickly press the A Key.
Note: You must press the letter key quickly after releasing the shortcut keys. Otherwise, the non-accented letter is created.
Here is a great website that shows how to do it for each character you want:
(Please note the link is not a Samsung website and information on the site cannot be guaranteed at 100% accurate)
How to Type Spanish Letters and Accents (á, é, í, ó, ú, ü, ñ, ¿, ¡)
67.5K There are several ways to configure your keyboard to type in the Spanish accented letters and upside-down punctuation (á, é, í, ó, ú, ü, ñ, ¿, ¡) and which one you use depends on the frequency with which you need these letters.
- Inserting Accented Characters with an English Keyboard Layout
If you only need an accented character every now and then, there is no need to change your full keyboard layout.
There are several key combinations you can use to insert single characters into your text on a PC. The first is for newer computers using the Control key and may only work in Microsoft Office.
In Office for Windows: For accented vowles: Press Ctrl + , then the vowel (ctrl + ‘ + a = á)
For Ñ: Press Ctrl +
, then the letter n (ctrl +
The second way is using the ASCII code. Each character in your computer has a code made up of pressing the ALT key then a three-digit number, all of which are listed below.
To type the numbers, you must use the numeric keypad on the right side of your keyboard, not the number keys on the top row.
To get accented vowels on a Mac, hold down the Option key, and while holding it down, type the letter e; then release those keys and type the letter that you want the accent to appear on:
Opt + e, then a = á
Opt + e, then e = é
Opt + e, then i = í
Opt + e, then o = ó
Opt + e, then u = ú
For the ñ, hold down the Option key while you type the n, then type n again.
Opt + n, then n = ñ
To type an umlaut over the u, hold down the Option key while pressing the u key then type u again.
Opt + u, then u = ü
*To type the upside-down punctuation marks press the following keys all at once.
- Full Keyboard Configuration
For those using Spanish letters and punctuation on a regular basis, I recommend going into your Control Panel/System Preferences and add the Spanish keyboard configuration. This will mean you need to learn the new key placements, but it is very easy once you get used to it.
For Windows Vista
Go to your Control Panel Click on “Clock, Language, Region Click on “Change Keyboards” Click “Add” and Select “Spanish-International Sort” For Windows XP:
Go to your Control Panel Click on “Date, Time, Language, and Regional Options” Click on “Regional and Language Options” Select the “Languages” tab at the top Click on “Details” near the bottom Click “Add” and choose “Spanish-Traditional Sort” Go back to the “Languages” tab and choose the option to “switch languages” by pressing “left alt-shift” at the same time. This way, you can switch to and from the Spanish and regular keyboard whenever you want. For Macs
Go to your System Preferences Click on “International” Select the “Input Menu” tab Scroll down to select “Spanish – ISO” Note the keystrokes necessary to switch between languages OR Select “Show input menu in menu bar” to be able to click-select which keyboard you want to use. Spanish-International Sort Keyboard Layout
Spanish-International Sort Keyboard Key Strokes
Once you have installed your Spanish keyboard, it will react slightly differently than you are used to. First, you will notice that when you type an apostrophe ( ‘ ), nothing happens. This is because if you type a vowel immediately after, you will get an accented vowel (á, é, í, ó, ú). To get an apostrophe, push the key for the hyphen, next to the number 0. You can see several other changes in the picture below.
The quotes ( ” ) key behaves the same way as the apostrophe key in that it gives you the umlaut ( ¨ ) rather than quotes for the letter (ü) in words like “lingüística”. To type in regular quotes, simply press shift then the number 2.
The semicolon ( ; ) key has also been replaced by the ñ. To type a regular semicolon, simply press shift then the comma key.


