When you connect any new hardware device to the computer, by default, the Windows system will automatically try to install or update the relevant driver for the device. Most of the time, this is useful and brings convenience to the user. However, some new versions of drivers may be incompatible with the operating system and affect Windows performance. Hence, you can manually turn off automatic driver updates feature. Now, this post will show you how to turn off automatic driver updates in Windows 10.В Three ways are described below.
Way 1: Turn off automatic driver updates through System Properties
Step 1: Right-click on This PC and select Properties to open System window. Alternatively, you can press Win + X and then select System.
Step 2: On the System panel, click the Advanced system settings link on the left-side pane.
Step 3: After System Properties dialog opens, select the Hardware tab, and then click Device Installation Settings.
Step 4: Select the option “No, let me choose what to do”, then select “Never install driver software from Windows Update”, and click Save Changes.
Step 5: Restart Windows 10 for the changes to take effect.
Way 2: Turn off automatic driver updates through Group Policy Editor
Step 2: Navigate to: Computer Configuration -> Administrative Templates -> System -> Device Installation -> Device Installation Restrictions, then double-click the item “Prevent installation of devices not described by other policy settings” on the right-side pane.
Step 3: Select Enabled, then click Apply and click OK.
Way 3: Turn off automatic driver updates through Registry Editor
Step 1: Open Registry Editor. (Type regedit in Start menu search box or Run dialog box.)
Step 2: Navigate to: HKEY_LOCAL_MACHINE -> SOFTWARE -> Microsoft -> Windows -> CurrentVersion -> DriverSearching, then double-click the key “SearchOrderConfig” on the right-side pane, and change its value data from “1” to “0“. Finally click OK.
Note: When the DWORD value data of the “SearchOrderConfig” key is “1”, automatic driver updates are in an enabled state. When the DWORD value data “0”, automatic driver updates are turned off.
Step 3: Restart Windows 10 for the changes to take effect.
Windows 10 provides an easy way to install new device drivers, but to avoid problems sometimes you may want to stop the operating system from installing them automatically — here’s how.
- Tweet
- Share
- Submit
Windows 10 is really good at detecting and installing new drivers for hardware you connect to your computer. However, there will be times when you may not want them to install automatically. It could be because Windows 10 may try to install a version of the driver that is not compatible or a version that contains bugs and it’ll result on more issues.
Sometimes you may also want to stop drivers from installing automatically because there is another version (newer or older) known to work better on your computer. For whatever the reason it might be, you can stop the operating system from trying to use Windows Update to download driver updates.
In this guide, you’ll learn the steps to change the settings and stop Windows 10 from automatically installing drivers on your computer.
How to stop automatic driver installation using Control Panel
Use the Windows key + X keyboard shortcut to open the Power User menu and select System.
Click on Advanced system settings from the left pane.
Control Panel System settings
On System Properties, click the Hardware tab.
Click the Device Installation Settings button.
Control Panel System Properties settings
Select No (your device might not work as expected) option.
Click Save Changes.
Device installation settings
Click OK to complete the task.
Once you completed the steps, Windows 10 will no longer try to install drivers automatically for new devices on your computer. If you’re upgrading your graphics card or setting up a new printer, you’ll need to download and install those drivers from your manufacturer.
How to stop automatic driver installation using the Group Policy
Alternatively, if you’re running Windows 10 Pro, Enterprise, or Education, you can use the Local Group Policy Editor to stop the operating system from checking and installing updates for drivers.
Use the Windows key + R keyboard shortcut to open the Run command.
Type gpedit and click OK to open the Local Group Policy Editor.
Browse the following path:
Double-click the Do not include driver with Windows Update option.
Local Group Policy Editor Windows Update policies
Check the Enabled option.
Click Apply.
Click OK to complete the task.
Windows Update policy
After enabling this policy Windows Update will stop providing drivers during updates.
How to stop automatic driver installation using the Registry
While the first method is the safest way to stop Windows 10 from installing drivers automatically, if you’re up to the challenge or running Windows 10 Home, you can tweak the Registry to accomplish the same thing.
Use the Windows key + R keyboard shortcut to open the Run command.
Type regedit and click OK to open the Registry.
Browse the following path:
Double-click the SearchOrderConfig DWORD key, and change its value from 1 to 0.
Registry DriverSearching settings
Click OK.
Close the Registry.
Restart your computer to complete the task.
Setting SearchOrderConfig to 0 will block drivers from update every time Windows 10 checks for new updates.
You can always revert the changes by using the same steps, but on step 4 change the DWORD key value from 0 to 1.
It’s worth pointing out that this not only works on Windows 10, but on Windows 8.1 and Windows 7 as well.
We may earn commission for purchases using our links to help keep offering the free content. Privacy policy info.
All content on this site is provided with no warranties, express or implied. Use any information at your own risk. Always backup of your device and files before making any changes. Privacy policy info.
Need to block a new version of Windows 10 from automatically installing? This article will show you how to do it if your hardware or apps are incompatible.
Windows 10 upgrade mechanisms do a rather basic check for compatibility: CPU speed, storage, RAM, and that’s basically it. Users can receive the offer for a new Feature Update through Windows Update but discover during installation or after setting up that the new release is incompatible with their hardware. As Microsoft continues to roll out more and more Windows 10 Feature Updates, those with older hardware are increasingly finding themselves left behind due to Windows update compatibility issues.
OEM’s maintain databases determining support for a particular release of Windows 10. That said, Windows Update, Media Creation Tool, and the Upgrade Assistant don’t reference any of these services. If you discover your system isn’t compatible with a new Windows 10 Feature Update, here is how you can block it from installing.
How to Block New Versions of Windows 10 from Automatically Installing
The Windows 10 setup process doesn’t inform users whether their computer is supported or not. Before you install a Feature Update, the first thing you should do is check the hardware vendor’s website to determine if your system is compatible. Here are some links to popular brands where you can check support status for your make and model. This can be the first step to ensure you don’t update your system to find out later in frustration you have to roll back or perform a clean install.
- Acer
- ASUS
- Dell Inc
- Fujitsu
- Hewlett Packard (HP)
- Lenovo
- Packard Bell
- Panasonic
- Samsung
- Sony Vaio
- Toshiba
Through Windows Update
The most common way many users install a new Feature Update is through Windows Update. But how do you prevent it from installing? Microsoft’s Show or Hide Updates tool can be a first-line option. This small wizard lets you choose to hide the Feature Update in Windows Update. After downloading, launch it, click Next, wait while it detects pending Windows Updates.
Click the Hide Updates menu.
Scroll through the list, then select the Feature Update. In my case, I am hiding Windows 10 Creators Update, version 1703. Check the box next to the update, then click Next to confirm changes. When future versions are released in the fall and spring, you will see either 1709 or 1803.
Temporary Block
The next option is not practical but can temporarily block a feature update too. You can set your network up as a metered connection, which prevents large updates from downloading. Open Start > Settings > Network & Internet > Wi-Fi, click your network connection, then toggle on Metered Connection. You can also do this for wired connections in Windows 10 version 1703 or later.
Pause the Updates
All Windows editions let you pause an update for up to 35 days. Users running premium business editions such as Windows 10 Pro, Pro Edu, Enterprise, Education, and Pro for Workstation have additional options. Using the Group Policy editor, you can defer feature updates for even longer. If you are running any of those editions, here is how you do that.
Press Windows key + R, type: gpedit.msc then hit Enter. Under Computer Configuration, expand Windows Components > Windows Updates > Defer Updates, then double click Select when Feature Updates are received.
Block Updates for a Full Year
You can block a feature update for up to 365 days. Taking into consideration that Feature Updates are released every seven months, this should be sufficient. But keep in mind, a Feature Update is only supported for 18 months, so eventually, you will need to move to a release to maintain support. So, if you block 1703, for example, you will need to move to 1809 when the time comes.
Summing Up
Being able to block Feature Updates temporarily or indefinitely works today. But the way Microsoft handles Feature Updates story is not written in stone—the Windows as a Service (WaaS) model means that doing things is always subject to change. Users are pretty much between a rock and a hard place for the time being. We don’t recommend blocking feature updates indefinitely since they have become a critical part of Windows 10’s security mechanisms. As new releases are delivered, it’s truly an unknown in the future for older hardware. I guess when we arrive at that bridge, we will have to figure how to cross it.
Let us know if you found this helpful. What are your thoughts on Feature Updates so far; are they more trouble than you asked for, or are they working just fine?
Chris Hoffman is Editor-in-Chief of How-To Geek. He’s written about technology for over a decade and was a PCWorld columnist for two years. Chris has written for The New York Times, been interviewed as a technology expert on TV stations like Miami’s NBC 6, and had his work covered by news outlets like the BBC. Since 2011, Chris has written over 2,000 articles that have been read nearly one billion times—and that’s just here at How-To Geek. Read more.
Windows 10 automatically downloads and installs all updates. This includes security updates, feature updates, and driver updates provided through Windows Update. This is generally a good thing, but if a driver or update causes problems you can uninstall it and block Windows from downloading it again.
Step One: See Which Updates and Drivers Were Recently Installed
If you’re not sure which device driver or update Windows just installed that might be causing you problems, you can view the list of installed updates. Boot into safe mode, if you need to, Head to Settings > Update & security > Windows Update and click “Update history”. You’ll see a list of updates and the dates they were installed here.
Step Two: Uninstall the Problematic Update or Driver
Next, you’ll need to uninstall the offending update or driver update—but doing so is different for each.
Uninstall an Update from the Settings App
The option to uninstall Windows Updates (not driver updates) is buried in the Settings app. Head to Settings > Update & security > Windows Update > Update history. Click the “Uninstall updates” link here.
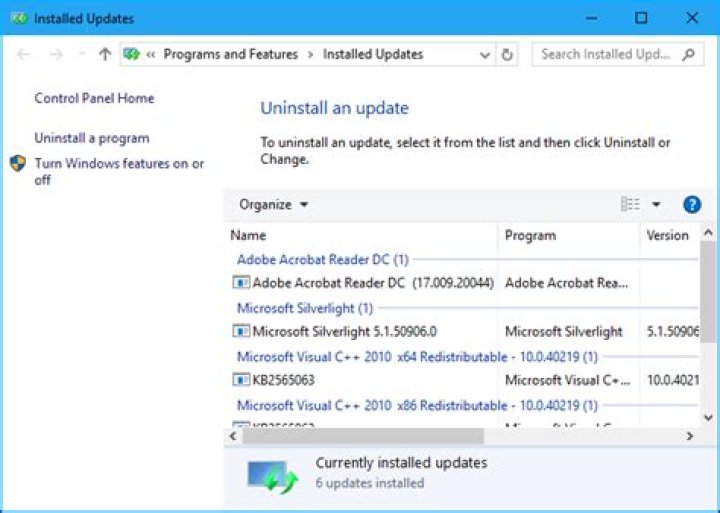
This link takes you to the “Uninstall an update” dialog, where you can uninstall an individual Windows Update if it’s causing problems on your system.
This only lists all the updates that have been installed since the last major update, or “build“, of Windows 10. For example, Windows 10’s Creators Update, Anniversary Update, and November Update were all major updates.
To roll back a build of Windows 10, head to Settings > Update & security > Recovery. If it’s been less than 10 days since you installed a build and you haven’t removed its files with Disk Cleanup, you’ll see a “Go back to an earlier build” option. Click “Get started” to roll back to your previous build of Windows 10. For example, if you used this option after installing the Creators Update, you’d roll back to the Anniversary Update.
Roll Back a Driver from Device Manager
Drivers can be particularly problematic. If you roll back a driver or install a different one yourself, Windows Update will continue downloading and installing that specific driver over and over, overwriting your preferred driver whenever it checks for updates. We’ll talk about how to stop that in a moment, but first, let’s talk about how to roll back the driver.
To roll back a driver, right-click the Start button at the bottom-left corner of your screen or press Windows+X and select Device Manager to launch the Device Manager. Locate the device whose driver you want to uninstall, right-click it, and select “Properties”. Click the “Driver” tab and click “Roll Back Driver”.
The option to roll back a driver was added in Windows 10’s Anniversary Update. Previously, you had to uninstall the device from your system and delete the driver so you could reinstall the original driver.
Step Three: Prevent a Driver or Update From Being Installed from Windows Update
Just uninstalling drivers or updates won’t prevent them from being installed again. There’s no way to “hide” an update or block updates from within Windows itself, but Microsoft provides a downloadable tool to do this. It’s intended for temporarily hiding buggy or otherwise problematic while they don’t work properly on your system.
When you run this troubleshooter, it will search for available updates and allow you to “hide” them, preventing Windows from automatically installing them. In the future, you can run this troubleshooter again and unhide the updates when you want to install them.
Alternatively: Stop Windows 10 From Automatically Installing Updates (Not Recommended)
If you want to temporarily prevent Windows from automatically downloading and installing any updates, you can do it without using the above tool to block updates. Set your connection as metered to prevent Windows 10 from automatically installing most updates. We don’t recommend this, though, as this will prevent important security updates from being installed.
If you don’t want Windows touching your system’s hardware drivers, you can configure Windows to never update the drivers for a specific hardware device. You could also disable driver updates entirely and tell Windows Update to never install new driver versions.
Windows 10 automatically downloads and installs all updates. This includes security updates, feature updates, and driver updates provided through Windows Update. This is generally a good thing, but if a driver or update causes problems you can uninstall it and block Windows from downloading it again.
Step One: See Which Updates and Drivers Were Recently Installed
If you’re not sure which device driver or update Windows just installed that might be causing you problems, you can view the list of installed updates. Boot into safe mode, if you need to, Head to Settings > Update & security > Windows Update and click “Update history”. You’ll see a list of updates and the dates they were installed here.
Step Two: Uninstall the Problematic Update or Driver
Next, you’ll need to uninstall the offending update or driver update—but doing so is different for each.
Uninstall an Update from the Settings App
The option to uninstall Windows Updates (not driver updates) is buried in the Settings app. Head to Settings > Update & security > Windows Update > Update history. Click the “Uninstall updates” link here.
This link takes you to the “Uninstall an update” dialog, where you can uninstall an individual Windows Update if it’s causing problems on your system.
This only lists all the updates that have been installed since the last major update, or “build“, of Windows 10. For example, Windows 10’s Creators Update, Anniversary Update, and November Update were all major updates.
To roll back a build of Windows 10, head to Settings > Update & security > Recovery. If it’s been less than 10 days since you installed a build and you haven’t removed its files with Disk Cleanup, you’ll see a “Go back to an earlier build” option. Click “Get started” to roll back to your previous build of Windows 10. For example, if you used this option after installing the Creators Update, you’d roll back to the Anniversary Update.
Roll Back a Driver from Device Manager
Drivers can be particularly problematic. If you roll back a driver or install a different one yourself, Windows Update will continue downloading and installing that specific driver over and over, overwriting your preferred driver whenever it checks for updates. We’ll talk about how to stop that in a moment, but first, let’s talk about how to roll back the driver.
To roll back a driver, right-click the Start button at the bottom-left corner of your screen or press Windows+X and select Device Manager to launch the Device Manager. Locate the device whose driver you want to uninstall, right-click it, and select “Properties”. Click the “Driver” tab and click “Roll Back Driver”.
The option to roll back a driver was added in Windows 10’s Anniversary Update. Previously, you had to uninstall the device from your system and delete the driver so you could reinstall the original driver.
Step Three: Prevent a Driver or Update From Being Installed from Windows Update
Just uninstalling drivers or updates won’t prevent them from being installed again. There’s no way to “hide” an update or block updates from within Windows itself, but Microsoft provides a downloadable tool to do this. It’s intended for temporarily hiding buggy or otherwise problematic while they don’t work properly on your system.
When you run this troubleshooter, it will search for available updates and allow you to “hide” them, preventing Windows from automatically installing them. In the future, you can run this troubleshooter again and unhide the updates when you want to install them.
Alternatively: Stop Windows 10 From Automatically Installing Updates (Not Recommended)
If you want to temporarily prevent Windows from automatically downloading and installing any updates, you can do it without using the above tool to block updates. Set your connection as metered to prevent Windows 10 from automatically installing most updates. We don’t recommend this, though, as this will prevent important security updates from being installed.
If you don’t want Windows touching your system’s hardware drivers, you can configure Windows to never update the drivers for a specific hardware device. You could also disable driver updates entirely and tell Windows Update to never install new driver versions.
12 May 2020 5:04am at June 25, 2021 • by CarvedInside • in Windows 10 Guides •
Solutions on how to deal with problematic drivers updated by Windows.
- 12 May 2020: Article published.
1. How to uninstall a recent driver update delivered through Windows Update
- Open Device Manager (press Win+R or search and copy-paste: devmgmt.msc or right-click on This PC/Computer icon -> select Manage-> select Device Manager)
- Navigate to the device you want to and double click on it.
- In the opened Proprieties window, select Driver tab, click on “Roll Back Driver” button if it’s enabled.
- Follow on with the wizard and restart when promoted.
2. Block specific Windows drivers from installing
Uninstalled or pending drivers can be blocked from installation following these steps:
- Download wushowhide (direct link / archived direct link – might not be the latest version, info and download page)
- Run wushowhide.diagcab, click Next, chose “Hide updates”, chose the update or driver you want to block.
In order to block an already installed update you need to first uninstall it as per the guide above.
To unblock a previously blocked update:
- Run wushowhide.diagcab, click Next, chose “Show hidden updates”, chose the update or driver you want to allow.
3. Disable all automatic Windows driver updates from installing
To disable Windows automatic drivers from ever installing, download and run disable_driver_update_Windows_v1.0.bat. Now Windows will not automatically updates drivers anymore. Just keep in mind to re-enable this option if you want to update a driver for a device with drivers from Microsoft Windows driver catalog. To re-enable, download and run enable_driver_update_Windows_v1.0.bat.
Alternatively, you can disable automatic installation of Windows 10 updates and drivers and choose which ones to install following “3. Disable automatic installation of Windows 10 updates and drivers and instead choose which updates to install” from this guide.
12 May 2020 11:17pm at May 19, 2021 • by CarvedInside • in Articles, Windows 10 Guides • 2
Solutions on how to deal with problematic Windows updates and take control of Windows Update.
- 12 May 2020 : Article published.
1. How to uninstall a specific Windows update
- Type in Windows search: Programs and Features or open paste the following in the Windows Explorer address field: Control Panel\All Control Panel Items\Programs and Features .
- On the left pane click on View installed updates .
- (Optional) Enable “Installed On” column and sort updates after the “Installed On” date so that the recent ones are easier to find.
- Select a specific update you want to uninstall and click Uninstall.
- If you don’t wish to uninstall any other updates, restart when promoted.
To prevent those uninstalled updates from installing again check “Block specific Windows updates and drivers from installing” below.
2. Block specific Windows updates and drivers from installing
Uninstalled and pending updates and drivers can be blocked from installation following these steps:
- Download wushowhide (direct link / archived direct link – might not be the latest version, info and download page)
- Run wushowhide.diagcab, click Next, chose “Hide updates”, chose the update or driver you want to block.
In order to block an already installed update you need to first uninstall it as per the guide above. For drivers installed through Windows update, see this guide on how to roll them back before hiding them.
To unblock a previously blocked update:
- Run wushowhide.diagcab, click Next, chose “Show hidden updates”, chose the update or driver you want to allow.
3. Disable automatic installation of Windows 10 updates and drivers and instead choose which updates to install
To take control of which Windows updates and drivers are installed and when do the following:
- Download and launch WAU Manager.
- Select “Disable the built-in Windows Automatic Updates and use only WAU Manager”
- (Optional) Select “Create a Desktop shortcut to quickly update. ” and/or schedule when the program should search for Windows updates and notify you if you wish to install them.
- Press “Save and Apply”. To search and chose which updates to install press on “Update Windows Now”.
! Note that Windows 10 will automatically start installing updates again if you go to Windows Settings->Update & Security-> and you press the “Check for updates” button. There might also be other situations where Windows might automatically update without your intervention, so if you want to make sure Windows updates are not applied without your permission check “Disable Windows Update completely” below and only enable the Windows Update service when you want to install Windows updates.
4. Disable Windows Update completely
If you wish to permanently or temporarily block any currently pending and future Windows updates and drivers updates you can use Windows Update Blocker program. Unfortunately this will also prevent Microsoft Store apps downloads and updates from installing, so keep that in mind in case you need that at some point. Disabling Windows Update completely would be useful for benchmarking purposes or if you want to make sure that Windows updates are not applied without your intervention.
If you still want to receive security patches for Windows you can use 0patch software. 0patch approach to patching security issues is innovative as it does not require system restarts, patches can be individually turned on/off, it includes patches for other software applications and they are much faster at patching security issues than Microsoft with their Windows and Office updates. Note that the FREE version has limited patching capability/functionality as described here.
March 11, 2016 By Sukanya K M
How to Block / Uninstall Problematic updates and drivers: – Gone are those days when you have to select for each and every driver and process, separate updates. Microsoft, when it launched Windows 10, included a new option where by drivers,regardless of our decision does the download and updates automatically. It is in fact invaluable as you don’t have to choose new updates for everything and the system can keep itself prompt with the latest features, it is sometimes also possible that not all systems will be able to work properly in a similar way.
Even if you try to uninstall the problematic Windows update ,the next time a new update gets available, Windows 10 will reinstall it by itself!
Thus, we present here the steps on how to uninstall the drivers that often cause problems on automatic update and how to stop Windows from doing a temporary reinstall them in order to keep the system up-to-date.
Unnecessary update and drivers removal
Uninstall device driver
Choose the device manager option from the Search menu
Scroll down the options available under them and right click on the device causing problems.
Choose the Uninstall option and make sure to check the Delete the driver software from this device option in the dialog box that pops up.
Uninstall Windows Update
Click on the Start menu and choose the View Installed Update option from them.
The Control panel of Installed updates section pops up
Choose the update which you fear is problem and choose the uninstall option by right clicking on it.
Blocking of temporary reinstall of drivers by Windows Update
In Windows 10, Microsoft has added a new tool called the Troubleshooter tool whereby you are allowed to both hide as well as show updates and drivers.
The following are the main steps to accomplish “Show or hide Updates” troubleshooter.
You need to download then Show or hide Updates Troubleshooter from the Microsoft Download Center.
Open the .diagcab file in the downloads folder and run it.Click on the Next button as shown.
Select the Hide updates option and select from the list that appears, the updates and drivers which you don’t want Windows to reinstall.
Once it gets completed and if everything has gone right,then a ‘Fixed’ label will appear to the right of the chosen option.
Run the Show or hide Updates troubleshooter again and select the Show Hidden Updates option
On clicking the Next button again,it shows the fixed updates.
Close button needs to be clicked for completing the whole process.
Once the whole process gets completed,Updates and drivers will be available through Windows Update for installation.
December 16, 2015 By Admin
Device drivers are hardware’s software settings which help to run the hardware properly on your system. To increase the performance and efficiency level of hardware’s, they can be updated too. Every device driver is listed in “Device Manager” which tells us which hardware’s are installed in your PC along with their properties.
Device Manager helps in configuring hardware settings. Device Manager is useful in performing various tasks such as Enabling, Disabling, Uninstalling the drivers, roll back any update or scan for any hardware changes.
If any hardware is updated and it starts having anomalies within the system, it can be pushed back to the previous state (version) by using the feature of roll back.
In this article, we’ll ensure how to use the features of Device Drivers in Windows 10:
Firstly, we’ll right click on “Start” icon positioned at the bottom left corner of the screen and then we’ll click on “Device Manager”.
Using Disable:
To use the disable feature, right click on any of the driver you wish to disable. Click on “Disable”.
Using Uninstall:
To use the “uninstall” feature, right click on any of the driver you wish to uninstall. Click on “Uninstall”.
Note: Uninstalling any device driver can cause system problems. Hence, it is not recommended. Make sure you have a Device Driver Resource CD before performing Device Uninstallation.
Using Roll back:
To use the “roll back” feature, right click on any drivers which you wish to roll back. Click on “Properties”.
Now, click on “Roll back driver” to roll back to the previously installed version of the hardware.
Using Update:
To use the “update” feature, right click on any of the driver you wish to update. Click on “properties”.
Click on “Update driver” to update the current installed version of the device driver (if any).
Note: Updating drivers will run an Update Wizard which will guide you to rest of the process.
Saurav is associated with IT industry and computers for more than a decade and is writing on The Geek Page on topics revolving on windows 10 and softwares.


