Technical Level : Basic
Summary
Learn how to move the OneDrive folder to a new location. This is useful if you have a limited storage capacity main drive but a separate storage drive and you want your OneDrive content synced to the separate drive.
The scope of this article is for the personal version of OneDrive on Windows 10 and earlier versions. Please refer to the table below for additional support for the following products:
| Product | Support Link |
| OneDrive for Business | Contact Office 365 for Business support |
Details
Many people use two separate drives on their computers: a main drive like an SSD to run the operating system and other programs, and a regular hard drive to store the bulk of their content. OneDrive defaults to the C:\User\ \OneDrive location, however you can change it wherever you want.
Move the OneDrive Folder in Windows 10, Windows 7, and Previous Operating Systems
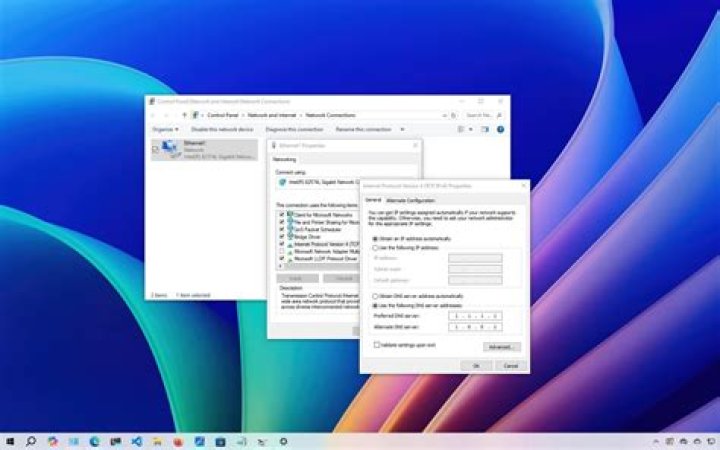
To change the OneDrive folder location in Windows 10, Windows 7 and previous versions of Windows, you must unlink OneDrive from your account and then repeat the setup process:
- Create a new folder called “OneDrive” in the desired location
- Right-click on the OneDrive icon in the notification area and then select Settings
- Select “Account” and then select “Unlink this PC”
- Follow the setup process again and ensure to select the new drive or location to have OneDrive sync to; you must wait for your files to download again to the new location
- (Optional) Follow these Microsoft instructions to move the folder without downloading data again: Change the location of your OneDrive folder
Special Instructions – Move OneDrive to SD Card
Based on multiple posts in the OneDrive forum and comments on this article, obviously moving to an SD card doesn’t work. It does seem to work though if you create a VHD (virtual hard drive) on the SD card:
Thanks to BenToan for the reference.
Move the OneDrive Folder in Windows 8.1
To change the OneDrive folder location in Windows 8.1, you can simply change the location directly through the Properties menu of the OneDrive folder:
- Create a new folder called “OneDrive” in the desired location
- Open File Explorer, right-click on the OneDrive folder in the navigation pane (left-hand side), and then select Properties
- Click the “Location” tab and then select “Move“
- Select the location where you want OneDrive to sync to and then click OK
OneDrive will move all of your OneDrive files from the default location to the new location; you don’t have to wait for files to download again.
Post-move Instructions – Windows User Permissions
If you move the OneDrive folder to a new location, it inherits the folder permissions of the parent folder (or drive if the OneDrive folder is placed at the root directory). You’ll need to update the Windows user permissions to the new OneDrive folder that used to exist on the old folder, else that folder will be viewable by everyone who uses the machine.
For most subscription plans, the default storage space for each user’s OneDrive is 1 TB. Depending on your plan and the number of licensed users, you can increase this storage up to 5 TB. For info, see the OneDrive service description.
For help finding out which subscription you have, see What Microsoft 365 Apps for business subscription do I have?
If your organization has a qualifying Microsoft 365 subscription and five (5) or more users, you can change the storage space to more than 5 TB. To discuss your needs, contact Microsoft support. You must assign at least one license to a user before you can increase the default OneDrive storage space.
The new storage limit is applied the next time a user accesses their OneDrive.
Set the default OneDrive storage space in the SharePoint admin center
This storage space setting applies to all new and existing users who are licensed for a qualifying plan and for whom you haven’t set specific storage limits. (To check if a user has a specific storage limit, see the next section.) To change the storage space for specific users, see Change a specific user’s OneDrive storage space.
If you decrease the storage limit and a user is over the new limit, their OneDrive will become read-only.
Go to the Settings page of the new SharePoint admin center, and sign in with an account that has admin permissions for your organization.
If you have Office 365 Germany, sign in to the Microsoft 365 admin center, then browse to the SharePoint admin center and open the Sharing page.
If you have Office 365 operated by 21Vianet (China), sign in to the Microsoft 365 admin center, then browse to the SharePoint admin center and open the Sharing page.
Select the OneDrive Storage limit setting.
In the Default storage limit box, enter the default storage amount (in GB), and then select Save.
The minimum storage is 1 GB.
Check if a user has the default storage limit or a specific limit
Sign in to as a global or SharePoint admin. (If you see a message that you don’t have permission to access the page, you don’t have Microsoft 365 admin permissions in your organization.)
If you have Office 365 Germany, sign in at If you have Office 365 operated by 21Vianet (China), sign in at Then select the Admin tile to open the admin center.
In the left pane, select Users > Active users.
Select the user.
Select the OneDrive tab.
Next to “Storage used,” look at the max value (for example, 3 GB of 1024 GB).
Set the default OneDrive storage space using PowerShell
If you installed a previous version of the SharePoint Online Management Shell, go to Add or remove programs and uninstall “SharePoint Online Management Shell.”
Run the following command:
Where is the value in megabytes for the storage space. For example, 1048576 for 1 TB or 5242880 for 5 TB. You can specify any value that you want, however, if you specify a value greater than that allowed by a given user’s license, that user’s storage space will be rounded down to the maximum value allowed by their license.
To reset an existing user’s OneDrive to the new default storage space, run the following command:
When you set site storage limits in PowerShell, you enter them in MB. The values are converted and rounded down to the nearest integer to appear in the admin centers in GB, so a value of 5000 MB becomes 4 GB. If you set a value of less than 1024 MB using PowerShell, it will be rounded up to 1 GB.
Chris Hoffman is Editor-in-Chief of How-To Geek. He’s written about technology for over a decade and was a PCWorld columnist for two years. Chris has written for The New York Times, been interviewed as a technology expert on TV stations like Miami’s NBC 6, and had his work covered by news outlets like the BBC. Since 2011, Chris has written over 2,000 articles that have been read nearly one billion times—and that’s just here at How-To Geek. Read more.
Windows 8.1 integrates OneDrive (formerly SkyDrive) everywhere, even on the desktop. You may want to save all your personal files to OneDrive so they’ll be accessible everywhere, but Windows doesn’t always save to OneDrive by default.
We’ll walk you through setting things up so you can more easily save to OneDrive and won’t accidentally save your important files to your local storage. These tips could also be used to save files to Dropbox, Google Drive, or another cloud storage service.
Move Folders From This PC to OneDrive
By default, programs will save many files to the folders under This PC in File Explorer — that is, the Documents, Music, Pictures, and Videos folders. You can move these folders to your OneDrive folder and Windows will continue to display them under This PC. Files you save to these folders under This PC will automatically be saved to your OneDrive storage. You can’t just drag and drop the folders to your OneDrive folder, however — you have to move them in a special way.
To do this, open File Explorer and right-click one of your user data folders under This PC — the Documents folder, for example. Select Properties in the menu. Click the Location tab in the Properties window, click the Move button, and choose a new location for the folder inside your OneDrive account. You may need to create a new folder inside OneDrive for the folder. For example, below we’re moving the Documents folder under This PC to the Documents folder inside our OneDrive account. Click the OK button and Windows will move the folder and the files in it to OneDrive.
You’ll have to repeat this process for each folder you want to move. You may want to skip some folders — for example, you probably don’t want to move your Downloads folder to OneDrive, as it’s a temporary location for downloads, and you don’t want to upload each file you download.
If you have other Windows 8.1 PCs, repeat this process on each of them and the user data folders under This PC will be kept in sync between your PCs and your OneDrive storage.
Point Your Libraries at OneDrive
This second trick is somewhat redundant if you’ve used the above trick. Libraries are apparently being phased out of Windows — they’re now hidden by default in Windows 8.1 — even though many “Store apps” still depend on them. With some tweaking to your libraries, files you save to your Documents, Pictures, Music, or Videos libraries will be automatically saved to OneDrive. This method also allows you to split your files between OneDrive and your local storage. You could have some files in the library saved to a local folder and some saved to your cloud storage.
To do this, you’ll first need to show the hidden libraries in File Explorer. In File Explorer, click the View tab on the ribbon, click the Navigation pane button, and enable the Show libraries checkbox.
Libraries will appear in File Explorer’s navigation pane. Right-click one of the libraries and select Properties. Click the Add button to add a new folder and select a folder in your OneDrive folder. You may need to create a new folder in OneDrive for this. Add that folder to the library, then select it and click Set save location. Files you save to the library will now automatically be saved to the folder on OneDrive and synchronized across your computers.
Repeat this process on each of your computers and the files in your OneDrive account will show up in your libraries. Note that files already in the library won’t be moved to OneDrive — you’ll have to open the library and move them between folders to move them to your OneDrive storage.
Change Your Save Location in Each Program
Many programs have their own options for where to save files by default. If an individual program isn’t saving files to OneDrive by default, open its options and look for a “Default Save Location”-type option to change. Office 2013 saves your files to OneDrive by default, so you won’t need to do anything for it.
Note that you may not have to adjust this option if you moved one of your user data folders to OneDrive. For example, if you moved your Documents folder to OneDrive, programs that attempt to save to your standard Documents folder will automatically save to OneDrive.
Link Other Folders to OneDrive
OneDrive no longer supports symbolic links on Windows 8.1, so you can’t create a link to an external folder inside your OneDrive folder and have OneDrive automatically sync that folder. OneDrive will only sync files and folders located within in the OneDrive folder itself.
Luckily, there’s still a trick that works for programs that insist on saving their files to a specific location outside your OneDrive folder. Follow our guide to syncing any folder with OneDrive on Windows 8.1 if you need to synchronize any folder or file outside your OneDrive folder.
Microsoft wants people to save their files to OneDrive instead of local storage, so expect them to make this even easier in future versions of Windows. For now, it’s easy to automatically save files to your cloud storage service of choice with a few tweaks.
Having the ability to store your personal documents, pictures, videos and music on a separate hard drive on a computer is a very useful feature in Windows. Hard drives have dropped in price significantly over the last several years and so it makes for an inexpensive upgrade in the long run.
The idea of keeping your personal files separate from the hard drive that contains your operating system also means a crash of that OS drive does not also take out your personal files.
Of course, using a feature like this does not eliminate the need for backups – you never want to realize that a backup is necessary when you actually need one – so always have a backup.
So anyway, in Windows 10 there is an easy way to change the default save locations for your files under Settings>System>Storage.
Just search from the Start Menu for “default save locations” and then click/tap the top search result:
That will open the settings page for the system storage and default save locations:
The top half of the page shows the connected hard drives on your system and below it you can use the drop down menu to select a new storage location for your personal files.
You can choose just one of them or all of them although only saving certain types to the secondary hard drive defeats the purpose of saving files on a separate hard drive.
As you can see below each category of files has a drop down menu with the storage locations listed. Just select the one you want to use.
What happens when you select a new storage drive is a new folder is created based on your Windows 10 user name. This is the one used by the OS for your user directory, in my case it is richa, then sub folders are created under that directory. They are labeled Documents, Pictures, Videos or Music (based on your selections).
No files are moved or merged using this settings dialog in the Windows 10 Settings app.
That is very different in Windows 10 compared to past versions of Windows. In those past versions of Windows we used to move files in special folders like these using the File Folder properties dialog shown below.
Using this dialog to change the location of these folders will prompt you to move/merge the files into their new location which is convenient and desired for good file management.
Unfortunately, the change default save locations in Windows 10 does not prompt you to move the files from one location to the other. This means you can end up with files in two different locations. Personal documents in two different locations is not helpful at all and quite messy.
Fortunately, the File Folder Properties option is still available in Windows 10 as shown above and, as I mentioned earlier, that will ask about moving your files.
Did I mention making sure your files were always backed up on matter where you store them?
Question
Answers
As you may have known, this OneDrive feature is integrated in Windows 8.1, which can’t be realized as OneDrive for Business. We use OneDrive for Business in Windows as a component of Office suite, but it’s not a build-in feature of Windows 8.1.
Forum Support
Come back and mark the replies as answers if they help and unmark them if they provide no help.
If you have any feedback on our support, please click here
- Marked as answer by Brian Hoyt Wednesday, May 21, 2014 4:58 PM
All replies
As you may have known, this OneDrive feature is integrated in Windows 8.1, which can’t be realized as OneDrive for Business. We use OneDrive for Business in Windows as a component of Office suite, but it’s not a build-in feature of Windows 8.1.
Forum Support
Come back and mark the replies as answers if they help and unmark them if they provide no help.
If you have any feedback on our support, please click here
- Marked as answer by Brian Hoyt Wednesday, May 21, 2014 4:58 PM
I’m sorry if this brings you any inconvenience, please be assured our products will always be improved via users’ needs, Microsoft always keeps making the products easier to use.
Forum Support
Come back and mark the replies as answers if they help and unmark them if they provide no help.
If you have any feedback on our support, please click here
- Edited by Melon Chen Microsoft contingent staff Thursday, May 22, 2014 8:18 AM modify
It is not a perfect solution, but I find that it is one that works well enough for what I need. Give this a try and see if it meets your needs.
- Setup your OneDrive for business to sync with your local computer
(this will create a local copy of your OneDrive files) - Right click on that drive and copy the address
- Right click on Documents and select Properties
- Change the location to the address you copied for your local copy of OneDrive for business
Now whenever you save a file to Documents, it will save it to your local copy of OneDrive, which will automatically syncs with your OneDrive for business in the cloud.
PS. Make sure you turn off OneDrive for Windows 8.1 as the default location in your PC Settings.
Windows 8.1 integrates OneDrive (formerly SkyDrive) everywhere, even on the desktop. You may want to save all your personal files to OneDrive so they�ll be accessible everywhere, but Windows doesn�t always save to OneDrive by default.
We�ll walk you through setting things up so you can more easily save to OneDrive and won�t accidentally save your important files to your local storage. These tips could also be used to save files to Dropbox, Google Drive, or another cloud storage service.
Move Folders From This PC to OneDrive
By default, programs will save many files to the folders under This PC in File Explorer � that is, the Documents, Music, Pictures, and Videos folders. You can move these folders to your OneDrive folder and Windows will continue to display them under This PC. Files you save to these folders under This PC will automatically be saved to your OneDrive storage. You can�t just drag and drop the folders to your OneDrive folder, however � you have to move them in a special way.
To do this, open File Explorer and right-click one of your user data folders under This PC � the Documents folder, for example. Select Properties in the menu. Click the Location tab in the Properties window, click the Move button, and choose a new location for the folder inside your OneDrive account. You may need to create a new folder inside OneDrive for the folder. For example, below we�re moving the Documents folder under This PC to the Documents folder inside our OneDrive account. Click the OK button and Windows will move the folder and the files in it to OneDrive.
You�ll have to repeat this process for each folder you want to move. You may want to skip some folders � for example, you probably don�t want to move your Downloads folder to OneDrive, as it�s a temporary location for downloads, and you don�t want to upload each file you download.
If you have other Windows 8.1 PCs, repeat this process on each of them and the user data folders under This PC will be kept in sync between your PCs and your OneDrive storage.
Point Your Libraries at OneDrive
This second trick is somewhat redundant if you�ve used the above trick. Libraries are apparently being phased out of Windows � they�re now hidden by default in Windows 8.1 � even though many �Store apps� still depend on them. With some tweaking to your libraries, files you save to your Documents, Pictures, Music, or Videos libraries will be automatically saved to OneDrive. This method also allows you to split your files between OneDrive and your local storage. You could have some files in the library saved to a local folder and some saved to your cloud storage.
To do this, you�ll first need to show the hidden libraries in File Explorer. In File Explorer, click the View tab on the ribbon, click the Navigation pane button, and enable the Show libraries checkbox.
Libraries will appear in File Explorer�s navigation pane. Right-click one of the libraries and select Properties. Click the Add button to add a new folder and select a folder in your OneDrive folder. You may need to create a new folder in OneDrive for this. Add that folder to the library, then select it and click Set save location. Files you save to the library will now automatically be saved to the folder on OneDrive and synchronized across your computers.
Repeat this process on each of your computers and the files in your OneDrive account will show up in your libraries. Note that files already in the library won�t be moved to OneDrive � you�ll have to open the library and move them between folders to move them to your OneDrive storage.
Change Your Save Location in Each Program
Many programs have their own options for where to save files by default. If an individual program isn�t saving files to OneDrive by default, open its options and look for a �Default Save Location�-type option to change. Office 2013 saves your files to OneDrive by default, so you won�t need to do anything for it.
Note that you may not have to adjust this option if you moved one of your user data folders to OneDrive. For example, if you moved your Documents folder to OneDrive, programs that attempt to save to your standard Documents folder will automatically save to OneDrive.
Link Other Folders to OneDrive
OneDrive no longer supports symbolic links on Windows 8.1, so you can�t create a link to an external folder inside your OneDrive folder and have OneDrive automatically sync that folder. OneDrive will only sync files and folders located within in the OneDrive folder itself.
Luckily, there�s still a trick that works for programs that insist on saving their files to a specific location outside your OneDrive folder. Follow our guide to syncing any folder with OneDrive on Windows 8.1 if you need to synchronize any folder or file outside your OneDrive folder.
Microsoft wants people to save their files to OneDrive instead of local storage, so expect them to make this even easier in future versions of Windows. For now, it�s easy to automatically save files to your cloud storage service of choice with a few tweaks.
Productivity apps, 1 TB of OneDrive, and advanced security.
While you can always choose where to save files that you create, your computer settings include default save locations for your Desktop, Documents, and Pictures files.
During Windows 10 setup, you should have seen a “Back up your files with OneDrive” screen telling you about the benefits of saving your files to OneDrive. (Before July 2019, the screen said, “Protect your files with OneDrive.”) If you clicked Next, you set up OneDrive as your default save location. If you clicked the “Only save files to this PC” option, you set up your PC as the default save location. You can change this default save location any time.
Whether you save by default to your computer or to OneDrive, all your files are available on your PC. The OneDrive app built in to Windows 10 synchronizes your files between OneDrive and your computer, so they’re backed up, protected, and available on any device. You can use Files On-Demand to free up space or to make sure files or folders are always available on your device, even when you’re offline.
Tip: To move a file between a folder in your PC and a folder in OneDrive, use File Explorer or the OneDrive app to drag the files where you want them.
Set where your files are saved
You can change your default save setting any time. If you want to change where your files are saved by default, use the OneDrive app settings below. If you want to move your entire OneDrive to a different location (e.g., an external drive), see Change the location of your OneDrive folder.
Select the OneDrive cloud icon in the notification area, at the far right of the taskbar.
Note: You might need to click the Show hidden icons arrow next to the notification area to see the OneDrive icon. If the icon doesn’t appear in the notification area, OneDrive might not be running. Select Start, type OneDrive in the search box, and then select OneDrive in the search results.
Select Help & Settings > Settings.
On the Backup tab, under Important PC Folders, select Manage backup and follow the instructions to back up your Documents, Pictures, and Desktop folders with OneDrive.
No matter which default setting you choose, you still can select the save location you want each time you save a file. When you click Save for new files or Save As for existing files, click OneDrive or This PC and then pick a folder to save your file to.
Important: If you stop protecting a folder, that folder on your PC may suddenly look empty. This is because the Desktop, Documents, and Pictures folders exist both under This PC and OneDrive, which might make them easy to mix up. When you stop protecting a folder, existing files stay in OneDrive and new files save to your PC.
Need more help?
Get online help
See more support pages for OneDrive and OneDrive for work or school.
For the OneDrive mobile app, see Troubleshoot OneDrive mobile app problems.
Contact Support
If you still need help, contact support through your browser or shake your mobile device while you’re in the OneDrive app.
Got feedback?
OneDrive UserVoice is your place to suggest the features you’d like to see us add to OneDrive. While we can’t guarantee any specific features or timelines, we will respond to every suggestion that gets at least 500 votes.
By default, programs will save many files to the folders under This PC in File Explorer — that is, the Documents, Music, Pictures, and Videos folders. You can move these folders to your OneDrive folder and Windows will continue to display them under This PC. Files you save to these folders under This PC will automatically be saved to your OneDrive storage. You can’t just drag and drop the folders to your OneDrive folder, however — you have to move them in a special way.
To do this, open File Explorer and right-click one of your user data folders under This PC — the Documents folder, for example. Select Properties in the menu. Click the Location tab in the Properties window, click the Move button, and choose a new location for the folder inside your OneDrive account. You may need to create a new folder inside OneDrive for the folder. For example, below we’re moving the Documents folder under This PC to the Documents folder inside our OneDrive account. Click the OK button and Windows will move the folder and the files in it to OneDrive.
You’ll have to repeat this process for each folder you want to move. You may want to skip some folders — for example, you probably don’t want to move your Downloads folder to OneDrive, as it’s a temporary location for downloads, and you don’t want to upload each file you download.
If you have other Windows 8.1 PCs, repeat this process on each of them and the user data folders under This PC will be kept in sync between your PCs and your OneDrive storage.
Point Your Libraries at OneDrive
This second trick is somewhat redundant if you’ve used the above trick. Libraries are apparently being phased out of Windows — they’re now hidden by default in Windows 8.1 — even though many “Store apps” still depend on them. With some tweaking to your libraries, files you save to your Documents, Pictures, Music, or Videos libraries will be automatically saved to OneDrive. This method also allows you to split your files between OneDrive and your local storage. You could have some files in the library saved to a local folder and some saved to your cloud storage.
To do this, you’ll first need to show the hidden libraries in File Explorer. In File Explorer, click the View tab on the ribbon, click the Navigation pane button, and enable the Show libraries checkbox.
Libraries will appear in File Explorer’s navigation pane. Right-click one of the libraries and select Properties. Click the Add button to add a new folder and select a folder in your OneDrive folder. You may need to create a new folder in OneDrive for this. Add that folder to the library, then select it and click Set save location. Files you save to the library will now automatically be saved to the folder on OneDrive and synchronized across your computers.
Repeat this process on each of your computers and the files in your OneDrive account will show up in your libraries. Note that files already in the library won’t be moved to OneDrive — you’ll have to open the library and move them between folders to move them to your OneDrive storage.
Change Your Save Location in Each Program
Many programs have their own options for where to save files by default. If an individual program isn’t saving files to OneDrive by default, open its options and look for a “Default Save Location”-type option to change. Office 2013 saves your files to OneDrive by default, so you won’t need to do anything for it.
Note that you may not have to adjust this option if you moved one of your user data folders to OneDrive. For example, if you moved your Documents folder to OneDrive, programs that attempt to save to your standard Documents folder will automatically save to OneDrive.
Link Other Folders to OneDrive
OneDrive no longer supports symbolic links on Windows 8.1, so you can’t create a link to an external folder inside your OneDrive folder and have OneDrive automatically sync that folder. OneDrive will only sync files and folders located within in the OneDrive folder itself.
Luckily, there’s still a trick that works for programs that insist on saving their files to a specific location outside your OneDrive folder. Follow our guide to syncing any folder with OneDrive on Windows 8.1 if you need to synchronize any folder or file outside your OneDrive folder.
Microsoft wants people to save their files to OneDrive instead of local storage, so expect them to make this even easier in future versions of Windows. For now, it’s easy to automatically save files to your cloud storage service of choice with a few tweaks.
SkyDrive is now called OneDrive instead.
OneDrive is a cloud-based storage service where you can view, browse, upload, and share the files you saved online to OneDrive.com. When you save files to OneDrive, the files are automatically available to access or share from any device, even if something happens to your PC.
This tutorial will show you how to turn on or off having documents that are saved to your Documents library automatically saved to OneDrive by default instead in Windows 8.1 or Windows RT 8.1.
When you turn on having your documents saved to OneDrive, Windows will automatically set your “C:\Users\(user-name)\OneDrive\Documents” folder as the default save location for your Documents library.
When you turn off having your documents saved to OneDrive, Windows will automatically set whatever folder you had set prior as the default save location again for your Documents library.
1. Open PC settings, and click/tap on OneDrive on the left side. (see screenshot below)
5. When finished, you can close PC settings if you like.
Attachments
Brink
- Messages 24,705
- Reaction score 843
- Points 113
Wotan
New Member
- Jan 13, 2014
My Computer
System One
Brink
Administrator
- Jan 13, 2014
Hello Wotan, and welcome to Eight Forums.
No worries. If you’re not signed into Windows 8.1 with a Microsoft account, then nothing is being saved to SkyDrive since you must be signed in with a Microsoft account for the integrated SkyDrive to work.
My Computer
System One
Wotan
New Member
- Jan 16, 2014
Hello Wotan, and welcome to Eight Forums.
No worries. If you’re not signed into Windows 8.1 with a Microsoft account, then nothing is being saved to SkyDrive since you must be signed in with a Microsoft account for the integrated SkyDrive to work.
Thanks, Brink. That’s good to know. What I noticed is that I go to save some downloaded file, and the default save location is a SkyDrive folder. I fiddled with some settings, but haven’t tested it yet to see if my preference will be honored.
Nice icon, BTW. Am a UFO buff myself
My Computer
System One
Brink
Administrator
- Jan 16, 2014
Setting the Documents library like in the blue Note box at the top of the tutorial to the default save locations you want should work for this.
To bad there’s not many decent UFO shows on TV anymore.
My Computer
System One
bmax1985
New Member
- Mar 7, 2014
This keeps getting turned back on. Very annoying.
Any way how to permanently stop it as indicated above but not break SkyDrive as I use it to manually put files there?
My Computer
System One
Brink
Administrator
- Mar 7, 2014
I’ve noticed that as well. I believe that removing the “C:\Users\(user-name)\SkyDrive\Documents” from the Documents library may help, but I just recently tested this and it hasn’t been long enough to see if it stops it from being turned back on yet. You might give it a try to see as well.
My Computer
System One
FunkyB
New Member
- Jan 12, 2015
“Save document to OneDrive by default” keeps getting silently turned back on every time Windows updates are installed. It’s causing me a lot of trouble and nothing I’ve tried has stopped it, until now (hopefully). However there is a related thread about disabling OneDrive integration entirely and that gave me a hint. Here’s what I’ve done which seems to work, although I won’t know for sure until the next round of updates. Note that I have my OneDrive\Documents folder included in Libraries > Documents (not sure if that makes a difference.)
1. As described at the top of this thread, open PC Settings > One Drive > File Storage, and turn ON “Save Documents to OneDrive by default” (no, that’s not a typo; this did not work with it OFF to begin with).
2. Run gpedit.msc
3. Navigate to Administrative Templates > Windows Components > OneDrive
4. Double click “Save Documents to OneDrive by default”
5. Set it to “Disabled”, click Apply, click OK, close gpedit
6. Set the default save location for the Documents Library to your local Documents folder. (To keep this short, I’ll assume everyone knows how to do that.) NOTE: This will cause “Save Documents to OneDrive by default” in PC Settings to be turned Off. (Not sure if this step is actually needed.)
7. Restart
Now, regardless of whether “Save Documents to OneDrive by default” in PC Settings is set On or Off, when you go to actually save a file, you should be directed to your local Documents folder. To test, I actually turned that setting back on in PC settings, and although it made OneDrive show a green check as the default Save location for the Documents library (appeared to reverse #5), that seems to be ignored and I am always taken my local Documents folder be default.
I hope this sticks through the next Windows Update, but if all the updates do are turn on the setting in PC Settings, then I should be OK.


