@agiledoc
Apr 9, 2020, 11:23 am EST | 1 min read
Outlook Online has a Snooze function, just like Gmail. Use it to move items out of your inbox until you’re ready to deal with them and stop your inbox from filling up with emails you don’t need right now.
Gmail’s Snooze option was one of those new functions that was so obvious in hindsight that you wonder why no one did it sooner. You select an email, choose a snooze time, and it disappears out of your inbox, only to reappear as if by magic at the required time. Brilliant!
Obviously, Microsoft thought so, too, because the company has added its own version of Snooze to Outlook Online. If you’re used to Gmail’s Snooze, the good news is that Outlook’s version works in pretty much the same way, except it uses folders rather than labels. Let’s take a look.
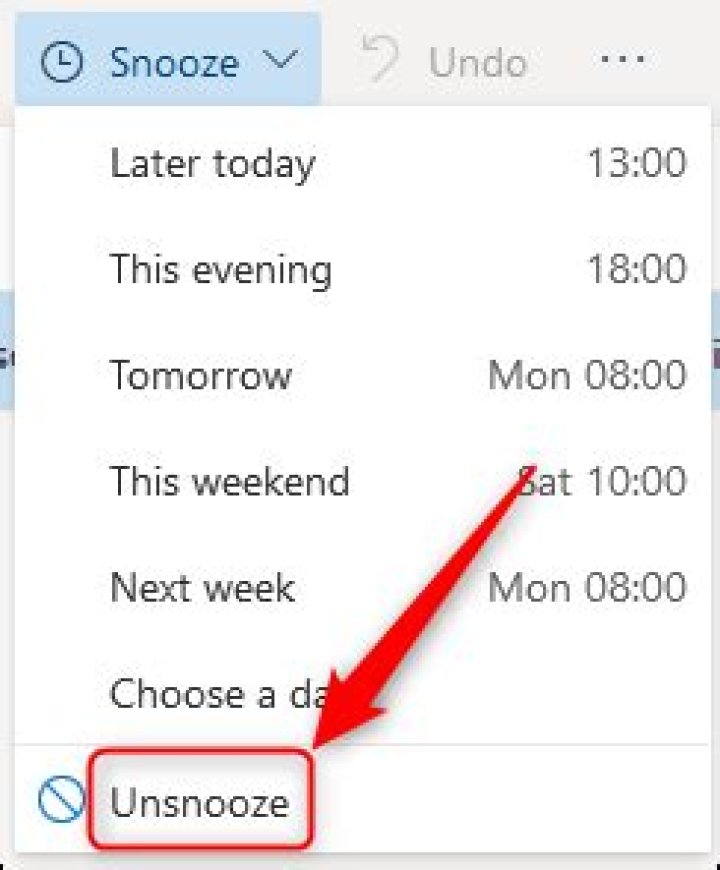
You can find the Snooze option on Outlook Online’s toolbar above the Inbox.
Snooze only works in the Inbox, so if you have an email elsewhere that you want to snooze, either move it to the Inbox in Outlook Online or mark it for Follow Up in the Outlook client instead.
Once you have selected an email, click the “Snooze” button to choose when you want the message to reappear.
The default times can’t be changed, so if none of them are suitable for you, select the “Choose A Date” option.
Choose the date and time that you want the email to reappear and then click the “Save” button.
Once you’ve chosen either a default or a custom snooze time, the email will be moved to a new folder called “Scheduled”.
When the snooze time comes around, the email will automatically be moved back into your Inbox and marked as Unread.
If you want to deal with it before then, open the “Scheduled” folder, select the snoozed email, and then click the “Unsnooze” button.
This will remove the snooze reminder, move the email straight back to the Inbox, and mark it as Unread.
That’s email snoozing, Outlook-style. Well, Gmail-style done pretty much identically on Outlook Online, at any rate.
Outlook Online has a Snooze function, just like Gmail. Use it to move items out of your inbox until you’re ready to deal with them and stop your inbox from filling up with emails you don’t need right now.
Gmail’s Snooze option was one of those new functions that was so obvious in hindsight that you wonder why no one did it sooner. You select an email, choose a snooze time, and it disappears out of your inbox, only to reappear as if by magic at the required time. Brilliant!
Obviously, Microsoft thought so, too, because the company has added its own version of Snooze to Outlook Online. If you’re used to Gmail’s Snooze, the good news is that Outlook’s version works in pretty much the same way, except it uses folders rather than labels. Let’s take a look.
You can find the Snooze option on Outlook Online’s toolbar above the Inbox.
Snooze only works in the Inbox, so if you have an email elsewhere that you want to snooze, either move it to the Inbox in Outlook Online or mark it for Follow Up in the Outlook client instead.
Once you have selected an email, click the “Snooze” button to choose when you want the message to reappear.
The default times can’t be changed, so if none of them are suitable for you, select the “Choose A Date” option.
Choose the date and time that you want the email to reappear and then click the “Save” button.
Once you’ve chosen either a default or a custom snooze time, the email will be moved to a new folder called “Scheduled”.
When the snooze time comes around, the email will automatically be moved back into your Inbox and marked as Unread.
If you want to deal with it before then, open the “Scheduled” folder, select the snoozed email, and then click the “Unsnooze” button.
This will remove the snooze reminder, move the email straight back to the Inbox, and mark it as Unread.
That’s email snoozing, Outlook-style. Well, Gmail-style done pretty much identically on Outlook Online, at any rate.
SnoozeIt functionality has been integrated into SimplyFile.
If you have an existing license for SnoozeIt,
you can download the installer here.
Manage ToDos right in
your Outlook Inbox
Do you keep emails that require follow up in your Inbox?
Do you miss important items because they have scrolled out of view?
Focus on what’s important! Don’t lose it – SnoozeIt!
If you need to act on a message in the future, you can “snooze it”. The message will be hidden from the Inbox until the time you specify. This allows you to keep very few messages in the Inbox at any given time, so you can see what is important to work on right now.
Hide messages until you are ready to deal with them
Keep your Inbox small, so you can see what is important
Do not miss important ToDos
Schedule follow ups on sent messages
Preset and configurable snooze intervals
Many unsnooze notification options
” After using the Mailbox app on my phone, I grew accustom to snoozing my inbox. I decided to search for a tool that offered the same functionality. I tried a competing product and it was a mess setting up and wasn’t very user friendly. I already use TwInbox, so when I saw your product, I knew it would work well. I downloaded the trial and have been using it for the past month. So far I have no complaints. This product was exactly what I was looking for.” – Quinn E.
“I use it to save my life. I cant keep track of everything I have going on by just relying on my own brain. SnoozeIt lets me bring conversations, projects, and information back into my awareness when I need it. This is why I can sleep at night, keep my vitals from exploding, and live a productive life.” – Chris S.
If you’re using Outlook to access your Office 365 email account or another Exchange-based email account, and you’re having problems, we want to get you back to sending and receiving email as quickly as possible.
If you’re looking for help with Outlook.com, check out Help for Outlook.com. > If you’re looking for help with Outlook for Mac, check out Outlook 2016 for Mac Help.
Let us fix your Outlook connection problems for you
We can diagnose and fix several common Outlook connectivity issues for you. If our automated tool can’t fix your issue, or you’d like to fix it yourself, see the next section.
| Let us fix your issue Support and Recovery Assistant for Office 365 | Need more help? Contact support for business products – Admin Help. |
Fix software update and profile issues
Out-of-date software and corrupted Outlook profiles are two of the most common issues that can prevent you from sending and receiving email. If you’re an admin with multiple users reporting problems, you also should check for service issues with Office 365.
@agiledoc
Mar 8, 2020, 8:30 am EST | 3 min read
One of Outlook’s most useful and least-understood options is Follow Up, the program’s email reminder tool. If you struggle to remember to answer emails after they’re no longer on the front page of your inbox, this tool is for you.
Follow Up reminds you about emails on a date of your choosing and adds them to your Outlook task list. When you’ve dealt with the reminder and mark them as completed, they disappear from your task list. It’s simple, quick, efficient, and easy to use.
To get started, select an email in Outlook, and then click Home > Follow Up (it’s in the “Tags” group).
In the drop-down menu, select the date on which you want a follow-up on the email. Microsoft offers several quick actions, including “Today,” “Tomorrow,” or “Next Week.” However, you can also click “Custom” to select a date.
The email is then highlighted in yellow, so that you can tell in a glance which messages are marked for a follow-up. It also adds the email to your Outlook task list.
This is called “adding a flag” to an email. Once you’ve done this, you can move the email to any other folder, like your Archive, and it will remain visible in your task list—just double-click it to open it.
By default, Outlook reminds you about the email on the day you selected. However, if you want to choose the exact date and time of the reminder, head to Home > Follow Up again, and then select “Add Reminder.”
This opens the “Custom” panel, where you can change the name of the flag, the Start and Due dates, and the Reminder date and time.
You can also click Home > Follow Up, and then select “Custom” to access the panel.
The first option, “Flag to,” is the name of the flag you’re giving the email. This appears at the top of the message as an information tip. In this case, it displays “Follow Up,” which is the default name, Start, and Due Date.
You can select a different flag name from the drop-down menu or type your own.
We changed the flag name to “Review,” and the information tip changed accordingly.
If you want to change the date you’ll follow-up on the email, you can change the “Start Date” and “Due Date” values.
By default, Outlook tasks work based on the “Due Date,” so when you set one, that determines when the email shows up in your task list.
You can also set the date and time you want a pop-up reminder. By default, Outlook uses the default reminder alert noise, but you can change that, too, if you want.
When you’re done, click “OK” to close the Custom panel.
If you use Follow Up a lot, you might also like the Quick Click option. This allows you to click an email once and add a default flag. If you haven’t yet changed the default options in Outlook, hover over an email until you see the Quick Action buttons on the right—one of these will be a Follow-Up flag.
If you don’t see this option, check out our guide on Quick Actions to add it. When you click the Quick Action button, it marks the email for a follow-up “Today” by default.
You can head to Home > Follow Up, and then select “Set Quick Click” to change this setting.
In the drop-down menu, select the default date you want the Quick Action button to use, and then click “OK.”
Now, when you hover over an email and click the Follow Up flag in Quick Actions, it will automatically use the date you selected. This is really useful if you’re running through emails at the end of the day to remind yourself to deal with them later.
When you’re done with an email, click Home > Follow Up, and then select either “Mark Complete” or “Clear Flag.”
“Mark Complete” marks the task as done and removes it from the visible task list, while “Clear Flag” deletes the task. Either one works, but we like “Mark Complete” because it’s like ticking something off a to-do list.
Now you’re ready to use the Follow Up flag!
A shared mailbox makes it easy for a group of people to monitor and send email from a public email address, like [email protected] When a person in the group replies to a message sent to the shared mailbox, the reply appears to come from the shared address, not from the individual person. You can also use the shared mailbox as a shared team calendar.
Tip: Before you can use a shared mailbox, the Microsoft 365 admin for your organization has to create it and add you as a member. For more information, ask your admin to see Create a shared mailbox, which describes what the admin needs to do.
If you want to monitor the email from your primary mailbox and the shared mailbox at the same time, use this method. After you complete this task, the shared mailbox and its folders are displayed in the left navigation pane each time you open Outlook on the web.
Sign in to your account in Outlook on the web.
For Exchange Online mailboxes, right-click Folders in the left navigation pane, and then choose Add shared folder. For Exchange on-premises mailboxes, right-click the name of your primary mailbox (such as Molly Dempsey) in the left navigation pane, and then choose Add shared folder.
In the Add shared folder dialog box, type the name or email address of someone who has shared a mailbox with you, and then click Add. Or, type the name of the shared mailbox you are a member of, such as [email protected]
The shared mailbox displays in your Folder list in Outlook on the web. You can expand or collapse the shared mailbox folders as you can with your primary mailbox. You also can remove the shared mailbox from your Folder list. To remove it, right-click the shared mailbox, and then click Remove shared folder.
To receive notifications of new messages in the Inbox of a shared mailbox, you must open the shared mailbox in a separate browser window.
Use this method if you want to view and manage the email for the shared mailbox in its own browser window. This method also lets you receive notifications of new items in the Inbox of the shared mailbox.
Sign in to your account in Outlook on the web.
On the Outlook on the web navigation bar, click your name. A list appears.
Click Open another mailbox.
Type the email address of the other mailbox that you want to open, and then click Open. Another Outlook on the web session opens in a separate window, allowing access to the other mailbox.
Tip: If you mistype the email address of the mailbox, the result is “No match was found”. Try typing the email address again.
Choose New mail above the folder list. A new message form opens in the reading pane.
At the top of the message, choose > Show From.
This option shows you that the people who receive the email message will see it comes from the shared mailbox and not from your own email account.
The first time you use the shared mailbox, you need to add the address to the options available in the From drop-down list:
Right-click the From address and choose Remove.
Type the shared address. The next time you reply from the shared mailbox, its address will appear as an option in the From drop-down list.
To add recipients, type the name of anyone who is in your contacts folder or organization’s address list, or type the email address in the To or Cc box. The first time you enter a person’s name, Outlook on the web searches for that person’s address. In the future, the name is cached so it resolves quickly.
Type the message you want to send.
When your message is ready to go, click Send.
The first time you reply to a message sent to the shared mailbox, you need to add the shared address to the From drop-down box. Here’s how to do that:
Open Outlook on the web and go to your shared mailbox.
Open a message that was sent to the shared address.
At the top of the message, choose > Show From.
Right-click the From address and choose Remove.
Type the shared address and send the message. The next time you reply from the shared mailbox, its address will appear as an option in the From drop-down list.
One of the great things about using a shared mailbox is that anyone who has access to the shared mailbox also has full access to the calendar. You can create, edit, and delete events in the calendar. Use the shared calendar just as you would use your own calendar. Here’s a short list of things you can do with the shared mailbox calendar:
Let your team know when you’re going on vacation or when you’ll be out of the office.
Create a team meeting.
Edit a calendar event that someone else created.
Cancel a meeting that someone else created.
To access the shared calendar, do the following:
Sign in to your mailbox using Outlook on the web, and then select Calendar.
Right-click Other Calendars, and then click Open calendar.
In From directory, search for the shared calendar you want to open. Select the shared mailbox you want to open, and then click Open.
The shared calendar displays in your Calendar folder list.
To access a shared mailbox on a mobile device, open your browser, sign in to Microsoft 365, and then go to Outlook on the web. From Outlook on the web, you can access the shared mailbox.
You can’t access the shared mailbox from the Outlook app that’s installed on the mobile device. Do you want this feature? Let the Outlook Engineering team know. Vote here!
Only your Microsoft 365 admin has permissions to set up the ability to send automatic replies from a shared mailbox. For instructions, ask your admin to see Create a shared mailbox.
@agiledoc
Oct 4, 2018, 10:24 am EST | 1 min read
Whether you are trying to decide what type of pizza to order for a meeting or taking a vote on something more important, a poll makes it easy. Lots of tools provide this ability, from a simple poll in Slack to a full-blown SurveyMonkey questionnaire. Outlook’s voting buttons provide a simple and easy way to poll people if they’re all in your Outlook contacts.
When you compose a new email in Outlook, switch over to the “Options” tab and click the “Use Voting Buttons” drop-down menu.
If one of the default options meets your need, click it to add it to your open message.
If the defaults aren’t what you need, click “Custom” to bring up the Properties window for the message. The “Use Voting Buttons” option is already selected (because you opened the window from that menu), so just type in the answers you want to appear in the field, separated by semicolons.
Click Close and the voting options will be added to the mail, along with a message above the “To” field.
That’s all there is to it. Send the mail to your voters, and they will see a message advising them to respond by using the vote button.
After the recipient has made their choice a box pops up verifying the poll response and gives them an option to add additional information in their response.
When you receive the response, it will contain a message telling you how they voted.
Keeping track of the individual responses isn’t much fun though, so Outlook keeps a running tally for you. Open the original mail that you sent and click Message > Tracking. There’s a list of the responses and a total for each of the options.
This isn’t the flashiest poll solution, but sometimes you don’t need flashy. If you just need a quick vote from your Outlook contacts, then it’s a solid choice that doesn’t require your voters to log in to another tool or navigate yet another web interface.
@agiledoc
Oct 30, 2018, 9:00 am EST | 2 min read
Some people like to keep their Outlook folders perfectly controlled, with emails neatly categorized and stored in a logical, minimal folder structure. Most of us aren’t like that, so Microsoft has provided tools to help. One of these tools is the little-known Conversation Cleanup tool, which deletes or moves redundant emails from a conversation. Here’s how it works.
You can run the Conversation Clean Up tool against a single conversation, a folder, or a folder and all of its sub-folders. It looks for emails that are redundant, which mean those that are included in full in another message in the conversation. It then deletes (by default) or moves these emails to another folder, depending on how you’ve set it up. This helps keep your mailbox from being filled with multiple copies of the same message.
First, you need to set the Conversation Clean Up parameters. Head to File > Options > Mail and then scroll down to the “Conversation Clean Up” section.
By default, Conversation Cleanup deletes items, but if you want to move redundant items to a folder instead, you can click “Browse” and choose the folder to which you want to move them. This is handy if you want to double-check for yourself that the messages the tool finds really are redundant. The Conversation Cleanup tool is reliable in our experience, but sometimes there’s no substitute for checking things yourself.
You can probably leave the other default options as they are because they make a lot of sense, but if your situation or preferences are different, go ahead and switch the parameters on or off as you see fit. Once you’ve got the settings the way you want, click “OK” to go back to Outlook.
Now, you need to open the tool. On the “Home” tab, click the “Clean Up” button. The drop-down menu gives you the option to clean up the conversation that’s currently selected in the folder, the whole folder, or the whole folder and all of the sub-folders.
You can also access this menu by clicking Folder > Clean Up Folder if you don’t need the “Clean Up Conversation” option.
We’ll go with “Clean Up Folder” for now, but the process is the same whether you clean up a conversation, a folder, or a folder and its sub-folders. And for a one-click option, you can always right-click a folder in the Navigation pane and select “Clean Up Folder.”
The first time you run this tool, a warning pops up, giving you the option to change the settings, run the tool, or cancel the operation.
If you want the tool to run without seeing this popup, enable the “Don’t show this message again” option.
Click “Clean Up Folder” to run the tool (if you switched on the “Don’t show this message again” option then from this time onwards the tool will run as soon as you select it). When the tool is running, which can take a little while if you’re running it for the first time on a folder with a lot of messages, a status notice appears in the bar at the bottom of Outlook.
You can keep using Outlook while this is running. Once the status notice disappears, the tool has finished. It won’t tell you that it’s finished—the tool is designed to run in the background to help you, not bombard you with messages—but it will tell you if it can’t find any messages to clean up.
That’s all there is to it. When we ran this tool on an example folder containing 2487 emails, it found 502 mails that could be deleted. Over a fifth of the emails in the folder was redundant, so it’s an eye-opener and a tool worth using if you’re running out of space or tired of wading through conversations.
Sponsored by
Save New Contacts to iCloud Contacts
Although you can’t save new contacts directly in the iCloud contacts folder unless you select the iCloud Contacts folder before opening the new Contact form, there are a couple of options available to move new contacts to the iCloud.
Outlook iCloud Error 0x800706ba
When setting up iCloud to sync with Outlook, you may receive the following error message: “Your configuration could not be started due to an unknown error. (0x800706ba)”.
Using Yahoo and AOL accounts in Outlook
Update: Yahoo began upgrading user accounts earlier this year to require an app password if the email client did not support oAuth2 with their servers. On October 20 2020, all Yahoo accounts will be required to use an app password if the email client does not support oAuth2 to their servers. If you are using
Insert Emoji using VBA
The user wanted to know how to insert an emoji using VBA: Is there a way to create a VBA code to paste an emoji. For example, Unicode 128123? :ghost: I want to insert the text where ever my cursor currently is. Sure, you can do that using VBA. You’ll need to use the Word
Create a Contact Group to quickly send email to a multiple people
How to create a Microsoft Outlook contact group or distribution list to send messages to a group of people.
Outlook error: Something is wrong with your data files
After update Office, every time you open Outlook, you receive an error message: Something is wrong with one of your data files and Outlook needs to close. Outlook might be able to fix your file. Click OK to run the Inbox Repair Tool.
Outlook Windows Store Registry
How to find and export or edit the registry files used by the Office 365 Windows store version.
Fixed: Outlook 365: From field is blank
In Outlook 365 the From field is blank. You are also unable to change signature assignments in the Signatures dialog after upgrade from version 2002 (12527.20194) to version 2003 (12624.20176).
Daylight Saving Time Calendar Display Bugs
When you the week starts on the Sunday Daylight time starts, appointments may appear at the wrong time in the week view.
Change Insight’s Focus Time Appointments
Add categories and change to Tentative the Focus Time appointments created by the Insights feature of Office 365 Exchange Online.
Outlook command lines using /m switch fail
Changes to Outlook version 2001 (Build 12430.20184) break the command line switch /m.
Enable Automatic Replies (OOF) using a macro
How to use a macro to set up an Automatic reply (out of office reply) in Outlook on Windows desktop.
Clean up the Junk Email folder
How to use Rules or a macro to clear spam from Outlook’s Junk Email folder.
Make ‘Today’ stand out more in the calendar
How to change the calendar color or use conditional formatting rules to highlight appointments starting today to make ‘Today” more visible on your Outlook calendar.
Use VBA to Scan to Email
How to scan a document or image and attach or embed into an Outlook email using VBA and the Windows Image Acquisition Library (WIA).
View Read Receipt Request Indicator
All current versions of Outlook include a Read Receipt field, including Outlook 2010, 2013, 2016/2019/365. To see the Read Receipt indicator, you need to customize the view by adding the Receipt Requested field. For best results, you will need to use the Single Line view to see the read request field. To add the field
Delete folders using a macro or PowerShell
Use an Outlook macro or PowerShell script to bulk delete folders from Outlook.


