Last week, Microsoft did away with Equation Editor, a tool that has been part of Microsoft Office for over 17 years.
The reason behind the move? A remote code execution vulnerability actively exploited in the wild.
About Equation Editor
Equation Editor is a (mathematical) formula editor that allows users to construct math and science equations in a WYSIWYG environment.
While the software component has not been the default method of creating equations since 2007, it was still included in newer versions of MS Office in case users needed to edit an equation written in a version of Office older than 2007.
The beginning of the end for Equation Editor was when, last November, Microsoft patched its executable to plug a security hole discovered by Embedi researchers.
The patch worked to block that exploit, but soon other researchers analyzed the software and discovered that the PoC exploits they created to test the patch still worked. All in all, seven other vulnerabilities affecting the software have been reported to Microsoft since then, and the company decided to cut it from Office.
How desperate are you to get Equation Editor back?
As ACROS Security CTO Mitja Kolsek pointed out, the loss of the editor might be keenly felt by a specific subset of users who still prefer it, and they might decide to forego this and future security updates in favor of keeping the useful tool.
“Worse even, affected users may decide to migrate back to unsupported versions of Office that don’t receive security updates at all,” he says.
So, they’ve decided offer instructions on how to restore Equation Editor if users have installed the January Office updates, and to keep pushing out micropatches (in-memory software fixes) for the flaws for the time being.
Restoring Equation Editor requires a modicum of knowledge of and ease with computers, and the willingness to risk going through a procedure that is not officially supported by Microsoft and may result in unwanted side effects. For those willing to try, the step-by-step instructions are here.
Although Kolsek doubts that, in the long run, attackers will concentrate on finding and exploiting vulnerabilities in Equation Editor now that Microsoft has removed it, he’s made a point to say that they don’t recommend users restoring the software and then not installing their 0patch Agent to keep it patched against known vulnerabilities.
“You don’t want to be vulnerable to trivial inexpensive attacks that can be delivered in any Word document you ever receive,” he says.
“We’ve already issued our micropatch for CVE-2017-0802, and it’s been applied to all computers running 0patch Agent where the latest version of Equation Editor is still present. We’re also teaming up with other security researchers who have found vulnerabilities in Equation Editor to micropatch those issues too. We urge everyone who finds additional security issues in Equation Editor to share their findings with us and help us create micropatches for them.”
Effectively, the company has “security-adopted” an abandoned piece of software.
greater than 2 minutes
As we all know, Google offers a free platform that allows you to create, edit and share documents on the go as long as you have an internet connection. This useful feature requires no special software. All you need to do is launch your browser and search for Google Docs. The tool is especially useful for students and scientists as it allows them to collaborate with ease. Now, we must admit that writing math or chemistry equations or fractions can be quite a challenge. If you use Google Docs frequently, you must be wondering, “Do Google Docs have the equation editor?”
The good news is that you’ll find an equation taskbar on your Google Docs. The feature makes inserting equations easy with just a few clicks. Eager to learn how to do so? Let’s dive right into the details.
How to use the equation editor in Google Docs
- Launch your browser and search for Google Docs.
- Select “Go to Google Docs”.
- Open a “Blank” document or select an existing one.
- Now, go to the ribbon at the top of your document and select “Insert”.
- Click on “Equation” in the drop-down menu. You’ll see the equation editor appear underneath the main toolbar, along with a text box in which you’ll write your equations.
- To preview what each symbol entails, hover your mouse over the menus in the equation editor. You’ll see the following choices: Greek letters, Miscellaneous operations, Relations, Math operations, and Arrows.
- Now, to insert an equation, click on one of the menus above and click the drop-down menu.
- Select the equation that you wish to add to your document.
- To insert another equation, click on the “New equation” button next to the equation editor and repeat steps 7 and 8 above.
- Once you’ve completed adding all of your equations and no longer want the equation editor toolbar, click “View” and deselect the “Show equation toolbar” option.
If you just started using the equation editor in Google Docs, you may find the process a bit slow. But once you get used to it and learn where to find all the equations, you’ll have an easy time. The Google Docs equation editor uses the LaTex syntax. In simpler terms, if you know the shortcuts to the equations, type the corresponding symbols and Google Docs will recognize and insert them.
Pro Tip: It is possible to fix many PC issues by using the PC Repair tool. PC Repair is easy to use and reliable Windows optimization software developed to fix hundreds of system issues.
That said, sometimes you may notice that your computer is taking longer than usual to boot, programs are freezing or taking longer to load, the mouse freezes out of the blue, your computer crashes without warning, and so on. These are the telltale signs that you need to optimize your PC.
Stability issues and slow performance are caused by the accumulation of unnecessary system files, browser cache, and other PC junk. Moreover, corrupt or invalid registry entries are known to interrupt the normal functioning of your operating system. If left unchecked, such issues can lower your productivity or, worse, damage your computer.
Luckily, it doesn’t have to get to that point. Auslogics BoostSpeed is an optimization tool that tweaks your system to boost its performance. The tool clears all junk files, removes corrupt keys from your Windows registry, fixes connectivity issues to improve your browsing experience, and defragments your hard drive to boost your apps’ loading speed. And that’s not all. Auslogics BoostSpeed comes with over a dozen useful tools that are designed to keep your PC running at optimal levels.
We hope you’re now able to add equations in Google Docs. We’d love to hear about your experiences using the Google Docs equation editor. Let us know in the comments below.
Easily add math equations to your documents
Tim Fisher has 30+ years’ professional technology experience. He focuses on support and Microsoft topics but is an expert in all areas of tech. He’s also the GM & VP of Lifewire.
- Tweet
- Share
What to Know
- Go to Insert >Equation. Build your equation using numbers and the equation toolbar. Click outside of the text box to exit.
- Press the Enter key to edit other parts of the document like text, images, etc.
- To write another equation, select New equation from the toolbar. When you’re done, deselect Show equation toolbar in the View menu.
This article explains how to add equations to Google Docs in a web browser. You can’t edit or create equations in the Docs app.
How to Use the Equation Editor in Google Docs
Writing equations in Google Docs is easy with the built-in equation toolbar. Teachers can use it when producing worksheets, and students have all the symbols they need to show their work.
You can write Greek letters like pi and mu, relations such as inequalities and the ‘not equal’ sign, arrows, and symbols like divide, integral, square root, union, and sum.
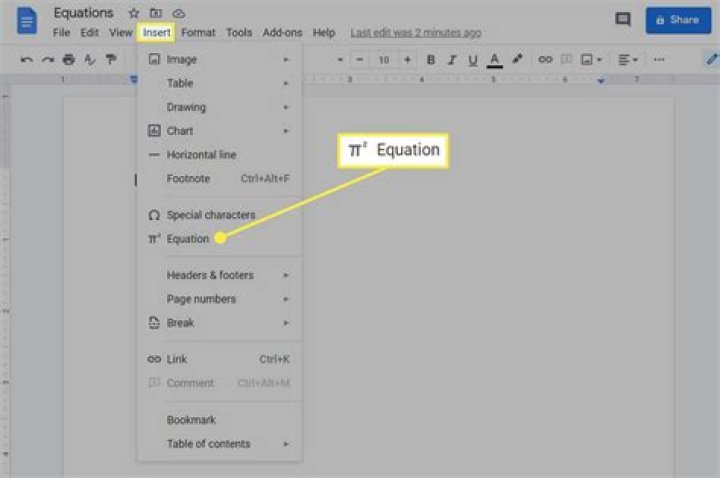
Go to Insert > Equation.
A new menu will appear, and a new text box will show up in the document. With the cursor focused in the text box, build the equation using numbers and the equation toolbar.
Click outside of the text box to exit the equation editor. Once the cursor is next to the text box, the Enter key lets you use the document for other things like text, images, etc.
To write a separate equation, select New equation from the toolbar. When you’re completely done with the math side of things, you can hide the toolbar by deselecting Show equation toolbar in the View menu.
Tips When Writing Equations
- Shortcuts are supported. Type a backslash followed by the symbol name and a space, such as \ne to write the ‘not equal’ sign or \frac to build a fraction. The Google Docs Equation Editor Shortcuts website has a great list of equation shortcuts you can use until you’ve memorized them.
- Use the left and right arrow keyboard keys to move through the equation; a space doesn’t always do what you think it will. For example, when you’re finished writing a fraction’s numerator, use the right arrow to jump down to the denominator. Repeat or press Enter to “exit” the fraction space and move on to the next part of the equation.
- Copying a single item from an equation proves difficult with a mouse. Hold Shift and choose an arrow key to highlight just that one part. Ctrl+C or Command+C is the quickest way to copy.
Google Docs Won’t Solve the Equation
Need help solving math equations? Docs can’t help you there, but some handy calculator apps can.
As many teachers know, Google Docs is a brilliant tool to use in the classroom. You can collaborate with colleagues together, your students can work together on the same document and you can access Google Docs from any device by simply logging in with your account. They can be used across the curriculum, including maths.
However, there was always one thing that I found tricky – writing maths equations. It would take me awhile to find the division sign and often I had to resize it. Writing the square root proved difficult and fractions were something I just didn’t want to think about. Great news – that has now all changed. Google Docs has an equation taskbar.
Open up your Google Doc as you normally would. In the ribbon at the top click on “Insert’. In the drop down menu you’ll see ‘Equation’. Select it.
Once you have selected the equation tools you’ll see a new tool bar has opened up underneath the existing one. You now have a choice of four menus. Each one gives you a different set of maths signs and symbols that you can type directly into your doc.
Before you can use any of the symbols make sure you have selected ‘New Equation’. Doing this will create a placeholder in your doc. Once you have that, choose which set of symbols you want to use by simply hovering over it and then selecting the exact one you want. The equations and maths symbols you type will appear in the placeholder. You can type anything you like inside the placeholder – it doesn’t just have to be equations. Typing fractions just became a whole lot easier!
If you want to get even more functionality into your Google Docs when it comes to maths then you can install the Equatio extension from the Chrome Web Store.
Click on “Add to Chrome’ and it will install the extension in your taskbar.
The first time you open it, it will ask you whether you are a student or a teacher and it will ask you to log in with your google account.
To use it once you have your Google Doc open, you simply click on the extension in the taskbar. It opens a dialogue bar at the bottom of your doc.
As you can see, you have the options of voice recording or drawing as well.
As you speak it automatically enters the maths equation that are saying:
When you’ve finished, click ‘Insert Maths’ in the bottom right hand corner of the Equation toolbar and it drops the equation into your doc wherever you have your cursor.
The drawing option works the same way. Use your mouse pad, or a stylus, to handwrite your maths. It converts it into typed equations on the right handside. Insert it into your doc when you’re finished in the same way.
This symbol in the bottom left hand corner will hide the Equation ribbon while you work on your document. When you want it again, just click on it to pop it back up. To close it completely click on the word in the very left hand corner and close it.
Make sure you show your students these two simple ways of adding equations into Google Docs. Remember, you can always create equations in Google Docs and paste them across to Slides and Drawings as well.
Give it a go – it’s never been easier to insert maths equations into Google Docs than it is now.
Want even more tips and tricks for working with technology? Download the UTB app ( iOS or Android ) so you are kept up to date with blog posts.
Or better yet – come along to one of our Maths specific or STEAM days where we explore a range of tools for education. Find an event near you here .
Google Forms™ is great for creating quick assessments for your students. However, it does not have an equation editor built in to the application. To insert math equations in Google Forms, you have to use another website or application.
I have listed three ways to insert math equations in Google Forms below.
1. Use CodeCogs (a free website)
This first method is to use this website. First, you type your equation into the yellow box. The equation will appear below the yellow box.
Next, scroll down to smaller yellow box and select “URL” from the drop-down menu. Copy the text in the box. (Control+C on a PC or Command+C on a Mac).
Go to your Google Form and click the image button beside the question or answer choice where you want to add the equation.
Click “BY URL” and paste the URL. You should see the equation below the pasted URL. Then, click “add image”.
The equation should now be visible on your Google Form.
This method the quickest, and you don’t have to download anything. However, the pictures aren’t the best quality.
2. Use Equatio (a Google Chrome extension)
The next option of to use EquatIO™ with a Google Chrome extension from texthelp®. Click here to see all the information about EquatIO. This is the method I use for all of my Google Forms.
EqautIO is currently free for teachers. You can register by clicking here. IMPORTANT: Make sure you register with the Google email you are going to be using to create Google Forms.
After downloading the software on your computer, you must install the Google Chrome extension to use it in Google Forms.
Go to the Google Chrome Web Store and search for Equatio. Add it to your Google Chrome extensions. It should pop up on your top menu bar.
After I downloaded EquatIO and added the Google Chrome extension, I restarted my computer. It still took about 24 hours for the extension to start working. So, just be aware that it doesn’t work instantly.
I knew it was working when I opened Google Forms and saw the blue icons beside the questions and answer choices like the ones below.
When you click the blue icons, an equation editor will open at the bottom of your screen.
Click the equation button and type the equation. Then click “Insert Math”.
EquatIO does not have symbol buttons you press like CodeCOGS. Simply start typing the symbol you want, and it will populate. For example, if you want to type a fraction, start typing the word “fraction”.
Once you press “Insert Math”, you will see the equation in Google Forms.
I like EquatIO because I can add equations right within the browser. The equation looks bigger and clearer than CodeCOGS.
3. Use a Microsoft Office Application (Word or PowerPoint)
The last method to insert math equations in Google Forms is using the equation editor in Microsoft Word or PowerPoint.
First, open a blank PowerPoint and delete any text boxes. Click insert>equation. If you don’t see an equation editor, make sure to update your version of PowerPoint.
Type your equation and take a screenshot of it. If you are on a Mac, press Command-Shift-5. If you are on a PC, use the snipping tool.
Then, insert the picture using the picture icon beside the answer choice.
I’ve used this method as well, but it is a little more time-consuming.
Ok, so just to recap, here is a picture of all three methods so you can see the difference. They are all decent methods. EquatIO is my personal favorite, but they are all great!
If you’re interested in learning how to make your own math resources (both digital and paper), grab my free 5-step cheat sheet here!
Equation Editor (Microsoft Equation 3.0) was included in earlier versions of Word, but was removed from all versions in the January 2018 Public Update (PU) and replaced with a new equation editor.
The content here describes this feature for users who have installed this update.
Important: Equation Editor 3.0 it was removed because of security issues with its implementation. Users who try to edit an equation created in Equation Editor 3.0 will receive the error message “Microsoft Equation is not available.” Equation Editor 3.0 objects will still display normally if you have MT Extra font installed (if you don’t have the font, you can download it). However, users can edit these equations only by downloading the MathType software tools that are provided by WIRIS. See MathType desktop for Equation Editor users.
Insert an equation with Equation Editor
On the Insert tab, in the Text group, click Object.
In the Object dialog box, click the Create New tab.
In the Object type box, click Microsoft Equation 3.0, and then click OK.
Use the symbols, templates, or frameworks on the Equation toolbar to edit the equation.
In Word, Excel, or Outlook, to return to your document, click anywhere in the document.
In PowerPoint, to return to the presentation, in Equation Editor, on the File menu, click Exit and Return to Presentation.
Edit an equation in Equation Editor
If you used Equation Editor to insert an equation, you can also edit that equation in Equation Editor.
Double-click the equation object that you want to edit.
Use the symbols, templates, or frameworks on the Equation toolbar to edit the equation.
In Word, Excel, or Outlook, to return to your document, click anywhere in the document.
In PowerPoint, to return to the presentation, in Equation Editor, on the File menu, click Exit and Return to Presentation.
Insert an equation with Equation Editor
On the Insert tab, in the Text group, click Object.
In the Object dialog box, click the Create New tab.
In the Object type box, click Microsoft Equation 3.0.
If Equation Editor is not available, you might have to install it.
Install Equation Editor
Exit all programs.
Click Add or Remove Programs in Control Panel.
In the Currently installed programs box, click Microsoft Office 2007, and then click Change.
On the Change your installation of Microsoft Office 2007. screen, click Add or Remove Features, and then click Continue.
On the Installation Options tab, click the expand indicator (+) next to Office Tools.
Click the arrow next to Equation Editor, and then click Run from My Computer.
After the Equation Editor installation is complete, restart the Office program that you were using.
In the Object dialog box, click OK.
Use the symbols, templates, or frameworks on the Equation toolbar to edit the equation.
In Word, Excel, or Outlook, to return to your document, click anywhere in the document.
In PowerPoint, to return to the presentation, in Equation Editor, on the File menu, click Exit and Return to Presentation.
Edit an equation in Equation Editor
If you used Equation Editor to insert an equation, you can edit that equation in Equation Editor.
Double-click the equation object that you want to edit.
Use the symbols, templates, or frameworks on the Equation toolbar to edit the equation.
In Word, Excel, or Outlook, to return to your document, click anywhere in the document.
In PowerPoint, to return to the presentation, in Equation Editor, on the File menu, click Exit and Return to Presentation.
To learn how to use built-in equations by using the Equation button, see Write an equation or formula.
This page provides an unofficial LaTeX-like shortcuts list / cheat-sheet for the Google Docs equation editor.
To use these shortcuts, enter them in the equation editor followed by space bar .
If you are looking for special characters or symbols that are not listed here, you can go to Insert → Special characters from the Google Docs toolbar and search by name.
Unlisted
Those aren’t in the menus, but they work! If anything is missing, feel free to contribute on GitHub .
Operations
These unlisted operations allow you to apply a treatment to some text.
| Element | Shortcut |
|---|---|
| \choose or \binom or \binomab | |
| \bar | |
| \hat | |
| \vec | |
| \tilde | |
| \underline | |
| \dot | |
| \ddot | |
| \max , \maxa | |
| \min or \mina | |
| \lima | |
| \liminfa | |
| B” /> | \liminfab |
| \limsupa | |
| B” /> | \limsupab |
Symbols
These unlisted shortcuts render specific symbols.
| Element | Shortcut |
|---|---|
| \angle | |
| \hbar | |
| \vdots | |
| \cdots | |
| \ldots | |
| ∇ | \nabla |
| ⊢ | \vdash |
| ∥ | \parallel |
| ∝ | \propto |
Keywords
These unlisted shortcuts apply a special treatment to some mathematical keywords, rendering them in normal font instead of the default italics.
| Element | Shortcut |
|---|---|
| log | \log |
| ln | \ln |
| exp | \exp |
| Trigonometry functions | \sin , \arcsin , \cos , \arccos , \tan , \arctan , \csc , \sec , \cot , \tanh , \cosh , \sinh , \coth |
| Other keywords | \lg , \inf , \dim , \Pr , \hom , \sup , \arg , \deg , \gcd , \det , \ker , \Pr |
About this page
The Google Docs equation editor is based on the LaTeX syntax, but LaTeX is much more complex, so if you are not familiar with it, it isn’t exactly easy to try and find working shortcuts.
I made this page when I discovered that the shortcuts are actually in the editor code (as an aria-label attribute on the buttons themselves), but aren’t really available in an easy-to-search manner as far as I could find. I am not in any way affiliated with Google.
Other people have since contributed to this list. See GitHub issues for a list of contributed elements .
Created in February 2017. Last updated in January 2021.
In Google Docs there is an equation editor that allows for users to insert math symbols into the document. Unfortunately there is not an equation editor for Google Presentation.
A work around is Daum Equation Editor, a Chrome App that will launch in the Chrome web browser.
The Daum Equation editor works like most equation editors, a variety of templates for fractions, radicals, symbols and more. After creating your equation, in the bottom right hand corner is an option to Save as Image.
On my Mac the Save as Image option does not add the .jpg file extension which is necessary to make the image file work. Simply type .jpg at the end of the file name.
I save the image files onto my desktop so that I can drag the images directly from the desktop into the Google Presentation.
This is a relatively easy way to get math expressions into my Google Presentation. The downside is that the expressions are images, thus not interactive. If you need to make a change you will need to go back to the equation editor and create a new one. But this is a relatively easy, and free, way for students to get math symbols in their Google Presentations.
Discover Google Drawings to create shapes, word art, and more
- Tweet
- Share
Drawing in Google Docs isn’t immediately obvious, but it’s a feature that you can use to add shapes, word art, create diagrams and more. If that’s not enough power for you, you could also use the Google Drawings app, which provides more features. Both methods will work to help illustrate your Google Docs. Here’s how to draw on Google Docs using both methods.
Adding drawings directly in Google Docs can only be done using Google Docs in a browser. That feature is not available as an app for iOS or Android devices.
How to Draw on Google Docs
The easiest way to draw on Google Docs is to use the Drawing feature. The capabilities of this feature are somewhat limited, but for quick shapes, word art, and simple diagrams it works just fine.
Neither the Drawing feature of Google Docs nor Google Drawing allows for the use of a stylus or pen for freehand drawing. You are limited to a few basic types of illustrations, all of which can be controlled using a mouse.
Start by creating or opening a document in Google Docs. Then place your cursor in the document where you want the drawing to appear.
Select Insert > Drawing.
If you need to insert a signature into Google Docs, this is the option you will use.
Select + New.
The Drawing window opens. Here, you can select the type of drawing you would like to create from the Actions menu. For example, you could choose Word art from this menu.
A text box appears in your drawing. Type the text you want to use for word art. When you have the text you want, press Enter to save it.
The text appears in the drawing. The contextual toolbar at the top of the page also changes to give you font and color options. Adjust these options until the word art looks the way you want it to.
You also have the option to add lines, shapes, text boxes, or images from the toolbar at the top of the window. For example, you could add a colored shape to your drawing to set off your word art. To do that, select the Shape tool at the top of the page, highlight Shapes, Arrows, or Callouts and then select the desired shape.
There is also the option to add Equations in this menu. If you’re creating a mathematical equation, this will be the option you use to insert it in your document.
Once the shape is inserted into the drawing, you can adjust the appearance of it using the context toolbar at the top of the Drawing window.
You may also need to push the shape to the background so you can see the word art you created. To do that, right-click the shape, highlight Order, and then select Send to back.
When you’ve finished making the adjustments that you want to make to your drawing, click Save and Close.
The drawing will be inserted into your document at the point of your cursor.
Insert a Drawing Using Google Drawings
Adding drawings from within Google Docs has some limitations. The most glaring of those is the limited capabilities of the Drawing function. To overcome that, you can insert a drawing that you create in Google Drawings.
If you’re using a Chrome browser or the Chrome OS, you can access Google Drawings in the Chrome web store.
Create your drawing using the menus and toolbars that are available. You’ll see some options here that aren’t available in the Drawing function of Google Docs. Those include tables, charts, and diagrams.
When you’re finished, you can close the drawing and it’s automatically saved into your Google Drive.
Then, to insert it into your Google Doc, place your cursor where you want the drawing to appear in your document and select Insert > Drawing > From Drive.
Select your drawing and it’s placed in your document at the location of your cursor.
You’ll be prompted to choose whether you want to link to the source of the drawing or insert the drawing unlinked. If you link to the source, collaborators can see the link to the drawing. If you choose to Link to source you can always unlink it later.


