Creating your signature does not automatically add it to your email messages. Set up Outlook to automatically attach the signature to all outgoing mail by following these seven steps.
This feature works the same in all modern versions of Microsoft Outlook: 2010, 2013, and 2016.
- Open a new message. From the Message Ribbon , select the Insert tab, and from the Include group, select Signature .
- Select Signatures from the drop-down list.
- In the Signatures and Stationery dialog box, on the E-mail Signature tab, in the Choose default signature section, from the E-mail account drop-down list, select an account with which you want to associate the signature.
- From the New messages drop-down list, select the signature that you created.
- To have the signature included on replies and forwards, select the signature from the Replies/forwards drop-down list.
- Click OK in the Signatures and Stationery dialog box.
- The signature will now be automatically included in all new, replied to, and forwarded messages.
Supposing you want to add a horizontal line in signature content in Outlook, how could you get it done easily? This article will introduce two solutions for you.
This method will guide you to insert a horizontal line in an email, and then copy it to the specified signature in Outlook.
1. In the Mail view, create a new email with clicking Home > New Email.
2. In the new Message window, put the cursor in the message body, and click Format Text > Table > Horizontal Line. See screenshot:
3. Select the horizontal line, right click and select Copy from the right-clicking menu.
4. Click Insert > Signature > Signatures.
5. In the opening Signatures and Stationery dialog box, please:
(1) In the Select Signature to edit section, select the specified signature you will add a horizontal line;
(2) In the Edit signature section, put the cursor where you will add a horizontal line, and press the Ctrl + V to paste the horizontal line;
(3) Click the OK button.
6. Close the new email without saving.
Auto add text and current datetime/timestamps to subject or signature for Outlook messages
Provided by Kutools for Outlook. Click for 60-day free trial without limitation!
If you are familiar with HTML code, you can add a horizontal line into the signature by modifying its HTML file.
1. Open the folder containing Outlook signatures with pasting below folder path into the Address box of a folder and pressing the Enter key.
Folder path of Outlook signatures: %App Data%\Microsoft\Signatures
2. Right click the specified signature’s HTML file, and select Open with > Notepad from the right-clicking menu. See screenshot:
3. In the opening Notepad, go to the place where you will insert a horizontal line, and type the code of .
4. Save and close the Notepad.
So far a horizontal line has been inserted into the specified Outlook signature already.
Tip: In this Video, Kutools tab is added by Kutools for Outlook . If you need it, please click here to have a 60-day free trial without limitation!
Email signatures are a fact of life in the business world, and chances are you’ve got a standard signature that you use for all your outgoing emails. But when you get that promotion and your job title changes, or when the marketing department asks everyone in your company to include the company logo on your signature, you’ll need to know how to change your signature.
The good news is, changing your signature in Microsoft Outlook 2013 uses the same method as that of Outlook 2010, which is outlined below:
Step 1: Click File, then Options in the left-hand menu.
Step 2: Select Mail from the list of options, and then click Signatures.
Step 3: Select the signature you wish to edit and make your changes. You can add images or logos by pasting them into the editor. URLs will be automatically hyperlinked. If you don’t have a signature, you can create one by clicking New. Click OK when finished.
Bonus Alternative
You can also arrive at the Signatures window to change your signature by following these steps:
Step 1: Click New Email button, located at the top-left corner of the Home tab.
Step 2: Click Signatures button, and select the signature you want to modify. You can also create a new signature by clicking New.
Step 3: Make the desired changes to your signature. You can add images or logos by pasting them into the editor. URLs will be automatically hyperlinked. If you don’t have a signature, you can create one by clicking New. Click OK when finished.
You can designate a default signature for outgoing mail and designate whether or not to use your signature for replies by making your selections in the Choose Default Signature area at the top-right of the signature window. Click OK and you’re done!
Lori Kaufman is a technology expert with 25 years of experience. She’s been a senior technical writer, worked as a programmer, and has even run her own multi-location business. Read more.
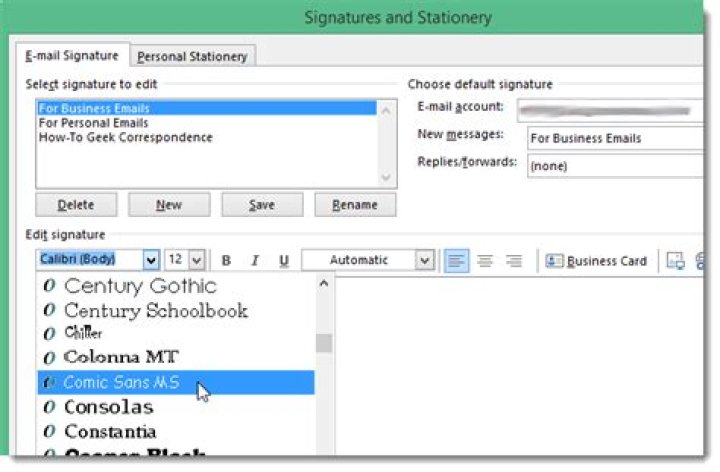
If you sign your emails the same way most of the time, you can create signatures in Outlook that you can attach to your emails. Easily create a signature for business emails and a different one for personal emails.
To create a new signature, open Outlook and click the File tab.
Click Options in the menu list on the left side of the Account Information screen.
On the Outlook Options dialog box, click Mail in the list of options on the left side of the dialog box.
On the Mail screen, click Signatures in the Compose messages section.
Click New under the Select signature to edit box on the Signatures and Stationery dialog box.
A dialog box displays asking for a name for this signature. Enter a descriptive name in the edit box and click OK.
You are returned to the Signatures and Stationery dialog box and the name you entered displays in the Select signature to edit box. If it’s the only signature, it will be automatically selected. Enter the text for your signature in the Edit signature box. Select the text and apply font, size, and other character and paragraph formatting as desired. Click OK to accept your changes and close the dialog box.
Click OK on the Outlook Options dialog box to close it.
Now, when you create a new email message, the default signature is added to the body of your email automatically. If you only have one signature set up, that will be the default signature.
Stay tuned for information about setting the default signature, using the signature editor, inserting and changing signatures manually, backing up and restoring your signatures, and modifying a signature for plain text emails, in future articles.
Email signatures are a fact of life in the business world, and chances are you’ve got a standard signature that you use for all your outgoing emails. But when you get that promotion and your job title changes, or when the marketing department asks everyone in your company to include the company logo on your signature, you’ll need to know how to change your signature.
The good news is, changing your signature in Microsoft Outlook 2013 uses the same method as that of Outlook 2010, which is outlined below:
Step 1: Click File, then Options in the left-hand menu.
Step 2: Select Mail from the list of options, and then click Signatures.
Step 3: Select the signature you wish to edit and make your changes. You can add images or logos by pasting them into the editor. URLs will be automatically hyperlinked. If you don’t have a signature, you can create one by clicking New. Click OK when finished.
Bonus Alternative
You can also arrive at the Signatures window to change your signature by following these steps:
Step 1: Click New Email button, located at the top-left corner of the Home tab.
Step 2: Click Signatures button, and select the signature you want to modify. You can also create a new signature by clicking New.
Step 3: Make the desired changes to your signature. You can add images or logos by pasting them into the editor. URLs will be automatically hyperlinked. If you don’t have a signature, you can create one by clicking New. Click OK when finished.
You can designate a default signature for outgoing mail and designate whether or not to use your signature for replies by making your selections in the Choose Default Signature area at the top-right of the signature window. Click OK and you’re done!
Using a signature in Outlook 2013 makes your emails more personal and provides your contact info to people. Creating one and then getting Outlook 2013 to put it in your emails automatically is easy.
Using a signature in Outlook 2013 makes your emails more personal and provides your contact info to people. Creating one and then getting Outlook 2013 to put it in your emails automatically is easy. Here’s how to do it.
First, click the File tab in the Outlook 2013 menu, then select Options.
When the Outlook Options screen comes up, click the Signatures button.
Click New and give your signature a name. This lets you distinguish it from other signatures you may be using.
Now that it has a name, type everything you want your new signature to contain in the box below Edit signature. You can use whatever font you like, in any size. Here I’m using the Verdana font.
Clicking Business Card on the top right side of the editing box lets you use a business card you have saved in your signature.
You may wonder what the two buttons next to the business card one are doing. The first one lets you insert a picture from your hard drive into your signature. Here I’m using our groovy logo.
The second button lets you create a link to an email or web address, as well as a file on the computer or a link in the document. I’ve decided to go with a link to our website.
There’s also a little trick here. If you’ve inserted an image in the signature and you click it before clicking the link button, the image will be linked. So, people clicking the logo will get to groovyPost, in my case.
Now you’ve created your signature, all you have to do is click Save and then decide when it should be used automatically. You select that below Choose default signature. You can choose which email account, as well automatically use it – for new messages, replies and forwards. Selecting different signatures for each one of these actions is possible.
It’s that simple. Click OK to get back to the main window and now your new signature will appear on emails.
If you decided not to use it automatically, you can always insert it into new emails from the Signature button on the ribbon.
And now that you know how to use a signature in Outlook 2013, how about learning how to add Gmail to Outlook 2013 via POP?
Email signatures are the shoes of the corporate world. Sometimes you just need a short, to-the-point one for chain replies. Sometimes you need a formal, official-looking one. Unfortunately, Microsoft Outlook’s signature options can be somewhat hard to find, buried deep in the abyss of its backstage mode for options.
Here’s how to create a signature in Outlook 2013 in five quick steps.
1. Click New Email at the top left corner of the Home tab.
2. Click Signature from the top panel, next to Attach Item. A dropdown menu will appear, with options to add an existing signature to the email you’re working on. Select Signatures from this menu to open a Signatures and Stationery window.
3. Click New in the Signatures and Stationery window to create a new signature template.
4. Compose your signature in the editing window. If you have your contact information already saved in Outlook, you can simply import all that information as a business card by clicking Business Card at the top right of the edit options.
You can add images to your signature, like a logo or banner, by pasting them into the editor or clicking the button to the right of the Business Card button. URLs will be automatically hyperlinked, but if you want to add your own link, you can click the Insert Hyperlink button on the extreme right. Click OK, and your signature will be saved for future use.
5. Designate your new signature as your default in the Signatures and Stationery window if you want to make sure it is included with every new message and replies or forwards you send.
If you don’t want a default signature , you can insert the signature into individual email messages by clicking Signature in the Compose window as in Step 1, and selecting the signature you just created.
Report abuse
Replies (30)
* Please try a lower page number.
* Please enter only numbers.
* Please try a lower page number.
* Please enter only numbers.
I understand how it feels when you are unable to edit or use the signature in Outlook. Let me help you with the issue.
I would need some more information before we proceed with the troubleshooting:
What is the type of email account configured on Outlook (POP3/IMAP/Exchange Active Sync or Exchange Server)?
Are the options grayed out or just not responding?
Does the signature contain any image?
Are you able to create new signatures with the same content?
What changes were made to the registry editor?
Provide more details to assist you better.
Meanwhile, you may delete the signature file from the following location:
Note: Ensure to back up all the files from the folder before deleting them.
Also you may delete the following registry key and check if the issue occurs:
Disclaimer: Important this section, method, or task contains steps that tell you how to modify the registry. However, serious problems might occur if you modify the registry incorrectly. Therefore, make sure that you follow these steps carefully. For added protection, back up the registry before you modify it. Then, you can restore the registry if a problem occurs. For more information about how to back up and restore the registry, follow these steps to back up the registry:
Let us know the details and results to assist you better.
Several times I have come across a bug in different Outlook versions when the “Signatures” button doesn’t work. No matter how many times you click it, the Signatures window won’t appear.
This time the bug appeared on Windows 10 with the newly installed RTM version of Outlook 2016. After clicking the Signatures button in the File -> Options -> Mail, nothing happened and the signature didn’t appear.
I tried to repair, remove and reinstall Office, cleanup the registry – but nothing helped. How to set a user Outlook signature in this case?
In one of the previous articles we told how to setup an Outlook signature based on user information from Active Directory. There we mentioned that in Windows 10, 8.1 and 7 the files with Outlook signatures are located in the user profile folder %APPDATA%\Microsoft\Signatures ( C:\Users\username\AppData\Roaming\Microsoft\Signatures ). So if you create an HTML/RTF/TXT file with the signature text and save it in the specified directory, you can insert your signature using the corresponding button in the Outlook 2016 interface when creating a new email or replying (Outlook must be restarted).
But it is quite inconvenient since each time you have to press the ‘Signature’ button manually. You can assign this file as a default Outlook signature through the registry. To do it, remove the First-Run parameter in registry key HKCU\Software\Microsoft\Office\ \Outlook\Setup and create 2 string (REG_SZ) values: NewSignature and ReplySignature in the reg key HKEY_CURRENT_USER\Software\Microsoft\Office\16.0\Common\MailSettings (for Outlook 2016). Specify the full path to the signature file as the values of these parameters.
However, this fix is inconvenient and not flexible.
There is a description of a similar bug in Windows 10 on support.office.com. To solve the problem of the Signatures button that is not working, it is recommend to uninstall a modern app Microsoft Office Desktop App (Settings -> Apps -> Apps & Features).
If it hasn’t helped, I have found some opinions on technical forums that the signature issue often appears after mailbox migration to the another domain or on computers with the preinstalled Office.
In order to make the Signatures button work, try the following:
In these registry keys (for x64 and x86 Office editions respectively) change the values of the Default and LocalServer32 parameters to the full path to the outlook.exe executable file on your computer (for example, to C:\Program Files (x86)\Microsoft Office\Office16\Outlook.exe for Outlook 2016):
- HKEY_LOCAL_MACHINE\SOFTWARE\Classes\Wow6432Node\CLSID\\LocalServer32
- HKEY_LOCAL_MACHINE\SOFTWARE\Classes\CLSID\\LocalServer32
If this method hasn’t helped, try to use this REG file (for Office 2016 and Office 365):
Windows Registry Editor Version 5.00
[HKEY_CLASSES_ROOT\Outlook.Application]
@=”Microsoft Outlook 16.0 Object Library”
[HKEY_CLASSES_ROOT\Outlook.Application\CLSID]
@=””
[HKEY_CLASSES_ROOT\Outlook.Application\CurVer]
@=”Outlook.Application.16″
[HKEY_CLASSES_ROOT\Outlook.Application.16]
@=”Microsoft Outlook 16.0 Object Library”
[HKEY_CLASSES_ROOT\Outlook.Application.16\CLSID]
@=””
[HKEY_CLASSES_ROOT\Wow6432Node\CLSID\]
[HKEY_CLASSES_ROOT\Wow6432Node\CLSID\\InprocServer32]
“Assembly”=”Microsoft.Office.Interop.Outlook, Version=16.0.0.0, Culture=neutral, PublicKeyToken=71E9BCE111E9429C”
“Class”=”Microsoft.Office.Interop.Outlook.ApplicationClass”
“RuntimeVersion”=”v2.0.50727”
[HKEY_CLASSES_ROOT\Wow6432Node\CLSID\\InprocServer32\16.0.0.0]
“Assembly”=”Microsoft.Office.Interop.Outlook, Version=16.0.0.0, Culture=neutral, PublicKeyToken=71E9BCE111E9429C”
“Class”=”Microsoft.Office.Interop.Outlook.ApplicationClass”
“RuntimeVersion”=”v2.0.50727”
[HKEY_CLASSES_ROOT\Wow6432Node\CLSID\\LocalServer32]
@=”C:\\Program Files\\Microsoft Office\\Office16\\OUTLOOK.EXE”
[HKEY_CLASSES_ROOT\Wow6432Node\CLSID\\ProgID]
@=”Outlook.Application.16″
[HKEY_CLASSES_ROOT\Wow6432Node\CLSID\\Typelib]
@=”“
If signature problem occurs in Office 2010, replace 16 with 14; if in Outlook 2013, replace 16 with 15.


