We told you about a free application to check the storage space in Windows, called TreeSize Free.
Though the application is free, not everyone is tech savvy to use such programs with ease. And some of you maybe thinking, “Wish Windows had a built-in tool like this”.
And the answer may surprise you. Indeed, Windows does have such a tool, but not all versions. Microsoft’s newest operating system, Windows 10, comes with such a Storage utility hidden under its Settings. Now, this method is for basic users only, and not suited for advanced users, because it isn’t very detailed.
Nevertheless, should a friend ask you for help with checking the storage space used by apps in Windows 10, you will know how to help them.
How to check the storage space of Hard Drives in Windows 10
1. Click on the Start Menu and open the Settings app.
2. Select the “System” tab.
3. Choose the “Storage” option in the left sidebar.
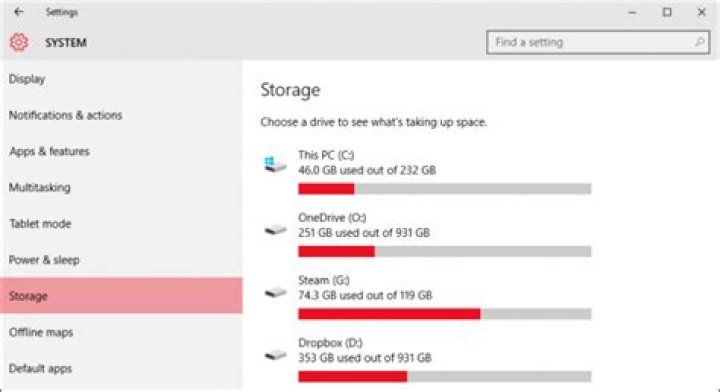
4. This will let you view the storage space of all the Hard Drives you have connected to the PC. (including USB Memory sticks and External HDDs).
5. Click on the hard drive which you wish to check and it will display a list of information, which shows you exactly how much space is used by each folder or area in Windows 10.
You can narrow it down further by clicking on any of the folders and it will provide you the information of its own folder tree. But it won’t display it within the app, and instead uses File Explorer for the most part, which is quite useless for digging deep.
The Apps & Games folder does have basic sorting options, and lists all installed apps/games in one screen, along with the size used by the app.
This method is not as efficient as TreeSize Free, as it lacks the advanced sorting power and searching options of the application. Personally we feel that the option in Windows 10 should be tweaked to perform better, with it’s own file manager.
Here’s a little tip:
If you’re like me, using an external hard drive permanently plugged in to your computer, you may wish to save things to your portable drive. For this, normally, we use Windows Explorer to copy and paste files and folders. But the Storage tab in the Settings app, will be more useful, as it allows you to set the default storage space for most file types.
The screen (in step number 3), allows you to select on which HDD, the new apps, documents, pictures, music and videos will be saved.
Windows 10 can help you free up disk space with helpful tools like Storage Sense. Here’s how to remove temporary files, uninstall apps, and more.
If you need to free up some disk space on your PC, Windows 10 provides a dedicated settings menu to make the process easier. From here, you can see how much space has been used on your device, and by what type of content. The Storage Sense feature will automatically remove temporary files, Recycle Bin items, and other items you may not need. Here’s how to view your internal storage and clear space quickly.
Storage Settings
Go to Settings > System > Storage to view the total space you have available, what space has been used across different categories, and how much free space remains on your hard drive. Turn on Storage Sense to automatically remove temporary files and other items you no longer need. Click the links on the right side of the Storage settings screen to learn more about disk management and low disk space.
Configure and Run Storage Sense
If you want to better configure the Storage Sense feature, click the Configure Storage Sense or run it now link. You can then determine how often the tool will run and when temporary files and downloads will automatically be deleted.
Open the Run Storage Sense drop-down menu to determine how frequently the feature should run—Every day, Every week, Every month, or During low free disk space. Unless you’re constantly running low on space, running it monthly should be a good place to start.
Under the Temporary Files header, check the box next to Delete temporary files that my apps aren’t using to automatically remove unneeded temporary files on a regular basis. You can also tell Storage Sense to automatically purge files in the Recycle Bin and Downloads folder daily—every 14, 30, or 60 days, or never.
Storage Sense must be switched on in order for your scheduled maintenance to take place. However, if you’re running low on space, you can take action right away. Click Clean now to make Windows scan for unnecessary files that can be deleted. After the work is done, Windows tells you how much space has been freed.
Review OneDrive Files
If you prefer not to automate the process, Windows still gives you enough information to make decisions on your own. Since Windows separates your data into different categories on the Storage settings screen, you can easily see which types of files are chewing up your hard drive’s storage and manually free up space. For example, if you use OneDrive to store and sync files on your computer, click the icon for OneDrive and then click View OneDrive. This will display all your OneDrive files, and give you a chance to review everything and delete what you don’t need.
Uninstall Apps
You can do the same with the programs downloaded to your computer. Go to Settings > Apps > Apps & features to view a list of installed apps you can review and uninstall if you no longer want them. Here, you can sort the list by name, date, or size. To remove an app, click it and select the Uninstall button.
Manage Photos
If you store photos and other images on your PC, click the entry for Pictures on the Storage settings screen. Select View Pictures to go to the default Pictures location, where you can look for images to delete.
Remove Temporary Files
Another category you’ll want to check is Temporary files. Windows has a bad habit of hoarding temporary installation files, temporary internet files, and other items that you typically don’t need. To view these, click Temporary Files on the Storage settings screen.
Windows suggests different types of files you can remove, including Recycle Bin files, Windows Update Cleanup files, upgrade log files, device driver packages, temporary internet files, and temporary files. Windows automatically adds a checkmark to any content types it believes you can safely remove without hindering your system.
Walter Glenn is a former Editorial Director for How-To Geek and its sister sites. He has more than 30 years of experience in the computer industry and over 20 years as a technical writer and editor. He’s written hundreds of articles for How-To Geek and edited thousands. He’s authored or co-authored over 30 computer-related books in more than a dozen languages for publishers like Microsoft Press, O’Reilly, and Osborne/McGraw-Hill. He’s also written hundreds of white papers, articles, user manuals, and courseware over the years. Read more.
Windows 10’s Creators Update adds a handy little feature that automatically cleans out your temp files and stuff that’s been sitting in your Recycle Bin for more than a month. Here’s how to enable it.
Windows 10 has always featured a number of storage settings that you can use to help manage your disk space. Storage Sense, a new addition in the Creators Update, works something like an automated, light version of Disk Cleanup. When Storage Sense is enabled, Windows periodically deletes any files in your temp folders that aren’t currently being used by applications and any files in your Recycle Bin that are more than 30 days old. Storage Sense won’t free up as much disk space as running Disk Cleanup manually—or cleaning up other, non-Windows files you don’t need—but it can help you keep your storage just a bit tidier without having to think about it.
Open the Settings app by hitting Windows+I and then click the “System” category.
On the “System” page, select the “Storage” tab on the left, and then on the right, scroll down until you see the “Storage Sense” option. Turn that option on.
If you want to change what Storage Sense cleans up, click the “Change how we free up space” link.
You don’t have a lot of options here. Use the two toggles to control whether Storage Sense deletes temporary files, old Recycle Bin files, or both. You can also click the “Clean Now” button to have Windows go ahead and run the cleanup routine now.
We’re hoping that this feature grows to include more options over time. However, it can help you reclaim a little disk space—especially if you you use apps that create lots of large temporary files. In the meantime, there are other ways to free up disk space in Windows that you might also find useful.
Windows 10 has a great high-level tool to analyze what’s taking up all that drive space. Here’s how to use it.
Today’s Best Tech Deals
Picked by PCWorld’s Editors
Top Deals On Great Products
Picked by Techconnect’s Editors
Managing hard drive space is always a pain. Who among us doesn’t regularly check out the little blue line for the “C” drive in File Explorer to see how much space is left for a new game, movie. whatever?
But in Windows 10, that little blue line is just the beginning when it comes to seeing what’s sucking up your storage. The operating system includes a new way to drill down deeper and figure out how much space you have left on your drive, and where you can make room.
The new feature is in the Settings app under Start > Settings > System > Storage. At the top of the screen you’ll see the familiar blue line showing how much storage you have left and how much you’ve used.
That’s nothing new, but clicking on that reveals a detailed breakdown of your storage usage very similar to the Windows 8.1 disk space feature. It shows all your disk usage based on the various folders you have on your PC.
In Windows 10, however, clicking on each of those segments brings you to a new screen where you can manage those particular file types on your hard drive.
Clicking the Apps & Games section right at the top, for example, shows a list of any Windows Store apps, desktop software including plugins, and games you’ve installed on your PC. This is the section of the settings app that doubles as the Control Panel’s “uninstall programs” section. By default the apps and games list is sorted by name, but you can also choose to sort it by size or install date. Click on an individual item and you’ll see an option to uninstall it from your system.
Going back to the main storage settings screen, you can also drill down into your various folders. Unlike the Apps & Games section, you won’t see a list of all your pictures or all your music if you click on these items. Instead you’ll be taken to a (mostly useless) screen with a View [pictures, music, documents, etc.] button that launches File Explorer.
The few exceptions to that are down at the bottom, where you see options for Temporary files and Other . Click on Temporary files and you’ll be able to delete any temporary files on your PC, empty the Recycle Bin, or view your downloads folder.
Click on Other and you see yet another list of miscellaneous folders on your PC taking up significant space, such as a virtual machines folder or GPU drivers. Click on any item within the Other list and you’ll once again launch File Explorer to manage your files.
Going deeper
The new storage feature in the settings app can be a great way to quickly figure out where you can make space on your drive, but it’s effective only for higher-level folders such as Documents, OneDrive, and Desktop.
To really get into the nitty-gritty of every folder and file on your PC, nothing beats embracing a good ol’ fashioned utility. Check out PCWorld’s quick tip on using WinDirStat to drill down even deeper into the files taking up space on your PC.
Ian is an independent writer based in Israel who has never met a tech subject he didn’t like. He primarily covers Windows, PC and gaming hardware, video and music streaming services, social networks, and browsers. When he’s not covering the news he’s working on how-to tips for PC users, or tuning his eGPU setup.
I have a small SSD with only 100GB, and Windows 10 tells me 12GB are being used by Mail. From “Storage” in settings, I click manage mail but it takes me to Microsoft Mail, and there are no accounts and no emails. And I don’t have Outlook listed on my Windows Apps. After researching around, reading locked discussion boards on this site with NO ANSWER, resetting Mail in Apps settings, deleting temporary files, trying to track down locally stored .eml files, etc. etc. I finally found the solution.
If you go to Control Panel instead of Settings, and go to Mail (32-bit), then a window “Mail Setup – Outlook” will open, click “Data Files. ” and then go to the “email” tab and delete any accounts. This deleted locally stored files – 12GB of them! Problem solved.
I couldn’t add this solution to all of the previous forums posted because they’re all locked (even though they were never solved), so hopefully I can get the information out this way.
Report abuse
Replies (2)
Where is Mail-32 bit in Windows 10 Control Panel (which itself is now hidden)?
The pictures you show are of Microsoft Office Outlook setup utilities. These would only open if Office Outlook is installed. Even if you have Office you don’t need to have Outlook and can deselect it as a feature during install, or uninstall it in App Settings by running the manage button to remove it as a Feature.
But the fact it had data files means someone on the PC had used or set up Office Outlook with accounts at some point and left data files like Mail, Contacts or folders behind.
I hope this helps. Feel free to ask back any questions and let us know how it goes. I will keep working with you until it’s resolved.
Now if I’ve gotten anything wrong here please feel free to correct me. Your posting this is a valuable service since I’ve had several cases lately where large Mail storage was reported in Storage settings. But the owners swore they didn’t have Office Outlook installed. Windows 10 Mail doesn’t store mail at all unless you save one email at a time which goes to Documents folder. It’s merely a sync service.
Windows MVP 2010-20
Millions helped via my tutorials and personally in forums for 12 years. Now an Independent Advisor.
I do not quit for those who are polite and cooperative.
Windows 10 Storage Disk Cleaner In Settings
Within the Windows 10 settings, there is an option for Storage which will scan your system for files, programs, and other stuff that is hogging up storage space. You will then be able to select and remove the stuff easily. This is an easy and fast way of making more space on your hard drive.
Not only is using Storage a great way to free up disk space, but by doing this you can also help improve the performance of your Windows 10 PC or Laptop, so it’s definitely worth doing it often.
How To Use Windows 10 Storage Cleaner:
1. Right-click Windows start menu > Settings
2. Go to System
3. Select Storage on the left-hand side menu
4. Once its finished scanning click “Show more categories“
4. Now go through each category such as Documents, Temporary files, etc. removing any stuff you no longer need on your system
That’s how you use Storage in Windows 10 settings to help free up disk space, which can also help improve the performance of your computer.
– Advertisement –
It doesn’t matter how bigger storage your PC or laptop has. Whether it’s an SSD or an HDD, there comes a time when you’ll run out of storage. In that case, you have to free up disk space on your PC otherwise your system will soon break down . In case you don’t know how to free up disk space on a Windows 10 PC, keep on reading this post to enlighten yourself.
Table of Contents
How To Free Up Disk Space On Windows 10
While these options will help you reclaim your lost storage, they will only take you so far. If you need bigger storage, you may have to replace your HDD or SSD with a bigger capacity or install an additional storage option. That said, here are the 9 quick ways to free up some space on a Windows 10 PC.
1. Delete Unnecessary Downloaded Files
With the ease of internet connection via broadband, people download lots of stuff on their PC. While it might be necessary at the time you downloaded it, later you might have forgotten to delete them. In that case, your disk drive is only filling the junk space. If that’s the exact case with you, consider deleting unnecessary files that are no more required.
To do that, head over to This PC>Downloads. Look for those files that you don’t need anymore and get rid of them as soon as possible.
2. Empty Your Recycle Bin
It’s good if you have followed the first option. However, deleting files from your Downloads folder doesn’t remove them from your PC. They are stored in the Recycle Bin in case you need your files back. While the Recycle Bin empties itself after it has reached the storage limit, you can instantly remove your files if you are assured you don’t them anymore.
To do that, head over to Recycle Bin and right-click on it. Click on Empty Recycle Bin to proceed. You will receive a pop-up message warning you that proceeding will permanently remove files from your PC. Click Yes to agree.
3. Remove Temporary Files From Your PC
Leftover files after updates and downloaded files can be removed from your PC to free up disk space. Go to Settings>System and click on Storage on the left panel. Under Windows (C:), click on Temporary Files and check those files that you don’t need on your PC. Once selected, click on Remove files to get rid of them.
4. Uninstall Unnecessary Apps
Some apps are pre-installed in your system that you may not need. These apps consume lots of storage in your disk that can result in low disk space problems. So it’s better to get rid of these apps. To do that, go to Settings>Apps. Decide which apps you don’t need and uninstall them from your PC.
If you don’t know which apps are filling up your space, just choose Sort by size and you will see the list of apps from the biggest to smallest. Uninstall those apps one by one.
5. Turn On Storage Sense
You can let Windows do the work for you by heading off to the Settings>System>Storage and toggling on Storage Sense. This feature by Windows 10 automates itself to delete files when your system is running on low disk space. You can also set Windows 10 to automatically empty recycle bin and delete files in the Downloads folder after a specific day.
You can also free up your disk space at the time by clicking on Clean now and get rid of unnecessary files.
6. Change The Path Of Saved Files
If your PC has multiple hard drives or partitioned into multiple drives like C, D, etc., you might be running on low disk space on one of these drives. Fortunately, you can change the default location for apps, music, photos, etc. To do that, go to Settings>System and click on Storage on the left panel. Under More storage settings, click on Change where new content is saved. Select the drive where you want to save your new content like apps, music, photos, etc. You can also select a removable drive like a Pendrive, SDcard, etc.
7. Run Disk Cleanup
Windows 10 comes with a pre-built disk cleaning feature, called the Disk Cleanup, that can help you free up disk space by removing downloaded program files, temporary internet files, etc. To find out this feature, head over to the search bar and type Disk Cleanup. Once you see it, click on the option and select files you want to remove. Once selected, click on Ok. You will be prompted with a warning message asking you to confirm. Click on Delete Files to proceed.
8. Use Cloud Storage As Your Secondary Option
If you aren’t familiar with Cloud Storage, these are great options to store your important files online without having to use your disk space. If you haven’t used any of the cloud storage options, you can get started with an already provided cloud storage, OneDrive.
Click on the OneDrive icon on your system at the bottom-right and click on Help & Settings>Settings. Under Settings, select Save space and download files as you use them. It will allow you to see the files you have stored in OneDrive from File Explorer on your PC.
9. Move Files To Removable Disk
If there’s nothing much you can remove from your PC, then, at last, you can move your important files to your Pendrive or an external hard drive. In this way, you don’t have to worry about freeing up disk space on your Windows 10 PC.
The Takeaway
While all these options are the best way to free up disk space on your PC, if your problem of low disk space still persists, you can buy yourself an additional hard drive or replace the existing one with a bigger capacity. That said, with Windows providing lots of reliable options to delete unnecessary files from your PC, you don’t have to rely on any third-party software to clean up your disk. If you have any doubt regarding the solution, you can ask me in the comments box. Till then, tell me which method worked for you?
Windows 10 updates provide the latest features and security improvements to help keep your PC more current and more secure. Before the installation process starts, Windows checks to make sure there’s enough storage space on your device for the installation process and for these new features and security improvements.
If there isn’t enough open space on your internal drive, you’ll see a message (like the one below) that tells you Windows requires more space.
Windows needs space to update
We can’t install the latest Windows 10 features and security improvements on your PC due to low disk space.
Get more space with external storage
You can temporarily gain extra space by using an external storage device like a USB drive, an SD card, or an external hard drive.
Here’s what you’ll need:
An external storage device with 10GB or more of free space, depending on how much additional space you need.
An internet connection.
Here’s how to do it:
Select Start > Settings > Update & Security .
From the Windows update page, select Fix issues. This launches the Windows update tool that lets you update your PC using an external storage device.
Before you use an external storage device for updating, make sure you back up any important files.
Connect your external storage device and select it from the drop-down menu.
Select Next and follow the instructions to finish installing the update.
Once the installation is complete, you can safely remove your external storage device.
Even after selecting external storage, if you don’t have enough free space on your internal drive, you might be prompted to free up more space.
If you don’t want to use external storage, select I don’t want to use external storage.
Free up space on your device
Here’s how to get more storage space on your device’s internal hard drive:
Open your Recycle Bin and remove deleted files.
Open your Downloads and delete any files you don’t need.
Note: if you don’t know how to find your Recycle Bin or your Downloads, search for them in the search box on your taskbar.
If you still need more space, Open your Storage Use.
This will open Settings > System > Storage.
Select Temporary Files and delete any files you don’t need.
Return to Windows needs space to update.
If you still see Windows needs space to update, repeat the process or consider deleting unneeded files from other folders. Alternatively, consider moving some files to external storage if you haven’t already.
When finished, select Start > Power > Restart.
– Advertisement –
It doesn’t matter how bigger storage your PC or laptop has. Whether it’s an SSD or an HDD, there comes a time when you’ll run out of storage. In that case, you have to free up disk space on your PC otherwise your system will soon break down . In case you don’t know how to free up disk space on a Windows 10 PC, keep on reading this post to enlighten yourself.
Table of Contents
How To Free Up Disk Space On Windows 10
While these options will help you reclaim your lost storage, they will only take you so far. If you need bigger storage, you may have to replace your HDD or SSD with a bigger capacity or install an additional storage option. That said, here are the 9 quick ways to free up some space on a Windows 10 PC.
1. Delete Unnecessary Downloaded Files
With the ease of internet connection via broadband, people download lots of stuff on their PC. While it might be necessary at the time you downloaded it, later you might have forgotten to delete them. In that case, your disk drive is only filling the junk space. If that’s the exact case with you, consider deleting unnecessary files that are no more required.
To do that, head over to This PC>Downloads. Look for those files that you don’t need anymore and get rid of them as soon as possible.
2. Empty Your Recycle Bin
It’s good if you have followed the first option. However, deleting files from your Downloads folder doesn’t remove them from your PC. They are stored in the Recycle Bin in case you need your files back. While the Recycle Bin empties itself after it has reached the storage limit, you can instantly remove your files if you are assured you don’t them anymore.
To do that, head over to Recycle Bin and right-click on it. Click on Empty Recycle Bin to proceed. You will receive a pop-up message warning you that proceeding will permanently remove files from your PC. Click Yes to agree.
3. Remove Temporary Files From Your PC
Leftover files after updates and downloaded files can be removed from your PC to free up disk space. Go to Settings>System and click on Storage on the left panel. Under Windows (C:), click on Temporary Files and check those files that you don’t need on your PC. Once selected, click on Remove files to get rid of them.
4. Uninstall Unnecessary Apps
Some apps are pre-installed in your system that you may not need. These apps consume lots of storage in your disk that can result in low disk space problems. So it’s better to get rid of these apps. To do that, go to Settings>Apps. Decide which apps you don’t need and uninstall them from your PC.
If you don’t know which apps are filling up your space, just choose Sort by size and you will see the list of apps from the biggest to smallest. Uninstall those apps one by one.
5. Turn On Storage Sense
You can let Windows do the work for you by heading off to the Settings>System>Storage and toggling on Storage Sense. This feature by Windows 10 automates itself to delete files when your system is running on low disk space. You can also set Windows 10 to automatically empty recycle bin and delete files in the Downloads folder after a specific day.
You can also free up your disk space at the time by clicking on Clean now and get rid of unnecessary files.
6. Change The Path Of Saved Files
If your PC has multiple hard drives or partitioned into multiple drives like C, D, etc., you might be running on low disk space on one of these drives. Fortunately, you can change the default location for apps, music, photos, etc. To do that, go to Settings>System and click on Storage on the left panel. Under More storage settings, click on Change where new content is saved. Select the drive where you want to save your new content like apps, music, photos, etc. You can also select a removable drive like a Pendrive, SDcard, etc.
7. Run Disk Cleanup
Windows 10 comes with a pre-built disk cleaning feature, called the Disk Cleanup, that can help you free up disk space by removing downloaded program files, temporary internet files, etc. To find out this feature, head over to the search bar and type Disk Cleanup. Once you see it, click on the option and select files you want to remove. Once selected, click on Ok. You will be prompted with a warning message asking you to confirm. Click on Delete Files to proceed.
8. Use Cloud Storage As Your Secondary Option
If you aren’t familiar with Cloud Storage, these are great options to store your important files online without having to use your disk space. If you haven’t used any of the cloud storage options, you can get started with an already provided cloud storage, OneDrive.
Click on the OneDrive icon on your system at the bottom-right and click on Help & Settings>Settings. Under Settings, select Save space and download files as you use them. It will allow you to see the files you have stored in OneDrive from File Explorer on your PC.
9. Move Files To Removable Disk
If there’s nothing much you can remove from your PC, then, at last, you can move your important files to your Pendrive or an external hard drive. In this way, you don’t have to worry about freeing up disk space on your Windows 10 PC.
The Takeaway
While all these options are the best way to free up disk space on your PC, if your problem of low disk space still persists, you can buy yourself an additional hard drive or replace the existing one with a bigger capacity. That said, with Windows providing lots of reliable options to delete unnecessary files from your PC, you don’t have to rely on any third-party software to clean up your disk. If you have any doubt regarding the solution, you can ask me in the comments box. Till then, tell me which method worked for you?


