Microsoft’s suite of applications is undoubtedly one of the most essential ones installed first on any Windows PC. First, there was just Word, which allowed easy editing of documents on the go, then came Excel, for editing and managing spreadsheets the easier way, and then PowerPoint, to make presentations appear more lively. We have seen a lot more applications evolve like Outlook, One Note, Project, and much more. Long story short, Microsoft is approaching us consumers to make our tasks really simple.
As we all know, the popular Office apps are Word, Excel, and PowerPoint. If you are in a situation where you need to extract all the media like images, and videos embedded inside of these files, then you’re in the right place. The newer versions of Microsoft Office apps have extensions like .docx, .xlsx, and .pptx. The ‘x’ in all of these extensions symbolizes that all of these are Microsoft XML supported applications, which means that they are actually compressed files that you can use to extract media directly. On the other side, the older non-supported XML documents like .doc, .xls. and .ppt cannot do this directly.
We will first be taking a look at how you can use the newer extensions to extract embedded images and files directly onto your Windows PC. Down below will also be a tutorial about a software which can do the same for these older non-XML supported files. You can access and view your files on Windows 10 more quickly using these File Explorer shortcuts.
Extract Embedded Files from Office Documents (.docx, .xlsx, or .pptx)
- In order to extract the embedded content of a newer office file, you need an application like WinRAR or 7Zip, or if you are running a newer version of Windows, it is already built-in. Go to the location where your Office file is situated.
- Press F2 to rename the file, and replace the file extension (from .docx, .xlsx or .pptx) to .zip. This will render the file useless, so make sure you have another copy of it backed up.
- Now, you will be able to open this file in applications like WinRAR and 7Zip. All you need to do is choose a directory, and extract the files.
- In our case, we’ve used a Word document as our test subject, so the extracted folder will contain a file named ‘word’. If you have extracted any other Office file, just go with the flow, and you’ll find your required folder. Click on this folder.
- You will further be greeted by a ton of other folders. The one you might be interested in is media. This contains all of the images attached or embedded into the document file you’ve just extracted.
Note: To access the raw text of your document, open the document.xml or similar file.
How to Extract Images from Documents (.doc, .xls, or .ppt)
- For this job, you need free software called Office Image Extraction Wizard. You may download this, and then continue on with the procedure.
- Launch the application, and click on next. This screen gives you two options, the target, and the output folder. You have to add your older office document in the former section and choose your output directory in the latter.
- Once you’re satisfied, click on ‘Next‘, and then click on ‘Start‘. You will now be able to see the process window, and this might take some time.
- After the process is done, the application will link you to the folder containing the extracted images.
If you have any issues with the tutorial, we’re always here to help you. If you think we’ve helped you plenty, then why not surf around our little space and grasp more such tips and tricks?
- Tipy
- Blog
- Jak
- Okna
- Telefon
- Hlavní
- Jak
- Jak zobrazit obrázky v souborech PPTX, DOCX nebo XLSX bez instalovaného systému Office
Neexistuje nic více frustrující než nakonec dostat snímek obrazovky nebo obrázek jste požádal, ale odesílatel je pustil do dokumentu Word nebo PowerPoint a nemáte nainstalován Office 2007 nebo 2010. Zde je návod, jak zobrazit snímky obrazovky.
Jak tohle funguje? Jednoduchý! Všechny nové formáty souborů v sadách Office 2007 a Office 2010 jsou ve skutečnosti soubory zip obsahujících XML a spoustu složek a mají všechny média úhledně vložené do tohoto souboru.
Prohlížení obrázků z souborů Office 2007/2010
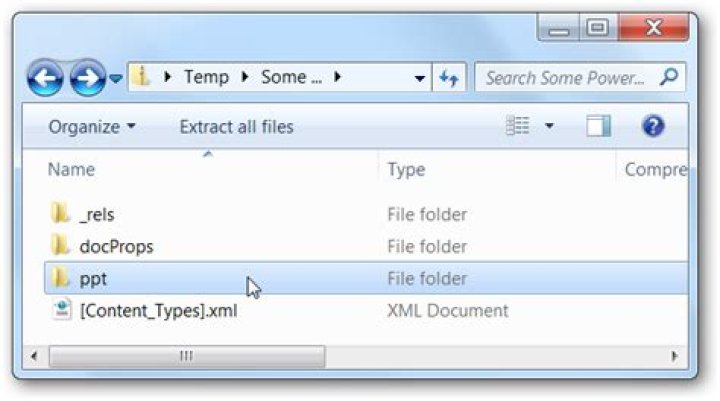
Pro náš příklad používáme soubor Powerpoint, jak můžete vidět zde:
Jednoduše změňte příponu souboru na .zip (možná budete muset vstoupit do složky Uspořádat -> Složka a vyhledat, abyste mohli zobrazit rozšíření souborů).
Nyní, když jste tak učinili, můžete otevřít soubor zip a uvidíte složku – pro Powerpoint se jmenuje ppt, pro Word to bude pojmenováno slovo a tak dále. Nyní otevřete tuto složku.
Jakmile jste tam, otevřete mediální složku .
A tady jste, obraz, který mohl člověk právě připojit k e-mailové zprávě.
Frustrace mierně odvrátila. Teď, kdybychom mohli přesvědčit lidi, aby přestali používat aplikace Office pro ukládání snímků obrazovky namísto jednoduše připojeného obrázku.
Problem
Missing DOCX, XLSX, PPTX, XPS export options.
If you export programmatically, the error message will be: “X rendering format is not available”, where X is DOCX, XLSX, PPTX, XPS.
Solution
The XPS rendering extension requires the Telerik.Reporting.XpsRendering.dll assembly.В
DOCX/PPTX/XLSX rendering extensions are OpenXML formats and they requireВ Telerik.Reporting.OpenXmlRendering.dllВ andВ Open XML SDK 2.0 for Microsoft OfficeВ (DocumentFormat.OpenXml.dllВ v.2.0.5022.0 or above).
If you are using DocumentFormat.OpenXml of version 2.5.5631.0, you will need binding redirect for theВ DocumentFormat.OpenXml.dll assembly – Deploy Telerik Reporting with newer OpenXML SDK version.В
In newer versions the DocumentFormat.OpenXml assembly the PublicKeyToken is changed. Thus if you are using DocumentFormat.OpenXml of version 2.7.2.0 you have to reference Telerik.Reporting.OpenXmlRendering.2.7.2. For even newer versions add and the required binding redirect.
The assembly references must be added in the project that handles reports:
- If the project uses ReportProcessor instance, assembly references must be added in that project’s configuration file;
- If the project uses a viewer that operates via Telerik Reporting Service, the assembly references must be added in the service project’s configuration file;
- If the project uses a desktop viewer or the obsolete ASP.NET WebForms ReportViewer control,В assembly references must be added in the viewer project’s configuration file;
- If you are testing the design-time preview in the Standalone Report Designer, it is configured to let export in DOCX, PPTX, XLSX and XPS without additional settings;
- If you are testing the design-time preview in Visual Studio Report Designer, you may not have all export options, unless OpenXML SDK 2.0 is installed on the machine, or if OpenXML SDK 2.5 or greater is installed and you manually add a binding redirect forВ DocumentFormat.OpenXml.dll assembly in the corresponding devenev.exe.config file (Visual Studio configuration file). During the installation, Telerik Reporting assemblies are automatically registered in the machine’s GAC and the design-preview will load them automatically.
If you do not want to install OpenXML SDK, copyВ DocumentFormat.OpenXml.dll next to the corresponding devenv.exe (Visual Studio exe).
On deploying the application, verify that the above-listed assemblies are copied in the bin folder. For this purpose, select the references in Visual Studio and set their CopyLocal to true.
Geoffrey_Carr
Ei ole mitään turhauttavaa kuin lopulta saada kuvakaappaus tai kuva, jota pyydit, mutta lähettäjä pudotti ne Word- tai Powerpoint-dokumentiksi, eikä sinulla ole Office 2007 tai 2010 asennettuna. Seuraavassa kuvataan kuvakaappauksia.
Miten tämä toimii? Yksinkertainen! Kaikki uudet Office 2007- ja Office 2010 -tiedostomuodot ovat itse asiassa zip-tiedostoja, jotka sisältävät XML: n ja paljon kansioita, ja niillä on kaikki tietovälineet, jotka on kätevästi upotettu kyseiseen tiedostoon.
Kuvien katseleminen Office 2007/2010 -tiedostoista
Esimerkkinä käytämme Powerpoint-tiedostoa, kuten näet täältä:
Vaihda tiedoston laajennus .zip-tiedostoon (saatat joutua perehtymään Organize -> Folder ja search options -toimintoihin, jotta tiedostojen laajennukset voidaan näyttää).
Nyt kun olet tehnyt niin, voit avata zip-tiedoston, ja näet kansion – sillä Powerpointilla nimeltään ppt, Wordille sanotaan sana ja niin edelleen. Avaa nyt kansio.
Kun olet siellä, avaa mediakansion .
Ja siellä olet, kuva, jonka henkilö olisi voinut liittyä sähköpostiviestiin ensiksi.
Turhautuminen kääntyi hieman. Nyt, jos voisimme vain vakuuttaa ihmiset lopettamaan Office-sovellusten tallentamisen kuvakaappausten sijasta yksinkertaisesti kuvan liittämisen sijasta.
How To Convert Image to Word or Excel (جولائی 2021).
فہرست کے ٹیبل:
اس کے نتیجے میں آپ کو اس کے اسکرین شاٹ یا تصویر کے لۓ زیادہ افسوس ہے کہ آپ نے پوچھا تھا، لیکن بھیجنے والے نے انہیں لفظ یا پاور پوائنٹ کے دستاویز میں گرا دیا، اور آپ کے پاس آفس 2007 یا 2010 نہیں ہیں. یہاں بھی اسکرینشاٹ کو دیکھنے کے لئے یہاں ہے.
یہ کیسے کام کرتا ہے؟ سادہ! آفس 2007 اور آفس 2010 میں سبھی نئی فائل فارمیٹس اصل میں زپ فائلیں ہیں جس میں XML اور بہت سے فولڈر شامل ہوتے ہیں، اور ان کے ساتھ ہی ان فائلوں کو صاف طور پر تمام میگزین بھی شامل ہیں.
آفس 2007/2010 فائلوں سے دیکھنے والی تصاویر
ہمارے مثال کے لئے، ہم PowerPoint فائل کا استعمال کر رہے ہیں، کیونکہ آپ یہاں دیکھ سکتے ہیں:
بس فائل کو ایکسچینج میں توسیع کو تبدیل کریں (آپ کو منظم کرنے کے لۓ رہنا پڑے گا -> فائل کی توسیع کے ڈسپلے کو فعال کرنے کیلئے فولڈر اور تلاش کے اختیارات).
اب آپ نے ایسا ہی کیا ہے، آپ زپ فائل کو کھول سکتے ہیں، اور آپ کو ایک فولڈر دیکھیں گے – پاور پوائنٹ کے لئے اس نے پی پی پی کا نام دیا ہے، لفظ کے لئے لفظ کا نام اور اسی طرح. اب اس فولڈر کو کھولیں.
ایک بار آپ وہاں موجود ہو، میڈیا فولڈر کھولیں …
اور آپ وہاں ہیں، اس تصویر پر جو شخص صرف ای میل پیغام سے پہلی جگہ میں منسلک کرسکتا تھا.
مایوسی خراب، تھوڑا سا. اب اگر ہم صرف اس بات کو قائل کر سکتے ہیں کہ صرف اس تصویر کو منسلک کرنے کی بجائے اسکرین شاٹس کو ذخیرہ کرنے کے لئے آفس ایپس استعمال کرنے سے روکنے کے لئے.
If you need to work with files created in Microsoft Office, or create files compatible a Microsoft Office application, many free options are available.
- Offline solutions
- Microsoft Viewer applications.
- OpenOffice
- LibreOffice
- Online solutions
- Google Docs
- ThinkFree
Offline solutions
There’s several free programs that can be installed on your computer to open Microsoft Office documents and other office or rich-text documents. Below is a selection of our favorites.
Microsoft Viewer applications
Microsoft has several “Viewer” programs that can be downloaded and used to view Word, Excel, and PowerPoint files, without having Microsoft Office installed on the computer.
Links to download each viewer application from Microsoft’s website are listed below.
OpenOffice
A free and open-source project from Sun that includes different solutions. It is available for all major platforms including Microsoft Windows, Apple macOS, and Linux. Below is a listing of programs this package includes.
- Base – Database
- Calc – Spreadsheet
- Draw – Drawing program used to create logos and flow charts.
- Impress – Presentation program
- Math – Allows a user to create scientific formulas and equations.
- Writer – Word processor and text editor.
- OpenOffice website
LibreOffice
One of the most popular free office suites that supports Microsoft Word, Excel, PowerPoint, and Publisher documents, and support for ODF (OpenDocument format).
Online solutions
There are also many free online solutions as well. Below is a listing of our favorites.
Google Docs
Google Docs, available from Google, not only allows you to freely open and create files, but you can also collaborate and share files with anyone who has Internet access.
Google Docs is compatible with many file formats, including .doc, .docx, .rtf, .sxw, .pdf, .ppt, .pps, .csv, .xls, .xlsx, .ods, and .html.
ThinkFree
Another solution capable of opening and viewing many Microsoft Office and other rich-content file formats.
ThinkFree is compatible with many file formats, including .doc, .dot, .rtf, .ppt, .pot, .pps, .xls, .xlt, .docx, .pptx, .xlsx, .pdf, and .hwp.
Word, Excel, PowerPoint Dateien auf iPhone und iPad übertragen (Juli 2021).
Inhaltsverzeichnis:
Es gibt nichts Frustrierenderes, als den gewünschten Screenshot oder das endgültige Bild zu erhalten, aber der Absender hat sie in ein Word- oder Powerpoint-Dokument eingefügt, und Office 2007 oder 2010 ist nicht installiert. So zeigen Sie die Screenshots trotzdem an
Wie funktioniert das? Einfach! Bei allen neueren Dateiformaten in Office 2007 und Office 2010 handelt es sich eigentlich um ZIP-Dateien, die XML und viele Ordner enthalten, und alle Medien sind sauber in diese Datei eingebettet.
Anzeigen von Bildern aus Office 2007/2010-Dateien
In unserem Beispiel verwenden wir eine Powerpoint-Datei, wie Sie hier sehen können:
Ändern Sie einfach die Dateierweiterung in .zip (möglicherweise müssen Sie unter Organisieren -> Ordner- und Suchoptionen navigieren, um die Anzeige von Dateierweiterungen zu ermöglichen).
Nachdem Sie dies getan haben, können Sie die ZIP-Datei öffnen und sehen einen Ordner – für Powerpoint heißt es ppt, für Word wird es Word genannt und so weiter. Öffnen Sie jetzt diesen Ordner.
Wenn Sie dort sind, öffnen Sie den Medienordner…
Und da sind Sie, das Bild, das die Person gerade an die E-Mail-Nachricht angehängt haben könnte.
Frustration leicht abgewendet. Wenn wir die Leute einfach davon überzeugen könnten, Office-Apps nicht mehr zum Speichern von Screenshots zu verwenden, anstatt das Bild einfach anzuhängen.
Office documents may contain images and other media besides text. I sometimes get article suggestions by email in Microsoft Word format. These articles often contain one or multiple images that I need to extract, since it is not possible to copy and paste them into the article on the Internet as it is with text contents.
Depending on the number of pictures it may be faster to save each manually from within the Office document, or use a third party application like Office Image Extraction Wizard to let the computer do all the hard work. The latter may speed things up considerably if you need to extract images from multiple documents.
You can save images in Office documents by right-clicking them in the Office program and selecting Save as Picture from the context menu.
That’s fine if one or two images are embedded in the document. The core benefit of using a software program is that it takes away the tedious process of right-clicking and saving images. Plus, it can be a lot faster.
Office Image Extraction Wizard can extract images and pictures from a variety of formats. It supports the Office formats docx, pptx and xlsx, the OpenDocument Formats odp, ods and odt and the epub and cbz formats.
It unfortunately does not support doc, xls or ppt documents which seems like a big oversight. You can convert those document formats into support formats though.
Office Image Extraction Wizard supports single document and batch document extraction. Just load documents either via drag and drop or the built-in file browser into the interface. The computer desktop is automatically selected as the output directory. You can change that if you prefer a different directory for the images.
The program then extracts all pictures from all documents. Batch mode users have the option to store images in separate folders which may be handy to avoid them getting mixed up. Images are always extracted in their natural format (that is their original format used by the document creator or editor) and without processing or compressing to ensure maximum quality.
Windows users can download Office Image Extraction Wizard from the developer website. The program is compatible with 32-bit and 64-bit editions of the Microsoft Windows operating system.
In this blog, we’ll show you how to add accurate, reliable, and fast support for MicrosoftВ® Office formats to an Angular project using PDFTron’s WebViewer, a [JavaScript PDF Viewer>(/webviewer/).
There are no server dependencies, MS Office licenses, or third party software required. WebViewer will directly convert DOCX , XLSX , and PPTX files client-side using JavaScript, and then render them for viewing.
Check out a MS Office viewer demo of what we’ll be building. (Try opening a local file to see it in action — or pick one of the samples.)
The source code for this Angular project is available in our Git repo. Here’s what it looks like:
Beyond just viewing Office documents, WebViewer supports additional functionality, such as pure client-side annotation , editing , manipulation , redaction , forms , and much more . It can also be connected to a backend to enable real-time collaboration .
PDF , JPG and PNG file types are also supported pure client-side, while 30+ additional formats (including CAD) are available when WebViewer is augmented with our server SDKs.
Step 1 – Initial Setup
This project was generated with Angular CLI version 7.0.3. See Angular – Getting Started for more information.
Before you begin, make sure your development environment includes Node.js.
Step 2 – Install
Once you’re set up, the next step is to clone the Git repo and install it. This can be done by entering the following into the command line:
Once installed, start NPM:
You can now navigate to to view the Angular app. The app will automatically reload if you change any of the source files.
The default document displayed in the viewer will be a PDF file. You can change this to an Office file by updating the following line in webviewer.component.ts :
And that’s it! Your app now has Office viewing and annotation capabilities.
You can refer to Getting Started with PDFNetJS Full for more information.
The WebViewer UI is highly configurable and comes with a rich set of APIs which allows you to customize and manipulate documents in many ways. If you’d like to customize the UI, check out the UI customization guide .
To build the project, run npm run build . The build artifacts will be stored in the dist/ directory. Use the –prod flag for a production build.
Adding an Office document viewer to your Angular project is straightforward with WebViewer, a JavaScript-based PDF library. You can find the source code for this blog post at Github.
If you have any questions about PDFTron’s PDF SDK, please feel free to get in touch !


